Assembly Instructions 14 X 20 X 9 Party Tent Style
Assembly Instructions MDM Products Party Tent Congratulations! Congratulations on your purchase of a MDM Products Party Tent Shelter by MDM Products LLC. With proper installation, use, and maintenance, your new unit will provide many years of good and suitable service. Your new MDM Products Party Tent is a combination of excellent engineering and well thought out design. The multiple part frame assembly is pre-drilled for easy insertion of hardware to assemble. The tubing is made from highgrade steel tubing, to resist moisture and oxidation over the life of the shelter. The covering membrane is made from ASTM-5 approved polyethylene materials. The cover is UV protected for continual exposure to the sunlight. It is suggested that you read the entire assembly instructions completely before you begin. This will help attain the best results for your installation.
SAFETY WARNING The installation of this unit must conform to the requirements of all authorities having jurisdiction in your specific local area. In the absence of such requirements, the assembly and installation must conform to the provided assembly and installation instructions. MDM Products LLC will not be responsible for failure to comply with any requirements in a given local area. Damages, consequential damages, or injuries caused by improper installation, alteration, improper use, or damages caused by wind, rain or any acts of nature are strictly that of the user. For installation assistance or Customer Service, please call 800-447-7079 or 203-380-2703, 8AM-5PM EST. Cartons should be inspected upon delivery from carrier, and any evident damages should be noted on the bill of lading before signing. If upon opening the cartons hidden damage is noted, contact carrier or its agent immediately. Claims for shipping damage MUST be made with the shipping company. An inspection of the goods will most likely be required. Do not discard packing or any components before the freight company’s inspection. All claims for freight damage must be made with 15 days of receipt of the goods in accordance with ICC regulations.
ASSEMBLY PROCEDURE The proper sequence and steps to install this unit will produce a proper and good installation. Failure to read and follow these guidelines may not result in a proper installation and will void all warranty and protection the owner is entitled to with the product. The steps to be undertaken are: 1. 2. 3. 4. 5. 6. 7. 8. 9. 10. 11.
Read Assembly Instructions completely before beginning installation. Prepare location and place both unit boxes near location site Perform an inventory check before beginning to be certain all components are available for installation. Assemble plastic feet to upright corner and interior legs of unit. Assemble Roof Frame with Poles and Connectors. Install Main Roof Cover over Roof Frame assembly. Add Corner and Upright Legs to Roof Frame Assembly – one side at a time. Install Sidewall Panels and End Panels as desired. Place Frame into desired position and secure to ground with guy ropes and stakes. Anchor frame assembly to ground with provided straps through upright feet. Complete securing tent to ground with corner guy ropes and feet stakes.
TOOLS REQUIRED The following hand tools will be needed for proper installation of your new MDM Products unit: 2lb Maul or Sledgehammer Open End Adjustable Wrench or Sockets
V2.0 14 X 20 X 9 Size Do NOT Return Unit to Store or Dealer. For all Questions or Shortages please call MDM Products LLC directly. For Customer Service 800-447-7079 or 203-877-7070 8 AM – 5 PM EST
Assembly Instructions 14 X 20 X 9 Party Tent Style
MDM Products 14’ x 20’ Party Tent
Item# 1
DIAGRAM
QTY DESCRIPTION Straight Uprights (Interior Leg Poles) - 78” Length (1980 mm) with 4 two holes at one end
2
Corner Uprights (Corner Leg Poles) – 78” Length (1980 mm) with additional holes for attaching Roof Cover
4
3
Cross Poles - 77” Length (1955 mm)
9
4
Rafter Poles - 80” Length (2032 mm)
8
5
3 way frame connectors with a shallow bend for the ridge or top of the tent
2
6
4 way frame connectors with a shallow bend for the ridge or top of the tent
2
7
3 way frame connectors with a sharp bend for the sides of the tent
4
V2.0 14 X 20 X 9 Size Do NOT Return Unit to Store or Dealer. For all Questions or Shortages please call MDM Products LLC directly. For Customer Service 800-447-7079 or 203-877-7070 8 AM – 5 PM EST
Assembly Instructions 14 X 20 X 9 Party Tent Style 4 way frame connectors with a sharp bend for the sides of the tent
4
9
Protective Roof Cover – This unit is protected with UV protection. Should be carefully protected to avoid any tears or snags. Always dry completely before storing in storage bag.
1
10
End Wall Panels – Interchangeable between ends of unit, these provide best access to unit when sidewalls are attached. Always dry completely before folding for storage.
2
11
Side Wall Panels with Three(3) Windows- Can be optionally installed on unit for privacy and protection. Sidewalls can be removed or left off for access, light, and air movement as desired by occupants. Always dry completely before folding for storage.
2
12
White Plastic Feet Plates for the Interior Straight Uprights and Corner Poles
8
13
Bungee Cords – Used to Secure the Roof Cover, Sidewalls, End Panels, and as Door Hold Ups
74
14
M6 x 2-3/8” (60 mm) Hex bolt & M6 lock nut – for Securing Plastic Feet to base of Corner and Straight Upright Poles
8
15
6 mm washer
16
16
Guy Ropes – for Securing from Roof Corners to Big Stakes
4
17
Small Stakes – for Securing the Base of End Panels, Sidewalls, and Plastic Feet of Upright Poles to Ground
40
18
Large Stakes- To Secure Guy Ropes from Corner of Unit to Ground
4
8
V2.0 14 X 20 X 9 Size Do NOT Return Unit to Store or Dealer. For all Questions or Shortages please call MDM Products LLC directly. For Customer Service 800-447-7079 or 203-877-7070 8 AM – 5 PM EST
Assembly Instructions 14 X 20 X 9 Party Tent Style SITE PREPARATION Select a level or as close to level as practical location for your MDM Products Party Tent. The unit should be placed on a base for the intended use, usually grass or soft surface. The unit should not be located under trees, which will shed hard fruit such as apples, walnuts, or heavy pine cones. The cover of your unit will protect against light leaves or debris, however large branches or other falling items may cause puncture or tears in the cover material. Take notice of drainage both around your intended location. Water draining from the surrounding terrain should be planned so that it does not run into the unit. Check to be certain that adequate clearance is allowed for entry and exit from ends of unit. Party tent should not be installed close to buildings or other obstructions that would prevent exit in the event of an emergency.
FRAME ASSEMBLY
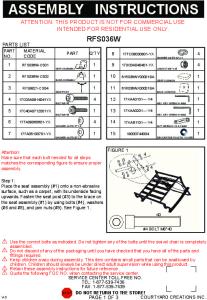
ones in the feet. Use a 2-3/8” hex bolt (#14) with a washer (#15) and pass it through the aligned holes. Use one more washers on the threaded side of the bolt as needed. Use a lock nut and tighten. Do not over tighten and damage either upright leg or plastic foot. Repeat for all legs and place aside until needed. Lay out all the parts as shown in the Frame Component Diagram so that they are roughly in their correct places. There are 4 different types of Connectors (#5, 6, 7, & 8). Those with a sharp bend (#7 & 8) connect the Leg Poles to the Rafter (#4) and Cross Poles (#3). Those with a shallow bend (#5 & 6) connect the Rafter & Cross Poles at the ridge of the tent. These connectors are either 3 or 4 way types. The 3 way connectors of both types (#5 & 7) are to be used at each end of the party tent frame.
#7
#8
Read the complete instructions guide before starting to assemble party tent. Familiarize yourself with each of the component parts. These are itemized for easy identification. Some parts are similar and vary only in shape or size so be sure you use the correct ones where stated. Identify the Corner and Interior Straight Upright Leg Poles (items #1 & 2). These and all have pre-drilled holes at the bottom for securing the feet plates. The number of Interior Straight Uprights will vary by the size of the Party Tent. The 4 corner leg poles (#2) have additional holes at the top, which will be used for attaching the roof cover to the legs with the use of the attached “S” hooks.
#6
#5
Frame Connector Types
Insert the leg poles (#2) into the white plastic feet plates (#12) so that the base holes align with the corresponding V2.0 14 X 20 X 9 Size Do NOT Return Unit to Store or Dealer. For all Questions or Shortages please call MDM Products LLC directly. For Customer Service 800-447-7079 or 203-877-7070 8 AM – 5 PM EST
Assembly Instructions 14 X 20 X 9 Party Tent Style Frame Assembly with Rafter Poles Attached INSTALLING THE ROOF COVER Before installing the upright leg poles to the frame structure the roof cover (#9) must be put over the assembled roof frame and attached using the bungee cords (#13). This is best done from underneath by passing the elastic cord of the bungee through the eyelets in the cover, stretch it around the pole and back over the toggle to secure. In calm conditions only the corners will need to be attached with the remainder done once the frame is fully erected. The more windy the weather then additional bungee cords will be needed at this stage to ensure that the cover is securely attached.
Frame Component Diagram
CARE AND SPECIAL PRECAUTIONS MUST BE TAKEN IN ADVERSE OR WINDY WEATHER CONDITIONS.
Begin by assembling the Roof Frame. Start by connecting the Cross Poles (#3) together that will create the center ridge of the tent. When this is completed join the Rafter Poles (#4) to these cross poles. The last part of the roof assembly is to add the Cross Poles (#3) that create the eaves of the tent.
Roof Cover Installed on Roof Frame
Ridge Pole and Eave Poles Assembled
V2.0 14 X 20 X 9 Size Do NOT Return Unit to Store or Dealer. For all Questions or Shortages please call MDM Products LLC directly. For Customer Service 800-447-7079 or 203-877-7070 8 AM – 5 PM EST
Assembly Instructions 14 X 20 X 9 Party Tent Style Bungee Cords For Securing Roof Cover, Sidewalls, and End Panels INSTALLING THE UPRIGHT VERTICAL LEGS AT THIS STAGE, ESPECIALLY IN WINDY WEATHER CONDITIONS, THAT THE MOST CARE AND PRECAUTION MUST BE TAKEN. The frame and the roof cover are heavy to lift so adequate assistance will be required to guard against personal injury. Only lift one side at a time: Lift the first side and insert the Corner and Interior Uprights into the Frame Connectors. Be certain to use the Corner Poles in the corner positions to secure the Roof Cover. Part of the roof cover extends down each of the 4 corners and attach to the poles by way of the “S” shaped hooks that locate in pre-drilled holes of the Corner Poles.
Adding an Interior Upright and One Corner Pole To Roof Frame- One Side
To attach the sidewall panels (#11), start at the top and at one of the panel and use the bungee cords (#13) in the same way as you did to secure the roof. Along the eaves it is best to share the same eyelets: i.e. from the inside first pass the bungee elastic through the eyelet in the roof, then back inside through the eyelet in the wall panel, wrap around the pole and back over the toggle. Repeat with all attachment points along the eaves so that roof and the wall panels (where required) are secured to the frame, and where the vertical ends of the walls finish or join each other.
C OVER
BUNGEE CORDS ATTACH WALL TO FRAME
Both Corner Poles and Interior Pole Inserted If the end wall panels (#10) are to be used, attach these now to the rafter poles now before the tent is at its full height. Repeat the procedure with the remaining side panel. At this point the tent is most vulnerable to injury & damage if it is windy. If it is windy at all, use the guy ropes to stabilize the tent before the side panels are attached. There are holes in the feet plates through which they may be pegged to the ground.
BAC K WALL
BUNGEE CORDS ATTACH WALL TO FRAME
SIDE WALL
Using Aligned Eyelets for Bungee Cords Using the Small Stakes (#17) provided, peg down the bottom edges of all sidewalls and end panels. Drive all pegs in at an angle (ideally of 45° or less to the horizontal) and in line with the seams.
V2.0 14 X 20 X 9 Size Do NOT Return Unit to Store or Dealer. For all Questions or Shortages please call MDM Products LLC directly. For Customer Service 800-447-7079 or 203-877-7070 8 AM – 5 PM EST
Assembly Instructions 14 X 20 X 9 Party Tent Style The guy ropes (#16) provided should be attached or tied to the frame only, ensuring that they are all pegged directly in line with the seam or pole to which the will apply tension and support. Once this is achieved tighten the adjusters so that equal tension is applied to each guy point.
Keep the exit(s) clear & free from obstruction to prevent accidental damage to occupants and the party tent in an emergency.
DISMANTLING PARTY TENT
To help keep the doors closed it may be necessary to cross over the stake points at the base of zippers. Avoid walking on the zippers and keep them free from dirt, as this will maintain their smooth operation. Should the zippers become difficult to operate, do not force them. Adjust the stakes/guying of the tent to ease the pressure on the zippers and lubricate with a silicon or similar lubricant to maintain their smooth operation.
Simply reverse the instructions above, again taking particular care in windy conditions to prevent the tent from becoming damaged and avoiding personal injury.
Periodically check each stake point or securing straps and re-adjust as necessary, especially during/after windy or stormy weather.
If these are not already attached, we suggest that securing straps be used to guard against sudden changes in weather and gusts of wind.
Please note that the stakes should be removed by either using a tent stake extractor or more simply by using another peg. Do NOT pull them out by using the guy rope or the tents’ fabric.
Door Hold Ups All MDM Products doors are manufactured with a pocket on the bottom edge along the width axis. A ½” plastic or metal EMT tubing can be inserted into the pocket and trimmed to fit. Four(4) Bungee Cords (#13) are provided to be used as Door Hold Up straps.
FIRE WARNING A Fire Retardant treatment has been applied to the fabric of this tent that will significantly reduce the rate of flame spread, but the tent is still flammable. • Keep all open fires, barbecues, or heaters at least 20 feet away from all tent fabrics. • Keep all open flames and heat sources well away from all tent fabrics. Do not allow smoking of cigarettes, cigars, pipes, or any open flames inside or near party tents. • Do not refill stoves or change fuel cartridges inside or near to the tent. • Never leave heating, lighting or cooking appliances unattended in the vicinity of the tent.
STORAGE, MAINTENANCE, & CARE
Bungee Hold Ups support End Panel Fabric in Up Position
PROPER CARE IN USE
Think Safety First
NEVER store the tent unless it is completely dry. Storing when damp allows the formation of mold and mildew, which will rot natural fibers & damages the waterproof coating to the fabric and leaves indelible stains. Poles and fitments, including tent pegs, should be cleaned, dried and stored separately from the main tent parts. These poles may be given a light coating of petroleum jelly to help prevent corrosion. Every couple of days when in use the unit should be completely inspected internally and externally to make certain the unit remains properly installed and secured. Particular attention should be paid to:
V2.0 14 X 20 X 9 Size Do NOT Return Unit to Store or Dealer. For all Questions or Shortages please call MDM Products LLC directly. For Customer Service 800-447-7079 or 203-877-7070 8 AM – 5 PM EST
Assembly Instructions 14 X 20 X 9 Party Tent Style Hardware – check all bungee cords and hardware connectors to be certain they are in place and tightened. Anchors – during light weather trends, the unit will strain against the anchors under windy conditions. Anchor hardware connection to frame members should be maintained tight and depth of anchors should be checked to be certain they remain deeply and firmly set. Snow Accumulation –under no circumstances should this unit be set up during periods of snow. Cleaning – cover and doors can be cleaned with a mixture of light detergent and water. A soft bristle brush with the mixture can be used to loosen any hard dirt, mold, or buildup on the cover. After cleansing, the cover should be rinsed thoroughly to avoid any chemical reaction from residual detergent. Light soiling may be removed either by the gentle use of a soft brush or using a soft, dampened cloth and mild detergents. Remove dirt from the fabric by gently brushing when dry. Never use strong detergents, bleach or similar cleaning products or wash in a washing machine, as this will damage the fabric of the tent. Store in a dry, well-aired place, any damage as a result of incorrect storage will not be covered by the warranty. Inclement Weather – MDM Products Party Tents are NOT intended to be used in inclement weather or year round. When windy conditions are experienced, dismantle and store tent to avoid damage. Under no circumstances can unit be left up through snow or cold weather.
Customer Service or Installation Assistance Please call your MDM Products Dealer or MDM Products LLC at 800-665-4737 or 203-877-7070 if there are questions about the installation of the unit in any way. Care and attention to a proper installation will add many years of life and function to your MDM Products unit.
V2.0 14 X 20 X 9 Size Do NOT Return Unit to Store or Dealer. For all Questions or Shortages please call MDM Products LLC directly. For Customer Service 800-447-7079 or 203-877-7070 8 AM – 5 PM EST