Portable LED Sign Assembly Instructions & User Manual
Assembly Instructions
Page 2
Hardware Use & Accessories
Page 3
Software Installation & Use
Page 4
Troubleshooting
Page 6
Warranty
Page 7
For more information and training videos, please visit www.outdoorsignsamerica.com/portableled Document revision 5/22/2014
2
ASSEMBLY INSTRUCTIONS Offloading and assembly of the Portable LED sign requires a minimum of two people. Failure to follow these instructions could result in injury and/or damage to the product. FULLY ASSEMBLED PHOTO
TOOLS REQUIRED
Box cutter or knife
Crescent wrench
1
If any wood crating exists around the large box, remove the crating and open the top of the box.
2
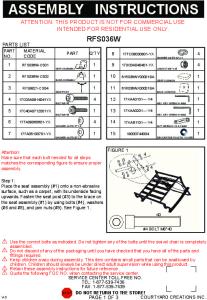
Remove the smaller box inside and unpack it. See photo 1. This box should contain the following parts:
2 cross beams A
4 legs B
8 bolts C
Photo 1
4 washers D
(3/8” x 1-1/2”)
IF PARTS ARE MISSING, DO NOT RETURN TO THE STORE. PLEASE VISIT
www.outdoorsignsamerica.com/portableled 3
Cut the sides of the large box open using a box cutter or knife along the dotted lines. The sign will be upside down and unstable without the legs attached. Take care to ensure that the sign does not fall over.
4
Attach the two cross beam pieces (A) near the outside edge of the bottom of the sign, which is currently facing upwards. Use four bolts (C) with washers (D) to attach. See photo 2.
5
Carefully flip the sign over so it is sitting on the cross beams.
6
Have one person lift one end of the sign. Another person will now insert a leg up through each “V” shaped hole in the cross beam. Repeat for the other end of the sign. See photo 3.
7
Adjust the legs to the desired height and ensure the sign is level.
8
Secure the legs to the cross beams using a bolt (C) inserted in the bottom of the cross beam and tightened with a wrench. See photo 4.
9
Move the sign to the desired location and plug in the power cord. The power source must be a properly grounded 120 volt outlet that meets local code for use with outdoor electric appliances.
Photo 2
Photo 3
Photo 4
3
HARDWARE USE & ACCESSORIES RESETTING & TESTING THE GFCI Your portable LED sign is equipped with an internal ground fault circuit interrupter (GFCI). This safety feature prevents accidental shocks resulting from moisture or other abnormal conditions. In the event that the GFCI has been tripped and power is not reaching the unit, press the ON button until it clicks to reset the GFCI. See photo 5.
Photo 5
To test the GFCI, press the OFF button with the unit turned on. The ON button should pop out and the unit should turn off. If the device does not trip, DO NOT USE. Disconnect power to the unit and contact a qualified electrician.
REMOVING SIGN FACES & CHANGING FLUORESCENT LAMPS Your portable LED sign is equipped with two sign faces and two internal fluorescent lamps to illuminate them. To remove the sign faces:
Photo 6
1
Disconnect power to the sign and find the end of the sign opposite from the power cord. Do NOT remove the end with the power cable.
2
Remove the screws holding the metal end panel in place.
3
Remove the top bracket holding the panel in place, and then the metal end panel itself.
4
Slide the faces out. See photo 6.
Photo 7
To remove fluorescent lamps:
5
Remove the tape around the end of the lamps. The tape was added to prevent the lamps from dislodging during shipping.
6
Pull the lamp back while pushing the socket in and remove the lamp. See photo 7.
OPTIONAL ACCESSORIES Get even more advertising power from your portable LED sign with custom sign faces! These directprint panels can accommodate any artwork and text.
Make your sign even more portable with our wheel kit extension! These heavy-duty wheels attach directly to the sign legs and make rolling your sign a snap.
To purchase custom sign faces, the wheel kit and more, please visit
www.outdoorsignsamerica.com/portableled
SOFTWARE INSTALLATION & USE Your sign message is controlled using the provided Sign Programmer software and USB drive. The software requires a Microsoft Windows®-based PC to operate. INSTALLING THE SOFTWARE The software installation file is available on the USB drive that was provided with the sign, as well as at www.outdoorsignsamerica.com/portableled
1
Double click on the signprogrammer.exe file to start the installation process.
2
If you use Windows® 7 or Windows® Vista, you may have to click Yes to the User Account Control window.
3
Click the Next button to start the software installation.
4
Accept the default destination location by clicking the Next button.
5
Accept the default Start Menu Folder by clicking the Next button.
6
Confirm your selections by clicking the Install button.
7
Complete the installation by clicking the Finish button.
Once installed, the Sign Programmer icon will be available on your desktop and in your Start menu. Click on the icon to start.
ADDING TEXT Sign Programmer can add a one-line or two-line message to your sign. Click the New Text button in the toolbar:
Type the message into the black box. The text alignment can be changed using the alignment buttons:
For a two-line message, change the drop down above the black box to
This will allow you to fit more text on to the sign:
The Stay Time is the duration that the text will stay on the sign. Stay times are listed as hours:minutes:seconds, and does not include the time used by the Entry Effect. Select an Entry Effect if you would like the text to transition on and off of the display. The Speed of the effect can be controlled with the slider.
4
5
SOFTWARE INSTALLATION & USE ADDING GAS PRICES Sign Programmer makes it easy to add gas prices to your sign. Click the New Gas Price button in the toolbar:
Select the Gas Type, Price (in dollars, cents and tenths) and whether Cash/Credit will be displayed. Your selections will be automatically formatted for the sign:
As with regular text, you may select a Stay Time, Entry Effect and Speed of the effect.
ORDERING, REMOVING & PREVIEWING ITEMS If you have more than one item being shown, you may adjust their order using the Items can be removed with the button.
buttons.
Once your content has been configured, click to view what will be shown on your sign. Once you have finished previewing, click the X in the top right of the Preview window to close it.
Sign Programmer supports up to 20 total items for display. Exceeding 20 total items is not supported by the software.
PLACING YOUR MESSAGE ON THE SIGN A USB drive is used to move your message from the computer to the sign. It is recommended to use the USB drive that came with your sign, as others may not be formatted correctly. The USB drive must not contain other data or folders.
1
Plug in the USB drive into an open USB port on your computer. When the computer recognizes the USB drive, make note of the drive letter.
2
Click
3
Click the folder icon next to the Export To box. Select your USB drive from the folder list. Click OK and then Export.
4
You will be alerted if the export was successful. Close the Export window and remove your USB drive from the computer.
5
Plug in the USB drive into the USB port on the sign. See photo 8. The transfer will be automatic, and the file will begin playing momentarily. Once the file begins playing, the transfer is complete. You may now safely remove the USB drive from the sign.
in the top toolbar.
Photo 8 WORKING WITH SCRIPT FILES A script file contains all of the information that you have entered into Sign Programmer. Script files are stored on your computer so that they may be changed at a future date. To create a new script file, click To open an existing script file, click Browse to the file location and click Open. To save your open script file to your computer, click When Sign Programmer is closed and later restarted, it will open the last script file that was saved.
6
TROUBLESHOOTING The entire sign won’t turn on, including the fluorescent lamps.
An individual LED or pixel does not turn on.
This indicates a problem with the electrical connection to the sign.
Under most usage conditions, failure of an individual LED or pixel is not noticeable to passing traffic. Please read the warranty information concerning the failure of individual pixels.
1
Ensure that the electrical line does not have a tripped circuit breaker.
2
Use an electrical tester or another electric device to ensure that power is being delivered to the sign site.
3
Press the ON button on the sign’s GFCI switch (see page 3).
A rectangular section of the LED display, or the entire top or bottom of the display does not turn on.
4
If the problem persists, visit the website below for further instructions.
This may indicate a problem with an LED board or with a loose cable inside of the display. Please visit the website below for further instructions before attempting to open the LED cabinet.
The fluorescent lamps are on, but the LED display is not on. This may indicate a hardware issue, or that no message has been programmed. 1
Reboot the display by disconnecting the power for 10 seconds and then reconnecting.
2
Follow the instructions on pages 4 and 5 to upload a new message. Ensure that you have set the software to show at least one item with text.
3
If the message still will not show on the display, visit the website below for further instructions.
The display is on, but the fluorescent lamps are not on.
The LED display is on but will not accept a new message. This may be caused by several factors. 1
Make sure you are using the USB drive that came with the sign. Other USB drives may not be formatted correctly.
2
Make sure that the USB drive does not contain any other files or folders before exporting your message from Sign Programmer.
3
Make sure you have successfully exported a message from Sign Programmer onto the USB drive.
4
Leave the USB drive in the sign until your new message starts playing. This may take up to 30 seconds.
5
Reboot the sign by turning the power off for 10 seconds and then back on.
6
If these steps are not successful, visit the website below for further instructions.
This may indicate that the lamps need to be replaced.
1
Follow the lamp replacement procedure on page 3. As the lamps are wired in a series, one faulty lamp will cause both to not light.
2
If the sign still will not light with new lamps, a new electrical ballast may be required. Please visit the website below for further instructions.
Do not attempt to open the LED cabinet before visiting www.outdoorsignsamerica.com/portableled for further instructions.
For more information or to contact us with further issues, please visit
www.outdoorsignsamerica.com/portableled
LIMITED PRODUCT WARRANTY
7
Definition of Warranty Coverage: Outdoor Signs America (the “Company”) expressly warrants to the original purchaser (“You” or “Buyer” or “Owner” or “Customer”) that, for a period of one (1) year from the date of shipment (the “Warranty Period”), the electronic displays and the associated company products (the “Product”) will be reasonably free of defects in materials and workmanship. During the Limited Warranty Period the Company will, at its discretion, repair or replace any defective covered product. This Limited Warranty only applies to the Company’s Product if installed, used, and maintained in the manner recommended by Company and this Limited Warranty is conditioned upon compliance with all such instructions. Title to the product passes to the buyer upon our delivery to the freight carrier. Loss or damage to the product when in possession of the freight carrier is the responsibility of the customer and the freight carrier is not covered by this warranty. Upon delivery, incidental blemishes and scratches are considered normal unless they can be viewed from 20 feet or more under normal use conditions. The Company assumes no liability for damage caused by careless handling or poor installation except for work completed by employees or agents of The Company. In the event the sign is damaged during shipping it is the responsibility of the buyer to refuse delivery causing the sign to be returned to the manufacturer for repair. Failed electronic parts or assemblies will be repaired, exchanged or replaced, at the discretion of the Company. Telephone support is provided as needed during the warranty period. Removing and reinstalling repaired or replacement parts are the responsibility of the owner. Replacement or repaired parts are warranted to be free from defects in material or workmanship for ninety (90) days or, for the remainder of the Limited Warranty Period of the Product they are replacing or in which they are installed, whichever is longer. The Company will repair failed LED pixels, if greater than 1.0% (one percent) of the total number of pixels in the sign have failed in one (1) year, provided the sign is installed with the recommended ventilation system for its location. The definition of pixel failure is when all LED’s in the pixel will no longer emit light. Pixel repair is performed at the Company Repair Center. Owner bears the responsibility of transporting Product to Company’s Repair Center. As known within the Sign Industry all LEDs degrade and produce less light as they age. Eventually the LEDs will require replacement even though the LEDs will still emit light. This Warranty does not cover normal LED degradation. Eligibility and Warranty Period: This Limited Warranty is not transferable. Service under this Limited Warranty begins immediately upon shipment to the Customer or the Company’s Authorized Reseller. Unless otherwise stated the Limited Warranty period is one (1) year. Customer Obligations: Failure by the Customer to properly maintain the Product, including but not limited to filters and the ventilation/air conditioning systems, will void coverage for affected components. The Customer shall notify the Company immediately of equipment failure and allow the Company full and free access to the Product when required. Waiver of liability or other restriction shall not be imposed as a site access requirement. The Customer is responsible for all costs and management oversight associated with providing the Company access to the Product, providing the necessary tools, machines, communication facilities and other equipment at no charge. Exclusions and Restrictions: The Company reserves the right to restrict service, limit replacement parts or invalidate this Limited Warranty to Customers whose account balance is past due. This Limited Warranty specifically excludes any on-site labor required to service the covered Product including diagnosis, removal and installation of parts or products. Any on-site service required by the Customer of Company technicians or a local Authorized Service Provider is billable to the customer based on an agreed upon written quote. This Limited Warranty does not apply to software. Software is covered by a separate Agreement, which appears in the seller's software license agreement. This Limited Warranty specifically does not cover the following: 1. Third-party communications devices such as wireless devices and modems, which are covered under a separate Electronic Communication Warranty; 2. Product that has been moved from its original installation location or is mounted in a mobile structure with the exception of portable signs that are being moved short distances by hand and with care; 3. Cosmetic damage to the product (including but not limited to scratches, dents and broken plastic that do not otherwise affect the functionality of the Product or materially impair its use); 4. Temperature sensors will register variable results given local environmental factors such as direct sunlight, distance from concrete or asphalt, etc.; results are not guaranteed or covered under this Limited Warranty. 5. Recovery or transfer of any data or software stored on the Product not originally installed on the Product by the Company. This Limited Warranty specifically does not cover conditions, defects or damage caused by or resulting from the following: 1. Defects caused by unreasonable or unintended use of Product, improper or unauthorized handling, accident, omission, neglect, vandalism (unless otherwise noted in this Warranty), misuse, physical abuse, installation, use and/or fabrication, and maintenance of the Product by any party other than the Company; 2. Damage not resulting from manufacturing defects that occur while the Product is in the Owner’s control and/or possession; 3. Extreme physical or electrical stress or interference; environmental conditions beyond the Company’ control such as man-made or naturally occurring corrosives and metallic pollutants; normal wear and tear; inadequate, improper, or surges of electrical power; lightning, floods, fire, acts of God, war, terrorism, or other external causes, including Force Majeure. 4. Unauthorized modification including installation of third-party software on the Product.
LIMITED PRODUCT WARRANTY (Continued)
8
5. Product modification or service by anyone other than: (a) The Company, (b) a Company Authorized Service Provider, or (c) Customer’s own installation of Company approved parts with instruction from the Company. Service to a damaged or malfunctioning sign which has not been ordered or authorized by the Company' Customer Support Department is not only not covered under this warranty, but also will immediately and automatically invalidate this warranty. 6. Computer viruses, Trojan horses, worms, self-replicating code or like destructive code which was not included in the Product by the Company. 7. Products installed with known or visible manufacturing defects at the time of installation. All items returned to The Company must have a Return Materials Authorization (RMA) number, available by using the contact information below. Items received without an RMA number will not be processed and returned to the Customer at their expense. For exchange items, the RMA number is included with the shipment of the exchange unit. The defective part must be returned to the Company or the Customer will be charged the price of a replacement part. The Company will provide and be responsible for the cost of shipping parts from The Company to the Customer. Expedited delivery is available to the Customer at their expense. The Customer will provide and be responsible for the cost of shipping parts to The Company. Warranty claims must be registered with the Company within thirty (30) days of damage or malfunction. To register a claim the Customer must contact the Company at the location specified below, providing your name and any other required contact information, a description of the Product, date of Product purchase, and nature of the defect, which may include, but is not limited to, written descriptions, photographs, video, defective parts or other evidence. The Company reserves the right to require proof of original purchase (e.g. paid invoice, receipt) and to visit the site of the installation or to require documentation of the claim before assuming any responsibility under the provisions of this warranty. Any information or suggestion by the Company with respect to the Product concerning applications, specifications or compliance with codes and standards is provided solely for your convenient reference and are made without any representation as to accuracy or suitability. You must verify and test the suitability of any information with respect to the Product for your specific application. THE LIMITED WARRANTIES SET FORTH HEREIN ARE THE ONLY WARRANTIES MADE BY COMPANY IN CONNECTION WITH THE PRODUCT. COMPANY CAN NOT AND DOES NOT MAKE ANY IMPLIED OR EXPRESS WARRANTIES WITH RESPECT TO THE PRODUCT, AND DISCLAIMS ALL OTHER WARRANTIES, INCLUDING, BUT NOT LIMITED TO, ANY WARRANTY OF MERCHANTABILITY OR FITNESS FOR A PARTICULAR PURPOSE. COMPANY’S SOLE OBLIGATION UNDER THIS WARRANTY SHALL BE TO REPAIR OR REPLACE MALFUNCTIONING OR DEFECTIVE PARTS OF THE PRODUCT. BUYER ASSUMES ALL RISK WHATSOEVER AS TO THE RESULT OF THE USE OF THE PRODUCT PURCHASED, WHETHER USED SINGULARLY OR IN COMBINATION WITH ANY OTHER PRODUCTS OR SUBSTANCES. Limitation of Liability: No claim by Buyer of any kind, including claims for indemnification, shall be greater in amount than the purchase price of the Product with respect to which damages are claimed. IN NO EVENT SHALL COMPANY BE LIABLE TO BUYER IN TORT, CONTRACT OR OTHERWISE, FOR ANY SPECIAL, INDIRECT, INCIDENTAL, CONSEQUENTIAL, RELIANCE, PUNITIVE OR EXEMPLARY DAMAGES, OR FOR LOSS OF PROFIT, REVENUE OR USE, IN CONNECTION WITH, ARISING OUT OF, OR AS A RESULT OF, THE SALE, DELIVERY, SERVICING, USE OR LOSS OF USE OF THE PRODUCT SOLD HEREUNDER, OR FOR ANY LIABILITY THAT BUYER HAS TO ANY THIRD PARTY WITH RESPECT THERETO.. Contact Information: Outdoor Signs America 1400 8th Street North, Clanton, AL 35045 Phone: 800-239-9990 Web: www.outdoorsignsamerica.com