Handicom
Symbol for Windows
Multiple Choice (Version 4)
© Handicom, 2011, The Netherlands
Manual
SfW Multiple Choice
2011
Content 1. Introduction.................................................................................................................. 2 1.1 What is Multiple Choice?.........................................................................................2 1.2 System requirements...............................................................................................2 1.3 Installation............................................................................................................... 2 2. Getting acquainted with the program.........................................................................4 2.1 Running mode......................................................................................................... 4 2.2 Edit mode................................................................................................................ 4 2.3 Alt + F10: change modes.........................................................................................5 3. Create an exercise........................................................................................................ 6 3.1 Save an exercise..................................................................................................... 6 3.2 Open an exercise.................................................................................................... 6 3.3 Add, insert, delete or move a page..........................................................................6 3.4 Add a sound to a page............................................................................................. 6 3.5 Fill the boxes........................................................................................................... 7 3.6 The correct answer.................................................................................................. 9 4. Exercise settings........................................................................................................ 10 4.1 General settings.................................................................................................... 10 4.2 Correct answer feedback.......................................................................................11 4.3 Wrong answer feedback........................................................................................ 11 4.4 Final reward........................................................................................................... 11 5. Input type and options............................................................................................... 13 5.1 Input: standard and scanning................................................................................13 5.2 Switch connection types........................................................................................ 13 5.3 Switch number and function (scan technique).......................................................14 5.4 Cursor movement (scan strategy).........................................................................14 5.5 Default action after selection.................................................................................15 5.6 Timer settings........................................................................................................ 15 6. Other options.............................................................................................................. 16 6.1 Choose a language................................................................................................ 16 6.2 Synthesizer settings............................................................................................... 16 6.3 Run the program with one exercise.......................................................................16
© 2011 Handicom, NL
Page 1
Manual
SfW Multiple Choice
1.
Introduction
1.1
What is Multiple Choice?
2011
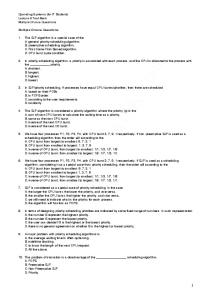
Multiple Choice is a computer program to make and play multiple choice exercises with symbols, images and text. Every exercise consists of a number of ‘pages’. On each page you see a big rectangle (the ‘question’) and 1 to 5 small rectangles below (reply boxes). Each box can contain one symbol, image or text. An immense variety of exercises can be made. For instance… - The question box contains an object (a pan, toilet paper, or a couch); the small reply boxes show pictures or images of rooms in the house. The question is in which room the object is used. - The question box shows a question mark only; the reply boxes show four objects of a kind and one of another kind (four animals, one book). The question is which one doesn’t belong to the others. - The question box shows a detail of a picture; the reply boxes show different pictures. The question is out of which picture the detail is taken. - The question box contains a word (e.g. fish); the reply boxes show pictures (e.g. of various animals). The question is: what does this word mean? The player can use the mouse or press a key or switch, to indicate the reply box that contains the correct answer. Audio-visual feedback can stimulate the player in a positive way, even if the answer is wrong. There is no pressure, no stress. The player will enjoy playing with the computer. Multiple Choice serves two goals: 1. Train and expand the vocabulary of the player. 2. Let the player enjoy working (on his own level) with the computer.
1.2
System requirements
To be able to use Multiple Choice well, you need the following: • A Pentium with Windows • Min. 16 Mb ram • About 750 Kb free space on the hard disk for the program • Free space on the hard disk for symbol databases and/or image files. If you want to use sounds, you need sound files (*.wav or *.mid), a sound card (plus driver) and at least one box. If you have a microphone and the MediaPlayer you can make your own sound files. (The MediaPlayer is a program that you get when you buy Windows. Search for Mplayer.exe).
1.3
Installation
Follow the installation procedure on the cd-rom or download the Update Wizard from the website: www.symbolforwindows.eu, and use that to download and install Multiple Choice. All Symbol for Windows programs and almost all databases are protected. Programs run in demo mode until you have registration codes or a software enabler key for them. Databases (except COMPIC and an older version of the Bliss database) show a limited set of symbols. You can order the applications and databases from Handicom (or a local distributor). A few sample exercises are installed with the program. More material can be found on our website. Click the ‘livingroom’, with the symbol of a chair.
Input through switches
Page 2
© 2011 Handicom, NL
Manual
SfW Multiple Choice
2011
Multiple Choice can be operated with mouse and keyboard, or with a game pad or with switches in the ‘scanning’ mode. It can also be operated with a special keyboard. Only the small boxes respond to the switches (one box per switch); other boxes and buttons don’t.
© 2011 Handicom, NL
Page 3
Manual
SfW Multiple Choice
2.
Getting acquainted with the program
2.1
Running mode
2011
Immediately after start-up, a small dialog appears with a list of exercises (found in the default Symbol for Windows documents directory; you can choose another directory if you want). This dialog also appears when you have finished playing an exercise. Choose a demo exercise and click on Play. Now you can play the exercise; this is called the running mode. In the Running mode only the big question box, the reply boxes and the caption (the blue bar at the top) are visible. In the caption you can read the question that applies to every page in this exercise. Correct answer or wrong answer When the player chooses a box, its frame gets another colour: it becomes green if it contains the correct answer, or red if it contains a wrong answer. When the player has made his choice, • A small rectangle appears at the right side (if it is the correct answer) or the left side (if it is not) of the question box. This rectangle can contain a symbol, image or text. It will stay there for 1 to 5 seconds, depending on the settings per exercise. • A sound can be played, like an applause or a verbal encouragement to try again. After a correct answer, the next sheet will be shown. After a wrong answer, it depends on the settings what will happen next: the wrong answer disappears and the player can choose from the remaining answers, or the next sheet is shown immediately. End of the exercise When the player has finished the exercise he can be given a ‘reward’: a screen that shows a ‘Score Metre’ and a symbol, image or photo, and plays a sound. The screen also contains three buttons. Click on the Print button if you want a print of this screen. (In the place of the buttons, the question will appear on the print.) You are asked to type the name of the player. (This doesn’t happen if you make use of the special command line parameters. It also doesn’t happen when you are editing an exercise and you want to try it out). With the Answers button you can take a look at the answers the player has given. You can print and save this list. Click OK to return to the reward screen. Click on the OK button to close the exercise. The very first dialog appears again, giving you the possibility to stop, to play or change an exercise or to make a new exercise. How does Multiple Choice keep the score? The score per page is at least 1 and at most the number of reply boxes (1 to 5). Every time the player makes a mistake, one point is subtracted. On the Score Metre the score is translated in a percentage.
2.2
Edit mode
Immediately after start-up, a small dialog appears with a list of exercises (found in the default Symbol for Windows documents directory; you can choose another directory if you want). This dialog also appears when you have finished playing an exercise. Choose an exercise and click on Settings (change the exercise) or click on the button New (make a new exercise).
Page 4
© 2011 Handicom, NL
Manual
SfW Multiple Choice
2011
In the Edit mode you see a menu, below the caption, and two numbers separated by a / (slash). The first number is the current page number; the other number is the total number of pages. When you rightclick on a box you see a popup menu; when you rightclick on the region around the boxes, another popup menu appears. You can use these menus to - Add, insert and remove pages - Go to the first, previous, next or last page - Fill the rectangles with an image, symbol or text. In the caption you can read the name of the exercise file.
2.3
Alt + F10: change modes
You can change from running mode to the edit mode and vice versa by pressing the keys Alt + F10. If you were in running mode, the same page is displayed in edit mode. The game is ended. If you were in edit mode, the game that you were editing is started in running mode, beginning with the first page. Choose File – Restart from the menu, if you prefer to return to the dialog that appears immediately after start-up.
© 2011 Handicom, NL
Page 5
Manual
3.
SfW Multiple Choice
2011
Create an exercise
In edit mode you can create or modify an exercise, using the menu and one or two popup menus. The menu is found at the top of the screen, directly below the caption. One popup menu is seen when you right-click on a box; the other popup menu appears when you right-click on the region around the boxes.
3.1
Save an exercise
Click File – Save or File – Save as. ‘Save’ means: save the exercise under the current name (if it already has a name). ‘Save as’ means saving the exercise under a new name, and/or in a different directory. The extension of Multiple Choice exercises is .MCO.
3.2
Open an exercise
Directly after start-up and after finishing a game, you can choose an exercise (click on the button Browse to choose another directory) and click on the button Settings. In edit mode you can use the menu to open an exercise. Click File – Open. Select the file that contains the exercise that you want to open and click OK.
3.3
Add, insert, delete or move a page
To add, insert or delete a page you can use the menu or a popup menu. To open the popup menu, rightclick somewhere on the region outside the question box.
3.3.1 Add or insert a page Click on (File –) Add, to add a new page after the last page. Click on (File –) Insert, to add a page after the current page.
3.3.2 Browse You can return to the previous page or go to the next page by clicking on (File –) Previous or on (File –) Next, respectively. You could also return to the first page: click on (File –) First, or go to the last page; click on (File –) Last.
3.3.3 Delete a page Browse to the page that you want to delete. The page should be visible on screen. Then click on (File –) Delete. There is another way to delete a page: choose Sheet – Order. Select the page that you want to delete by clicking on it in the Order dialog. Then click the button Delete.
3.3.4 Moving pages (change the sheet order) Choose Sheet – Order from the menu. Select a page by clicking on it in the Order dialog. Then click on the arrow up or the arrow down to move the sheet up or down in the sheet order.
3.4
Add a sound to a page
The program can play a sound when a page is shown on screen – a different sound for every page. To choose a sound for a page, click on the button Sound and select the sound file. Note: the program can also play a sound every time when the next page is shown. This sound is one of the general settings for the exercise, see 4.1.2 Play a sound. You can decide whether this sound should replace the page sound or be combined with it.
Page 6
© 2011 Handicom, NL
Manual
SfW Multiple Choice
2011
Delete the sound To delete the sound that is linked to a page, browse to the page and click on the button Delete Sound.
3.5
Fill the boxes
‘Move’ boxes You can easily exchange the contents of reply boxes with the mouse. Click on one field and keep the mouse button pressed down; move (‘drag’) the mouse to the other field and release the mouse button (‘drop’). The content will be exchanged, including the information about which answer is correct. You can also use the menu Edit to clear, copy and paste fields.
3.5.1 Select a symbol Rightclick on a box and choose Select image from database… from the popup menu. With the dialog that appears, you can look in the entire Symbol for windows databases that are found on your computer (see the introduction, about the installation).
At the right top of the dialog you see the name of a database. The dialog remembers which database was selected when you last closed it. That database is opened first, the next time you open the dialog. When you click on the small arrow next to the name of the database, you get a list of all available symbol databases. Select a database from the list. Now, click on ‘Standard category structure’ under ‘Category’ (on the left). The list in the middle will be filled with all concepts that are represented in the chosen database. Click on the name of a concept (a word in the list in the middle). The preview shows the first symbol that is linked to that concept. Use the small buttons with the image of a walking man, to ‘walk’ through the synonyms. Synonyms are symbols or images in the same database, that are linked to the same © 2011 Handicom, NL
Page 7
Manual
SfW Multiple Choice
2011
concept. For instance, if a database contains two symbols for ‘at home’, these symbols are synonyms and will both be linked to the concept ‘at home’. If you can’t find the symbol or image that you are looking for, there are two solutions: 1. Search in the categories When you click on the name of a category, the list in the middle is filled with all concepts that occur in that category and in the chosen database. A [+] placed before the name of a category means that there are sub-categories. Click with the left mouse button on the [+] to unfold a category. Now you can select one of the sub-categories to be able to browse a smaller selection. Below the category structure you will find several options which can make searching easier: 1. When a symbol database doesn’t contain too many symbols, many categories and sub-categories will be empty or almost empty. Check this option to remove the empty categories from the category structure and to place the contents of very small subcategories in their ‘parent’-category. When you choose another symbol database, the category structure will be adapted to that database. 2. If the second option is activated, the category structure functions as follows. When you click on the name of a category that contains subcategories, the list in the middle will be filled with all concepts, which occur in the chosen database as well as in the chosen category, and in all its sub-categories. (This is always the case when you click on the main category, whether this option is activated or not.) 3. The option ‘Remember current category’ makes the dialog remember which category was open when the dialog is closed. Next time you open the dialog, it will open with the same category. 4. The fourth option allows you to search the database using the original symbol names. This option is only available for certain databases that (sometimes) require this, like the Dutch sign language database. 2. Use the Find-buttons With the Find- and Find Next buttons you can look for a word or part of a word. The word or part of a word is looked for in all categories. If a word is found, or a word in which the given part occurs, the category-list shows to which category it belongs, adding a grey background to the name of that category. Tips: Remember that the name of a concept can differ from the name that the symbol had in the original database. If you are looking for a particular symbol, don’t forget to check synonyms. Place a symbol Select a concept name (and if necessary, a synonym) and click OK to place it in the box, or click Cancel to return to the page.
3.5.2 Import an image Rightclick on a box and choose ‘Import image from file…’ from the popup menu. Select a file and click on OK. Do not rename or move a file after you have imported it in an exercise. Importable files are Bitmaps (*.bmp), Windows Metafiles (*.wmf), Enhanced Metafiles (*.emf), Icons (*.ico) and JPEG Image Files (*.jpg and *.jpeg).
3.5.3 Add text Rightclick on a box and choose ‘Text…’ from the popup menu. Type a text or edit the current text. Tip: The name, size and style of the font for this text are part of the settings for each exercise; see chapter 4.
Page 8
© 2011 Handicom, NL
Manual
SfW Multiple Choice
2011
3.5.4 Change the label Rightclick on a box and choose ‘Label…’ from the popup menu. Type a label or edit the current label. Tips: • The visibility of the labels is one of the settings that belong to an exercise, as well as the name, size and style of the font for the labels; see chapter 4. • The label is filled in automatically when you choose a symbol or import a file in a box. You can change every label. Remember that only unchanged labels can be translated automatically into another language.
3.5.5 Draw options A symbol or image can be drawn: - with its original aspect ratio, or stretched so that it fills the whole cell - with an ‘opposite indicator’ in the form of a black, white or red cross or line. - in colour (if the original was in colour) or in black-and-white. You can change these settings per answer box. Right-click on a cell and choose Draw options from the pop-up menu.
3.5.6 Background colour Right-click on a box and choose Background colour from the pop-up menu. Then click on one of the coloured boxes. If you want you can define a custom colour and select it. Click on OK. The box that you clicked on will get the chosen colour as background colour. Every box can have its own background colour. Only the feedback boxes keep their silvergrey background.
3.6
The correct answer
On every page, only one box can contain the right answer. Rightclick on a box and choose ‘This is the correct answer’, from the popup menu. The frame of the box will be coloured green. If the correct answer is missing on one or more pages, the program will notify you at the moment you are going to save, try or close the exercise. However it will be possible to play the exercise. On pages where the correct answer is missing, the player has to choose all boxes one by one, before the next page appears. This results in a lower score.
© 2011 Handicom, NL
Page 9
Manual
4.
SfW Multiple Choice
2011
Exercise settings
Click on Exercise – Settings.
4.1
General settings
4.1.1 Question Below the word ‘Question’ you can write down the central question. It will be visible in the caption in running mode, and on paper if you print the ‘Final Reward’ screen. It can also be read out lout - when a page is turned - when the user selects the question box or clicks on it - when you press the 0 (zero) key or F12. Check the option ‘Read question’ if you want this. You need a speech synthesizer to make this work (see paragraph 6.2, Synthesizer settings).
4.1.2 Play a sound when a page is turned The program can play a sound every time the player goes to the next page in running mode. May be you have a sound file that is useful, e.g. one in which you hear the question (see 4.1.1, Question). Click on the button Choose sound, and select the file. The program can also play a sound when a specific page is shown, see 3.4, Add a sound to a page. Here you can choose if the Question sound must be combined with, or replaced by a specific Page’s sound. Tips: • You can use wave files (*.wav) or midi files (*.mid). • Don’t rename or move it after selecting it. If you have to, you will have to select it again in Multiple Choice or change the name or file path of the sound file in Multiple Choice by hand. • You can test the sound by clicking on the button with the loudspeaker. • You can not stop the sound, neither in this dialog and nor in running mode. Choose a sound that won’t take too much time.
4.1.3 Read answers and/or question (with a speech synthesizer) Check the option ‘Read answer labels’ if you want the labels to be read out when a box gets the focus or when the mouse moves over a box. Check the option ‘Read question’ if you want the question (seen in the caption) to be repeated when the user selects the question box or clicks on it. These options will only work if there is a speech synthesizer that is connected and set up (see paragraph 6.2, Synthesizer settings).
4.1.4 The number of reply boxes The number of reply boxes is at least one and at most five. Here you can see which boxes will be visible with a certain number of boxes: Box 1 1 box 2 boxes 3 boxes 4 boxes 5 boxes
Box 2
Box 3 X
X X X X
X X
Box 4
Box 5
X X X X
X X X
X
Tip: when you save an exercise, all (5) boxes are saved, whether they are visible or not. Page 10
© 2011 Handicom, NL
Manual
SfW Multiple Choice
2011
4.1.5 Frame and background colour You can choose the colour of the background and the frame around the reply boxes out of 64 colours. Of these 64 colours you can define 16 yourself; the other 48 colours are fixed. Click on the coloured button or panel. The chosen colour will be used for the question box and the reply boxes, not for the feedback boxes. The feedback boxes are always red (for a wrong answer) or green (for the correct answer). On paper (when you print the ‘final reward’ screen) the frame is always green.
4.1.6 Labels Check the option Labels to make the labels visible. Click on the button Label Font to choose another font (name, size and style) for the labels. Tip: The label is filled automatically when you choose a symbol or import a file in a box. You can change every label. Remember that only unchanged labels can be translated automatically into another language.
4.1.7 Text font Click on the button Text Font to choose another font (name, size and style) for the text in the reply boxes.
4.1.8 Feedback image disappears after… Use the arrow buttons to change the time that the feedback boxes (for a wrong answer and for a correct answer both) will remain visible: at least one second and at most five seconds.
4.1.9 Continue with the next sheet after one answer (right or wrong) On the tab menu Wrong answer there is a checkbox ‘Continue with next page’. Check it to make the exercise proceed to the next sheet after one answer, whether the answer was right or wrong. This setting can come in handy when the user is learning to work with scanning, or for example when a user is clicking wrong answers intentedly because the feedback that is associated to the wrong answer is too attractive.
4.2
Correct answer feedback
Click on the tab card Correct answer. Click on the button From database or From file to select an image. The image will be shown in the feedback box at the right side of the question box, when the player chooses the reply box that contains the correct answer. Click on the button Choose sound… to select the sound that will be played at the same time.
4.3
Wrong answer feedback
Click on the tab card Wrong answer. Click on the button From database or From file to select an image. The image will be shown in the feedback box at the left side of the question box, when the player chooses the reply box that contains a wrong answer. Click on the button Choose sound… to select the sound that will be played at the same time. When the checkbox ‘Continue with next page’ is checked, the exercise will proceed with the next sheet after one answer, whether the answer was right or wrong. When this box is uncheched, the exercise will not proceed until the correct answer is clicked, removing the wrong answers one by one as they are selected.
4.4
Final reward
Click on the tab card Final reward. Click on the button From database or From file to select an image. The image will be shown in the ‘final reward screen’ when the player has finished an exercise. Click on the button Choose sound… to select the sound that will be played at the same time.
© 2011 Handicom, NL
Page 11
Manual
SfW Multiple Choice
2011
Click on the option Score Metre if you want to reward the player with a ‘thermometer’ showing his score (a percentage of the maximum score). Tip: If you choose None (no image) and uncheck the option Score Metre, the final reward screen will not be displayed.
Page 12
© 2011 Handicom, NL
Manual
SfW Multiple Choice
5.
Input type and options
5.1
Input: standard and scanning
2011
The way the program is operated can be adjusted to each individual player. Go to Options – Input type, in the menu. There are two operation methods, 'Standard' and 'Scanning'. Standard means, using the mouse and keyboard. Press the button Options to prevent the program from reacting when the user involuntarily clicks (for instance when the player is suffering from a tremor). • The program won’t react when the mousebutton is pressed down shorter than the tremor time. • When the left mousebutton is pressed down (longer than the tremor time) the program won’t respond to the following mouseclicks during the debounce time. Scanning is the alternative for operation via mouse and keyboard. Instead the user handles one or two switches. With the switch or switches he or she can move the cursor or stop it, and make selections. Press the button Scan options to adjust this mechanism to the player. See the next paragraphs for further explanation.
5.2
Switch connection types
The switch(es) can be connected to the printer port or the serial (e.g. USB) port of the computer. Joystick buttons, mousebuttons and keyboard keys can also be used as switches; generally they will only be brought into action for testing purposes. After connecting the switch(es), joystick, mouse or keyboard to the computer, select the correct kind of switches in the Scanning Options dialog.
5.2.1 Switches on printer port For switches connected to the printer port you need to give the port number. Advanced settings Note for technicians: the ‘Advanced settings’ button opens up a dialog to change the switch input connection type. For each switch you can choose from: , DNS, OOP. We’ve already put out the settings for Handicom’s printer port connector. Click the button of the same name to adjust the settings to this connector type.
5.2.2 Joystick buttons To be able to use joystick buttons as switches, you have to fill out the right port number.
5.2.3 Switches on serial port For switches connected to the serial port, you have to give the port number. Advanced settings Note for technicians: press the ‘Advanced settings’ button to open a dialog about the switch input connection type. For each switch you can choose from: , RLSD, RI, DSR, CTS. Output signals can be DSR and/or CTS. When you are using Handicom’s serial port connector, the Cameleon 3 or the Wivik connector, you can press the button of the same name. The settings will be adjusted automatically. (The buttons for the Cameleon 3 and the Wivik connector are disabled because we don’t have all the technical specifications for these connector types yet.)
5.2.4 Keys (keyboard) To fill in a key that should be used as a switch, press the key once. Notes:
© 2011 Handicom, NL
Page 13
Manual • • •
SfW Multiple Choice
2011
In running mode the Symbol for Windows software responds only to those keyboard keys which are indicated as ‘switches’. It won’t react to other keys. However, Alt + F10 can still be used to switch to the facilitator mode. In scanning mode you can use the key on the keyboard to temporarily turn off scanning. Press this key again to continue working in scanning mode. When you switch to another, non-Symbol for Windows, program while the Symbol for Windows program is running in running mode, the other program behaves in precisely the other way: it responds to all keys like it normally does, except to the two keys which are indicated as ‘switches’. Despite it’s being put into the background, the Symbol for Windows program still responds to those two keys.
5.2.5 Mousebuttons No further information is needed if the mousebuttons are used as switches. Note: When the mouse is used for scanning purposes, the mouse pointer disappears in running mode. The program only reacts to mouseclicks, not to the moves of the mouse. Meanwhile, the mouse can’t be used in other programs, since the Symbol for Windows program reacts to the mouseclicks!
5.3
Switch number and function (scan technique)
One or two switches can be used to operate this Symbol for Windows program. In both cases there are two scanning techniques to choose from. Each scan technique has its own characteristics. It depends on the user which scan technique will be best. In the '2 Switch' scan techniques, it can't be said beforehand which task will be assigned to which switch. This will show as soon as you start to use the program in the scanning mode. 1 Switch auto scan: The cursor moves automatically. The user must push the switch at the right moment to make a selection. 1 Switch user scan: The user must press the switch and keep it pressed down to move the cursor. To make a selection, the user must stop pressing the switch at the right moment. 2 Switch single step: The first switch is used to move the cursor, step by step. With the other switch the user can select the column/row/field etc. that the cursor indicates. 2 Switch user scan: The cursor moves automatically as long as the first switch is pressed down. It stops when the user releases the switch. The second switch must be used to confirm the selection.
5.3.1 Option: balanced input For users who use two switches it is recommendable to use the balanced input method. With this method you use one switch per scan level. Normally one switch is used to move the cursor. The other switch is used to make a selection or confirm a selection. With the balanced input method, the switches change function as soon as a selection is made or confirmed. So then the other switch is used to move the cursor and the first switch is used to make a selection or confirm a selection. This method prevents overburdening of one hand (or foot, or neck, or whatever body parts are used to handle the switches) because the user has to use both switches about as many times. There is a checkbox in the bottom left of the scan settings dialog. Check this to activate the balanced input method.
5.4
Cursor movement (scan strategy)
The cursor always starts by indicating the elements in the main window of the program. This is scan level 0. Page 14
© 2011 Handicom, NL
Manual
SfW Multiple Choice
2011
In Multiple Choice, the cursor will scan the answers on scan level 0. The other levels are never used, so you don’t have to make changes to them.
5.5
Default action after selection
Where does the cursor go after the user has made a selection? This depends on the setting for the 'default action after selection'. In Multiple Choice this setting isn’t used; the cursor always returns to the first answer. So you don’t have to make changes here. • • • • • •
5.6
Timer settings
Step time (in milliseconds) The Step time is the time the cursor takes for every step. For instance, if the step time is 500 milliseconds, the cursor waits half a second on every item. Restart extra scan time (percentage) The 'Restart extra scan time' is the time added to the step time for the first step when the scanning (re)starts. For instance if the step time is 1000 milliseconds (1 second) and the restart extra scan time is 100 percent, the cursor waits 2 seconds on the first step on each page. Tremor delay and Debounce delay (in milliseconds) Some users who have a tremor can press a switch by accident. If the program would react to those accidental movements, it would cost the user a lot of time to undo what the program does next. If you set a tremor delay, the program does not react when the switch is pressed shorter than the time for the tremor delay. If you set a debounce delay, the program stops 'listening' to the switches after a selection until the time for the debounce delay is over. If there are two switches the tremor delay and debounce delay will be the same for both.
© 2011 Handicom, NL
Page 15
Manual
SfW Multiple Choice
6.
Other options
6.1
Choose a language
2011
Click on Options – Language to choose another language for the (automatic) labels. When you choose another language, only the labels that you have not changed will be translated into the new language. Tip: if the labels are not visible, you can change the settings of the exercise to make them visible.
6.2
Synthesizer settings
Select Options – Synthesizer, in the menu. A dialog will open where you can select one or two speech synthesizers and one or two voices.
• • • • •
Depending on the engine and the voice of your choice, you can change a number of voice parameters: volume rate (speed) pitch (central voice frequency) voice dynamics (frequency alteration) aspiration
If you use a so-called ‘clipboard reader’, no voice can be chosen. This also means it is not possible to change the voice by setting the parameters. Notes: The 16-bit versions of the InfoVocs can be used, but they function like a clipboard reader; the text is copied to the clipboard and then sent to the speech synthesizer. The name and settings of the speech synthesizer(s) will be stored in the computer’s registry.
6.3
Run the program with one exercise
To run Multiple Choice with one exercise and for a specific player, you have to use command line parameters. Place a shortcut to Multiple Choice on your desktop. Rightclick on the icon and choose Properties. On the second tab card (Shortcut) you will find the Target. First type a space behind the name of the executable, then type the name of the exercise and/or the player, both separated by a space. Name of the player Type /n= followed by the name of the player, for instance /n=John. If you want to use a space within the name, you must place the parameter between inverted commas: “/n=John Brown”. File name of the exercise Type the file name (plus extension) of the exercise including the name of the drive and subdirectories. If you want to use a space within the name, you must place the parameter between inverted commas: “c:\program files\handicom\symforwin\documents\demo.mco”. If the exercise is located in the same directory as the executable (SfW_MC.exe) you can leave out the name of the drive and subdirectories; the file name is enough. If the exercise is located in a subdirectory of the directory where the executable is located, you can type .\ followed by the name of the subdirectory (or subdirectories) and the file name. When you run the program with a file name as command line parameter, it will close automatically when the player has finished the exercise and you have closed the final reward screen by clicking on the OK button. If you use Alt + F10 in the meantime, the program won’t close down. Page 16
© 2011 Handicom, NL
Manual
SfW Multiple Choice
2011
Tips: • The sequence of the parameters is not important. • Separate the parameters with a space (for example, /n=john c:\mc\tellen.mco). • You can place every parameter between inverted commas, but it is not obligatory (unless you use spaces within the file name or the name of the player).
© 2011 Handicom, NL
Page 17