SRD 220
INSTRUCTION MANUAL NÁVOD K OBSLUZE
PORTABLE PLL FM RADIO WITH USB/MICROSD PLAYER PŘENOSNÉ PLL FM RÁDIO S USB/MICROSD PŘEHRÁVAČEM
NÁVOD NA OBSLUHU
PRENOSNÉ PLL FM RÁDIO S USB/MICROSD PREHRÁVAČOM
HASZNÁLATI ÚTMUTATÓ
HORDOZHATÓ PLL FM RÁDIÓ USB/MICROSD LEJÁTSZÓVAL
INSTRUKCJA OBSŁUGI
PRZENOŚNE RADIO FM PLL Z ODTWARZACZEM USB/MICROSD
CONTENTS CONTROL LOCATION ............................................................................................................................2 OPERATING INSTRUCTION ..................................................................................................................3 SPECIFICATIONS ...................................................................................................................................6 OPERATING INSTRUCTION ..................................................................................................................7
EN - 1
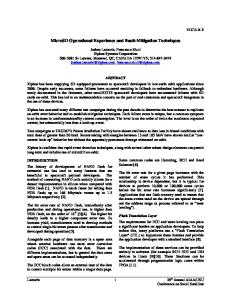
CONTROL LOCATION
1. 2. 3. 4. 5. 6. 7. 8. 9. 10. 11. 12. 13. 14. 15. 16. 17.
ON / STANDBY FUNCTION / TIMER SET PROGRAM / CLOCK SET / USB PLAY PAUSE BUTTON PRESET – / USB PREVIOUS BUTTON PRESET + / USB NEXT BUTTON VOLUME VOLUME + TUNING – / 10 – TUNING + / 10 + LCD DISPLAY AUX IN BATTERY COMPARTMENT COVER ROD ANTENNA CARRYING HANDLE SLEEP / SNOOZE USB CONNECTOR MICRO SD CARD SLOT
EN - 2
OPERATING INSTRUCTION Battery Supply Open the battery compartment and insert as indicated in the compartment three Batteries, type C. For clock backup, insert three 1.5 V type C batteries into this compartment as shown.
Mains Supply Connect the mains lead to the wall socket. The mains Supply is switched on. To disconnect the set from the mains completely, withdraw the mains plug from the wall socket.
Setting The Clock 1. 2. 3. 4. 5. 6. 7. 8.
Check the radio is switched off. Press CLOCK SET for 3 seconds on the front panel to start clock setting. Press Tuning + button for 12-hours/24-hours selection. Press CLOCK SET on the front panel to hour setting. To set the hours, press TUNING + or TUNING - while the display is still flashing. Press CLOCK SET on the front panel to minute setting. To set the minutes, press TUNING + or TUNING - while the display is still flashing. Press CLOCK SET on the front panel to complete the clock setting.
Setting The Alarm 1. 2. 3. 4. 5. 6.
Check the radio is switched off. Press TIMER SET for 3 seconds on the front panel to start alarm setting. To set the hours, press TUNING + or TUNING - while the display is still flashing. Press TIMER SET on the front panel to minute setting. To set the minutes, press TUNING + or TUNING - while the display is still flashing. Press the TIMER SET button on the front panel to select the alarm sound from the following options: bb (Buzzer), rAd (Radio) or USB(USB memory). The alarm source is changed using the PRESET+ button. 7. Press TIMER SET on the front panel to complete the alarm setting. Remark: Press TIMER SET to enable / disable the alarm function. To make sure the alarm icon is switch on if alarm function is in using,
Snooze Function 1. When your alarm sounds, you can press the Snooze Button to turn off the alarm temporary for 9 minutes. The radio will then turn on again. 2. Snooze can be repeated until the ALARM Button is pressed.
Sleep Function 1. Check the radio is switched off. 2. Press the SLEEP Button to select a time. For example, when the LED display shows 15 minutes. The radio turns on and then turns off automatically after 15 minutes. 3. To select a longer playing time, press the SLEEP button to select 15 / 30 / 45 / 60 / 75 / 90 minutes. 4. To turn off the radio at any time, press the ON / STAND BY Button.
EN - 3
Radio 1. 2. 3. 4. 5. 6.
Press ON / STAND BY to switch on the radio. Press FUNCTION button to listen to radio. In radio mode, the display will show frequency information about the radio station. Select your station by using TUNING + or TUNING – Adjust the sound with VOLUME. To switch off the radio, press ON / STAND BY once.
Tuning Manual tuning Press TUNING + or TUNING – briefly, once or more until the right frequency is found. Automatic tuning 1. Press and hold down TUNING + or TUNING – until the display frequency starts to run. 2. When a station of sufficient strength has been found tuning stops, or you can stop automatic tuning by pressing TUNING + or TUNING – again.
Presets You can store the frequencies of up to 30 radio stations. A stored frequency can be erased from the memory by storing another frequency in its place. 1. 2. 3. 4. 5. • •
Press PROGRAM once to enter programming mode. Select your wave band and tune to your desired station (See TUNING). Press PROGRAM once again to confirm the selected station. Press PRESET + or PRESET – to select the desired memory location. To listen to a preset station: select your waveband; press the PRESET + or PRESET – for selecting your desired station.
To improve reception: -
For FM, pull out the telescopic aerial. To improve FM Reception incline and turn the aerial, reduce its length if the FM-signal is too strong (very close to a transmitter).
Volume Adjust the sound with the controls VOLUME + or VOLUME You can connect mobile or any other external device to 3.5mm jack.
USB, MICRO SD CARD PLAYBACK Able to decode and playback all MP3 files which stored in the memory media with USB connector, MICRO SD Card Slot. 1. Select FUNCTION to MP3. 2. Before connecting the USB media to the unit, make sure the port is in correct direction and will connect. Or insert MICRO SD Card straightly without bending. 3. The system will automatically start reading the MP3 files in the USB Storage Media, MICRO SD Card. 4. Press USB MICRO SD PREVIOUS/PLAY/NEXT Buttons for Previous / Play / Next FUNCTION.
EN - 4
Wrongly connect the USB Storage Media or MICRO SD Card upside down could damage the unit or the USB Storage Media or MICRO SD Card. A locked MICRO SD Card cannot detected or playback. The USB slot supports a USB memory capacity of up to 16 GB. MICRO SD slot supports the max. capacity of the card 16 GB.
EN - 5
SPECIFICATIONS FM range: Speaker: Power Output: Battery power supply: AC Operate: Consumption: Dimensions: Weight:
87.5 – 108 MHz 3.5 inches, 8 Ohm dynamic speaker 1 W RMS DC (3 x 1.5V type C) AC 230 V ~ 50 Hz 5W 210 x 138 x 45 mm 720 g
EN - 6
OPERATING INSTRUCTION 1. For AC operation, make sure the voltage is compatible. Always use the provided AC power cord; never use other AC power cord. For DC operation, simply insert three batteries type C. 2. Always disconnect the AC power cord from the AC power source when it is not in use or when DC power is operating. 3. Do not leave the batteries in the compartment for a long time. Remove the batteries to avoid leakage and damage. 4. Do not expose the unit to extreme temperature nor high humidity to ensure normal functioning for a long lifetime. For instances, never place the unit in bathing areas nor around stoves and radiators. 5. If you find the unit is not working properly, please take it to your nearest services centre. Do not attempt to repair by yourself. Warning To prevent fire or shock hazard, do not expose the unit to rain or moisture. To avoid electrical shock, do not open the cabinet, refer to service agent or qualified engineer only.
EN - 7
INSTRUCTIONS AND INFORMATION REGARDING THE DISPOSAL OF USED PACKAGING MATERIALS Take the packaging material to a designated municipal waste facility. DISPOSAL OF USED ELECTRICAL AND ELECTRONIC EQUIPMENT This symbol on products or original documents means that used electric or electronic products must not be added to ordinary municipal waste. For proper disposal and recycling, take these products to designated collection points. Alternatively, in some European Union states or other European countries you may return your appliances to the local retailer when buying an equivalent new appliance. Through the correct disposal of this product you will help retain valuable natural resources and prevent potential negative effects on the environment, which could result from its incorrect disposal of waste. Ask your local authorities or collection facility for more details. In accordance with national regulations penalties may be imposed for the incorrect disposal of this type of waste. For business entities in European Union states If you want to dispose of electric or electronic devices, ask your retailer or supplier for the necessary information. Disposal in other countries outside the European Union This symbol is valid in the European Union. If you wish to discard this product, ask your local authorities or retailer about proper disposal. This product meets all the basic requirements of EU directives that apply to it. Changes to the text, design and technical specifications may occur without prior notice and we reserve the right to make these changes.
2015
08/2015
EN - 8
EN Warranty conditions Warranty card is not a part of the device packaging. This product is warranted for the period of 24 months from the date of purchase to the end-user. Warranty is limited to the following conditions. Warranty is referred only to the customer goods using for common domestic use. The claim for service can be applied either at dealer’s shop where the product was bought, or at below mentioned authorized service shops. The end-user is obligated to set up a claim immediately when the defects appeared but only till the end of warranty period. The end user is obligated to cooperate to certify the claiming defects. Only completed and clean (according to hygienic standards) product will be accepted. In case of eligible warranty claim the warranty period will be prolonged by the period from the date of claim application till the date of taking over the product by end-user, or the date the end-user is obligated to take it over. To obtain the service under this warranty, end-user is obligated to certify his claim with duly completed following documents: receipt, certificate of warranty, certificate of installation. This warranty is void especially if apply as follows: Defects which were put on sale. Wear-out or damage caused by common use. The product was damaged by unprofessional or wrong installation, used in contrary to the applicable instruction manual, used in contrary to legal enactment and common process of use or used for another purpose which has been designed for. The product was damaged by uncared-for or insufficient maintenance. The product was damaged by dirt, accident of force majeure (natural disaster, fire, and flood). Defects on functionality caused by low duality of signal, electromagnetic field interference etc. The product was mechanically damaged (e.g. broken button, fall). Damage caused by use of unsuitable media, fillings, expendable supplies (batteries) or by unsuitable working conditions (e.g. high temperatures, high humidity, quakes). Repair, modification or other failure action to the product by unauthorized person. End-user did not prove enough his right to claim (time and place of purchase). Data on presented documents differs from data on products. Cases when the claiming product cannot be indentified according to the presented documents (e.g. the serial number or the warranty seal has been damaged). Authorized service centers Visit www.sencor.eu for detailed information about authorized service centers.
EN - 9
EN - 10