18
CHAPTER 3
JOINING OF THERMOPLASTICS BY ULTRASONIC WELDING
3.1
JOINING OF PLASTICS
As discussed in the previous chapter joining of thermoplastics needs new techniques as their use is spread to different sections of industries. There are a variety of methods available for joining plastic parts. These include mechanical fasteners, adhesives, and welding. Mechanical fasteners are quick and are suitable for all materials, but they introduce stress concentrations in the parts. Adhesive bonding give good properties, but is relatively slow and can be difficult to handle, and introduces a third material (adhesive) between two parts (adherents). Welding is relatively fast, easy and reliable. The welding of plastics is confined to the thermoplastics as these materials can be melted or softened by the application of heat without degradation. The process is preferred to other methods of joining because it does not introduce stress concentrations or any new material.
The welding techniques available for plastics can be divided into two groups (Stinchcomb 1989): those in which heat is generated by mechanical movement between the parts to be welded (e.g. ultrasonic, friction and vibration welding) and those which involve an external heating source (e.g. hot gas, heated tool and resistance welding). Of these processes, ultrasonic welding is the most suitable process for mass production applications.
19
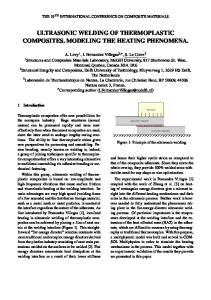
In ultrasonic welding, energy is rapidly transmitted through the plastic, concentrating at the interface between the two parts to be joined (Cary 2002). The process is rapid, clean, and versatile, does not require skilled operators, is readily automated, produces excellent joint integrity, and is applicable to many of the thermoplastic materials. A typical ultrasonic welding process starts when a power supply changes 50Hz of electrical energy into high ultrasonic frequency of 20 KHz to 40 KHz. To transform this electrical energy into mechanical energy, a converter- a lead zirconate titanate electrostrictive element, expands and contracts at the resonant frequency. The converter is coupled to the mechanical impedance transformer called a horn. The horn transmits the energy to the joint area where frictional heat is produced to melt the plastic momentarily, causing it to fuse together. A pneumatically activated press applies pressure to the part to be welded. The different stages of ultrasonic welding process are shown in Figure 3.1. In phase 1, the horn is placed in contact with the part, pressure is applied, and vibratory motion is started. Heat generation due to friction melts the energy director and it flows into the joint interface. The weld displacement begins to increase as the distance between the parts decreases. In phase 2, the melting rate increases, resulting in increased weld displacement, and part surfaces meet. Steady-state melting occurs in phase 3 as a constant melt layer thickness is maintained in the weld. In phase 4, the holding phase, vibrations cease, maximum displacement is reached and intermolecular diffusion occurs as the weld cools and solidifies. Ultrasonic welding processes are further classified into two conditions, namely near field and far field (Figure 3.2(a) and 3.2(b)). The near field welding takes place when the ultrasonic welding tool is located at a distance less than 6mm (approximately) from the joint interface, while far field takes place when the horn is at a distance which is more than 6 mm (approximately ) from the joint interface.
20
Figure 3.1 Different stages of ultrasonic welding
(a)
(b)
Figure 3.2 (a) Near field and (b) Far field welding
In near field welding, the vibrating horn is applied very close to the weld interface. Near field welding is necessary for welding materials which are poor conductors of ultrasonic waves. This is the case with plastics which have a low modulus of rigidity and have little capability of transmitting vibrations and dampen the amplitude of motion at a small distance from the point of propagation. Near field welding is especially useful for joining
21
materials with poor acoustical transmission properties. The technique of near field welding requires that ultrasonic welding tool adapts, almost exactly, to the contour of the joint to be welded. In far field welding, the horn is not applied in the immediate vicinity of the location of weld. The amplitude of vibration at the welding interface depends on the material as well as distance between the vibrating tool surface and the location of weld. The success of this technique depends essentially on the ability of the materials to propagate vibrations. Excellent results can be obtained with polystyrene and ABS, as these are rigid materials with high modulus of elasticity. The technique of far field welding permits large dimensions of parts. Most of the thermoplastics exhibit characteristics suitable for ultrasonic welding. These include the ability to transmit and absorb vibration, relatively low melting temperatures and low thermal conductivity to facilitate the local concentration of heat. Far field welding, where melting takes place at some distance from the contact with ultrasonic horn, works best on rigid, amorphous plastics. Soft plastics and porous plastics have high damping and they are mainly suitable for near field welding. 3.2
TYPICAL APPLICATIONS Ultrasonic assembly is the method of choice for many applications
in the automotive, appliance, medical, textile, packaging, toy and electronic applications (Table 3.1). The basic advantages of ultrasonic assembly - fast, strong, clean and reliable welds - are common to all markets. However, each market has specialized needs that they rely on ultrasonic assembly to meet.
22
Table 3.1 Applications of ultrasonic welding
Appliance In this high-volume market, hermetic, strength and also cosmetic appearance are important. Applications include: steam iron, pump housing, vacuum cleaner wand, and dishwasher spray arm. Automotive Hermetic seals in applications such as lenses, filter and valves. Other applications include: glove box door, instrument cluster, air diverter and mass airflow sensor. Business
"Clean" assemblies with reduced particulate matter are produced on information storage discs. Other applications include the assembly for ribbon cartridges, and audio and video cassettes.
Consumer Precision welding, staking and forming operations are used in the manufacture of the Swatch (quartz watch). Electrical
Multiple staking and inserting applications are often automated for high-volume production requirements with consistent reliability. Applications include: terminal blocks, connectors, switches (e.g. toggle, dip, rotary quick and diaphragm), and bobbin assemblies.
Medical
Non-contamination and the ability to be operated in a clean room are as important as the strength of the weld. Reliable, repeatable assemblies for critical life-support devices are produced with new capabilities in process control. Applications include: arterial filter, cardiometry reservoir, blood/gas filter, face mask and IV spike/filter.
Packaging
For good cosmetic appearance, ultrasonic assembly provides tamper-evident seals for blister packs. Applications include: condiment dispenser, blister package, juice pouch, juice carton and plastic coated paper cups.
Toys
In this highly competitive industry, the elimination of adhesives, screws and solvents, or other consumables is a bonus added to strong, safe and flash-free assemblies.
23
3.3
ULTRASONIC WELDING OF THERMOPLASTICS
Ultrasonic welding is a quick and efficient method of welding thermoplastics. The process has widespread industrial use in the last 25 years.
3.3.1
Overview
Ultrasonic welding, as described earlier (Jeffus 1999), is a bonding process in which high frequency ultrasonic vibrations are used for joining thermoplastic materials. The parts to be joined are held together under pressure and are then subjected to ultrasonic vibrations, usually at a frequency of 20 kHz. The consequent alternating stresses generate heat in the plastic and if the components are properly designed this heat can be localized at the joint where heat generation is by intermolecular friction. The ability to weld a component using ultrasonic is governed by the design of welding equipment, the mechanical properties of the material to be welded, the design of the components and welding parameters.
Ultrasonic welding is a very widely used technique for joining plastics because it is easily automated and it is very fast (Gibson 1997). Weld times of less than one second are typical. It must, however, be added that the molded part and the process must be precisely tailored to each other, since the shape of the part influences the welding process. The careful design of components and jigs and fixtures is required. So it is the most suited to mass production applications. Ultrasonic welding is a flexible technique that can be used in small lot size production as long as the fixturing is designed to be flexible. It is applicable to both amorphous and semi-crystalline thermoplastics. In some cases, the technique can be used to bond dissimilar materials if their welding temperatures are within 300F and their composition is compatible.
24
3.3.2
Ultrasonic Welder
Ultrasonic plastics welding machine (welder) typically consists of the power supply (generator), transducer, booster, horn, control system and fixture to hold the components (Little 1996). The details are shown in Figure 3.3. The power supply (generator) generates high frequency electrical power from a conventional supply. The ultrasonic transducer requires a special electrical power supply for operation. Standard electrical power has a frequency of 50-60 Hz. The transducer on the other hand, operates at much higher frequencies, 20 kHz. Thus, a frequency converter is required between a standard electrical power source and the transducer. The power supply converts line power into the high frequency electric power which drives the transducer.
The power supplies are normally rated in watts of output power based on the measurements taken at the output surface of the welding horn while under load. At 20 kHz, units in the range 150 to 3200 watts are commercially available. The unit has a number of controls and indicators allowing the user to set parameters that control the weld. The unit provides visible indications on the front panel.
The transducer is the device that converts electrical energy to mechanical vibrations. In the transducer, higher efficiency can be obtained with piezoelectric ceramic materials. These man-made ceramic materials that have high dielectric constraints were found to exhibit strong piezoelectric qualities after heat treated while under the influence of a D.C. electric field.
25
Pneumatic Cylinder
Converter
Booster Horn Work piece Fixture Anvil Generator Control
Figure 3.3 Ultrasonic welding setup
When a piezoelectric crystal is placed in an electric circuit such that its electric axis is parallel to its thickness, and an electromotive force is applied to the crystal, the crystal will change its thickness. Putting an alternating voltage of a given input frequency across the crystal will cause it to alternately expand and contract (Figure 3.4) at the input frequency, thus producing a vibration or acoustic wave. When excited at a frequency equal to its resonant frequency, the crystal vibrates with maximum displacement.
26
a. Compression
b. Expansion
c. Oscillation
Figure 3.4 The effect of an alternating voltage on piezoelectric crystal
The booster is a mechanical amplifier or attenuator for the vibration amplitude. It transmits the mechanical vibratory energy to the horn and transforms the vibration amplitude delivered by the transducer to the value required at the horn. Various boosters are machined of aluminum and produce a particular deflection (amplitude) ratio based upon welding requirements. Seven standard boosters, color coded or engraved for ease of identification (in Table 3.2) are available to increase or decrease the amplitude. For parts of one inch (25.4mm) diameter or greater, moderately high amplitude booster is used (gold-color). For smaller parts a booster with color green is used. High gain booster (such as silver and black) in combination with high gain horns can result in the horn cracking. Much of the work of both applications and tool engineering professionals in ultrasonic plastic welding industry is concentrating on one task: assuring that there will be sufficient amplitude at joint area to produce the desired effect without doing damages to the other area of the assembly. It is this balancing act that lies as the backdrop for each decision made in the development of an application feasibility report and in the development of tooling that will be both functional and durable. The horn designer may pay particular attention to designing a tool that will produce the desired amplitude without fracturing.
27
Table 3.2 Standard boosters
Color
Gain
Amplitude Effects
Black
2.50
increases
Silver
2.00
increases
Gold
1.50
increases
Brown
1.25
increases
Green
0
No change
Purple
0.75
Decreases
Blue
0.50
Decreases
The horn amplifies and focuses the mechanical energy produced by the transducer and imparts it to the work piece (Sacks and Bohnart 2005). It also transmits the clamping force to the work piece. The horn is made from materials which are wear resistant and which transmit ultrasonic waves easily. The energy of vibrations is non-uniformly distributed along the length of the horn with velocity/amplitude greater at the tip of the horn than at the booster end. The design of a horn involves a lengthy mathematical exercise.
Horn is the key component for ultrasonic welding to produce sufficient amplitude at joint area. The welding horn has two functions and they are to (i)
introduce ultrasonic vibrations into parts being welded and
(ii)
apply pressure to form a weld once joint surfaces have been melted.
Plastic parts represent a load or impedance to the transducer. The welding horn serves as a means to match the transducer to the load and is sometimes called an impedance matching transformer. Matching is
28
accomplished by increasing amplitude (hence velocity) of vibrations from the transducer. Amplification or gain is one factor in establishing the design of welding horn. As very high amplitudes predominate in the welding of plastics, the stress on horn is considerable. It means that only materials with a high alternating impact strength and low absorption can be used. The alloys of titanium (TiAlV64 with sound velocity 4900±100 m/s) and aluminum (AlCuMg2 with sound velocity 5000±100 m/s) are found to be the best. Both these alloys have great stability and distortion-free operation. They can withstand loads up to 40µm amplitude at 20 kHz. At higher frequencies lower amplitudes are employed. The design of horn is critical. At one end it must be shaped to focus energy into the work piece while at the other end it must match the transducer closely. The horn must be resonant at the operating frequency; i.e.it is half a wave length long. Amplitude transformation (Table 3.3) is achieved by reducing the cross-section along the length of the horn. The common profiles of horns for amplifying the output of transducer are stepped, conical, and exponential as shown in Figure 3.5(a), 3.5(b) and 3.5(c). a)
The stepped horn is the simplest horn which consists of two sections of different but uniform cross-sectional area. This achieves the highest gain but very high stresses are generated in the nodal region which can fracture the horn. Consequently its use is limited. For this design the magnification factor is given by the end area. The amplitude magnification is limited only by the dynamic tensile strength of the horn material. This is a useful design and easy to manufacture. A gain of 16 is easily achieved in a practical horn. But stress induced is higher than other types of horns.
29
Table 3.3 Details of amplitude transformation or gain in various horns
Type of Horn
Amplitude transformation or Gain
Stepped Horn (a1-amplitude at horn end,a 2-amplitude at booster end,D1 diameter at horn end,D2 diameter at booster end)
2
D a 1 22 a2 D1
Conical Horn (a1-amplitude at horn end,a 2-amplitude at booster end,D1 diameter at horn end,D2 diameter at booster end)
a1 D2 a 2 D1
a1 D2 a 2 D1
Exponential Horn (a1-amplitude at horn end,a 2-amplitude at booster end,D1 diameter at horn end,D2 diameter at booster end)
(a) Stepped
(b) Conical
Figure 3.5 Different types of horns
(c) Exponential
30
b)
Conical Horn Simple to make but its amplitude magnification is limited to a factor of approximately four.
c)
Exponential Horn Exponential horns distribute the change in section over a long distance. So they have low internal stresses but achieve only a small amplitude increase. This design is suitable for applications that require high force and low amplitudes. This design offers higher magnification factor than the conical horn. Shape of the horn makes it difficult to manufacture but its length coupled with a small diameter at the working end makes this design particularly suited for micro applications.
The control system, which comprises a cycle timer and air pressure regulator, permits the setting and sequencing of the welding parameters.
The fixture which holds the work piece is an important component for the production of good welds. The fixture holds the work piece so that it is properly aligned with the horn. The fixture, like the assembly stand, must be as rigid as possible. If most of the vibration is not taken up by the work piece, it results in insufficient heating and a poor weld. The holding fixture assures proper alignment of the two parts being welded and prevents lateral movement during the welding cycle. If the parts are free to move because of improper fixturing, they will inevitably become marked by the horn. Uneven welding is caused by poor joint design or unequal pressure on all joining surfaces. Establishing proper alignment between the plastic surface and the horn and between the joint areas of the parts is a major requirement if consistent welding results are to be expected. The fixturing device must also
31
provide proper support to ensure uniform dissipation of energy throughout the entire weld area.
3.4
FACTORS AFFECTING ULTRASONIC WELDING
There are several factors that affect the quality of welded parts. The critical variables are joint design, weld time, amplitude, pressure and hold time. They are discussed in subsequent sections.
3.4.1
Joint Design
For any application, there are two major factors regarding design: part design and joint design. There are many variations on joint design, but the two major categories are energy director and shear joints (Oates 1996). Both promote stress at the bond line to assure that energy is concentrated at the bond line.
3.4.1.1
Considerations for joint design
A joint is designed based on the following factors. They are 1)
Material to be bonded
2)
Ultimate use of the product
3)
Ease of holding and
4)
Location of joint surface relative to horn
The joint surface should be approximately perpendicular to the vertical axis of the ultrasonic system and parallel to the face of the horn. The distance between the horn face and joint should be within 6mm of the horn face. As discussed in chapter 3 this is referred to as a near field weld. Far field
32
welding is the term used when joint is further away and is only done when plastic material can efficiently transmit the ultrasonic energy to the joint location.
The joint geometry should be tailored to the end product use. The parts must not fit so tightly before joining that they inhibit the vibration needed to induce welding. Thin cross sections may crack under the action of vibration, and delicate parts such as fine wires, may become damaged when their enclosures are welded. Obviously, the ideal conditions are not always attainable and compromises are to be made.
In order to obtain acceptable and repeatable welded joints the general design guidelines must be followed. 1)
The initial contact area between the mating surfaces should be small to concentrate and decrease the total energy (and thus the time) needed to start and complete melting. Minimizing the time the vibrating horn remains in contact with the part also reduces the potential for scuffing. Since less material is removed, there is less flash.
2)
A means for aligning the mating parts should be provided. Features such as pins, sockets and steps should be used for alignment rater than the vibrating horn or fixture to ensure proper, repeatable alignment and to avoid marking.
3)
Horn contact and placement must be considered to provide proper bearing over the joint area to direct the mechanical energy and force to avoid marking of the contact surface. There should not be any voids preventing the energy from traveling directly to the weld area.
33
There are two major types of joint designs: the energy director and the shear joint. All other joint variations can be classified under these general categories or as hybrids combining aspects of both. The details of these joints are presented subsequently.
3.4.1.2
Energy director joint
The energy director is the protruding part (Figure 3.6) on one side of the joint interface. It directs and focuses the ultrasonic welding energy to smaller contact area and has the effect of increasing welding speed and quality. The primary function of the energy director is to concentrate the energy to rapidly initiate the softening and melting of the joining surface.
The diagrams in Figure 3.7 shows time-temperature curve for a common butt joint and an ideal joint incorporating an energy director. The energy director permits, rapid welding while achieving maximum strength. Material within the director generally flows throughout the joint area. The energy director is the most commonly used design for amorphous materials, although it is used for semi -crystalline materials.
(a)
(b)
Figure 3.6 Specimen (a) without energy director (b) with energy director
34
(a) Common butt joint
(b) Joint with energy director
Figure 3.7 Time-temperature curves; butt joint and energy director Most of the researchers and industry use triangular-type energy director for simplicity in production. Rectangular shaped energy director that has an identical cross-sectional area as triangular energy director and semicircular shaped energy director is the other shape usually subjected to analysis. The standard dimensions of the energy directors are shown in the Figure 3.8a, 3.8b and 3.8c. Since energy directors act as stress risers or concentrators and the lower part is held stationary by the fixture, the energy director is subjected to large amount of alternating deformation which causes melting and welding. In special situations (as on combination of different materials), the general practice is to place the energy director on the part with the material that has the highest melt temperature and stiffness. The energy director design requires a means of alignment such as pins and sockets, aligning ribs and tongue and groove designs or fixturing.
(a) Triangular
(b) Rectangular
All the dimensions are in mm (c) Semicircular
Figure 3.8 Details of energy director joint
35
3.4.1.3
Shear Joints
An energy director type of joint design in some cases may not produce the desired results with semi-crystalline resins such as nylon, acetal, polypropylene and thermoplastic polyester. This is due to the fact that semicrystalline resins changes rapidly from a solid to a molten state and back again over a relatively narrow temperature range. The molten material flowing from an energy director, therefore, could resolidify before fusing with the adjoining interface. The weld strength in a semi-crystalline resin could be limited to the base width of the energy director. A shear joint configuration is recommended for these resins where geometry permits.
With a shear joint design, welding is accomplished by first melting the small initial contact area and then continuing to melt with a controlled interface along the vertical wall as the parts telescope together. This allows a strong structural or hermetic seal to be obtained as the molten area of the interface is never allowed to come in contact with the surrounding air. For this reason the shear joint is especially useful for semi-crystalline resins.
Shear joint uses interference fit between the walls of the parts to be joined. This necessitates the melting and moving of the molten plastic at the joint as the parts are simultaneously subjected to ultrasonic energy and downward pressure. Because a shear joint melts larger amount of material, it may require higher power and longer time than a joint made using an energy director. A carefully designed shear joint can also achieve leak proof joints. The details of a shear joint are shown in Figure 3.9 and Table 3.4.
The shear joint requires rigid side wall support to prevent deflection during welding. The walls of the bottom section must be supported at the joint by the holding fixture, which conforms closely to the outside configuration of
36
the part. The top part should have sufficient structural integrity to withstand internal deflection. Shear joint is not recommended for parts with a maximum dimension of 3.5 inch or greater, sharp corners or irregular shapes. This is due to difficulty in holding the molding tolerances necessary to obtain consistent results.
Figure 3.9 Shear joint-variations
Table 3.4
General guide lines on dimensions for shear joints with parts of different sizes
Maximum part dimension in mm
Interference per side (range) in mm
< 18
0.2 to 0.3
18 to 35
0.3 to 0.4
> 35
0.4 to 0.5
Some of the advantages and limitations of each of these joint designs are mentioned in Table 3.5.
37
Table 3.5 Advantages and limitations of energy director and shear joints
Advantages Energy director Low energy dissipation Joint Minimal part marking
Shear Joint
3.4.2
Disadvantages With crystalline materials limited use
Limited flash
Limited weld strength with some materials
High weld strength
Tight dimensional tolerance
Hermetic seal
Relatively high power dissipation
Works well with all materials
Complex fixtures are usually required
Weld Time
Weld time is the period during which vibrations are applied. The correct weld time for each application is determined by trial and error. It is important to avoid over welding. In addition to creating excessive flash which may require trimming, this can degrade the quality of the weld and lead to leaks in parts requiring a hermetic seal. Melting and fracture of portions of the parts away from the joint area may occur at longer weld times, especially at holes, weld lines, and sharp corners in molded parts.
3.4.3
Amplitude of Vibrations
The physical amplitude of vibrations applied to the parts being welded is an important process variable. Because the basic transducer delivers its power at high force and low amplitude, the amplitude must be stepped up before reaching the tool tip. The horn design usually includes amplitude
38
transformation inherent in tapering or stepping its profile down to a small diameter. When the part geometry requires a large or complex tip shape, this amplification may not be possible in horn. In this case, amplification can be conveniently achieved in most commercial systems by use of an intermediate tuned section called a booster horn. Boosters up to 2.5:1 amplification are commercially available.
Increasing amplitude improves weld in parts designed with shear joints. With butt type joints, weld quality is increased and weld time is reduced with increasing amplitude.
3.4.4
Pressure
Weld pressure provides the static force necessary to “couple” the welding horn to the plastic parts so that vibrations may be introduced into them. This same static load ensures that parts are held together as the melted material in the joint solidifies during the “hold” position of the welding cycle. Determination of optimum pressure is essential for good welding. If the pressure is too low, the equipment is inefficient leading to unnecessarily long weld cycles. If it is too high in relation to horn tip amplitude, it can overload and stall the horn and dampen the vibrations. In ultrasonic welding, low pressure is required with high amplitude and high pressure is required with low amplitude. As amplitude increases, the range of acceptable pressure decreases. Therefore, finding the optimum pressure is most critical when amplitude is high.
39
3.4.5
Hold Time
Hold time is the nominal period after welding during which parts are held together and allowed to solidify under pressure without vibrations. It is not a critical variable, in most applications; 0.3 to 1 seconds are usually sufficient for most of the applications unless an internal load tends to disassemble the parts, such as a coil-spring compressed prior to welding.
3.5
SUMMARY
This chapter discussed the joining of plastics by ultrasonic welding, details of ultrasonic welding, important variables, joint designs and horn design. The current status of research in the area of ultrasonic welding is discussed in the next chapter (literature review).