Nathan Siwak ENGL393 Assignment 2 (Final) 10-06-03
How to choose, change, and tune guitar strings on a Fender Stratocaster When you keep a set of guitar strings on a guitar for an extended period of time, they tend to rust and begin to sound dull and washed out. It is important to change your guitar strings at least monthly, especially if you use your guitar regularly. This will keep your guitar playing smoothly and your tone sounding crisp and clean.
Choosing Strings The first thing to do is choose the gauge of string to use based upon their characteristics and your playing style. The strings are usually described by the smallest string in the package. Every manufacturer is different, but these are typical examples of the types of strings you will encounter: Grade
Gauge
Description
Common Use
Light
.009"
Easy to bend, easy on fingers
Lead Guitar
Hybrid
,009" on top 3 strings, .010" on bottom 3 strings
Easy to bend for solos, but deeper tone than light grade.
Lead Guitar
Medium
.010"
Harder to bend, but "fatter" sounding Lead and Rhythm tone Guitar
Heavy
.011"
Very hard to bend, rough on fingers
Rhythm Guitar
If you are unsure about which particular grade is for you, start with the lowest grade and try increasingly heavier strings each time you change them until you find a feel and sound you're happy with.
Nathan Siwak ENGL393 Assignment 2 (Final) 10-06-03
Changing the Strings Materials Needed before You Get Started: • • •
Your Guitar Set of guitar strings Pliers with Wire cutters
Item(s) you might want to have: •
Soft cloth
If you are unfamiliar with any guitar components mentioned throughout the instructions, refer to Figure 1 and Figure 2:
Figure 1
Figure 2
1) Unplug guitar from any amplifiers or accessories. 2) Place guitar face up across your lap. 3) Locate the tuning pegs on the head of the guitar. Note: It is best to remove and replace the strings one at a time in the order specified on Figure 2. This will keep the tension on the neck uniform, and prevent future neck warpage.
2
Nathan Siwak ENGL393 Assignment 2 (Final) 10-06-03
3) Begin to loosen the first string indicated in Figure 2 with a "1", taking care to not break the corner of the nut. 4) Unwind the string completely off the tuning peg and flip the guitar over • Look for the rectangular cover on the back. The holes which can be seen through the slot are where the strings are threaded into. • From the front side of the guitar, take the excess of your string and push it into the hole that it is threaded through on the bridge. You should see the back end of the string come out of the hole Figure 3 pictured in figure 3. • Grab it from this end and pull the string completely through. • Bundle up the old string and discard Tip: Now would be a good time to take your cloth and wipe down the guitar where your string used to be, and around the pickups. This cleans up the dust and residue that can build up over time.
5) Note how the manufacturer indicates the order of strings. This may vary from manufacturer to manufacturer, so check the packaging. • Open the package and take the strings out. • Choose the string that will replace the string you just removed in step 4. 6) Flip over the guitar as in step 4. • Thread the tip of the new string into the corresponding hole for the string on the back of the guitar. • Flip guitar back over and pull the string through until the string catches; you should not be able to pull it any further. 7) Thread tip of string into tuning peg for that specific string (see Figure 2 and Figure 4) and pull until string is loosely held along neck. Note: For highest two strings, be sure to use the string guides on the head of the guitar.
3
Nathan Siwak ENGL393 Assignment 2 (Final) 10-06-03
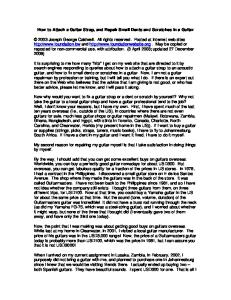
8) Wrap excess of string around the tuning peg once counterclockwise and thread tip through the tuning peg once again. You should have the string locked in place now (see Figure 4). • For some thicker strings, it may not be possible to thread through the eye twice, in this case make a kink and keep the tension on the string as you complete the next step (see Figure 5) • For lighter strings: 1. Take end of string and thread through loop created as if tying a knot (see Figure 6 on next page) Figure 5 2. Tighten the knot by grabbing the end with pliers and pulling Tip: Use pliers to pull this excess completely through the eye if it is a tight fit
Figure 4
Figure 5
4
Nathan Siwak ENGL393 Assignment 2 (Final) 10-06-03
Figure 6
9) Turn the tuning knob to make the peg rotate counterclockwise until string is taut. 10) Pluck string as you turn the knob until it is tight enough to give you a distinct tone. • Pull on string GENTLY as shown in Figure 7 below. This will stretch the string and keep it from going out of tune immediately after you tune it the first time. • Pluck string again and tighten string until you reach the same pitch the string was tuned to before stretching the first time. • Repeat these steps several times, until you notice little or no difference in pitch after stretching string.
!CAUTION! Overstretching can cause the string to snap, especially in lighter gauge strings. Be conservative in your stretching. Rule of thumb: Less is better!
11) Repeat all above steps for each string separately, replacing them in the order specified by Figure 2. Figure 7
5
Nathan Siwak ENGL393 Assignment 2 (Final) 10-06-03
Tuning Strings The most important step after changing your strings is to make sure that you have the guitar tuned properly, otherwise all of the care taken to make the guitar sound better will have been wasted when your play your first note. You will want to make sure that you have some sort of reference before you begin tuning your guitar. This means you need an electronic tuner or a tuning fork. Shown below is a tuning fork:
Most tuning forks are tuned to what is called "440", which simply means it is tuned to our "A" string. Other notes are available for tuning forks however, so be sure to check what note your tuning fork will play. If you have an electronic tuner, you won't have to worry about any of this, your tuner will tell you the note your playing. If you have a tuning fork, you will want to start with the string that is tuned to. If you have an electronic tuner, start with your low "E" string.
Using a tuning fork 1) Start with the string that matches the pitch on your fork (usually A). 2) Take your tuning fork by the handle, and hit the other end of it against something soft but firm, like your leg. This will cause the fork to vibrate and generate a pitch. 3) Place the handle of the tuning fork against your ear 4) Begin plucking the string that matches the pitch of the fork. Then adjust the string using the tuning knobs until the pitches match.
6
Nathan Siwak ENGL393 Assignment 2 (Final) 10-06-03
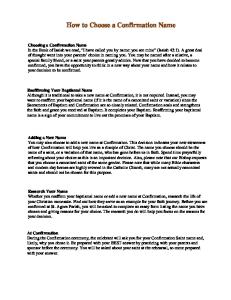
5) Starting with the bottom E string, press down on the 5th fret and pluck the string (see figure 8). • While you are plucking your E string, hit the open A string at the same time. By pressing on the 5th fret you should be playing the same tone as the open A string. • Adjust your E string until the pitches match.
Figure 8
6) Repeat step 5 on each string but adjust your open string. In other words, press the 5th fret on your A string, and pluck the open D string while you turn the tuning knob. Stop when you have played the 5th fret on your D string and tuned your G string. 7) You cannot use the same method to tune your B string. You have to play the 4th fret, instead of the 5th, on your G string while you pluck the B string open and turn the tuning knob. 8) Finally, you can use step 6 to tune the high E string. 9) Repeat steps 1-8 at least one more time to assure that your guitar is in tune with itself.
Using an Electronic Tuner 1) Pluck your low E string and turn the tuning knob until your tuner reads that you have achieved your "E" note. You should be able to tell when your pitch is above or below by the indicators on your tuner. Some ways that are used to let you know whether you are low (flat) or high (sharp): • Needles that move left and right. • Lights that light up on either side of a center light. Usually left means flat and right means sharp, but check your tuner instruction manual to be sure. 2) Repeat this for each string. Tip: You can use steps 5-8 for the tuning fork to double check your electronic tuner. 7
Nathan Siwak ENGL393 Assignment 2 (Final) 10-06-03
Audience Analysis These instructions are aimed toward a beginning guitar player. They are assumed to understand the basic parts of a guitar, the notes of each string, and other obvious guitar terms that any beginning student would (should) be acquainted with. Beginning guitar players many times do not realize the importance of changing strings, and this set of instructions is meant to not only help them change the strings, but to inform them of the benefits certain strings will have over others and how to better care for their guitar.
8