BUILDING A LAYOUT
Building a simple layout Terminal/rerailer R L
L
ROCK JUNCTION
Two 3" straights
HO Scale Scale: ¾" = 1'-0"
8
R Power pack
Wiring diagram (conventional DC)
Terminal/rerailer
Terminal rerailer
HO scale layout (4 x 8 feet)
HO scale layout (4 x 8 feet)
N scale layout (3'-6" x 7'-0")
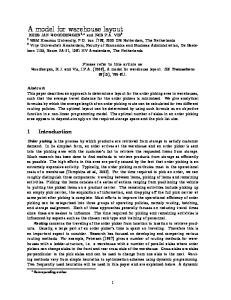
This simple track plan of the HO scale Rock Junction is a great for beginners. It’s easy to recreate and small enough to fit in a room or basement.
Planning a layout
Train sets usually come packed with an ovalPower or apack figure-8 of track. Hobby shops and other dealers sell extra track sections – straights, curves, and turnouts (sometimes called switches) that allow you to design a layout in almost any track configuration. The only limits are your imagination and the space available in your home for a layout. Some of the best track plans come from
Wiring diagram (Digital Command Control)
8
World’s Greatest Hobby
specialty books available at hobby shops and through the Internet that contain page after page of plans in different scales and in sizes from 4 x 8 sheets of plywood to baseN scale layout (3'-6" x 7'-0") ment empires. Different plans focus on difTerminal of model railroading, from ferent aspects rerailer mainline running to rural branch operations to yard switching. Your own tastes will dictate which plan is right for you.
Terminal rerailer
Once you’ve selected a plan, you’ll need to translate it into track sections. Some plans come with a “shopping list” of sections used to construct the layout. Other plans leave it up to you to study the catalogs and Websites of track manufacturers to determine what straight, curve, flextrack, and turnout sections you’ll need to build the layout and in what quantities.
Tabletop 1⁄4" plywood, 4 x 8-foot sheet
47"
96"
16"
Wing nut Lock nut Bolt-washer
Materials for table 4 x 8-foot sheet of 1⁄2" birch plywood ripped into 3"-wide by 8-foot strips (1) 4 x 8-foot sheet of 1⁄4" plywood (1) 8" lengths of 2 x 2 (4) 8-foot lengths of 1⁄4" x 11⁄4" wood molding (4) T-nuts, 1/4" (4) Carriage bolts, 1⁄4" x 2" (16) Washers, 1⁄4" (16) Lock nuts, 1⁄4" (4) Wing nuts, 1⁄4" (12) Carpenter’s glue Panel nails (1 box) 1⁄4" leg-levelers (or bolts) (4)
40" Bolt-washer-lock nut
32"
8" length of 2 x 2 Wood molding, cut to fit T-nut
Bolt-washer-wing nut
Leg-leveling bolt (or plain bolt)
18"
35"
Model railroad benchwork doesn’t need to be fancy, but it should be sturdy. Here is a sample of benchwork you could build at home.
Train tables
There are many different ways to build the support structure of your railroad, but they all fall under the general heading of “benchwork.” Benchwork can be just about anything, from a shelf attached to a wall to an unused kitchen table. Typical benchwork starts with four legs, a horizontal support frame made from 1 x 3 pine boards, and a piece of plywood screwed to the top of the support frame. The end result looks much like a table,
hence the term “train table.” Benchwork for larger layouts often requires more versatile designs to conserve material and provide more latitude for scenery construction. While they may seem complicated at first glance, they are actually easy to build. Among the most popular of these designs is “L-girder” benchwork. This openframe benchwork gets its name from the appearance of the cross-section of the
strip-wood girders, which looks like an uppercase letter L. The other parts of Lgirder benchwork are legs, joists, and risers. Horizontal L-girders join sets of legs together, horizontal joists run perpendicular to the girders and give the framework lateral strength, and risers support the track. By modifying the height of the risers you can create scenery effects that go far beyond the parameters of flat-topped tables.
www.GreatestHobby.com
9
BUILDING A LAYOUT
SECTIONAL TRACK ALL-IN-ONE TRACK
FLEX TRACK
Three types of commercially-available track. All-in-one track is sectional track with built-in roadbed. Sectional track comes in predetermined straight and curved sections. Flex track (shown from both the top and underside) can be bought in three-foot sections and can be formed to your specifications.
All-in-one track has roadbed integrated with the rails. To use, simply snap the pieces together.
Track
Many hobbyists get started with the loop of sectional track that came with their first train set. You can expand your loop with the same brand of track or you can use another brand in the same scale. Two types of sectional track are available: regular and all-in-one. Regular track features rails mounted on injection-molded plastic ties. All-in-one track includes plastic roadbed that represents the layer of rock ballast under the ties.
10
World’s Greatest Hobby
Nearly all brands of regular track will fit together with each other using metal rail joiners since the rails use the same crosssection profile. All-in-one track often uses clips on the ends of the plastic roadbed to mechanically join sections, so some manufacturers’ clips may not fit into another manufacturers’ track sections. Turnouts, sometimes called switches, are made to match the radii and length of track pieces offered by manufacturers.
Often they are described by a numeral such as 4, 6, or 8 that corresponds to the angle at which the diverging track turns away from the main line. Flextrack can be bought in bendable sections (usually 3-feet long) that allow you to construct a layout with curves different in radius from those created with standard curve pieces.
Wiring diagram (conventional DC)
Wiring diagram (conventional DC)
Terminal rerailer
Terminal rerailer
Power pack
Terminal rerailer
Power pack
Terminal rerailer
Wiring diagram (Digital Command Control)
Wiring diagram (Digital Command Control)
Terminal rerailer
Terminal rerailer
Command station Power supply Terminal rerailer Command station
Wiring
Power supply
For most model railroads, the simplest wiring system is straight DC (direct current). If your layout is fairly simple without any return loops that would create positive/ negative polarity problems, all you need are a locomotive, a power pack capable of producing variable voltages, and two wires. Your train moves at a speed determined by the track voltage. As your layout grows you’ll want to
The upper diagram illustrates direct current (DC) wiring, while the lower diagram is wired for Digital Command Control (DCC). Terminal
rerailer create electrical “blocks” of DC power. By using two power packs, you can use toggle switches to alternate which power pack is electrically connected to which block, allowing you to operate a second train on the same layout independent of the first. Advanced model railroaders often use electronic control systems, such as DCC (Digital Command Control). On DCC layouts, track voltage remains at a constant
rate. All of the locomotives contain digital receivers that do not recognize the track voltage until a control unit sends a digital signal to a specific locomotive’s unique “address,” in effect “waking up” the locomotive and telling it what to do. Since each locomotive has its own digital address, dozens of locomotives can be operated independently on one layout at the same time.
www.GreatestHobby.com
11
BUILDING A LAYOUT
Scenery
Model-railroad scenery can be as simple or as elaborate as you’d like. Hobby shops sell an abundance of scenery products to make the job easier, from rock molds and miniature trees to scenic backdrops and shrubs. Books and videos are available that
12
World’s Greatest Hobby
With the multitude of scenery products available at hobby shops, it's never been easier to detail your model railroad. Here, premade groundcover is sprinkled onto wet paint to simulate grass. show scenery making in detail. Create simple landscaping to your layout by adding grass, sand, or roads to your layout. For instance, in the photo, grass is being made by sprinkling premade groundcover (found at a hobby shop) on
top of wet paint. You could add to the scene by adding clumps of a dense groundcover to make bushes, or by “planting” a few prepackaged trees.
Structures and other details bring your layout to life. Cork is used as a base for this structure. T-pins secure the cork until the glue dries.
Structures and details
Make your layout come to life by adding structures and details. It’s never been a better time to enter the hobby. Products are available to suit nearly any scale, time
period, skill level, and price range, in either kit or presassembled form. Many kits and details are available in plastic, but you can also purchase them in wood or even brass.
As your skills improve, you may choose to make structures from scratch using your choice of materials.
www.GreatestHobby.com
13
BUILDING A LAYOUT
You can almost hear the two Wisconsin & Southern engines roll past this train depot. This HO scale scene features regional railroading in southeast Wisconsin.
Locomotives and rolling stock
You don’t have to spend too much time walking the aisles of a hobby shop to notice the variety of locomotives and freight and passenger cars (collectively known as rolling stock) available to hobbyists. Models of diesel, steam, and electric (powered by overhead wires) locomotives are available in all scales, in nearly all railroad names, and in prototype designs from the 19th century to today.
Model locomotives are manufactured from plastic, steel, alloys, and even handcrafted brass. They come with a wide range of details, depending on price. Many higher-end locomotives contain digital control receivers and some even offer remotely controlled sound and smoke effects. Models of rolling stock, too, are available in different scales, road names, and time
DVD NOW AVAILABLE Find out why model really is the World’s railroading with this exciting Greatest Hobby that teaches you instructional video to know to build everything you need layout. No prior a model railroad experience is necessary, just the desire to have fun!
• How to build the table • Easy methods for laying track • Building structur es and scenery • Wiring techniq ues • And much more!
Narrated by Michael Gross, actor and model railroad enthusiast. 60 minutes (plus 15-minute bonus video); DVD; all-digita l format; stereo sound; color.
Building your first model railroad
Everything you to know about need g your first modelbuildin railroad!
This instructional video, narrated by Michael Gross, guides you through the process of building a simple HO layout. To order, go to www.GreatestHobby.com
VIDEOS ON THE WEB
Building your first model railroad Your guide to getting
started with model
trains
It’s easy!
S: BONUtrain
model video
P4312
For more information about the World’s Greates visit www.greatestht Hobby obby.com
6 44 65 1 0 003 94 2
10003
$12
.95
N A R R A T E D
14
World’s Greatest Hobby
B Y
eras. Some are ready-to-run straight from the box while others come in kit form to be assembled. Nearly all manufacturers use wheels and couplers that are standardized following National Model Railroad Association guidelines, so locomotives and rolling stock from one manufacturer can be combined with those from other manufacturers in the same train.
M I C H A E L
G R O S S
www.GreatestHobby.com Helpful video clips of building a simple layout are available on the World’s Greatest Hobby website. Click on the link in the “Building your first model railroad video” section.