Tri-Fold Patio Door Set
Assembly Instructions
About your patio door set All products must be installed in accordance with accepted good trade practice (and in accordance with supplied instructions where applicable), and maintained in accordance with these procedures or else the warranty shall be void.
Important information
Maintenance
• We recommend that a competent tradesperson install this product. • A single person must never carry out the installation, as some components are very heavy. • The Outer-Frame Head requires fixing to the building lintel over the opening.The lintel must be capable of carrying the load of the door in all conditions. If in doubt consult a structural engineer.
Hardware in buildings is subject to deterioration from everyday use, and also environmental attack due to atmospheric and other conditions. Maintenance of hardware is even more important in severe environments such as coastal marine areas, and some industrial areas. Even stainless steel products require maintenance to prevent deterioration in some environments. We require the following minimum maintenance to be followed otherwise the warranty shall be void.
Automatic Closures and Operators • The hardware systems are designed for manual operation. Poorly adjusted automatic operator closers can import significant destructive forces to tracks, bearings and stops. Such hardware used in installations is expressly excluded from warranty terms. Care of Timber Doors and frames on site • Please check doors, frame and sill at time of delivery to ensure that they are acceptable and in good condition. If you find a component missing or damaged please inform your supplier immediately. We keep replacement components of most set parts and these can be sent out to you quickly.This will save you having to re-package and return the whole set, and allows you to continue with the project. (See separate parts list for component reference number). • When storing prior to installation the doors and frames should be kept in their packaging, handled with care and stored in a dry, ventilated building. Doors and frames should be stored flat on a level surface (not on edge or on end). • Doors should not be stored or fitted in the building until the wet trades such as plastering, painting etc. Have been completed and the room is dried out. Finishing prior to Installation • See Pre-finishing the wooden parts – Very important: We do not recommend wax or oil finishing systems such as Linseed oil or Teak oil. Trimming • This Tri-Fold door set is not designed to be trimmed on site and should be fitted as supplied. Conditions of Sale • We shall not be held responsible for any incidental work expenses arising out of or because of any defect in our product, or bad workmanship to our product. In the event of the goods having manufacturing defects and requiring replacement, our liability will be limited to the value of the door or frame component only.These notes do not affect your statutory rights with the retailer of this product.
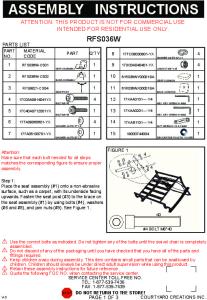
Track and Bearings: Using a spatula or similar (not your fingers), apply a small amount (typically a 1/2 teaspoon of white petroleum jelly (Vaseline) or similar lubricant to the inner lip of each side of the track. Ensure that the wheels pass through the lubricant and it is distributed evenly along the track. Put additional lubricant around bearings. Lubricant reduces wear, improves smoothness and further protects against corrosion or track and bearings. Remove all surface contaminants by wiping all visible track surfaces with a damp soft cloth and mild detergent, then wipe clean with a clean cloth. In severe environments, apply a thin film of corrosion preventative such as WD40, by wiping with a soft cloth moistened with one of these products. Stainless steel bearings are manufactured from hardening-grade stainless steel and although this material performs considerably better than plated steels, it is susceptible to corrosion unless maintained as described above. Hangers, Pivots and Brackets: A light spray application of a corrosion preventative such as WD40, followed by a light wipe with a dry cloth to remove excess, is recommended to all hangers, pivots and brackets. Exposed surfaces should first be wiped with warm soapy water and a soft rag, and then rinsed clean before applying preventative. Hinges: Wipe down the visible surfaces with warm soapy water on a soft rag and then rinse off by wiping with a clean damp rag. Application of a thin film of light machine oil or WD40 will help to maintain the original lustre of the metal finish. Be careful not to get these compounds on the timberwork itself as may cause staining. Drop bolts: Spray application of a suitable lubricant such as WD40 to the sliding pin inside the bolt and to the lock cylinder is recommended. A tube attached to the nozzle will help to concentrate the spray where you want it to go. There are access holes or slots on all drop bolt products so that this can be done without removing the locks from the doors. Frequency: The procedures mentioned above need to be carried out as often as is necessary to prevent deterioration in the installed environment, however we recommend the following minimum frequency of application: General environment 6 monthly Marine environment 3 monthly Please be careful not to get the lubricants or other liquids above on the Timber components as may cause staining of the timber. The properties of timber No two trees produce identical grains or colour of wood and this adds to the beauty of a natural product. We therefore cannot guarantee that all doors and frame components will look exactly the same in grain and colour. Warping of wood is not a defect if it does not exceed 1/4 inch (6mm) in its installed position. Maintaining the doors and frame We suggest additional treatment and finishing may be required at least once a year or sooner if there is any indication of deterioration in the wood protective finish used.
2
Tri-Fold Patio Door Set
Contents Please check the contents of the packages to ensure that all parts are present before beginning assembly.
Straight Hinge - Quantity 1 Straight Hinge fixing pack - quantity 1 pack
Timber parts Door 1 – Pivot hinge door – quantity 1 size 6' set = 1972 x 560 x 54mm size 8' set = 1972 x 760 x 54mm
Intermediate guide - quantity 1 Intermediate guide fixing pack - quantity 1 pack
Door 2 – Middle door – quantity 1 size 6' set = 1972 x 560 x 54mm size 8' set = 1972 x 760 x 54mm Door 3 – Access door – quantity 1 size 6' set = 1972 x 560 x 54mm size 8' set = 1972 x 760 x 54mm Top frame section includes aluminium top track – quantity 1
Drop bolt keyed - quantity 1 Keyed drop bolt fixing pack – quantity 1 pack Includes drop bolt cup
Side frame sections (jambs) - quantity 2 Sill bottom section includes aluminium bottom track - quantity 1 Fixing Pack - quantity 1 ________________________________________________________
Seals
T6
T8
Draft seal AQ21
2 metres x 4 1.7 metres x 2
2 metres x 4 2.3 metres x 2
Draft seal Brush seal
1.7 metres x 1
2.3 metres x 1
Draft seal AQ63
2 metres x 4
2 metres x 4
Drop bolt non keyed - quantity 1 Non-keyed drop bolt fixing pack - quantity 1 pack Includes drop bolt striker plate
Blank plate and driver pack - quantity 1 Blank plate fixing pack - quantity 1 pack
________________________________________________________
Hardware Top pivot - quantity 1 Top pivot fixing pack – quantity 1 pack
Latch striker plate - quantity 1 Latch striker plate fixing pack - quantity 1 pack ________________________________________________________
Installation Bag Contents Bottom pivot - quantity 1 Bottom pivot fixing pack – quantity 1 pack
Half offset hinges - quantity 3 Half offset hinges fixing pack - quantity 1 pack
Intermediate carrier - quantity 1 Intermediate fixing pack - quantity 1 pack
Direct Frame Fixings - quantity 18 Hardened Steel Wood Screws M5 x 100mm - quantity 4 M5 x 70mm - quantity 4 M5 x 60mm - quantity 4 Torx T30 Insert Bit - quantity 1 Pozi No.2 Insert Bit - quantity 1 HSS Long Series Drill Bit - quantity 1 6.5mm x 148mm SDS Drill Bit - quantity 1 6.5mm x 210mm Installation Instructions - quantity 1
Tri-Fold Patio Door Set
3
Pre-finishing the wooden parts After you have checked the parts list to ensure you have all the parts ready and all components are in good condition (replacement parts are available) please carry out the pre-finishing procedure specified. Please do not proceed with installation or assembly before applying high quality water-repellent sealant to all wooden parts as recommended below. It will be difficult for you to apply the sealants correctly once the product is assembled and installed. Failure to do this will cause the wooden parts to break down in UK weather conditions. • Apply at least 3 coats of water-repellent protective finish to all faces, edges and top/bottom of each door and wood frame component prior to starting assembly or installation. Ensuring the backs of each frame is well sealed. For your convenience the under side of the wood components in the sill have received a factory applied sealant coating therefore there is no need to remove from the assembled sill. Just finish the exposed wooden areas of the sill in its assembled form as supplied. • Apply a further coating of water-repellent protective finish to the back of the frame once the frame has been assembled and just prior to installation - all 4 edges.
• Apply a further topcoat of water-repellent protective finish to the tops and bottom of each door before installing the hardware or installation.The tops and bottom of each door are critical areas to finish, as this is the end grain area of the timber where moisture absorption will occur. • If any scratches are incurred during installation please give another coating.
Preparing the site ÀVÜÀÊ«i}ÊÜ`Ì
ÊrÊ�À>iÊÜ`Ì
ʳʣä
ÀVÜÀÊ«i}
i}
Ì r �À>iÊ
i}
Ì ³Ê£ä
>}>ÊÌiÀ>ViÊrʳÉÊÓ
�� �� ����
����
Óää°ÓÊ
���
�
ÓÎäÊ
Brickwork opening: When preparing the site please prepare the brickwork opening to be 10mm more in height and width than the outside assembled frame size. It is essential that all 4 internal surfaces of the brickwork be levelled before installation. Please ensure that all dimensions are correct for installation before proceeding, as the set must be installed square and level into the opening.
��
��
���
�� ��
��� �
4
���
�� ��
��� �
���
��
��
��� �
��
��
���
The Tri-fold door set outer frame sizes are as follows: T6 - 6' Tri-fold door set = 1790mm Wide x 2090.2mm High T8 - 8' Tri-fold door set = 2390mm Wide x 2090.2mm High
�
Tri-Fold Patio Door Set
Assembling the frame £ää
1
Fix right and left frame jambs to the frame head using wood screws provided. - 100mm at back, 70mm in centre and 60mm at front. Apply a bead of silicone sealant to the touching joint surfaces before assembly.
Çä Èä
2
Fix cill to the left and right jambs using the wood screws provided - 100mm at back, 70mm in centre and 60mm at front. Apply a bead of silicone sealant to the touching joint surfaces before assembly.
Left Jamb
Head Cill
Silicone seal kerf grooves before assembly
Left Jamb Çä
Èä >}>ÊÌiÀ>ViÊrʳÉÊÓ
£ää
3
Frame assembled with end plate of cill to outside of jamb.
4
Very Important. Carefully check frame is tightly fixed together and is square. Diagonals of frame musst be equal +/- 2mm. Do not proceed with the installation if the frame is not square.
Opening options
5
Choose the opening direction before installing the frame.The Tri-fold door set is reversible, with left or right opening options. Before assembling the frame or fitting the doors, choose the direction you wish the doors to open. This will determine which instructions, A or B, to follow and which door to fit first. (The Tri-fold doors always open outwards.) Right opening
À Î
À Ó
A
À £
View from outside looking inside
Left opening
À £
À Ó
À Î
B
View from outside looking inside
Follow the appropriate instuctions for your choice of opening. Follow A for Right opening. Follow B for Left opening. Tri-Fold Patio Door Set
5
Assembling the top track
A
Instructions for Right opening �ÕÕ Ì«ÊÌÀ>V
�VViÃÃ ÃÌ
,iÛiÊÌÀ>ëÀÌ>ÌÊÃVÀiÜÃ
6a
Remove the two transportation screws to release the aluminium top track from the frame head.
7a
Slide the intermediate carrier wheels into the track.
�ÌiÀi`>ÌiÊV>ÀÀiÀ
�VViÃÃÊÃÌ /«Ê«ÛÌÊLV
8a
Slide plastic top pivot into the track
9a
Re-secure the top track to the frame head using the two transportation screws only at this stage. Important - The track access slot is on the right
Assembling the top track
B
Instructions for Left opening �ÕÕ Ì«ÊÌÀ>V
�VViÃÃ ÃÌ
,iÛiÊÌÀ>ëÀÌ>ÌÊÃVÀiÜÃ
6b
7b
Slide the intermediate carrier wheels into the track.
Remove the two transportation screws to release the aluminium top track from the frame head.
�VViÃÃÊÃÌ
�ÌiÀi`>ÌiÊV>ÀÀiÀ
/«Ê«ÛÌÊLV
8b 6
Slide plastic top pivot into the track
9b
Re-secure the top track to the frame head using the two transportation screws only at this stage. Important - The track access slot is on the left
Tri-Fold Patio Door Set
Installing the assembled frame Proceed to install the assembled frame ensuring that the sill faces to the outside. It is critical that the frame is fitted square and level with tolerances as follows. Ensure the frame is installed straight and square, if necessary use shims (packers) between the frame and the � brick opening. �i}
ÌÊv
>}>ÊÌiÀ>ViÊrʳÉÊÓ
«i}®
The height (H) must be the same across the whole width of the opening, +/- 2mm. The diagonals must be the same, +/- 2mm.
ÈvÌÊvÀ>i\ÊÊ£ÇäÊ
£ää {ÇÓ°x
£ää
{ÇÓ°x
{ÇÓ°x
{ÇÓ°x {ÇÓ°x
{ÇÓ°x
{ÇÓ°x
£ää
Use the direct frame fixings as follows: 1) Use the 6.5mm HSS drill (supplied) to drill holes in frame jambs, aluminium track and steel. 2) Use the 6.5mm SDS masonry drill (supplied) to drill into brickwork. 3) Use the Torx T30 bit (supplied) to screw in the direct frame fixings.
�À>iÊvÝ}Ê«ÌÃ
{ÇÓ°x
Fix the outer frame to the brickwork through both jambs with 5 fixings at spacing shown using the direct frame fixings provided (unless the construction of your building requires more appropriate fixings to suit the individual dwelling). Countersink holes in frame.
nvÌÊvÀ>i\ÊÊÓÎäÊ
£ää
10
Fix the outer frame into the brickwork, setting it to overhang the cavity. Install sill onto a bed of silicone sealant and/or mortar.
Direct Frame Fixing
Cill Do not fix through the aluminium part of the sill as this may damage the drainage system. Mortar bed
Silicone sealant Drainage channel
Important information about direct frame fixings The Direct Frame Fixings supplied will screw directly into brickwork and up to 2.5mm thickness of steel. It is essential to use the 6.5mm drills and Tork T30 bit provided to ensure a secure fixing.
Tri-Fold Patio Door Set
7
Installing the assembled frame continued Pressed Steel Lintel -VÀiÜÊÌ
ÀÕ}
�ÕÕ /«Ê/À>V] Ì
ÀÕ}
�À>iÊ�i>` Ì �Ìi
�Ìi
�À>iÊ�i>` { �>Ý
�ÕÕ Ì«ÊÌÀ>V
RSJ �ÕÊn `>iÌiÀ ÕÊÈä }ÊLÌÊÜÌ
Ì>«iÀi`ÊÜ>Ã
iÀ
�À>iÊ�i>` { �>Ý
�ÕÕ Ì«ÊÌÀ>V
11
The aluminium top track, which is temporarily held in place with transit screws, has been pre-drilled for fixing points into the Lintel. The aluminium track must be securely fixed, through the head of the frame, into the lintel using the direct frame fixings provided. Use the direct frame fixings as follows: 1) Locate the pre-drilled holes in the aluminium top track (either 7 or 8 holes depending on width of frame). 2) Use the 6.5mm HSS drill (supplied) to drill through pre-drilled holes, through timber frame head and through pressed-steel lintel. 3) Use the 6.5mm SDS masonry drill (supplied) to drill through same holes into brickwork above lintel. 4) Use the Torx T30 bit (supplied) to screw in the direct frame fixings. IMPORTANT: Fixings must fix through aluminium track, frame head and lintel. (The fold and slide system is “top hung” so all the weight is supported from the aluminium top channel and the head of the timber frame, hence the importance of a secure fixing into the lintel, to enable the system to work correctly.) Please note that the maximum screw head that can be used is 4mm without inhibiting the performance of the sliding/ folding action. (Wheels along upper track).We have provided fixings to suit a steel lintel. For any other type of lintel such as concrete, timber or other we recommend you consult with a structural engineer before deciding on the best fixings to use. For fixing into RSJ / "I" Lintel use nuts and bolts (not provided). Do not use direct frame fixings.
Fitting the seals to the frame
12
Once the frame is fixed into place, fit the weather seals (AQ21) to the frame and the brush seal into the frame head.
-i>Ê�+Ó£ÊiÀv }ÀÛiÊÜÌ
ÃViÊÃi>>Ì
�À>iÊ�i>`
�À>iÊ�i>`
�>L
)MPORTANT �ÌÀiÊÀÊ ÕÌÌÊÌ �+Ó£ÊÃi>ÃÊ>ÌÊVÀiÀð �««ÞÊ>ÊëÌÊv ÃViÊÃi>>Ì
ÀÕÃ
ÊÃi> �+Ó£
�+Ó£ÊÃi> VÀÃÃÃiVÌ
8
�ivÌ �>L
�+Ó£
,}
Ì �>L
*>ÊÛiÜ
Tri-Fold Patio Door Set
Overview of door and hardware arrangement
13a
A
Choice
for Right opening
)NTERMEDIATE#ARRIER3ET
(ALF/FFSET(INGE3ET
0IVOT3ET
)NTERMEDIATE#ARRIER
4OP0IVOT
(ALF/FFSET(INGE (INGE
(ALF/FFSET(INGE �WITHHANDLE
)NTERMEDIATE'UIDE
"OTTOM0IVOT (ALF/FFSET(INGE
$ / / 2 �
$ / / 2 �
����� #ENTREOF0ANEL
����� ��� ����� #ENTREOF0ANEL
4OP�"OTTOM0IVOT(OLE,OCATIONS 4HETOPANDBOTTOM(INGEFLAPS HAVETHESAMESYMETRICALHOLE LOCATIONASTHEBELOWDETAIL!�
$ / / 2 �
�����
���� ����
��
��
��
����
�����
�����
����
&ITTOTHISDOOR &ITTOTHEOTHERDOOR
3TRAIGHT�/FFSET(OLE,OCATIONS !LLTHESTRAIGHT�INTERMEDIATECARRIERSET HINGESANDALLOFTHE(ALF/FFSETHINGES HAVETHESAMEHOLELOCATIONASBELOW DETAIL"�
����
���� � ���
��
��
����
��
#ENTREOF0ANEL
#ENTREOF0ANEL
�
�� ��
���
��
�
�
���
����
�
"
���
����
�
�
$%4!),! 0IVOT(INGES
��
��
����
��
!
(ALF/FFSET(INGES
)NTERMEDIATEHINGES
$%4!)," .OTTOSCALE
Note: Pivots are reversible. For this option 'A' it is necessary to take the top and bottom pivots apart to reverse them - see 16
Tri-Fold Patio Door Set
9
Overview of door and hardware arrangement
13b
Choice
B
for Left opening
(ALF/FFSET(INGE3ET
0IVOT3ET
)NTERMEDIATE#ARRIER3ET
)NTERMEDIATE#ARRIER
4OP0IVOT
(ALF/FFSET(INGE (INGE
(ALF/FFSET(INGE �WITHHANDLE
)NTERMEDIATE'UIDE
"OTTOM0IVOT (ALF/FFSET(INGE
����� #ENTREOF0ANEL
�����
#ENTREOF0ANEL
4OP�"OTTOM0IVOT(OLE,OCATIONS 4HETOPANDBOTTOM(INGEFLAPS HAVETHESAMESYMETRICALHOLE LOCATIONASTHEBELOWDETAIL!�
$ / / 2 �
$ / / 2 �
$ / / 2 �
���
����
����
�����
���� ����
�� ��
�� ����� ���
�����
�����
���� ����
&ITTOTHISDOOR &ITTOTHEOTHERDOOR
3TRAIGHT�/FFSET(OLE,OCATIONS !LLTHESTRAIGHT�INTERMEDIATECARRIERSET HINGESANDALLOFTHE(ALF/FFSETHINGES HAVETHESAMEHOLELOCATIONASBELOW DETAIL"�
� �
��
��
��
"
����
��
���
��
! ����
����
��
#ENTREOF0ANEL
�
#ENTREOF0ANEL
�� ��
���
�
�
���
����
�
��
$%4!),! 0IVOT(INGES
(ALF/FFSET(INGES
�
$%4!),"
)NTERMEDIATEHINGES
.OTTOSCALE
Note: Pivots are reversible.The pivots are delivered set up for this option 'B' - Use without change.
10
Tri-Fold Patio Door Set
Fitting the dropbolts
14
15
Fit the keyed drop bolt to the bottom of door 1 using the pre-cut position.
Fit the keyed drop bolt cup to the cill in the pre-cut position. Fit the non-keyed drop bolt striker plate to the frame head in the pre-cut position.
Fit the non-keyed drop bolt to the top of door 1 using the pre-cut position.
Use the blank plates to cover the unused pre-cut positions.
Fitting the pivot door (door 1) Before fitting door 1 thoroughly clean the top and bottom tracks
16
Reversing top pivot - Applicable to option A only. Carefully remove centre bolt from hinge barrel then re-insert from the other end.
Hinge barrel
17
Fix top and bottom pivot hinges to door 1 using screws supplied in predrilled holes
A Do not remove yellow clip at this stage Centre bolt
18
Assemble top pivot block. Slide and click cover plate onto the pivot block. Screw through cover plate into rear of access slot.
19
Remove centre part of bottom pivot
Tri-Fold Patio Door Set
20
Insert pivot base into cill channel. Drill pilot hole in channel and fix with self-tapping screw. Re-assemble centre part with pivot to outside. Drill second pilot Cill hole and fix with selftapping screw through complete unit
Pivot centre
11
Fitting the pivot door (door 1) continued
22
21
Lift door onto bottom pivot. Support door then screw top pivot centre bolt into pivot block until door swings freely.
Adjust alignment of pivot door as shown. Leave a 7mm gap between the door edge and the frame jamb.
Note: Screwing top pivot bolt in and out adjusts height.
23
Temporary supports
�>vÊvvÃiÌÊ
}i
�>vÊvvÃiÌÊ
}i ÜÌ
Ê
>`i
Fit half offset hinges to the inside edge of door 1. Fix through small centre part of hinges using screws provided in pre-drilled holes. Note: Hinge barrels and centre hinge handle to inside.
�>vÊvvÃiÌÊ
}i
Fitting the middle door (door 2)
24
Lay door 2 and 3 on their edges with the red and blue dots uppermost and the raised mouldings to the inside.
The red and blue dots on the door edges indicate approximate positions only for drilling of pilot holes to fit the intermediate carrier set
Door 3 Door 2
Make sure the doors are level.
Use Red dots for Option
A
Right opening
Use Blue dots for Option
B
Left opening
Set square
25
VERY IMPORTANT Using the intermediate carrier set as templates on the door edge, refer to drawings 13a or 13b to measure and mark the precise location of the pilot holes to fit the intermediate carrier set. Only when you are sure the exact hole position has been correctly marked, drill pilot holes 2.5mm diameter and 20mm deep in doors 2 and 3. Finally, fix intermediate carrier set to door 2 only.
12
�ÌiÀi`>Ìi V>ÀÀiÀ
26
Lift door 2 and locate intermediate guide in bottom channel. Support door on blocks then screw top carrier bolt into top wheel assembly. Finally fix door 1 and 2 together using the half offset hinges. Note: Handle to inside
�>vÊvvÃiÌÊ
}i
�>vÊvvÃiÌÊ
}i ÜÌ
Ê
>`i
�>vÊvvÃiÌÊ
}i
-ÌÀ>}
ÌÊ
}i
�ÌiÀi`>Ìi }Õ`i
Intermediate Guide
Tri-Fold Patio Door Set
Fitting the access door (door 3)
27
Attach door 3 to the Intermediate Carrier and Intermediate Guide using the predrilled holes as a guide. Use the Straight Hinge in the central position.
�ÌiÀi`>Ìi V>ÀÀiÀ
-ÌÀ>}
ÌÊ
}i
Drawings in this section show the arrangement of parts for Opening Option B
�ÌiÀi`>Ìi }Õ`i
Fitting the weather seals to the doors
28
Fit weather seals to doors as follows:
AQ21
AQ63
1 strip type AQ21 to door 1 4 strips type AQ63 to door 2 1 strip type AQ21 to door 3 �+Ó£
Where necessary, remove sections of seal to accommodate hinges and other hardware
�+ÈÎ
AQ63
AQ21
Adjusting the operation of the doors
29
Raise or lower the height of the doors by adjusting the top pivot and intermediate carrier.
Final adjustment, correct spacing 5mm Top of door to underside of head
30
Adjust the top and bottom pivots to move the doors left or right.
Tri-Fold Patio Door Set
10mm Bottom of door to cill
7mm
4mm
4mm
7mm
Door to jamb
Door to door
Door to door
Door to jamb
13
Removing the shipping clips
31
Do not remove the shipping clips until you have made all the necessary adjustments as shown in sections 30 and 31. Once you are satisfied with the adjustments you have made, remove the yellow Shipping Clip from the Top Pivot and Intermediate Carrier to lock the position. 2
1
3
Fitting the lock and handle
32
Fit lock keep into frame jamb next to door 3 using the pre-cut position.
If you have chosen opening option A then you will need to reverse the sash bolt in the lock.
Always fit keep with this edge to outside
Lift handle to fully throw the deadbolt. Remove the two screws and the sash bolt.
Fit the 'blank' keep into frame jamb next to door 1 using the pre-cut position.
33
Turn the sash bolt though 180º and insert in lock. Replace and tighten the two screws.
Sash bolt Fit the latch striker plate to the frame jamb with the curved 'leading edge' to the outside
14
It is only necessary to reverse the sash bolt if you have chosen opening option A.
A
Important This 'bump' is provided for adjustment. Use a file to reduce the 'bump' until door closes and lock holds door shut
Tri-Fold Patio Door Set
Fitting the lock and handle continued
35
34
Carefully mark out and drill the face of the door to fit the Euro cylinder and handle locating holes.
Fit lock into door 3 and secure with screws provided. The keyhole is always at the bottom.
©Ê£
iÌÀiÊi vÊ
>`i
Îx L>VÃiÌ
Ó£°x
©Ê£Î
Ó ©Ê£
£ÓÓ Óä
©Ê£Î
©Ê£Ó
36
Fitting spindle assembly. Insert the spindle end with the spring block into the exterior handle. Secure the handles with the screws provided.
37
When closing the door set, first close doors 1 and 2, securing them with the dropbolts.Then close and lock door 3.
À Ó
1 Tri-Fold Patio Door Set
2
À £
À Î
À Ó
À £
3 15
16
Tri-Fold Patio Door Set