PAPERS
The Bidirectional Microphone: A Forgotten Patriarch* RON STREICHER, AES Fellow Pacific Audio-Visual Enterprises, Pasadena, CA 91107, USA AND WES DOOLEY, AES Fellow Audio Engineering Associates, Pasadena, CA 91104, USA
Despite being one of the progenitors of all modern microphones and recording techniques, the bidirectional pattern is still not very well understood. Its proper and effective use remains somewhat of a mystery to many recording and sound-reinforcement engineers. The bidirectional microphone is examined from historical, technical, and operational perspectives. It is reviewed how it was developed and exists as a fundamental element of almost all other singleorder microphone patterns. In the course of describing how this unique pattern responds to sound waves arriving from different angles of incidence, it is shown that very often it can be employed successfully where other more commonly used microphones cannot.
0 INTRODUCTION In the beginning of electrical recording there was the omnidirectional microphone, and it was good, for it picked up sound equally well from all directions, was relatively easy and inexpensive to build, and, perhaps most important, it freed the performer from having to stare down the mouth of the large black horn that made a direct acoustical connection to the cutting head on the recording lathe. Next came the bidirectional microphone, and it too was good, for it offered the user directionality, that is, more control over what it heard. By picking up sound equally from the front and the back it enabled the performers to work on either side, facing each other. At the same time it rejected unwanted sound coming from the sides, such as other performers and room noises. It also was relatively easy and inexpensive to build. Through the generations these two begot all the rest. Their progeny has not always been as good, however, and it certainly is neither easy nor inexpensive to build them. Progress moves in mysterious ways. The omnidirectional and bidirectional microphones together can be considered as the matriarch and the patriarch of all other polar patterns. Why, then, is the bidirectional microphone the forgotten patriarch in the microphone locker? * Presented at the 113th Convention of the Audio Engineering Society, Los Angeles, CA, 2002 October 5–8. Specific facts for this paper were derived from Harry F. Olson in [2, pp. 219–228]. J. Audio Eng. Soc., Vol. 51, No. 3, 2003 March
Every sound engineer knows intuitively that a cardioid microphone picks up what it is aimed at, and this is good enough for most sound-reinforcement and recording applications. The omnidirectional microphone, which gathers sound from all directions equally, is most often used for recording, but rarely is it used for sound reinforcement because of its relative inability to reject feedback when used at a distance from the sound subject. It is these two microphone types, and their common variations, that account for nearly 90% of all microphones sold. Among the remainder are the shotgun and, yes, the bidirectional. Although the bidirectional microphone has been with us almost since the earliest days of electrical recording, it remains the least appreciated and used of the polar patterns available in the modern microphone locker because it is not well enough understood how to take advantage of its unique polar pattern. How do you handle the rear-lobe pickup? What can you do with the null plane? This is a microphone that makes you think about how to use it! 1 MICROPHONE POLAR RESPONSE –– A BIT OF HISTORY AND THE BASICS 1.1 Omnidirectional Microphone All microphones respond to the motion of air particles from which they generate analogous electric signals. Thus they are transducers, converting one form of energy (air motion) into another (electric). This may seem simple enough, but how they go about this task is anything but simple. 211
STREICHER AND DOOLEY
PAPERS
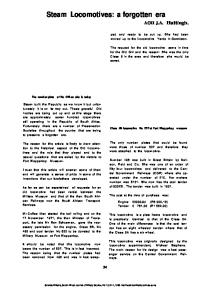
Like a barometer, the first practical microphones responded to the changes in air pressure caused by the compressions and rarefactions of a sound wave as it radiated outward from the source and impinged on the microphone diaphragm (Fig. 1). (Compressions exist where the air particle density is greater than the average pressure; rarefactions are where the density is less than the average pressure.) These were called, naturally enough, pressure microphones. A microphone diaphragm moves only when there is a difference in the air particle density between its front and back. As a sound wave reaches the microphone, it causes the diaphragm to move in direct response to these changes in air pressure. With a pressure microphone, the diaphragm covers a sealed chamber. The air within this chamber has a fixed air particle density. Thus no matter from what direction it approaches the microphone, the sound wave will cause the diaphragm to move inward if the pressure is greater, or outward if it is less than the
density inside the chamber. Because they respond equally to sound coming from all directions, pressure microphones became known as omnidirectional. The polar equation for the omnidirectional pattern is ρ � 1. This is a scalar function, because it indicates magnitude, irrespective of direction. One of the earliest commercial microphones, the Western Electric model 618A (developed in the mid1920s), was a moving-coil-type transducer. Fig. 2 shows a simplified functional schematic. A lightweight coil of wire was glued to the back of a very thin diaphragm and surrounded by a magnet. As the sound wave caused the diaphragm to move, the coil was moved similarly within the magnetic field. This is the essence of a small motor generator which, in turn, creates a very small electric current corresponding to the original sound wave. Also developed in the mid-1920s, the Western Electric model 394 and the RCA model 11A were the first capacitortype microphones. These also were pressure transducers.
+ + + + + + + - - - - - - -
+ COMPRESSION (positive pressure) - RAREFACTION
(negative pressure)
Fig. 1. As sound waves radiate outward from the source, they produce alternating compression (positive pressure) and rarefaction (negative pressure) in the air. Soundwaves can approach the diaphragm from any direction.
Motion of Diaphragm when excited by the changes in air pressure caused by Soundwaves
2
1 3
Diaphragm Voicecoil Magnet Structure Microphone Housing
Fig. 2. Simplified drawing of a typical moving-coil-type pressure sound wave omnidirectional microphone. The output is directly proportional to the motion of the diaphragm caused by the variations in air pressure as the sound wave passes by. 212
J. Audio Eng. Soc., Vol. 51, No. 4, 2003 April
PAPERS
BIDIRECTIONAL MICROPHONE
ribbon. This ribbon was suspended in a magnetic field and thus generated a small electric current in direct response to its movement. The ribbon microphone, like the movingcoil type, proved to be environmentally stable, easy to maintain, and more reliable than capacitor microphones of the period (Fig. 3). Inherent to this design is the fact that sound waves coming toward the microphone directly from either the front or the back will be picked up with equal sensitivity. The only difference will be the absolute polarity of the electric output: sounds arriving from the back will produce polarity opposite to those arriving from the front (Fig. 4). This
1.2 Bidirectional Microphone In the early 1930s a fundamentally different type of microphone was developed, the pressure-gradient microphone. Like the omnidirectional microphone, this also moved in response to the difference in pressure between the front and the back of the diaphragm as the sound wave passed by. However, in this microphone the diaphragm (which in these early versions was a very thin aluminum ribbon) was exposed on both sides. Thus as the sound wave moved past it, it created a very slight but nonetheless distinct difference in the air pressure on either side of the Simplified Side View (shown without side Pole Pieces for clarity)
Simplified Front View
Pole Pieces Ribbon Diaphragm Ribbon clamps also serve as contact terminals
Magnet Structure
S
N (a)
As the Soundwave passes the Ribbon Diaphragm the Compressions and Rarefactions result in a difference in pressure on the front and back of the ribbon.
2
1 3
(b) Fig. 3. (a) Simplified drawing of a typical ribbon-type pressure-gradient bidirectional microphone. (b) The output of the pressuregradient ribbon microphone is directly proportional to the differences in pressure induced on the front and back of the ribbon as the sound wave (compressions and rarefactions) passes by.
Positive Air Pressure
2
1 3
2
Positive Air Pressure
Positive Voltage Output
(a)
1 3
Negative Voltage Output
(b)
Fig. 4. (a) As the sound wave approaches from the front of the diaphragm, positive pressure produces a positive voltage at the output of the microphone. (b) As the sound wave approaches from the back of the diaphragm, positive pressure produces a negative voltage at the output of the microphone. J. Audio Eng. Soc., Vol. 51, No. 4, 2003 April
213
STREICHER AND DOOLEY
PAPERS
two-sided response led these to be termed bidirectional microphones. (They also are commonly called figure-ofeight microphones because of the obvious shape of their polar response.) The polar equation for the bidirectional pattern is ρ � cos θ, where θ signifies the angle of incidence of the sound as it approaches the microphone. Because it indicates both magnitude and direction, this is a vector function. The term velocity microphone also is often applied to ribbon microphones because the current in the ribbon is directly proportional to the velocity of its motion in the magnetic field. The significant operational difference between the bidirectional microphone and the omnidirectional one is that while the omni responds to sounds arriving from any and all directions with equal sensitivity, with a properly designed single-diaphragm bidirectional microphone a response null of almost �90 dB will occur at precisely 90 degrees from the principal pickup axis. Fig. 5 shows that this null exists both vertically and horizontally because a sound wave approaching the microphone along the plane of the diaphragm will produce equal pressure on both sides of the diaphragm. If there is no difference in pressure on the front and the back of the diaphragm, there will be no output signal. Because this null plane affects both sides of the diaphragm equally, the figure-of-eight polar response will be uniform with respect to frequency.
ribbon clamped in the middle. The lower half was exposed on both sides, functioning as a conventional pressuregradient pickup, and the upper half was coupled at the rear to an acoustically damped chamber so that it operated like a pressure-response pickup.1 Thus the two halves of the ribbon responded to both the pressure and the particle velocity components of the sound wave, and because both halves worked within a common magnetic field, their combined output resulted in a cardioid pickup pattern. The RCA model 77D shown in Fig. 6(b) was developed in the early 1940s and employed a rotating shutter between the ribbon and a damped chamber. This “polydirectional” microphone offered selectable patterns by adjusting the amount of damping on the ribbon to achieve an omnidirectional, a unidirectional, or a bidirectional polar pattern. The final version, the RCA 77DX, remained in production until the mid-1970s. At about the same time a very different approach was employed by Western Electric to create a cardioid micro1 The diagrams of Fig. 6 were taken from Harry Olson [1], who was head of the RCA acoustical research division from 1934 to 1967. This paper, first published in 1976 and included in the Audio Engineering Society’s anthology [2] provides detailed descriptions of many of the evolutionary developments in microphone technology.
1.3 Deriving Other Polar Patterns It is not within the scope or intent of this paper to discuss in detail the wide variety of other microphone polar patterns. Suffice it to say here that all first-order microphone patterns can be represented mathematically as some combination of omnidirectional (pressure) and bidirectional (pressure-gradient) components. In fact, the first practical cardioid microphone was developed by Harry Olson in 1931 and released in 1933 as the RCA 77A unidirectional ribbon. As shown in Fig. 6(a), it utilized a long
(a)
OR
Equal Pressure on both sides of the ribbon
2
1 3
No Output
Fig. 5. As the sound wave approaches directly along the plane of the ribbon (that is �90 degrees from the front), it produces equal pressure on both sides of the diaphragm. Because this results in no pressure gradient, there will be no output. 214
(b) Fig. 6. (a) RCA model 77A unidirectional ribbon microphone. (b) RCA model 77D multipattern ribbon microphone. J. Audio Eng. Soc., Vol. 51, No. 4, 2003 April
PAPERS
BIDIRECTIONAL MICROPHONE
phone pattern. They used separate omnidirectional movingcoil and bidirectional ribbon transducers summed electrically and enclosed within a common housing. This was the classic model 639A cardioid microphone. As shown in Fig. 7, later versions offered the user the ability to select from among multiple patterns––omnidirectional, bidirectional, and three variations of cardioid––by adjusting the relative amounts of the pressure and velocity components in the combined output. Released in 1939, the Altec (Western Electric) model 639B was the first commercial switch-selectable, multipattern microphone.
a point in space. Fig. 8 shows that by combining these two patterns equally, the result is a cardioid pattern. The polar equation for the cardioid can be expressed as ρ � 1⁄2 (1 � cos θ). In general terms, the polar equation for any first-order microphone polar pattern can be represented by the equation ρ � a � b cos θ, where a � b � 1 and the values of a and b represent the relative amplitudes of the omnidirectional and bidirectional components, respectively. Fig. 9 illustrates some of the most commonly used microphone patterns. Note that the pickup characteristics termed random energy response, distance factor, and directivity index describe how the various polar patterns relate to their sonic environment. The random energy response figures describe how each pattern compares to the omnidirectional pattern in the pickup of the entire sonic environment. For example, if exposed to the same total acoustic power coming from all directions, the output of a cardioid will be about one-third
1.4 Polar Equations for Microphone Polar Patterns As noted earlier, the polar equation for an omnidirectional pattern is ρ � 1, and the polar equation for a bidirectional microphone is ρ � cos θ. These are scalar and vector functions, respectively, and as such they describe the essential components of any sound wave measured at
>
(a)
Moving-coil Pressure Pickup
Ribbon Pressuregradient Pickup
+ +
-
2
1 3
(b) Fig. 7. (a) (Altec Western Electric) model 639B, the first commerical multipattern microphone, which derived its polar pattern by combining a moving-coil pressure transducer with a ribbon pressure-gradient transducer together in a common housing. (b) Simplified schematic diagram of the 639B. (From [3, pp. 177–178, fig. 4-66].) J. Audio Eng. Soc., Vol. 51, No. 4, 2003 April
215
STREICHER AND DOOLEY
PAPERS
that of an omnidirectional one. This is particularly useful when determining the ratio of direct to reverberant sound in a microphone pickup. The directivity index is a measure of the increased sensitivity on axis versus off axis for the various polar patterns, again stated relative to the omnidirectional microphone as the reference. The distance factor is simply another way of expressing the directivity index. Here it is stated as a measure of
the relative distance between the microphone and the sound source. For example, to achieve the same direct-toambient ratio, a cardioid can be used at 1.7 times the distance as an omnidirectional microphone. 1.5 Not All Bidirectional Microphones Are Created Equal The ribbon microphone referred to is a single-diaphragm transducer, and so are some capacitor microphones. While
ρ=1
ρ = cos θ
ρ = a + b cos θ
Fig. 8. Cardioid pattern, the result of combining an omnidirectional and a bidirectional pickup equally.
Fig. 9. Chart of first-order microphone polar patterns, showing polar diagrams, equations, and various technical data. (From [4], derived from data by Shure, Inc.) 216
J. Audio Eng. Soc., Vol. 51, No. 4, 2003 April
PAPERS
BIDIRECTIONAL MICROPHONE
there are both ribbon and capacitor microphones that offer variable patterns utilizing purely acoustical means, most modern studio capacitor microphones that provide multiple switch-selectable patterns accomplish this by combining the electric outputs of two cardioid diaphragms mounted back to back on a common back plate. The German engineers Braunmühl and Weber obtained a patent for this technology in 1935 (Fig. 10). While single-pattern dual-
diaphragm capacitor microphones were manufactured by Neumann in the early 1930s, the first commercial switchselectable multipattern capacitor microphone utilizing this design was the Neumann model U47, issued in 1949. Combining the signals from the back-to-back cardioids of a Braunmühl–Weber capsule produces the basic patterns shown in Fig. 11. In addition to the three primary patterns shown, by adjusting the relative amplitudes of
BACKPLATE LEAD
DIAPHRAGM
DIAPHRAGM
INSULATOR
BACKPLATE (FIXED ELECTRODE)
ELECTRODE LEAD
ELECTRODE LEAD
ACOUSTICAL PORTS THROUGH BACKPLATE
Fig. 10. Braunmühl– Weber multipattern capacitor microphone capsule, first described in 1935. It has two diaphragms on either side of a common back plate. Each is essentially a cardioid pattern, and when their signals are combined electrically, all first-order polar patterns may be created.
(a)
(b)
(c) Fig. 11. By adding the front and back diaphragm signals from a dual-diaphragm microphone capsule a multipattern microphone can be created. This is the principle behind the original multipattern capacitor microphone developed by Braunmühl and Weber. There are three basic polar patterns. (a) Adding no signal from the back diaphragm leaves just the front cardioid pattern. (b) Adding the back diaphragm signal in phase produces an omnidirectional pattern. (c) Adding the back diaphragm signal in reverse phase produces a bidirectional pattern. J. Audio Eng. Soc., Vol. 51, No. 4, 2003 April
217
STREICHER AND DOOLEY
these two cardioid signals, a multitude of intermediate patterns can also be generated. It is important to understand that it is not actually cardioid patterns per se that are being combined but their respective omnidirectional and bidirectional components. Also, because they are facing in opposite directions, these components are in antipolarity with respect to each other. Although these microphones are combining cardioid signals electronically, it is actually the omnidirectional and bidirectional components of these signals that are being added and subtracted to achieve all of the polar patterns produced by the dual-diaphragm multipattern microphone. When done with precision, the polar patterns thus created can be nearly as uniform as their single-pattern counterparts. When the response becomes less than ideal, it is most often as the sound wave approaches from close to the plane of the capsule diaphragms, that is, near 90 degrees off axis. Here, because of the physical construction of the microphone housing and the spacing between the two diaphragms, minute differences exist between the respective electric signals of the diaphragms, so that when they are combined, some interference cancellations occur. As a result, the off-axis response of these microphones at higher frequencies may be compromised. The omnidirectional pattern tends to become constricted at the sides, the cardioid becomes irregular, and the bidirectional pattern similarly resembles a less than perfect figure-of-eight (Fig. 12).
PAPERS
2 USING THE BIDIRECTIONAL MICROPHONE 2.1 Taking Advantage of the Nulls Most people, when using a directional microphone, just aim it at the subject, giving little thought to the overall polar response pattern. While this point-and-shoot approach might work in a simple recording or public-address (PA) situation, there is much more to consider when the going gets rough. Careful aiming of the nulls of a microphone pattern often can be more significant to the quality of the sound pickup than where the principal axis is pointing. Offending intrusive sounds such as PA, monitor, or reinforcement loudspeakers, other nearby instruments, noisy air-conditioning equipment, or other environmental noises can often be minimized by proper aiming of the nulls of the microphone. By reducing these unwanted sounds, the clarity of the pickup will increase dramatically. 2.2 Minimizing Feedback As shown in Fig. 9, the bidirectional microphone has the deepest null of all patterns, nearly �90 dB in the plane of the diaphragm with a well-designed model. It is important to realize that this null plane extends both laterally and vertically with respect to the principal axis of the pickup. Deep nulls mean good rejection of unwanted sounds, which can be most beneficial in sound-reinforcement situations, where feedback is always threatening.
Fig. 12. Polar response diagrams for the Neumann U87 multipattern capacitor microphone. (From [5, pp. 633–634].) 218
J. Audio Eng. Soc., Vol. 51, No. 4, 2003 April
PAPERS
BIDIRECTIONAL MICROPHONE
Fig. 13 shows a typical concert setup, where a performer is downstage front and a central loudspeaker cluster is directly overhead. In this situation the loudspeaker cluster will be 90 degrees off axis (vertically) to the microphone. Because a cardioid microphone is only �6 dB down at 90 degrees, the potential for feedback will be high. By using a bidirectional microphone, however, with the deep null plane aimed directly at the cluster, the potential for feedback can be almost completely eliminated. With the performer directly on axis, the rear lobe will be aimed out into the audience, which is relatively much farther away so that the inverse square law will prevail to reduce their pickup by the microphone. Similarly, if side-fill stage monitors are used because these also are at 90 degrees to the performer, a bidirectional microphone again will provide optimum rejection of these for the prevention of feedback. 2.3 Reducing Environmental Noise Out of doors or in large interior spaces such as sound stages, factories, or warehouses, environmental or general background noise tends to approach a microphone along the plane of the horizon if its source is either reasonably distant or random in nature. Because this sound wave will, in effect, produce equal pressure on both sides of the diaphragm of a vertically oriented bidirectional microphone (that is, the diaphragm is horizontal), this noise will cancel and sound sources that are closer and more directly on axis will prevail. Jim Tannenbaum, a very active film
dialog mixer in Hollywood, explained at an AES workshop how he uses this to good effect in recording actors in a noisy environment. By placing a bidirectional microphone just below the camera shot and orienting its pattern vertically, the actor’s voice is picked up by the front lobe while the rear lobe is aimed at his feet, which presumably are not making any noise at all. The result is that the environmental noise pickup is significantly less than the direct sound of the talent, producing clean and usable dialog (Fig. 14). 2.4 Minimizing Pickup of Nearby Instruments (Some Case Studies) A significant and ever-present problem in contemporary studio recording is minimizing leakage from nearby instruments into the various microphones. While gobos can be very effective in isolating performers from each other, they can introduce their own set of problems. To be effective, gobos usually are very bulky and occupy valuable floor space. They also inhibit the ability of the musicians to hear each other easily, thus requiring complex and often cumbersome headphone monitor mixes for the musicians. One solution to this problem is to use bidirectional microphones and arrange the musicians so that they are at right angles to each other, thus placing nearby musicians in the null of their neighbor’s microphone, and vice versa. Although this cannot eliminate the need for gobos entirely, it will reduce their number significantly. As a result, the studio can be less crowded, and because the musicians now will be better able to hear each other
OVERHEAD CENTRAL LOUDSPEAKER CLUSTER 90° off-axis to microphone
SIDE-FILL MONITOR
90° off-axis to microphone
SIDE-FILL MONITOR
90° off-axis to microphone
Fig. 13. By placing a bidirectional microphone so that the overhead central loudspeaker cluster is 90 degrees off axis, it will be in the null plane of the pickup. Similarly, side-fill monitors also will be at �90 degrees to the microphone. In this arrangement, maximum gain before feedback can be achieved. J. Audio Eng. Soc., Vol. 51, No. 4, 2003 April
219
STREICHER AND DOOLEY
PAPERS
directly, the need for numerous monitor headphones can also be reduced. Another common problem in both recording and soundreinforcement situations occurs when a singer also is playing an instrument, such as guitar or piano. The need to provide good isolation between the singer’s voice and the instrument usually leads to the use of separate microphones for each, but this can lead to problems of balance and phase interference between the microphones. In both of these situations the use of a single bidirectional microphone can provide the solution. Placing a vertically oriented bidirectional microphone between the performer’s mouth and the guitar and adjusting its position to achieve a proper balance between the two can provide an excellent pickup of both and, at the same time, rejection of other nearby instruments. Of course, if there is a monitor loudspeaker directly at the performer’s feet, this technique will not work and separate microphones will be required. When the performer is seated at a piano, a bidirectional microphone can be placed above and in front of his or her head, aimed such that his or her voice will be directly on axis to the front and the null plane aimed into the piano. This will provide a clean vocal pickup with maximum rejection of the piano which, then, can be miked separately. The rear lobe of the vocal microphone will be aimed upward toward the ceiling, so you need to be sure there are no hard reflections (or loudspeakers) to be heard from this area. In concert recording, when there is a chorus placed behind the orchestra, it often is difficult to keep the instruments at the back of the orchestra, usually brass or percussion, from leaking into the choral pickup. The use of bidirectional microphones, placed high above and aimed downward toward the chorus and with their null planes aimed directly at the back of the orchestra, often will solve this problem. The front lobe of the microphones picks up the chorus and the rear captures the immediate
reflection from the canopy over the stage, adding an extra degree of fullness to their sound. The exception always proves the rule. On two occasions the author has had the opportunity of recording the Symphony No. 8 by Gustav Mahler. By coincidence both times a concert tuba had been seated directly in front of the boys’ choir. Even a bidirectional microphone placed directly in front of the choir, with the null plane aimed straight down the bell of the tuba, was not sufficient to keep this very powerful low-frequency instrument from intruding on the pickup of the choir. 3 WORKING BOTH SIDES OF THE MICROPHONE Ever since the golden days of radio in the 1930s and 1940s actors have appreciated working with bidirectional microphones such as the RCA models 44 and 77. Not only do these have an unsurpassed quality with the human voice, the two-sided pickup helped to create the art of radio acting because it allowed the actors to work on either side of the microphone so that they were able to face and act to and with each other. Coming into a scene meant doing little more than starting with one’s head turned slightly away from the microphone and then turning back toward the microphone as dialog began. If a more distant approach was required, beginning the scene just a step or two back and then moving toward the microphone would produce this effect. Coming in from an even greater distance could be accomplished by starting the dialog from the side of the microphone and then moving around to be on axis. Throughout all of this, the script could be held directly to the side of the microphone, allowing the actors to read, yet minimizing the sound of the pages rustling as they were changed or, as was common practice, let fall to the floor. Vocal ensembles, such as duets, trios, and quartets, also used these microphones to good advantage by grouping around the microphone and balancing their voices to achieve a proper natural blend. No need to rely on a mix-
Actor
Vertically-oriented Bidirectional Microphone
Distant or Random Noise Source Fig. 14. The sound wave from a distant or random noise source approaches the microphone and actor as a horizontal plane wave. If the microphone is a vertically oriented bidirectional, the noise will be reduced significantly relative to the closer, on-axis actor’s voice. 220
J. Audio Eng. Soc., Vol. 51, No. 4, 2003 April
PAPERS
BIDIRECTIONAL MICROPHONE
ing engineer to make them sound right––the musicians did it themselves! For working in stereo, two bidirectional microphones, oriented at 90 degrees with respect to each other, create the classic crossed bidirectional pair (also known as a Blumlein pair, in recognition of Alan Blumlein who first proposed this technique in his seminal patent of 1934). This technique provides what many engineers have said is the most natural sounding stereophonic image of any microphone configuration because it provides an extremely even spread with precise and accurate localization within the stereo stage. As with the single bidirectional microphone, a Blumlein pair can be worked from opposite sides with equal effect. This allows multiple actors or musicians to group in the front and back quadrants of the microphone pair for a full stereophonic performance. Notice, as shown in Fig. 15, that the stereo channels in the back quadrant are reversed with respect to the front, and this must be kept in mind when arranging the stereo stage perspective. It also is important to realize that the two side quadrants are out of phase with each other, so any direct sound should be avoided here, lest it become vague and difficult to localize or cancel entirely when summed to mono.
none exhibits more than the single-diaphragm velocity microphone. In fact, it is the bidirectional component in all directional microphones that renders them susceptible to the proximity effect. Pressure microphones, on the other hand, are not subject to it. This rising low-frequency response at closer working distances can be used to good effect, in particular with male voices to give them an almost superhuman richness and depth. Like most things in audio, however, the potential tradeoff is reduced articulation or clarity, which can result from excessive bass response. The proximity effect should be treated like another form of equalization and, as such, used with care and moderation. 5 BIDIRECTIONAL MICROPHONES FOR STEREO AND SURROUND SOUND We already have introduced the crossed bidirectional microphone pair shown in Fig. 15, but there is another important stereophonic microphone configuration that Blumlein defined in his 1934 patent, the mid/side technique, and this too has the bidirectional microphone at its core. In fact, it is the bidirectional component that provides all of the directional information in this stereophonic pickup technique. The mid/side system employs two vertically coincident microphones: a forward-facing (mid) microphone and a laterally oriented bidirectional (side) microphone. By combining their signals via a sum-and-difference matrix, the
4 PROXIMITY EFFECT The proximity effect, or “bass tip-up” as the British call it, is a characteristic of all directional microphones, but 0°
45°
45°
Left +
Right +
90°
90°
Left -
Right -
180°
Fig. 15. The Blumlein microphone configuration is comprised of two coincident crossed bidirectional microphones, where the principal axis of each is coaligned with the null axis of the other. J. Audio Eng. Soc., Vol. 51, No. 4, 2003 April
221
STREICHER AND DOOLEY
left channel traditionally is the mid � side signal and the right is the mid � side. Although a cardioid is shown as the mid microphone in Fig. 16, any polar pattern can be used. (In fact, in his original research Blumlein used an omnidirectional as the mid component.) Further, the ratio of mid to side also can be varied in the matrix to adjust the width of the resulting stereophonic image. Varying both the polar pattern of the mid microphone and the mid-to-side ratio can produce a rich variety of stereophonic perspectives. By using the mid/side technique, an extremely natural and versatile stereophonic image can be produced. Not only can this rival or surpass any other conventional stereo pickup, it also is the only one that is capable of providing an almost infinite variety of stereo perspectives while remaining fully mono compatible. Carrying this principle even further, by employing velocity patterns oriented along the three cardinal axes––lateral, fore/aft, and vertical–– and then matrixing these with the pressure component, the complete spherical sound field, as captured at a point in space, can be described. This is the essence of the SoundField microphone system, developed by Michael Gerzon in the 1970s. Originally developed as a remote-controlled microphone for stereophonic and ambsionic recordings, this unique system is capable of providing a fully discrete and completely adjustable multichannel surround sound pickup. (For an in-depth discussion of the Blumlein, mid/side, and SoundField microphone techniques refer to [6]. The complete Blumlein patent of 1934 is reproduced in its Appendix.) 6 PRACTICAL MATTERS––DO’S AND DON’T’S OF RIBBON MICROPHONES As observed earlier, although both ribbon and capacitor transducers can be true velocity pickups, it is the
Fig. 16. Basic mid/side to left/right conversion. Mid � side produces the left channel and mid � side produces the right. Note that the mid microphone may be of any polar pattern. 222
PAPERS
ribbon microphone that is the more common. Most bidirectional capacitor microphones are dual-diaphragm designs. Therefore a few comments on the proper handling and treatment of ribbon microphones seem to be in order. The first, and perhaps most important, rule with ribbon microphones is, don’t connect them to a powered input. Either phantom or T power can convert a ribbon microphone instantly into a blown fuse. With T power (a remote powering system where a 12-V dc differential exists between pins 2 and 3 of the conventional XLR input connector) this damage will be guaranteed. With phantom power systems (where there is supposed to be no voltage potential between pins 2 and 3), if everything is in perfect order, there will be no problem. However, all it takes is a poor cable, a loose connector, or an intermittent short circuit to create a slight differential voltage, just enough to damage a ribbon microphone. Therefore it is strongly recommended that any powering on a microphone preamplifier input be turned off for about 5 minutes before a ribbon microphone is connected. This will allow sufficient time for the preamplifier’s internal blocking capacitors to discharge fully. A second and equally important rule is never to blow directly into a ribbon microphone to test it. “Poof, poof, is this microphone working?” Not as well as it was a minute ago. Strong air turbulence can stretch the ribbon diaphragm, and while it may not break, it will nonetheless change the tension of the ribbon and degrade the microphone performance significantly. Here the rule at hand is in fact to use the back of your hand. If you can feel the air motion on the back of your hand, do not put the microphone there unless you first provide some form of wind protection, such as a Popper Stopper.2 Obviously outdoor use requires special care so that the ribbon is not damaged by wind. Indoors, however, it is also important to avoid air turbulence. Open windows, air-conditioning systems, or even rapid movement of the microphone, such as when carried about or panned on a studio boom, all can be sufficient to stretch the ribbon. While on the subject, it should be emphasized that it is never wise to blow into a microphone, no matter what type it is. Not only does this force dirt and moisture inside, if the microphone is connected to a live sound system, this strong blast of acoustical energy, when amplified, might be sufficient to launch the loudspeaker cones right out of their boxes. Normal high sound-pressure-level (SPL) sound sources do not usually pose a problem because most ribbon microphones can handle 130-dB SPL or more without difficulty. It is only those explosive sources that produce a strong gust of air, such as an electric bass amplifier, a guitar being plugged (or unplugged) while the amplifier level control is turned up fully, a kick drum, or even a very close talking or singing voice with a lot of plosive sounds, that require special protection. Again, just apply the back-ofthe-hand test. If the microphone is stored in a cabinet or box, do not slam the door. This strong acoustic pressure 2 Popper
Stopper is a registered trademark of Shure, Inc. J. Audio Eng. Soc., Vol. 51, No. 4, 2003 April
PAPERS
impulse could be sufficient to stretch the ribbon. Remember also that most ribbon microphones contain a magnet that produces a fairly strong magnetic field. This field can attract any ferric objects toward the microphone, and, if they are small enough, they can penetrate the outer screening and work their way inside the microphone. Minute iron particles, sometimes known as “tramp iron,” exist everywhere within our environment. When in close proximity of a ribbon microphone, these can be drawn inside and over time can build up sufficiently in the magnetic gap to rub against the ribbon, causing distortion. The best prevention is just to keep the microphone covered with a plastic bag when it is not actually in use. This simple procedure also protects the microphone from the air turbulence problems discussed. When storing the microphone, common sense is all that is needed to protect it from excessive mechanical shock and air turbulence. If it will be left in storage for extended periods of time, it is a good idea to keep the microphone upright so that the ribbon is vertical. This will minimize the tendency of the ribbon to sag due to the pull of gravity. Again, it is best to keep it covered until it is being used. 7 A FEW OF THE INDUSTRY’S LEADING MIXING ENGINEERS TALK ABOUT HOW THEY USE THE BIDIRECTIONAL PATTERN When I first started recording I was lucky enough to work at a studio that had multipattern RCA 77s, and figureof-eight only 44, 74, and B&O ribbons. I used them on horns, electric guitars, lead vocals, strings, woodwinds, just about everything. More recently the Royer 121 joined my microphone cabinet as my electric guitar mike of choice. The figure-of-eight pattern works well in live tracking situations to isolate neighboring players, for instance, keeping an adjacent percussionist out of an acoustic guitar player’s microphone. I recently had a great experience with the AEA R44 on jazz guitarist Peter White’s nylon string guitar. The figure-of-eight pattern also works well with background singers who are good at balancing themselves on a single mike, such as a Neumann U87 or an AKG 414. I’ve had wonderful experiences using this technique while working with great singing groups like Poc, the Wilson Sisters, and the Nitty Gritty Dirt Band performers who understand the art of blending harmonies. The figure of eight also works superbly with solo instrumentalists. The back side does a good job of capturing the room tone of a solo sax. I’ve had good experiences with people like Grover Washington Jr., Dave Koz, Wayne Shorter, Gato Barbieri on a single mike. I’ve also used the figure-ofeight pattern as part of an AKG C-24 MS miking setup for recording strings. I’ve used this technique on sessions for Elton John, Bon Jovi, The Cult, and the Kronos Quartet. Joe Chiccarelli, Los Angeles, California, 2002 June I think my most consistent use of the figure-of-eight pattern is recording saxes and/or woodwinds in a Big J. Audio Eng. Soc., Vol. 51, No. 4, 2003 April
BIDIRECTIONAL MICROPHONE
Band setting. It helps the separation between instruments because the side-to-side rejection is important. The fact that the back is open is not really an issue because anything leaking into the back is too far away to be concerned about. In this particular case I’m using Neumann U67s or 87s. Leslie Ann Jones, Skywalker Ranch, Marin, California, 2002 June The first time I used a figure-of-eight was on a background vocal track using U67s or 87s. The singers liked the eye contact and did their own balancing on the phone monitors. The sound was cleaner, as you might expect with fewer electronics in the signal path. Next I experimented with Blumlein stereo. Using a U67, 87, or C414 pair head to head as a crossed-eight array sounded good on classical piano, lead vocals, electric guitar, and drum overheads. Figure-of-eight ribbon microphones are often my first choice now. Most of my electric guitar, bass guitar, and drum recordings are done with AEA and RCA 44s and Coles 4038s. I use ribbons almost exclusively on brass and woodwinds. A recent Brian Setzer Orchestra session in Studio A at Capitol had five saxes at the conductor’s left, four trombones in the middle, and four trumpets at his right. The musicians formed a shallow arc, and each faced a figure-of-eight ribbon set 2 to 3 feet in front. These delivered great sound and exceptional isolation. Figure-of-eight ribbons also excel as room mikes on drums. The side nulls are aimed toward the drums and the mikes are placed 10 to 12 feet apart and 6 to 8 feet out. This delivers the room sound with little direct sound. It’s similar to the sound effects trick for recording a gunshot. The weapon is fired in a 44’s side null, so the fat room sound is dominant. Jeff Peters, Los Angeles, California, 2002 June Using a pair of figure-of-eight microphones in a crossed 90 degree Blumlein pair is one of my favorite microphone techniques, especially when recording a really good choir. I’m amazed how few music-recording people are familiar with this excellent technique. I’m often asked: what is the effect you used on the choir on Michael Jackson’s “Man in the Mirror” on his BAD album? My answer is: there is NO effect on the choir! Then I explain that the recording was done with only a simple Blumlein pair. I have to admit that the rest of this winning combination was Andre Crouch’s gospel choir, one of the best in the world, and Westlake Audio’s gorgeous Studio D in Hollywood. This wonderful piece of music has a graceful, natural sounding, dynamic curve to it. From the transparent, burnished brass synthesized bells in the intro, to the Andre Crouch choir that comes in at the modulation, to the climax with the huge ending, I feel that “Man in the Mirror” is the musical centerpiece of the album. My favorite pair of Neumann M-49s, vertically coincident and angled 45 degrees to either side of the centerline, captured this great choir recording. It’s why Blumlein is one of my favorite stereophonic microphone techniques 223
STREICHER AND DOOLEY
PAPERS
and perhaps the best known single-point stereo technique. For me, figure-of-eight is really great! Bruce Swedien, Ocala, Florida, 2002 June Figure-of-eight pattern microphones were used extensively by all Capitol mixers. I could go on and on about using them. The 44 was our standard kick drum microphone for pop orchestras. The bass drum would be used with the front skin removed and a sandbag inside. The 44 was laid horizontally atop the sandbag, and this combination delivered a very tight thud sound. When doing pop-type jazz orchestras we used the 44s for sax and woodwinds, placed so that the dead sides did not pick up too much brass. In symphony work I always used a 44BX for the double bass. For Angel Classical sessions, depending on hall acoustics, I often set the forward-facing capsule on my Neumann SM69 or AKG C24 stereo microphones to figureof-eight and then used a mid/side decoder to provide variable angle control for the resultant virtual Blumlein pair. I was the only mixer who frequently used the figure-of-eight pattern on stereo mikes. The full story is quite long, but room acoustics and reverb time strongly influenced whether I used the stereo mikes in XY or whether I used them with differential circuits (M/S) to further control the balance. In the studio at Capitol I used M/S with differential balance controls a great deal. Carson Taylor, Danville, California, 2002 April
8 REFERENCES AND RECOMMENDED READINGS [1] H. F. Olson, “A History of High-Quality Studio Microphones,” presented at the 55th Convention of the Audio Engineering Society, J. Audio Eng. Soc. (Abstracts), vol. 24, p. 862 (1976 Dec.), preprint 1150, also published in Microphones [2, pp. 219–228]. [2] Microphones, An Anthology of Technical Papers (Audio Engineering Society, New York, NY, 1979). [3] H. Tremaine, Audio Cyclopedia (Howard W. Sams, Indianapolis, IN, 1969). [4] J. Eargle, The Microphone Book (Focal Press, Boston, MA, 2001). [5] C. Woolf, Ed., Microphone Data (Human-Computer Interface Limited, UK, 2001). [6] R. Streicher and F. A. Everest, The New Stereo Soundbook, 2nd ed. (Audio Engineering Asso., Pasadena, CA, 1998). 9 ASSOCIATED READING J. Borwick, Microphones––Technology and Technique (Focal Press, London, UK, 1990). M. Gayford, Ed., Microphone Engineering Handbook (Focal Press, London, UK, 1994).
THE AUTHORS
224
R. Streicher
W. Dooley
Ron Streicher received a B.A. degree in music from the University of California and an M.A. degree in communications arts from Loyola University, both in Los Angeles. Pursuing a lifelong involvement in music, his interest in audio began in 1963 while serving as a volunteer for the music department of a public radio station in Los Angeles; that avocation subsequently evolved into his career. His many broadcast projects include sound design and production of radio plays, national syndication of the Los Angeles Philharmonic Orchestra concerts, and chamber music concerts from throughout California. His work has been heard over National Public Radio and the Public Broadcasting System networks. Continuing to be involved with live music performance and production, Mr. Streicher joined the engineering staff and faculty of the Audio Recording Institute at the Aspen Music Festival and School in 1988; since 1997 he has
served as its Audio Production Manager. For eleven summers prior to Aspen, he designed and supervised concert sound reinforcement for the Philadelphia Orchestra, the Metropolitan Opera, and the New York City Opera productions at the Mann Music Center in Philadelphia. His recording projects have taken him as far afield as Karachi, Shanghai, throughout Europe, and twice to Moscow to record the Bolshoi Theatre Orchestra. He has engineered recordings for Angel, Brio, CMS Desto, CRI, Discovery, Koch International, Omega Record Classics, RCA, Pilz, Protone, and SAZ Records. He also produced two projects for the AES: the CD “Graham Blyth in Concert” and the video “An Afternoon with Jack Mullin.” A fellow of the Audio Engineering Society, Mr. Streicher just completed eleven years as the secretary of the AES and is currently president-elect. He is actively involved with the Society’s educational activiJ. Audio Eng. Soc., Vol. 51, No. 4, 2003 April
PAPERS
BIDIRECTIONAL MICROPHONE
ties and has given numerous presentations at local and international meetings. In recognition of his long-term service to the Society, he was awarded the AES Bronze Medal in 1995. ●
Wes Dooley’s speciality is on-location recording, and his experiences in the United States, Europe, Africa, and New Zealand led him to develop portable recording tools such as multichannel microphone arrays, mid/side stereo processors, stereo phase displays, and very tall microphone stands. His company is dedicated to creating products that further the art and science of recording. Ribbon microphones are what Mr. Dooley has become best known for. He has represented and serviced Coles’ 4038 ribbon microphones in the United States for the past two decades. During the 1990s he observed that RCA 44 “collectors” were taking these microphones out of circulation, making it difficult for recording studios to own or use a 44. Its rebirth became Mr. Dooley’s crusade and resulted in the AEA R44, a faithful recreation of this classic microphone. Introducing a widening circle of modern recordists
J. Audio Eng. Soc., Vol. 51, No. 4, 2003 April
to ribbon mikes has been a fulfilling task. His latest opus, the AEA R84 large ribbon geometry microphone, was introduced at the Fall 2002 AES convention in Los Angeles. Mr. Dooley and Mr. Streicher previously have coauthored two papers about stereo microphone techniques published in the AES Journal and the Stereophonic Techniques Anthology. Mr. Dooley is a fellow of the AES. He has chaired workshops on microphone techniques and mixing strategies for compatible multiple releases for cinema, broadcast, and videocassette, has presented section meetings on stereo techniques and forensic audio, and has participated on panels at many meetings of the AES and other technical organizations. A former governor and vice-president (Western Region) of the Society, he remains involved with AES standards work and currently serves on the SC-03-12 Working Group on Forensic Audio, where he heads a writing group on Forensic Audio Standards. He is also a member of the SC-04-04 Working Group on Microphone Measurement and Characterization. Also an amateur audio historian, Mr. Dooley cochaired the Audio History Room at the Fall 2002 AES convention in Los Angeles.
225