NetVault®: Backup
Hyper-V Plugin version 1.0
User’s Guide
HYV-101-1.0-EN-03 11/02/09
Copyrights NetVault: Backup Hyper-V Plugin User’s Guide Software Copyright © 2009 BakBone Software Documentation Copyright © 2009 BakBone Software This software product is copyrighted and all rights are reserved. The distribution and sale of this product are intended for the use of the original purchaser only per the terms of the License Agreement. All other product trademarks are the property of their respective owners. The NetVault: Backup Hyper-V Plugin User’s Guide is copyrighted and all rights are reserved. This document may not, in whole or part, be copied, photocopied, reproduced, translated, reduced or transferred to any electronic medium or machine-readable form without prior consent in writing from BakBone Software. THIS PUBLICATION IS PROVIDED “AS IS” WITHOUT WARRANTY OF ANY KIND, EITHER EXPRESS OR IMPLIED, INCLUDING, BUT NOT LIMITED TO, THE IMPLIED WARRANTIES OF MERCHANTABILITY, FITNESS FOR A PARTICULAR PURPOSE, OR NONINFRINGEMENT. THIS PUBLICATION COULD INCLUDE TECHNICAL INACCURACIES OR TYPOGRAPHICAL ERRORS. CHANGES ARE PERIODICALLY ADDED TO THE INFORMATION HEREIN; THESE CHANGES WILL BE INCORPORATED INTO NEW EDITIONS OF THE PUBLICATION. BAKBONE SOFTWARE MAY MAKE IMPROVEMENTS AND/OR CHANGES IN THE PRODUCT(S) AND/OR THE PROGRAM(S) DESCRIBED IN THIS PUBLICATION AT ANY TIME. © 1999-2009 BakBone®, BakBone Software®, NetVault®, Application Plugin Module™, BakBone logo®, Integrated Data Protection™, NetVault: SmartDisk™, Asempra®, FASTRecover™, ColdSpark® and Spark Engine™ are all trademarks or registered trademarks of BakBone Software, Inc., in the United States and/or in other countries. All other brands, products or service names are or may be trademarks, registered trademarks or service marks of, and used to identify, products or services of their respective owners.
BakBone Software 9540 Towne Centre Drive, Suite 100 San Diego, California 92121 866.484.2663
Table of Contents Chapter 1: Introduction
5
• About NetVault: Backup Hyper-V Plugin ........................................................................ 5 -
At a Glance ...................................................................................................................................... 5 Key Benefits ..................................................................................................................................... 5 Feature Summary ............................................................................................................................ 6 Target Audience ............................................................................................................................... 7 Recommended Additional Reading ................................................................................................. 7
• Technical Support ............................................................................................................. 7 • Documentation Updates ................................................................................................... 7
Chapter 2: Installation
9
• Deployment Overview ...................................................................................................... 9 • Installing Hyper-V Plugin ............................................................................................... 10 -
Preinstallation Requirements ......................................................................................................... 10 Install PowerShell .......................................................................................................................... 10 Installing Integration Services ........................................................................................................ 10 NVBU Server/Client Software ........................................................................................................ 11 Installation Procedure .................................................................................................................... 11
• Removing Hyper-V Plugin .............................................................................................. 12
Chapter 3: Configuration
13
• Configuring Hyper-V Plugin ........................................................................................... 13 • Configuration Process ................................................................................................... 13 - Configure from NVBU Configurator ............................................................................................... 15
Chapter 4: Backup
17
• Available Backup Types ................................................................................................. 17 • Backup Considerations .................................................................................................. 18 • Performing Image-Level Backups ................................................................................. 18 - Selecting Data for Backup ............................................................................................................. 18
4 - Finalizing and Submitting Jobs ...................................................................................................... 19
• Performing File-Level Backups ......................................................................................19 - Selecting Data for Backup ............................................................................................................. 20 - Setting File System Plugin Backup Options ................................................................................... 22 - Finalizing and Submitting Jobs ...................................................................................................... 25
Chapter 5: Restore
27
• Image-Level Restore Overview ......................................................................................27 - Restoring Image-Level Backups .................................................................................................... 27 - Recovering Image-Level Backups ................................................................................................. 28
• Restoring Image-Level Backups ....................................................................................28 -
Prerequisites .................................................................................................................................. 28 Selecting Data to Restore .............................................................................................................. 28 Setting Restore Options ................................................................................................................. 30 Finalizing and Submitting Jobs ...................................................................................................... 31
• Restoring File-Level Backups ........................................................................................31 -
Prerequisite .................................................................................................................................... 32 Selecting Data to Restore .............................................................................................................. 33 Setting Restore Options ................................................................................................................. 35 Selecting Target Clients ................................................................................................................. 36 Finalizing and Submitting Jobs ...................................................................................................... 36
Chapter 6: Troubleshooting
37
• Backup Job Fails While Using VSS Snapshot ..............................................................37
NetVault: Backup Hyper-V Plugin User’s Guide
5
Chapter 1:
INTRODUCTION
1.1.0 1.1.1
About NetVault: Backup Hyper-V Plugin
At a Glance
Key Benefits
Feature Summary
Target Audience
Recommended Additional Reading
Technical Support
Documentation Updates
About NetVault: Backup Hyper-V Plugin At a Glance NetVault: Backup (NVBU) Hyper-V Plugin (Hyper-V Plugin) gives you the confidence and flexibility needed to deploy Hyper-V Plugin and provide virtual machines (VMs) with protection from disasters, media failure, and wide-ranging data corruption. An intuitive, easy-to-use graphical user interface (GUI) gives you a single, centralized console for configuring backup and restore policies for virtual environments. Hyper-V Plugin offers granular control that minimizes downtime by letting you restore complete VM images or individual Windows files faster and more reliably. Through automatic integration with a wide range of backup devices, virtualized data can be protected and safely stored offsite to meet disasterrecovery and business-continuity goals for virtual environments.
1.1.2
Key Benefits
Increase Confidence When Deploying Hyper-V Plugin Hyper-V Plugin is flexible enough to account for a number of recovery scenarios. By relying on Hyper-V Plugin to implement your backup policies, you can focus on more critical tasks without risking your ability to recover exactly what is needed in the event of a failure. Hyper-V Plugin also empowers the storage administrator to create a comprehensive and flexible backup policy and reduces the need for scripting, which may increase the risk of syntax or human errors.
Reduce Risk with Flexible Backup and Recovery Options Hyper-V Plugin equips administrators with a powerful set of tools to simplify backup and recovery of business-critical VMs. The Volume Shadow Copy
6
Chapter 1 Introduction Service (VSS)-based backup provides a simple method to protect VMs including their applications. Full image-based backups protect the VM from failures while also providing flexibility to support test environments and disaster recoveries. Individual file backups on Windows Guest operating system (OS) offers faster backup, reduces storage utilization, server load, and the amount of data transferred over the network. Hyper-V Plugin offers the choice to restore a complete VM image or individual files. Further flexibility comes from the ability to relocate individual files to an alternate directory.
Maximize Information Technology (IT) Efficiency Hyper-V Plugin reduces administrator involvement in the recovery process while delivering faster and more reliable recoveries. Less-experienced staff can confidently initiate restores correctly and as quickly as possible, thereby reducing downtime and improving business continuity and freeing administrators from being available 24x7. Routine administrative options can be performed by less-experienced personnel allowing administrators to create comprehensive backup policies with a reduced need to understand Hyper-V Plugin internals. Hyper-V Plugin uses an automated workflow with point-and-click options for tasks such as defining backups and submitting job scheduling.
Ensure Enterprise-Class Business Continuity With offsite backups being an important part of the data-protection plan for any mission-critical application, Hyper-V Plugin takes advantage of NVBU’s fundamental integration with a wide range of backup devices. Hyper-V Plugin gives you the confidence that your virtualized environments are protected and stored offsite for disaster-recovery purposes.
1.1.3
Feature Summary
VSS-based VM backups
Full image-based backups
Full and incremental individual-file backups on Windows Guest OS
Single plugin for image-level and individual-file backups
Protection down to individual-file level
Job scheduling
Point-and-click GUI
Test-environment and disaster-recovery support
Restores of complete VM image or individual Windows files
Relocate individual files to alternate directory
NetVault: Backup Hyper-V Plugin User’s Guide
1.1.4
7
Target Audience This guide is intended for users who are responsible for the backup and recovery of VMs. Familiarity with Windows Server administration and the OS under which is running is assumed. Advanced knowledge of VMs would be useful for defining an efficient backup and recovery strategy.
1.1.5
Recommended Additional Reading
Microsoft Hyper-V: Backing Up and Restoring Virtual Machines http://msdn.microsoft.com/en-us/library/dd405549(VS.85).aspx
NVBU Documentation
NetVault: Backup Installation/Upgrade Guide – This guide provides complete details on installing the NVBU Server and Heterogeneous Client software.
NetVault: Backup Administrator’s Guide – This guide explains how to use NVBU and describes the functionality common to all APMs and plugins.
You can download these guides from the BakBone web site at the following address: http://www.bakbone.com/documentation/
1.2.0
Technical Support BakBone Software is dedicated to providing friendly, expert advice to its customers. BakBone’s highly trained professionals are available to answer questions, offer solutions to problems and generally help make the most of any BakBone software purchase. Log on to the web site for more information: www.bakbone.com/supportportal
1.3.0
Documentation Updates For late-breaking documentation updates, refer to the BakBone Software Knowledge Base. BakBone's Knowledge Base article for Hyper-V Plugin can be found at the following link: http://kb.bakbone.com/4401
8
Chapter 1 Introduction
NetVault: Backup Hyper-V Plugin User’s Guide
9
Chapter 2:
INSTALLATION
Deployment Overview
Installing Hyper-V Plugin
2.1.0
Preinstallation Requirements
Install PowerShell
NVBU Server/Client Software
Installing Integration Services
Installation Procedure
Removing Hyper-V Plugin
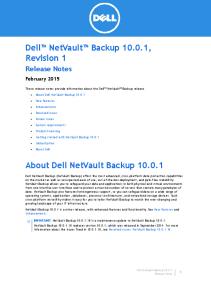
Deployment Overview Hyper-V Plugin is installed on the Hyper-V Server, which is the physical machine that hosts the VMs — it is not installed on each of the VMs that are being protected.
Figure 2-1: Deployment Overview
Virtual Machine
NetVault: Backup Server Hyper-V Plugin for Windows
NetVault: Backup Server
Hyper-V Server
Virtual Machine
Virtual Machine
10
Chapter 2 Installation
2.2.0
Installing Hyper-V Plugin Before installing Hyper-V Plugin, make sure that the following prerequisites are met on the system designated as the Hyper-V Server.
2.2.1 2.2.1.a
Preinstallation Requirements Install PowerShell The installation of the PowerShell feature is also required on the Hyper-V Server. PowerShell must be configured to allow scripts to run locally. This can be done from the command prompt or the Run command on the Start menu. Powershell set-ExecutionPolicy RemoteSigned Both PowerShell and Hyper-V Plugin can be installed from the Server Manager application.
2.2.1.b
Installing Integration Services To perform file-level backups, the Integration Services must be installed on the VM from the Hyper-V Server. 1. From the Virtual Machine window on the Hyper-V Server, select Action from the menu item, and click Insert Integration Services Setup Disk.
Figure 2-2:VM Action menu
2. When the AutoPlay dialog appears that allows installation of the Hyper-V Integration Services, click Install Hyper-V Integration Services. Figure 2-3: Autoplay dialog
NetVault: Backup Hyper-V Plugin User’s Guide
11
3. When the Installation Complete dialog appears, click Yes to restart the VM and complete the installation. Figure 2-4: Installation Complete dialog
2.2.1.c
NVBU Server/Client Software At a minimum, the NVBU Client software must be installed on the Hyper-V Server. For instructions on installing the NVBU Client software and adding the Hyper-V Server as a Heterogeneous Client, refer to the NetVault: Backup Installation/ Upgrade Guide.
2.2.2
Installation Procedure To install the Hyper-V Plugin, perform the following steps: 1. Open the Client Management window on NVBU Server (click Client Management button on the toolbar or Large Buttons panel, or select this command from Administration menu). 2. Locate the Hyper-V Server in the Clients frame, right-click it, and select Install Software from the pop-up menu. 3. In the window that appears, navigate to the location of the .npk installation file for Hyper-V Plugin (on the installation CD or the directory to which the file was downloaded from the BakBone web site). Depending on the OS, the filepath for this software may vary on the installation CD. Select the file named hv-x-x-x-x.npk (where x-x-x-x represents the platform and version number), and click Open. The installation will start. After it is complete, an Installed software successfully message will be displayed.
12
Chapter 2 Installation
2.3.0
Removing Hyper-V Plugin To remove Hyper-V Plugin, perform the following steps: 1. Before removing Hyper-V Plugin, make sure that there is no mounted VM in the NVBU Backup window. 2. In the Client Management window, locate the Hyper-V Server on which the Hyper-V Plugin is installed. 3. Right-click this machine, and select Remove Software from the pop-up menu. 4. In the Remove Software dialog, select Hyper-V Plugin from the list of installed plugins, and click Remove to start the removal process. 5. In the confirmation window, click OK. 6. To return to the Client Management dialog, click OK.
NetVault: Backup Hyper-V Plugin User’s Guide
13
Chapter 3:
CONFIGURATION
Configuring Hyper-V Plugin
Configuration Process
3.1.0
Configure from NVBU Configurator
Configuring Hyper-V Plugin Before initiating a backup, you must configure the Hyper-V Plugin Working Directory and indicate whether to Mount VMs in place if they are not running. The Hyper-V Plugin contains two configuration options that can be configured by using either the NVBU Selection tab or the NVBU Configurator:
3.2.0
Working Directory
Mount VM in Place if VM is Not Running
Configuration Process Important: If the Working Directory configuration value is modified while a VM is currently mounted, the Hyper-V Plugin will not be able to unmount the VM properly. You must unmount all VMs before modifying the Working Directory configuration value. 1. From the NVBU Console running on the NVBU Server, open the Backup window (via either of the toolbar buttons or by clicking Operations > Backup). The Selections tab displays a list of NVBU Clients. 2. To display a list of plugins installed on the system, locate and open the NVBU Client that is configured as the Hyper-V Server. 3. To open any node listed in the Selections tab, do either of the following:
Double-click the node.
Right-click the node, and select Open.
4. Locate the Hyper-V Plugin node in the list, right-click it, and select Configure.
14
Chapter 3 Configuration
Figure 3-1: NVBU Backup window with Hyper-V Plugin right-click popup menu displayed
5. The Hyper-V Server Configure window is displayed. Figure 3-2: Hyper-V Plugin Configure dialog
6. Specify the following default configuration options:
Working Directory – Specify a path to store the intermediate data temporarily during backups and restores. This should be a directory on the Hyper-V Server on which Hyper-V Plugin is installed. Ensure that the specified directory already exists. No validation will be performed at this point. The default is: C:\HyperV_APM_Working_dir. During backup, Hyper-V Plugin uses this directory as the mount folder and loads the snapshot onto it, so make sure that it has sufficient space to hold the contents of the largest VM that will be backed up. Hyper-V Plugin does not currently verify that the space available is sufficient for mounting the virtual disk images. In addition, this working directory also holds all the restored files during Image-level Restore and Recovery. In some cases, Hyper-V Plugin must copy the files from a VSS snapshot to the working directory before being able to mount the VM's File System. This copy operation includes all files associated with that VM, including configuration files, disk files, and snapshot files.
Mount VM in place if VM is not running – When enabled, this option allows Hyper-V Plugin to mount the actual files of a VM that is not running and browse for file-level backup selection. If the VM is running, Hyper-V Plugin makes a copy of the actual files on the VM and mounts only the copy.
Important: Because Hyper-V Plugin mounts the actual files of a VM that is not running, you must unmount the VM before powering it on to avoid data corruption.
NetVault: Backup Hyper-V Plugin User’s Guide
15
7. Click OK.
3.2.1
Configure from NVBU Configurator Important: If the Working Directory configuration value is modified while a VM is currently mounted, the Hyper-V Plugin will not be able to unmount the VM properly. You must unmount all VMs before modifying the Working Directory configuration value. 1. Open the NVBU Configuration. 2. In the Configuration window, click the Plugin Options tab. 3. Click the Hyper-V Plugin tab, which displays the following options:
Working Directory – Specify a path to store the intermediate data temporarily during backups and restores. This should be a directory on the Hyper-V Server on which Hyper-V Plugin is installed. Ensure that the specified directory already exists. No validation will be performed at this point. The default is: C:\HyperV_APM_Working_dir. During backup, Hyper-V Plugin uses this directory as the mount folder and loads the snapshot onto it, so make sure that it has sufficient space to hold the contents of the largest VM that will be backed up. Hyper-V Plugin does not currently verify that the space available is sufficient for mounting the virtual disk images. In addition, this working directory also holds all the restored files during Image-level Restore and Recovery. In some cases, Hyper-V Plugin must copy the files from a VSS snapshot to the working directory before being able to mount the VM's File System. This copy operation includes all files associated with that VM, including configuration files, disk files, and snapshot files.
Mount VM in place if VM is not running – When enabled, this option allows Hyper-V Plugin to mount the actual files of a VM that is not running and browse for file-level backup selection. If the VM is running, Hyper-V Plugin makes a copy of the actual files on the VM and mounts only the copy.
Important: Because Hyper-V Plugin mounts the actual files of a VM that is not running, you must unmount the VM before powering it on to avoid data corruption. 4. To apply your settings and close the Configuration window, click OK. For more information on the NVBU Configurator, refer to the NetVault: Backup Configuration Guide.
16
Chapter 3 Configuration
NetVault: Backup Hyper-V Plugin User’s Guide
17
Chapter 4:
BACKUP
Available Backup Types
Backup Considerations
Performing Image-Level Backups
4.1.0
Selecting Data for Backup
Finalizing and Submitting Jobs
Performing File-Level Backups
Selecting Data for Backup
Setting File System Plugin Backup Options
Finalizing and Submitting Jobs
Available Backup Types The Hyper-V Plugin supports both image-level and file-level backups. While the image-level backups are OS-neutral and can be performed on any Guest OS, filelevel backups are supported only on the Windows Guest OS. This section briefly describes the backup types supported by the Hyper-V Plugin.
Image-level Backups – Backs up all disk and configuration files associated with a given VM, enabling restoration of the entire VM. This type of backup can be used in the event of hardware failure or accidental deletion of the VM disk files.
File-level Backups – Backs up individual files and folders in Windows Guest OS, which can be used to restore one or more files and folders. This type of backup is suitable for recovering from data loss due to user errors, data corruption or accidental deletion of files. The Hyper-V Plugin internally uses the NVBU File System Plugin for performing file-level backups. The supported file-level backup types include the following:
Full Backup – Backs up all the selected files and folders. The Full Backup serves as the base for the future Incremental and Differential Backups.
Incremental Backup – Backs up files that have changed or are new since the last backup, whether Full or Incremental Backup.
Differential Backup – Backs up files and folders that have changed or are new since the last Full Backup.
18
Chapter 4 Backup
4.2.0
4.3.0
Backup Considerations
An image-level backup and a file-level backup must not be scheduled to run at the same time. Running an image-level and a file-level backup for the same or different VMs simultaneously may result in failure of one of these jobs because Hyper-V Plugin allows only a single snapshot for a VM at any given point of time.
Hyper-V Plugin allows only a single snapshot for a VM at any given point of time. So, while a VM is mounted, trying to mount the same VM from another NVBU Backup window (on the same or different system) will interfere with the first operation and must not be attempted.
Backups cannot be performed if the Hyper-V Server is in maintenance mode or inaccessible.
Performing Image-Level Backups The procedure for performing image-level backups can be divided into the following steps:
Selecting Data for Backup
Finalizing and Submitting Jobs
These steps are described in detail in the sections that follow.
4.3.1
Selecting Data for Backup To select data for a backup, perform the following steps: 1. Open the Backup window on the NVBU Server (click the Backup button on the toolbar or Large Buttons panel, or select Backup from the Operations menu). In the Selections tab, you will see a list of machines added as NVBU Clients. 2. Locate the Hyper-V Plugin, and expand it by doing either of the following:
Double-click the Hyper-V Plugin node.
Right-click the Hyper-V Plugin node, and select Open.
3. Expand the localhost node using the method above to display the list of VMs. 4. Select the localhost node to include every VM that exists at the time of backup, or select individual VMs to back up a specific set of VMs. Important: If VMs are explicitly selected with a big green check mark, only the selected VMs will be included in the backup, even if new VMs have been added to the Hyper-V Server since the last backup.
NetVault: Backup Hyper-V Plugin User’s Guide
19
Figure 4-1: Hyper-V Plugin expanded to display VMs for inclusion in backup
Note: There are no options available in the Backup Options tab for a Hyper-V Plugin image-level backup.
4.3.2
Finalizing and Submitting Jobs After selecting the data, perform the following steps to finalize the backup job and submit it. 1. Open the Schedule, Target, and Advanced Options tabs, and set the options as required. These options are common to all NVBU Plugins. For more information on these options, refer to the NetVault: Backup Administrator’s Guide. 2. Enter a name for the job in the Job Title field. Specify a detailed name that allows you to easily identify the job for monitoring its progress or restoring data. 3. Click Submit. Alternatively, on the Accept menu, click Submit Backup. 4. You can monitor the backup job progress and log entries via the NVBU Jobs and NVBU Logs windows. Refer to the NetVault: Backup Administrator’s Guide for details on accessing these windows and their use.
4.4.0
Performing File-Level Backups The procedure for performing file-level backups can be divided into the following steps. File-level backups are available only for VMs running the Windows OS.
Selecting Data for Backup
20
Chapter 4 Backup
Using Selection Sets
Creating a Selection Set
Loading a Selection Set
Setting File System Plugin Backup Options
Finalizing and Submitting Jobs
These steps are described in detail in the sections that follow.
4.4.1
Selecting Data for Backup To select data for a backup, perform the following steps: 1. Open the Backup window on the NVBU Server (click the Backup button on the toolbar or Large Buttons panel, or select Backup from the Operations menu). In the Selections tab, you will see a list of machines added as NVBU Clients. 2. Locate the Hyper-V Plugin, and expand it by doing either of the following:
Double-click the Hyper-V Plugin node.
Right-click the Hyper-V Plugin node, and select Open.
3. Expand the localhost node using the method above to display the list of VMs. 4. Right-click the VM for which the file-level backup will be performed, and select Mount. 5. Depending on the file size of the VM disk files, the mount operation may take some time. The following will occur after the mount is successful:
A folder with the same name as the VM will be created in the working directory that was specified during configuration, as described in Configuration Process on page 13.
A Drives node will appear beneath the VM node.
NetVault: Backup Hyper-V Plugin User’s Guide
21
Figure 4-2: Mounted VM with drives displayed
6. Open the Drives node to display the available drives. 7. Select the drives or open the nodes further to display the directory tree, and select the required files and folders. Important: After mounting a VM, you must not explicitly select the VM node on the selection tree. This would cause a job to fail. For a file-level backup of all drives, select each drive individually. The Hyper-V Plugin does not know what internal drive letters are being used by a guest VM for its volumes. When the volumes of a Windows guest are enumerated, the Hyper-V Plugin will auto assign drive letters starting at C:, and it will continue sequentially from there. If the guest has gaps in drive letter assignment, those gaps won't be reflected in the Hyper-V Plugin browser. For example, if the guest VM has 2 volumes C: and E:, those volumes will appear as C: and D: in the Hyper-V Plugin browse tree.
22
Chapter 4 Backup When a VM is mounted for file-level browsing, the Hyper-V Plugin can only assign 24 drive letters, starting at C: and ending at Z:. When a VM is mounted for file-level browsing and selection, a VSS snapshot is taken of the target VM and the shadow copy is used for the browse operation. This essentially freezes the files being browsed to that point in time. If the VM is running and changes are being made to those files, those changes will not be reflected in the copy being browsed. If a backup operation is submitted before an unmount is performed, any changes made to the guest files between the point in time when the Mount and the Submit Job will not be reflected in backup. To avoid this, be sure to Unmount the VM after the files have been selected and before the job is submitted.
4.4.1.a
Using Selection Sets A Selection Set allows you to save the frequently selected data items in a composite set, which can be easily accessed for future backup jobs. This eliminates the need to select these items manually each time a backup is performed, and ensures that the same data set is selected for the subsequent backups. Selection Sets are common to all NVBU plugins. For more information on Selection Sets, refer to the NetVault: Backup Administrator’s Guide.
4.4.1.b
Creating a Selection Set To create a Selection Set, perform the following steps: 1. With the desired items selected, click Save As in the Backup Selection Set frame at the bottom of the Selections tab. 2. In the Save Backup Selection Set window, enter a unique name for the Selection Set. 3. Click OK.
4.4.1.c
Loading a Selection Set To use a Selection Set, perform the following steps: 1. Click Load in the Backup Selection Set frame at the bottom of the Selections tab. 2. In the Load Backup Selection Set window, select the required set. 3. Click OK.
4.4.2
Setting File System Plugin Backup Options The next phase in the backup procedure involves the following tasks:
Specifying a Backup Method
Specifying a Backup Type
NetVault: Backup Hyper-V Plugin User’s Guide
23
Setting Backup Options
Figure 4-3:Ba ckup Options tab for filelevel backup
4.4.2.a
Specifying a Backup Method The NVBU File System Plugin supports the following methods for VM, file-level backups:
4.4.2.b
Standard – The legacy backup method uses file-system application programming interfaces (APIs) for backing up files and folders on the NVBU Client.
Volume Shadow Copy Service (VSS) – The VSS backup method is supported on Windows 2003, Vista, and 2008. It uses the VSS technology to create consistent point-in-time copies of data known as shadow copies. The shadow copies have two primary advantages:
They allow the creation of consistent backups of a volume, ensuring that the contents cannot change while the backup is being made.
They avoid problems of file locking. By creating a read-only copy of the volume, backup programs are able to access every file while minimizing interruption to other applications that are writing to those same files.
Specifying a Backup Type The NVBU File System Plugin supports the following types for VM, file-level backups:
Full Backup – This method backs up all the selected files and folders. Full Backups take longer to complete and consume more backup media. However, restores are faster because the plugin only has to restore a single
24
Chapter 4 Backup saveset. A Full Backup serves as the base for the future Incremental and Differential Backups.
4.4.2.c
Incremental – This method backs up files that were created or modified since the last Full or Incremental Backup. Incremental Backups consume minimum storage space and are quicker to perform. However, data recovery takes longer and might require the plugin to access several savesets, depending on the number of incremental savesets that must be restored.
Differential – This method backs up files that were created or modified since the last Full Backup. Differential Backups speed up recovery because the plugin is only required to restore two savesets. However, they consume more storage space and take longer than the Incremental Backups. The Differential Backups duplicate the data backed up by previous backups of the same type.
Setting Backup Options The NVBU File System Plugin supports the following options for VM, file-level backups:
Ignore Archive Bit – The archive bit helps determine whether a file has been modified since the last backup. The archive bit is set to 1 if the file has changed, and it is set to 0 if the file has not changed. By default, the File System Plugin includes files for which the archive bit is set to 1 and clears the bit after it is backed up. Regardless of the state of the archive bit, the File System Plugin backs up a file if the parameters (such as file size or last update date) have changed since a previous backup. To ignore the archive bit settings and use only the file size, last update date, and so on, for selecting files, select the Ignore Archive Bit check box. BakBone recommends that you only select this option under the following conditions:
Another program is changing the state of the archive bit, which causes the File System Plugin to back up unnecessary files or folders.
The File System Plugin (or NVBU) can only access the files for a backup and cannot clear the archive bit settings after backup because of access rights.
Check for Files Being Modified During Backup – To mark files modified during backup, select this check box. The File System Plugin marks such files as in flux. During restore, the files marked as in flux are not restored by default. You can override the default action by selecting the Restore Files Modified During Backup option on the Restore Options tab.
Backup Through Mount Points – Select this option to back up data on volumes mounted on a Windows NT File System (NTFS) folder.
Enable Restartable Backup – The File System Plugin provides the ability to stop a running job and resume it any time later from the point the backup was stopped. To use this feature, you must configure a job as restartable. When you stop the job, the plugin generates an index for the files backed up and
NetVault: Backup Hyper-V Plugin User’s Guide
25
writes it to the backup media and the NetVault Database (NVDB). When you restart the job later, the plugin runs an incremental job to back up the remaining files and folders. A backup can be stopped and resumed from the NVBU Jobs window. This feature can be used only with a backup Selection Set. For more information on stopping and resuming a backup job, refer to the NetVault: Backup Administrator’s Guide.
4.4.3
Path to Backup Log – To generate a backup log file, enter the directory and the file name in the box. The log contains the list of all files selected for a backup. You can use this option with an incremental backup to find out which new or changed files have been backed up. If you enter an existing file name, the File System Plugin will overwrite the file.
Finalizing and Submitting Jobs After selecting the data, perform the following steps to finalize the backup job and submit it. 1. Open the Schedule, Target, and Advanced Options tab, and set these options as required. These options are common to all NVBU Plugins. For more information on these tabs and the options within, refer to the NetVault: Backup Administrator’s Guide. 2. Enter a name for the job in the Job Title field. Specify a detailed name that allows you to easily identify the job for monitoring its progress or restoring data. 3. Click Submit. Alternatively, on the Accept menu, click Submit Backup. 4. You can monitor the backup job progress and log entries via the NVBU Jobs and NVBU Logs windows. Refer to the NetVault: Backup Administrator’s Guide for details on accessing these windows and their use. Important: A mounted VM will be automatically unmounted after the file-level backup is completed. BakBone recommends that you close the NVBU Backup window after submitting the backup job to prevent unexpected behavior.
26
Chapter 4 Backup
NetVault: Backup Hyper-V Plugin User’s Guide
27
Chapter 5:
RESTORE
5.1.0
Image-Level Restore Overview
Restoring Image-Level Backups
Recovering Image-Level Backups
Restoring Image-Level Backups
Prerequisites
Selecting Data to Restore
Additional Functionality Available in the Restore Selections Tab
Finalizing and Submitting Jobs
Restoring File-Level Backups
Prerequisite
Selecting Data to Restore
Setting Restore Options
Additional Functionality Available in the Restore Selections Tab
Selecting Target Clients
Finalizing and Submitting Jobs
Image-Level Restore Overview When performing image-level restores, you can restore the entire VM hierarchy to the Working Directory on the Hyper-V Server or you can perform an image-level recovery, which restores the entire VM and establishes a new version of that VM in Hyper-V Manager.
5.1.1
Restoring Image-Level Backups Image-level restores will restore the entire VM hierarchy, including:
Virtual Disk Files
Save State Files
Configuration Files
Snapshots
These files will be restored into the working directory associated with the selected VM as designated during configuration, as described in Configuration Process on page 13.
28
Chapter 5 Restore At this point you could perform any manual operations desired on the files, such as merge disks, manually mount snapshots, or even perform a manual recovery. You could even use the restored files and directory hierarchy to recover to an alternate Hyper-V Server. Important: All the files for the specified VM will be restored to a Restores directory under the configured Working Directory. The entire hierarchy for the VM will be restored to match the hierarchy that was backed up, starting with the drive letter that originally hosted the backed up VM. This is intended so that a manual recovery operation could be performed via a copy utility, starting at the drive-letterbased root directory.
5.1.2
Recovering Image-Level Backups Image-level recovery restores the entire VM and establishes a new version of that VM in Hyper-V Manager. An Image-level recovery is similar to an Image-level restore, but with the addition of automatically taking the restored image and putting it back in service.
5.2.0
Restoring Image-Level Backups The procedure for restoring an image-level backup can be divided into the following steps:
Prerequisites
Selecting Data to Restore
Finalizing and Submitting Jobs
These steps are detailed in the sections that follow.
5.2.1
Prerequisites Before performing an image-level recovery in which the entire VM will be restored and a new version will be established in Hyper-V Manager, ensure that the VM is powered down and that none if its files are open. The Hyper-V Plugin Recovery process will overwrite the existing VM, and write-access is required.
5.2.2
Selecting Data to Restore To select data to restore, perform the following steps: 1. Open the Restore window on the NVBU Server (click the Restore button on the toolbar or Large Buttons panel, or select Restore from the Operations menu). In the Selections tab, you will see the list of NVBU Clients that have been the target of backup jobs. 2. Locate the Hyper-V Server node, and open it. 3. To open any node in the Selections tab, do either of the following:
NetVault: Backup Hyper-V Plugin User’s Guide
Double-click the node.
Right-click the node, and select Open.
29
4. Next, locate Hyper-V Plugin from the list of Plugins, and open it to display the backup savesets created with the plugin. Each saveset will be labeled with its Job Title followed by the Saveset ID and the Backup Timestamp. 5. Open the required backup saveset. From this level, double-click a node to open it (or right-click the node, and select Open). Figure 5-4: Savesets for image-level backups displayed in the Selections tab
6. Open the localhost node to display the VMs. 7. Select one or more VMs to restore.
5.2.2.a
Additional Functionality Available in the Restore Selections Tab In addition to direct data selection, the Selections tab offers a variety of other functionality that can be used to perform tasks ranging from locating specific data to managing entries in the NVDB. This functionality is not unique to Hyper-V Plugin (it is available for use with all NVBU Plugins), and descriptions on their use can be found in the NetVault: Backup Administrator’s Guide. The following list briefly describes this functionality:
Selection Method Menu – This menu allows you to select a method for the organization of data items displayed in the Selections tab, based on three basic selections:
APM/Plugin Used in the Backup (Default)
Backup Selection Set Used
Job Title
30
Chapter 5 Restore
Filter Options Frame – Filter Options can be set to customize how data is displayed in the Restore Selections window. The following options are available:
By Date Range – To list the savesets generated during a given period, select this option and set the dates in the fields provided.
Show On-line Status – Select this option to list only the currently available media.
Searching Functionality – At various levels of the selection tree, you can access the Search command by right-clicking a node. This allows you to search for specific data items based on an item’s name.
Media List – This command provides information pertaining to the media used for this backup saveset.
Index Compression Functionality (Compress/Uncompress Commands) – Each job generates an index entry in the NVDB, and this entry is required by NVBU to restore the job. However, as job numbers increase, so do the number of index entries, and as an end result, the NVDB will continue to grow and occupy increasing amounts of hard disk space. This functionality allows you to compress these entries and reduce the overall size of the NVDB. In turn, these entries can be decompressed as required to allow for a restore.
5.2.3
Setting Restore Options 1. Click the Restore Options tab. 2. To restore the entire VM and establish a new version of that VM in Hyper-V Manager, select Recover Virtual Machine. If you clear the Recover Virtual Machine check box, the entire VM hierarchy, including Virtual Disk Files, Save State Files, Configuration Files, and Snapshots, will be restored to the Working Directory.
Figure 5-5: Enable Recover Virtual Machine on the Restore Options tab
NetVault: Backup Hyper-V Plugin User’s Guide
31
3. When Recover Virtual Machine is selected, select the Delete restored VM copy from working directory after recovery option if you want to remove the restored files under the Working Directory after a successful recovery.
5.2.4
Finalizing and Submitting Jobs After setting the restore option, perform the following steps to finalize the job and submit it. 1. Open the Source, Schedule, and Advanced Options tabs, and set these options as required. 1. These options are common to all NVBU APMs and plugins. For more information on these options, refer to the NetVault: Backup Administrator’s Guide. 2. Enter a name for the job in the Job Title field. Specify a detailed name that allows you to easily identify the job for monitoring its progress or restoring data. 3. Click Submit. Alternatively, on the Accept menu, click Submit Restore. 4. You can monitor the restore job progress and log entries via the NVBU Jobs and NVBU Logs windows. Refer to the NetVault: Backup Administrator’s Guide for details on accessing these windows and their use.
5.3.0
Restoring File-Level Backups The Hyper-V Plugin provides the following two methods to restore file-level backups:
Using Network Share – This method does not require an instance of NVBU Client running locally on the VM. The restores are performed to the network share on the VMs using the File System Plugin installed on the Hyper-V Server.
Using Virtual Machine Local Installed File System Plugin – This method is suitable if an instance of NVBU Client is already running on the VM for more granular protection and recovery of application data. The VM is treated as any other physical NVBU Client for the File System restores.
Important: If neither of the preceding methods are used, the files will be restored to the Hyper-V Server by default. You will need to copy the restored files manually to the VM from the Hyper-V Server. If you do not use the Rename feature, files will be restored to the equivalent location in the file hierarchy on the Hyper-V Server (for example, files that were in C:\example will be in C:\example on the Hyper-V Server). The procedure for restoring the file-level backups can be divided into the following steps:
32
Chapter 5 Restore
5.3.1
Prerequisite
Selecting Data to Restore
Setting Restore Options
Selecting Target Clients
Finalizing and Submitting Jobs
Prerequisite If a network share will be used to restore the individual files to the VM, perform following steps to set up the network share: 1. Open the Backup window on NVBU Server (click the Backup button on the toolbar or Large Buttons panel, or select Backup from the Operations menu). In the Selections tab, you will see a list of machines added as NVBU Clients. 2. Locate the Hyper-V Server node, and open it. 3. To open any node in the Selections tab, you can do either of the following:
Double-click the node.
Right-click the node, and select Open from the pop-up menu.
4. Locate File System in the list of APMs and plugins, and open this node. 5. Right-click the Network Shares node, and select Add Network Share from the pop-up menu. 6. In the Add New Network Share window, enter the filepath for the shared drive in the format: \\\\. 7. Click Add. This will add the shared folder to the Network Shares node. 8. Right-click the shared folder, and select Connect As. 9. In the Connection Details window configure the login details:
Domain – Enter the Windows domain for the VM.
Username – Enter a user name with necessary privileges to write/change files on the shared folder.
Password – Enter the password associated with the user specified in the field above.
10.Click OK.
NetVault: Backup Hyper-V Plugin User’s Guide
5.3.2
33
Selecting Data to Restore Select the data to be restored as described below: 1. Open the Restore window on the NVBU Server (click the Restore button on the toolbar or Large Buttons panel, or select Restore from the Operations menu). In the Selections tab, you will see the list of NVBU Clients that have been the target of backup jobs. 2. Locate the Hyper-V Server node, and open it. 3. To open any node in the Selections tab, you can do either of the following:
Double-click the node.
Right-click the node, and select Open from the pop-up menu.
4. Next, locate File System in the list, and open it. Because the Hyper-V Plugin internally uses the File System Plugin to perform the file-level backups for the VMs, the savesets for these backups are organized under the File System Plugin. 5. To distinguish the savesets generated for the VMs, the VM name is appended to the Job Title. Thus, the label for the savesets will contain the Job Title, followed by the VM Name, Saveset ID, and Backup Timestamp. 6. Open the required backup saveset to display the directories and files contained within. From this level, double-click a node to open it (or right-click the node, and select Open from the pop-up menu). Select the files/directories to be restored by selecting the appropriate nodes. Figure 5-6: Savesets for file-level restores displayed in the Selections tab
7. If a network share will be used to restore the individual files to the VM, do the following: a. Right-click the file or folder, and select Rename. b. In the Restore Rename window, enable Relocate To. In the text box to the right, enter the network share path.
34
Chapter 5 Restore
5.3.2.a
Additional Functionality Available in the Restore Selections Tab In addition to direct data selection, the Selections tab offers a variety of other functionality that can be used to perform tasks ranging from locating specific data to managing entries in the NVDB. This functionality is not unique to Hyper-V Plugin (it is available for use with all NVBU Plugins), and descriptions on their use can be found in the NetVault: Backup Administrator’s Guide. The following list briefly describes this functionality:
Selection Method Menu – This menu allows you to select a method for the organization of data items displayed in the Selections tab, based on three basic selections:
APM/Plugin Used in the Backup (Default)
Backup Selection Set Used
Job Title
Filter Options Frame – Filter Options can be set to customize how data is displayed in the Restore Selections window. The following options are available:
By Date Range – To list the savesets generated during a given period, select this option and set the dates in the fields provided.
Show On-line Status – Select this option to list only the currently available media.
Searching Functionality – At various levels of the selection tree, you can access the Search command by right-clicking a node. This allows you to search for specific data items based on an item’s name.
Media List – This command provides information pertaining to the media used for this backup saveset.
Index Compression Functionality (Compress/Uncompress Commands) – Each job generates an index entry in the NVDB, and this entry is required by NVBU to restore the job. However, as job numbers increase, so do the number of index entries, and as an end result, the NVDB will continue to grow and occupy increasing amounts of hard disk space. This functionality allows you to compress these entries and reduce the overall size of the NVDB. In turn, these entries can be decompressed as required to allow for a restore.
NetVault: Backup Hyper-V Plugin User’s Guide
5.3.3
35
Setting Restore Options Next, open the Restore Options tab, and set the required options as described below:
Figure 5-7: Restore Options tab for file-level restores
Overwrite Newer Files – To overwrite the files on disk with the version in the saveset, leave this check box selected. If you do not want to overwrite the files that are present on the disk, clear this check box.
Reset File Timestamps – To reset the timestamps for the restored files to what is recorded in the backup, leave this check box selected. If you want to restore the files and use the current datestamp, clear this check box.
Reset Directory Timestamps – By default, directory timestamps will be reset to the time of the restore job. To reset the timestamps to what is recorded in the saveset, select this check box. To reset the timestamps for the restored directories to what is recorded in the backup, you must also select the preceding Reset File Timestamps check box.
Restore Files Modified During Backup – To restore files that were marked as in flux during backup, select this check box.
Path to Restore Log – To generate a restore log file, enter the directory and file name in the box. The log file contains the list of all files selected for a restore. If you specify an existing file name, the File System Plugin will overwrite the file.
Exclusion List Path – To use an exclusion list, enter the path in this box. For more information on creating exclusion lists, refer to the NetVault: Backup Administrator’s Guide.
36
Chapter 5 Restore
5.3.4
Selecting Target Clients If you are using the File System Plugin installed on the local VM to perform the restore, open the Target Client tab, and select the target VM.
5.3.5
Finalizing and Submitting Jobs After setting the restore method, perform the following steps to finalize the job and submit it. 1. Open the Source, Target Client, Schedule, and Advanced Options tabs, and set these options as required. These options are common to all NVBU APMs and plugins. For more information on these options, refer to the NetVault: Backup Administrator’s Guide. 2. Enter a name for the job in the Job Title field. Specify a detailed name that allows you to easily identify the job for monitoring its progress or restoring data. 3. Click Submit. Alternatively, on the Accept menu, click Submit Restore. 4. You can monitor the restore job progress and log entries via the NVBU Job and NVBU Logs windows. Refer to the NetVault: Backup Administrator’s Guide for details on accessing these windows and their use.
NetVault: Backup Hyper-V Plugin User’s Guide
37
Chapter 6:
TROUBLESHOOTING
6.1.0
Backup Job Fails While Using VSS Snapshot
Backup Job Fails While Using VSS Snapshot If a backup job is aborted or fails while a VSS snapshot is being used, it is possible that Hyper-V Plugin will not be able to clean up the VSS snapshot. If this happens, a tool such as Microsoft's CLI diskshadow.exe can be used to remove the snapshot. After diskshadow is run from the command line, execute the following commands at the DISKSHADOW> prompt to find and remove the orphaned shadow copy. Enter: list shadows all The preceding command will list the current shadow copies. Look through the list of shadow copies noting the Exposed Locally as field. Find the field with the exposed directory name matching the VM name used during the aborted or failed job. Using the Shadow copy ID field from that entry, run the following command: delete shadows ID
38
Chapter 6 Troubleshooting