Music Studio Lite Version 1.6.1
User Manual Music Studio is available on the App Store for all iPhone, iPod Touch and iPad models
Table of Contents Limitations of the Lite version Keyboard Instruments Projects Beats Effects External Hardware
Quick Start Guide
1 1 1 1 1 1 1
Recording a song
2 2 3
Best practices
4
FAQ (Frequently Asked Questions)
5
Keyboard Tab
6 6 6 6 6 6 6 7 7 7 7 7 7 8 8 8 8 9
Playing on the keyboard
Introduction Scrolling and resizing Keyboard menu Play button Pause button (iPad only) Loop button Record button Undo button Display Metronome button Tempo Button (iPad only) Keyboard layout button Rows button (iPad only) Key label button (iPad only) Accelerometer button Velocity (volume) Keyboard layout mode
Music Studio Lite 1.6.1
i
Octave buttons Fullscreen button Keyboard map Rows button (iPhone only) Key label button (iPhone only) Keyboard playhead mode Rewind button Bar reel buttons Navigation map Marker buttons
Instruments Tab Introduction Volume fader Attack time fader Release time fader Defaults button Preview button Keep attack/release times (iPad only) Sync keyboard rows (iPad only) Row indicator
Tracks Tab Introduction Scrolling What is a track? Track management What is an event? Common controls Play button Loop button Pause button Undo button Display Tempo Button Zoom button Horizontal zoom buttons (iPad only) Track view switch Tempo indicator Song ruler Song markers Track zoom mode
Music Studio Lite 1.6.1
9 9 9 9 9 10 10 10 10 10 11 11 11 11 11 11 11 12 12 12 13 13 13 13 13 13 14 14 14 14 14 14 14 14 15 15 15 15 15 16 ii
Horizontal zoom buttons (iPhone only) Vertical zoom buttons Navigation map Track playhead mode Rewind button Bar reel buttons Navigation map Marker buttons Mixer Track list Rearranging tracks and changing the color Gain bars Warning triangle Keyboard row icon Filter track Add track button Mute button Solo button FX button Edit button Duplicate button Delete button Pan knob and volume slider Sequencer Track list New selection button Change selection button Clipboard (copy and paste) Move button Duplicate button Repeat button Transpose button Quantize button Edit button Delete button Song bar edit button Piano roll editor Piano roll view Vertical scrolling New selection button Change selection button Draw button Music Studio Lite 1.6.1
16 16 16 17 17 17 17 17 18 18 18 18 19 19 19 19 19 19 19 19 19 19 20 21 21 21 21 21 21 22 22 22 22 22 22 23 24 24 24 24 24 24 iii
Draw mode Draw mode note buttons Draw mode dotted button Quantized drawing button Move button Duplicate button Length button Volume button Quantize button Delete button Quantization popup Note buttons Dotted button Triplet button Note length checkbox Soft (humanize) checkbox Tempo popup Tempo Signature
Effects Tab Bus structure Common Controls Power button Limit to FX tracks checkbox Preview button Default button Volume Master gain Device volume Decibel meters Reverb Reverb size Reverb brightness Reverb stereo spread Reverb mix (wet/dry) Reverb style Reverb quality Remember settings for each style (iPad only) Filter Resonance/Frequency display Filter type switch Music Studio Lite 1.6.1
25 25 25 25 26 26 26 26 26 26 27 27 27 27 27 27 28 28 28 29 29 30 30 30 30 30 31 31 31 31 32 32 32 32 32 32 32 32 33 33 33 iv
Filter accelerometer axis Accelerometer sensitivity Snap back checkbox Pitch Semitone slider Sensitivity slider Pitch bend accelerometer axis Pitch bend invert axis checkbox Pitch bend record mode
Projects Tab Introduction Filename textfield File list Beats Buttons New Load
Setup Tab Differences on the iPad General settings Latency Polyphony Continuous playhead movement Lock interface orientation (iPhone only) Restore defaults button Keyboard settings Velocity control Snap to white keys Allow touches between black keys Allow touches on key borders German key labeling Auto quantization Transposition Accelerometer settings Threshold slider Reactivity slider Calibration Interface settings Instruments tab Keep attack/release times on instrument change (iPhone only)
Music Studio Lite 1.6.1
33 34 34 35 35 35 35 35 35 36 36 36 36 37 37 37 37 38 38 38 38 38 39 39 39 40 40 40 40 40 40 40 40 41 41 41 41 42 42 42 v
Tracks tab Scroll on the margins when moving notes Centered zooming Effects tab Remember reverb settings for each type (iPhone only) Metronome settings Volume Style Precount Precount only at song start
42 42 42 42 42 43 43 43 43 43
Troubleshooting Guide
44
Version history
45 45 45 46 46 47
Version 1.6.1 Version 1.5.1 Version 1.5 Version 1.4 Version 1.3
Music Studio Lite 1.6.1
vi
Limitations of the Lite version Keyboard The keyboard is limited to 5 octaves (60 keys). The full version's keyboard features 85 keys.
Instruments The lite version features 9 instruments, whereas the full version includes 40 instruments and 50 more in the instrument shop. Here is a full list of the instruments by category: Free instruments (40) • Classic: grand piano 1 & 2, church organ, cello section, string ensemble, harp, brass section, trombone, clarinet, concert flute • Band: E-Piano, drawbar organ, alto saxophone, acoustic guitar, clean electric guitar, overdrive electric guitar, electric guitar power chords, acoustic bass, bass guitar, rock bass, drum kit • Electro: synth brass, synth bass, distortion bass, analog square, fat lead, slicer lead, dirty lead, trance lead, blade sweeper, dream pad, sky pad, choir pad, piano synth, remix drum kit, hip hop kit, sound effects kit • World: harmonica, pan flute, marimba Instruments available in the shop (50) • Classic: harpsichord, choir, cello, violin, pizzicato violin, trumpet, trumpet muted, oboe, xylophone, timpani • Band: vintage E-Piano, rock organ, hammond organ, hammond rock organ, tenor saxophone, soprano saxophone, steel string, jazz guitar, electric lead guitar, electric strat guitar, muted electric guitar, electric funk guitar, pick bass, slap bass, vibraphone, rock drum kit • Electro: synth strings, synth bells, synth pulse, analog attack, aggressive sync, extreme sync, glass pad, moog pad, 5th chord, space synth, 8-bit kit • World: recorder, ocarina, shakuhachi, didgeridoo, bagpipe, accordion, banjo, ukulele, sitar, saz lute, japanese koto, steel drum
Projects In the lite version, projects cannot be saved or exported into MIDI or wav format. iTunes file transfer and WiFi transfer to your Mac/PC is also available in the full version only. Any .xms and .mid files from other apps (like Safari, Mail) can be directly opened with the full version of Music Studio.
Beats The full version comes with 100 drum beats (instead of only 10).
Effects The full version includes 3 additional effects: Delay, 3-band equalizer and amplifier (overdrive).
External Hardware The full version is compatible with the Line 6 MIDI Mobilizer, the Akai SynthStation 25 and Core MIDI.
Music Studio Lite 1.6.1
1
Quick Start Guide Playing on the keyboard You can adjust the size and position of the keyboard by making a slide or pinch gesture anywhere on the menu bar.
• To change the labels on the keys, press the keys button and switch between the 4 key label modes with the key label button. • Select the instrument of your choice from the scrollable instrument list in the Instruments tab. • Adjust the attack/release sliders in the instruments tab to change the fade in/out times. • In the Keyboard tab, tap the accelerometer button to enable pitch bend, then tilt your device to bend the played note's pitch. • Tapping the keys button brings up a menu for switching to 2 keyboard rows, changing the key labels, and a keyboard map that allows to to position the keyboard with a single tap. • Load a beat in order to play on top of a rhythm: tap the Projects tab, double tap the Beats folder and double tap a beat to add it to your song. • Effects can be added in the Effects tab. The sound is greatly influenced by the reverb. Adjust the reverb type and size in the effects tab to simulate a specific room. High quality reverb sounds better but may introduce playback stuttering on older devices.
Music Studio Lite 1.6.1
2
Recording a song Follow these steps to create a simple song from scratch: • Open the projects tab and tap the New button to create a new project. • Open the tracks tab and tap the tempo button to set the tempo and signature of your new song. • Open the instruments tab and select your instrument of choice. • Open the keyboard tab and press the record button, wait for the counter to hit 1.1 (precount can be disabled in the metronome section of the setup screen), play your piece, then tap the stop button. • If you made a mistake and want to re-record, simply tap the undo button to erase the notes you just recorded. • Switch to the tracks tab to review what you just recorded. The track can be edited bar-wise (sequencer) and notewise (piano roll editor), more on this topic in the tracks tab section. to create a new track. • Tap the plus icon The keyboard and instruments tabs always apply to the active track, so make sure that track 2 is selected. • Repeat the previous steps to record something on the second track. • Let's assume that your song has a duration of 20 bars and you want to start recording at bar 10. In the tracks tab, move the left marker
on the ruler to the 10th bar and recording will always start from there.
• Tune the reverb in the effects tab, maybe set the equalizer and play around with the other effects. • To save your song, open the projects tab, enter a song name in the text field and tap the save button.
Music Studio Lite 1.6.1
3
Best practices Use higher latency for editing Change the latency setting in the setup tab to achieve the best performance: low latency is best for recording and playing on the keyboard, while high latency minimizes stuttering when editing a complex song. Avoid overlapping (red) notes Congruent (identical) and overlapping notes are marked red in the tracks tab. Congruent notes result in higher note volume, if the effect is unwanted just delete the top note. Make use of the undo button If you misplaced a note while recording, don't even hit the stop button but instead tap the undo button , tap undo and restart recording. Try different quantization parameters Every recording requires its own set of quantization parameters. Better results are obtained if you don't just stick with quantizing everything with 1/16. Try different settings and hit the undo button in between. Release times can simulate legato If a recorded melody should flow but it sounds more like staccato, the notes are simply too short. The perfect correction would be to manually increase the note lengths in the piano roll editor, but there is a quicker way: increase the track's release time until it sounds like legato. Adjust the reverb quality Reverb requires a lot of CPU power. If stuttering occurs during playback, decrease the reverb quality. Set it to high quality before you export your final song to wav.
Music Studio Lite 1.6.1
4
FAQ (Frequently Asked Questions) For more support-related discussions, please refer to the Forum on the Music Studio website. Do I lose my songs if I remove the app from my device? Yes, if you tap and hold the app icon and tap X to remove the app, all files and settings are deleted too. Even if you sync the app back from iTunes onto your device, it will be a fresh install and your files won’t be restored. In order to save your songs, transfer them to your Mac/PC with iTunes file sharing. If you restore your iDevice by pressing the restore button in iTunes, your songs will be restored automatically (along with a reinstallation of iOS and all other apps). How to maximize the sound quality of the instruments? To get the most out of the high quality studio-recorded instruments, use earphones or external speakers. Most instruments are designed for a specific tonal range, an E-Bass sounds as unreal in the 4th octave as a flute in the lowest octave. Some instruments also benefit from a higher or lower release time. • Wind instruments in general sound best with a low release time and the reverb set to hall or canyon. • A great effect for synths is to set the delay to 1/8th and dotted. • String instruments sound best with a medium attack time (around 0.5s) and maybe a high release time. • Keyboard instruments and guitars get a sustain feeling with a high release time. If I select and edit bars in the sequencer, why are some notes ignored? Selected notes are colored dark blue. If you select a bar but a note starts a few ticks earlier than this bar, it will not be selected. If possible, quantize the track, thereby aligning the notes to simplify further editing. Why are the drum kit's sounds arranged in such a strange way? This "strange way" is called the "General MIDI Level 1 Percussion Key Map". It is commonly used on nearly every hardware keyboard/synthesizer to retain full MIDI compatibility. Why is the default instrument volume 80% and not 100%? This way you don't have to change all the other track's volumes if you want one track to be louder. Why doesn't the preview button play a nice melody? Because it would be distracting for a musician who has a melody in mind while composing music. Why is the app size so large? Studio-sampled instruments require a lot of space. We decided not to trade quality for app size. Which features will be included in future updates? Please refer to the Forum on the Music Studio website for more feature-related discussions.
Music Studio Lite 1.6.1
5
Keyboard Tab Introduction Music Studio features a 60-key clavier (85 keys in the full version) capable of handling up to 5 simultaneous touches (10 on the iPad). Not every instrument has the full tonal range, hence the number of playable octaves varies from instrument to instrument. If you are uneasy with the way the keys react to your input, the setup tab offers some handy keyboard preferences.
Scrolling and resizing The keyboard position and width can be adjusted via the scroll and pinch gestures. Either tap the keyboard layout button or simply do the gesture on the top menu bar: move one finger left or right to slide the keyboard, pinch with two fingers to adjust the key width.
Keyboard menu Play button Starts and stops playback of the song. Stop rewinds to the left marker.
Pause button (iPad only) Simply pauses playback, like stop but without rewinding.
Loop button Toggles looping, i.e. during playback and recording the song (or the section between the markers) will be repeated indefinitely.
Music Studio Lite 1.6.1
6
Record button Start or stop a new recording. More on this topic in the tracks tab.
Undo button Tap to undo the last recording, hold for 2 seconds to display a popup with the possible undo/redo actions.
Display
The LCD displays the current instrument and the position of the playhead in the format measure-dot-beat, e.g. 7.2 means that the playhead is in the 2nd beat of the 7th bar (measure). Tap it to enter the playhead mode. A small white dot in the upper left corner indicates that the current track is not empty.
Metronome button Toggles the metronome. Its state is remembered separately for playback and recording. Per default, the metronome is enabled only at recording. Beat and signature can be configured in the tempo popup in the tracks tab. Metronome volume and style settings are found in the setup tab. iPhone/iPod touch only: tap and hold the metronome button to bring up the tempo popup.
Tempo Button (iPad only) Toggles the tempo popup.
Keyboard layout button Toggles the keyboard layout mode.
Music Studio Lite 1.6.1
7
Rows button (iPad only) Switches between one and two keyboard rows. More on this topic here. On the iPhone, this button can be found in the keyboard layout mode.
Key label button (iPad only) Switches between the 4 key label modes: off, C only, all keys labeled, and colored key labels. On the iPhone, this button can be found in the keyboard layout mode.
Accelerometer button Toggles the accelerometer input. By default, it enables the pitch bend effect. Tilt your device to bend the pitch of the currently played notes. The filter effect can also be configured to react to the accelerometer. If this button is enabled while recording, the device tilt is also recorded (which could affect the pitch bend and/or the filter effect). In this case, the filter track will be overwritten unless you disable the accelerometer button or the accelerometer checkbox of the filter effect.
Velocity (volume) In the setup tab, enable Velocity to control the note volume. If set to Touch-Y, the volume depends on where you touch a key (upper end quiet, lower end forte). The Accel setting allows you to control the note volume with the accelerometer by tilting the device.
Music Studio Lite 1.6.1
8
Keyboard layout mode In this mode, the keyboard rows can be scrolled and resized anywhere on the screen.
Octave buttons The left and right octave buttons quickly scroll the keyboard one octave (12 semitones) down or up.
Fullscreen button Switches to the full screen keyboard.
Keyboard map
The map illustrates which part of the keyboard is currently visible. Slide or tap it to quickly scroll the keyboard.
Rows button (iPhone only) Switches between one and two keyboard rows. More on this topic here.
Key label button (iPhone only) Switches between the 4 key label modes: off, C only, all keys labeled, and colored key labels.
Music Studio Lite 1.6.1
9
Keyboard playhead mode Tap the LCD in the menu bar to enter the playhead mode. It allows you to adjust the position of the playhead and to set the markers. Use the controls in the bottom menu or simply slide your finger anywhere on the screen to adjust the position of the playhead.
Rewind button Rewinds the playhead to the left song marker. Tap it a second time to rewind to the beginning of the song.
Bar reel buttons Rewind and forward the playhead position by exactly 1 bar (measure).
Navigation map
Tap or slide it to quickly position the playhead anywhere in the song. Areas outside the markers are darkened. The map also displays the current track's notes as white lines.
Marker buttons Set the left or right song marker to the current playhead position. The markers must be at least 1 bar apart. Why markers? Recording always starts at the left marker. The loop button loops the section between the markers. When exporting to a wav file, you can choose to only export the range between the markers.
Music Studio Lite 1.6.1
10
Instruments Tab Introduction Change the selected track's instrument by tapping an instrument from the scrollable list.
Volume fader Sets the current track's gain, like the volume slider in the mixer does.
Attack time fader Controls the fade-in time, i.e. how long it takes for the instrument to reach its volume. Use longer attack times for soft sounds like strings and synth pads.
Release time fader Controls the fade-out time, i.e. how long the sound fades out after a key is released. Use longer release times for simulating legato or one-shot for drum kits and percussive instruments.
Defaults button Resets the three sliders to the instrument's default preset. If "Keep attack/release" is disabled in the setup tab, this button is automatically pressed each time you select an instrument.
Preview button Plays one or more notes (alternating) with the current instrument.
Music Studio Lite 1.6.1
11
Keep attack/release times (iPad only) If this checkbox is disabled, each time you select an instrument its default attack and release time will be set. If enabled, the current track's attack/release durations are kept when you select another instrument. On the iPhone, this setting can be found in the setup tab.
Sync keyboard rows (iPad only) Enable this checkbox to synchronize the settings (instrument, volume, attack and release time) of both keyboard rows. Every change you make will affect both rows and thus two tracks.
Row indicator Tap the lower row to switch to 2 keyboard rows. This control then allows you to switch between them to select different instruments for the upper and lower keyboard row. More on this topic here.
Music Studio Lite 1.6.1
12
Tracks Tab Introduction
Scrolling Analogous to the keyboard tab, sliding and pinching on the menu bar scrolls and zooms the visible range of the song.
What is a track? Think of a track as one instrumentalist in a band or an orchestra. It holds recorded notes (events), one instrument and some parameters. There can be multiple tracks with the same instrument but different parameters (e.g. volume, pan, attack/release time).
Track management Only one track can be selected at a time. The keyboard will play this track's instrument, the record button will record on this track, and all the changes you make in the instrument tab will apply to it. You cannot delete the first track, the maximum number of tracks is 128. If you switch to two keyboard rows, a separate track for the lower row is created (more on this topic here)
What is an event? A recorded note places 2 events on a track: key-down and key-up (also called note-on and note-off). The position of an event is stored with a resolution of 48 ticks per beat, which equals to 192 ticks per bar with a signature of 4/4, meaning that the shortest note can be a 1/192th. Music Studio Lite 1.6.1
13
Common controls Play button Starts and stops playback of the song. Stop rewinds to the left marker.
Loop button If looping is active and the playhead reaches the right song marker (by default the song end), it will jump to the left marker and continue playback from there. This allows you to loop any part of the song, the markers can be moved in the song ruler.
Pause button Simply pauses playback, like stop but without rewinding.
Undo button Tap to undo the previous action. Hold for 2 seconds to display a popup with the possible undo/redo actions. If the result would not be obvious, the popup appears anyway (e.g. if you would undo a recording but switched to the tracks tab, or if only redo is possible). Selection does not count as an action.
Display
The LCD displays the position of the playhead in the format measure-dot-beat, e.g. 7.2 means that the playhead is in the 2nd beat of the 7th bar (measure). Tap it to enter the playhead mode. The display also shows parameter values (pan, volume, transposition) while you are changing them, and the currently selected note range in the piano roll editor.
Tempo Button Toggles the tempo popup.
Zoom button Toggles the zoom mode.
Music Studio Lite 1.6.1
14
Horizontal zoom buttons (iPad only) Zoom the ruler in or out. Tap the zoom-out button a few times to view the whole song. On the iPhone, these two buttons can be found in the zoom mode.
Track view switch Switches between the mixer and the sequencer.
Tempo indicator Displays the song tempo, bpm stands for beats per minute. Double tap it to enter the tempo popup.
Song ruler The numbers and the vertical lines indicate the measures (bars), the short vertical lines are beats. The ruler also holds the playhead (white vertical line) and the markers (triangles). Slide anywhere on the ruler to position the playhead.
Song markers The left and right song makers are located on the ruler and can be moved to a certain song position. An alternative method for positioning the markers is via the playhead mode. Why markers? Recording always starts at the left marker. The loop button loops the section between the markers. When exporting to a wav file, you can choose to only export the range between the markers.
Music Studio Lite 1.6.1
15
Track zoom mode In this mode, the view (i.e. the ruler) can be scrolled and resized anywhere on the screen.
Horizontal zoom buttons (iPhone only) Zoom the ruler in or out. Tap the zoom-out button a few times to view the whole song.
Vertical zoom buttons Only visible in the piano roll editor for zooming the mini keyboard.
Navigation map
Tap or slide it to quickly position the viewed range. Areas outside the visible range are darkened. The map also displays the current track's notes as white lines.
Music Studio Lite 1.6.1
16
Track playhead mode Tap the LCD in the menu bar to enter the playhead mode. It allows you to adjust the position of the playhead and to set the markers. Use the controls in the bottom menu or simply slide your finger anywhere on the screen to adjust the position of the playhead.
Rewind button Rewinds the playhead to the left song marker. Tap it a second time to rewind to the beginning of the song.
Bar reel buttons Rewind and forward the playhead position by exactly 1 bar (measure).
Navigation map
Tap or slide it to quickly position the playhead anywhere in the song. Areas outside the markers are darkened. The map also displays the current track's notes as white lines.
Marker buttons Set the left or right song marker to the current playhead position. The markers must be at least 1 bar apart. Why markers? Recording always starts at the left marker. The loop button loops the section between the markers. When exporting to a wav file, you can choose to only export the range between the markers.
Music Studio Lite 1.6.1
17
Mixer The mixer is designed to edit whole tracks and set their volume and pan.
Track list
The track list allows you to select a track and scroll the list of tracks. Each track row holds its number, instrument icon, mute/ solo/FX icons (see below), the keyboard row icon (if 2 rows), and the recorded notes as lines. Move your finger across the note area to scroll the playhead and get an audio preview. Double tap any region of a track to enter the piano roll editor. Congruent (identical) and overlapping notes are marked red. Delete congruent notes and move overlapping notes to an additional track. Rearranging tracks and changing the color Tap and hold a track’s instrument icon for 1 second. A tip box will appear, instructing you to slide vertically to move the track or horizontally to change the track’s color. Gain bars These 2 green bars show the track's output gain for the left and right stereo channel, allowing you to see the volume and pan for each track at one glance. If the pan is centered, both bars have the same height.
Music Studio Lite 1.6.1
18
Warning triangle Indicates that some notes on the track are outside the instrument's note range. Tap it to see more information. Notes outside the range will be played back but may sound atypical for this instrument, since every real instrument has a limited range of playable notes. Keyboard row icon Only visible if 2 keyboard rows are enabled, indicating which keyboard row the track is assigned to. If you switch to two keyboard rows, a separate track for the new row will be created. Selecting a track will always assign it to the upper row. However, the track assignment of the lower row cannot be changed. If you switch back to one row, the lower row's track will be deleted if nothing has been recorded on it. Filter track The filter track appears only if the filter effect is enabled. The 2 lines represent the cutoff frequency and the resonance, like in the filter's panel. With the filter track selected, only the mute and the delete buttons are enabled. Muting the filter track prohibits it from being played back, allowing you to experiment with new filter settings.
Add track button The add track button is located at the end of the track list. It adds a new track with the current instrument to the bottom of the list.
Mute button Mutes the selected track, excluding it from playback. Muted tracks are darkened and are indicated by the mute icon.
Solo button If one or more tracks are switched to solo, all non-solo tracks will be excluded from playback.
FX button Sets the effects bus of the selected track. In short, effects with FX enabled act only on tracks that have FX enabled. The other effects are applied on all tracks except the ones with the crossed out FX icon. Per default, all standard effects apply to the track. Tap the FX button once to mark the track as an FX track, meaning that also the FX effects apply, in addition to the default effects. Tap the button again to exclude the track from all effects (useful for raw drum and base sounds). The blue FX icon next to the track icon indicates each track's FX state.
Edit button Switches to the piano roll editor for the selected track.
Duplicate button Duplicates the selected track, thereby copying its parameters and recorded notes.
Delete button Brings up a popup with the options to deleted or clear a track. Clear will delete its notes but leave the track in the list. Delete will remove the track from the list. If the track holds pitch bend events, a checkbox for clearing only the pitch bend data appears. Music Studio Lite 1.6.1
19
Pan knob and volume slider
The pan knob controls the track's stereo pan. Touch it and move your finger left or right to change the selected track's stereo pan. Double tap it to reset the pan to 0 (center). The LCD displays the current value (left is -127, center is 0, right is +127). The volume slider displays and sets the track's volume. Its function is identical to the instrument tab's volume slider. The LCD displays the current value from 0 to 100%.
Music Studio Lite 1.6.1
20
Sequencer The sequencer is designed for quick, bar-wise editing of the song. Select a range of bars (measures) and delete, repeat, move, or transpose them.
Track list The sequencer's track list is almost identical to the mixer's track list. Since the sequencer edits bars, track selection is not possible and the current track is not highlighted. Tapping a track's instrument icon will select all bars on the track.
New selection button Clears the current selection and starts a new one. Tap it, then draw a rectangle on the note area in order to select bars. Selected bars are highlighted white and their notes are colored dark blue. Tap a track's instrument icon to select the whole track.
Change selection button Adds or subtracts bars from an existing selection. Tap the button, then tap an unselected bar to add it to the selection, or a selected bar to deselect it. Tap a track's instrument icon to (de)select the whole track.
Clipboard (copy and paste) The clipboard holds a selection of bars which is retained even if another project is loaded. To copy something from one song into another, make a selection, then tap and hold until the copy button appears. Tap copy, load the other song and go back to the sequencer screen. Tap and hold where you want to paste the contents of the clipboard, then tap the paste button.
Move button Activates the move mode where the selected bars can be dragged around. The song length can be increased by moving bars past the song end.
Music Studio Lite 1.6.1
21
Duplicate button Duplicates the selected bars and selects the new ones which can be moved around immediately. The copied notes will appear red until they are moved, because they are congruent (identical) with the originals.
Repeat button Duplicates the selected bars and moves them to the right so that they start where the selection ended. The song length is automatically increased if the new bars reach past the song end.
Transpose button Brings up the transpose menu which allows you to change the tone pitch of the selected bars. The semitone buttons de/increase it by one semitone, the octave buttons by 12 semitones. The LCD displays the number of semitones currently transposed.
Quantize button Tap the quantize button to bring up the quantization popup for quantizing the selected bars.
Edit button Switches to the piano roll editor for the selected track. This button is disabled if the selection encompasses more than one track.
Delete button Deletes the notes in the selected bars.
Music Studio Lite 1.6.1
22
Song bar edit button Toggles the song bar edit mode where whole bars can be inserted and cut from the song. Tap anywhere to select a bar of the song (not just of individual tracks), which gets highlighted in red. The cut button deletes all notes in the selected bar and cuts it, i.e. shifts all later notes one bar to left and decreases the song length by 1 bar. The insert button inserts an empty bar at the position of the vertical line left to the red area. This means that the song length is increased by 1 bar and all notes to the right of the line are shifted one bar to the right.
Music Studio Lite 1.6.1
23
Piano roll editor
Piano roll view In contrast to the mixer and the sequencer screen, the piano roll editor displays only one track. The horizontal song ruler is still the same, but the vertical axis now represents keys. The mini keyboard on the left serves as a ruler for the note pitch. The background has the track's color scheme, where the dark stripes represent black notes. White horizontal lines between B and C keys mark the octaves. Notes are displayed as blocks, the color indicates the volume (velocity) from dark blue (silent) to green (default) to yellow (loudest). Congruent (identical) and overlapping notes are marked red. Congruent notes result in higher note volume. Delete congruent notes and move overlapping notes to an additional track. Notes with pitch bend data have a different texture.
Vertical scrolling Slide vertically on the mini keyboard to scroll and do the pinch gesture to zoom vertically. At low zoom factors, selecting individual notes is nearly impossible, but of course greater note ranges can be selected at once.
New selection button Clears the current selection and starts a new one. Tap it, then draw a rectangle in order to select notes. Selected notes are highlighted and the note range of the whole selection is displayed in the LCD.
Change selection button Adds or subtracts notes from an existing selection. Tap the button, then select a range to toggle it.
Draw button Tap it to enable the draw mode.
Music Studio Lite 1.6.1
24
Draw mode
In the draw mode, notes can be created without recording on the keyboard. A crosshair, an OK button and a new menu will appear. Underneath the crosshair, the translucent note is the one which will be created if you press the OK or the Done button. Move the crosshair to the desired note location and tap OK to create the note - immediately, a new translucent note awaits creation. The song length can be increased by dragging the crosshair past the song end. Press the done button to exit the draw mode. Draw mode note buttons The selected note button defines the length of the note to be drawn.
Draw mode dotted button Increases the note length by 50%.
Quantized drawing button Quantizes the new note even before it is drawn. If this button is enabled, the crosshair snaps to a raster defined by the selected note button.
Music Studio Lite 1.6.1
25
Move button Activates the move mode where the selected notes can be dragged around. The buttons in the menu (notes, dotted, done) have the same function as in draw mode. The OFF button disables quantization and allows for (almost continuous) movement with 1/192th precision. Tap one of the the lock buttons to lock horizontal or vertical movement, which is very handy if you intend to move or transpose only.
Duplicate button Duplicates the selected notes and selects the new ones which can be moved around immediately. The copied notes will appear red until they are moved, because they are congruent (identical) with the originals. Important: Not moving the new notes will cause them to be identical (colored red) to the originals. They will be played back with increased volume.
Length button Tap it to enable the length edit mode which brings up a new menu. The buttons in this menu (notes, dotted, quantize, done) have the same function as in draw mode. Either tap a note button to set the length of all selected notes to an absolute value, or move your finger horizontally to de/increase the relative length.
Volume button Toggles the volume mode where the volume (also called key velocity) of the selected notes can be modified by moving your finger vertically. The LCD displays the current volume of the first selected note, ranging from 0 to 127 (default is 100). The note color indicates the volume from dark blue (silent) to green (default) to yellow (loudest).
Quantize button Brings up the quantization popup for quantizing the selected notes.
Delete button Deletes the selected notes.
Music Studio Lite 1.6.1
26
Quantization popup
Quantization is the most important step after recording because it corrects the timing. If the quantization raster (resolution) is one quarter note, every selected note is moved to the nearest raster point in a 1/4 note raster. The selection of the right raster is crucial, therefore you might want to try out different settings for each recording. For example, if you played a rather fast melody and quantized it to 1/4, the timing will be ruined - in this case, just tap the undo button and try again with a higher resolution like 1/16. On the other hand, quantizing notes with a high resolution might not correct all timing errors you made when recording them.
Note buttons Set the quantization raster (or resolution) by selecting a note. In practice, low resolutions like 1/4 are the right choice for slow notes like the background cello in the demo "Canon in D (Pachelbel)". 1/16 fits to most melodies, while at 1/32 you will only notice the difference if you recorded fast notes (like a fast drum pattern) or at a low tempo setting.
Dotted button Increases the quantization raster by 50%. For example if you selected 1/8 dotted, the quantization resolution is 1/6 of a bar.
Triplet button Treats the notes as triplets, meaning that the raster interval is multiplied by 2/3. This allows for more swing and quantization of Jazz style melodies. Naturally, dotted and triplet cannot be enabled at the same time.
Note length checkbox If checked, note lengths will also be quantized, meaning that every note length will be an integer multiple of the selected quantization. This is especially handy if you want to enforce legato.
Soft (humanize) checkbox To keep a human touch to the recording, soft quantization will shift every note by just 50%, keeping it slightly off the perfect timing.
Music Studio Lite 1.6.1
27
Tempo popup
Tempo Tap or hold the +/- buttons to change the tempo in the range of 40 to 240 bpm (beats per minute). A faster way to set the tempo is to tap and slide the value on the LCD. An alternative tempo input method is to tap the Tap Tempo button with the desired tempo for at least two times. Hold the Preview button to hear a metronome preview of the current tempo and signature.
Signature The song signature can be set to a value between 2/4 and 7/4. Most songs have a signature of 4/4, meaning that 1 bar has 4 beats (i.e. the length of 4 quarter notes). Hold the Preview button to hear a metronome preview of the current tempo and signature.
Music Studio Lite 1.6.1
28
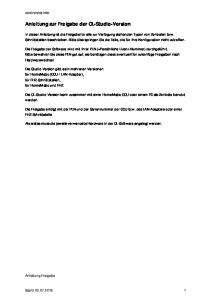
Effects Tab Bus structure In short, effects with FX enabled act only on tracks that have FX enabled. The other effects are applied on all tracks except the ones with the crossed out FX icon. The following diagram illustrates the audio signal flow:
• Tracks are treated separately depending on the FX bus setting. • Effects are always applied in the following order: pitch bend, amplifier, delay, equalizer, reverb. • If the amplifier effect (overdrive) is enabled, it’s applied to the tracks like a pre-fader effect in order to have a high overdrive even on quiet tracks. • All effects with the FX checkbox enabled are applied to the mix of all tracks with FX bus setting. • This is added together with the rest of the tracks (those without FX bus setting) • The rest of the effects are applied to the mix (those effects with the FX checkbox disabled) • The tracks with a no-FX setting are now added to the mix. • The limiter is applied, according to the master gain.
Music Studio Lite 1.6.1
29
Common Controls
Power button Simply switches the effect on or off.
Limit to FX tracks checkbox Puts the effect into the FX bus, meaning that it will be applied only to those tracks which have FX enabled (blue FX icon in the track list). All the other effects are still applied to all tracks after the FX effects are processed.
Preview button Identically to the instrument tab's preview button, it plays one or more notes (alternating) with the current instrument.
Default button Resets the current effect's settings to the preset values.
Music Studio Lite 1.6.1
30
Volume
Master gain This is not the device gain, instead it controls the gain of the internal limiter. High values may lead to unwanted volume compression or distortion, low values may not produce the desired volume. Different volumes may be required depending on your output route (the device's internal speaker, or earphones, or loudspeakers). In technical terms, this setting is required because if all playing instruments are mixed (added up), the resulting values will in most cases be much higher than 65535 (the 16 bit border) and clipping would occur. The limiter uses a smooth mathematical function (a curve) to compress larger numbers into the 16 bit range. The master gain slider controls the slope of this curve.
Device volume Brings up a popup with a slider which has the same function as the iPhone's hardware volume buttons. If the iPhone's internal speaker is used (not recommended), be sure not to turn it all the way up. If you connected external speakers, set this slider to maximum and control the volume via the speaker's volume controls for the best audio quality.
Decibel meters These gauges indicate the current output level of each of the stereo channels.
Music Studio Lite 1.6.1
31
Reverb Reverb simulates a room of a certain type (Hall/Canyon/Room) and size. If stuttering occurs during playback, decrease the reverb quality.
Reverb size Controls the size of the sound space. In larger spaces, the reverb is audible for a longer period of time. The size also depends on the selected reverb style, e.g. the largest room reverb is smaller than the largest canyon reverb.
Reverb brightness Low brightness gives the impression of a darker room (using a low pass filter), while maximum brightness leaves the reverb unfiltered.
Reverb stereo spread Controls the perception of stereo wideness of the reverb space. In technical terms, this slider sets the delay between the reverb reaching the left and the right channel.
Reverb mix (wet/dry) The mix slider controls the relation of the dry sound (the original, without the effect applied) and the wet sound (the effect's result).
Reverb style Selects the type of reverb (room, hall, canyon). Each style uses a different algorithm, thus the size slider has a different effect for each style.
Reverb quality Reverb requires a lot of processing power. In order to prevent playback stuttering on older devices or with complex songs, decrease the reverb quality. In technical terms, the reverb algorithm stays the same but the number of filters used in the reverbation filter chain is decreased.
Remember settings for each style (iPad only) As you change the reverb type, the previous settings you made for this type are recalled. If this checkbox is disabled, the reverb sliders remain unchanged if you change the reverb type. Music Studio Lite 1.6.1
32
Filter
The filter effect is a resonant low-, high-, or band-pass filter. The cutoff frequency and the resonance can be set by moving the crosshair, or by tilting the device if the accelerometer is enabled. The filter track in the mixer holds the recorded events (which can be deleted there). For synth sounds and drum kits, this is a very useful effect. Enable the accelerometer control, switch to the keyboard tab and play or record something while gently tilting the device from one side to the center. A commonly used effect is, with the filter type set to low pass, changing the cutoff frequency from low to high, while keeping the resonance low.
Resonance/Frequency display The crosshair indicates the current values of the cutoff frequency (x axis) and the resonance (y axis). Move the crosshair to change the values. This can also be performed while recording. Beware: high resonance values may lead to unpleasantly loud and high tones.
Filter type switch The filter type defines how the cutoff frequency influences the sound. • Lowpass: All frequencies above the selected cutoff frequency are dampened (attenuated). The sound remains unchanged if the crosshair is in the lower right corner. • Highpass: The effect behaves inverse to the lowpass. All frequencies below the selected cutoff frequency are dampened. The sound remains unchanged if the crosshair is in the lower left corner. • Bandpass: Frequencies above and below the selected cutoff frequency are dampened. The sound remains unchanged if the crosshair is at the bottom center.
Filter accelerometer axis If the accelerometer is enabled, tilting it in any direction changes the cutoff and the resonance. The sound remains unchanged if the device lies flat on a surface.
Music Studio Lite 1.6.1
33
• X+Y: Tilting along the x axis changes the cutoff frequency, while the y axis changes the resonance. Starting from the centered position, all 4 quadrants are symmetrical, i.e. tilting the device to the far left has the same effect as the far right. • X: Filter and cutoff frequency are both changed if the device is tilted in the x axis. • Y: Filter and cutoff frequency are both changed if the device is tilted in the y axis.
Accelerometer sensitivity With the sensitivity set to low, the device needs to be tilted almost 90 degrees to achieve the maximum effect. At high sensitivity, small movements are sufficient to set the filter values to maximum.
Snap back checkbox If snap back is enabled and the crosshair is moved, it snaps back to its original location after you release it.
Music Studio Lite 1.6.1
34
Pitch
If the pitch bend effect and the accelerometer button in the keyboard tab are enabled, the pitch of the currently played notes can be influenced by tilting the device. Unlike most MIDI sequencers, Music Studio stores pitch bend data per note, not just per track. This means that two simultaneous notes on the same track can have different pitch bend data (events). The big advantage of this method is that editing a note automatically affects the pitch bend data for this note, but does not affect any other notes on the track (other software sequencers commonly ask if you want to move the pitch bend data too, this is obsolete with this method). In the piano roll editor, notes with pitch bend data have a different texture (a vertical color gradient).
Semitone slider Set the pitch bend range with the semitone slider from +/-1 to +/-24 semitones.
Sensitivity slider The tilt angle required to bend the maximum semitone range is controlled with the sensitivity slider. The text to the right of the sliders clarifies the behavior of the current setting (e.g. the device needs to be tilted 45 degrees to achieve a pitch bend of 8 semitones).
Pitch bend accelerometer axis This pulldown menu selects if the pitch bend reacts to tilt in the x or the y direction.
Pitch bend invert axis checkbox Enable it to invert the behavior of the current accelerometer axis, e.g. moving down (instead of up) will increase the pitch.
Pitch bend record mode The recording mode controls how existing pitch bend data is treated at recording. • In overwrite mode, existing pitch bend events on the recorded track are overwritten by the new ones. • Overdub mode preserves existing pitch bend data and stores the new pitch bend events only for newly recorded notes.
Music Studio Lite 1.6.1
35
Projects Tab Introduction
In the full version, the projects tab can be used to create new projects, load, save and delete existing songs, or to export songs into WAV or MIDI files which can be transferred to your Mac/PC. The lite version can only load the demo songs.
Filename textfield
If a project is selected, its name is displayed in the textfield.
File list
The list displays the type, name and length (or size) of every file. Demo songs and beats are organized in separate folders. Select a file to view its details (date, size) in the area below the list. Double tap a file or a folder to open it.
Music Studio Lite 1.6.1
36
Beats Beats contain one or more loopable drum tracks which can be appended to a song. Tapping a beat immediately plays a preview, which simplifies the process of finding the beat you are looking for. If the current song is empty, loading a beat applies its tempo and reverb settings and enables loop playback and recording. Otherwise, a popup lets you choose to append the beat tracks to the current song or to replace all beat (drum) tracks of the current song with the beat’s tracks. In practice, beats are great to start a song with, and are also handy for trying out different rhythms for an existing song. When appending a beat to an existing song, you may want to use the Sequencer’s repeat button to manually loop (extend) the beat to the duration of the song.
Buttons New Creates a new project, deleting all tracks and resetting all effect parameters in the process.
Load Loads the selected .xms or .mid file. You can also double tap a song to load it.
Music Studio Lite 1.6.1
37
Setup Tab Differences on the iPad On the iPad, all settings are organized on one screen, while on the iPhone/iPod touch they are split up into sub screens.
General settings
Latency The time interval between your finger touching a key in the keyboard tab and the sound being audible is called latency. Low latency is required for a musician to feel connected with the virtual instrument and to play fast pieces. However, on slower devices, high CPU load can lead to stuttering/crackling in the audio output. This can happen if a complex song with many tracks is played back or if the device is busy with background tasks like mobile phone network processes. To avoid these performance dropouts, the latency can be increased, however the keyboard's responsiveness will suffer. You might want to choose the lowest possible latency for recording and a higher latency to ensure stutter-free editing and playback.
Polyphony Polyphony defines the maximum number of notes that can be played simultaneously. High polyphony requires more CPU and can lead to stuttering/crackling in the audio output, but low polyphony can result in notes fading out too soon. If it is set to 16 and at one point during playback, the song would require 17 notes to be played simultaneously, the oldest note will quickly be faded out to allow the new one to play. The required polyphony of a song depends on the number of simultaneous notes on all tracks, and heavily on the release times. When exporting a song to a wav file, a polyphony of 128 is applied. In addition to this setting, the polyphony is automatically restricted for each track to 16 (8 on devices prior to the iPhone 4).
Music Studio Lite 1.6.1
38
Continuous playhead movement This checkbox appears only on the iPhone 3GS, iPod Touch 2nd generation, iPad and newer devices. In order to save CPU power, this setting is off by default and the playhead in the tracks tab moves only from beat to beat. Enable it to trade a lot of CPU power for more precise playhead movement (may introduce playback stuttering).
Lock interface orientation (iPhone only) Per default, the interface is adapted to the current device orientation, i.e. if the home button is left or right in landscape orientation. If this checkbox is enabled, the current interface orientation is locked. On the iPad, use the hardware switch beside the volume buttons to lock the interface orientation.
Restore defaults button Brings up a popup asking you if the factory defaults should be restored. This means resetting all preferences in the setup tab and creating a new song. Saved songs (i.e. all files in the projects tab file list) will remain unchanged.
Music Studio Lite 1.6.1
39
Keyboard settings
Velocity control Enable velocity to control the note volume while playing on the keyboard. If set to Touch-Y, the volume depends on where you touch a key (upper end quiet, lower end forte). The accel setting allows you to control the note volume with the accelerometer by tilting the device in the selected axis.
Snap to white keys If enabled, scrolling in the keyboard tab will snap to the nearest white key.
Allow touches between black keys If enabled, white keys can be touched in the area between the black keys. Otherwise, white keys can only be touched on the area below the black keys.
Allow touches on key borders Allow touches on key borders If disabled, an invisible 5% border is between the white keys in order to minimize accidental touches.
German key labeling The German key naming system uses the letter H instead of B and B instead of A#. If checked, key labels on the keyboard tab and the piano roll editor's display use this naming convention.
Auto quantization To save time, quantization can be automatically applied after each recording on the keyboard. The default setting is off, meaning that the sequencer or the piano-roll editor need to be utilized in order to quantize notes. Keep in mind that automatic quantization can lead to undesirable results and is not undoable. It is recommended for bass and drum recording.
Transposition If you tap a C on the keyboard with the transposition set to +2, a D will be played. The transposition range of -11 to +11 semitones allows you to play in a different key without having to learn the melody again.
Music Studio Lite 1.6.1
40
Accelerometer settings Pitch bend, the filter effect and the keyboard note velocity can be controlled via the accelerometer. The global settings in this screen might come in handy if you use the accelerometer a lot. The crosshair in the accelerometer panel indicates the current device tilt as perceived by the app (after processing the calibration, threshold and reactivity settings).
Threshold slider Device tilt is ignored up to the angle set the threshold slider. At a high threshold, the device can be tilted by about 15° until accelerometer vales are recorded.
Reactivity slider High reactivity increases the effect of accelerometer noise while low reactivity leads to sluggish behavior (which may be a desired effect in some cases).
Calibration Tap the calibrate button to set the current device tilt as the centered position. The Reset Calibration button restores it.
Music Studio Lite 1.6.1
41
Interface settings
Instruments tab Keep attack/release times on instrument change (iPhone only) If this is disabled, each time you select an instrument its default attack and release time will be set. If enabled, the current track's attack/release durations are kept when you select another instrument. On the iPad, this setting is included right in the instruments tab.
Tracks tab Scroll on the margins when moving notes If enabled, the sequencer and the piano roll editor automatically scroll if you move a selection to the edge. Centered zooming If checked, the pinch gesture in the tracks tab zooms into the center of the song ruler. Otherwise, the left song ruler position stays fixed and the right border changes when zooming.
Effects tab Remember reverb settings for each type (iPhone only) As you change the reverb type, the previous settings you made for this type are recalled. If this checkbox is disabled, the reverb sliders remain unchanged if you change the reverb type. On the iPad, this setting is included right on the reverb screen in the effects tab.
Music Studio Lite 1.6.1
42
Metronome settings
Volume The volume slider controls the gain of the metronome tick sound.
Style Choose between five metronome sounds. The higher pitched (first) sound indicates the beginning of a bar, the other sound marks the other beats.
Precount Set how many bars a recording will be precount. This is handy if you want to record the first note at the very beginning of the song (beat 1.1). Without precount, there wouldn't be enough time to tap the record button and immediately play the first note. Additionally, precount helps to get in line with the rhythm before you start playing (recording). For example if precount is set to 2 bars, the playhead position is at the beginning of the song (1.1) and you tap the record button, the playhead will count 2 bars from -2.1, -1.1 until the recording starts at 1.1.
Precount only at song start If checked, precount is only applied if the left song marker is positioned at the beginning of the song. If it is not checked and the left song marker is for example at position 7.1, a 1-bar precount will begin at 6.1.
Music Studio Lite 1.6.1
43
Troubleshooting Guide For more support-related discussions, please refer to the Forum on the product website. Rebooting properly Rebooting your device will resolve most issues. Press and hold the Home and the Sleep/Wake button for about 10 seconds until the Apple logo appears (don't slide to power off, hold longer). Key presses have a very high latency / I cannot press more than 2 keys at once • Deactivate the Zoom feature in the Accessibility section of the iPhone's Settings. Launch the Settings app, tap General, Accessibility, Zoom and turn it off. • Switch to a lower latency in the general section of the setup tab. • If you still experience latency problems, please properly reboot your device. The audio output stutters Decrease the reverb quality, increase the latency, or decrease the polyphony to reduce the CPU load. If the song (together with the effects, latency and polyphony settings) requires more CPU speed than your device can provide, audio stuttering occurs. The audio output sounds noisy Use earphones or external speakers because the device's internal speaker cannot cope with the broad frequency spectrum of the instruments. Additionally, decrease the master gain (in the volume section of the effects tab) to prevent clipping. This might be necessary if many instruments play simultaneously, because their gains add up. Some notes end too early during playback Increase the polyphony in the setup tab, but keep in mind that this may lead to stuttering with complex songs on older devices. Do I lose my songs if I remove the app from my device? Yes, if you tap and hold the app icon and tap X to remove the app, all files and settings are deleted too. Even if you sync the app back from iTunes onto your device, it will be a fresh install and your files won’t be restored. In order to save your songs, transfer them to your Mac/PC with iTunes file sharing. If you restore your iDevice by pressing the restore button in iTunes, your songs will be restored automatically (along with a reinstallation of iOS and all other apps).
Music Studio Lite 1.6.1
44
Version history Version 1.6.1 Released in February 2011 Major new features • Clipboard: tap and hold a selection in the SEQ screen to copy and paste between songs • Auto-quantization after recording (in the keyboard setup) • Tempo precision increased to 0.1 bpm Minor changes • Fix: the pitch bend range slider influenced recorded note’s pitch bend values (now it acts on live notes only) • iPad: behavior of “Sync keyboard row instruments” improved • Tapping on the tracks tab a second time switches to the MIX screen • Stability and performance improvements
Version 1.6 Released on December 16, 2010 Changes • Rearrange tracks in the MIX screen (tap and hold the icon) • Keyboard transposition setting • Track editing operations don’t pause playback anymore • Note selection is retained when switching from the piano-roll editor to the SEQ screen • Fix: Moving the playhead during a track editing operation cancelled the editing mode • Stability and performance improvements
Version 1.5.1 Released on October 26, 2010 Bug fixes regarding • Audio output and bluetooth accessories • Pitch-bend recording • Crashes at launch Minor changes • Additional polyphony choices (8 and 12) for older devices • iPad: if “Sync keyboard rows” is on and a track is selected, the lower row’s instrument is changed too • Fix: the YouTube button did not work
Music Studio Lite 1.6.1
45
• Fix: when an instrument was changed during playback, the selected instrument was silenced • Fix: graphics glitch when changing (loading) an instrument on newer devices • Fix: the projects tab’s Load button did not display its down state correctly • Fix: the redo button did not work in some cases
Version 1.5 Released October 16, 2010 Major new features • New instruments: HipHop Kit, Sound Effects Kit, Trance Lead • 10 beat loops • iPhone 4 retina display supported • Improved multitouch on the keyboard (slide and play simultaneously) • Battery consumption improved • Lots of performance optimizations and stability improvements Major bug fixes • iPad-only fix: audio route changes (connecting earphones) disrupted audio output • iPad-only fix: changing the metronome type did not load the new metronome until the next launch • Fix: accelerometer pitch bend with adaptive calibration was too sensitive • Fix: signature 7/4 was not selectable in the tempo popup on the iPhone • Fix: when deleting congruent notes, both were deleted instead of only one • Fix: volume and pan changes did not affect notes that were already playing Keyboard tab • Even when keys are touched, the slide/pinch gestures on the menu can now be performed (scroll the keyboard with one finger on the menu while holding down some keys with your other hand). • Menu buttons can be tapped while keys are touched (e.g. to tap stop while you are still holding down some keys) • iPad: number of keyboard rows and keyboard row syncing setting are now retained Tracks tab • Piano-roll editor: note colors improved, now ranging from blue to green to yellow, overlapping notes are red • Piano-roll editor: selection of overlapping and congruent (red) notes improved • Fix: filter recording cleared the filter track (was overwrite instead of overdub) • Fix: filter track visualization improved • Fix: zooming in the piano-roll editor sometimes was erratic • Fix: too many undo points were created when drawing notes Projects tab • Folders for demos and beats
Version 1.4 Released August 3, 2010 Major new features
Music Studio Lite 1.6.1
46
• iPad optimization: Music Studio is now a universal binary • New free instrument: a gorgeous grand piano (replaces the old grand piano) • iOS 4 multitasking enabled Keyboard tab • Tap and hold the metronome button to bring up the tempo popup • Fix: accelerometer pitch bend did not conform to the desired pitch range in some cases Instruments tab • iPad: checkbox to synchronize the keyboard rows Projects tab • New demo added: “Club on fire” by TecWeed Misc • A tempo or signature change is now an undo step • Fix: undo unloaded used samples in rare cases • Fix: orientation changes were not handled correctly by the loading screen • Various memory optimizations and stability improvements
Version 1.3 Initial version. Released June 26, 2010
Music Studio Lite 1.6.1
47