Adobe Reader XI To read a PDF on your computer you usually use Adobe Reader. Adobe Reader is a free program and you can get versions for Windows, Mac or Linux computers. If you don’t have Adobe Reader on your computer already, download and install it from http://www.adobe.com. Adobe Reader XI is the latest version of Adobe Reader and is worth installing because it lets you use the Comment tools on any PDF, not just those that have had ‘extended user sights added’. This means that if you have: • downloaded a PDF textbook (e.g. a TeeJay maths book) from the Books for All Database); or • converted a Word file to PDF using the built in converter in Word 2010; or • scanned a paper worksheet or resource to PDF; you will be able to type answers and use the Adobe Reader drawing tools in the resource. (With older versions of Reader, the author of the PDF had to ‘reader enable’ the file or ‘extend user rights’, which required Acrobat Professional, in order for the learner to have access to the comment tools.)
Set up Adobe Reader Preferences •
If you see the How To window on the right side of the screen, uncheck the Show How To Window at Startup to turn this off.
•
Right-click on the grey toolbar and in Select & Zoom, choose the Select Tool and then the Hand Tool.
•
If you always want to open the book at the last page you read, click on Edit > Preferences > Documents and then tick Restore last view settings when reopening documents.
•
Click on Edit > Preferences and click on Reading: a. Set the Reading Order to Infer reading order from document (recommended). b. In Screen Reader Options, for Pages vs Documents, choose to Only read the current visible pages.
Adobe Reader XI c. In Read Out Loud Options, deselect Use default voice and choose a voice from the menu (e.g. Heather or Stuart, assuming you have them installed). Deselect Use default speech attributes and choose the pitch and speed you prefer for the voice.
Adjust Screen colours You may find the paper easier to read if you change the paper background or text colour. •
Click Edit > Preferences > Accessibility, then Replace Document Colors. Tick Custom Color and choose the desired text and background colour. Tick Only change the colour of black text and line art and Change the color of line art otherwise some information may not be visible.
•
If the computer has been set up with a specified colour scheme already, you could tick Use Windows Color Scheme although this can sometimes be unreliable. You may need to set the document colours within Custom Colour settings or you could try out the High Contrast options.
•
To change the highlight colour for the answer boxes, click Edit > Preferences > Forms and choose a colour for the Fields highlight color.
Smooth text on screen display •
Click Edit > Preferences > Page Display and set Smooth Text to be For Monitor (if you have a CRT monitors) or For laptop/LCD screens (if you have a laptop or a flat panel screen). This will improve the clarity of the text displayed on screen.
Spellchecker •
Go to Edit > Preferences > Spelling and set Check spelling while typing on. You may choose an alternate underline colour if you wish, particularly if you have altered the Adobe Reader page and text colours.
•
Choose the correct spelling dictionary, go to Edit > Preferences > Spelling, select English (UK) and then click Check. Uncheck the others if not needed.
•
If you choose a foreign language dictionary as well as English UK, ensure that English (UK) is at the top of the list by clicking on the Up button.
Set up auto-save •
Click Edit > Preferences and then Documents. Under Save Settings, select Automatically save document changes to temporary file every and then type in the time you want to have between saves. The default is to save every 5 minutes. 2
Adobe Reader XI
Turning pages and moving around the book •
To turn pages, use the arrows on the toolbar, or right and left arrow keys on the keyboard.
•
To scroll up or down the page: o
use the scroll bar;
o
press the Space bar to move down a screen at a time;
o
press the Page up/down keys.
•
Use the zoom buttons if you need to zoom in on the paper.
•
To fill the screen click the View Page Width button or press CTRL+2.
•
To see the whole page click the Fit Page button or press CTRL+0.
•
Choose View > Page Display > Single Page (not ‘continuous’) to see a page at a time. Or try Two Page View to see two pages at a time.
•
To get back to 100% click on the arrow to the right of the magnification level and choose Actual Size
Type number of page and press Enter
Previous page
Next page
Zoom out
Zoom in
View width of page
View whole page
Edit > Preferences > Accessibility to change page and text colours page
Click to see structure (if the book has one). Click to go to the section.
3
Adobe Reader XI
Reading the book with Read Out Loud Adobe Reader has free built-in text-to-speech called Read Out Loud. It is quite basic, not that easy to control and lacks features that you find in other text-to-speech programs, but it is readily available and free.
Set up and choose your voice • •
Click on Edit > Preferences > Reading. Set the Reading Order to Infer reading order from document (recommended).
•
In Screen Reader Options, for Pages vs Documents, choose to Only read the current visible pages.
•
Read Out Loud can read using most voices installed on your computer. Choose your voice by unticking Use default voice, and choose a voice from the list. If you want your voice to speak at it’s standard speed and pitch, tick Use default speech attributes. If you want to adjust the voice, untick this, and then set the pitch and speed. The standard speed is usually 190 words per minute: if you are new to text-to-speech you might reduce the speed slightly to perhaps 180 wpm. Tick Read form fields. Click OK.
•
• •
Read some text •
Now click View > Read Out Loud and then Activate Read Out Loud or press SHIFT+CTRL+Y.
• •
Click Tools > Select and Zoom > Select Tool Now click on some text and it will read out that chunk of text – usually the paragraph. To read the next paragraph or line, click with the mouse or press the Down arrow key. To pause and restart the speech, press SHIFT+CTRL+C; to stop it press SHIFT+CTRL+E. You can also have the page or the whole document read out (View > Read Out Loud > Read This Page only or Read to End of Document). However, you may find that it reads out the text on the page in a strange order, which is why the click and read method above is better for most candidates. The limitations of Read Out Loud are: o sometimes it doesn’t read the full line or sentence; o you can’t select the exact text that you want to read; o sometimes it doesn’t read text at all and just says ‘blank’; o it doesn’t highlight the words as it reads. o you can’t change the pronunciation of particular words.
• • •
•
4
Adobe Reader XI
Reading the book with Ivona MiniReader Ivona MiniReader is a simple text reader which adds a floating toolbar on the screen and can read out text from almost any program – Adobe Reader, Microsoft Word, internet browsers etc.. MiniReader can use Heather and Stuart and most other voices on your computer.
Download and install • •
Go to http://www.ivona.com/en/mini-reader/ and click on the Free Download button. Follow the instructions to install MiniReader. When you install MiniReader, it offers you the option to install some of the Ivona voices for 30 day trial – we suggest that you decline this offer and untick the Start the Ivona voices installation, unless unless you are interested in evaluating the voices.
Reading text with MiniReader • •
•
•
Click Start > All programs > IVONA > IVONA MiniReader Open your PDF, select text then click on the Play button (or press CTR+SHIFT+SPACE), and MiniReader will read it out. Click Pause or press the keyboard shortcut again to pause the speech. Double click on a word to select it, triple click to select a line and quadruple click to select the whole page. You can switch between the Mini and Full toolbar by clicking on the Show/Hide button. The Full toolbar lets you change voice and adjust speed and volume:
Some limitations of MiniReader compared to other paid-for text readers are that you have to manually select the text to be read, it doesn’t highlight the text as it reads, and there is no pronunciation dictionary. The paid-for Ivona Reader comes with extra voices, can convert text to MP3 files, has a reading window that does highlight the text as it reads, and adds reading buttons to internet browsers, Word and email.
5
Adobe Reader XI
Books with Answer Boxes Some PDFs (e.g. SQA digital papers or many Heinemann maths from the Books for All Database) have answer boxes and other facilities for interacting as well as reading the document.
Highlight the answer boxes If you want the answer boxes to be highlighted click on the Highlight Fields button at the top right of the paper (the answer boxes are called ‘Fields’).
Type into the answer boxes •
Go to the first page, click in the first answer box and type your answer.
•
Press the TAB key to move to the next answer box, or click on the next box with the mouse, and type in the details.
•
Press SHIFT-TAB to move back a field.
6
Adobe Reader XI
Comment Tools The Comment tools let you draw and add text to the resource. Click Comment on the right side of the toolbar and then click Annotations.
Notes You can use Notes to collect ideas and text as you read through the resource. •
, or right-click where you To add a note, either click on the Note Tool want the Note, and choose Add Note. (This will only work outside the answer boxes.)
Highlights Highlights can be used to mark key locations or sections of the text. •
Click on the Highlight button text to be highlighted.
•
To delete the highlight, right-click on the highlight and choose Delete.
•
To change the highlight colour, right-click on the highlight and choose Properties. If you want to keep the colour for all your highlights, tick Make Properties Default.
and then select the
Annotations Add notes, highlight, underline and strike-though text, add text and audio comments Drawing Tools Text boxes, labels, lines, arrows, shapes etc Use Text Comment to type in answers
7
Adobe Reader XI
Text Comments •
Use the Text Comment tool to add comments, numbers or text to diagrams. This is particularly helpful for PDFs that do not have answer boxes.
•
To change the text comment font and colour, type in your first comment, then select some of the text you have just typed. You should see the Properties appear, and then you can choose the font, size, colour etc.
Record Audio The Record Audio tool lets you record an audio comment. This can be useful for a teacher to record instructions, and give feedback, or for a pupil with significant writing difficulties to give a response. •
then click on Click on the Record Audio button the page to place your recording. Click the Red record button to start recording and the black Stop button to stop.
•
Once you are happy, click OK, choose an icon, and the recording will be inserted into the document.
•
You can add as many recordings as you want.
Drawing tools •
To draw a line on the resource, click on the Line tool, then click on the places where you want the line to start and end. To stop drawing, press the ESC key on the keyboard
Draw lines by clicking on the Line Tool, then click to draw each end of the line
•
The default line colour is red, which is good for viewing on screen but can be faint when printed out, so right-click on the line you have drawn, choose Properties and then choose a different, darker line colour that will be clearer when printed out on a black and white printer.
•
Now tick Make Current Properties Defaults so that the lines you draw from now on will all be a darker colour. Click OK. 8
Adobe Reader XI •
To stop drawing lines press the ESC key or click on the Select Tool in the toolbar.
•
For drawing use the Cloud, Arrow, Line, Rectangle (hold Shift key to draw a square), Ellipse (hold Shift key to draw a circle) and Pencil tools. Click on the tool you need, and then click on the page to draw or insert the item.
•
You can change the appearance of an item – for example, the colour of the text, the thickness of a line, or the fill colour of a shape, by right-clicking on the item, and choosing Properties.
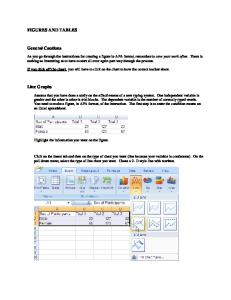
You can use the Comment tools to answer all sorts of questions. In the maths book below we use the highlight tool to colour numbers, and the circle tool to mark the correct answer. Click on Comment to see the annotation and drawing tools Colour the numbers by clicking on the Highlight Tool, and then double click on the number you want to mark
Circle the numbers by clicking on the Circle Tool, then draw a Circle round the number
Analysis toolbar •
Click on Extended in the top right of the toolbar. If you can’t see Extended, click View > Extended > Extended Features. Go to Edit > Preferences > Units to set the units to cm or mm).
•
Click on Measuring Tool to see the measuring options.
•
Select the Distance tool to measure the distance between two points. Click the first point, move the pointer to the second point, and click again.
•
Select the Perimeter tool to measure a set of distances between multiple points. Click each point you want to measure. Then, double-click the last point.
•
Select the Area tool to measure the area within the line segments that you draw. Click each point you want to measure. After you have clicked at least two points, click the first point to complete the area measurement.
9
Adobe Reader XI •
To stop measuring, press ESC.
•
To delete a measurement, right-click and press Delete.
Viewing your comments and answers Click Comments List in the Comment tools to see all the answers, comments and mark-ups you have added to the PDF. This can be useful for reviewing your notes. You can then review the notes and copy the text in them into another application, such as Word, for creating your answers.
Spell checker •
If the spellchecker is enabled, Adobe Reader will underline possible spelling mistakes when you type them into the answer boxes.
•
You can spellcheck a word by right-clicking on it and choosing from a list of suitable words.
•
Or at any time you can press F7, click on Start and use the Spellchecker dialogue box.
•
To turn the spellchecker on or off, go to Edit > Preferences > Spelling. If you do use the spellchecker, make sure the correct dictionary (English United Kingdom) is selected.
Saving and printing •
Save as you work through.
•
Go to File>Print (Ctrl-P) and under Comments and Forms choose Document and Markups, and then click OK.
•
MAKE SURE YOU SET “DOCUMENT AND MARKUPS” OTHERWISE IT WILL NOT PRINT YOUR ANSWERS AND COMMENTS!
10
Adobe Reader XI
Summary To:
Do this:
See the table of contents
View > Navigation Panels > Bookmarks or press F4. (Note that some PDFs don’t have bookmarks.)
Open the book at the last page you read
Edit > Preferences > Documents and click Restore last view settings when reopening documents
Go to the next page
Click the Down or Right arrow in the toolbar, or press PageDown key, or press the Down Arrow key
Go to the previous page
Click the Up or Left arrow in the toolbar, or press PageUp key, or press the Down Arrow key
Make the text larger
Click on the zoom buttons (see screen shot) to zoom in and out.
See a whole page
Click View > Zoom > Fit Page or press CTRL+0 to see the whole page.
Fit the text to the screen
First set the Page Display to be a single page View > Page Display > Single Page. Now click Page > Zoom > Reflow and the text will be ‘reflowed’ to fit across the screen. This means you don’t have to scroll left and right if you have zoomed in to make the text very large.
Use Reading Mode (this hides the toolbars at the top of the screen)
View > Reading Mode press CTRL+H. Press CTRL+H again to come out of Reading Mode.
To use Full Screen Mode (this hides everything apart from the page)
View > Full Screen Mode or press CTRL+L. Press CTRL+L again to come out of Reading Mode. In Full Screen Mode you can press a Left Mouse Click to go forward a page and Right Mouse Click to go back (see Edit > Preferences > Full Screen Mode)
To see two pages at once
View > Page Display > Two Up
To change the colours
Edit > Preferences > Accessibility, tick Replace Document Colours and then choose the colour for the Page Background and the Document Text. Tick Only change the colour of black text and line art and Change the color of line art otherwise some information may not be visible.
To have the book read out by the computer with Read OutLoud
Most PDFs can be read out by the computer. Some can’t: if the publisher or author has prevented access to the text (to stop it being copied) then the text reader may not be able 11
Adobe Reader XI to get at it to read it.
Before you use Read OutLoud, choose a computer voice by going to: Edit > Preferences > Reading, Untick Use default voice then choose a voice from the list. Test it to make sure it works and adjust the speed to suit you. Don’t choose an ‘Elan’ voice because they don’t work with Adobe Reader. Click OK to close the preferences, then click View > Read OutLoud > Activate Read OutLoud There are a few ways to have the text read out: View > Read Out Loud > Read This Page Only will read the page you’re looking at. View > Read Out Loud > Read To End of Document will read to the end of the book. Or, choose the Select Tool (Tools > Select and Zoom > Select Tool), click on the text, and it will read out the sentence or paragraph you have clicked.
Switch access to Adobe Reader books To use switches to turn the pages in Adobe Reader, you need: •
Switches and a switch interface to connect them to the computer;
•
Set the switches to control the Left and Right arrow keys to turn pages back and forward. For example, this Don Johnston Switch Interface lets you turn pages with switches.
12