How to Build Corner Kitchen Cabinets An Easy Project for a Remodel – the Corner Cabinet Plans
Kitchen Kitchen
I was recently asked by a reader if I had plans on the site to build corner kitchen cabinets… I do have a post about my lower corner kitchen cabinet not fitting through the front door (d’oh!) but did not have any corner kitchen cabinet plans. The plans are based on the corner cabinets I built for my own kitchen, including the “L” shaped door – I was too cheap the spend the money on the corner cabinet door hinges to make the doors open flat. The “L” shaped doors still open wide enough for me to get my larger appliances in and out, including my 6qt. slow cooker! The doors don’t have to be built the same way I show here – build them to suit your needs! The materials and lumber listed are to build one upper cabinet and one lower cabinet. The lower cabinet also rests on adjustable cabinet feet. I used the adjustable feet to keep the cabinet off of the floor. The hardware includes clips for the kick plate.
Materials: 1-1/4″ pocket hole screws 1-1/4″ brad nails 4 – overlay hinges (like these) 4 – corner cabinet door hinges, optional (like these) 4 – adjustable cabinet feet (like these) Edge banding, optional Wood glue Sandpaper (100, 150, 220 grits) Finishing supplies (primer & paint, or stain, sealer)
Lumber: 3 2 2 1 3
– 1×2 at 6′ – 1×3 at 6′ – 1×3 at 8′ – 2′ x 4′ sheet of 1/4″ plywood sheets of 3/4″ plywood
Cut List: 1 – 3/4″ plywood at 31″ x 36″ – Lower Back 1 – 3/4″ plywood at 31″ x 35-1/4″ – Lower Back 2 – 3/4″ plywood at 21-1/2″ x 31″ – Lower Sides
2 – 3/4″ plywood at 34-1/2″ x 34-1/2″ – Lower Bottom & Shelf 1 – 3/4″ plywood at 2-1/2″ x 13″ – Lower Stretchers 1 – 3/4″ plywood at 2-1/2″ x 13-3/4″ – Lower Stretchers 2 – 1×2 at 19-3/4″ – Shelf Supports 1 – 1×2 at 33-3/4″ – Shelf Supports 1 – 1×2 at 34-1/2″ – Shelf Supports 3 – 1×3 at 28-3/4″ – Door Stiles 1 – 1×3 (ripped to 1-3/4″ wide) at 28-3/4″ – Door Stile 4 – 1×3 at 8-1/4″ – Door Rails 2 – 1/4″ plywood at 9″ x 24-1/2″ – Door Panels 1 – 3/4″ plywood at 24″ x 24″ – Upper Back 1 – 3/4″ plywood at 23-1/4″ x 24″ – Upper Back 2 – 3/4″ plywood at 11-1/4″ x 24″ – Upper Sides 3 – 3/4″ plywood at 22-1/2″ x 22-1/2″ – Upper Top, Bottom, and Shelves 2 – 1×2 at 9-1/2″ – Shelf Supports 1 – 1×2 at 21-5/8″ – Shelf Supports 1 – 1×2 at 22-1/2″ – Shelf Supports 3 – 1×3 at 23-1/2″ – Door Stiles 1 – 1×3 (ripped to 1-3/4″ wide) at 23-1/2″ – Door Stile 4 – 1×3 at 6-1/2″ – Door Rails 2 – 1/4″ plywood at 7-1/4″ x 19-1/4 – Door Panels
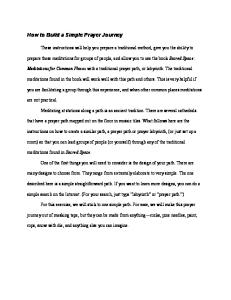
Click on the drawings for a larger view!
Notes: The steps apply to both the upper and lower cabinets unless otherwise noted.
Step One Cut the pieces for the back. With the pocket hole jig set for 3/4″ material, drill pocket holes in one edge of the shorter back piece as shown in the drawings. Secure the back piece using glue and 1-1/4″ pocket hole screws.
Step Two Cut the pieces for the sides and drill pocket holes in one long edge of each piece. Secure the to the back pieces using glue and 1-1/4″ pocket hole screws.
Step Three Cut the pieces for the bottom and shelves, as well as the top for the upper cabinet. Cut the notches as shown using a jigsaw or a bandsaw. Drill pocket holes as shown in the bottom pieces as well as the upper top. Secure the bottom pieces to the back and sides as shown using glue and 1-1/4″ pocket hole screws.
Step Four Cut the pieces for the shelf supports. Secure the longest support to the back first, using glue and 1-1/4″ brad nails, then attach the remaining pieces. The shortest pieces will be located 1″ back from the front edge of the sides. Position the shelves on the supports and secure in place using glue and 1-1/4″ brad nails.
Step Five For the upper cabinet – position the top as shown and secure to the back and sides using glue and 1-1/4″ pocket hole screws.
Step Six Cut the pieces for the stretchers. Drill pocket holes in each end of the shorter piece, and one end only of the longer piece. Assemble the pieces in an “L” shape using glue and 1-1/4″ pocket hole screws. Position the pieces at the upper part of the sides as shown. Secure in place using glue and 1-1/4″ pocket hole screws.
Step Seven Cut the pieces for the doors. One stile will be narrower than the other three for each set of doors – see the drawings. Drill pocket holes in each end of the shorter pieces locating the pocket holes so they will not interfere with the router bit when the recess is cut for the panels. Assemble the door frames using glue and 1-1/4″ pocket hole screws.
Step Eight Use a 3/8″ rabbeting bit and a router to cut a 1/4″ deep recess on the inside of the frame for the door panels. Cut the panels for the doors, and secure in place with glue and clamps.
Step Nine If creating the “L” shaped doors, use 1-1/4″ brad nails and glue to attach the doors to each other. If using the corner cabinet hinges, install the hinges according to the manufacturer’s installation instructions. Attach the 3/8″ overlay hinges on the doors, then install the doors in the cabinet. The top and bottom of the doors will overlap the opening by 1/2″, and the sides will overlay by 3/8″.
Finish as desired. Building corner cabinet for a kitchen is very easy, and there are several different ways the cabinet can be built. This was the design I used in my own kitchen and has worked really well for me! Have any questions about the corner kitchen cabinet plans? Let me know at cher {at} designsbystudioc {dot} com! Disclaimer: This post contains affiliate links. What that means is that if the link is clicked and a purchase is made, I will receive a commission.
A Simple Bookcase to Build with an Open Design
DIY Plans Bookcase
to
Build
a
Parson
This simple bookcase packs a lot of style! The DIY plans to build a Parson Bookcase feature plywood sides and shelves with solid wood frames on the front and back. (The frames are built and attached separately!) This would be a great piece to use as a room divider and would be fabulous in a pair. As always, this is a very easy plan that can be completed in a weekend!
Materials: 1-1/4″ pocket hole screws 1-1/4″ brad nails Wood glue Sandpaper (100, 150, 220 grits) Finishing supplies (primer & paint, or stain, sealer)
Lumber: 6 – 1×2 at 8′ 1 – 4′ x 4′ sheet of 3/4″ plywood 1 – 4′ x 8′ sheet of 3/4″ plywood
Cut List: 2 – 3/4″ plywood at 14-1/2″ x 63-1/2″ – Sides 5 – 3/4″ plywood at 14-1/2″ x 28-1/2″ – Shelves 4 – 1×2 at 63-1/2″ – Face Frames 10 – 1×2 at 27″ – Face Frames
Click on the drawings for a larger view!
Step One Cut jig the and
the pieces for the sides and shelves. With the pocket hole set for 3/4″ material, drill pocket holes in each end of shelf pieces. Secure the shelves to the sides using glue 1-1/4″ pocket hole screws.
Step Two Cut the pieces for the face frames and drill pocket holes in each end of the shorter pieces. Assemble the frames using glue and 1-1/4″ pocket hole screws. Secure the face frames to the front and back of the bookcase using glue and 1-1/4″ brad nails. The top of the shorter pieces on the face frames will line up with the top of the shelves, and the frames will cover the raw plywood edges.
Finish the bookcase as desired. The bookcase would make an excellent addition to any room. Casters can also be added to the bottom to add portability, especially when using as a room divider. This is also a great plan for those new to woodworking! Have any questions about the DIY plans to build a Parson Bookcase? Leave a comment
below!
An Easy to Build Rustic Console Table with X-Legs DIY Plans to Build a Rustic X-Leg Console Table This fabulous console table is a super-quick and easy build! The DIY plans to build a Rustic X-Leg Console Table feature a planked 2x top and x-legs with metal bars connecting them. This plan is an excellent choice for all skill levels!
Materials: 2-1/2″ pocket hole screws 3/4″ threaded rod with 12 nuts and 12 washers Wood glue Sandpaper (100, 150, 220 grits) Finishing supplies (primer & paint, or stain, sealer)
Lumber: 2 1 2 3
– – – –
2×3 2×4 2×4 2×6
at at at at
8′ 4′ 8′ 6′
Cut List: 2 – 2×4 at 58-1/8″ – Legs 2 – 2×4 at 27-9/16″ – Legs 2 – 2×4 at 28-1/16″ – Legs 2 – 2×3 at 58″ – Top Frame 3 – 2×3 at 11-1/2″ – Top Frame 3 – 2×6 at 53″ – Top 2 – 2×3 at 16-1/2″ – Top
Click on the drawings for a larger view.
Step One Cut the pieces for the legs. Mark the position of the holes as shown, then use a paddle bit or a hole saw to cut the holes. To cut the angles, measure from the top of one side and make a mark at the dimension indicated. Draw a diagonal line from the opposite edge at the top to the mark. Cut the angle with a jigsaw, a miter saw or a bandsaw. With the pocket hole jig set for 1-1/2″, drill pocket holes in the pieces as shown. Assemble the legs using glue and 2-1/2″ pocket hole screws.
Step Two Cut the pieces of threaded rod to 16″ lengths. Each piece will have a nut and a washer on each side of the leg. Tighten the nuts against the washers on the legs until they are snug.
Step Three Cut the pieces for the top frame. Drill pocket holes in each end of the shorter pieces. Also drill pocket holes in one long edge of each piece to attach the top. (The pocket holes are NOT shown in the drawings.) Secure the legs to the frame using glue and 2-1/2″ pocket hole screws.
Step Four Cut the pieces for the top. Drill pocket holes in the 2×6 pieces as shown. Assemble the top using glue and 2-1/2″ pocket hole screws. Lay the top face down on a flat surface, then position the
base frame on the underside. Secure the frame using glue and 2-1/2″ pocket hole screws.
Finish as desired. This table would work well in an entryway, a dining room, or behind a sofa. Have any questions about the DIY plans to build a Rustic X-Leg Console Table? Leave a comment below!
A Beautiful Walnut Base
Lamp
with
a
DIY Plans to Build a Lamp Base with Plywood I love making and refurbishing lamps.
I love walnut wood,
too! I had a few scraps of PureBond walnut plywood left over from one of the projects I create for them and decided that I really, really needed a lamp with a walnut base. Constructing a lamp base from the DIY plans to build a lamp base with plywood are super-easy. The plywood is joined together using 45° bevels in the edges of the pieces. It sounds hard but really isn’t!
Materials: 1-1/4″ brad nails Wood glue Sandpaper (100, 150, 220 grits) Finishing supplies (primer & paint, or stain, sealer) 1 – 1/4″ lamp pipe at 15-1/2″ 1 – replacement lamp cord with plug 3 – 1/4″ lamp nuts 1 – washer to fit the pipe 1 – candelabra socket cover at 4″ 2 – check rings to fit on the ends of the socket cover Lamp socket Lamp shade of your choice
Lumber: 1 – 2’x 2′ sheet of 1/2″ plywood
Cut List: 4 – 1/2″ plywood at 5″ x 12″ – Base Sides 1 – 1/2″ plywood at 5″ square – Base Top 1 – 1/2″ plywood at 4″ square – Base Bottom Click on the drawings for a larger view!
To Build the Lamp Base: Cut all of the plywood pieces to size. I used the table saw with the blade set at 45° to cut the bevels in each of the long ends of the base sides, as well as the top edge of each piece. A router with a 45° chamfer bit can also be used. Cut 45° bevels in all four edges of the top. I used a compound miter saw to do this but a router with a 45° chamfer bit can also be used. Sorry for the “shady” photos… It is that time of year where
my work table in partially shaded! Lay the side pieces on a flat surface side by side with the bevels facing down. Place at least two or three rows of masking tape across the pieces with the ends of the tape extending past each side piece.
Carefully flip the pieces over and apply glue to each bevel. Fold the pieces on each other creating a box and secure the tape. Let the piece dry.
Mark the center of the top and bottom pieces, and drill a hole in each piece large enough for the lamp pipe to fit through.
(This is not shown in the photos.)
Fit the beveled top into the top of the base, trimming as necessary. Spread glue on the bevels, then position the top, securing it in place with masking tape. Let the piece dry.
Place the bottom piece inside the bottom positioning it approximately 1″ up from the bottom. Secure the piece in place with 1-1/4″ brad nails through the sides. I did not photograph this step but I’m sure you get the idea! Drill a hole in the lower back side of the base below the bottom. This is so the cord will not interfere with the bottom of the lamp.
Thoroughly sand the base and fill any holes or gaps with wood filler. Stain and seal the base as desired. Decorate the base with a stencil and paint, if you’d like… I cut a stencil out of vinyl then painted it with metallic white paint. A woodburning tool could be used to create a design (before staining) or even the glue-resist technique can be used.
To Install and Wire the Lamp: Thread the washer and one of the nuts onto the lamp pipe, then thread the pipe through the hole in the bottom and through the hole in the top. Place a check ring (face down) over the pipe, then thread a second nut on the pipe. The check rings will “frame” the socket cover helping to keep it in place.
Cover the socket cover with scrapbooking paper or spray paint the piece. This is where I like to have fun and add a pop of color! Thread the cover on the pipe, then add the second check ring (face down) and the remaining nut.
Thread the wiring through the hole in the lower edge of the base, then through the pipe and pull it out of the top. Thread the socket cap onto the pipe. Tie an underwriter’s knot (which helps keep the cord from being yanked out of the socket) and attach the wiring to the socket terminals. Wrap the wiring in the same direction as the screw will tighten. Install the socket’s cover.
Install the lamp shade of your choice! Gorgeous!
What do you think? The lamp can be constructed out of any species of wood like oak, cherry, even cedar! Have any questions about the DIY plans to build a lamp base with plywood? Leave a comment below or contact me at cher {at} designsbystudioc {dot} com!
Build a Greek Key Dresser Free DIY Woodworking Plans to Build a Greek Key Dresser This dresser is so stylish, isn’t it? Very “Hollywood Regency”! The free DIY woodworking plans to build a Greek Key Dresser are such an easy build, I bet it can be constructed and finished in a weekend even with the detailing on the front!
Materials: 1-1/4″ pocket hole screws 2-1/2″ pocket hole screws 1-1/4″ brad nails 2-1/2″ screws Edge banding, if desired 4 sets of 18″ drawer slides 4 drawer pulls Finishing supplies
Lumber: 7 – 1×2 at 8′ 3 – 2×2 at 8′ 5 – 1×12 at 8′ (3/4″ plywood cut at 11-1/4″ wide can also be substituted for the drawer boxes) 2 sheets of 3/4″ plywood
Cut List: 12 – 2×2 at 4″ – Legs & Decorative Base Pieces 2 – 2×2 at 18″ – Base Sides 2 – 2×2 at 71″ – Base Front & Back 1 – 3/4″ plywood at 22″ x 75″ – Bottom 2 – 3/4″ plywood at 21″ x 27-1/4″ – Sides 1 – 3/4″ plywood at 27-1/4″ x 72-1/2″ – Back 3 – 1×2 at 72-1/2″ – Stretchers 2 – 1×2 at 12-1/2″ – Dividers 2 – 1×2 at 18″ – Drawer Slide Supports 1 – 3/4″ plywood at 21″ x 74″ – Top 4 – 3/4″ plywood at 16-1/2″ x 33-3/8″ – Drawer Bottoms 8 – 1×12 at 16-1/2″ – Drawer Box Sides 8 – 1×12 at 34-7/8″ – Drawer Box Front & Back 4 – 3/4″ plywood at 13-3/8″ x 36″- Drawer Front Base 8 – 1×2 at 1-1/2″ – Greek Key 8 – 1×2 at 3-3/4″ – Greek Key 8 – 1×2 at 4-1/2″ – Greek Key 8 – 1×2 at 7-1/2″ – Greek Key 8 – 1×2 at 8-7/8″ – Greek Key 4 – 1×2 at 33″ – Greek Key
Click on the drawings for a larger view!
Step One Edge banding will be applied to the exposed edges of the plywood before assembly. Cut the pieces for the base frame, legs, and decorative pieces. Drill pocket holes in each end of the frame pieces then attach to the legs using glue and 2-1/2″ pocket hole screws. Cut the decorative pieces then secure them as shown using glue and 2-1/2″ countersunk screws.
Step Two Cut the piece for the bottom. Position the piece so that 1/2″ overhangs on all sides. Secure using glue and 1-1/4″ brad nails.
Step Three
Cut the pieces for the sides and drill pocket holes in the top and bottom edges. The sides will be positioned so that they are 3/4″ from the front and back edge, and 1/2″ from the side edges. Secure to the bottom using glue and 1-1/4″ pocket hole screws.
Step Four
Cut the piece for the back and drill pocket holes in all four edges. Secure to the sides and bottom using glue and 1-1/4″ pocket hole screws.
Step Five
Cut the pieces for the stretchers. Drill pocket holes in each end of TWO of the pieces. Position the piece without pocket holes on the bottom, locating it 3/4″ back from the front
edges of the sides (1-1/2″ back from the front edge of the bottom). Secure in place using glue and 1-1/4″ brad nails. Attach the remaining two stretchers as shown using glue and 1-1/4″ pocket hole screws.
Step Six
Cut the pieces for the dividers and drill pocket holes in each end. Position them in the center of the stretchers as shown, then secure using glue and 1-1/4″ pocket hole screws.
Step Seven
Cut the pieces for the drawer slide supports and drill pocket holes in each end. Secure to the dividers and back, locating them just above the stretchers, using glue and 1-1/4″ pocket hole screws.
Step Eight
Cut the piece for the top. Secure in place using glue and 1-1/4″ pocket hole screws through the sides and back into the bottom.
Step Nine
Cut the pieces for the drawer boxes. Drill pocket holes in each end of the sides as well as all four edges of the bottom. Assemble as shown using glue and 1-1/4″ pocket hole screws. Install the drawer slides according to the manufacturer’s installation instructions. For an easy tutorial on installing drawer slides, click here. Make any necessary adjustments.
Step Ten
Cut the pieces for the drawer fronts. The “Greek Key” design will be created by placing the 1×2 pieces sort of like a puzzle. They will be attached using glue and 1-1/4″ brad nails. Starting with the 33″ piece, position it so that it is located 1-1/2″ from the side and bottom edges. Secure in place. Add the remaining pieces moving around in a circle. Secure each piece before moving on to the next piece. For an easy tutorial on installing the drawer fronts, click here.
Finish as desired! The free DIY woodworking plans to build a Greek Key Dresser would create a great piece to use as a sideboard in a dining room to store linens or in an entryway to store scarves and gloves, backpacks, and conceal a purse! Have any questions? Let me know at cher {at} designsbystudioc {dot} com!
Sharing with: Alderberry Hill
Build a Vintage Style Desk DIY Plans to Build a Vintage Style Desk Back to School is just around the corner, so why not build this great desk to get your student started off right? The DIY plans to build a vintage style desk feature a roomy top with four drawers. It is such an easy build, too!
Materials: 1-1/4″ pocket 2-1/2″ pocket 1-1/4″ screws Edge banding, 4 sets of 14″ Cabinet pulls
hole screws hole screws optional Drawer slides
Wood glue Sandpaper (100, 150, 220 grits) Finishing supplies (primer & paint, or stain, sealer)
Lumber: 1 – 1×2 at 4′ 1 – 1×2 at 6′ 1 – 1×3 at 6′ 1 – 1×3 at 8′ 1 – 1×6 at 6′ 5 – 2×2 at 8′ 1 half sheet of 3/4″ plywood 1 full sheet of 3/4″ plywood
Cut List: 4 – 2×2 at 29-1/2″ – Legs 4 – 2×2 at 15″ – Side Frames 2 – 3/4″ plywood at 15″ x 22-1/2″ – Side Panels 2 – 2×2 at 28″ – Inner Legs 2 – 2×2 at 15″ – Inner Leg Frame & Back Frame 1 – 2×2 at 23-1/2″ – Back Frame 2 – 2×2 at 40″ – Upper Stretchers 1 – 3/4″ plywood at 15″ x 22-1/2″ – Back Panel 1 – 3/4″ plywood at 22-1/2″ x 23-1/2″ – Back Panel 1 – 3/4″ plywood at 15″ x 40″ – Top 1 – 3/4″ plywood at 15″ x 23-1/4″ – Divider 7 – 1×2 at 15″ – Drawer Spacers 3 – 2×2 at 15″ – Front Stretchers 1 – 2×2 at 23-1/2″ – Front Stretcher 1 – 3/4″ plywood at 12-1/2″ x 21″ – Center Drawer Bottom 2 – 1×3 at 12-1/2″ – Center Drawer Sides 2 – 1×3 at 22-1/2″ – Center Drawer Front & Back 3 – 3/4″ plywood at 12-1/2″ x 12-1/2″ – Smaller & Larger Drawer Bottoms 2 – 1×3 at 12-1/2″ – Smaller Drawer Sides
2 – 1×3 at 14″ – Smaller Drawer Front & Back 4 – 1×6 at 12-1/2″ – Larger Drawer Sides 4 – 1×6 at 14″ – Larger Drawer Front & Back 1 – 3/4″ plywood at 2-3/4″ x 23-1/4″ – Center Drawer Front 1 – 3/4″ plywood at 2-3/4″ x 14-3/4″ – Smaller Drawer Front 2 – 3/4″ plywood at 8″ x 14-3/4″ – Larger Drawer Front
Click on the drawings for a larger view!
Step One Cut the pieces for the legs, the side frames, and the side panels. With the pocket hole jig set for 1-1/2″ material, drill pocket holes in each end of the frame pieces. Secure them to the legs using glue and 2-1/2″ pocket hole screws. Set the pocket hole jig for 3/4″ material, and drill pocket holes in all four edges of the panels. Secure to the legs and frame pieces using glue and 1-1/4″ pocket hole screws. The outside face of the panels will be flush with the outside face of the frame and legs.
Step Two Cut the pieces for the inner legs, inner leg frame, upper stretchers, and back frame. Set the pocket hole jig for 1-1/2″ material and drill pocket holes in each end of the inner leg frame piece, upper stretchers, and back frame pieces, as well as one end only of each of the inner legs. Secure the upper stretchers as shown using glue and 2-1/2″ pocket hole screws, then attach the inner legs to the upper stretchers using glue and 2-1/2″ pocket hole screws. Secure the remaining framing pieces as shown using glue and 2-1/2″ pocket hole screws.
Step Three Cut the pieces for the back panels. Set the pocket hole jig for 3/4″ material and drill pocket holes in all four edges. Insert each panel into the corresponding frame, and secure using glue and 1-1/4″ pocket hole screws. The outside face of the panels will be flush with the outside face of the frames.
Step Four Cut the piece for the edges. Secure the top using glue and 1-1/4″ the top panel will stretchers and side
top and drill pocket holes in all four to the upper stretchers and side frames pocket hole screws. The outside face of be flush with the top of the upper frames.
Step Five Cut the piece for the divider and drill pocket holes in all four edges. Secure the divider to the inner legs and inner leg framing piece using glue and 1-1/4″ pocket hole screws. The outside face of the panel will be flush with the inner legs as shown.
Step Six Cut the pieces for the drawer spacers. Secure the spacers as shown to the inside of the left side panel and the inside of the divider using glue and 1-1/4″ countersunk screws. One spacer will be positioned on the inside of the right side panel at the same dimension as the upper spacer as shown.
Step Seven Cut the pieces for the front stretchers. Set the pocket hole jig for 1-1/2″ material and drill pocket holes in each end. Secure to the legs as shown using glue and 2-1/2″ pocket hole screws.
Step Eight Cut the pieces for the drawer boxes. Set the pocket hole jig for 3/4″ material and drill pocket holes in all four edges of the bottom as well as each end of the sides. Assemble the drawer box as shown using glue and 1-1/4” pocket hole screws. Install the drawer slides according to the manufacturer’s installation instructions, locating them ¾” back from the front edge of the legs. For an easy tutorial, click here. Make any necessary adjustments.
Smaller Drawer Bottom & Sides
Smaller Drawer Front & Back
Larger Drawer Bottom & Sides
Larger Drawer Front & Back
Center Drawer Bottom & Sides
Center Drawer Front & Back
Step Nine Cut the pieces for the drawer fronts. Mark the position for the drawer pulls and drill the holes. Shim the drawer front in the opening – there will be a 1/8” gap around all sides – then drive screws through the holes for the drawer pulls into the drawer box. Open the drawer, and secure the drawer front using countersunk 1-1/4” screws from the inside. Remove the screws from the holes for the drawer pull then finish drilling the holes. Install the drawer pull. For an easy tutorial on installing drawer fronts, click here.
Finish as desired! What a great desk! Quick and easy – just the way we like it, right? If you have any questions about the DIY plans to build a vintage style desk, leave a comment below or contact me at cher {at} designsbystudioc {dot} com!