INTRODUCTION Games used to require specialized tools to produce. Now all you need is a browser and a text editor. Even outside of HTML5 games, the time and cost to make a game has dropped so dramatically that people can now build games in hours or days. The indie game developer scene is growing, as are game jams, the online and in-person get-togethers for rapid game making. The typical time frame for a game jam is 48 hours, as codified by larger distributed events such as Global Game Jam and Ludum Dare. But game designers (by definition) like to invent their own rules, so some jams can be as short as 1 hour long. Besides the social and collaborative benefits, game creators forcing themselves to create a game quickly can make them faster the next time around, which are great skills for long-term or short-term projects. “Building things quickly” isn’t just for those indie developer punks. In the corporate world, it’s called productivity. Finding and learning to use good tools is a much easier path to productivity than the ill-defined goal of “getting smarter.” And it passes quite convincingly as intelligence, especially if your definition of “tool” encompasses things such as mathematics. This book tracks down some of the best HTML5 game engines available, whittled down from an initial list of more than 100. These, and the other tools in this book, enable you to create games quickly in the browser. All of them are accessible in that nothing is required beyond loading their JavaScript into an HTML file and occasionally adding a few lines of code. Overall, the chosen few have great documentation and a thriving community around them. Some of the engines are bigger than others. They all expose a unique set of functionality for game making, and through learning to use a few, you can start to see what is common among them as well as what is different. Each engine is paired with a complementary game genre in each chapter. The complexity of the genre informs the requirements for increasingly feature-rich engines as you progress through the book. By the end, you should feel comfortable learning a new game engine or even hacking together your own. Each game can be created in a few hours. Will these be your favorite games of the given genre? It’s highly unlikely. This book demonstrates how to break down genres of games into their basic
elements. This lays the foundation, puts up the frame, and installs the drywall. In some cases, the author has decorated sparsely. There might be a big hole in the roof and the author’s favorite pictures are hanging on the wall. Don’t hesitate to build a courtyard, install shag carpeting, or plant some ginkgo trees if you want. Take down my pictures. You’ll see where to get all of the materials you need, but it’s your house. Do whatever you want with it. These are your games as soon as you load them up. When you finish this book, you should be able to easily think of a scene from your favorite game, break it into a list of features, and know how you would create a similar experience by using the toolset you use throughout this book. You might even have a sense of how difficult it is or how long it would take. If you are productive with these tools, and you have a good story to tell, you should be able to create something that someone loves in no time.
Audience for This Book There are many paths that may have brought you here. If you have an interest in games, and are just learning to code, this book is for you. If you are a web developer or designer who is looking for exposure to tools, techniques, or templates for making games, or you want to go from beginner to intermediate level JavaScript coding, this book is for you. If you are a game designer or developer for flash, native mobile/desktop applications, or some other platform, investigating how to build things in an HTML5/JavaScript context, this book is for you also. If you have a tattoo of the HTML5 shield, regularly present about your open source contributions to game engines, and can jam out an HTML5 Mario 64 clone with a native iPhone port in a weekend, this book might not be what you’re looking for.
Coding Style Conventions Used In This Book To indicate that a line is new or has changes, bold text is used. When code is omitted from a listing, an ellipsis (...) is used in place of 1 or more lines of code. To explicitly call out removed or changed lines of code, a commented (begins with //), bolded line of code is used in its place. If an entire listing shows new code, the text will not be bold. The continuation character (´) indicates that code is continued from the previous line. When code appears inside of the text, it will look like this.
note When there is something that requires a bit more explanation, it is called out in a “note” that looks like this.
2
INTRODUCTION
tip When there is something that doesn’t quite fit in the text, but is helpful to know, it appears as a “tip” that looks like this.
warning WARNINGS LOOK LIKE THIS A “warning” is used when there is something that may not be obvious and could cause problems if you did not know about it.
How This Book Is Organized This book is broken up into 11 chapters, with one game per each in Chapters 1 through 10, along with three appendixes (A, “JavaScript Basics,” B, “Quality Control,” and C, “Resources”). Chapter 1, “Quiz,” assumes no knowledge of HTML, CSS, JavaScript, or a functional toolset. The rest of the chapters assume that Appendix A and Chapter 1 are well understood by you. From a code standpoint, none of the chapters rely on tools built in previous chapters. That said, the genres are ordered roughly by their complexity, so gaining experience in the simpler genres may be of benefit in creating the games in the later chapters. Chapter 11, “Leveling Up,” serves as a guide to what you might want to do after completing this book. It is complemented by the list of resources in Appendix C, which also supports Chapters 1 through 10 by highlighting what tools are needed to create the games in this book. Each game is broken up into “recipes,” which, in addition to breaking up games into understandable chunks of code and text, are reflected in the source files provided at jsarcade.com. What this means is that every recipe contains a complementary folder within the code that can be downloaded on the companion site. If you get lost or want to warp ahead, you can start fresh with the code in a later recipe. Also, if you want to preview what the game will be like when you finish a chapter, you can warp straight to the “final” directory for the given game/ chapter and see what it is you are making. If you find yourself getting lost a lot, and you have a good understanding of the material in Chapter 1 and Appendix A, Appendix B is there to provide more context around how to prevent getting stuck, and what to do about it when you are.
HOW THIS BOOK IS ORGANIZED
3
How To Use This Book To make full use of the text, you need to download the source code files for each chapter. This includes JavaScript, HTML, CSS, images, and any additional files needed for each recipe. They are linked to at jsarcade.com. Code is organized first by chapter title. Inside of each chapter’s directory is a full copy of the code you need to make the game run, with three different types of directories. “initial/” marks the minimum amount of code you need to have a game running. “after_recipe/” directories specify “checkpoints” after each recipe (most headings in each chapter) so that in case you get lost along the way somehow, you can be confused for only a page or two. The “final/” directory specifies the finished game after you complete a chapter. While inside any of the chapters’ recipe directories, you can see an index.html file. If you double-click it or otherwise open it in a browser by some other means, you can see the game as it exists after following the recipe that is indicated by the directory name. Demos of all the final versions of each game are available at jsarcade.com, so you can preview a game and choose which one you want to implement next.
note The source files for all the games, game engines, and other required software are available to download at jsarcade.com and the Publisher’s website at informit.com/title/9780321898388
You can skip around, but keep in mind that the games get more complex as the book progresses. If you have trouble understanding anything, make use of the checkpoint (after_ recipe) code, and pay special attention to Chapter 1 and Appendix A. If you have trouble understanding why something is going wrong, read through Appendix B. You may notice that after finishing a chapter, you still feel like the game is missing something. It could be an explosion, a great storyline, or a boss battle. You can find suggestions at the end of each chapter of things that you could add to them—whether you have different ideas or like the suggestions provided, go for it. These become your games as soon as you get the code running on your computer. They are templates, and meant to be hacked, extended, and personalized. I will applaud and definitely not sue you for beating me at my own game making.
4
INTRODUCTION
CHAPTER 5
PLATFORMER
When we think about games, Super Mario Brothers, the canonical platformer originally released on the Nintendo Entertainment System in 1985, frequently comes to mind. This game illustrates a classic genre that has maintained relevance for decades, and continues to be innovated upon today, both in big production houses and in the indie games scene. It may be obvious, but games like this are called “platformers” because they usually involve jumping from one platform to another. These games are frequently created for the web as well as the console, so HTML5 is a perfect fit.
Getting Started with melon.js For building this chapter’s game, we’re going to be using melonJS. This engine has a simple API for developing games that is straightforward and easy to code against. It even contains prebuilt functions to manage jumping and walking in a side view type environment, which is perfect as you build your platformer. Not only does it make common development tasks very easy, but this engine also provides a ton of functionality to support more complex game behavior. One feature of melonJS that newcomers to game making can appreciate is its integration with a tilemap editor called Tiled. Tilemap editors are incredibly useful, not only for generating level maps, but also for seeing at a glance what layers and objects are going into the game. In the other games in this book, you form your maps from simpler structures such as arrays. Tiled creates a map in a .tmx format (a type of XML). If you look in the platformers/initial directory of this book’s project files, you will not see a tmx file. You can either copy it from a later recipe’s directory or create a new one by going to mapeditor.org, downloading Tiled, and following the first recipe, “Creating a Tiled Map.”
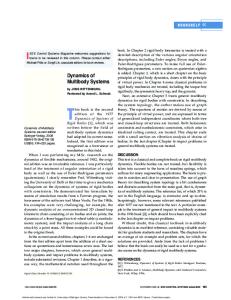
Recipe: Creating a Tiled Map Open Tiled and select File, New. You will see a box that allows you to enter values for Orientation, Map size, and Tile size. Fill out the box as in Figure 5.1 by selecting the following values: Orientation: Orthogonal, Width: 40 tiles, Height: 30 tiles, Width: 16px, and Height: 16px.
Figure 5.1 Creating a New Map with Tiled
On the right side, you will see a tile layer called Tile Layer 1. Rename this “foreground” so that it represents what it is a little better.
118
CHAPTER 5
PLATFORMER
Next, you’ll need to import a tileset, often called a spritesheet in other contexts and chapters. For this game, the sprites are included in the platformers/initial directory. These might be good for starters, but you can draw your own if you’re so inclined (see the “Art Creation/Finding” section of Appendix C, “Resources”). Wherever you get your sprites, the most important thing here is that they are 16-pixels wide and 16-pixels high and have no margins between the sprites. To start, in Tiled, go to Map …New Tileset and you will see the New Tileset dialog box. Fill it out as in Figure 5.2 and click OK. Note that if your levelSprites image lives somewhere other than in the platformers/after_recipe1 directory, you should pull it from there instead.
Figure 5.2 Creating a New Tileset in Tiled
Now you can edit the map. This is the fun part. Select the sprites on the right side of the Tiled window, and place them on the big, gray box in the middle wherever you want. Ground, water, lava, sky, and item boxes have been included. You might end up with something like Figure 5.3. If you are less sadistic, you might have placed the item box somewhere other than directly over the lava. Next, you want to save your map in a format that melonJS will understand. If you go to Tiled, Preferences, there is a select box next to Store Tile Layer Data As with five different options. melonJS can use the formats XML, Base64 (uncompressed), and CSV. It cannot work with the Base64 compressed formats. Base64 (uncompressed) produces the smallest file that melonJS can work with, so it’s best to use that.
RECIPE: CREATING A TILED MAP
119
Figure 5.3 Creating a New Level with Tiled
Saving as CSV is an interesting option for another reason, however, because you can more easily see which sprites are where (and edit the map file directly). For further options on saving the map data, try looking into export as. Normally, Tiled will save as a tmx file, but there are other options available (for example, json) for working with other game creation software or game engines. Also good to keep in mind is that Tiled has many options for opening different types of map files. Save your file as level1.tmx in the same directory as index.html.
Recipe: Starting the Game Now that we’ve created the map, let’s get it running in a browser. We’ll need the .tmx file that we created earlier, along with a copy of the melonJS engine. First, let’s flesh out the index.html file in Listing 5.1. Listing 5.1 HTML Document Loading JavaScript Files Guy's Adventure
120
CHAPTER 5
PLATFORMER
I called my game Guy’s Adventure (my niece named it actually), so I’ve set that as the title. Next, we add some slightly prettier styling to contain the game screen. Now for the tricky part. We make a div with id="jsapp" and inside of it include the melonJS library, a resources.js file, a main.js file, and a screens.js file. We’ll be referring to this div in just a moment. These files could all be combined into one file, as is the case with other games in this book. That said, it’s useful to know a few different ways to do things, such as how we don’t use a separate JavaScript file in Chapter 4, “Puzzle.” We’re headed in the opposite direction here. So what’s in these files? The melon.js file is the game engine. We’ll be using a good section of its API in this chapter, but the documentation at http://www.melonjs.org/docs/index.html is absolutely worth a look if you want to have a reference as you’re building. Note that all of the game engine project pages are listed in Appendix C, “Resources.” In case you’re curious, you won’t be making any changes to the engine itself, but like all the engines covered in this book, it is open source. That means if you see some feature missing or a bug you’d like to fix, you can implement it and help make the engine better for yourself and everyone else. The resources.js file is where you store all your information about what images, audio, and level files (created in Tiled) you need. For now, this file can be simple. All you need is the code in Listing 5.2 to add the resources for the level and sprites you used to build it. Save this as a file called resources.js. Listing 5.2 Adding a Resources.js File var resources = [{ name: "levelSprites", type: "image", src: "levelSprites.png" },
RECIPE: STARTING THE GAME
121
{ name: "level1", type: "tmx", src: "level1.tmx" }];
warning WATCH YOUR COMMAS When working with arrays and objects in JavaScript, be careful about how you use commas. There is one bug that appears only in certain browsers when a comma follows the last element. Leaving out commas between elements is not the best idea regardless of which browser you are using.
The screens.js file is also simple. Think of “screens” as mapping to large game states such as Play, Menu, and GameOver. For now, all you need to do is create a new PlayScreen that inherits from me.ScreenObject and says to load level1 whenever entering the state of being on this screen. Add the code from Listing 5.3 and save it as screens.js. Listing 5.3 Adding a PlayScreen Object to screens.js var PlayScreen = me.ScreenObject.extend({ onResetEvent: function() { me.levelDirector.loadLevel("level1"); } });
If you wonder what ”me” is, it stands for Melon Engine and provides a namespace for every object in melonJS. Most code that you write and use will not have an object called levelDirector, but for more common words, namespaces are useful to ensure that a name refers to only one object. This is also a good reason to make sure to declare variables using the var keyword. In JavaScript, declaring variables without var creates them in the “global” namespace, meaning that they are accessible from everywhere. Let’s get back to the code. In Listing 5.4, the main.js file contains your high-level logic and is a bit more complex. First, we create a variable called jsApp. We are using the object pattern here to create two functions. The onload function runs when the window is loaded. Inside of this function, the div with the id of jsapp is declared to be the canvas object you’ll be
122
CHAPTER 5
PLATFORMER
manipulating throughout the game. It takes four additional parameters for width, height, double buffering, and scale. Because you are using 16x16 sprites, your game is set at a 2.0 scale (zoomed in) compared to the default expectation of melonJS. Because we are using scale, we need to set double buffering to true. Next, the me.loader.onload function sets the loaded function as the callback function for when the onload function completes. bind(this) ensures that the callback function will have the context of jsApp. The preload function preloads your images and level map from the resources file. The loaded callback function associates the PlayScreen object that you created in screens.js with the built-in state PLAY (with the game.set function) and then changes the state of the game to PLAY with the state.change function. Finally, the window.onReady() call runs the code jsApp.onload() when the window is loaded. Listing 5.4 Initializing the App and Loading Assets var jsApp = { onload: function() { if (!me.video.init('jsapp', 320, 240, true, 2.0)) { alert("html 5 canvas is not supported by this browser."); return; } me.loader.onload = this.loaded.bind(this); me.loader.preload(resources); me.state.change(me.state.LOADING); }, loaded: function() { me.state.set(me.state.PLAY, new PlayScreen()); me.state.change(me.state.PLAY); } }; window.onReady(function() { jsApp.onload(); });
If you open index.html now, you should see a screen similar to Figure 5.4. It’s a portion of the map that you made. It’s not a game yet, though. What else do we need? Let’s find out in the next recipe.
RECIPE: STARTING THE GAME
123
Figure 5.4 Our map loaded in a browser
Recipe: Adding a Character Let’s bring a character into the game. We’ll call him Guy. He’s the one who will be doing the adventuring. First, you need to use Tiled again to set a starting position. To do this, you need to add an object layer. Go to Layer, Add Object Layer. In the Layers pane on the right side (if for some reason you can’t see your layers, go to View… Layers), and rename this object layer player. Also, as you did before, by following the Map… Add Tileset instructions, add the player.png image with the tileset name player. You can place Guy somewhere safe-looking near the ground. To do this, click the insert object icon (see Figure 5.5) or press O and then click somewhere on the map to place him. Note that unlike the foreground sprites, you won’t actually see him. Then, right-click the gray box that has been added, and select Object Properties… You need to fill out the Name field with player. You also need to set two new properties in the bottom of the box. They should be named image and spritewidth, with values of player and 16, respectively (see Figure 5.6).
Figure 5.5 The add object button
124
CHAPTER 5
PLATFORMER
Figure 5.6 The player object
If you tried to load your game now, you wouldn’t have much luck. You still have a bit of work to properly integrate Guy into his new world. First, you need to add his image to your array in resources.js with the code in Listing 5.5. Remember to watch your commas. Listing 5.5 Adding Your Player to resources.js { name: "player", type: "image", src: "player.png" }
Next, add him to the melonJS entity pool in the loaded function of main.js with the code in Listing 5.6. Listing 5.6
Adding Your Player to the Entity Pool of main.js
me.entityPool.add("player", PlayerEntity);
You also need to create the last file you’ll use for this tutorial, entities.js. With game development, it is common to refer to important objects as entities. Sometimes, these are enemies,
RECIPE: ADDING A CHARACTER
125
the player, or projectiles. Unlike in traditional object-oriented programming, an entity-based system is typically supported by a less strict hierarchy. This paradigm can take a bit of getting used to, and we’ll explore it more in Chapter 10, “RTS.” It’s a good start just to think of entities as being composed of logical units that describe properties such as their movement capabilities and what happens when they hit each other. In addition, it is worth considering that these are not just objects “in the code,” but also objects “in the game.” So if you say “the player entity,” you are referring both to the lines of code representing the player and the notion of a “thing” that exists in the game world. You need to add entities.js to your index.html file near all the other included JavaScript files with the code in Listing 5.7. Listing 5.7 Loading the entities.js File in index.html
The code in Listing 5.8 is fairly straightforward. You create the entities.js file, initialize a PlayerEntity variable that inherits from ObjectEntity, and set the viewport to follow the character around. Next, set an update function to handle updating the animation when the player moves. Listing 5.8 Adding the PlayerEntity Object var PlayerEntity = me.ObjectEntity.extend({ init: function(x, y, settings) { this.parent(x, y, settings); me.game.viewport.follow(this.pos, me.game.viewport.AXIS.BOTH); }, update: function() { this.updateMovement(); if (this.vel.x!=0 || this.vel.y!=0) { this.parent(this); return true; } return false; } });
If you load the game now, you’ll see something encouraging for us but fairly drastic for our hero. He starts in the position we set him to in Tiled (great), but he then immediately falls off the screen. What’s going on? We never created any solid ground for him to stand on.
126
CHAPTER 5
PLATFORMER
Recipe: Building a Collision Map Let’s add a new tile layer. As before (see Figure 5.2), go to Layer… Add Tile Layer. Then name this layer collision. Some tile layers can be arbitrarily named, but melonJS will not recognize a collision layer unless it contains the word “collision.” Next go to Map… New Tileset, import collision.png, and as before do not include margins and use 16x16 tiles. Next, right-click the first tile of the collision tileset on the right. (If you cannot see the tileset toolbar, go to View, Tilesets.) To do this, you may have to select the collision tileset. Add a property of “type” with a value of “solid.” On the collision tile layer, paint the ground with the tile you called “solid.” You should see something similar to Figure 5.7 where the black tiles are the solid collision tiles that you just added. You see the collision layer because it is on top, but you can reorder, filter, and change the opacity of your layers on the layers toolbar on the right to see different visual representations of your map.
Figure 5.7 Collision layer over foreground
Save and reload index.html to see Guy successfully standing on the ground. This is quite an accomplishment. Perhaps “just standing there” games are going be big in the future, but we have little evidence of this. Let’s stick with the platformer ideal and make him a little more adventure-capable.
RECIPE: BUILDING A COLLISION MAP
127
Recipe: Walking and Jumping To enable walking and jumping, we’ll have to make two changes. First, we’ll want to bind the jump, left, and right buttons to keys on the keyboard. If we alter the screens.js file so that we can do that, we will arrive at something like the code in Listing 5.9. Listing 5.9 Binding Keys to Move var PlayScreen = me.ScreenObject.extend({ onResetEvent: function() { me.levelDirector.loadLevel("level1"); me.input.bindKey(me.input.KEY.LEFT, "left"); me.input.bindKey(me.input.KEY.RIGHT, "right"); me.input.bindKey(me.input.KEY.SPACE, "jump"); } });
Then, the init and update functions of the PlayerEntity must be altered in your entities.js file. In your init function, you need to set the default walking and jumping speed, and in the update function, you need to handle updating the movement based on input, as well as checking for collisions. The code needed for these tasks is in Listing 5.10. Listing 5.10 Handling Player Movement init: function(x, y, settings) { this.parent(x, y, settings); me.game.viewport.follow(this.pos, me.game.viewport.AXIS.BOTH); this.setVelocity(3, 12); }, update: function() { if (me.input.isKeyPressed('left')) { this.doWalk(true); } else if (me.input.isKeyPressed('right')) { this.doWalk(false); } else { this.vel.x = 0; }; if (me.input.isKeyPressed('jump')) { this.doJump(); } me.game.collide(this); this.updateMovement(); if (this.vel.x!=0 || this.vel.y!=0) { this.parent(this); return true; } return false; }
128
CHAPTER 5
PLATFORMER
melonJS comes with these handy convenience functions of doJump() and doWalk(), which are useful for getting started. Keep in mind that hand-crafting acceleration envelopes, although more challenging, can provide a different character for a game. Sonic the Hedgehog is a notable example, owing much of its popularity to the unique slow acceleration and high maximum velocity of the title character. In fact, there is even an HTML5 game engine created entirely to explore his movement in a three-dimensional space. If you load the index.html file, you may notice that the arrow keys and spacebar can now be used to control Guy! You’re well on your way. You may have also noticed that Guy’s feet move when he walks. melonJS did that for you. All you had to do was load the player.png spritesheet with two sprites, and it knew what you wanted. Fantastic! What’s next? Despite your best efforts, Guy will occasionally fall in a hole. Then, you should expect the player to refresh the browser every time, right? Nope. Let’s reset the game when things go awry.
Recipe: Title Screen First, you need the TitleScreen object that you’ll show players when they start the game or when Guy falls into a hole. Let’s add the code in Listing 5.11 to the bottom of the screens.js file. Listing 5.11 Creating a TitleScreen Object var TitleScreen = me.ScreenObject.extend({ init: function() { this.parent(true); me.input.bindKey(me.input.KEY.SPACE, "jump", true); }, onResetEvent: function() { if (this.title == null) { this.title = me.loader.getImage("titleScreen"); } }, update: function() { if (me.input.isKeyPressed('jump')) { me.state.change(me.state.PLAY); } return true; }, draw: function(context){ context.drawImage(this.title, 50, 50); } });
RECIPE: TITLE SCREEN
129
Let’s look at what this code in Figure 5.11 does. First, you create the variable TitleScreen to inherit from me.ScreenObject. Then in the init function, you call this.parent(true) to set the TitleScreen as visible and ensure that the update and draw functions work. You also bind the spacebar to the jump key. In the onResetEvent function, you load the titleScreen image if it has not already been set. The update function waits for the spacebar to be pressed and goes to the main game loop if it has. The draw function draws the image (first parameter) at the specified pixel offsets (second and third parameters). If you haven’t been through any of the other chapters with games that use canvas-based engines, you may wonder what context, the parameter in the draw function, refers to. This is the Canvas Rendering Context. melonJS declared it for you. In this case, it is the 2-D canvas, but the API that declared this as canvas.getContext('2d'), can also be used to initialize a webgl (3d) context. As one last bit of cleanup, there’s no sense in binding the jump key twice, so while you’re in the screens.js file, take out this line from the PlayScreen object: me.input.bindKey(me. input.KEY.SPACE, "jump", true);. Next, load the screen image to resources.js as in Listing 5.12. Listing 5.12 Loading the Screen Image as a Resource { name: "titleScreen", type: "image", src: "titleScreen.png" }
Next, you need to make three changes to your loaded function in main.js. First, you need to assign your TitleScreen object to the predefined MENU state. Then, you need to change the state that is loaded at the beginning of the game from PLAY to MENU. Last, you can define a transition effect between screens. It should now look like Listing 5.13. Listing 5.13 Working with the MENU State loaded: function() { me.entityPool.add("player", PlayerEntity); me.state.set(me.state.PLAY, new PlayScreen()); me.state.set(me.state.MENU, new TitleScreen()); me.state.transition("fade", "#2FA2C2", 250); me.state.change(me.state.MENU); }
130
CHAPTER 5
PLATFORMER
We’re almost there; our title screen boots up quite nicely at the beginning, but we still haven’t enabled automatic resetting after falling into a hole. To do this, we’ll make a few minor adjustments to our PlayerEntity object in the entities.js file. Add the gameOver function after the update function in the PlayerEntity object with the code in Listing 5.14. This can go just above the last line in the file. Make sure to add the comma to the curly brace above the gameOver function. Don’t add a new curly brace there. Just the comma. Listing 5.14
The gameOver Function in entities.js
}, // Don't forget to add this comma here gameOver: function() { me.state.change(me.state.MENU); } }); // This is the end of the file (not new)
You also need some condition to trigger the gameOver function, as shown in Listing 5.15. Depending on how you set up your map, you may want to do it differently, but a basic “fell in the hole” type condition is to check the position of Guy along the y-axis. If he’s too low, it’s game over. This can directly follow the call to updateMovement. Listing 5.15 Game Over if Guy Falls in a Hole this.updateMovement(); if (this.bottom > 490){ this.gameOver(); }
Now players see the title screen when they lose, which is a much better experience than having to reload the page after every mishap. That’s great, but we still have a problem. Right now, the only “adventure” that Guy is on is the “adventure of trying not to fall in holes.” How about we give him a better reason for leaving home?
Recipe: Adding Collectables What does every platform adventurer love? That’s right—metal objects as big as they are, to collect and carry around while they try to run and jump. Let’s start by editing the map again in Tiled. Add a new object layer (Layer… Add Object Layer) called coin. After adding the layer, add a new tileset for the coins (Map… New Tileset) and call the tileset coin as well. See Figure 5.5 to recall how to add objects to the screen.
RECIPE: ADDING COLLECTABLES
131
For each coin added to the screen, be sure to right-click (Object Properties…) to set the name as coin, as well as the attributes image:coin and spritewidth:16. You can right-click to duplicate this object, and choose the selector tool to move it around. Note that it will create the clone directly above the original, so you may not initially realize that there are stacked objects until you move one. Now we have quite a bit of code to add. Let’s start simply by adding coins to the entity pool in the loaded function of main.js, as in Listing 5.16, directly following where the PlayerEntity is added. Listing 5.16 Adding Coins to the entityPool me.entityPool.add("player", PlayerEntity); me.entityPool.add("coin", CoinEntity);
Next, in Listing 5.17, add the coin file as an image resource within resources.js. Listing 5.17 Adding the Coin Sprite to resources.js }, // Reminder: Add these commas to preceding objects as you go! { name: "coin", type: "image", src: "coin.png" }
Now, in Listing 5.18, create the CoinEntity at the end of the entities.js file. Listing 5.18 Creating the CoinEntity var CoinEntity = me.CollectableEntity.extend({ init: function(x, y, settings) { this.parent(x, y, settings); }, onCollision : function (res, obj) { this.collidable = false; me.game.remove(this); } });
Here, we start by declaring the CoinEntity as inheriting from CollectableEntity (which itself inherits from ObjectEntity). We then call the parent constructor to enable certain methods to be accessible. Last, we add some logic for collisions with the coin so that it cannot be collected twice.
132
CHAPTER 5
PLATFORMER
Load index.html and notice how far we’ve come. Guy can now collect coins to pay for all his adventuring needs. Life might seem a little too good for Guy right now, though. Let’s add a little more conflict.
Recipe: Enemies First, create a new object layer in Tiled (Layer… Add Object Layer) and call it EnemyEntities. Then add a new object (no new tileset required) to the map, and right click to name it EnemyEntity. Here is the tricky part. You can be more precise in declaring the X and Y positions of the baddie, but you can also specify width and height. With all these numbers, the assumption is made to multiply by 16, which means that for any whole integer value of X and Y, the enemy will be placed on your grid. The height should be set to 1 assuming your bad guy is 16-pixels tall. The cool part is that when you set the width, you are not indicating the width of sprite, but rather, the horizontal area that the enemy can walk back and forth. Next, you need to add your enemy to the entity pool in main.js, as shown in Listing 5.19. This can directly follow your CoinEntity code. Listing 5.19 Adding the EnemyEntity to the entityPool me.entityPool.add("coin", CoinEntity); me.entityPool.add("EnemyEntity", EnemyEntity);
Then add the badGuy to the resources.js file, as shown in Listing 5.20. Again, remember to watch your commas. Listing 5.20 Adding the badGuy Image to resources.js { name: "badGuy", type: "image", src: "badGuy.png" }
By now, you might have guessed that you need to define EnemyEntity in entities.js. This is a fairly complex entity, but the overall structure of the code should be starting to look familiar at this point. One big change is that you are defining some of the properties (settings) for the EnemyEntity object directly in melonJS (Listing 5.21) instead of Tiled. Also notice how the path is indicated with the settings.width. The last important thing to notice is that you now have a new Game Over condition for when Guy touches the bad guy. The code in Listing 5.21 can go at the end of the entities.js file.
RECIPE: ENEMIES
133
Listing 5.21
Creating the EnemyEntity
var EnemyEntity = me.ObjectEntity.extend({ init: function(x, y, settings) { settings.image = "badguy"; settings.spritewidth = 16; this.parent(x, y, settings); this.startX = x; this.endX = x + settings.width - settings.spritewidth; this.pos.x = this.endX; this.walkLeft = true; this.setVelocity(2); this.collidable = true; }, onCollision: function(res, obj) { obj.gameOver(); }, update: function() { if (!this.visible){ return false; } if (this.alive) { if (this.walkLeft && this.pos.x = this.endX){ this.walkLeft = true; } this.doWalk(this.walkLeft); } else { this.vel.x = 0; } this.updateMovement(); if (this.vel.x!=0 || this.vel.y!=0) { this.parent(this); return true; } return false; } });
Guy has a lot to deal with now, and if you were cruel and created a lava and bad guy-filled wasteland for a map, he could be having a rough time. Let’s make sure Guy can still get the upper hand.
134
CHAPTER 5
PLATFORMER
Recipe: Powerups Did you put any coins out of Guy’s reach? Let’s give him some winged boots to help him jump higher. In Tiled, you need to add an object layer called boots. Then add objects in the same way as with coins before, declaring the name to be boots with image:boots and spritewidth:16. First, add boots to the resources.js file in Listing 5.22. Remember to watch your commas between each object in the array. Listing 5.22 Adding the boots Image { name: "boots", type: "image", src: "boots.png" }
Next, add the boots to the entity pool in main.js, as shown in Listing 5.23. Listing 5.23
Adding the boots to the entityPool
me.entityPool.add("EnemyEntity", EnemyEntity); me.entityPool.add("boots", BootsEntity);
Then declare the BootsEntity at the bottom of entity.js, as shown in Listing 5.24. Listing 5.24 Creating the BootsEntity var BootsEntity = me.CollectableEntity.extend({ init: function(x, y, settings) { this.parent(x, y, settings); }, onCollision : function (res, obj) { this.collidable = false; me.game.remove(this); obj.gravity = obj.gravity/4; } });
This should all look incredibly familiar because it’s basically the same as the CoinEntity, with one notable exception. On the last line is the powerup part. When the player gets these boots, Guy will experience one-fourth the gravity. He should have no problem reaching any coins in the sky now!
RECIPE: POWERUPS
135
The game is now complete. For one last recipe though, let’s take a look at how we might improve the presentation of the game a bit.
Recipe: Losing, Winning, and Information Sometimes people like to be a little bit confused. Puzzles can be fun. However, “what button do I press to jump?” and “did I win?” are not terribly interesting puzzles. Yes, you could make a game where there was a puzzle about which button to press to jump. It might be clever or artfully done. But we’re not doing anything so bold or groundbreaking in this chapter. We’re making a no-nonsense platformer, so we should present the game to players as clearly as possible. Let’s add some containers for our messages to our index.html file, as shown in Listing 5.25, after the closing of the jsapp. Listing 5.25 Adding Some Containers for Messages and Instructions
In the screens.js file, let’s add the bolded lines in Listing 5.26 to the onResetEvent function of the PlayScreen object with some basic instructions for the player. Listing 5.26 Tell the Player How to Move me.input.bindKey(me.input.KEY.RIGHT, "right"); document.getElementById('game_state').innerHTML = "Collect all of the ´coins!"; document.getElementById('instructions').innerHTML = "Arrows to move and ´Space to jump.";
In that same file, let’s clean up those messages in onResetEvent for the TitleScreen object, as shown in Listing 5.27.
136
CHAPTER 5
PLATFORMER
Listing 5.27 Clear Out Old Messages this.title = me.loader.getImage("titleScreen"); document.getElementById('game_state').innerHTML = ""; document.getElementById('instructions').innerHTML = "";
Then, in your entities.js file, let’s add a bit to the gameOver function so that it looks like Listing 5.28. Listing 5.28 Create the gameOver State gameOver: function() { me.state.change(me.state.MENU); document.getElementById('game_state').innerHTML = "Game Over"; document.getElementById('instructions').innerHTML = ""; }
Now that we’ve extended our gameOver function, it’s making the game look a little bleak for Guy. He should be able to win, not just lose. Let’s add a winning state that looks like Listing 5.29 after gameOver. Don’t forget to add a comma to the end of the gameOver function. Listing 5.29 Create the youWin State }, // This is at the end of the gameOver function. The brace needs a comma now. youWin: function() { me.state.change(me.state.MENU); document.getElementById('game_state').innerHTML = "You Win!"; document.getElementById('instructions').innerHTML = ""; }
Say that you can enter this winning state by getting all the coins on the level. How do you do that? Add coins and totalCoins to the onload function of the jsApp variable in main.js, as shown in Listing 5.30. Listing 5.30 Add Coins and Total Coins me.gamestat.add("coins", 0); me.gamestat.add("totalCoins", 2);
Note that you might have a different number for totalCoins depending on how you created your level in Tiled.
RECIPE: LOSING, WINNING, AND INFORMATION
137
Next, add the code from Listing 5.31 to add an onDestroyEvent function to the PlayScreen object in screens.js to reset the coins collected. Put this before onResetEvent, and be careful with your commas. Listing 5.31 Reset Coins When Game Ends onDestroyEvent: function() { me.gamestat.reset("coins"); },
Next, we’ll need to add the bolded code in Listing 5.32 to our CoinEntity inside of entities.js. It should increment the coin value when collected and check to see if all the coins are collected. If they all are collected, the player sees the “You win” message. Listing 5.32 Create a Way to Win if All the Coins Are Collected var CoinEntity = me.CollectableEntity.extend({ init: function(x, y, settings) { this.parent(x, y, settings); }, onCollision : function (res, obj) { me.gamestat.updateValue("coins", 1); this.collidable = false; me.game.remove(this); if(me.gamestat.getItemValue("coins") ´=== me.gamestat.getItemValue("totalCoins")){ obj.youWin(); } } });
Naturally, there are other ways to handle winning and losing other than simply printing text below the game. You could even create an entire new screen for each case.
Summary I hope you enjoyed building a platformer with melonJS and Tiled. Using these tools, we were able to create a basic game with powerups, enemies, coins, as well as winning and losing states in a short amount of time. There are some ways of extending the game you’ve created: Fireballs, enemy/player health, enemy AI, animations for death and jumping, more levels, a countdown timer, saving, high scores…the list goes on and on. And if you’re looking to explore more
138
CHAPTER 5
PLATFORMER
features of melonJS, there’s plenty to choose from, including timers, audio, parallax scrolling, heads up displays, and bitmap font rendering. In this chapter, we took advantage of some low-tech, standard JavaScript methods to display information to players. Don’t forget that you are creating games on the web, so techniques such as standard DOM manipulation, pulling in content from other sites, and even redirecting players to other URLs are not only possible, but also rather easy and potentially surprising for players.
SUMMARY
139
This page intentionally left blank
INDEX Symbols % operator, 94 + operator, 321 tag, 19 2-D context, 66 2-D maps, creating, 196-199 3-D, faking with raycasting, 208-212 3-D context, 66
A accessing sprites from spritesheet, 145-147 action RPGs, turn-based RPGs versus, 232 active holes, setting, 77-84 adding cameras, 212-216 characters, 124-126, 221-229, 264 coins, 137 collectibles, 131-133 collision data to maps, 243 complex interactions, 43-53 CSS files, 12-14 enemies, 133-134, 176-180, 271 entities, 135 functions, 93 handlers, 23, 37 images, 133, 135 inventory with drag and drop, 35-43 item containers, 35-36 jQuery, 15 layers, 177-178 main.css, 30-31 maps, 196-198 message containers, 136 objects, 122, 211 pages to story, 29 players, 125-126, 180-183, 199-203, 237-243, 271 powerups, 135-136, 187-190 properties, 52 rendered text, 153 resources.js file, 121-122 script tags, 88 sprites, 132
symbol indicators, 187 variables, 159 akihabara game engine, 332 alerts, debugging with, 326 altering. See changing Anthropy, Anna, 337 APIs, 280 in JavaScript, 318-319 arguments, 321 array literals, referencing, 78 arrays bracket syntax versus dot syntax, 79 building, 95 in JavaScript, 321 art creation tools, list of, 335-336 The Art of Game Design (Schell), 315, 337 atom game engine, 17, 332 drawing with canvas, 65-67 sample game, creating, 60-65 holes, drawing, 67-70 moles, drawing, 70-73 Audio API Extension, 83 audio in browsers, 82-84 tag, 82-84
B backgrounds, scrolling, 175 base 16 numbers, 22 bat.png file, 35 battle interface, creating, 263-274 binary numbers, decimal equivalents, 157 binding init function to window, 87 JavaScript functions to windows, 87 keys, 128, 245 spacebar to “a” key, 244 bitmasks, 157-161 bitwise operators, 158 bitwise update method, 159-160 blitting, 143-144 block image transfer, 143-144 tag, 7-8 books, list of, 336-337 boolean arithmetic, 158
boolean limits, 166 booleans, 323 BootsEntity, 135 bopping moles, 78-82 Box 2D Web website, 337 bracket syntax dot syntax versus, 79 for objects, 322 breadcrumb trail, 53-55 breaking encapsulation, 198 breakpoints, 327 browsers audio in, 82-84 debugging tools in, 326-327 list of, 334 windows, when to refresh, 303
tag, 12 bugs. See debugging buying items, 261-262
C caching, 106-108 calculating movement in FPS game, 202-203 calling castRays, 225 clearStatus, 252 makeHoles function, 74 new player constructors, 153 update for players, 157 cameras, adding, 212-216 Can I use website, 337 canvas accessing through atom.js, 65 drawing with, 65-67 holes, 67-70 moles, 70-73 hiding, 21 canvas-based rendering, DOM-based rendering versus, 172 tag, 19 for atom.js file, 61 Cascading Style Sheets. See CSS casting rays, 205-206 chaining in jQuery, 178 changing castRay function, 218-219 forms, 150-154 gameTick function, 164 impress.js, 44-45 placeUnits function, 305-307
340
INDEX
players for leveling and attacking, 264-265 replaying to reload the page, 108 sprite sizes, 162 characters adding, 124-126, 221-229 movement problems in Chrome, 243 NPCs (nonplayable characters), talking to, 248-251 walking and jumping, 128-129 charset=, 29 cheating players, avoiding, 282 Chrome browser, 334 character movement problems, 243 clearing old messages, 137 player’s inventory, 256 click handler, 295-296 client-side code, 280 client-side storage options, 277 closure, 42 CoffeeScript, 60-65, 334 CoinEntity, 132 collaboration for quality code, 329-330 collectibles, adding, 131-133 collision detection, 243-244 in crafty game engine, 305-310 for enemies, 183-184, 188 collision maps, creating, 127 collisions, masking, 161-164 color palettes, 216-221 colors random color, adding on page load, 90 RGB color values, 22 commas, troubleshooting, 122 comments HTML, 19 JavaScript, 321, 324 comparison operators, 323 complex interactions, adding, 43-53 conditional checks, 80, 99 conditionals in JavaScript, 323 console, debugging with, 326 constructors, 64 content-exploration games. See RPG game crafty game engine, 17, 332 collision detection, 305-310 creating isometric maps, 288-291 Crockford, Douglas, 28, 328, 337 CSS (Cascading Style Sheets) adding files, 12-14 editing, 34
for inventory and drag/drop, 36-37 resetting in browsers, 31 strengths and weaknesses, 173
D Daily JS website, 337 damage, giving and taking, 164-170 Dealing with Collisions listing, 184 debugging browser debugging tools, 326-327 collaboration for quality code, 329-330 testing code, 328 decimal numbers, binary equivalents, 157 declaring functions, 296-297 variables, 91-92 defining functions, 39, 105 properties, 98 variables, 63 delaring DOCTYPE, 7 demos, list of, 336 dino object, code listing for, 227 tag, 8, 11, 174 DOCTYPE, delaring, 7 documentation for enchant.js, 240 doJump() function, 129 domain names, setting up, 281 DOM-based rendering canvas-based rendering versus, 172 strengths and weaknesses, 173 dot syntax bracket syntax versus, 79 for objects, 322 doWalk() function, 129 drag and drop, adding inventory with, 35-43 dragDrop.js file, 35, 37, 45 dramatic ending in interactive fiction game, 56-58 draw method, 68, 76, 162 drawing backgrounds, 66 with canvas, 65-67 colors and shades, 219-220 with easel.js file, 87-91 holes, 67-70 isometric boards with crafty, 289-290 items for sale, 259-260 Maneki, 258-259 moles, 70-73
moles in holes, 73-77 multiple objects, 91-94 units, 291-295 drawSquare function, 93, 96 drawSquare method, 89 drawTextTile function, 112 dynamic mole peeking, 77-84
E easel game engine, 17, 86, 332 caching, 106-108 rendering multiple objects, 91-94 rendering with, 87-91 editing CSS, 34 emacs text editor, 333 encapsulation, breaking, 198 enchant game engine, 17, 232-233, 240, 332 enemies adding, 133-134, 176-180 collision handling, 183-184 EnemyEntity, 134 entities.js file, 125-126 Etsy, 335 eval function, 188 event handlers, 78-82, 160-161, 260-261 existence checks, 80 exporting tiled maps, 120
F fake 3D with raycasting, 208-212 fighting game, 141-170 accessing sprites from spritesheet, 145-147 bitmasks, 157-161 game.js file, 142-145 giving and taking damage, 164-170 masking collisions, 161-164 moving and changing forms, 150-154 nonblocking input, 154-157 two-player input handling, 147-150 filters for images, 215 Filtrr, 334 Firebug, 326, 334 Firefox browser, 334 first-person shooters. See FPS game “fish-eye” effect, avoiding, 210 Flashcard Array listing, 110 flashcard game, 109-115 flipping pictures, 100-102 floats, 320
INDEX
341
font module, importing, 151 for loops, 94, 111-112 forms functions for changing, 151 moving and changing, 150-154 as normal array, 167-168 forms object, 152 FPS (Canvas-Based Raycaster), 336 FPS (DOM-Based Raycaster), 336 FPS game, 193-230 camera, adding, 212-216 characters, adding, 221-229 color palettes, 216-221 creating 2-D maps, 196-199 fake 3D with raycasting, 208-212 Jaws, 194-196 players, adding, 199-203 raycasting, 203-208 full-screen mode, 242 functional looping, procedural looping versus, 38 functions calling for shop, 262 cycling through, 189-190 defining, 39 determining source of, 90 determining sprites, 249 form changing, 151 in JavaScript, 321-322 return values, 42 scope of, 42
G game.bop object, 79-80 game.css file, 195, 232 game engines list of, 332-333 terminology, finding, 254 game.items file, 256 game.js game engine, 14, 35, 41, 46, 142-145, 195, 233, 332 accessing sprites from spritesheet, 145-147 collision masking, 161-164 giving and taking damage, 164-170 importing font module, 151 moving and changing forms, 150-154 player movement updates, 238-239 with socket.io client code, 287 game.keys file, 78 gameOver function, 104, 114, 131, 137 Game Over page, 33 gamepad API, 245 342
INDEX
game programming, improving, 314-316 GameQuery game engine, 333 DOM-based rendering in, 172 keycodes, 183 shooter game interface, 174-176 games, saving, 274-277 game.slide function, 48-50 game.things, 46-47 gameTick, 149 geddit text editor, 333 getRandomPlacement, 97 getters, 176 Gimp, 335 git, 18, 283 github, 18, 283, 329 globally installing packages, 286 global variables, 319 goto pages, 32-34
H tag, 8 handleDragOver function, 40 handleDrop function, 40 handleOnPress function, 98-99, 101, 113 handlers adding, 37 during battles, 272-273 for key presses, 149 for player movement, 128 hashing functions, 21-24 tag, 7 hexadecimal numbers, 22 hiding canvas, 21 content, 13 pictures, 100-102 questions, 15 quizzes, 12-14 high-level abstractions, 86 hits, giving and taking damage, 164-170 holes drawing, 67-70 putting moles in, 73-77 setting active holes, 77-84 hosting, 281 HTML (HyperText Markup Language), 7 comments, 19 elements, 7 loading JavaScript files, 120-121 Local Storage API, saving games, 274-277 HTML5 Audio website, 338
HTML 5 Game Development website, 338 HTML5 Rocks website, 328, 338 HTML files, 195 for atom.js, 60-61 starter files, 86, 142, 174, 286 tag, 7 HTML tags. See tags HTTP servers in Node, 284
I image creation tools, list of, 335-336 images, filters for, 215 implementation API, 318 importing font module, 151 tilesets, 119 Impress presentation tool, 17, 28, 44, 334 improving game programming, 314-316 IndexedDB, 277 index.html file, 6, 54, 232 informational messages in platformer game, 136-138 inheritance, 63-65, 148 init function, 88, 93-94, 96, 103, 110-111 initializing apps, 123 cache, 107 dino, 222 player handler updates, 308-309 Inkscape, 335 input handling nonblocking input, 154-157 for two players, 147-150 tag, 12 installing node.js, 282-285 packages globally, 286 integers, 320 interactive fiction game, 27-58 adding complex interactions, 43-53 adding inventory with drag and drop, 35-43 breadcrumb trail, 53-55 dramatic ending, 56-58 goto page, 32-34 styled pages, 28-32 inventory, creating, 41, 251-254 IRC (Internet Relay Chat), 329 isometric maps, creating, 288-291 isometric projection, 194
J JavaScript APIs, 318-319 arrays, 321 CoffeeScript, 60-65 comments, 324 conditionals, 323 console, debugging with, 326 files, loading, 14 functions, 321-322 binding to windows, 87 libraries, integrating with code, 16-21 loops, 323-324 numbers, 320-321 objects, 322 return values, 42 as server-side language, 284-285 statements, 319 strings, 320 variables, 319-320 when to load, 29 JavaScript: The Good Parts (Crockford), 337 jaws game engine, 17, 194-196, 333 jQuery, 17, 334 adding, 15 chaining, 178 getters and setters, 176 jsfiddle.net, 330 JSLint, 328 jumping (character movement), 128-129
K–L keycodes in gameQuery, 183 keys binding, 245 handling, 152-153 tag, 12 Learning JavaScript (Wright), 337 library APIs, 318 licensing agreements, 21 tag, 8 listeners, 245, 294 listings Add Coins and Total Coins, 137 Adding a New script Tag with Your init Function, 88 Adding Another Layer, 177-178 Adding a PlayScreen Object to screens.js, 122 Adding a Resources.js File, 121-122
INDEX
343
Adding a Symbol Indicator to playerBody, 187 Adding Collision Data to the map, 243 Adding Handlers to Inventory Boxes, 37 Adding jQuery to index.html File, 15 Adding main.css for Navigation and Styling, 30-31 Adding onclick Handler to Body in index.html, 23 Adding Pages to Story in index.html, 29 Adding Player to the Playground, 181 Adding Rendered Text to the Game, 153 Adding Some Containers for Messages and Instructions, 136 Adding the badGuy Image to resources.js, 133 Adding the boots Image, 135 Adding the boots to the entityPool, 135 Adding the Brawler Character, 264 Adding the canvas Object, 211 Adding the Coin Sprite to resources.js, 132 Adding the convenience Variables, 159 Adding the Enemies Dynamically, 178-179 Adding the EnemyEntity to the entityPool, 133 Adding the Item Containers to index.html, 35-36 Adding the map, 196-197 Adding the minimap to index.html, 198 Adding the Player and the Enemy, 271 Adding the PlayerEntity Object, 126 Adding the randomColor Function, 93 Adding the screen Property to the Game, 52 Adding Your Player to resources.js, 125 Adding Your Player to the Entity Pool of main.js, 125 Adjustments to raycaster’s castRay Function for Colored Walls, 218-219 Altering the End of the gameTick Function, 164 Altering the Size of the Sprite, 162 Attempting to Buy an Item, 261-262 Basic html File, 195 Basic HTML File for atom.js, 60-61 Beginning of the New Script, 109 Binding Keys to Move, 128 Binding the init Function to the Window, 87 Binding the Spacebar to the “a” Key, 244 bitwise update Method, 159-160 Breadcrumb css, 55 Building a maskCache Array, 163-164 Building a placementArray, 95 Building the Scene, 274 Bump Players Down, 167 344
INDEX
Call castRays from the update Function, 225 Calling clearStatus when Arrow Keys Are Pressed, 252 Calling the makeHoles Function, 74 Calling the new Player Constructors, 153 Calling update for Players, 157 Camera Added to html File, 212-213 camera Object, 214 Capability of Playing Media in Browsers, 83 Casting Rays, 205-206 Changes to impress.js, 44-45 Changes to player to Enable Leveling and Attacking, 264-265 Changes to the placeUnits Function in game.js, 305-307 Change the Call to Replay to Reload the Page, 108 Checking for Bopped Moles, 81 Checking for Right Answers, 23-24 Checking Whether to Display Status or Execute a Sprite’s Action, 250-251 Clearing the Player’s Inventory, 256 Clear Out Old Messages, 137 Click Handler for Tiles, 295-296 Create a Way to Win if All the Coins Are Collected, 138 Create the gameOver State, 137 Create the youWin State, 137 Creating an inventoryObject to Store and Retrieve Items, 41 Creating a TitleScreen Object, 129 Creating game.things, 46-47 Creating How to and What to Display, 246 Creating Random Colors on Page Load, 90 Creating the BootsEntity, 135 Creating the CoinEntity, 132 Creating the EnemyEntity, 134 Creating the game.slide Function in game.js, 48-50 Creating the handleDragOver Function, 40 Creating the handleDrop Function, 40 Creating the playerInventory, 51 Creating Your Ship Variables, 180 CSS for Inventory and Drag/Drop, 36-37 Cycling Through Your Functions, 189-190 Dealing with Collisions, 184 Decision Page, 32-33 Declaring the moveUnit Function, 296-297 Declaring Variables for Making Squares, 91 Declaring Variables for the init() Function, 92 Defining the replay Function for Starting Over, 105
Determining How Many hp a Hit Will Deduct, 267 Determining if the Player Won, 105 Determining unit Placement in server.js, 292-294 dino Object, 227 Displaying Our Options for Combat, 270-271 dragDrop Revisited, 45 Drawing a Background, 66 Drawing a Mole in the Main draw Function, 71 Drawing an Isometric Board with Crafty, 289-290 Drawing Colors and Shades, 219-220 Drawing Holes, 69 Drawing Maneki, 258-259 Drawing the Items for Sale, 259-260 draw Method Without Scaling, 162 drawSquare Function, 93 drawSquare Method, 89 drawTextTile Function, 112 Emitting place units to the Client, 292 Enemy Constructor and New Variables, 177 Event Handling Using the mask, 160-161 Example CoffeeScript Code from README, 61 Example Game in Pure JavaScript, 62-63 A Few Objects to Set Right Away, 266 First Part of the init() Function, 110-111 Flashcard Array, 110 Form Changing Functions, 151 forms as a Normal Array, 167-168 Forms Object Instead of Sprite Nicknames, 152 Friendlier Variables, 145 full init() Function for Rendering Squares, 93-94 function Calls and Property Assignments for the Shop, 262 Functions for Determining What Sprite Is in Front of the Player, 249 game.bop Object, 79-80 game.css, 195, 232 game.items with More Detail, 256 game.js, 195 game.js file, 14 game.js File with socket.io Client Code, 287 game.js Stub, 233 game.js Updated with Player Movement, 238-239 game.keys in Action, 78 gameOver Function, 114 gameOver() Function, 104 gameOver Function in entities.js, 131
Game Over if Guy Falls in a Hole, 131 GameOver Pages, 33 gameTick, 149 getRandomPlacement, 97 Getting the Rest of the Questions Back, 20 handleOnPress Changes, 101 handleOnPress Function, 98-99, 113 Handler for When the Battle Starts, 272 Handler to Loop During Battle, 272-273 handling Key Presses, 149 Handling Player Movement, 128 Hide the Content, 13 Hiding the Questions, Not the Quiz, 15 Hiding the Tiles’ True Colors, 100 Hole with More Drawing Responsibilities, 75 How canvas Is Accessed Through atom.js, 65 HTML Document Loading JavaScript Files, 120-121 HTTP Server in Node, 284 Including the mask Utility, 162 index.html Changes for Breadcrumb, 54 index.html File, 232 Individual Sprite Rendering main Function, 146 init() Function Loop Adjustments, 96 init Function with More Detail, 88 initialize player Handler Updates, 308-309 Initializing the App and Loading Assets, 123 Initializing the Cache, 107 Initializing the dino, 222 Keeping the draw Method Simple, 68 Label for the Status of the Player, 267 Last Lines of the main Function, 150 Listener for the “a Button”, 245 Listening to the Server for place units, 294 load and preload Should Reference New Sprite, 162 Loading the entities.js File in index.html, 126 Loading the Map, 236 Loading the map File, 234 Loading the Screen Image as a Resource, 130 Loading Your First External JavaScript File, 14 Losing a Battle, 268 Main for Loop, 111-112 makeHoles Function Definition, 74 Making Text Possible, 151 Making the Update Function Work, 77 Making Your Cat Talk, 255 map.js, 234-235 Missile Collision Detection, 185 Missile Creation, 186 Missile Layer, 185 INDEX
345
missile speed, 184 Mole Object with a draw Method, 71-72 More Typical Way of Looping, Procedural Rather Than Functional, 38 Moving the player, 201-202 Moving Your Ship Around, 182-183 New components, 305 New draw Method, 76 New drawSquare() Function, 96 new key Handling, 152-153 New Variables After Tag, 102 Nicknames for Sprites, 148 No More eval, 189 Objects to Let the NPC Talk, 250 Obtrusive JavaScript Style of Loading Code, 87 palette Object, 217 placeUnits Function in game.js, 295 placeUnits Updated with Clicking and Moving, 297-298 Player Object, 147 Player Object with mask Attribute, 159 Players Called with Form id 3 (Stick Person), 169 Player update Function, 155, 166-167 Player with Forms Rather Than Sprites, 151 Possible Actions to Take in Battle, 269-270 Preloading the dino asset, 221 pushScene to Open Up Shop, 257 Putting the player on the minimap, 200 The Questions of the Quiz, 9-11 Raptorized index.html, 56 raycaster Object, 204 Reading from Local Storage, 276 Registering Hits, 165-166 Registering Input, 201 Registering Input on Player Objects, 156 Remove the Highlight Variable, 101 Removing Caching, 108 Replacing previous and next with change, 155 Requiring Your JavaScript Files in index.html, 18-19 Reset Coins When Game Ends, 138 Rest of the init Function, 103 room and player Attributes, 299 Saving Variables to Local Storage at a 5-Second Interval, 274-275 scaleUp Function, 145 Scaling Up the Sprites, 144 Sepia Filter, 228
346
INDEX
Server Communication for Updated Positioning, 302-303 setPlacementArray, 112-113 setPlacementArray Function, 95 setShopping Started, 258 Setting the Active State of Holes, 78 Setting the New Variables Inside of the init() Function, 103 Setting Up the Background of the Game, 174-175 Setting Up Your raycaster, 204 setup Function with palette, 217 Set Up the Battle When the Game Starts, 265-266 Set Up Tweaks for Clicking, Matching, and Removing, 98 shop’s Event Handlers, 260-261 Showing and Hiding the Inventory, 253 Showing the html Structure, 6 Showing Your First Question if jQuery is Loaded, 16 showInventory Updated, 256 Smarter Missile Collisions, 188 socket.io Server File, 287 Some CSS to Hide the Canvas in main.css, 21 Some New Variables, 164 Starter HTML, 174 Starter HTML File, 86 Starter HTML index File, 286 Starter index.html File, 142 Starter main.js File, 143 Starting the Camera in game.js, 213-214 starting the Shop, 257-258 Storing a Key Press Registry Inside of Player, 154 Storing More information of Player, 165 Styling the Camera Elements, 213 Styling the Enemy Ship, 180 Styling the Inside of Slides, 34 Styling the minimap Element, 199 Styling the Ship, 182 Styling Your Missiles, 186-187 Tell the Player How to Move, 136 Testing for Collisions, 244 tick and replay Functions, 114 tick() Function, 104 Toggling Visibility of Status, 251-252 Update Call to displayStatus, 256 Updated changeForm Function, 165 Updated draw Function, 81
Updated Input Handling to Remove Status Message, 247 Updated Player draw Function, 151 Updated Way of Displaying the player’s Status, 265 Updates to gameTick, 168-169 Updates to raycaster, 209, 222-224 Updates to the canvas Object, 218 Updates to the connection Handler, 299-300 Updates to the main draw Function, 226 Updates to the minimap draw Function, 226-227 Updates to the placeUnits Function, 300-301 Update the place units Handler, 308 Updating impress.js for Breadcrumb, 53-54 Updating the Cache, 107 Updating the draw and setup Functions, 208-209 Updating the index.html File, 43-44 Using Object.create for Inheritance for the game.js File, 63-64 Variables for Symbol Array, 187 What Happens When We Leave the Scene, 273 When Attacks Happen, 268-269 Winning a Battle, 267-268 Winning Style in main.css, 22 Working with the MENU State, 130 loading JavaScript, 29 JavaScript files, 14 entities.js File, 126 map, 234, 236 screen image as resource , 130 Local Storage API, saving games, 274-277 locking content, 12-14 loops, 38 for loops, 94 in JavaScript, 323-324 losing battles, 268 losing state in platformer game, 136-138 low-level abstractions, 86
M mailing lists, 329 main.js file, 143 main.css file, 13 makeHoles function, 74 map.js file, 234-235 mappings, 110
maps 2-D maps, creating, 196-199 collision maps, creating, 127 creating, 233-237 isometric maps, creating, 288-291 tiled maps, creating, 118-120 mask utility, including, 162 maskCache array, 163-164 masks bitmasks, 157-161 collision masking, 161-164 matching pairs, 97-100 instead of duplicates, 109-115 melon game engine, 17, 118, 333 character movement, 128-129 characters, adding, 124-126 collectibles, adding, 131-133 collision maps, creating, 127 enemies, adding, 133-134 powerups, adding, 135-136 tiled maps, creating, 118-120 starting platformer game, 120-124 MENU state, 130 messages in platformer game, 136-138 tag, 7 meta-tag extensions, 241 missiles collision detection, 185 creatingg, 186 layers for, 185 shooting, 184-187 speed, 184 mobile devices, zooming on, 241 Modernizr feature detection, 335 module pattern, 42 moles bopping, 78-82 drawing, 70-73 dynamic mole peeking, 77-84 putting in holes, 73-77 movement in FPS game, 202-203 speed, adjusting, 297 moving forms, 150-154 players, 136, 201-202 ships, 182-183 units, 295-298 Mozilla Developer Network documentation, 240 multiple objects, rendering, 91-94
INDEX
347
N naming conventions object inheritance, 148 variables, 320 native API, 318 navigation, breadcrumb trail, 53-55 node.js installing, 282-285 run-time environment, 327 server-side framework, 335 nonblocking input, 154-157 Notepad++ text editor, 333 NPCs (nonplayable characters), talking to, 248-251 NPM, 335 null guards, 80 numbers in JavaScript, 320-321
O–P object.create, 63-64 objects encapsulation, breaking, 198 inheritance, 148 in JavaScript, 322 scope, 181 obtrusive JavaScript, 87 onclick handlers, 23 Open Game Art, 336 optimization caching, 106-108 of color palettes, 220 packages, installing globally, 286 pairs creating, 95-97 matching, 109-115 matching and removing, 97-100 palette object, 217 parameters, 321 party game, 59-84 audio in browsers, 82-84 bopping moles, 78-82 creating sample game, 60-65 drawing with canvas, 65-67 dynamic mole peeking, 77-84 holes, drawing, 67-70 moles drawing, 70-73 in holes, 73-77
348
INDEX
performance with bitwise operators, 158 caching, 106-108 of color palettes, 220 testing, 328 Pickle sprite editor, 336 pictures, hiding and flipping, 100-102 Pixel Joint, 336 placementArray, 95 placeUnits function, 295, 297-298 Platformer, 336 platformer game, 117-139 character movement, 128-129 characters, adding, 124-126 collectibles, adding, 131-133 collision maps, creating, 127 enemies, adding, 133-134 informational messages, 136-138 melon.js file, 118 powerups, adding, 135-136 starting the game, 120-124 tiled maps, creating, 118-120 title screen, 129-131 playerInventory, 51 players adding, 180-183, 199-203, 237-243 bumping down, 167 calling with Form id 3 (Stick Person), 169 cheating players, avoiding, 282 forms versus sprites, 151 moving, 136, 201-202 object code listings, 147, 159 placing on minimap, 200 update function, 155, 166-167 player-specific control and visibility, 299-304 playing media in browsers, 83 positioning in FPS game, 202-203 powerups, adding, 135-136, 187-190 preloading sprites, 143, 221 procedural looping, functional looping versus, 38 properties, defining, 98 prototypes, 64 pushScene, 257 puzzle game, 85-115 caching, 106-108 creating random pairs, 95-97 hiding and flipping pictures, 100-102 matching and removing pairs, 97-100 matching pairs instead of duplicates, 109-115
rendering with easel.js file, 87-91 multiple objects, 91-94 time limits, 102-106 pygame, 142 Pythagorean theorem, 220
Q–R quality control. See debugging question-making in quiz game, 6-12 questions determining correct answers, 21-24 getting back, 14-16 hiding, 15 showing, 16 quiz game, 5-25 determining correct answers, 21-24 getting questions back, 14-16 hiding and showing quiz, 12-14 making the questions, 6-12 shopping list, 16-21 QUnit, 328 random color, adding on page load, 90 random pairs, creating, 95-97 raptorized index.html, 56 raptorize jQuery plug-in, 56, 335 raycaster object, 204 raycasting, 194, 203-208 creating 2-D maps, 196-199 fake 3D with, 208-212 raytracing, 194 reading from Local Storage API, 276 real-time strategy game. See RTS game recipes. See names of specific game types (e.g. fighting game, FPS game, etc.) refactoring, 68, 146 referencing array literals, 78 refreshing browser windows, 303 registering hits, 165-166 input, 156, 201 relational data storage options, 277 reloading server file, 291 removing caching, 108 highlight variable, 101 pairs, 97-100 text, 247
rendering. See also drawing sprites, 146 squares, 93-94 types of, compared, 172-173 replacing previous and next with change, 155 replay function, 114 replaying games, 105 requiring JavaScript files in index.html, 18-19 resetting coins, 138 CSS, 31 resources for information art creation, 335-336 books, 336-337 browsers, 334 demos and tutorials, 336 game engines, 332-333 text editors, 333 tools, 334-335 websites, 337-338 resources.js file, 121 return values in JavaScript, 42 RGB color values, 22 Rise of the Videogame Zinesters (Anthropy), 337 role-playing games. See RPG game RPG game, 231-277, 336 adding players, 237-243 battle interface, creating, 263-274 collision detection, 243-244 enchant.js, 232-233 inventory, creating, 251-254 map, creating, 233-237 saving game, 274-277 shops, creating, 254-263 status screens, 244-248 talking to NPCs (nonplayable characters), 248-251 RTS game, 279-311 collision detection, 305-310 creating isometric maps, 288-291 drawing units, 291-295 moving units, 295-298 node.js, 282-285 player-specific control and visibility, 299-304 servers, terminology, 280-282 socket.io, 285-288
INDEX
349
S saving games, 274-277 tiled maps, 119-120 variables to local storage, 274-275 Scalable Vector Graphics (SVG), strengths and weaknesses, 173 scaleUp function, 145 scaling sprites, 144, 161 scenes, building, 274 Schell, Jesse, 315, 337 scope functions, 42 objects, 181 variables, 63, 319 screens.js file, 122 tag, 19, 102 scrolling backgrounds, 175 sepia filter, 228 servers node.js, installing, 282-285 reloading file, 291 terminology, 280-282 updating positioning, 302-303 server-side code, 280 JavaScript for, 284-285 sessionStorage, 277 setPlacementArray function, 95, 112-113 setShopping function, 258 setters, 176 setup function, 217 shooter game, 171-191, 336. See also FPS game enemies, adding, 176-180 enemy collisions, 183-184 gameQuery, 174-176 players, adding, 180-183 powerups, 187-190 shooting missiles, 184-187 shooting missiles, 184-187 shopping list in quiz game, 16-21 shops, creating, 254-263 showing inventory, 253 HTML structure, 6 questions, 16 quizzes, 12-14 showInventory function, 256 socket.io, 285-288, 335 software licensing, 21 sound in browsers, 82-84 speed of movement, adjusting, 297 350
INDEX
Sprite Database, 336 sprites accessing from spritesheet, 145-147 forms versus, 150-154 nicknames for, 148 preloading, 143 scaling, 161 tools for creating, 335-336 spritesheets accessing sprites from, 145-147 creating new, 251 importing, 119 squares, rendering, 93-94 stackoverflow.com, 330 starting camera in game.js, 213-214 platformer game, 120-124 shop, 257-258 state machines, 273-274 statements in JavaScript, 319 status screens, creating, 244-248 stores. See shops storing key press registry, 154 player information, 165 Stratego, 280 strings in JavaScript, 320 styled pages, 28-32 styling camera elements, 213 enemy ship, 180 minimaps, 199 missiles, 186-187 player ship, 182 slide interiors, 34 Sublime Text text editor, 333 SVG (Scalable Vector Graphics), strengths and weaknesses, 173
T tag-based selectors, 13 tags, 7 , 19 , 82-84 , 7-8
, 12 , 19, 61 , 8, 11, 174 , 8 , 7 , 7
, 12 , 12 , 8 , 7 , 19 , 7 talking to NPCs (nonplayable characters), 248-251 terminology of game engines, finding, 254 for servers, 280-282 testing code, 328 collisions, 244 text importing font module, 151 removing, 247 text editors, list of, 333 this keyword, 68 three.js website, 338 tick function, 104, 114 TIGSource website, 338 tiled maps, creating, 118-120 Tiled tilemap editor, 118, 335 tilemap editors, 118 tilesets, importing, 119 time limits, setting, 102-106 title screen for platformer game, 129-131 tag, 7 toggling visibility of status, 251-252 tooling, 328 tools, list of, 334-335 troubleshooting commas, 122. See also debugging truthiness, 80, 99, 323 turn-based RPGs, action RPGs versus, 232 tutorials, list of, 336 two-player input handling, 147-150
U–V units drawing, 291-295 moving, 295-298 unlockables, 12-14 unlocking questions, 16 update function, 77 updating cache, 107 canvas object, 218 changeForm function, 165 connection handler, 299-300
displaying player status, 265 displayStatus call, 256 draw function, 81, 151, 208-209, 226 gameTick function, 168-169 impress.js, 53-54 index.html file, 43-44 input handling, 247 minimap draw function, 226-227 placeUnits function, 300-301 place units handler, 308 raycaster, 209, 222-224 setup function, 208-209 variables creating, 180 declaring, 92 defining, 63 determining source of, 90 in JavaScript, 319-320 saving, 274-277 after tag, 102 setting new, 103 for symbol array, 187 version control system, 18, 283 viewports, 241 vim text editor, 333 visibility, player-specific, 299-304
W–Z walking (character movement), 128-129 Web Audio, 83 web services, 280 websites, list of, 337-338 web sockets, 285 Web SQL Database, 277 windows binding JavaScript functions to, 87 when to refresh, 303 winning battles, 267-268 collecting all coins, 138 state in platformer game, 136-138 style in main.css, 22 Wright, Tim, 337 Yabble, 335 yabble.js file, 17 youWin state, 137 your API, 319 zooming on mobile devices, 241
INDEX
351