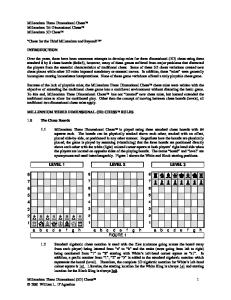
ABOUT THE CAMERA A B C D E F G H I J K L M N O P
Record/GPS Status Record Switch Bluetooth Button Rotating Lens Microphone Plug Battery Slot Battery Latch Card Format Button USB Configuration Switch microSD card Connect View Slot HDMI Memory Status Power Button Battery Status
Contour+ User Manual
A E
H
I
P
G
O J
1 2
F K N
A
M L
1
2
BASIC FEATURES
3
+ GETTING READY
+ POWER ON
+ Push door up to open. + Insert battery with (+) aligned. + Align back door slightly above camera and slide down until it clicks.
+ Push power button firmly and immediately release. + Camera beeps and front Record/GPS LED blinks bright green. + You are ready to record.
4
+ RECORD + Start: slide switch forward. Camera beeps once and the front Record/GPS LED turns red. + Stop: slide switch back. Camera beeps twice and the front Record/GPS LED turns green. + Congrats, your first video! Note: Record/GPS status will flash while camera is obtaining a GPS position Fix and go solid once a GPS fix is achieved. Contour+ User Manual
5
+ USING THE GPS FUNCTION GPS in the Contour+ is turned on automatically when the camera is powered on. The GPS module must acquire 4 GPS satellites in order to obtain a position fix (Fix). The Record/GPS Status LED on the front of the camera will flash (either green or red, depending if the camera is recording or not) while the camera searches for satellites and obtains a Fix. Once a Fix has been obtained, the Record/GPS Status light will remain a solid color (green or red). The ability for the GPS module in the camera to acquire satellites is affected by environmental variables. The Contour+ is most efficient in obtaining a Fix in an ‘open sky’ or ‘unobstructed horizon’ situation. Key environmental variables are as follows: + Outdoors (GPS will not work indoors or an obstructed overhead situation). + No tall buildings, cliffs, or objects blocking the view to the sky or horizon. + Not in a natural or urban ‘canyon’ where the satellite signals can bounce around before getting to the camera. + The record slider of the camera (where the GPS antenna is located) is not obscured by clothing, other equipment, or the user’s body. + The camera battery is well charged (more that 30% power). 6
+ No other electronic devices nearby that are emitting electronic noise that could interfere with the camera’s antenna. + No trees overhead. + The camera is stationary until a Fix is acquired.
Note: The Contour+ will still record video even if the GPS system has not obtained a Fix.
Under ideal condition (as described above), the Contour+ camera will typically obtain a Fix within 30 to 60 seconds. If your camera has not obtained a Fix within 4 minutes, power down the camera, remove the battery for at least 10 seconds, re-install the battery, and power up the camera. This process will reset the GPS module. If the Contour+ had obtained a Fix within two to four hours from being powered off and the battery has remained in the camera, then the camera will typically obtain a Fix in less than 30 seconds when powered back up. Connect the Contour+ to Storyteller or use the mobile app tool to automatically load the AssistNow file onto the microSD card and into the camera’s memory. This file contains current data pertaining to deviations in GPS satellite orbits and can help the GPS module obtain a Fix faster (often 30 seconds or less). Contour+ User Manual
7
+ CAMERA CONFIGURATION SWITCH Use switch under back door to select video format. Default Formats: 1: 1280 x 720 @ 60 fps 2: 1920 x 1080 @ 30 fps + POWER Recharge + Connect to computer with USB cable. + Red light indicates charging. + Charge complete when light turns green (about 4 hrs). Note: Always turn camera off before removing microSD card. 8
Alternate Formats: + 1280 x 960 @ 30 fps + 1280 x 720 @ 60 fps + Picture Mode Power Off + Press and hold power button for 3 seconds. + Double beep & lights turn off.
+ STATUS Press power button while the camera is powered on to check status. Memory / Battery Available Green > 50% Yellow 20-50% Red < 20% 2GB microSD card included. Accepts up to 32GB microSD. + ERROR CONDITIONS When the camera cannot record due to an error, it will beep three times. Look at the status LEDs to determine what is wrong. + Battery status flashes red, camera shuts off. The battery is too low. + Memory status flashes yellow. The is no microSD card in the camera. + Memory status flashes red. microSD card is full. + Memory status flashes yellow and red. microSD card needs formatting in camera (see page 18).
Contour+ User Manual
9
+ ROTATING FLAT SURFACE MOUNT + It is best to adhere the mount to the helmet at room temperature. + Locate the best spot for your camera. The mounting area should be smooth and flat. + Check the angle and position by sliding camera onto mount and taking a test video. + Clean the surface with alcohol and adhere mount. The adhesive takes up to 24 hours to fully cure. + Slide your camera onto rails. + Unlock the mount and rotate camera to the perfect angle. + Press “Lock” to lock the camera into place. Note: Before using any of our mounts in recreational activities, you need to determine if the holding power of the mount is appropriate and safe. Contour does not warrant lost cameras.
10
+ LEASH + Unclip leash. + Loop one end of leash through side hole of camera, then out back. It is helpful to use a pin to help thread the leash through the camera. + Attach other half of leash to mount. + Clip leash together. Note: DO NOT ATTACH THE LEASH TO THE CAMERA WHEN THE CAMERA IS MOUNTED ON HELMET OR GOGGLES, WHEN THE CAMERA WILL BE USED IN HIGH WINDS OR AT HIGH VELOCITIES, OR IN ANY OTHER CIRCUMSTANCES WHEREBY THE CAMERA COULD CAUSE INJURY OR HARM IN THE EVENT THAT IT COMES LOOSE FROM THE MOUNT AND REMAINS TETHERED BY THE LEASH. BY ATTACHING THE LEASH TO THE CAMERA, YOU AGREE TO WAIVE ANY CLAIMS AGAINST CONTOUR, INC. AND ANY OF ITS AFFILIATES, AGENTS, EMPLOYEES, OFFICERS OR DIRECTORS ARISING FROM THE USE OF THE LEASH. Contour+ User Manual
11
12
ADVANCED FEATURES
13
+ SOFTWARE + Contour Storyteller - Mac/PC editing software that connects to your camera with USB cable. www.contour.com/support + Mobile App - works with Connect View card to align camera and change settings. www.contour.com/mobile + ADJUST CAMERA SETTINGS Load Storyteller onto computer, connect camera to USB port, open Storyteller and select “Tools → Configure Camera,” or adjust using mobile app. You can adjust: + Resolution and Frame Rate + Exposure Level + Sharpness
+ Contrast + Audio Level + White Balance
+ GPS Sample Rate + GPS Power + Auto-Shut Off
+ SETTING WHITE BALANCE The Contour+ automatically adjusts the White Balance level. Connection to Storyteller allows you to configure the White Balance to these factory preset levels: Automatic (Default) 2,800 K Incandescent 4,000 K Fluorescent 14
5,000 K Daylight D50 6,500 K Overcast D65 7,500 K Cloudy
9,000 K Shade 10,000 K Xenon HID
+ DOWNLOADING FILES DIRECTLY FROM THE CAMERA + Connect the camera to any PC or Mac using the supplied USB cable. + The camera will mount as a generic storage device. + Navigate to the mounted device. + Video and still image files are located in the \DCIM\100MEDIA directory. Video files can be copied to your hard drive and played with any .mov video player (i.e. Quicktime, Windows Media Player, Storyteller and VLC). Mac Users: Please make certain when deleting files from your microSD card to empty the “trash bin” while the camera is connected to your Mac. Otherwise, the deleted files will remain on your camera’s microSD card in a hidden folder and may prevent subsequent videos from recording properly.
Contour+ User Manual
15
+ PLAYING HDMI VIDEO + With the camera powered on, connect an HDMI cable between the camera’s HDMI output port and a video display. + The camera will display a screen showing thumbnails of videos stored on the microSD card. + Press and release the Power Button to toggle through the available videos. + Slide the Record Switch forward to Play a video in full-screen. + While a video is playing, slide the Record Switch back to Pause. + While a video is paused, press and release the Power button to return to the thumbnails of videos stored on the microSD card. + STREAMING HDMI VIDEO + With the camera powered off, connect an HDMI cable between the camera’s HDMI output port and a display, recorder, or transmitter. + When the camera is powered on video will start streaming through the HDMI port. + The video will continue to stream while the camera is powered on, even if the camera is recording.
16
+ BLUETOOTH The Contour+ has Bluetooth 2.1 + EDR onboard and a Connect View card pre-installed. Using a mobile device and the Contour Camera mobile app, you can configure your camera settings in real-time and preview what your camera sees. + Check the compatibility of your mobile device at www.contour.com/mobile. + Download and install the Contour Camera mobile app onto your mobile device. + Press Bluetooth button (see C on page 1) and hold it down for 5 seconds, this turns Bluetooth on and initiates a pairing request. The front LED will begin flashing blue. (Note: if you slide the record switch forward the camera will go out of Bluetooth mode). + On your Mobile device, enable Bluetooth. Wait while your mobile device locates the Contour+ camera. Once you see ‘Contour+’, select it to accept the pairing request. You will know the pairing is complete when the front LED on the camera goes solid blue. + Open the Contour App to configure your camera settings in real-time and preview what your camera sees. + If your Bluetooth connection is lost the app will let you know; if this happens, you’ll need to turn your Bluetooth back on by pressing the Bluetooth button once. A single beep will sound and the camera will connect with the pre-existing pairing. + To turn Bluetooth off, press the Bluetooth button on your camera. Contour+ User Manual
17
+ microSD CARD FORMATTING All microSD cards MUST be formatted before use in the Contour+ camera. Follow the directions below. 1. Remove microSD card. 2. Power on the camera - it will triple beep. 3. Insert the microSD Card. 4. Using a small narrow object (such as the end of a paper clip), firmly depress the format button (See “H” on page 1) and hold it down until the camera beeps once and the Memory status LED flashes once. This should take no longer than 10 seconds. 5. Power off the camera by holding down the power button for 3 to 5 seconds. 6. Power on the camera. It is now ready to shoot video on the reformatted microSD card. Note: All existing data on microSD card will be lost during the reformat process.
18
Cautions and Warranty This Important Product Information Guide contains regulatory, safety, handling, disposal and recycling information, as well as the 180-day limited warranty for your Contour+ camera. Read all safety information below and operating instructions before using Contour+ camera to avoid injury. For detailed operating instructions and the latest Important Product Information Guide, go to: www.contour.com/support.
WARNING: Failure to follow these safety instructions could result in fire, electric shock, or other injury or damage. Battery and Handling The lithium-ion battery may present a hazard if mistreated. Do not disassemble, crush, or puncture the lithium-ion battery. Do not immerse battery in water and store in a cool dry place when not in use. Do not use or leave battery near a heat source or in direct sunlight. Contour+ uses a rechargeable lithium-ion, 3.7V, 1050mAh battery. Do not use batteries other than those specifically designed for the Contour+. Use of any other Contour+ User Manual
19
battery may invalidate the warranty provided by Contour, Inc. and may present a risk of fire or explosion. To charge, only use the Contour USB Cable with a high power USB port on a computer or other device that is compliant with the USB 2.0 or 1.1 standards, or a Contour wall, car or battery charger. Disposal information Do not dispose of either the Contour+ camera or lithium-ion battery in a fire. Dispose of batteries in accordance with local laws and regulations.
20
Leash Use: DO NOT ATTACH THE LEASH TO THE CAMERA WHEN THE CAMERA IS MOUNTED ON HELMET OR GOGGLES, WHEN THE CAMERA WILL BE USED IN HIGH WINDS OR AT HIGH VELOCITIES, OR IN ANY OTHER CIRCUMSTANCES WHEREBY THE CAMERA COULD CAUSE INJURY OR HARM IN THE EVENT THAT IT COMES LOOSE FROM THE MOUNT AND REMAINS TETHERED BY THE LEASH. BY ATTACHING THE LEASH TO THE CAMERA, YOU AGREE TO WAIVE ANY CLAIMS AGAINST CONTOUR, INC. AND ANY OF ITS AFFILIATES, AGENTS, EMPLOYEES, OFFICERS OR DIRECTORS ARISING FROM THE USE OF THE LEASH. FCC information Contour+ Camera Model: 1500 This device complies with Part 15 of the FCC Rules.
Bluetooth information FCC ID: QOQWT21A IC ID: 5123A-BGTWT21N ACN: 135 810 098
Operation is subject to the following two conditions: + This device may not cause harmful interference, and + This device must accept any interference received, including interference that may cause undesired operation. Contour+ User Manual
21
Warning: Changes or modification to this unit not expressly approved by party responsible for compliance could void the user’s authority to operate the equipment. Note: This equipment has been tested and found to comply with the limits for a Class B digital device, pursuant to Part 15 of the FCC Rules. These limits are designed to provide reasonable protection against harmful interference in a residential installation. This equipment generates, uses and can radiate radio frequency energy and if not installed and used in accordance with instructions, it may cause harmful interference to radio communications. There is no guarantee that interference will not occur in a particular installation. If this equipment does cause harmful interference to radio or television reception, which can be determined by turning the equipment off and on, the user is encouraged to try to correct the interference by one or more of the following measures: + Reorient or relocate the receiving antenna. + Increase separation between equipment and receiver. + Connect the equipment into an outlet on a circuit different from that to which the receiver is connected. 22
+ Consult the dealer or an experienced radio/TV technician for help. The CE symbol on your Contour+ camera indicates that it is in compliance with the Electromagnetic Compatibility (EMC) directive, and Limits and Methods of Measurement of Radio Interference Characteristics of ITE. Industry Canada This Class B device meets all requirements of the Canadian Interference-Causing Equipment Regulations. Cet appareil numerique de la classe B respecte toutes les exigences du Reglement sur le materiel broulleur du Canada. Repairing or Modifying Never attempt to repair or modify a Contour+ camera yourself. Disassembling Contour+ camera, including the removal of external screws, may cause damage that is not covered under the warranty. The Contour+ camera does not contain any user-replaceable parts, except the microSD card and battery.
Contour+ User Manual
23
RoHS Contour+ cameras comply with the European Union’s R0HS directive 2002/95/EC and similar regulations that may be adopted by other countries for European Sales. CONTOUR, INC. LIMITED WARRANTY Contour, Inc. (“Manufacturer”) warrants to the original end user (“Purchaser”) that for the 180 days (“Warranty Period”), the Contour+ camera (excluding any third party software) and accessories (“Product”) will be free from defects in materials and workmanship when properly installed and used for its intended purpose and in its intended operating environment. This warranty does not apply to any Product that has been: (i) altered, repaired or modified or (ii) damaged or destroyed by accidents or similar events or by any intentional, reckless or negligent acts or omissions of any party. In the event of a defect, return the Product to the original place of purchase or Manufacturer, but only after instructed to do so by Manufacturer. Purchaser shall ship and bear the cost of shipping the Product to Manufacturer and Manufacturer shall bear the cost of shipping the Product back to Purchaser after the completion of service under this limited warranty. Purchaser’s exclusive remedy and Manufacturer s entire 24
liability under this warranty will be for Manufacturer at its option to repair or replace the Product or refund purchase price less any rebates. Manufacturer does not warrant against loss of any data (including data stored on Product returned to Manufacturer for service), and assumes no liability for such loss. Purchaser assumes all liability, and as such releases Manufacturer from any liability, for any accident, injury, damage, death, loss, illegal activity or any other claim that may occur resulting from or during use of the Product, whether or not such use is foreseeable by Manufacturer. ALL IMPLIED WARRANTIES OF MERCHANTABILITY OR FITNESS FOR A PARTICULAR PURPOSE ARE LIMITED TO THE DURATION OF THE APPLICABLE EXPRESS WARRANTY. ALL OTHER EXPRESS OR IMPLIED CONDITIONS, REPRESENTATIONS AND WARRANTIES, INCLUDING ANY IMPLIED WARRANTY OF NON-INFRINGEMENT, ARE DISCLAIMED. Some jurisdictions do not allow limitations on how long an implied warranty lasts, so the above limitation may not apply to Purchaser. This warranty gives Purchaser specific legal rights, and Purchaser may also have other rights which vary by jurisdiction. Contour+ User Manual
25
All third party software provided with the Product is provided “AS IS”. Purchaser assumes the entire risk as to the quality, performance, accuracy and effect of such software, and should it prove defective, Purchaser, and not Manufacturer, assumes the entire cost of all necessary servicing or repair. TO THE EXTENT NOT PROHIBITED BY LAW, IN NO EVENT WILL MANUFACTURER BE LIABLE FOR ANY LOST DATA, REVENUE OR PROFIT, OR FOR SPECIAL, INDIRECT, CONSEQUENTIAL, INCIDENTAL OR PUNITIVE DAMAGES, HOWEVER CAUSED REGARDLESS OF THE THEORY OF LIABILITY, ARISING OUT OF OR RELATED TO THE USE OF OR INABILITY TO USE THE PRODUCT, EVEN IF MANUFACTURER HAS BEEN ADVISED OF THE POSSIBILITY OF SUCH DAMAGES. IN NO EVENT WILL MANUFACTURER’S LIABILITY EXCEED THE AMOUNT PAID BY PURCHASER FOR THE PRODUCT. The foregoing limitations will apply even if any warranty or remedy provided under this Agreement fails of its essential purpose. Some jurisdictions do not allow the exclusion or limitation of incidental or consequential damages, so the above limitation or exclusion may not apply to Purchaser. 26
Contour Disclaimer All purchasers, users, and any or all parties involved or engaging in the use of Contour, Inc. (“Contour”) products agree to the following: + Contour does not promote or endorse high risk, careless and/or dangerous actions when using its products. + Contour is not liable for any use or misuse of Contour Products or any video captured that may be considered illegal. + Contour is not responsible for any illegal actions taken while recording, attempting to record, or editing video that was captured with our products. + Contour Products’ primary purpose is recording legal sports activities as seen by all Local, State, Federal, and Country laws.
Contour+ User Manual
27
We are here to help Keeping Shoot and Share simple is what we are all about. We would love to help you have a great Contour+ experience so please contact us with any questions you have. How to get service To obtain warranty service, register your product at www.contour.com within 180 days from the date you purchased this product. If service is required, you may be instructed to deliver the product freight prepaid, in either its original packaging or packaging affording an equal degree of protection, to the company and provide proof of purchase in the form of a bill of sale or receipt which evidences that the unit is within the warranty period. Contour will, at its sole discretion, replace or repair the product. Please do not return the product to Contour unless specifically instructed to do so. Hours: Monday - Friday 9am to 6pm PST USA toll free phone: 866.397.6920 International phone: +1 206 792.5226 Email:
[email protected] Web: www.contour.com/support 28
Contour Hands-free Camera and/or associated software and other Contour products are protected by copyright, international treaties, and various patents, including: U.S. patents: D616,006. Other patents are registered or pending in the U.S. and in various countries around the world. Visit www.contour.com for a list of applicable patents. All trademarks and registered trademarks mentioned herein are recognized as the property of their respective holders. Contour+ is a product of Contour, Inc. in Seattle, Washington. www.contour.com ©2011 Contour, Inc. All rights reserved.
Contour+ User Manual
Version 2011.01
29
30