“Your New Telescope The Good, the Bad, and the Ugly” Antelope Valley Astronomy Club, Inc. Tom Koonce May, 2000
Congratulations! • You have a new telescope! Great! But you have some questions… – What’s what? – How do I set it up? – Do I have to do that “Polar Alignment” thing? – How do I keep everything clean? – Where should I keep it?
Parts • From the Ground Up – Your Tripod – More Important Than the Telescope? • The success of your observations literally rests on your tripod. • A beefy, rigid tripod means steady images • Vibration dampening is “Good.” (Rubber Feet, Weights) • Dobsonian Mounts
Parts (Continued) – Drive Mechanism • If your telescope can track the stars, it has a precision set of gears that move the telescope. These require power from batteries or an outlet.
Parts (Continued) • From the Ground Up – Mount • The Right Ascension (east-west movement) mechanical axis • The Declination (north-south movement) mechanical axis • Some kind of attachment to the telescope itself
Parts (Continued) – There are three basic kinds of mounts – The simplest: A Dobsonian Mounting
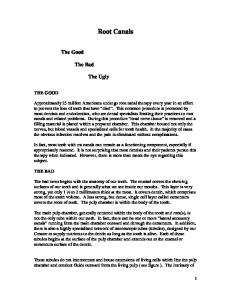
Parts (Continued) • From the Ground Up – Mount • Fork Mount (Meade and Celestron SchmidtCassegrains
Finder Scope
Optical Tube
Eyepiece Fork
Parts (Continued) • From the Ground Up Mount – Equitorial Mount (Meade Starfinders, most refractors) Optical Tube Finder Scope Eyepiece
Equitorial Mount
Parts (Continued) • From the Ground Up – Optical Tube Assembly (The Telescope) • Refractor
Parts (Continued) • Reflector –
Newtonian & Dobsonian Telescopes
Spider Mirror Stalk Secondary Mirror
Rack & Pinon Focuser
Primary Mirror
Mirror Mount
Parts (Continued) • Schmidt-Cassegrain
Corrector Plate Secondary Mirror Primary Mirror Focal Point (Eyepiece)
Parts (Continued) – Spotting Scope • “Little Telescope” or 1x Finder? Which is best for you?
Assembly Tips • When you assemble your telescope, you want things to be just tight enough. It’s not necessarily time to prove that you ate your Wheaties. – What Needs to be Secure? • The telescope needs to be securely in its mount. “Good” • The polar axis angle needs to be locked in firmly. “Good” • The set screw holding your diagonal mirror to the telescope should be tightened and checked frequently. “Good” • Having your telescope or diagonal/eyepiece drop suddenly out of its mount - “Bad.”
Assembly Tips • What Just Needs to be “Finger Tight?” – There is a set screw that holds the eyepiece in place. You just need to tighten this one snugly so the eyepiece doesn’t fall out. – Don’t put any muscle into it or you’ll scratch the eyepiece barrel or strip the threads on the set screw. Again, “Bad.”
The Big Rules of Observing • Don’t look directly at the Sun. – A special Solar Filter can be used over the FRONT of your telescope, or “eyepiece projection” with an eyepiece that is not cemented together. – Without a Solar Filter, if you glimpse the sun with your telescope, you will instantly burn your retina, perhaps go blind and besides you’ll ruin a perfectly good eyepiece from the intense heat. – This is “Bad.”
The Big Rules of Observing • Don’t look directly at a Solar Eclipse with out a Solar Filter. – A Solar Eclipse happens during the day when the Moon passes in front of the Sun.
• You may use your telescope to look at a Lunar Eclipse – No Filter Required! – A Lunar Eclipse happens at night when the Moon passes into the Earth’s shadow.
Polar Alignment • Simple Methods – Sight along the telescope’s Right Ascension axis towards Polaris. – Offset the axis from Polaris about a degree opposite of Cassiopeia. – This is good enough for an evening of casual visual observing.
Polar Alignment (Continued) • Simpler Method – Point the Right Ascension axis roughly at Polaris. Start Observing. – Just fine
– Simplest but $$: Buy a dob. Start Observing.
Observing Tips • Learn what magnification each eyepiece provides. • Always start with the lowest power eyepiece you have. • Keep the magnification under 50x the aperture of your telescope in inches. • Line up the finderscope during the day. • Don’t look through a window (even open).
Observing Tips (Continued) • Don’t expect to see… – …Stars looking like disks. They’re too far away to look like anything but points of light. – …Colors in nebulae and galaxies. The colors only show up in long photographic exposures. They will look mostly gray. – …Planets filling the eyepiece view like the Voyager photos. They will appear as small disks. – …The Apollo spacecraft on the moon. No telescope on earth can see these.
Cleaning the Mirror • OK – Some serious stuff! – Don’t touch the coating on a first surface mirror unless ABSOLUTELY necessary! – Compressed Air First! • Don’t use air from an air compressor which contains tiny droplets of oil that will ruin your mirror. Really “Ugly.” • Hold can of compressed air upright at all times.
– Distilled Water Not Tap Water! • For reflectors only. Remove mirror carefully from mirror cell. Using a new, clean squirt bottle, run water across the mirrors surface. Use a gallon for a 6 inch mirror. Stan mirror up at about 60 degrees and let it air dry. Use compressed air to disperse any big droplets.
Cleaning the Mirror (Continued) • OK – Some serious stuff! (Continued) – 100% Pure Medical Cotton • After the mirror dries, and there is still a little spot, use some 100% Pure Medical Cotton with a LIGHT flicking motion to remove it. Do not use a circular scrubbing motion. The mirror will scratch.
– 100% Rubbing Alcohol • Last resort only. Use 100% Pure Medical Cotton with a little bit of rubbing alcohol and a light flicking motion to remove the spot.
Cleaning the Eyepiece • Use compressed air from a can first • Optical Cleaning Tissues – First use compressed air to get all of the dust off or it will scratch the lenses, then use a new tissue and optical cleaner to remove the smudge.
• Cotton Swab – I have used a cotton swap to successfully remove specks that were deep inside an eyepiece. Don’t moisten the swab, just very gently try to loosen it enough that compressed air can blow it off.
Cleaning the Optical Tube • Waxing – Most telescopes tubes can be cleaned using a mild detergent on a cloth, rinsed with a moist closth, dried and then waxed using regular car wax. Don’t get water in the motor drive or on your mount.
• Painting – Telescope tubes may be painted, Dobs especially, but stripping off the paint if you don’t like it usually requires complete disassembly.
Storage • Cover – You want to keep the dust off your clean mirror, but you also want the telescope to be able to breathe enough that it can dry out after your last observing session. – People use pillow cases (designer color up to you), Custom sewn covers, or my method, a loose cover of Contractor Grade Black Trash Bag.
Storage (Continued) • Temperature – Your telescope should be stored ideally at the temperature at which you will be observing. I recommend keeping it inside the house. – The garage is usually VERY hot in the summer and cool in the winter. This is rough on a scope and will shorten the life of the mirror and coatings.
• Humidity – Moisture is hard on mirror coatings. A low humidity, cool place is ideal. Don’t store the scope in a bathroom or bedroom connected to a bathroom – the regular exposure to the steam from showers is “Bad.”