WHAT’S ALL THIS TALK ABOUT ENGINES?
Have you heard children talking about their “engines” going up into high gear (hyper) or into low gear (lethargic) or in a “just right” gear (attentive and focused)? If you haven’t yet, you probably will soon. We’re introducing the “How Does Your Engine Run?”® The Alert Program® for Self-Regulation developed by two internationally known occupational therapists, Mary Sue Williams and Sherry Shellenberger. By using the engine analogy to teach self-regulation (changing how alert we feel), we are helping children learn what to do if they are in a non-optimal state of alertness. We teach children that there are five ways to change how alert we feel: put something in the mouth, move, touch, look, or listen. We all self-regulate throughout our day, but rarely do any of us talk about it. For example, think about what you did for your engine this morning to get up and get going. To start your day, did you drink a hot cup of coffee or drink a cold fruit smoothie (mouth category)? Before work, did you go for a jog or walk the dog (move category)? To wake up, did you take a steamy hot shower or pet your cat (touch category)? Did you watch TV (look category) or turn on the radio (listen category)? We teach children how to expand the use of these types of engine strategies at school and at home to be in an optimal state for learning, playing, or interacting with their friends, family, and peers. We empower children to know what to do if their engines are in low gear and need to focus on learning a new math skill or, if their engines are in high gear, what they can do to get ready to sleep at night. You can help teach self-regulation by talking about your own engine. If your engine is in a low speed when you are trying to read a book, or if it goes up into a high speed when rushing to get to an appointment, share that with children. Don’t be surprised if children who are learning about the Alert Program® concepts suggest an engine strategy such as taking a deep breath (mouth category), stretching (move category), squeezing a stress ball (touch category), watching the sunset (look category), or listening to music (listen category). Encourage the use of engine strategies to support self-regulation so your engine and your children’s engines can run just right! To read more about the Alert Program®, go to www.AlertProgram.com.
©2007 TherapyWorks, Inc. Reprinted with permission for educational purposes.
How Does Your Engine Run Heather Childs, Registered Psychologist #809 Feb 5, 2012
How Does Your Engine Run? (Alert Program) Primary Focus - to help children learn to monitor, maintain, and change their level of alertness so that it is appropriate to a situation or task Designed to: Help recognize arousal states as they relate to attention, learning, and behavior Help to expand the number of self-regulation strategies student’s use in a variety of tasks and settings. Arousal – describes how alert one feels. In order to attend, concentrate, and perform tasks in a manner suitable to the demand of the situation. In this program the word “alert” is used in place of “arousal.” Self-regulation – the ability to attain, maintain, and change arousal appropriately for a task or situation.
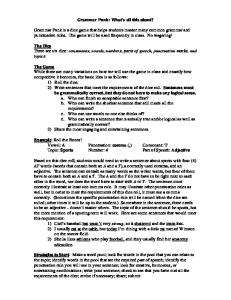
Q- Why does movement help you calm down? Involves thinking and reasoning
Takes information from muscles and joints (proprioceptive system)
Contains the reticular formation, responsible for how alert we feel 1
Top down inhibition – using one’s thinking process to regulate oneself. Ex. Mary might talk to herself to stay on task and remind herself of the consequence if she does not complete her work. From the top of her brain and down, she is trying to inhibit herself. This is not efficient. It’s like … Bottom- up inhibition – using muscles and movement to regulate oneself The brain is responding to input from the body and regulating itself naturally. This helps the student’s nervous system to function optimally It’s like …
Q- Why does a child need to have so many breaks – they can’t do this as an adult. A child’s nervous system may crave movement, for example, swinging. In a certain developmental period, a child may choose to swing at every school recess (frequency), pumping as hard and as fast as possible (intensity). The child may continue swinging the whole recess period (duration). The adults nervous system may enjoy swinging but only seeks light swinging movements (intensity) for short periods of time (duration), once in a great while (frequency). Most adult nervous systems do not need as much intensity, frequency, or duration of sensorimotor input to reach or maintain optimal functioning (arousal) appropriate for a specific task or situation. Program Overview o Program has 3 Stages o Each stage has a varied number of Mile Markers (objectives) o Each Mile Marker has a varied number of activities (lessons to teach objectives) Designed for grades 4-8 but can be adapted for other grades (See Chapter 5 for adaptations) NOTE: Those who are younger than 8 years or are developmentally delayed may not have the self-knowledge to complete the 3rd stage and select strategies independently
2
Stage 1: Identifying Engine Speeds Mile Marker 1: Students learn the engine words Mile Marker 2: Adults label their own engine levels Mile Marker 3: Students develop awareness of the feel of their own engine speeds, using the adults’ labels as guides Mile Marker 4: Students learn to identify and label levels for themselves Mile Marker 5: Students label levels for themselves, outside the teaching moment
3
Stage 2: Experimenting with Methods to Change Engine Speeds Mile Marker 6: Leaders introduce sensorimotor methods to change engine levels Mile Marker 7: Leaders identify sensorimotor preferences and sensory hypersensitivities Mile Marker 8: Students begin experimentation with choosing strategies
When you need to concentrate at your work space, what helps you to work most efficiently? Tools for the mouth: Oral motor input has a range of characteristics, including the following: a) Action Variables (what you do): - blowing, sucking, swallowing, biting, crunching, chewing, licking b) Quality Variable (how it feels or tastes): - physical feeling of resistance when biting, crunching, chewing, sucking, blowing; the taste of sour, sweet, salty, spicy, or bitter; the temperature of food such as hot chocolate, cold popsicle, or warm soup c) Medium Variables (with what?): - whistle, straw, bubbles, musical instrument, exercise water bottle, candy, beef jerky, rubber tubing, fruit, crackers, pretzels, gum, bagels, popcorn, etc. Tools for the Body Vestibular and proprioceptive (information from muscles) inputs include: (Note: these are all in relation the direction that one’s head goes in. For example, bouncing a ball would be an example of heavy work, rather than an “up and down” motion that one would think). a) Oscillation (up and down): - sitting on a teeter-totter, trotting on a horse, jumping, sitting and bouncing on a therapy ball, or jumping on a trampoline b) Linear (front and back): - swinging on a playground swing, rocking in a rocking chair or on a rocking horse, or swinging on a glider c) Rotary (circles): 4
- riding on a merry-go-round, using a “sit ‘n spin”, standing and twirling, or spinning on a tire swing d) Inverted (upside down): - hanging by the knees on a playground bar with hands near the ground, bending over with head between knees, “wheelbarrow” walking, or on tummy laying over therapy ball e) One type of proprioception (heavy work) meaning input to muscles, tendons, and joints: - crossing the monkey bars on a playground, climbing a tree, pushing furniture, lifting firewood, or pulling a sled uphill f) Another type of proprioception (crash and bump): - jumping into a large pile of pillows, doing a “cannon ball” off the diving board, tackling a player in football, or driving bumper cars Heavy Work
5
Tools for the eyes Visual input can include: a) Variations in light: - natural lighting vs. artificial lighting, - dim lighting vs. bright lighting b) Variations in colour: - walls painted a neutral colour vs. a bright colour, - classroom bulletin boards decorated with muted brown, beige, &/or rose vs. a brilliant red, orange, or yellow colour c) Variations in the amount of visual distractions - sparsely decorated room vs. visually cluttered room
6
Tools for the ears Auditory input can include: a) Variations in noise level - quiet music vs. loud music, - whispering vs. screaming b) Variations in rhythm - slow music vs. fast - rhythmical music vs. a-rhythmical c) Variations in amount of auditory distractions - quiet working environment vs. noisy working environment, - constant background noise (such as a clock ticking) vs. unexpected sounds Stage 3: Regulating Engine Speeds Mile Marker 9: Students choose strategies independently Mile Marker 10: Students use strategies independently Mile Marker 11: Students learn to change engine levels when options are limited Mile Marker 12: Students continue receiving support
7
How Does Your Engine Run Program Overview Stages/Mile Markers/Activities Overview/ Activity p. # Printable p. # Stage 1: Identifying Engine Speeds Discussions 1-3 minutes Mile Marker 1: Students learn the 4-3 engine level words
a) Our Engine Speeds (3-10 min.)
4-3
b) Engine Speeds Guessing Game
4-4
c) Engine Collage
4-4
Mile Marker 2: Adults label their own 4-5 engines (No activity, provide info before, during & after session).
Description
Use the 3 activities to define engine vocabulary. “If your body is like a car engine, sometimes it runs on low, sometimes on high, or sometimes just right.” Show what an engine in high, low, and just right might feel like. A-4 to A-6, Engines Use pictures to demonstrate what people look like at high, low, and in high, low, and just just right levels. Place them on corresponding charts. right A-4 to A-6, Engines Use same enlarged pictures and have a guessing game – is the person in high, low, and just high, low, or just right? Tell a story about each picture to help right students fully understand what indicates the level. E.g. show the picture of the boy sitting at his desk, and explain that the boy is feeling great. He’s finding it easy to pay attention and to get his work done. He’s not overexcited. He’s not feeling like a couch potato. He’s in ** gear. A-4 to A-6, Engines Make collages. End session with: “We sure had fun playing together in high, low, and just today. We learned that if our body is like a car engine, our engines right can run on high, low, or just right. We’ll talk more about our engine speeds tomorrow.” NO ACTIVITY Adults use the engine terms in regular conversation by labeling their engines frequently. “My engine is too high, I need to go for a walk during recess to get to that just right level to teach.”
1
Mile Marker 3: Students develop awareness of the feel or their own engine speeds, using the adults’ label as guides
4-5
-
-
a) Obstacle Course
4-3
-
b) Stations
4-6
-
Set up obstacle course in large open space. May include: crawling through cloth tunnel, bouncing on therapy ball, rolling on scooterboard, crawling under landing mat, blowing cotton ball using straw across a track. Comment on their engine levels as they are doing the obstacle course. Add motivators if necessary, use a stop watch, do it one-at-a time, aim to beat the group time, etc. Set up 2-6 stations, students play at each station for 5-15 minutes, label the students engines while they are playing at each station. Continue with obstacle courses, but teach students how to monitor their own alertness levels.
Mile Marker 4: Students learn to 4-6 identify and label levels for themselves Each activity from this point forward should follow this sequence: 1. Chart level of alertness on High-Low Chart 2. Engage in gross motor movement to obtain optimal arousal state (e.g. obstacle course, movement stations, etc.) 3. Chart level of alertness following movement. 4. Introduce Mile marker activity or discussion selected for the particular session. While leader conducts a discussion or activity, students should use previously learned strategies to stay at the “just right level” 5. Leader and student together assure that the student’s engine is just right as the session closes 6. Leader briefly summarizes the concept that was introduced in that session. a) Engine Speedometer 4-7 Students make engine speedometers to use in different settings (at least one to be taped or used at their desk. See page 4-7 for examples. Mile Marker 5: Students label levels 4-8 for themselves, outside of sessions a) How Does Your Engine Run? 4-8 A-7 to A-10, How Students use the activity chart to label their alertness levels at home Does Your Engine and throughout their school day. Run charts
2
Stage 2: Experimenting with Methods to Change Engine Speeds Discussions 5-10 minutes Mile Marker 6: Leaders introduce sensorimotor methods to change engine levels
4-9
-
a) Engine Tune-Up: Tools For The Mouth
4-9
4-10
b) Engine Tune-Up: Tools For The Body
4-12
A-11 to A-20, Ways to Move pictures
c) Engine Tune-Up: Tools For The Hands
4-13
-
3
Review Mile Marker 7 before completing this activity. By the end of this Mile Marker, students will learn 5 ways to change how alert they feel: through oral, movement, touch, looking, or listening. SEE p. 2-9 for a review of these strategies. Use the chart on p. 4-10 in a large format. Explain that you can try different things to change your engine speed. One way is to put things in your mouth to help their engines change. Review the words on the chart. Have a collection of items to sample (p. 4-9).Students take turns picking one item from the container and determining where to mark the item on the grid. E.g., lollipop – sweet, licking, sucking. Then give the item to all students to try and discuss. Continue for all items and discuss other items that are not being sampled. Do not ask the students what helps their engines change. At this point, it’s only an introduction. The adult should talk only about his/her own engine. Similar to above activity but using movement rather than things for mouth. Remind students of oral strategies that helped them the last time. Use these while you discuss the activity. Discuss ways to move: front and back, up and down, circles, crash and bump, upside down, and heavy work (muscles). Use pictures to identify what type of movement is being done and tape them under categories on the board. Movements are described in relation to how one’s head is moving. Cover table with newspaper, use items on p.4-13 to explore how touch changes their engine levels. During the discussion, have students use tools for the body to help them stay engaged (therapy ball, t-stool, etc.). students will make flour balloon fidgets in this activity. Offer other fidgets for them to try as well. If s puts the balloon in their mouth, direct them to a strategy appropriate for oral motor input.
d) Engine Tune-Up: Tools For The Eyes
4-14
-
Use previously learned strategies during discussion. Discuss how lighting and colour can change your engine levels. Tour the building and point out different rooms with variation of visual input OR use pictures and discuss visual impact of each. Adult to discuss their own engine preferences. Don’t ask students at this point about their own preferences – but do point out what you see to help them understand what is working for them. Use previous strategies to keep engines “just right” during discussion. Play music in background while students do an activity. Music should alternate between types, rhythms, etc. Discuss what students could do to problem solve in situations such as one person needing noise and another needing quiet, etc. Adult comments on what strategies seem to be helping students. E.g., “Liz, when you filled out the chart today, your engine was running in low speed. Jumping up and down on the trampoline seemed to help your engine get to a just right speed.”
e) Engine Tune-Up: Tools For The Ears
4-15
-
Mile Marker 7: Leaders identify sensorimotor preferences and sensory hypersensitivities (No activity, provide info before, during & after session). Mile Marker 8: Students begin experimentation with choosing strategies a) Sorting Engine Tools
4-16
NO ACTIVITY
4-17
-
-
4-17
A-21 to A-39, Cards for the Mouth, Body, Hands, Eyes, Ears
b) Variation Of Sorting Engine Tools
4-18
A-21 to A-39, Cards for the Mouth, Body, Hands, Eyes, Ears
Set up obstacle course stations. Do the activity, pick a picture card and place it under the correct heading (cards for mouth, body, hands, eyes, ears). At the end, review, and have students fill in blank cards with other ways to change their engine levels – putting them under the correct headings. Use same cards as above. Make a stack of cards for each student. Have each student do an obstacle course activity, and at end pick a card, decide if it is a preference for them, and place on a larger paper with their name on it. Have them fill out blank cards with other ideas that they prefer.
4
Stage 3: Regulating Engine Speeds Discussions 5+ minutes Mile Marker 9: Students Choose strategies independently c) Customizing Engine Care
4-18
-
4-19
d) Changing How Alert You Feel
4-20
A-40 to A-44, Put something in your mouth etc.; A-21 to A-26, Cards for mouth etc. A-45 to A-46, Changing How Alert You Feel forms
Mile Marker 10: Students use strategies independently, outside therapy sessions a) Sharing Stories From Home And School
4-20
-
4-20
-
b) Can You Change Your Engine Speed
4-21
A-47, Can you change your engine speed chart
c) What Works, What Bothers Me?
4-22
A-48 to A-50, What works, What bothers me? 3-page chart
d) Fanny Pack Game
4-23
A-51; A-21 to A-39 Cards for the Mouth, Body, Hands, Eyes, Ears 5
Expect that students will start choosing their own strategies. Give plenty of positive feedback when you see them using a strategy. Copy the picture of the large mouth for each student. Pick up small pictures of oral strategies. Individually, each student decided if that strategy helps them and glues or draws it on their page. This can be done for all 5 ways as well. Print out the alert form for each student. This reviews what the Alert program is about – ask students to take them home and discuss it with their parents. Have students highlight their own preferences on the form. In advance ask students to pay attention to their engine outside of school. Then encourage them to share stories at the next session. Tell a story, write a story, or draw a picture. Continue providing strategies to be used during discussions and activities. Use a chart to monitor how their engines change after using a strategy. Charts should be individualized to the student. Fill in the chart at home. In the next session, discuss experiences about filling out the chart. Continue adding to the chart and re-using it to encourage carry-over of the engine concepts. Use that what works, what bothers me chart – give one to each student. Discuss strategies and have each student put the item on the chart in the correct location as it relates to them. Use the discussion to help problem solve as some of the strategies may not always be available or they may not be allowed to use them all of the time. Help students learn to plan ahead to use things that change their engine levels. They think of items to take to school, for the car, in stores, etc. In each setting, use cut out pictures and have students place them in a picture of a backpack, purse, or fanny pack.
Mile Marker 11: Students learn to change engine levels when options are limited a) Maintenance Required: A Problem- solving Game
4-24
-
4-24
A-52 to A56;Problem Solving Questions A-55; Sensory-Motor Preference Checklist
b) Sensory-Motor Preference Checklist Interviews
4-24
Mile Marker 12: Students continue receiving support
4-25
-
6
Use sample problem questions to practice problem solving. Each student gets a question, problem solves, and others can add their thoughts. 2 sessions. 1) Give each student a sensory-motor preference checklist to take home and interview their parents, friends, etc. Practice interviewing in class first. 2)At the next session review the experience with students – comment on how different the strategies are that people need to keep themselves “just right.” Follow up periodically, perhaps monthly, then every other month, and every six months.
Heather Jeancart Registered Psychologist #809 Nov. 28, 2011
Body Breaks (Individual students or class-wide) Include the following elements, in this order: 1. Lots of movement and jumping to begin. Activities like jumping jacks, pretend downhill skiing, etc. are excellent choices. 2. Then progress to movement without jumping (e.g. miming swimming strokes). Ensure both sides of the body are working. 3. Then play the “grown-up” version of Simon Says, where students simply copy postures rather than listening to Simon’s instructions. a. Begin with the arms moving one at a time. (e.g. right hand on right shoulder and left hand on left shoulder). b. Then progress to having the arms cross the midline, but doing the same thing, (e.g. moving hands to opposite shoulders). c. Finally, end with arms moving together, crossing midline, but doing different things (e.g. right arm on left shoulder, left arm on right knee) This progression moves from simple to complicated movement patterns, and “slows down” the students by making them think about their movements. 4. Have the students sit down and perform a chair push-up or do a seated heavy work activity. 5. Finish the body break by using both index fingers and pointing to various facial features, labeling the movements in a soft voice (“touch your mouth, touch your ears,” etc.). Continue until all students are “with you” then announce, “Everyone looks ready for learning.” The important part of a body break is that it moves through the 5 identified stages (jumping, movement without jumping, moving so students need to think about the body, heavy work, and a soft, seated re-focusing activity). This will help regulate students. Example: 1. Let’s do jumping jacks 2. Now we’re downhill skiing (in a squat position) 3. Let’s swim - Ensure both sides of the body are working while doing swim strokes. 4. Put your right hand on right shoulder and left hand on left shoulder. Begin with the arms moving one at a time. 5. Now your right hand is on your left shoulder, left hand on right – one at a time. 6. Move arms together right arm on left shoulder, left arm on right knee (and vice versa). This progression moves from simple to complicated movement patterns, and “slows down” the students by making them think about their movements. 7. Sit down, put your palms together, and use all your strength to push your arms together. 8. With a soft voice – now touch your mouth, touch your ears, touch your eyes, touch your nose. Etc. Continue until all students are “with you” then announce, “Everyone looks ready for learning.”