Using Android in Industrial Automation Technical Report A student semester project at the University of Applied Sciences Northwestern Switzerland for the Institute of Automation Authors Manuel Di Cerbo Andreas Rudolf
Project principal Matthias Meier c FHNW/IA, 29.01.2010
Acknowledgements First of all we want to thank Matthias Meier who enabled us to create a project in such a form. Without his deep knowledge of Linux and its application in embedded systems this would not have been possible. Not only has he encouraged us to bring our own ideas into the project but also he has shown an enormous amount of patience toward us. While we both were very new to embedded Linux and Android we profited greatly from his experience in all areas of our project. We also want to thank Martin Meyer, head of the course of studies ”Electrical Engineering and Information Technology”, who agreed to our submitted project idea the same day we turned it in. Moreover we want to thank the Android and Linux open source community. Also we want to thank the recurring visitors of our blog http://android.serverbox.ch who motivated us to keep going and showed us the importance of this project.
2
Abstract Android is an open source operating system for mobile devices. Today its primary use is for mobile phones. During the last year many projects have been created, targeting to bring Android to other platforms such as sub-notebooks or embedded systems. Our target is to evaluate if Android is a suitable platform for Industrial Automation. We accomplish this goal by building an embedded spectrum analyzer where criteria such as delay, performance and seamlessness are measured.
3
Assignment of Tasks As a semester project at the University of Applied Sciences Northwestern Switzerland Android is to be evaluated in terms of usability in Industrial Automation. Using an appropriate hardware platform, an application is to be created which samples, processes and visualises signal data. As a result, real-time capability, simplicity in hardware connectivity and usability of GUI are to be evaluated during the application development process.
4
Contents I
Introduction
8
1
About the project
9
2
About this report
11
2.1
Platform . . . . . . . . . . . . . . . . . . . . . . . . . . . . . . . . . . . . . . . . . . .
12
2.2
Application . . . . . . . . . . . . . . . . . . . . . . . . . . . . . . . . . . . . . . . . .
13
II
Platform
14
3
Android
15
4
Beagleboard
17
5
Bootloader U-Boot
19
6
Linux Kernel
21
6.1
Collecting possible options . . . . . . . . . . . . . . . . . . . . . . . . . . . . . . . . .
22
6.2
Choosing the Kernel by the right criteria . . . . . . . . . . . . . . . . . . . . . . . . . .
23
6.3
Kernel configuration and compilation . . . . . . . . . . . . . . . . . . . . . . . . . . .
23
6.4
Android and Beagleboard related Kernel sources . . . . . . . . . . . . . . . . . . . . .
23
6.5
Conclusion . . . . . . . . . . . . . . . . . . . . . . . . . . . . . . . . . . . . . . . . .
24
7
8
Android Platform Development
25
7.1
Android Source Tree Structure . . . . . . . . . . . . . . . . . . . . . . . . . . . . . . .
26
7.2
Android Platform Configuration . . . . . . . . . . . . . . . . . . . . . . . . . . . . . .
28
Compiling and Porting Native Applications and Libraries
29
8.1
Porting libusb . . . . . . . . . . . . . . . . . . . . . . . . . . . . . . . . . . . . . . . .
30
8.2
Porting fxload . . . . . . . . . . . . . . . . . . . . . . . . . . . . . . . . . . . . . . . .
32
8.3
Compiling an executable outside Android with another tool chain . . . . . . . . . . . . .
32
5
CONTENTS
9
III
6
DSP
33
9.1
DSP/BIOS Link . . . . . . . . . . . . . . . . . . . . . . . . . . . . . . . . . . . . . . .
34
9.2
DSP/BIOS Bridge . . . . . . . . . . . . . . . . . . . . . . . . . . . . . . . . . . . . . .
35
Application
36
10 The Spectrum Analyzer
37
11 Analogue Front End
41
12 USB Front End FX2
43
13 USB Host on the Beagleboard
45
13.1 Issuing Bulk IN transfers with libusb . . . . . . . . . . . . . . . . . . . . . . . . . . . .
46
13.2 Exposing the functionality to Java through JNI . . . . . . . . . . . . . . . . . . . . . . .
48
14 Java Application
52
14.1 Service . . . . . . . . . . . . . . . . . . . . . . . . . . . . . . . . . . . . . . . . . . .
53
14.2 Activity . . . . . . . . . . . . . . . . . . . . . . . . . . . . . . . . . . . . . . . . . . .
56
14.3 OpenGL . . . . . . . . . . . . . . . . . . . . . . . . . . . . . . . . . . . . . . . . . . .
57
15 FFT Implementation
60
IV
65
Performance Considerations
16 USB throughput measurement
66
16.1 Setup . . . . . . . . . . . . . . . . . . . . . . . . . . . . . . . . . . . . . . . . . . . . 17 USB system reaction for latency determination
66 67
17.1 Setup . . . . . . . . . . . . . . . . . . . . . . . . . . . . . . . . . . . . . . . . . . . .
67
17.2 Results . . . . . . . . . . . . . . . . . . . . . . . . . . . . . . . . . . . . . . . . . . . .
68
V
Conclusion
69
VI
Appendix
71
A Setup Guide
72
A.1 Bootloader Setup . . . . . . . . . . . . . . . . . . . . . . . . . . . . . . . . . . . . . .
c 2010 FHNW/IA
72
CONTENTS
7
A.1.1 Basic U-Boot Script . . . . . . . . . . . . . . . . . . . . . . . . . . . . . . . .
72
A.1.2 NFS root file system . . . . . . . . . . . . . . . . . . . . . . . . . . . . . . . .
73
A.2 Kernel . . . . . . . . . . . . . . . . . . . . . . . . . . . . . . . . . . . . . . . . . . . .
74
Building the uImage . . . . . . . . . . . . . . . . . . . . . . . . . . . . . . . .
74
A.3 Building the Android Root File System . . . . . . . . . . . . . . . . . . . . . . . . . .
75
A.3.1 Getting the sources . . . . . . . . . . . . . . . . . . . . . . . . . . . . . . . . .
76
A.3.2 Configuring Android . . . . . . . . . . . . . . . . . . . . . . . . . . . . . . . .
76
A.3.3 Building the Root File System . . . . . . . . . . . . . . . . . . . . . . . . . . .
77
A.4 Eclipse Debugging . . . . . . . . . . . . . . . . . . . . . . . . . . . . . . . . . . . . .
78
A.4.1 Over USB . . . . . . . . . . . . . . . . . . . . . . . . . . . . . . . . . . . . . .
78
A.4.2 Over ethernet . . . . . . . . . . . . . . . . . . . . . . . . . . . . . . . . . . . .
79
A.5 DSP . . . . . . . . . . . . . . . . . . . . . . . . . . . . . . . . . . . . . . . . . . . . .
80
A.5.1 DSP/BIOS Link . . . . . . . . . . . . . . . . . . . . . . . . . . . . . . . . . .
80
DOWNLOADING & INSTALLING . . . . . . . . . . . . . . . . . . . . . . . .
80
CONFIGURATION . . . . . . . . . . . . . . . . . . . . . . . . . . . . . . . .
80
BUILDING . . . . . . . . . . . . . . . . . . . . . . . . . . . . . . . . . . . . .
81
RUNNING SAMPLE APPLICATIONS . . . . . . . . . . . . . . . . . . . . . .
82
USING DSPLIB . . . . . . . . . . . . . . . . . . . . . . . . . . . . . . . . . .
83
A.5.2 DSP/BIOS Bridge . . . . . . . . . . . . . . . . . . . . . . . . . . . . . . . . .
84
B Configuration files
87
B.1 emulator/keymaps/qwerty.kl . . . . . . . . . . . . . . . . . . . . . . . . . . . . . . . .
87
B.2 system/core/rootdir/init.rc . . . . . . . . . . . . . . . . . . . . . . . . . . . . . . . . . .
88
B.3 vendor/beagle/AndroidBoard.mk . . . . . . . . . . . . . . . . . . . . . . . . . . . . . .
94
B.4 vendor/beagle/AndroidProducts.mk . . . . . . . . . . . . . . . . . . . . . . . . . . . .
94
B.5 vendor/beagle/BoardConfig.mk . . . . . . . . . . . . . . . . . . . . . . . . . . . . . . .
94
B.6 vendor/beagle/Android.mk . . . . . . . . . . . . . . . . . . . . . . . . . . . . . . . . .
94
c 2010 FHNW/IA
Part I
Introduction
8
Chapter 1
About the project Android is built on top of the Linux Kernel. One of Android’s key features is the programmability of its applications in Java. Due to its well-thought-out Java Software Development Kit and feature set (libraries for Bluetooth, Speech Recognition, UI, Networking, etc.) it seems much easier and more elegant for a developer to create an application for Android compared to other embedded operating systems. Moreover Android features a complete software stack which is desirable in terms of compatibility among processes and applications. The target of this report is to enable the reader to see whether or not Android suits his or her requirements for an embedded solution in Industrial Automation. Furthermore the report will give the reader an idea of where he or she will spend most effort for implementation, and where to find help (online communities, Android related projects, . . . ). Since we used Linux (Ubuntu 9.04) for our development, many parts require the reader to understand Linux shell commands and/or basics of the Linux root file system. However, every task in this report can theoretically be accomplished in a Windows development platform in combination with the Cygwin project 1 . Although we advise the reader to work with a Linux distribution, simply due to a larger community to support him or her with development-environment related issues. This document contains information about building a spectrum analyzer in Android (version 1.6 code name ”donut”) on an embedded system using USB to receive samples from an analogue-digital converter (ADC). To give you a brief overview of what you can expect from the spectrum analyzer we list our key features here: • • • • •
8 Bit A/D conversion at 9,6 kSamples per Second. Cypress FX2 development board featuring an USB 2.0 high speed interface Beagleboard development platform (Texas Instruments OMAP 3530) FFT of variable block size in native C using KISS FFT Visualization of the signal and spectrum using Android OpenGL
We decided to use USB due to its high throughput and platform independency. Since we already have been introduced to a USB-FX2 development board in a course at the university, it seemed perfect for our application. Additionally we were able to concentrate on implementation rather then hardware layout and testing. The connected ADC is operated by an I2C Bus and can be clocked at a maximum rate of 100 [kHz]. This only allows a theoretical throughput of 12.5 [kSamples] per second. As a design decision we initially agreed to this rather low sampling rate in favour of stability. In a second approach - after the application runs stable and is tested in terms of functionality, CPU consumption, and seamlessness - we then would be able to test for a higher sampling rate. Since one target of the application is to visualize the 1
http://www.cygwin.com
9
10
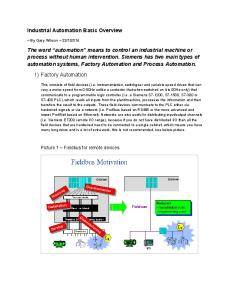
spectrum of the signal, we would not benefit much from a higher sampling rate due to the limitation of frames per second the application is able to draw. However, for automation purposes where visualization is not always necessary the desired sampling rate may be much higher. To summarize: We decided to split the application design in two parts. First, we design the application for stability and afterwards for up-scalability. To finalize the introduction into our project we show the reader the following diagram[1.1] which visualizes our processing chain from the hardware front end to the screen. ed plifi sim cept Con
USB FX2 DEV Board
A/D I2C BUS
USB
9.6 kSps FFT
Beagleboard running Android Figure 1.1: Simplified concept of our application By the end of the semester we were able to successfully operate the spectrum analyzer including the entire A/D chain from the physical signal to the processing in C and visualization in Android. Additionally, we succeeded in calculating an FFT with the digital signal processor on the OMAP3530. Moreover we collected data of processor utilization and reaction time of the system running the application. As a result of the project we have also created a setup guide which aims to help installing the entire embedded system. You can find the guide in the appendix of this report [VI] or on our project website2 .
2
http://android.serverbox.ch
c 2010 FHNW/IA
Chapter 2
About this report This report aims to enable the reader to understand all basic concepts of our project application. These concepts include hardware implementation, micro controller C software implementation, low level software C/C++ implementation and high level software Java implementation. It will furthermore explain design decisions for the spectrum analyzer application and show concepts on each system level. There are many information sources available on the internet which explain aspects of Android and the Beagleboard. Also you will be able to find a hand full of projects which ported Android to the Beagleboard and offer source code and ”how-to” guides. However, we were not able to find a condensed node of general information for an application and platform like ours. Thus, another goal of this report is to fill this missing link. To address a larger community we have decided to write this report in English rather than in our maternal language German. If you are interested in setting up an embedded platform with Android and need specific instructions such as bash commands, compile commands or configuration information then you should read our setup guide which can be found on our website1 or in the appendix [VI] of this report. Although some essentials of the setup will be covered by this report you will find more detailed information in the setup guide. This report is built in a modular fashion. Each chapter of this report is self-contained. The reader will not be forced to read through the report from A to Z but rather he or she will be able to read through chapters which matter the most for him or her. To further improve readability we have split the contents of the report into three major parts. The ”Platform” part [II] discusses setup and basic structure of the embedded system. The ”Application” [III] part discusses implementation and concepts of the spectrum analyzer. The ”Performance Considerations” part [IV] contains latency and throughput measurement using USB on Android. The following sections will give the reader a brief overview of what information he or she can expect in every chapter.
1
http://android.serverbox.ch
11
12
2.1
Platform
1. Android - An open source operating system for mobile devices In this chapter the reader will find an abstract of what Android is. 2. The Beagleboard - A suitable hardware platform for embedded applications This chapter aims to introduce the reader to real hardware for embedded applications. Also, we will show the reader what main aspects we were looking for when choosing an appropriate hardware platform. 3. The Bootloader - u-boot, the universal open source bootloader In this chapter the popular boot loader u-boot is discussed. To make the reader familiar with the purpose of u-boot we explain basic environment variables and hence how to edit them. Furthermore we show the reader how to create and save boot arguments for the kernel from u-boot. 4. The Linux Kernel - How the kernel relates to Android and the Beagleboard In this chapter the reader learns what role the kernel plays in hard- and software implementation. It will introduce the reader further to existing Kernel projects for the Beagleboard and Android. Moreover it contains criteria for choosing the appropriate Kernel sources for a given application. 5. Android Platform Development - Explaining the source code structure and build process This chapter introduces the reader to Android development using the official source code. It further explains the role of certain configuration files and discusses compilation and installation of Android. 6. Compiling and porting native applications and libraries - Libusb and fxload Android has powerful libraries for nearly every application in the mobile environment. However, it may be missing a few libraries often used in embedded systems. One example is libusb which is a popular USB API with high speed support. This chapter will introduce the reader into porting frameworks, libraries and Linux applications to Android. 7. Working with the Beagleboard’s Digital Signal Processor (DSP) - How to access the DSP Much time and effort in this project was spent to access the DSP on the Beagleboard to calculate the FFT in a fast way. This chapter aims to give the reader a starting point for understanding and creating DSP applications.
c 2010 FHNW/IA
13
2.2
Application
1. The Spectrum Analyzer - Hardware and Software Concepts, Decisions and Limitations In this chapter the reader will learn about our general processing concept. It will give him or her an in-depth introduction into our software and hardware concept for the spectrum analyzer. It will further show accomplishments and limitations of our project. 2. Analogue Front End - The Analogue Digital Converter connected to the FX2 development board This chapter discusses the hardware front end of our application, where the signal is being sampled. It further contains a hardware diagram to the ADC circuit and shows the interface to the FX2 microcontroller. 3. The USB Front End - FX2 development board connected to the Beagleboard The application that runs on the FX2 development board is responsible for collecting samples and transmitting them to the Beagleboard. This chapter explains concepts and implementation of the front end application running on the FX2 development board. 4. The USB Host on the Beagleboard - Receiving Samples through USB and passing them to the Java Application. The host application uses a native function to collect samples from USB. This chapter introduces the reader into the powerful USB API and the Java Native Interface (JNI). 5. The Java Application - Processing the samples and displaying them on the screen To visualise the spectrum of the sampled signal we have created a classic Android Activity. On the other hand we also created a Service which is continually receiving samples from the underlying native function. This chapter explains how to create an Android Service and Activity which communicate with each other through the Binder using Androids Advanced Interface Description Language (AIDL). Additionally the reader will find the basic concepts of implementing an OpenGL surface and using it to draw objects. 6. The FFT implementation - Calculating the Spectrum natively There are mainly two ways of calculating the Fast Fourier Transformation for the application. Either in Java or using a native function. This chapter will discuss the native implementation.
c 2010 FHNW/IA
Part II
Platform
14
Chapter 3
Android What is Android? When referring to Android one usually thinks of an operating system. However, Android is even more. To quote the android developer website: ”Android is a software stack for mobile devices that includes an operating system, middleware and key applications.”
15
16
Android is an open source project initially developed by Google. Today, a large group of technology and mobile companies including Google form the so called Open Handset Alliance (OHA). The main goal of the OHA is to further improve and to make the open source Android platform a commercial success. During our project we have immensely profited from the open source community, in turn we tried to share our achievements by publishing them on our website. Thus, we clearly want to state that we encourage the open source philosophy. With Android being open source project, one might initially think that Android is not an adequate environment for commercial purposes due to licensing restrictions. However, Android ships with its own compiler that uses a stripped down version of the standard C library called bionic. When building and distributing applications with that particular compiler you are therefore not obligated to lay open your source code to your customers. Android provides many Application Programming Interfaces (API) for developing your own projects. The real beauty of Android is that these APIs are available using the Java programming language. Furthermore, Android features a Plugin for the Integrated Development Environment (IDE) Eclipse, making it easy to develop and debug your applications on a virtual emulator as well as on real hardware. It is also possible to create your own native C/C++ applications and accessing them from within the Java context. Even though intentionally developed for mobile devices there is no reason why it could not be used for other platforms as well. Since Android is built on top of the Linux 2.6 Kernel, every device capable of running Linux is theoretically able to use Android as well. In practice, you will need a Linux Kernel with specific Android drivers. More on that in chapter [6].
c 2010 FHNW/IA
Chapter 4
Beagleboard The Beagleboard is a development platform that has it all: lots of external peripherals, a huge open source community and high performance at a low cost. In this chapter we tell you which aspects we were looking for when choosing an appropriate platform and how we ended up with the Beagleboard.
17
18
There are many developer boards on the market. Our initial selection criteria was to choose a board that already featured an Android port. Porting Android to a new platform would probably absorb the amount of time of a semester project of it’s own, and one even cannot be sure to succeed at last. This way, we already had a good starting point to work with Android and could concentrate on improving the system rather than starting from scratch. Another important selection criteria are the external peripherals. We knew from the beginning that we wanted to use USB for connecting an external analogue to digital converter. Fortunately, almost every developer board features USB. To visualize the spectrum on an external screen we were also looking for a suitable video connector. The Beagleboard has a DVI-D and S-Video connector as well as external LCD pins. Especially the DVI-D connector is very convenient for attaching a standard computer monitor. One downside of the Beagleboard is the lack of an ethernet interface but one can use an usb to ethernet adapter for this purpose. Also, we were looking for a developer board that had a broad and sharing community. The aspect of a broad community would raise the chances that the developer board is continuously improved in terms of bug fixes and availability of kernel patches. The sharing aspect will especially help in the beginning when searching the Internet for instructions on how to set up a system, as well as tips and tricks for implementing new features. Of course, one cannot draw a straight line between a broad and sharing community, but when referring to a sharing community we also consider how useful the shared information is to us. Take for instance the Chinese Beagleboard clone DevKit8000. This board certainly has a large community in Asia but since many publications are in Chinese, we cannot make use of this information. Especially when looking for developer boards with Android ports, we have come across the Beagleboard from early on. The fact that it meets all our peripheral needs and that it is based on a Texas Instruments OMAP controller - which is very popular in the Open Source Community - has further strengthen our decision towards the Beagleboard. We need to point out that we did not look for a high performance system in the first place, rather the Beagleboard Rev C3 board with a 600Mhz CPU and 256MB RAM was more than sufficient for our purposes.
c 2010 FHNW/IA
Chapter 5
Bootloader U-Boot To clarify without going into details: a bootloader is a program that is automatically loaded at startup, and will in turn start the operating system. The Beagleboard ships with a ready-to-use u-boot bootloader on the NAND flash. Also, you can download precompiled bootloaders for SD/MMC card booting from the Google Beagleboard wiki pages http://code.google.com/p/beagleboard/. If you are already familiar with the u-boot bootloader you can probably skip this chapter.
19
20
With the Beagleboard one basically has two choices: either boot from the integrated NAND flash, or boot from an inserted SD/MMC card. The setup for both methods is well explained in the Google Beagleboard wiki pages 1 . To properly format an SD card you dont really need to follow all the detailed steps from the wiki pages. Instead, you can use the tool gparted. Just make sure that the boot partition is the first physical partition formatted as FAT32 with the bootable flag set; and that the root partition is formatted as EXT3. Notice that you will be needing a Kernel image commonly named uImage. If you have just unpacked your Beagleboard you can use the provided or downloaded Angstrom Kernel from the above wiki pages just to check that everything works fine. The next chapter [6] will focus on choosing an appropriate Kernel for using Android. When booting the Beagleboard, u-boot will create an output on the serial interface. You need to connect the Beagleboard with your computer using a serial null-modem cable, and probably a serial to USB converter. Furthermore, a serial communication program is needed. We have been using minicom for this purpose. Again, the connection setup is well explained in the Google Beagleboard wiki pages 2 . Once you are able to communicate over the serial connection you should make yourself familiar with some basic u-boot concepts. During the initial countdown hit any key to prevent auto booting. Keep in mind that u-boot will ultimately uncompress and start the Linux kernel. It will also pass boot arguments to the kernel, specifying an initial console, the location of the init-process, the type of the root file system to be used etc. All the information for the boot arguments as well as name and location of the corresponding kernel are stored in so called environment variables. You can take a look at the environment variables by writing printenv
on the command line. You will see a rather long environment variable bootcmd, among with loadbootscript and bootscript. The content of bootcmd is executed, as soon as the auto boot process has started. Here are some outputs you receive after typing printenv: bootcmd=if mmcinit; then if run loadbootscript; then run bootscript; else if run loaduimage; then if run loadramdisk; then run ramboot; else run mmcboot; fi; else run nandboot; fi; fi; else run nandboot; fi loadbootscript=fatload mmc 0 ${loadaddr} boot.scr bootscript=echo Running bootscript from mmc ...; autoscr ${loadaddr}
The above bootcmd will use an u-boot function mmcinit3 to test wheter an MMC card is attached. If an MMC card has been detected, it will then try to load a file called boot.scr from the card. If this was sucessful, it will run the contents of the boot.scr file using u-boot’s autoscr feature. If there is no boot.scr file, it will at least try to load a kernel image specified in the loaduimage environment variable, and so on. To set your own environment variables you can use the command setenv: setenv serverip 10.196.132.201
This will set an environment variable serverip to the value 10.196.132.201. You can verify the result using printenv. This variable will be lost after resetting the board; to permanently store the environment values, you have to use the command saveenv after setting the environment variable. Be aware that all environment variables are stored on the Beagleboard and not on the MMC card, even when using a bootloader on an MMC card. In our setup guide [A.1], we show you how to create your own boot.scr file in order to boot the linux kernel using a root file system located on a remote network file system (NFS) server.
1 2 3
http://code.google.com/p/beagleboard/wiki/BeagleBootHwSetup (17.1.2009) http://code.google.com/p/beagleboard/wiki/BeagleboardRevCValidation (17.1.2009) . . . or ”mmc init”, depending on your u-boot version
c 2010 FHNW/IA
Chapter 6
Linux Kernel The Linux Kernel builds the foundation for Android. It resides on top of the hardware, in our case the Beagleboard. If you do not have a precompiled Kernel image for your platform, then you will probably have to compile your own Kernel. The essential question is what version of the Kernel should you use? The quick answer is: any Kernel that fits on your hardware and has the Android related drivers included will work. We found the most convincing solution are the Kernel sources hosted in the Android Git-Repository.
21
22
6.1
Collecting possible options
As a developer you will probably need to choose, configure and compile a suitable Kernel for your embedded system. But not only will you have to find a Kernel version which fits your hardware platform (in our case the OMAP 3530 Beagleboard) but also the overlaying Android OS.
Android
Android specific drivers
Kernel
Beagleboard specific configuration (OMAP3530)
Beagleboard
Figure 6.1: Kernel: between the Beagleboard and Android Since Android requires the Kernel to have additional drivers (like Binder IPC, Power Management, Asynchronous Shared Memory, Process Memory Allocator, etc.)1 you will have to choose your Kernel according to both Hardware and OS as illustrated in figure [6.1]. At this point, the benefit of a popular hardware (the Beagleboard) comes into play. On one hand there are already projects that ported Android to the Beagleboard and that host their patched sources. On the other hand, there is a good chance that there is a matching platform configuration in the mainstream Android Kernel sources. Similarly if Android becomes more popular there is a better chance of finding its drivers in a platform related tree. In our case this would be the OMAP tree maintained by Tony Lindgren. As a rule of thumb: the more popular your platform and the more popular your OS, the easier it is to find Kernel sources that match your system. If your are unsure what platform you are going to use and you have the choice between an unknown and unpopular platform and a well known and popular platform, you will be able to safe a lot of time and effort (if not the most!) in implementation by choosing the latter over the first one. We have tried to compile and run a variety of Kernel versions and trees. Eventually we decided to use the Kernel sources found in the official Android git repository2 . As long as the Android project exists there is a good chance that you will be able to find Kernel sources in this particular git repository. Additionally the sources include configuration for various OMAP platforms such as the Beagleboard. 1 2
http://elinux.org/Android Kernel Features http://android.git.kernel.org/?p=kernel/omap.git;a=shortlog;h=refs/heads/android-omap-2.6.29
c 2010 FHNW/IA
23
One downside of the Kernel version we used is that the USB-Host port does not work yet. Luckily, we were able to operate the USB-OTG as an USB host controller.
6.2
Choosing the Kernel by the right criteria
Having collected possible kernel sources, there are a few criteria which help you to decide which one to choose. All your sources should already have Android Kernel drivers. You can easily verify this by searching the keyword Android in your menuconfig. Type / and search for Android. If you find no matches, it is most likely that you will dismiss the current kernel source. To choose the best matching kernel for your needs we recommend you to take the most general tree which supports your required features. The main entry point for our project was the ”Embinux” Android port and therefore we first compiled their Kernel. As we grew more familiar with Android and Kernel configuration we decided to stick with the most common working Kernel source which is the Android OMAP Kernel found in the Android git repository3 . Since we aim to work with Android in future projects as well we found it more valuable to work with a source that will have a wide popularity. That being said, we believe that for many applications the ”Embinux” source will work just fine. However, we felt the dependency on the Android mainline Kernel is safer than being dependent on ”Embinux”.
6.3
Kernel configuration and compilation
For a step by step instruction of how to configure and compile the Kernel please consult our setup guide [A.2]. In this section we want to show the reader the basic concept of how to configure and then build the Kernel. In the Kernel sources you will find predefined configurations for your platform. For instance, under arch/arm/configs/omap3_beagle_defconfig you will find the basic configuration file for the Beagleboard. Using this file, the configuration process looks like the following. 1. 2. 3. 4.
Copy the predefined configuration to the Kernel main directory as .config file Configure the Kernel to match all your requirements with make menuconfig Build the Kernel uImage using the cross compiler Copy the Kernel image to your boot media (SD-Card, flash drive, ...)
The most challenging step when using the Android OMAP Kernel sources is to configure the Kernel. Since the predefined Beagleboard configuration has none of the Android drivers enabled. You will however find detailed instruction of which features to enable in our setup guide [A.2].
6.4
Android and Beagleboard related Kernel sources
• Embinux Project http://labs.embinux.org Features: Kernel sources, Android sources 3
http://android.git.kernel.org/?p=kernel/omap.git;a=shortlog;h=refs/heads/android-omap-2.6.29
c 2010 FHNW/IA
24
• Rowboat http://code.google.com/p/rowboat/ Features: Kernel sources, Android sources • 0xdroid http://gitorious.org/0xdroid/ Features: Kernel sources, Android sources • Omap Kernel sources http://git.kernel.org/?p=linux/kernel/git/tmlind/linux-omap-2.6.git;a=summary Features: mainline OMAP Kernel sources • Android Sources http://android.git.kernel.org/ Features: mainline Android sources, various Kernel sources (also OMAP) These are the five most popular Kernel related projects for the Beagleboard.
6.5
Conclusion
Setting up the Kernel may be the most difficult and time consuming part of your project. Be sure to define the goals of your application carefully before choosing your Kernel sources. If your system does not need to be updated after development or you will rely only on the set of features currently supported by Android version X.Y then it might be the best solution to work with an existing port project. You will save a large amount of time and effort and instead trade it for a certain amount of dependency on that particular project. Say for instance the Embinux Kernel. Not only does it work out of the box — it also supports the USB host controller. On the other hand it is more guaranteed that the sources on the Google repository will persist over a longer period. Since our project was not depending on the USB host port and we wanted to comprehend the steps to configure our own Kernel we went along with the more ”bare” Kernel found in the Google repositories.
c 2010 FHNW/IA
Chapter 7
Android Platform Development As soon as you have your Kernel image ready it is time to set up your Android Root File System (RFS). There are many differences between Android and other Linux embedded operating systems. This chapter will discuss Android source structure and platform configuration, as well as file system architecture.
25
26
7.1
Android Source Tree Structure
The sources of Android are available on their official website1 . You will find directions on how to download these sources in the download instructions2 . For this project we used the Android 1.6 ”donut” sources. Note that we first used an existing Android port from the ”Embinux” team. We then started to comprehend their changes made to the source code and engineered our own configuration. This section aims to give you an idea of the project layout. Although there is a rough explanation in table [7.1], we find it important to discuss some of the contents in more detail. Project bionic bootloader/legacy build dalvik development frameworks/base frameworks/policies/base hardware/libhardware hardware/ril kernel prebuilt recovery system/bluetooth system/core system/extras system/wlan/ti
Description C runtime: libc, libm, libdl, dynamic linker Bootloader reference code Build system Dalvik virtual machine High-level development and debugging tools Core Android app framework libraries Framework configuration policies Hardware abstraction library Radio interface layer Linux kernel Binaries to support Linux and Mac OS builds System recovery environment Bluetooth tools Minimal bootable environment Low-level debugging/inspection tools TI 1251 WLAN driver and tools
Table 7.1: Description of Android source folders from the website http://source.android.com/projects Initially you will notice the folder ”external” is missing in this listing. It contains sources of ported frameworks, libraries and executables. This is important to mention since you might port some projects on your own. To have an entry point in porting projects you can find excellent examples in the external folder. To maintain proper structure we have placed our project sources for libusb, fxload and kiss fft in the external folder as well. Furthermore, the folder frameworks/base/core needs to be mentioned. It contains the core functionality of Android. Under the folder ”jni”’ you will find the heart piece of the native function set that provides the Java framework with essential ”low level” access. Therefore, if you do want to dive into the system you will find almost every crucial method to the system there. Another unlisted directory that will, however, be mentioned later on in this chapter is the ”vendor” folder. In this folder, all major adjustments to the target platform are made. If you look at the sources you will also notice an ”out” directory. After building the system all compiled files will eventually be put in there. Depending on your goals, understanding the structure of the sources can be very crucial to your success. After all you will be spending a large amount of time with the Android sources. Look through all the directories of the sources before you start working on configuration and adjustments. It will benefit you almost certainly. When searching in the sources there is one incredibly useful shell command. It is the 1 2
http://android.git.kernel.org/ http://source.android.com/download
c 2010 FHNW/IA
27
developer’s bread and butter. Say for instance, you are looking for a constant ”PI” in your sources. Issue the command: grep -r PI . It will search for your keyword in all descending directory contents. Also when dealing with distinct Android ports, the tool ”meld” which visually compares two files will help you a lot. For instance, you my want to compare the init file of the original Android sources with the one in the Embinux Android sources. The following command using ”meld” will open a visual comparison of the said file as shown in figure[7.1]. meld path_to_embinux_home_dir/system/core/rootdir/init.rc path_to_original_home_dir/system/core/rootdir/init.rc
Figure 7.1: Visual comparison of two files using meld Another essential command, although it is more basic, is the find command. For instance you want to search for init.rc. This is how you do it: find . -name init.rc Again the command will descend from your current directory and look for the correspondingly named file.
c 2010 FHNW/IA
28
7.2
Android Platform Configuration
On http://pdk.android.com/online-pdk/guide/index.html you will find a guide for configuring Android properly. It is not advertised by source.android.com nor by developer.android.com. However, it is a key document to the system. Almost any platform related subjects are covered by this website. Generally, there are three configuration adjustments you almost certainly have to make to be able to develop your application on the Beagleboard. 1. Set up init.rc configuration 2. Set up keyboard layout 3. Only build/install necessary applications In the vendor folder of the Android sources you will find sample configurations of hardware manufacturers. As our entry point we downloaded the sources from Embinux rather than from the official website. The Embinux team already has made major adjustments and set up their configuration files in the vendor folder. There are three files Android will look for when building a given platform. • AndroidBoard.mk Contains instructions for pre built files. (Copy file x to RFS folder y) • AndroidProducts.mk Contains a set of applications to build for the platform • BoardConfig.mk Provides information about what to build. Also defines the name for the configuration. Take a look at the files of the Rowboat project 3 to get an idea of how to create your files. Also compare it to the Embinux variant 4 . They use different instructions and build the Kernel with Android together. The init.rc script will be executed on Android start up. For our system we commented out the yaffs2 part (since we use ext3) and added USB and network configuration right below the on boot section. on boot # basic network init ifup lo hostname localhost domainname localdomain setprop net.dns1 10.51.2.40 # mount usb file system # mdc, 30.09.09, 16.10 mount usbfs none /proc/bus/usb -o devmode=0666 You can either modify the init.rc before you build the system in ./system/core/rootdir/init.rc or provide your own file as you can see in the Rowboat project. However you are also able to first build the system and make adjustments to init.rc afterwards. Note that if you rebuild the system and copy the newly generated init.rc, your old configuration will be lost. For the keyboard layout copy your appropriate .kl file to the system/usr/keylayout/ directory of your root file system. For our project we have used the layout from the Embinux sources with an USB Keyboard. 3 4
http://gitorious.org/rowboat/vendor-ti-beagleboard/trees/master http://labs.embinux.org/git/cgit.cgi/android-omap3/platform/vendor/embinux/beagle/tree/?h=beagle-donut
c 2010 FHNW/IA
Chapter 8
Compiling and Porting Native Applications and Libraries Android offers many frameworks for Java Applications. You can even access hardware (Audio, Networking, Battery status, etc.) from your Java application. To keep the operating system as modular as possible there are a few libraries missing. In this section we want to show you how you can fill the gaps by porting a Linux library (libusb) to Android. Furthermore we demonstrate how to port the application fxload which is used for the USB FX2 chip to Android.
29
30
The first thing to understand is that Android includes existing open source projects. By inspecting the external directory of the Android sources you will find well known libraries. For example openssl or bzip2 or even the application ping. So porting a library to Android is not a problem you have to solve on your own since it has been solved by design. In the following section we will show you how to port ”libusb” to Android, starting from scratch. There are two ways to compile your native source code for Android. • Putting your sources into the Android source tree and compiling them with the Android tool chain. • Compiling your sources statically with another tool chain.
8.1
Porting libusb
The following example ”libusb” will use option one. It is in our eyes the preferable option for most cases. What you will require are the Android sources and the libusb sources. To verify the port we additionally build the tool ”lsusb” for Android. Ultimately you will be able to execute ”lsusb” from a system shell to get a list of all attached USB devices. These are the steps to port a library or executable to Android using the first option: 1. Get the sources of the library or application. 2. Write your Android.mk files 3. Compile the sources and interpret possible errors First you will download the sources for libusb found on http://libusb.org/wiki/Libusb1.0. Now extract them to the external directory where all other native libraries of the systems are found. Android has its own makefile syntax. Therefore you will have to create your own makefiles. Refer to other examples found in the external folder to learn how to create you own makefiles. For libusb we create a makefile that will call another makefile in the sub folder libusb. Android.mk in the main directory: LOCAL_PATH := $(call my-dir) subdirs := $(addprefix $(LOCAL_PATH)/,$(addsuffix /Android.mk, \ libusb \ )) include $(subdirs) in the libsub subdirectory create another Android.mk file. LOCAL_PATH:= $(call my-dir) include $(CLEAR_VARS) LOCAL_SRC_FILES:= \ core.c \ descriptor.c \ io.c \ sync.c \ os/linux_usbfs.c LOCAL_C_INCLUDES += \
c 2010 FHNW/IA
31
external/libusb-1.0.3/ \ external/libusb-1.0.3/libusb/ \ external/libusb-1.0.3/libusb/os
LOCAL_MODULE:= libusb include $(BUILD_SHARED_LIBRARY) The last line tells the compiler that we want to build a shared library. Normally you would go ahead now and start compiling. In this case this would result in a compile error due to a missing macro. E: undefined reference to ‘TIMESPEC_TO_TIMEVAL’ S: defined TIMESPEC_TO_TIMEVAL macro in libusb/io.c Luckily you will find the missing piece of code by googeling the macro’s name. #define TIMESPEC_TO_TIMEVAL(tv, ts) do { (tv)->tv_sec = (ts)->tv_sec; (tv)->tv_usec = (ts)->tv_nsec / 1000; } while (0)
\ \ \ \
By inserting the snippet into your io.c file you finished the porting part of the library. When compiling you will still get the following error: E: build/tools/apriori/prelinkmap.c(137): library ’libusb.so’ not in prelink map S: build/core/prelink-linux-arm.map This is due to the fact that Android keeps track of its shared libraries in its source tree. You will have to enter the library into build/core/prelink-linux-arm.map. libqcamera.so libusb.so
0xA9400000 0xA8000000
More information regarding the prelink mechanism used by the Bionic Linker can be found in the Android Sources under ./bionic/linker/README.txt You can also append the following LOCAL PRELINK MODULE := false to your Android.mk to suppress the warning. Compile libusb by issuing the following commands from your main Android source directory: $ . build/envsetup.sh $ choosecombo $ mmm -j4 /external/libusb-1.0.3 This will create your library libusb.so. Although you will still have to mount the USB file system to use it. Add the following line to your init file somewhere below the ”on boot” event. mount usbfs none /proc/bus/usb -o devmode=0666 Libusb is now ready to use. To see it working, compile the example application lsusb (found within the libsub sources in the examples folder). Create a folder lsusb in your external directory. Place the files into that folder. Create a new Android.mk.
c 2010 FHNW/IA
32
LOCAL_PATH:= $(call my-dir) include $(CLEAR_VARS) LOCAL_SRC_FILES:= lsusb.c LOCAL_MODULE := lsusb LOCAL_C_INCLUDES += external/libusb-1.0.3/ LOCAL_SHARED_LIBRARIES := libc libusb include $(BUILD_EXECUTABLE) Now build it with the command: $ mmm -j4 /external/lsusb . . . which will create the executable ”lsusb”.
8.2
Porting fxload
Fxload1 is used to download the compiled hex file to the FX2 micro controller. To build fxload for Android, create a folder fxload under external and extract all files of the sources. Add an Android.mk with the following content: LOCAL_PATH:= $(call my-dir) include $(CLEAR_VARS) LOCAL_SRC_FILES:= \ main.c \ ezusb.c LOCAL_C_INCLUDES += \ external/fxload/ LOCAL_SHARED_LIBRARIES := libc LOCAL_MODULE:= fxload include $(BUILD_EXECUTABLE) This is all you need. Compile it with mmm and you are done. It is much simpler than building libusb. While these projects built successfully there is, however, no guarantee that sources XY — that compile with glibc — will compile with the Android Bionic libc.
8.3
Compiling an executable outside Android with another tool chain
One possibility to build an executable or even a library for Android is to use the Code Sourcery arm toolchain (http://www.codesourcery.com/sgpp/lite/arm). Keep in mind to always link statically since Android uses its own libc (bionic) rather than glibc.
1
http://sourceforge.net/projects/linux-hotplug/files/
c 2010 FHNW/IA
Chapter 9
DSP The Beagleboard’s OMAP3530 processor features a separate Digital Signal Processor (DSP). The computationally intensive Fast Fourier Transform could be done on this additional processor. The benefits of using the DSP are better performance as well as less load on the main processor. Fortunately, there also exists a DSP Signal Processing Library from Texas Instruments called DSPLIB. This Library contains numerous general-purpose signal-processing routines, including Adaptive Filtering, Correlation and of course Fast Fourier Transformation, making it predestined for our application. However, we need to point out, that due to lack of time we did not implement an FFT calculation using the DSP in our application. Rather, this chapter will show you how to realise a standalone FFT calculation on the DSP using DSP/BIOS Link.
33
34
To make use of the integrated DSP, there are mainly three distinct Linux DSP systems, two of which we have evaluated. Those three systems are called DSP/BIOS Link, DSP/BIOS Bridge and DSP Gateway. Having worked with both DSP/BIOS Bridge in the beginning and DSP/BIOS Link later on, we consider DSP/BIOS Link as the better choice. The further development of DSP Gateway has basically halted, therefore we did not take a closer look at this particular system. In the following we will provide you with an overview of DSP/BIOS Link and DSP/BIOS Bridge. The main goal was to realise an FFT computation on the DSP using Texas Instruments’ precompiled DSP Signal Processing Library DSPLIB. DSP/BIOS is a real time operating system running on the DSP. DSP/BIOS is a huge topic on it’s own and going into details would be beyond the scope of this report as well as of this semester project.
9.1
DSP/BIOS Link
DSP/BIOS Link is developed and still maintained by Texas Instruments (TI). The actual release is now entirely open source (GPLv2 and BSD) and can be downloaded from TI’s website. The downloaded package will contain documentation, source code of the required kernel module and some sample applications, and most importantly a configuration script to adapt the generated applications for various platforms such as the Beagleboard’s OMAP3530. One fundamental concept in DSP/BIOS Link (as well as in DSP/BIOS Bridge) is the separation of a general purpose processor side (GPP-side) and a digital signal processor side (DSP-side). Thus, a GPP-side application runs on the main processor and is a normal C-executable, while a DSP-side application runs on the separate digital signal processor and needs to be compiled with a DSP C6x compiler. DSP/BIOS Link will manage the interconnection between those two sides using a loadable kernel module. In order to develop and run applications for the DSP you will need to setup a toolchain and compile the the DSP/BIOS Link kernel module. Please refer to our setup guide [A.5] for instructions. A good starting point for developing your own applications are the User Guide and Programmer’s Guide found in the documentation section of DSP/BIOS Link as well as the provided sample applications. When looking into the sources of the DSP-side loop sample application in the folder dsplink/dsp/src/samples/loop/ you will find two source files tskLoop.c and swiLoop.c. This is due to two different implementations task(TSK) and software interrupt(SWI). The main difference bewteen TSK and SWI – as we understand it – is how a thread running on the DSP is triggered. The default mode for the loop sample application is TSK, and therefore we will be using TSK for our purposes. When further inspecting the tskLoop.c source file, you will notice three functions TSKLOOP create, TSKLOOP execute and TSKLOOP delete. These functions represent the fundamental create, execute and delete phase that every running thread on DSP/BIOS must implement. As the names imply, initializations are to be placed into the create phase, the execute phase is equivalent to a running thread, and the delete phase again deallocates all resources from the create phase. Looking into the TSKLOOP execute function, you will find a commented line /* Add code to process the buffer here*/ This is where the the computation of the FFT will take place. To make use of DSPLIB containing the FFT function, one has to include the DSPLIB header files in tskLoop.c and tell the linker to use the precompiled DSPLIB library. This is done in the file dsplink/dsp/src/samples/loop/DspBios/COMPONENT by specifying
c 2010 FHNW/IA
35
USR_LIBS
:= dsplink.lib dsplib64plus.lib
The whole procedure is explained in the setup guide in the appendix [A.5]. There we will show you how to setup your complete toolchain; and how to implement an FFT computation from the OSSIE project website1 , which Ravi Mehra2 kindly allowed us to reference in our report.
9.2
DSP/BIOS Bridge
First of all, lets state that we did not accomplish to run an FFT on the DSP using DSP/BIOS Bridge. However, we managed to get a simple application called dsp-dummy3 by Felipe Contreras running on the DSP. This application simply passes buffers back and forth between the GPP- and DSP-side. DSP/BIOS Bridge was originally developed by Texas Instruments and has been released in open source. It is currently maintained by OMAPpedia/Openomap and is sometimes referred to as the DSP bridge project, DSP/Bridge, tidspbridge or simply dspbridge. Fortunately, DSP/BIOS Bridge is already contained in the android omap.git kernel branch ’android-2.6.29’. When statically including dspbridge inside the kernel, you will end up with two kernel modules dspbridge.ko and bridgedriver.ko. DSP/BIOS Bridge requires a base image to be loaded onto the DSP prior to running other DSP applications. One would normally load a base image with a DSP/BIOS Bridge utility called ’cexec’. However, we never managed to get cexec working in Android, so we have been using another method. Instead of statically including the kernel modules, we use menuconfig to build them as dynamic loadable modules. When inserting the bridgedriver.ko module into the kernel, one can also pass an additional argument specifying the location of the initial base image. insmod dspbridge.ko insmod bridgedriver.ko base_img= The current version of DSP/BIOS Bridge can be downloaded using git clone git://gitorious.org/ti-dspbridge/userspace.git Alternatively dspbridge omapzoom v1.4.tar.gz can be downloaded from the openomap website 4 The downloaded package will contain documentation, sources of sample applications and utilities such as the above mentioned cexec, precompiled base images, and sources of the kernel modules. Although following the provided build instructions we had many unresolved compilation errors. Also, we we’re missing some kind of global configuration file or script, to explicitly generate applications for the OMAP3530 platform with it’s corresponding DSP. If we take into account, that we don’t really need the utility ’cexec’, that the DSP/BIOS Bridge modules are already contained in the Android Git-Kernel repository, and that there is a precompiled OMAP3430 base image which will work for OMAP3530 as well, we can set aside the DSP/BIOS Bridge specific build procedures and just build the dsp-dummy application. The detailed instructions are found in the setup guide in the appendix [A.5.2]. However, the main problem occurs when trying to use DSPLIB functions inside the dsp-dummy application. We assume that the base image needs to be built with references to the DSPLIB library, but we could not achieve this matter. Also, the documentation lacks the important chapter ’base image configuration’ stating ’to be written in the future’.
1
Utilizing the DSP on the BeagleBoard, OSSIE project web site, http://ossie.wireless.vt.edu/trac/wiki/BeagleBoard, available 18 January 2010. 2 R. Mehra and S. Jonnadula, Personal communication, 18 January 2010. 3 http://github.com/felipec/dsp-dummy 4 http://www.openomap.org/pub/dspbridge/ (available 16.1.2010)
c 2010 FHNW/IA
Part III
Application
36
Chapter 10
The Spectrum Analyzer The development of the spectrum analyzer application aims to evaluate if it is possible to use Android in an embedded system for an application in Industrial Automation. Having an analogue front end to sample a signal source and then passing those samples to Android where they are processed could be a real application for Industrial Automation. In our experience Android is a very suitable solution for such an application.
37
38
In this chapter we will give you a more detailed overview of the spectrum analyzer application as well as the idea behind it. We found a spectrum analyzer to be a perfect fit for our first Android application. From the beginning we aimed to include an analogue part to see the most aspects from Android from the hardware layer up to the Android Activity. Our goal was to create a stable application which covers all layers of the OS. The most effort was put into the platform. However, for developing the application we benefited from many aspects of Android. Especially programming in Java was a real pleasure since there is not only object oriented programming but also all other handy features of Java. With a large number of examples for Activities and OpenGL (and every other API) we were able to plot lines in no time. We did however not make much use of the UI components although in other possible applications UI usually is very handy. Having pointed out the pros of Android there are a few more time intensive tasks. Android sadly has no USB API to work with. However, it is possible to port libusb and implement the necessary functionality in C or C++. Although working with the Java Native Interface (JNI) can be very frustrating at first. The best way to learn JNI implementation for Android is actually to look into the Android sources and find source code there. Depending on your preferences you can also use Androids Native Development Kit (NDK) to create native methods. It’s certainly more automated. However, if you do have an application similar to the spectrum analyzer, there is a good chance that you will find some answers in chapter [14]. The Android part of our application would not be of any use if there was no analogue application front end. On our FX2 Development Board, two tasks are handled. We read samples from the 8bit-ADC over an I2C bus. And we then send the samples (512 bytes) to the USB host (Beagleboard). This side of the application is Android unrelated but also demonstrates how to work with the popular framework for the FX2 High Speed USB micro-controller. The application design can be split in three parts. • The analogue front end with an analogue-digital converter (ADC) for the signal source and the FX2 USB device. • The sampling service on Android which initiates USB bulk transfers to the FX2 device and collects samples. • The Android sampling Activity which processes the samples and displays the spectrum of the signal. The following diagram [10.1] shows an overview of the application model. The numbers indicate the order of events that will happen as soon as the application boots up. In the following section we will explain each step to give you an idea of how all parts of our application fit together.
c 2010 FHNW/IA
39
Calling native method as soon as 1024 new bytes are ready
8 10
Returning the calculated FFT
9
JNI wrapper function
Android Activity
JNI Method calling fthe native function
Displaying the magnitude of the spectrum of 1024
7
Kiss FFT method caller KISS FFT Calculates the FFT of the length
Calling and waiting for 512 samples
Reading from the I2C at 100[kHz]
4
Registering callback function for new samples
Calling Interface function to indicate and pass new samples
Android Service Continous sampling. Registers Callback from Activity at first connection.
2
A/D converter extension, I2C 8-bit Analogue Digital Conversion
1
Returning 1024 bytes
JNI wrapper function
6
JNI Method Passing the 1024 Samples to the Java Caller
Method to acquire 1024 samples using libusb
FX2 micro-controller, with I2C and USB interface I2C read of 256 bytes Executed two times in a row. Double buffered 512 byte.
Waiting for USB Bulktransfer of 512 Bytes (Samples). USB Device
Initiating USB Bulk transfer
3
USB Host
Requesting 1024 bytes
5
Returning 2x512 bytes
Figure 10.1: Processing chain Many embedded applications are designed in a similar way to our Java application. One part deals with user input, display and controlling. The other part deals with data collection and transmission. It’s a typical client-server concept. The client is represented by our Android Activity whereas the server is represented by the Android Service.
c 2010 FHNW/IA
40
An Android Service has no user interface and runs in the background. It is designated to fulfil a task over and over again. This is exactly the case for our sampling-part. We just want to collect samples until the application is terminated or the system is shut down. An Android Service can even be run in a separate process and communicate with multiple clients through Androids Binder IPC (Inter Process Communication). To understand step 1 (at the time the application is started) we need to explain one concept of the Android Service-Activity model. When the Activity connects to the Service for the first time, we register a method that the Activity has implemented from an Interface. Let us call the method ”newSamples”. As soon as the Service has collected new samples it will call the Activity’s method and pass a byte array with the collected samples. It behaves like a callback function. The advantage of this concept is that we do not have to care about blocking loops. With that out of the way we have now a look at our application flow. 1. The Activity starts up and creates its UI. It will then start the Service. The Service then will register the callback method of the activity. 2. The service now continuously calls the native method ”acquireSamples” to fill a buffer of 1024 (length of the FFT) bytes. 3. The native function ”acquireSamples” issues an USB bulk IN transfer of 1024 bytes (using libusb) and waiting for the framework to call a callback function. This happens in a non-blocking way. 4. The FX2 micro-controller will register the IN packet. If the buffer where the samples are placed is ready, it will send the data. Let’s say it’s not. The controller in this case is reading from the I2C bus. The I2C bus is connected to the ADC. 5. As soon as the 512 bytes are read, the micro-controller will issue its IN packet containing the data samples. Since the bulk transfer requested 1024 bytes, step 4 will be repeated once. 6. The libusb framework executes the callback method when the transfer is terminated. ”acquireSamples” returns the byte array to the service. 7. The service initiates a callback to the previously registered callback-method of the Activity. It will pass the samples as an argument. 8. The Activity processes the samples by calling the native FFT method through JNI. 9. The FFT is calculated using the popular KISS-FFT in native C. The complex samples are returned to the Activity. 10. The Activity calculates the magnitude of the samples and draws them on the OpenGL SufaceView. 11. (not on the diagram) Since the Service is continually sampling the Activity callback is executed whenever 1024 new samples are available. By the end of the semester we were able to operate the spectrum analyzer. The most time intensive part was the communication between FX2 board and libusb since it was more difficult to debug than other aspects of the application.
c 2010 FHNW/IA
Chapter 11
Analogue Front End For the Analogue Digital Conversion we use an I2C capable 8 bit Analogue Digital Converter (ADC). It is placed on a simple print and has been designed for a lab course at the university of applied sciences. On board, there is an additional oscillator circuit. It’s purpose is to be able to sample a signal other than DC without having to connect a function generator. For our application we modified the board and connected a real function generator, and therefore we are able to verify the entire application.
41
42
We measure AIN2/AIN3 in differential mode and connect our signal source to X1-2. We use a PCF 8591 A/D-D/A Chip. However, we do not make use of the D/A functionality.
Figure 11.1: Schematic of the ADC circuit At the time the FX2 micro-controller starts up it has to first configure the ADC correctly. This is done over an I2C write command. Each time after an I2C read command is issued from the FX2 micro controller the next conversion is started. The I2C bus is clocked at 100[kHz] and therefore the theoretical sampling rate with an 8Bit A/D conversion is 12.5[kSamples/s]. However, there is an addressing overhead and we measure a real sampling rate of around 9.5[kSamples/s]. The I2C bus is not designed for high data throughput. Usually, sampling rates are higher, but for our application we decided to maintain this rather slow sampling rate in favour of application stability.
c 2010 FHNW/IA
Chapter 12
USB Front End FX2 Today the Universal Serial Bus (USB) is a very popular (if not the most popular) bus system. Due to it’s relatively complex standard many developers seem to have a healthy respect for it and thereby choose other solutions like SPI or UART in favour. To demonstrate the power of USB we selected it for our communication between the analogue front end and the Beagleboard. Using a Cypress FX2 USB development board, we issue bulk transfers containing our signal samples. Ultimately, we found the implementation very transparent. Furthermore we benefit from a very high data throughput.
43
44
When choosing a bus system for data transfer there are two aspects to take into account. One is delay; the other is maximum throughput. Since we sample at a relatively low rate, throughput is not really an issue. However, the rather slow I2C ADC could easily be replaced by an SPI ADC. Either way it is always a good idea to have a capable data backbone - in this case USB 2.0 High Speed. Delay however is not an issue for our application. Note that if your application should be optimized for delay then you should test USB for your needs first as demonstrated in chapter [17]. Since we already worked with the USB FX2 development board in a course and gathered experience with the software framework for the FX2 micro-controller we decided to use it for our application. Furthermore the Beagleboard offers a USB High Speed Host controller port. We are working with a Cypress Semiconductor EZ-USB FX2 8051 micro-controller (CY7C68013). In our application the FX2 micro-controller has two tasks. Read from the I2C bus to collect signal samples and send the samples via bulk transfer to the Beagleboard. We chose bulk transfer over isochronous transfer because it is much easier to implement and suits our needs perfectly. To guarantee a fixed sampling rate we use a double buffered bulk endpoint. Therefore the application side on the Beagleboard has a certain amount of time to issue the next IN packet for the FX2 device. However, if the IN packets are not sent in this time window the sampling is halted. There is a very nice example application for the FX2 chip. It is called ”bulksrc” and only sends empty packets to the host as soon as an IN packet is issued. This might be the best entry point into the application. In our setup phase we configure the ADC for single ended channel 0 only conversion. In the next phase we need to set up the end point buffers. These are the memory areas which are transmitted by the underlying hardware state machine. The FX2 chip offers many buffer configuration and buffer size options. For our application we require a double buffered in-endpoint of 512 bytes. For further information about configuring endpoint buffers please consult the FX2 reference manual. void TD_Poll(void){// Called repeatedly while the device is idle // if EP6 IN is available, read from i2c and rearm it if(!(EP2468STAT & bmEP6FULL)){ //Fill 2x256 bytes of EP6 Buffer with Data read from I2C_ADC EZUSB_ReadI2C(I2C_ADC_ADDR, 256, EP6FIFOBUF); EZUSB_ReadI2C(I2C_ADC_ADDR, 256, EP6FIFOBUF); SYNCDELAY; EP6BCH = 0x02;//Bitcount high SYNCDELAY; EP6BCL = 0x00;//Bitcount low -> this will rearm the Endpoint } } In the application’s main loop we read from the I2C bus (two times 256 bytes) into our endpoint buffer. After the buffer is full we rearm it by setting the buffer’s bit count register. The framework now automatically switches to the second buffer for the next I2C read. As soon as the buffer is armed the hardware state machine will take care of transmission. Reading 512 bytes from the I2C Bus will approximately take 50[ms] since the bus is clocked at 100[kHz] (take addressing into consideration). As you see, implementing a bulk transfer on the FX2 device seems fairly easy. Although you have to take into account the setup and configuration of the endpoints. Since we are not using flash memory on the FX2 device the hex file has to be downloaded to the memory each time it boots up. Luckily there is a Linux tool called ”fxload” which takes care of this. To find out how to port fxload to Android, please refer to the chapter [8] of this report.
c 2010 FHNW/IA
Chapter 13
USB Host on the Beagleboard Libusb is an open source USB API supporting High Speed USB 2.0 transfers. It is multi-platform capable and programmed in C. One key feature of the libusb 1.0 version are asynchronous transfers. Meaning that after submitting a transfer the API works in a non blocking way until the device has sent the data in return. For our application we implemented the host part in native C and pass received data back to the Java application through the Java Native Interface (JNI). JNI wrapper function JNI Method Passing the 1024 Samples to the Java Caller
Method to acquire 1024 samples using libusb Initiating USB Bulk transfer USB Host
45
46
Working with libusb has been very convenient. Although finding an entry point into the API is not that simple (much more complex compared to the device side), the design of the library is very transparent as soon as you get the first transfers working. Android has no built in USB API (yet?) so we had to port libusb to Android and access its features through JNI. If you find yourself in a situation where you work with libusb, it is generally a good idea to start implementation without JNI and debug the application through the Android log daemon (which is also available in C/C++). As soon as everything runs you can then create a JNI wrapper function. It is even a better idea to start debugging your libusb application on your developer environment (i.e. your desktop or laptop) and then port the code to your target side afterwards. For this part of the application we had to basically solve two problems (set aside porting of libusb). On one hand we had to get our bulk transfers working. On the other hand we had to write a JNI wrapper to access the functionality of USB in Java.
13.1
Issuing Bulk IN transfers with libusb
Detailed information for libsub can be found at the project’s website1 . To give you an overview of the native function, we will explain the following code snippet which issues a bulk IN transfer. bulk.cpp Initialisation of libusb and allocation of the bulk transfer: int openUSB(){ int r; r = libusb_init(NULL); if (r < 0){ LOGE("Return r, libusb_init returned errorcode %d \n",r); return r; } stop = 1; //stop is used later on as the signal //VID is the vendor id //PID is the product id if((handle = libusb_open_device_with_vid_pid(NULL, VID, PID)) == NULL){ libusb_exit(NULL); LOGE("handle NULL %d\n",handle); return -1; } libusb_claim_interface(handle, 0); bulkTransfer = libusb_alloc_transfer(0); //static bulkTransfer return 0; }
In order not to waste resources, we create a static bulk transfer. As soon as libusb is set up, we can call our method ”requestSamples”. int requestSamples(unsigned char* buffer, int len){ length = len; stop = 0; if(bulkTransfer == NULL){ LOGE("Transfer not allocated\n"); 1
http://libusb.sourceforge.net/api-1.0/
c 2010 FHNW/IA
47
return -1; } if(handle == NULL){ LOGE("Handle is NULL\n"); return -1; } libusb_fill_bulk_transfer( //fill the transfer with data bulkTransfer, //see openUSB handle, //see openUSB IN, //defined 0x86 (in endpoint 6) buffer, //the buffer passed by JNI len, //how many samples to request done, //this is the callback method NULL, // the context 0); //the time out (0 is valid and means ’auto’) //try to submit the transfer if(libusb_submit_transfer(bulkTransfer) < 0){ LOGE("Could not submit transfer\n"); return -1; } //let the callback method handle events while(!stop){libusb_handle_events(NULL);} if (bulkTransfer->status == LIBUSB_TRANSFER_COMPLETED)return len; return 0; } The callback method has to set the static ”stop” variable to 1 to let the while loop break. ”libusb handle events” is called in a blocking way but the method itself behaves non blocking. As soon as the transfer completed (or failed) the callback method ”done” will be executed. static void done(struct libusb_transfer *transfer){ static int packets; if (transfer->status == LIBUSB_TRANSFER_COMPLETED) { //the transfer was successful stop = 1; // }else{ //the transfer was not successful, handle errors here stop = 1; } return; } If successful, the given buffer has been populated with new signal samples and the method returns. ”requestSamples” will repeatedly be called by the Java Service through JNI as long as the application runs. On termination of the application libusb has to be terminated and the statically allocated transfer has to be freed. int closeUSB(){ libusb_free_transfer(bulkTransfer); libusb_release_interface (handle, 0); libusb_exit(NULL);
c 2010 FHNW/IA
48
return 0; } That’s it. The length of the buffer (”len”) can be up to 64000 bytes. You will notice a decrease in throughput if you lower the number of requested bytes. This makes sense of course, since there is much more overhead if you call the method 1024 times rather then requesting 1024 bytes at once. Depending on your application you don’t even want a high throughput and but a short latency instead, in which case sending one byte at a time is the better idea.
13.2
Exposing the functionality to Java through JNI
At the end of the day you will want to call your method in Java where the rest of your application is. The best way to do this is by using the Java Native Interface (JNI). There is a native development kit (NDK) for Android. However, we figured the NDK does not expose all functionality and we are working with a non-standard library. What we did was looking up the code in the Android sources where JNI is used. Ultimately, nearly every library accessing hardware has to implement JNI somewhere. The best place to look is in the sources under ./frameworks/base/core/jni For our application we need an interface that accepts a byte array and its length. Since we pass a pointer, the given array can be populated by libusb. We already have written an openUSB/closeUSB method and have to make sure to expose them likewise. This is what we came up with. samples.cpp Let us start with our sampling method which calls requestSamples: static jint acquireSamples(JNIEnv* env, jobject thiz, jbyteArray arr, jint len) { jint ret = 0; jbyte* buffer; if((int)len & (0x1FF)) //mod 512 has to be 0 return ret; buffer = env->GetByteArrayElements(arr, NULL);//get the buffer ret = requestSamples((unsigned char*)buffer, len);//request the samples env->ReleaseByteArrayElements(arr, buffer, 0); //release the buffer return ret; }
We also want to create a wrapper to call openUSB static jint initUSB(JNIEnv* env, jobject thiz) { jint ret = 0; ret = openUSB(); return ret; } ... and closeUSB static jint deinitUSB(JNIEnv* env, jobject thiz)
c 2010 FHNW/IA
49
{ jint ret = 0; ret = closeUSB(); return ret; } You have to expose the methods to Java by declaring their signature and passing the pointers. Additionally you will have to register these methods. static JNINativeMethod methods[] = { {"aquireSamples", "([BI)I", (void*)aquireSamples }, {"initUSB", "()I", (void*)initUSB }, {"deinitUSB", "()I", (void*)deinitUSB } }; /* * Register several native methods for one class. */ static int registerNativeMethods(JNIEnv* env, const char* className, JNINativeMethod* gMethods, int numMethods) { jclass clazz; clazz = env->FindClass(className); if (clazz == NULL) { LOGE("Native registration unable to find class ’%s’", className); return JNI_FALSE; } if (env->RegisterNatives(clazz, gMethods, numMethods) < 0) { LOGE("RegisterNatives failed for ’%s’", className); return JNI_FALSE; } return JNI_TRUE; } static int registerNatives(JNIEnv* env) { if (!registerNativeMethods(env, classPathName, methods, sizeof(methods) / sizeof(methods[0]))) { return JNI_FALSE; } return JNI_TRUE; }
Further you set the class path name for your application. We figured this step is not mandatory. static const char *classPathName = "ch/fhnw/samplingservice/SamplingServer";
When initializing the interface, JNI will call the following method and verify the JNI Version (we extracted this from an NDK example). /* * This is called by the VM when the shared library is first loaded. */ typedef union {
c 2010 FHNW/IA
50
JNIEnv* env; void* venv; } UnionJNIEnvToVoid; jint JNI_OnLoad(JavaVM* vm, void* reserved) { UnionJNIEnvToVoid uenv; uenv.venv = NULL; jint result = -1; JNIEnv* env = NULL; LOGI("JNI_OnLoad"); if (vm->GetEnv(&uenv.venv, JNI_VERSION_1_6) != JNI_OK) { LOGE("ERROR: GetEnv failed"); goto bail; } env = uenv.env; if (registerNatives(env) != JNI_TRUE) { LOGE("ERROR: registerNatives failed"); goto bail; } result = JNI_VERSION_1_6; bail: return result; } To access your methods you will have to build a shared library and initialize it in Java. To build the library you need to create an Android.mk file which defines the rules for compilation. LOCAL_PATH := $(call my-dir) include $(CLEAR_VARS) LOCAL_MODULE := libsampling LOCAL_SRC_FILES := samples.cpp \ bulk.cpp LOCAL_C_INCLUDES += external/libusb-1.0.3/ \ $(JNI_H_INCLUDE) LOCAL_SHARED_LIBRARIES := \ libc \ libusb \ libutils include $(BUILD_SHARED_LIBRARY) Since you are probably working in the Android source directory you can compile the JNI. This is done in the exactly same fashion as described in the chapter [8] of the platform section.
c 2010 FHNW/IA
51
While you are at it, why not improve the function to print the CPU load average. It is very easy to do. Here is our implementation of the function ”loadUsage”: int logUsage(){ char buffer[16]; char* ptr; float n; FILE* fp; fp = fopen("/proc/loadavg","r"); if(fp == NULL) return -1; fgets(buffer, 16, fp); fclose(fp); ptr = strpbrk(buffer," "); if(ptr == NULL) return -1; *ptr = ’\0’; n = atof(buffer); LOGD("[==CPU==\t\t%.2f%%] used\n", (float)(n*100.0)); return 0; } Modify your acquireSamples to call it each 10th time. static jint acquireSamples(JNIEnv* env, jobject thiz, jbyteArray arr, jint len) { static int cnt; if(cnt++ > 10){ logUsage(); cnt = 0; } ... } If you have never heard of JNI this part will probably not be the easiest to process. We also had to put a large amount of effort into learning how to use JNI. However, the best way to make improvements is to look at the tons of examples found in the Android source. Additionally you will come across many crucial parts of the system since Android’s JNI part is where important things happen. After all if you had to design a USB API for Android with libusb, the above implementation would probably lead you into the right direction. Libusb is a very powerful API and enables you to work with USB enormously efficient. In our eyes it is the most preferable way to work with USB.
c 2010 FHNW/IA
Chapter 14
Java Application The Java application’s task is to continually call the underlying native sampling method, calculate the FFT of the signal and display the spectrum on the screen. We have split the application into two parts. One part that is responsible for sampling the signal (Service) and one part that is responsible for the FFT and displaying (Activity).
Calling native method as soon as 1024 new bytes are ready
Returning the calculated FFT
JNI wrapper function
Android Activity
JNI Method calling fthe native function
Kiss FFT method caller KISS FFT Calculates the FFT of the length
Displaying the magnitude of the spectrum of 1024
Calling Interface function to indicate and pass new samples
Android Service Continous sampling. Registers Callback from Activity at first connection.
52
Registering callback function for new samples
53
14.1
Service
Programming in Java, this is where Android shines. All the hard work for JNI implementation, system setup and compilation finally pays off. For our project we have used Eclipse with the ADT plugin. However, there are a few Android specific matters you have to keep in mind when coming from the desktop side. When creating your first Android project in Eclipse you will notice files such as AndroidManifest.xml or strings.xml for example. Luckily, there is a large amount of examples found on the Android developers website1 which will guide you through your first steps in Android. Our focus was on the essential ”client - server” concept which can be found in almost any embedded application that is connected to real hardware. In Android you have Activities which deal with user input, visualization and controlling of the application and Services which run in the background and have no user interface. Our application can in fact be realised as an Activity only. However, we felt it would not only benefit us but also anyone who needs to implement a ”client - server” model with Android if we demonstrated how it works. If however time is of the essence in your project then we recommend you to replace the Service part with a Thread running in your Activity. Your main hub for information regarding Services will be on these two websites: • http://developer.android.com/guide/topics/fundamentals.html#procthread • http://developer.android.com/guide/developing/tools/aidl.html The Services will register our previously exposed native functions. On creation it will initialise libusb functionality. On termination it will clean up libusb. In its main loop it will continuously call acquireSamples. public class SamplingServer extends Service{ private byte[] mBuffer = new byte[1024]; Thread mServiceThread = new Thread(){ public void run() { initUSB(); while(true){ acquireSamples(mBuffer,mBuffer.length); try { //inform activity that there are new samples mCallback.newSamples(mBuffer); //explained later } catch (RemoteException e) {e.printStackTrace();} } }; }; private native int acquireSamples(byte[] buffer, int length); private native int initUSB(); private native int deinitUSB(); static{ System.loadLibrary("sampling"); //loads libsampling } } So far nothing exciting happens. Most importantly the main loop has been defined. It acquires new samples (remember libusb will not block the thread) and afterwards the Activity is informed that new samples are available. 1
http://developer.android.com/index.html
c 2010 FHNW/IA
54
Now at a certain point in time the Activity wants to connect to the Service. At this point onBind() will be called, so we have to override it. Truth be told it is not really that simple. Just keep the lines above in mind when reading on. What we really want to accomplish is to have a callback function ”newSamples” registered within our service. The simple solution would be to write an interface ISamplingListener and let the Activity implement it. Let’s do this for a second. public interface ISamplingListener{ public void newSamples(byte[] buffer); } The Activity would then implement the interface: public SamplingApp extends Activity implements ISamplingListener{ @Override public void newSamples(byte[] buffer){ //calc fft, update the display ... } } And the server would register it and call it when new samples are received. public class SamplingServer extends Service{ ISamplingListener mCallback = null; @Override public IBinder onBind(Intent intent) { //get reference to the activity mCallback = (ISamplingListener)refToActivity; } ... } At least that is how we would do it. Well, the concept is a bit different in Android. Since any Service can be run in a different process the implementation through the Binder is not that easy. Yet the idea of the interface is very similar to the above implementation. The key part is AIDL (Advanced Interface Definition Language) which defines how to create a Binder-conform ”Remote Interface”. As an entry point we followed the example found on the Android developer page http://developer.android.com/guide/developing/tools/aidl.html To find more information regarding Services and IPC refer to http://developer.android.com/guide/topics/fundamentals.html#procthread} . . . which will discuss a Services life cycle in more detail. We set up an AIDL Interface to create a callback for the Activity. We call it IBufferCallback. package ch.fhnw.Sampling; interface IBufferCallback{ void newSamples(in byte[] buffer); } The other Interface registers the callback in the Service. We call it IBufferService
c 2010 FHNW/IA
55
package ch.fhnw.Sampling; import ch.fhnw.Sampling.IBufferCallback; interface IBufferService{ void registerCallback(in IBufferCallback callBack); } If you use Eclipse with the ADT plugin then your Interface will be created automatically after you save your .aidl file. However, you can manually create the Interfaces with the aidl tool found in the tools directory of your Android SDK. We override the Service’s onBind method and create an Interface Stub of the IBufferService Interface. public class SamplingServer extends Service{ //this is the reference to the Activity’s interface private IBufferCallback mCallback; IBinder mBinder = new IBufferService.Stub() { @Override public void registerCallback(IBufferCallback callBack) throws RemoteException { if(callBack != null)mCallback = callBack; mServiceThread.start(); //this is where we start sampling } }; @Override public IBinder onBind(Intent intent) { if (IBufferService.class.getName().equals(intent.getAction())) return mBinder; return null; } ... } This is the code for the Service side. If we lost you during the last listing do not worry. It is not trivial and the best way to comprehend it is to read the code example found on the above mentioned websites. The crucial part of this code is the line mCallback.newSamples(mBuffer); . . . which allows you to use a callback as soon as the Service received new samples. Note that instead of having just one registered callback you are able to create an entire list of callbacks when dealing with several Activities connected to the Service.
c 2010 FHNW/IA
56
14.2
Activity
The Activity displays the user interface and in our case the magnitude of the spectrum of our signal. In the following section you will be able to read about the SpriteTextActivity which simply extends an Activity and adds more functionality to it. However, in the further following example we will refer to it as a ”normal” Activity. There are many examples of how to create Activities found on the Android developers website which will give you a nice entry point in creating applications for Android. In this particular section we want to demonstrate how the Activity handles inter process communication to the above described Service. Let us examine the basic Activity below. public class SamplingActivity extends Activity{ IBufferService mService; int[] mSamples = new int[1024]; ServiceConnection mConnection = new ServiceConnection() { @Override public void onServiceConnected(ComponentName cmp, IBinder service) { mService = IBufferService.Stub.asInterface(service); try { //this registers the callback mService.registerCallback(mCallback); } catch (RemoteException e) { e.printStackTrace(); } } @Override public void onServiceDisconnected(ComponentName cmp) {} }; IBufferCallback mCallback = new IBufferCallback.Stub() { @Override public void newSamples(byte[] buffer) throws RemoteException { //this is called by the Service if new samples are available System.out.println("new buffer available"); synchronized(mSamples){ for(int i = 0; i < buffer.length; i++){ mSamples[i] = (int)buffer[i]; } } //since this code is executed in another thread we have to //call a Handler in the Activity’s thread mHandler.sendEmptyMessage(0); } }; Handler mHandler = new Handler(){ public void handleMessage(Message msg) { //do fft //update display }; };
/** Called when the activity is first created. */ @Override
c 2010 FHNW/IA
57
public void onCreate(Bundle savedInstanceState) { //standard code super.onCreate(savedInstanceState); setContentView(R.layout.main); //bind the Activity to the above defined Service bindService(new Intent(IBufferService.class.getName()), mConnection, BIND_AUTO_CREATE); } }
This is the smallest possible implementation for our Service binding. First we create a Connection ”mConnection” which receives a reference to the Service. Then the callback mCallback is registered through the remote interface. Note that the executing Thread of the callback is not the same as the Activity’s Thread. Therefore we have to create a Handler to calculate and redraw the frame. The onCreate method will then actually bind the Service to the Activity. This is the most basic implementation for the Activity/Service concept. After all, with this implementation you now have the possibility to run the Service in a separate process, and you can even have multiple Activities connecting to the Service at the same time. For our spectrum analyzer we calculate the FFT in the Handler and redraw our frame using OpenGL.
14.3
OpenGL
Android provides APIs for OpenGL ES (Open Graphics Library for Embedded Systems). OpenGL on it’s own, is a huge topic, and there are many tutorials found on the internet, unfortunately they are of course not very Android specific. A good starting point to use OpenGL in Android is the android developer website2 , as well as a tutorial on the droidnova website3 . We recommend you to at least take a look at the mentioned tutorials, since in this section we will only cover some fundamental basics of using OpenGl. We will be using the package com.example.android.apis.graphics.spritetext from the official Android ApiDemos4 . The reason for this, is that there is no native font support in OpenGL, and we want to at least display the current frame rate on the screen. There are mainly three different approaches for drawing fonts in OpenGL • Rasterize: create your fonts by drawing pixel by pixel • Vectorize: draw fonts by approaching them with geometric primitives, such as lines and polygons • Texture: use prebuilt texture maps - also called sprites - for every alphabetic letter The mentioned ApiDemo package already contains an implementation of the texture-mapped approach, hence the name ”spritetext”. 2
http://developer.android.com/guide/topics/graphics/opengl.html http://www.droidnova.com/android-3d-game-tutorial-part-i,312.html 4 http://developer.android.com/resources/samples/ApiDemos/index.html 3
c 2010 FHNW/IA
58
Take a look at the SpriteTextActivity.java class. In the onCreate method, one can see how to make the current view an OpenGL GLSurfaceView, and how to set the renderer to the included SpriteTextRenderer. SpriteTextRenderer contains the method onDrawFrame, this is where the actual drawing takes place. The most primitive object in OpenGL is called a vertex (plural: vertices), which basically represents a point in the 2D or 3D space. In order to draw vertices on the screen, they must be placed in an array respectively in a vertex buffer. Furthermore, you need an array specifiying the indices of the vertices in the vertex buffer that you actually want to draw. Let us assume we have an array vertexBuffer containing x- and y-coordinates of three points in the 2-dimensional space, as well as a simple indexBuffer for drawing three points. vertexBuffer = {x1,y1,x2,y2,x3,y3}; \\ The actual vertexBuffer will be of type FloatBuffer. \\ Thus, every x- and y-coordinate is of type float as well. indexBuffer = {1,2,3}; \\ indexBuffer will be of type ShortBuffer
Now, in the onDrawFrame method, we can insert the following OpenGL API calls to draw our vertices, connecting consecutive points with a line. public void onDrawFrame(GL10 gl) { ... gl.glVertexPointer(2, GL10.GL_FLOAT, 0, vertexBuffer); gl.glColor4f(0, 1f, 0, 1.0f); // following elements are drawn in green color gl.glDrawElements(GL10.GL_LINE_STRIP, 3, GL10.GL_UNSIGNED_SHORT, indexBuffer); ... }
glVertexPointer(size, type, stride, *pointer) takes the following arguments • • • •
size: number of coordinates per vertex, i.e. the dimension type: the data type of the vertexBuffer, GL SHORT, GL INT, GL FLOAT etc. stride: specifies the offset between consecutive vertices in the vertex pointer pointer: a pointer to the vertex buffer
glColor(red, green, blue, alpha) is self explained. glDrawElements(mode, count, type, *indices) • mode: how to connect consecutive vertices; other options are GL POINTS, GL LINES, GL TRIANGLES, GL POLYGON, etc. • count: how many elements should be rendered? • type: specifies the data type of the indices pointer • indices: a pointer to the indices to be rendered. Setting up a vertex buffer and index buffer in the proper data format is not very straightforward. The following code snippet includes all important steps for doing so: float[] coords = { 0,0, 1,1, 2,0 }; short[] indices = {1,2,3}; public FloatBuffer vertexBuffer; private ShortBuffer indexBuffer; ByteBuffer vbb; // vertex byte buffer ByteBuffer ibb; // index byte buffer vbb = ByteBuffer.allocateDirect(coords.length * 4); // size of float is 4 Bytes
c 2010 FHNW/IA
59
ibb = ByteBuffer.allocateDirect(indices.length * 2); // size of short is 2 Bytes vbb.order(ByteOrder.nativeOrder()); ibb.order(ByteOrder.nativeOrder()); vertexBuffer = vbb.asFloatBuffer(); vertexBuffer.put(coords); vertexBuffer.position(0); indexBuffer = vbb.asShortBuffer(); indexBuffer.put(indices); indexBuffer.position(0);
You may have noticed that we declared vertexBuffer as public. This way, we can also access that buffer from outside the SpriteTextRenderer class. For instance we can call the following statements in our sampling client to fill the vertex buffer with new values // put coordinates to vertexBuffer and render spriteRenderer.vertexBuffer.put(coords); spriteRenderer.vertexBuffer.position(0); mGLSurfaceView.requestRender();
In the last line we are calling requestRender which will initiate a repaint if the current rendermode is set to RENDERMODE WHEN DIRTY. The default mode is that OpenGL will just continuosly render. You can set the rendermode in SpriteTextActivity just after setting the current renderer as seen in the folowing code snippet. ... spriteRenderer = new SpriteTextRenderer(this); mGLSurfaceView.setRenderer(spriteRenderer); mGLSurfaceView.setRenderMode(android.opengl.GLSurfaceView.RENDERMODE_WHEN_DIRTY); // call requestRender to repaint setContentView(mGLSurfaceView); ...
Another important step is to define your OpenGL Viewport. The Viewport manages which region is actually visible in the OpenGL window. Therefore, setting a Viewport is basically equivalent to position a virtual camera in the abstract three dimensional space. You might want to use an Orthographic Projection as explained on J´erˆome Jouvie’s website 5 .
5
http://jerome.jouvie.free.fr/OpenGl/Lessons/Lesson1.php
c 2010 FHNW/IA
Chapter 15
FFT Implementation For calculating the Fast Fourier Transformation we have used a native C implementation. We have chosen the KISS FFT library for this task. To access the methods provided by the library in Java you will need to create a Java Native Interface wrapper function. You are, however, able to calculate the FFT in Java. Although a Java implementation is generally slower than a native one.
60
61
There are two reasons why to work with native functions in Android. One reason is hardware access. For instance USB transfer implementation. The other reason is performance. Generally any processor intensive task will run faster when implemented in C rather than in Java. The Fast Fourier Transformation is a perfect example for a resource hungry task. Although our first FFT implementation ran fine in Java and the performance sufficed for our application we decided to implement a native function anyway. Since we have created a JNI wrapper for USB transfers we already knew all fundamental steps to create such a native implementation. The procedure for implementation was the following: getting the source code, creating a JNI wrapper and declaring a native Java method. The sources for the KISS FFT can be downloaded from the sourceforge website1 . Again we created a directory for the implementation in the external folder of the Android sources. We call it ”libfft” since the output is going to be a shared library. We extracted the source files kiss fft.c, kiss fft.h and kiss fft guts.h into the created folder and created a JNI wrapper module fft.cpp which contents are shown below. We find it important at this point to show you a full example for a JNI wrapper function since such an implementation will often be used in real applications. #include #include #include #include #include #include #include #include
"jni.h" "JNIHelp.h" "kiss_fft.h"
void _fft(unsigned char*,int, int*, int*); static jint mFft(JNIEnv* env, jobject thiz, jbyteArray in, jint len, jintArray dstReal, jintArray dstImg) { jbyte* buffer; jint* real; jint* img; int i = 0; if((int)len & (0x1FF)) //mod 512 has to be 0 return -1; buffer = env->GetByteArrayElements(in, NULL); real = env->GetIntArrayElements(dstReal, NULL); img = env->GetIntArrayElements(dstImg, NULL); _fft((unsigned char*)buffer, len, real, img); env->ReleaseByteArrayElements(in, buffer, 0); env->ReleaseIntArrayElements(dstReal, real, 0); env->ReleaseIntArrayElements(dstImg, img, 0); return 0; } void _fft(unsigned char* source, int len, int* real, int* img){ int i = 0; kiss_fft_cfg mycfg = kiss_fft_alloc(len,0,NULL,NULL); kiss_fft_cpx* in = (kiss_fft_cpx*)malloc(len*sizeof(kiss_fft_cpx)); kiss_fft_cpx* out = (kiss_fft_cpx*)malloc(len*sizeof(kiss_fft_cpx)); 1
http://sourceforge.net/projects/kissfft/
c 2010 FHNW/IA
62
for(i = 0; i < len; i++){//create the input struct in[i].r = -source[i]+128; in[i].i = 0; } kiss_fft(mycfg, in,
out);
for(i = 0; i < len; i++){//copy to out real[i] = out[i].r; img[i] = out[i].i; } free(in); free(out); } static const char *classPathName = "ch/fhnw/samplingservice/SamplingClient"; static JNINativeMethod methods[] = { {"mFft", "([BI[I[I)I", (void*)mFft} }; /* * Register several native methods for one class. */ static int registerNativeMethods(JNIEnv* env, const char* className, JNINativeMethod* gMethods, int numMethods) { jclass clazz; clazz = env->FindClass(className); if (clazz == NULL) { LOGE("Native registration unable to find class ’%s’", className); return JNI_FALSE; } if (env->RegisterNatives(clazz, gMethods, numMethods) < 0) { LOGE("RegisterNatives failed for ’%s’", className); return JNI_FALSE; } return JNI_TRUE; } /* * Register native methods for all classes we know about. * * returns JNI_TRUE on success. */ static int registerNatives(JNIEnv* env) { if (!registerNativeMethods(env, classPathName, methods, sizeof(methods) / sizeof(methods[0]))) { return JNI_FALSE; } return JNI_TRUE; } // ---------------------------------------------------------------/* * This is called by the VM when the shared library is first loaded. */
c 2010 FHNW/IA
63
typedef union { JNIEnv* env; void* venv; } UnionJNIEnvToVoid; jint JNI_OnLoad(JavaVM* vm, void* reserved) { UnionJNIEnvToVoid uenv; uenv.venv = NULL; jint result = -1; JNIEnv* env = NULL; LOGI("JNI_OnLoad"); if (vm->GetEnv(&uenv.venv, JNI_VERSION_1_6) != JNI_OK) { LOGE("ERROR: GetEnv failed"); goto bail; } env = uenv.env; if (registerNatives(env) != JNI_TRUE) { LOGE("ERROR: registerNatives failed"); goto bail; } result = JNI_VERSION_1_6; bail: return result; }
The method fft is the actual native implementation of the FFT which is called by the JNI wrapper function mFft. static JNINativeMethod methods[] = { {"mFft", "([BI[I[I)I", (void*)mFft} }; The above array contains the signature of the native interface method similar to the libsub implementation. The code outside these methods is standard and found in many JNI implementations on the System. At this point we have to create an Android.mk Makefile. It is very similar to the one created for the libsub wrapper found in the platform chapter ”Compiling and Porting Native Applications and Libraries” [8]. LOCAL_PATH := $(call my-dir) include $(CLEAR_VARS) LOCAL_MODULE := libfft LOCAL_SRC_FILES := fft.cpp \ kiss_fft.c \ LOCAL_C_INCLUDES += $(JNI_H_INCLUDE) \ external/libfft LOCAL_SHARED_LIBRARIES := \
c 2010 FHNW/IA
64
libc \ libutils include $(BUILD_SHARED_LIBRARY) The next step is to either add the option LOCAL PRELINK MODULE := false or enter the libfft to the prelink map found in build/core/prelink-linux-arm.map as done in chapter [8]. We can now build the library using the below command in your Android source directory. ˜$ . build/envsetup.sh ˜$ choosecombo ˜$ mmm -j4 external/libfft To use the native interface we load the library in our Activity and declare the native method. public class SamplingClient extends SpriteTextActivity{ ... static{ System.loadLibrary("fft"); } private native int mFft(byte[] src, int length, int[] real, int[] imag); } The actual results are then put into the real and imag arrays. We find that the FFT example demonstrates nicely how to write a JNI wrapper for your custom native methods.
c 2010 FHNW/IA
Part IV
Performance Considerations
65
Chapter 16
USB throughput measurement 16.1
Setup
For this measurement we remove the I2C read part on the FX2 controller and constantly rearm the bulk end points on the board. Below you will find the new main loop of the application: void TD_Poll(void) // Called repeatedly while the device is idle { while(!(EP2468STAT & bmEP6FULL)){ SYNCDELAY; EP6BCH = 0x02; SYNCDELAY; EP6BCL = 0x00; } } Note that we use the same end point configuration as in our real application (double buffered 512). To measure the maximum throughput with libusb we have created a native application on the usb host side that requests a variable number of bulk packets. We have chosen the maximum request size of 64[MB] for libsub. For 1000 transfers of the request size 64[MB] (note that the packets are split up into 512 bytes) we reach a throughput of 170[Mb/s] which is a bit more than 21[MB/s]. The mean time for 1000 packets lies at 2.9588 [ms] for 64[MB] with a standard derivation of 0.19[ms]. When only requesting 512 bytes one thousand times from libusb, the throughput drops to 26[Mb/s]. This is caused by the function over head (library initialisation, memory allocation ...) We also note that while usually a transfer takes around 0.06 [ms] there are transfers that take up to 9 [ms]. This might be an implementation problem and not a platform problem. To determine the system’s CPU load we issue bulk transfers for over one minute and evaluate the average CPU load (/proc/loadavg). In average, we have around 0.25 to 0.4 processes waiting in the queue after one minute. Which is a surprisingly low number for full USB high speed usage.
66
Chapter 17
USB system reaction for latency determination A more complex experiment is the determination of the length of the path FX2 → Beagleboard → FX2. We want to have an estimation of how long it takes for an event on the FX2 side to be processed by the Beagleboard and sent back to the FX2 micro-controller. Therefore we decided to measure the time between a capture of a button pressure on the FX2 chip and the reaction of the Beagleboard by setting an LED pin on the FX2 when the USB host responds.
17.1
Setup
The FX2 board constantly reads the input button pin and issues a bulk IN transfer as soon as the button is pressed. The host on the Beagleboard reacts by sending an OUT bulk transfer. As soon as the FX2 controller receives this packet it will toggle a chosen LED. On an oscilloscope we measure the time between the button press and the LED toggle. To achieve such a measurement we use the following implementation for TD Poll on the FX2 controller: void TD_Poll(void) // Called repeatedly while the device is idle { if(!(EP2468STAT & bmEP6FULL)){ EP6FIFOBUF[0] = BUTTONS_MASK&IOC;//just send IO register SYNCDELAY; EP6BCH = 0x00; SYNCDELAY; EP6BCL = 0x01; } if(!(EP2468STAT & bmEP4EMPTY)){ IOC = LEDS_MASK & (0xFF ˆ IOC); //Toggle LED pin //rearm SYNCDELAY; EP4BCL = 0x80; } } On the host side we issue IN bulk transfers of one byte until we detect the desired IOC register. At this point we issue an OUT packet so the device will toggle it’s LED. With the Oscilloscope we measure the time between a button press and the LED toggle.
67
68
17.2
Results
Figure 17.1: Latency Measurement with Oscilloscope We issued a few measurements and we throughout read reaction times around 6[ms] ± 0.2[ms]. Again for a non deterministic system this result was quite astonishing. The resulting time is visible on an oscilloscope in figure [17.1]. Note that we constantly only request one byte.
c 2010 FHNW/IA
Part V
Conclusion
69
70
After working with Android and the Beagleboard platform for a semester we feel that Android can in fact be useful in Industrial Automation. Although one has to consider the effort that needs to be put into the platform setup. Most of the effort will not be spent in application design and implementation but rather in Kernel and root file system configuration. Android might be an exceptional good solution for application that need it all together: user interface, connectivity and complex programs. Moreover, the light weight programming in Java makes a platform (once set up and configured) very attractive for reuse in entirely new areas. We feel that developing Java applications with Eclipse can be very time efficient. Furthermore, the variety of available API samples is simply amazing. With the new Bluetooth API in the Android ”Eclair” build, the possibilities for connectivity even increase. Since we have not tested the real time Kernel patches yet, we can not make large assumptions about which level of preemtivity can be reached. However, we did test system reaction time using USB and constantly had numbers of around 6[ms]. At the end of our project we believe that Android will become a viable solution for embedded system in Industrial Automation. Especially in applications with a wide spectrum of required features. This is where Android can and in our opinion will be used in the near future. You might ask yourself why you should prefer Android over any other embedded linux system. There are mainly two arguments that speak for Android. On the one hand, Google and the Open Handset Alliance are behind the project. Many mobile companies such as HTC, Samsung, Motorola, Sony Ericsson, etc. have already released their Android devices, and we think that this will radically raise the chances that Android will persist in the embedded market. On the other hand, Android alleviates application development by providing a whole software stack and giving you the chance to write your applications using the Java programming language. Of course you can use Java on other embedded linux platforms as well but there you will never find such a rich set of user APIs for Networking, UI, Bluetooth, OpenGL etc. Furthermore, since Android runs on a Linux Kernel, you can still use all your existing native C/C++ projects as you would with any other embedded linux system.
c 2010 FHNW/IA
Part VI
Appendix
71
Appendix A
Setup Guide A.1
Bootloader Setup
The Beagleboard is shipped with an initial u-boot environment that makes fair use of so called u-boot scripts. By default, the u-boot bootloader will look for a file boot.scr on the SD card, and then execute it’s contents. Although you can just as well override all existing u-boot environment variables to achieve the same goal, we recommend you to use boot scripts to pass all needed boot arguments to the kernel. The first upcoming section will show you how to create a very simple u-boot script for booting off an SD card. The next section will then show you how you can use an Android root file system located at a remote network file system (NFS) server.
A.1.1
Basic U-Boot Script
When using an SD-card with two partitions (the first one is the boot partition and second one contains the Android root file system), you can create your own boot script to properly run Android off the SD-card. Open a new text file, paste in the following lines echo running presentation bootscript setenv bootargs console=ttyS2,115200n8 rw rootwait rootfstype=ext3 rootdelay=1 androidboot.console=ttyS2 root=/dev/mmcblk0p2 init=./init fatload mmc 0 ${loadaddr} uImage.bin bootm ${loadaddr} . . . and save it as boot.txt for instance (make sure that setenv bootargs . . . is all on one line). Now create a boot script file called boot.scr with the following command mkimage -T script -C none -n ’my SD card script’ -d boot.txt boot.scr This of course implies that you have mkimage1 installed on your system. Copy the generated boot.scr to the boot partition and you are now ready to boot Android from the SD card. 1
you can install it with: sudo apt-get install mkimage
72
A.1.2
NFS root file system
A.1.2
73
NFS root file system
Note: the following is an excerpt from our project website2 . Although informally written, we still want to include it in our technical report, since it explains in detail all the steps to be taken for using a root file system on a remote NFS server. Make sure that you have an NFS Kernel Server installed on your Hostsystem. sudo apt-get install nfs-kernel-server Now, in the configuration file under /etc/exports add a line to specify the folder containing the RFS and other options. In our example this is /opt/android/google/out/target/product/generic/root 10.196.132.0/24(rw,no_root_squash,sync,crossmnt,no_subtree_check)
This will export the specified folder and make it available to all ip numbers in the form of 10.196.132.*. Also pay special attention that you correctly insert the additional parameters like rw,no root squash, etc. We for instance didnt bother much about these parameters in the beginning; and therefore wasted at least two hours of our lives. If you are still planning to alter those parameters, then be aware that you will always have to restart your NFS server after doing so. Now restart the NFS Server with the following commands sudo /etc/init.d/nfs-kernel-server restart sudo exportfs -a
If you didnt see any errors your NFS server should be working fine. The next step is to configure U-Boot on the Beagleboard to mount the exported RFS via NFS. We found that the easiest solution is to write a custom U-Boot script and save it as boot.scr on the MMC boot partition. If you havent changed the standard bootcmd environment variable, then u-boot will automatically look for a boot.scr file on the MMC and execute it. If you did mess up all environment variables just like us, then you might want to reset them to the original settings (see Validating Beagle Board for further information). Create a simple text file nfsbooting.txt and paste in the following lines: echo echo echo echo
running NFS bootscript serverip is ${serverip} serverpath is ${serverpath} ip is ${ip}
setenv nfsroot ${serverip}:${serverpath},nolock,tcp,rsize=1024,wsize=1024 setenv bootargs console=ttyS2,115200n8 rw rootwait rootfstype=ext3 rootdelay=1 androidboot.console=ttyS2 nfsroot=${nfsroot} ip=${ip} root=/dev/nfs init=./init fatload mmc 0 ${loadaddr} uImage.bin bootm ${loadaddr}
Note that you will have to save the additional environment variables on the Beagle Board: $serverip, $serverpath and $ip ($loadaddr should already be specified). But first, save nfsbooting.txt and convert it to an u-boot script file named boot.scr with mkimage (of course you might have to sudo apt-get install mkimage beforehands). mkimage -T script -C none -n ’NFS Script File’ -d nfsbooting.txt boot.scr 2
http://android.serverbox.ch/?page id=10
c 2010 FHNW/IA
74
Finally copy boot.scr to the boot partition of your MMC. Insert MMC into Beagleboard again, reset and stop the autoboot process throught minicom by hitting any key on your keyboard. Now well set the missing environment variables mentioned above. Of course you need to adjust those for your needs. This is just our working example. setenv serverip 10.196.132.201 setenv serverpath /opt/android/google/out/target/product/generic/root/ setenv ip dhcp saveenv
Now you should be good to go! Restart the Beagle Board and wait for autoboot to kick in. Android will now always automatically boot with the provided RFS over NFS. If you ever change your server ip, or the export path in which the RFS is installed, simply redo the last one of the above steps with your new values!
A.2
Kernel
Building the uImage In this section we want to show you how to download, configure and build the OMAP Kernel from the Android repositories 3 . To build your system we recommend you to use the ”Code Sourcery” cross compiler 4 . Create a directory for the Kernel ˜$ mkdir kern-omap-android
Download the sources ˜$ cd kern-omap-android ˜/kern-omap-android$ git clone git://android.git.kernel.org/kernel/omap.git
This takes a while for downloading ˜/kern-omap-android$ cd kernel ˜/kern-omap-android/kernel$ git checkout origin/android-omap-2.6.29 -b myBeagle
The above command will create a new branch ”myBeagle” and switch to it. Now you need to configure the Kernel properly. We do this by copying the existing Beagleboard config file and make some adjustments to it. ˜/kern-omap-android$ cp arch/arm/configs/omap3_beagle_defconfig .config
Since this configuration is not made for Android we have to include some drivers. Not all of them are necessary, however, if you do the same steps in the menuconfig as listed below, you will be able to build a working Kernel. So start configuring with the below command. ˜/kern-omap-android$ make menuconfig
And activate these options in the Drivers section • • • • 3 4
Staging Drivers → Android → select all Misc devices → Android pmem HID Devices Input Device Support → Event Interface
http://android.git.kernel.org/?p=kernel/omap.git;a=summary http://www.codesourcery.com/sgpp/lite/arm
c 2010 FHNW/IA
75
Following under Drivers → USB-Support • Inventra Highspeed Dual Role Controller → Driver Mode → USB Host • EHCI HCD Following under Drivers for your given USB-Network adapter (We used a Moschip) • Network device Support → USB Network Adapters → Moschip Following for graphic support under Drivers → Graphics Support → OMAP2/3 Display Subsystem support • Omap2/3 Frame buffer • Omap2/3 Display Device Driver → Generic Panel Following in Power Management • • • •
Wake lock Wake lock stats Userspace wake locks Early suspend
Following in System Type • TI Omap Implementations → McBSP . . . and in General Setup • Enable the Anonymous Shared Memory Subsystem • Floating Point Emulation → Advanced SIMD (NEON) Extension support This will do it. Time to build the system! You will have to insert the path to your code sourcery toolchain in the next command. We placed it at the path /opt/sourceryToolChain/arm-2009q1/bin/arm-none-linux-gnueabi- . So exchange the location with the location of your toolchain. ˜/kern-omap-android/kernel$ make -j4 CROSS_COMPILE=/opt/sourceryToolChain/arm-2009q1/bin/arm-none-linux-gnueabiCC_PATH=/opt/sourceryToolChain/arm-2009q1/bin/arm-none-linux-gnueabi- uImage
This will build the uImage under arch/arm/boot/uImage. Copy the uImage to your BOOT partition on your SD-Card to a file ”uImage.bin”. You are done building the Kernel.
A.3
Building the Android Root File System
Building the Android Root File System consists of three parts. Getting the sources, configuring Android and building the Root File System. Google has created a tool called repo which enables you to get the Android sources from their repository. It is used to manage multiple git repositories at the same time.
c 2010 FHNW/IA
A.3.1
Getting the sources
A.3.1
76
Getting the sources
An overview over the Android repository can be found on the official git website. There is a guide for Android Platform Development found under http://android.git.kernel.org/. There is also a website about the open source project http://source.android.com where you will find instructions on how to download Android via repo (http://source.android.com/download). We exactly followed the instructions found on the download site. First you have to install repo. Quote from http://source.android.com/download: To install, initialize, and configure Repo, follow these steps: Make sure you have a /bin directory in your home directory, and check to be sure that this bin directory is in your path: $ cd ˜ $ mkdir bin $ echo $PATH Download the repo script and make sure it is executable: $ curl http://android.git.kernel.org/repo >˜/bin/repo $ chmod a+x ˜/bin/repo The below steps will download the sources and initialise a new repo branch. $ $ $ $
mkdir and-beagle cd and-beagle repo init -u git://android.git.kernel.org/platform/manifest.git -b donut repo sync
The last command will take a while to complete since it will download the sources. After the download completes the sources will be in your ”and-beagle” folder.
A.3.2
Configuring Android
In order to build the RFS it is best practice to create a new vendor configuration. For the build command you then can choose the created configuration for your platform. At the time of this writing we still used the vendor configuration of the Embinux team found at their git repository 5 . However, today we would probably use the configurations of the rowboat project6 , since they seemed more transparent to us. For instance, instead of changing the keyboard layout in development/emulator/keymaps/qwerty.kl
they provide the key layout in the vendor folder which is the much more elegant way. The same counts for the init.rc script. To provide you with our adjustments of the sources we included the following four files in the appendix ”Configuration files” [B]. • Keymap: development/emulator/keymaps/qwerty.kl • Init script: system/core/rootdir/init.rc 5 6
http://labs.embinux.org/git/cgit.cgi/android-omap3/platform/vendor/embinux/beagle/ http://gitorious.org/rowboat/vendor-ti-beagleboard/trees/master
c 2010 FHNW/IA
A.3.3
Building the Root File System
77
• Board config: vendor/beagle/AndroidBoard.mk vendor/beagle/BoardConfig.mk • Product config: vendor/beagle/AndroidProducts.mk vendor/beagle/beagle.mk To implement them, create a folder vendor/beagle/ To avoid battery exceptions you will need to hack the file frameworks/base/services/java/com/android/server/BatteryService.java. . . . by exchanging the code on line 182: mBatteryLevelCritical = mBatteryLevel Run configurations > Target.. and select manual to choose the Beagleboard as the default Target.
A.4.2
Over ethernet
If you have your Beagleboard connected to a network switch over usb-ethernet, you can still use the Android Debug Bridge (ADB) tools, and even install and debug your applications with Eclipse. First of all, you need to find out which ip address the Beagleboard is currently assigned to. This can be done with the following command on the Beagleboard (use a serial connection to get access to a terminal) netcfg Let us assume, the current ip address of the Beagleboard is 10.196.132.11. In a terminal on your development computer, issue the following command to kill the current adb server on the Beagleboard: ADBHOST=10.196.132.11 adb kill-server Now, type . . . ADBHOST=10.196.132.11 adb devices . . . to get a list of all available adb devices. You can also open a terminal with: ADBHOST=10.196.132.11 adb shell Again, in Eclipse — as described in the previous section — simply go to Run > Run configurations > Target.. and select manual to choose the Beagleboard as the default Target.
c 2010 FHNW/IA
80
A.5 A.5.1
DSP DSP/BIOS Link
This guide will show you how to run applications on the DSP using DSP/BIOS Link. It is based on the guide ”Installing DSPLink on a BeagleBoard Outside OpenEmbedded from Source” from the OSSIE project website9 , with especially more detailed configuration instructions. Most files will be downloaded from the Texas Insruments(TI) website10 . The detailed download links are contained in this guide; however, they might change in the future and you may just as well use the search function on their website to find the appropriate download locations. Furthermore, you will need to register a free account on the TI website to download some of the following files. DOWNLOADING & INSTALLING For generating DSP applications, you will need • DSP/BIOS 11 • XDCTools 12 • C6x compiler 13 preferably install them to /opt/ti-tools/bios /opt/ti-tools/bios/xdctools /opt/ti-tools/c6000 if you prefer other install locations, you will have to adapt a configuration file c64xx 5.xx linux.mk mentioned later on. Furthermore you will need • Local Power Manager package 14 • DSP/BIOS Link 15 Unpack them to anywhere you like. I will be using /opt/dsplink as the install location for DSP/BIOS Link in this example. CONFIGURATION First of all, set an environment variable DSPLINK to the location where you installed DSP/BIOS Link, this will be needed by the configuration script afterwards. export DSPLINK=/opt/dsplink Be careful not to include a trailing slash in the path, ie do not use DSPLINK=/opt/dsplink/. Now, prior to anything else, run the configuration script cd $DSPLINK/config/bin perl dsplinkcfg.pl 9 10 11 12 13 14 15
http://ossie.wireless.vt.edu/trac/wiki/BeagleBoard DSPLink http://www.ti.com/ https://www-a.ti.com/downloads/sds support/targetcontent/index.html https://www-a.ti.com/downloads/sds support/targetcontent/index.html https://www-a.ti.com/downloads/sds support/CodeGenerationTools.htm http://software-dl.ti.com/dsps/dsps registered sw/sdo sb/targetcontent//linuxutils/linuxutils 2 23/index.html http://software-dl.ti.com/dsps/dsps registered sw/sdo sb/targetcontent//link/index.html
c 2010 FHNW/IA
A.5.1
DSP/BIOS Link
81
. . . which will not succeed, but you will find a notice in the bottom Example: --platform=DAVINCI or --platform= or --help for ... Thus, try perl dsplinkcfg.pl --platform=OMAP3530 to specify the OMAP3530 platform. Do this continuosly, until every needed paramter is set. In the end, you should come up with something like perl dsplinkcfg.pl --platform=OMAP3530 --nodsp=1 --dspcfg_0=OMAP3530SHMEM --dspos_0=DSPBIOS5XX --gppos=OMAPLSP --comps=ponslrmc In the file $DSPLINK/make/Linux/omap3530 2.6.mk, set the location of your Kernel sources and your cross-compiler. In our example, this would be BASE_BUILDOS := /var/kernel/omap.git/omap BASE_TOOLCHAIN := /opt/arm-2009q3 Do the same in the file $DSPLINK/gpp/src/Rules.mk ifeq ("$(TI_DSPLINK_PLATFORM)", "OMAP3530") KERNEL_DIR := /var/kernel/omap.git/omap TOOL_PATH := /opt/arm-2009q3/bin endif #ifeq ("$(TI_DSPLINK_PLATFORM)", "OMAP3530") At last, in the file $DSPLINK/make/DspBios/c64xx 5.xx linux.mk you may need to adapt BASE INSTALL, BASE SABIOS, XDCTOOLS DIR, BASE CGTOOLS etc. to your installed location. If you have installed DSP/BIOS, the C6x compiler and xdctools to the suggested locations from above, you do not need to edit anything. optional: Adjust the kernel memory in the boot arguments. We are unsure if this is still an issue. We have run dsplink with and without adjustements, and both ways seemed to work just fine. However, if you run into troubles, we recommend you to take this additional step. In the u-boot bootloader, set your bootargs to use at least 2M less than your physical ram. Say you have 128M physical ram, you may want to use 80M as kernel memory, leaving the rest for dsplink. Leave any other kernel arguments the way they were. Adjusting the bootargs could look like setenv bootargs ’console=ttyS2,115200n8 console=tty0 mem=80M rw ...’ saveenv reset Or, if you are using a boot.scr script, you can rebuild your own script and set the bootargs there, as explained in the Bootloader Setup appendix [A.1]. BUILDING You are now ready to build the sources $ $ $ $ $ $
cd $DSPLINK/gpp/src/api make -s clean make -s debug make -s release cd $DSPLINK/gpp/src make -s clean
c 2010 FHNW/IA
A.5.1
$ $ $ $ $ $ $ $ $ $ $ $ $ $
DSP/BIOS Link
82
make -s debug make -s release cd $DSPLINK/gpp/src/samples make -s clean make -s debug make -s release cd $DSPLINK/dsp/src make -s clean make -s debug make -s release cd $DSPLINK/dsp/src/samples make -s clean make -s debug make -s release
This will build GPP-side executables and the dsplinkk.ko kernel module, as well as the DSP-side executables in $DSPLINK/gpp/export/BIN/Linux/OMAP3530 $DSPLINK/dsp/export/BIN/DspBios/OMAP3530/OMAP3530_0 Copy everything to the target file system. To build the Local Power Manager module, we need to adapt yet another Makefile. Insert the location of your kernel sources, your cross-compiler prefix and dsplink directory. Afterwards, run the make command. $ cd omap3530/lpm $ gedit Makefile #LINUXKERNEL_INSTALL_DIR = _your_kernel_installation_ #MVTOOL_PREFIX = _your_codegen_installation_and_name_prefix_ #DSPLINK_REPO = _your_dsplink_repository_ LINUXKERNEL_INSTALL_DIR = /var/kernel/omap.git/omap MVTOOL_PREFIX = /opt/arm-2009q3/bin/arm-none-linux-gnueabiDSPLINK_REPO = /opt # Process DSPLINK flags LINK_DIR = $(DSPLINK_REPO)/dsplink $ make Copy the generated kernel module lpm omap3530.ko to the target file system. Also copy lpmON.x470uC and lpmOFF.x470uC to the target system. These executables are needed for resetting the DSP, and can be found in ./packages/ti/bios/power/test/bin/ti_platforms_evm3530/linux/release/ ./packages/ti/bios/power/test/bin/ti_platforms_evm3530/linux/release/ RUNNING SAMPLE APPLICATIONS insmod dsplinkk.ko insmod lpm_omap3530.ko ./messagegpp message.out 1000
c 2010 FHNW/IA
A.5.1
DSP/BIOS Link
83
Some parts of the message.out application will be cached on the DSP. You can run the above command again. However, if you want to run another application, you need to reset the DSP in order to clear it’s cache. Resetting the DSP is done by calling lpmON.x470uC lpmOFF.x470uC Now you can run another sample application. Check the user guide under $DSPLINK/doc/UserGuide.pdf to see what arguments the other sample applications will use. USING DSPLIB Furthermore, using DSPLIB to calculate an FFT. Download DSPLIB from the Texas Instruments website 16 . If you are having problems downloading the file when clicking on the Download button, you may copy the URL and use wget for downloading (for instance) wget http://focus.ti.com/lit/sw/sprc834/sprc834.gz Ravi Mehra from the OSSIE project website 17 18 has kindly allowed us to reference their FFT calculation based on the sample loop application. Download loop fft.tar.gz from the mentioned website and unpack it (dsp loop fft and gpp loop fft folders will be created) Copy the contents of dsp loop fft to ${DSPLINK}/dsp/src/samples/loop_fft . . . and copy the contents of gpp loop fft to ${DSPLINK}/gpp/src/samples/loop_fft Edit the following files on the DSP-Side • SOURCES adapt the path to your DSPLIB source files • tskLoop.c set the absolute path to your DSPLIB header files. Also, you may need to exchange all backslashes to frontslashes in the DSPLIB header file under C64x+DSPLIB/dsplib_v210/dsplib64plus.h • DspBios/COMPONENT Add dsplib64plus.lib to USER LIBS so that it reads USR_LIBS := dsplink.lib dsplib64plus.lib and copy dsplib64plus.lib to the following locations ${DSPLINK}/dsp/BUILD/OMAPxxxx/EXPORT/RELEASE ${DSPLINK}/dsp/BUILD/OMAPxxxx/EXPORT/RELEASE cd to $DSPLINK/dsp/src/samples/loop fft and run make. To run loop fft with 128 Buffersize, 1 Iteration, on Processor 0; issue the following command ./loop_fftgpp loop_fft.out 128 1 0 Now you can alter the source files to calculate a 1024-FFT instead of the implemented 32-FFT. Furthermore you can measure how much time it will take for a buffer roundtrip. Be alert though — for some reasons we can not explain yet — the round trip time of the first buffer is significantly higher than for the following ones. 16
http://focus.ti.com/docs/toolsw/folders/print/sprc265.html#Order%20Options Utilizing the DSP on the BeagleBoard, OSSIE project web site, http://ossie.wireless.vt.edu/trac/wiki/BeagleBoard, available 18 January 2010. 18 R. Mehra and S. Jonnadula, Personal communication, 18 January 2010. 17
c 2010 FHNW/IA
A.5.2
A.5.2
DSP/BIOS Bridge
84
DSP/BIOS Bridge
Note: the following is an excerpt of a post from our project website19 . It is informally written, yet still we wanted to include it in our technical report, since it demonstrates how to run an application on the DSP using DSP/BIOS Bridge. We finally managed to get a simple DSP task node running on our Beagleboard using Android. The sources were taken from felipecs dsp-dummy at github. Many thanks for sharing this! In this post we will provide you with a step by step guide for doing the exact same thing: 1. Get the dsp-dummy sources aswell as a C6x compiler and doffbuild tools. Make sure that you get the latest dsp-dummy sources by downloading them with git (the provided ZIP and TAR files may contain older versions) git clone git://github.com/felipec/dsp-dummy.git The C6x Compiler for the DSP can be downloaded from Texas Instruments . We have been using the linux version of C6000 Code Generation Tools v6.1.12. Preferably install to /opt/dsptools Doffbuild tools are downloaded through git clone git://gitorious.org/ti-dspbridge/userspace.git You will end up with three subfolders called binaries, documents and source. Doffbuild tools are located in ./source/dsp/bdsptools/packages/ti/dspbridge/dsp/doffbuild. Copy the doffbuild folder to /opt/doffbuild or anywhere you like. 2. Now that we have all needed sources and programs, we will build the ARM and DSP side applications (you may notice that we only build the DSP side though :-) ). Change to the dsp-dummy folder previously downloaded and issue make DSP_TOOLS=/opt/dsptools DSP_DOFFBUILD=/opt/doffbuild CROSS_COMPILE=/opt/arm-2009q3/bin/arm-none-linux-gnueabiof course, you will have to adapt CROSS COMPILE to whatever cross-compiler you are using. If everything went well, there will be two important files created, namely dummy.dll64P for DSP-side, and dummy for ARM-side. Copy dummy.dll64P to /lib/dsp on the android filesystem. If you try to run dummy on Android, you will end up with an error dummy: not found But dont panic, continue with step 3! (or alternatively, set LDFLAGS to -static in the Makefile, and jump over to step 4 Oh no, now I spoiled everything! :-D ) 3. Now we will build the dummy userspace application especially for Android. In the Android sources, create a new folder under external/dsp-dummy mkdir /external/dsp-dummy Copy and paste everything from the dsp-dummy source folder into it. Also create an Android.mk file in that new folder containing the following lines LOCAL_PATH:= $(call my-dir) include $(CLEAR_VARS) 19
http://android.serverbox.ch/?p=167
c 2010 FHNW/IA
A.5.2
DSP/BIOS Bridge
85
LOCAL_SRC_FILES:= \ dummy_arm.c \ dsp_bridge.c \ log.c LOCAL_C_INCLUDES:= external/dsp-dummy/ LOCAL_MODULE := dsp-dummy LOCAL_STATIC_LIBRARIES := libcutils libc include $(BUILD_EXECUTABLE) Now source envsetup.sh followed by choosecombo, to set all environment variables and dependecies . build/envsetup.sh choosecombo . . . and finally we create the dsp-dummy for Android mmm external/dsp-dummy/ If everything went well, you will find dsp-dummy in ./out/target/product/generic/system/bin/dsp-dummy. Copy this to the target file system. 4. In this step we will load a base image onto the DSP. We used to have DSP Bridge Driver statically included in the android omap.git kernel. One would normally load a base image with a DSP/BIOS Bridge Driver utility called exec (sometimes called exec.out). However, until now we couldnt get exec working on android so we will do this in a slightly different way. One can also load a DSP base image when inserting the bridgedriver.ko module into the kernel, and this is exactly what well do! First of all run make menuconfig inside the kernel folder. Go to device drivers, and in the bottom you will find DSP Bridge driver. Press M to modularize it. Now you can try to build the modules with make -j4 modules CROSS_COMPILE= CC_PATH= However, the bridgedriver module will not succeed. We have to modify a source file in the kernel (this is probably not nice!) gedit ./kernel/fork.c and add the following on line 161; just after the function void ends.
put task struct(struct task struct *tsk)
EXPORT_SYMBOL(__put_task_struct); Now you can build the modules! As a result, youll get dspbridge.ko and bridgedriver.ko. Copy these two to the Beagleboard. We will load the dspbridge.ko module using insmod, and also load the bridgedriver.ko with an additional paramter specifying the location of a DSP base image. insmod dspbridge.ko insmod bridgedriver.ko base_img=
c 2010 FHNW/IA
A.5.2
DSP/BIOS Bridge
86
For the base image we use the provided dynbase tiomap3430.dof64P, which can be found in the binaries subfolder from step 1 of this guide. Do you still remember? Therefore copy dynbase tiomap3430.dof64P to the target filesystem and issue the command above. 5. Now you can finally run the dsp-dummy application on Android Beagleboard, what a relief! # dsp-dummy info external/dsp-dummy/dummy_arm.c:67:create_node() dsp node created info external/dsp-dummy/dummy_arm.c:114:run_task() dsp node running info external/dsp-dummy/dummy_arm.c:124:run_task() running 14400 times info external/dsp-dummy/dummy_arm.c:161:run_task() dsp node terminated info external/dsp-dummy/dummy_arm.c:81:destroy_node() dsp node deleted
c 2010 FHNW/IA
Appendix B
Configuration files The following configuration files are used for building the Android Root File System.
B.1
emulator/keymaps/qwerty.kl
key key key key key key key key key key key key key key key key key key key key key key key key key key key key key key key key
399 2 3 4 5 6 7 8 9 10 11 1 58 107 62 126 127 217 228 227 231 61 232 108 103 102 105 106 104 109 125 212
GRAVE 1 2 3 4 5 6 7 8 9 0 BACK SOFT_RIGHT ENDCALL ENDCALL MENU SEARCH SEARCH POUND STAR CALL CALL DPAD_CENTER DPAD_DOWN DPAD_UP HOME DPAD_LEFT DPAD_RIGHT VOLUME_UP VOLUME_DOWN POWER CAMERA
key key key key key key
16 17 18 19 20 21
Q W E R T Y
WAKE_DROPPED WAKE WAKE_DROPPED WAKE_DROPPED WAKE_DROPPED WAKE_DROPPED WAKE_DROPPED
WAKE_DROPPED WAKE_DROPPED WAKE_DROPPED WAKE_DROPPED WAKE_DROPPED WAKE WAKE_DROPPED WAKE_DROPPED
WAKE
87
88
key key key key key key key
22 23 24 25 26 27 43
U I O P LEFT_BRACKET RIGHT_BRACKET BACKSLASH
key key key key key key key key key key key key
30 31 32 33 34 35 36 37 38 39 40 14
A S D F G H J K L SEMICOLON APOSTROPHE DEL
key key key key key key key key key key key
44 45 46 47 48 49 50 51 52 53 28
Z X C V B N M COMMA PERIOD SLASH ENTER
key key key key key key key key
56 100 42 54 15 57 70 155
ALT_LEFT ALT_RIGHT SHIFT_LEFT SHIFT_RIGHT TAB SPACE EXPLORER ENVELOPE
key 12 key 13 key 215
B.2
MINUS EQUALS AT
system/core/rootdir/init.rc
on init sysclktz 0 loglevel 3 # setup the global environment export PATH /sbin:/system/sbin:/system/bin:/system/xbin:/data/busybox export LD_LIBRARY_PATH /system/lib export ANDROID_BOOTLOGO 1 export ANDROID_ROOT /system export ANDROID_ASSETS /system/app export ANDROID_DATA /data
c 2010 FHNW/IA
89
export EXTERNAL_STORAGE /sdcard export BOOTCLASSPATH /system/framework/core.jar :/system/framework/ext.jar :/system/framework/framework.jar :/system/framework/android.policy.jar :/system/framework/services.jar
\\ \\ \\ \\ \\
# Backward compatibility symlink /system/etc /etc # create mountpoints and mount tmpfs on sqlite_stmt_journals mkdir /sdcard 0000 system system mkdir /system mkdir /data 0771 system system mkdir /cache 0770 system cache mkdir /sqlite_stmt_journals 01777 root root mount tmpfs tmpfs /sqlite_stmt_journals size=4m #
mount rootfs rootfs / ro remount write write write write write write
/proc/sys/kernel/panic_on_oops 1 /proc/sys/kernel/hung_task_timeout_secs 0 /proc/cpu/alignment 4 /proc/sys/kernel/sched_latency_ns 10000000 /proc/sys/kernel/sched_wakeup_granularity_ns 2000000 /proc/sys/kernel/sched_compat_yield 1
# Create cgroup mount points for process groups mkdir /dev/cpuctl mount cgroup none /dev/cpuctl cpu chown sytem system /dev/cpuctl chown system system /dev/cpuctl/tasks chmod 0777 /dev/cpuctl/tasks write /dev/cpuctl/cpu.shares 1024 mkdir chown chmod write
/dev/cpuctl/fg_boost system system /dev/cpuctl/fg_boost/tasks 0777 /dev/cpuctl/fg_boost/tasks /dev/cpuctl/fg_boost/cpu.shares 1024
mkdir chown chmod write
/dev/cpuctl/bg_non_interactive system system /dev/cpuctl/bg_non_interactive/tasks 0777 /dev/cpuctl/bg_non_interactive/tasks /dev/cpuctl/bg_non_interactive/cpu.shares 16
# mount mtd partitions # Mount /system rw first to give the filesystem a chance to save a checkpoint # mount yaffs2 mtd@system /system # mount yaffs2 mtd@system /system ro remount
#
#
# We chown/chmod /data again so because mount is run as root + defaults mount yaffs2 mtd@userdata /data nosuid nodev chown system system /data chmod 0771 /data # Same reason as /data above mount yaffs2 mtd@cache /cache nosuid nodev chown system cache /cache chmod 0770 /cache # This may have been created by the recovery system with odd permissions
c 2010 FHNW/IA
90
chown system system /cache/recovery chmod 0770 /cache/recovery # create basic filesystem structure mkdir /data/misc 01771 system misc mkdir /data/misc/hcid 0770 bluetooth bluetooth mkdir /data/misc/keystore 0770 keystore keystore mkdir /data/misc/vpn 0770 system system mkdir /data/misc/vpn/profiles 0770 system system # give system access to wpa_supplicant.conf for backup and restore mkdir /data/misc/wifi 0770 wifi wifi chmod 0770 /data/misc/wifi chmod 0660 /data/misc/wifi/wpa_supplicant.conf mkdir /data/local 0771 shell shell mkdir /data/local/tmp 0771 shell shell mkdir /data/data 0771 system system mkdir /data/app-private 0771 system system mkdir /data/app 0771 system system mkdir /data/property 0700 root root # create dalvik-cache and double-check the perms mkdir /data/dalvik-cache 0771 system system chown system system /data/dalvik-cache chmod 0771 /data/dalvik-cache # create the lost+found directories, so as to enforce our permissions mkdir /data/lost+found 0770 mkdir /cache/lost+found 0770 # double check the perms, in case lost+found already exists, and set owner chown root root /data/lost+found chmod 0770 /data/lost+found chown root root /cache/lost+found chmod 0770 /cache/lost+found on boot # basic network init ifup lo hostname localhost domainname localdomain setprop net.dns1 10.51.2.40 # mount usb file system # mdc, 30.09.09, 16.10 mount usbfs none /proc/bus/usb -o devmode=0666 # set RLIMIT_NICE to allow priorities from 19 to -20 setrlimit 13 40 40 # Define the oom_adj values for the classes of processes that can be # killed by the kernel. These are used in ActivityManagerService. setprop ro.FOREGROUND_APP_ADJ 0 setprop ro.VISIBLE_APP_ADJ 1 setprop ro.SECONDARY_SERVER_ADJ 2 setprop ro.BACKUP_APP_ADJ 2 setprop ro.HOME_APP_ADJ 4 setprop ro.HIDDEN_APP_MIN_ADJ 7 setprop ro.CONTENT_PROVIDER_ADJ 14 setprop ro.EMPTY_APP_ADJ 15 # Define the memory thresholds at which the above process classes will # be killed. These numbers are in pages (4k).
c 2010 FHNW/IA
91
setprop setprop setprop setprop setprop setprop setprop setprop
ro.FOREGROUND_APP_MEM 1536 ro.VISIBLE_APP_MEM 2048 ro.SECONDARY_SERVER_MEM 4096 ro.BACKUP_APP_MEM 4096 ro.HOME_APP_MEM 4096 ro.HIDDEN_APP_MEM 5120 ro.CONTENT_PROVIDER_MEM 5632 ro.EMPTY_APP_MEM 6144
# Write value must be consistent with the above properties. # Note that the driver only supports 6 slots, so we have HOME_APP at the # same memory level as services. write /sys/module/lowmemorykiller/parameters/adj 0,1,2,7,14,15 write /proc/sys/vm/overcommit_memory 1 write /proc/sys/vm/min_free_order_shift 4 write /sys/module/lowmemorykiller/parameters/minfree 1536,2048,4096,5120,5632,6144 # Set init its forked children’s oom_adj. write /proc/1/oom_adj -16 # Permissions for System Server and daemons. chown radio system /sys/android_power/state chown radio system /sys/android_power/request_state chown radio system /sys/android_power/acquire_full_wake_lock chown radio system /sys/android_power/acquire_partial_wake_lock chown radio system /sys/android_power/release_wake_lock chown radio system /sys/power/state chown radio system /sys/power/wake_lock chown radio system /sys/power/wake_unlock chmod 0660 /sys/power/state chmod 0660 /sys/power/wake_lock chmod 0660 /sys/power/wake_unlock chown system system /sys/class/timed_output/vibrator/enable chown system system /sys/class/leds/keyboard-backlight/brightness chown system system /sys/class/leds/lcd-backlight/brightness chown system system /sys/class/leds/button-backlight/brightness chown system system /sys/class/leds/jogball-backlight/brightness chown system system /sys/class/leds/red/brightness chown system system /sys/class/leds/green/brightness chown system system /sys/class/leds/blue/brightness chown system system /sys/class/leds/red/device/grpfreq chown system system /sys/class/leds/red/device/grppwm chown system system /sys/class/leds/red/device/blink chown system system /sys/class/leds/red/brightness chown system system /sys/class/leds/green/brightness chown system system /sys/class/leds/blue/brightness chown system system /sys/class/leds/red/device/grpfreq chown system system /sys/class/leds/red/device/grppwm chown system system /sys/class/leds/red/device/blink chown system system /sys/class/timed_output/vibrator/enable chown system system /sys/module/sco/parameters/disable_esco chown system system /sys/kernel/ipv4/tcp_wmem_min chown system system /sys/kernel/ipv4/tcp_wmem_def chown system system /sys/kernel/ipv4/tcp_wmem_max chown system system /sys/kernel/ipv4/tcp_rmem_min chown system system /sys/kernel/ipv4/tcp_rmem_def chown system system /sys/kernel/ipv4/tcp_rmem_max chown root radio /proc/cmdline # Define TCP buffer sizes for various networks # ReadMin, ReadInitial, ReadMax, WriteMin, WriteInitial, WriteMax,
c 2010 FHNW/IA
92
setprop setprop setprop setprop setprop
net.tcp.buffersize.default net.tcp.buffersize.wifi net.tcp.buffersize.umts net.tcp.buffersize.edge net.tcp.buffersize.gprs
4096,87380,110208,4096,16384,110208 4095,87380,110208,4096,16384,110208 4094,87380,110208,4096,16384,110208 4093,26280,35040,4096,16384,35040 4092,8760,11680,4096,8760,11680
class_start default ## Daemon processes to be run by init. ## service console /data/busybox/sh console # adbd is controlled by the persist.service.adb.enable system property service adbd /sbin/adbd disabled # adbd on at boot in emulator on property:ro.kernel.qemu=1 start adbd on property:persist.service.adb.enable=1 start adbd on property:persist.service.adb.enable=0 stop adbd service servicemanager /system/bin/servicemanager user system critical onrestart restart zygote onrestart restart media service vold /system/bin/vold socket vold stream 0660 root mount service nexus /system/bin/nexus socket nexus stream 0660 root system disabled #service mountd /system/bin/mountd # socket mountd stream 0660 root mount service debuggerd /system/bin/debuggerd service ril-daemon /system/bin/rild socket rild stream 660 root radio socket rild-debug stream 660 radio system user root group radio cache inet misc service zygote /system/bin/app_process -Xzygote /system/bin --zygote --start-system-server socket zygote stream 666 onrestart write /sys/android_power/request_state wake onrestart write /sys/power/state on service media /system/bin/mediaserver user media group system audio camera graphics inet net_bt net_bt_admin service bootsound /system/bin/playmp3 user media
c 2010 FHNW/IA
93
group audio oneshot service bootanim /system/bin/bootanimation user graphics group graphics disabled oneshot service dbus /system/bin/dbus-daemon --system --nofork socket dbus stream 660 bluetooth bluetooth user bluetooth group bluetooth net_bt_admin service hcid /system/bin/hcid -s -n -f /etc/bluez/hcid.conf socket bluetooth stream 660 bluetooth bluetooth socket dbus_bluetooth stream 660 bluetooth bluetooth # init.rc does not yet support applying capabilities, so run as root and # let hcid drop uid to bluetooth with the right linux capabilities group bluetooth net_bt_admin misc disabled service hfag /system/bin/sdptool add --channel=10 HFAG user bluetooth group bluetooth net_bt_admin disabled oneshot service hsag /system/bin/sdptool add --channel=11 HSAG user bluetooth group bluetooth net_bt_admin disabled oneshot service installd /system/bin/installd socket installd stream 600 system system #service flash_recovery /system/etc/install-recovery.sh # oneshot service racoon /system/bin/racoon socket racoon stream 600 system system # racoon will setuid to vpn after getting necessary resources. group net_admin keystore disabled oneshot service mtpd /system/bin/mtpd socket mtpd stream 600 system system user vpn group vpn net_admin net_raw disabled oneshot service keystore /system/bin/keystore user keystore group keystore socket keystore stream 666
c 2010 FHNW/IA
94
B.3
vendor/beagle/AndroidBoard.mk
LOCAL_PATH := $(call my-dir) ALSA_CONF_FILE := out/target/product/$(TARGET_PRODUCT)/system/etc file := $(ALSA_CONF_FILE)/asound.conf ALL_PREBUILT += $(file) $(file) : $(LOCAL_PATH)/asound.conf | $(ACP) $(transform-prebuilt-to-target)
B.4
vendor/beagle/AndroidProducts.mk
PRODUCT_MAKEFILES := \ $(LOCAL_DIR)/beagle.mk \section{vendor/beagle/beagle.mk} PRODUCT_PACKAGES := \ ApiDemos #here come our custom packages $(call inherit-product, build/target/product/core.mk) # Overrides PRODUCT_BRAND := fhnw PRODUCT_NAME := beagle PRODUCT_DEVICE := beagle
B.5
vendor/beagle/BoardConfig.mk
# config.mk # # Product-specific compile-time definitions. # BOARD_USES_GENERIC_AUDIO := true TARGET_CPU_ABI := armeabi USE_CAMERA_STUB := true BOARD_HAVE_BLUETOOTH := false TARGET_NO_BOOTLOADER := false TARGET_NO_KERNEL := true TARGET_NO_RADIOIMAGE := true
B.6
vendor/beagle/Android.mk
# This empty Android.mk file prevents the build system from # automatically including any other Android.mk files under this directory.
c 2010 FHNW/IA


![Android Test Automation Framework [Documentation]](https://kipdf.com/img/300x300/android-test-automation-framework-documentation_5ac525621723ddd7d0b9fd3f.jpg)