TECHNICAL PROCEDURE
TRAILER SUSPENSION SYSTEMS
SUBJECT: Non-delay Height Control Valve Installation Procedure LIT NO: L668 DATE: June 2016 REVISION: E
TABLE OF CONTENTS Service Notes........................................................................................................................................ 2 Contacting Hendrickson..................................................................................................................... 2 Introduction........................................................................................................................................... 2 Fitting Installation.................................................................................................................................. 2 Valve Mounting / Air Line Attachment...................................................................................................... 2 Ride Height Adjustment.......................................................................................................................... 3 Adjusting The Height Control Valve...................................................................................................... 3 Link Installation For Top-Mount Models................................................................................................... 5 Minor Valve Adjustment For Top Mount Models..................................................................................... 5 Link Installation For Low-Ride Models .................................................................................................... 6 HCV Assembly Exploded Views............................................................................................................... 6
Non-delay Height Control Valve Installation Procedure
SERVICE NOTES
FITTING INSTALLATION
This document focuses on the installation of the Height Control Valve (HCV). Before conducting any installation work: • Read and understand Hendrickson publication L496 Wheel-end Maintenance Procedures (available at www.Hendrickson-intl.com/TrailerLit), for additional safety information. • Read and understand applicable work instructions and safety information provided by the trailer manufacturer. • Always wear proper eye protection and other required personal protective equipment. • Park the trailer on a flat, level, debris-free surface. • Set the trailer parking brakes. • Chock the wheels of the trailer axles to prevent the trailer from moving.
1. If necessary, apply thread sealant onto the fitting threads (on some fittings it is pre-applied). IMPORTANT: Do not apply Teflon® tape to the fitting threads. The tape may contaminate the air system. 2. Install the supply and suspension fittings on the height control valve. IMPORTANT: Do not overtighten fittings onto the height control valve. Overtightening may damage the valve body.
VALVE MOUNTING / AIR LINE ATTACHMENT IMPORTANT: Before installing the height control valve, please review the drawings in the height control valve kit to determine the proper mounting and assembly.
CONTACTING HENDRICKSON
For any questions, contact Hendrickson Trailer Technical Services in the United States and Canada at 866-RIDEAIR (743‑3247) or email
[email protected].
When tightening the lock nuts on the height control valve mounting studs, DO NOT BACK OUT the studs from the height control valve body. Loosening the studs may cause the height control valve to leak.
INTRODUCTION
The height control valve maintains a constant ride height by automatically adding air to or exhausting air from the air suspension system.
1. Attach the air line(s) from the suspension air springs to the C1 and/or C2 port(s), shown in Figure 1 and Figure 2 on page 3. Ports C1 and C2 on the forward and rear face of the height control valve (or on the rear top and bottom face of the integral dump valve) are the suspension ports.
Hendrickson air suspensions only require one height control valve per trailer, regardless of the number of trailer axles. IMPORTANT: Unless approved in writing by the Hendrickson Engineering department, DO NOT use more than one height control valve per trailer. The use of more than one height control valve will void the Hendrickson warranty.
2. When using only one suspension port, plug the unused port with the 1/4‑inch NPT pipe plug provided in the height control valve kit.
This height control valve can be used in right-hand, left-hand, fore, aft and long- or short-control arm applications.
3. Attach the air supply line from the pressure protection valve to the supply port on the top of the height control valve (Figure 1 and Figure 2 on page 3). 4. Install the exhaust fitting into the exhaust port. 5. Tighten all the lines.
2
L668 E
Non-delay Height Control Valve Installation Procedure
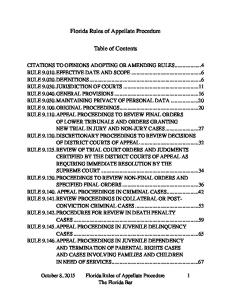
1 /4-20 Mounting studs
Part number
Suspension Port C2 (plug if necessary)
Break off at scored line if short control arm required
I/E Suspension port C1
Alignment hole I/E
NOTE: For port description, refer to Table 1.
Figure 1: Hendrickson OEM non-delay height control valve PORT I/E
DESCRIPTION In Exhaust
Supply air line, at top port. Exhaust port, must be on bottom.
C1 & C2 Delivery air line to suspension. One or both can be used. Plug unused port. DUMP
Emergency supply line. (If with dump option) Table 1: Control valve port assignments
Part number (not shown)
I/E
RIDE HEIGHT ADJUSTMENT
Determine recommended ride height by locating and reading the information on the identification tag, found on the suspension trailing arm.
/4-20 Mounting studs
1
Suspension port C1 (plug if not in use)
ADJUSTING THE HEIGHT CONTROL VALVE
Before adjusting ride height, the trailer should be unloaded and placed on a flat, level work surface. The trailer should be parallel to the work surface and supported by the landing gear legs or coupled to a tractor.
DUMP control port
I/E
1. Secure the vehicle. Chock the trailer wheels and release the trailer brakes.
Alignment hole
2. Pressurize the air system. Connect the trailer to a tractor or a compressed air supply with approximately the same pressure as the tractor’s air system. Check the valve connections for leaks.
Suspension port C2 (plug if not in use) NOTE: For port description, refer to Table 1. Figure 2: Hendrickson OEM non-delay height control valve with integral dump
L668 E
3
Non-delay Height Control Valve Installation Procedure 3. When the air system is fully inflated, measure the suspension ride height. A suspension’s ride height is defined as the distance from the suspension mounting surface (the bottom of the trailer or slider box) to the center of the axle. There are two easy ways to measure ride height:
4. Compare the measured ride height with the recommended or designed ride height (in other words, compare what you measured to what the ride height should be). NOTE: The recommended or designed ride height for all current Hendrickson trailer suspensions is listed on the suspension identification tag in the description line. Refer to Hendrickson literature number L977 Trailer Suspension and Axle ID Guide and L388 Ride Height Settings (available at www.Hendrickson‑intl.com/ TrailerLit).
A. Tape measure method i. Measure the distance from the top of the axle to the mounting surface of the suspension. ii. Add half of the axle diameter to this measurement to determine your suspension’s ride height. For example: on a suspension with a 5‑inch axle, add 21/2 inches (63.5 mm) to the measured distance, and on LDA™ Large-Diameter Axles (5.75-inch), add 27/8 inches (73 mm) to the measured distance.
If the designed ride height cannot be determined from the information on the identification tag, refer to CONTACTING HENDRICKSON on page 2. Fill position
B. Ride Height Gauge method
Raise
Control arm
Neutral position
Lower Figure 3: Hendrickson ride height gauges
i. Use a Hendrickson Ride Height Gauge (Figure 3) to measure the distance between the axle and the mounting surface of the suspension. A ride height gauge works with both 5‑inch and LDA (5.75-inch) axle diameters. Ensure the appropriate scale is being used when measuring.
Exhaust position Figure 4: Ride height adjustment
IMPORTANT: A minimum of 100 psi air pressure must be available to open the brake protection valve and allow air flow to the height control valve in the next step.
To order a Ride Height Gauge, contact the Hendrickson customer service department at 866-RIDEAIR (866-743-3247) and specify part number A-23442 (Ride Height Gauge for conventional, top-mount suspensions) or A-23445 (Ride Height Gauge for low-ride suspensions). 4
L668 E
Non-delay Height Control Valve Installation Procedure MINOR VALVE ADJUSTMENT FOR TOP MOUNT MODELS
5. If necessary, rotate the control arm on the height control valve up to raise or down to lower the suspension (Figure 4) until the distance between the suspension mounting surface and the axle center matches the recommended suspension ride height.
1. If a minor adjustment is necessary, loosen the locking nuts for the height control valve. 2. Rotate height control valve clockwise to increase ride height setting or counterclockwise to decrease ride height setting.
IMPORTANT: After setting the ride height, the control arm must remain in the neutral position.
3. Retighten the locking nuts after completing the minor adjustment.
6. Insert the wooden centering dowel into the control arm alignment hole and engage into the valve body (Figure 1 and Figure 2 on page 3).
4. Check ride height to ensure it is properly set.
LINK INSTALLATION FOR TOP-MOUNT MODELS NOTE: This section describes height control valve linkage installation for top-mount suspension models (AAT, AANT, AAZNT, HKAT or HKANT). Refer to Figure 6, Figure 7 or Figure 8 for installation details. For instructions on installing the height control valve on a low-ride suspension model (AAL, AANL, AAZL, HKAL, or HKARL), refer to the LINK INSTALLATION FOR LOW-RIDE MODELS section. 1. Fasten half the link to the height control valve control arm and the other half to the lower mounting bracket with the provided shoulder bolts. NOTICE: Ensure that the links rotate freely and do not bind. If the links do not rotate freely it can result in damage to the link, brackets and/or suspension. NOTICE: Ensure the height control valve linkage is vertical when viewed from the rear of the suspension. 2. Tighten the ¼‑inch locking nut onto the 5/16‑inch shoulder bolt until snug. 3. Rotate the halves until they are side by side and line up the nearest set of holes on both halves. 4. Install the #10-24 screws that are provided in the kit. 5. Remove the wooden centering dowel. 6. Verify the ride height setting. L668 E
5
Non-delay Height Control Valve Installation Procedure
LINK INSTALLATION FOR LOW-RIDE MODELS
3. Set the suspension at the proper ride height by moving the control arm up to fill the air springs or down to exhaust the air springs.
(Includes: INTRAAX® AAL and AANL fixed primary, VANTRAAX® HKAL and HKARL slider and INTRAAX-SP AAZL slider suspension models)
4. With the suspension at ride height, insert the wooden centering dowel into the alignment hole, preventing the control arm from moving.
LINK LENGTH CHART Ride Height
5. Install the link on the height control valve control arm with the fasteners provided in the kit.
Link Length
Inch
mm
Inch
mm
6.5
165
3.5
89
7.5
191
3.5
89
9
229
3.5
89
10
254
3.5
89
11
279
6.25
159
12
305
6.25
159
14
356
5.5
140
15
381
6.25
159
16
406
9.25
235
17
432
10
254
6. Install the bracket and band clamp loosely on the axle. 7. Position the bracket on the axle, so the height control valve link is vertical. 8. Rotate the bracket and band clamp around the axle until the bracket mounting hole and the link mounting hole line up. 9. Install the link fastener and tighten the lock nut. Tighten the band clamp to 55±5 ft. lbs. (75±6 Nm) of torque.
Table 2: Determining Link Length
IMPORTANT: When tightening the band clamp, AVOID CHANGING the position of the bracket.
1. Assemble the height control valve link to the length (Table 2). Lengths in the chart are from center to center of the mounting holes (Figure 5).
HCV ASSEMBLY EXPLODED VIEWS
The following sample HCV assembly exploded views are examples only. For more up-to-date information and details, please refer to installation drawings1 provided with HCV kits.
Lengths in chart are from center to center of mounting holes
Figure 5: Measurement points for low-ride link lengths
2. Install the height control valve to the suspension as shown in Figure 9 and the drawings provided with the kit.
1
6
Installation drawings are provided with each HCV kit and supersede information in this document. They are also available online at www.Hendrickson-intl.com/TrailerLit. If unavailable, refer to CONTACTING HENDRICKSON on page 6. L668 E
Non-delay Height Control Valve Installation Procedure
IMPORTANT: For all HT™ Series suspensions, except the HT250US, mount the non-delay height control valve directly to the suspension frame bracket. Bolted link
/16‑inch shoulder bolt
5
5
/4‑inch NPT tube fitting
1
1 /4-20 locking nut
/16‑inch flat washer
#10-24 lock nuts (x2) Torque to 40 in. lbs. (5 Nm) /4‑inch NPT tube fitting
1
Bolted link Height control valve
1 /4‑inch NPT plug
#10 flat washers (x2) 5 /16‑inch shoulder bolt
#10-24 lock nuts (x2) /4-20 hex head bolts (x2)
1
Spacer bracket
/4-20 locking nut Torque to 7 ft. lbs. (10 Nm) 1
/16‑inch flat washer
5
1 /4-20 locking nuts (x4)
Exhaust fitting Exhaust tube
Port C1
To air springs
To supply reservoir Lower Brackets (Refer to applicable suspension installation drawing)
Port C2 AAL AANT To exhaust HT250US
Figure 6: HCV assembly for INTRAAX® AAL, AANT and HT250US suspensions L668 E
7
Non-delay Height Control Valve Installation Procedure
Height control valve bracket
/4-20 locking nuts (x4)
1
/4‑inch NPT tube fitting
1
1 /4-20 locking nut Torque to 7 ft. lbs. (10 Nm)
Bolted link /16‑inch flat washer
5
5 /16‑inch shoulder bolt
1 /4‑inch NPT plug
1 /4-20 hex head bolts (x2)
#10-24 lock nuts (x2) Torque to 40 in. lbs. (5 Nm)
Height control valve
#10 flat washers (x2)
Exhaust fitting
Exhaust tube
5 /16‑inch shoulder bolt 5
/4-20 locking nut
1
/16‑inch flat washer
To supply reservoir Port C1 To air springs
Port C2 To exhaust Bracket
Figure 7: HCV assembly for VANTRAAX® HKANT suspensions
8
L668 E
Non-delay Height Control Valve Installation Procedure
/4-20 locking nuts (x2)
1
/4‑inch NPT tube fitting
1
/4‑inch NPT plug
1
Height control valve bracket
Torque to 55±5 ft. lbs. (75±6 Nm)
/4‑inch NPT tube fitting
1
/4-20 locking nut
1
Bolted link /16‑inch flat washer
5
5 /16‑inch shoulder bolt
/4-20 locking nuts (x2) 1
/4‑inch NPT tube fitting
1
Height control valve #10-24 lock nuts (x2) Torque to 40 in. lbs. (5 Nm) #10-24 bolts (x2)
Exhaust fitting
#10 flat washers (x2)
Exhaust tube 1 /4-20 locking nut Torque to 7 ft. lbs. (10 Nm)
/16‑inch shoulder bolt 5
5 /16‑inch flat washer
Bracket Port C1 To emergency / supply glad hand (dump control) Dump To supply reservoir Port C2 To exhaust To air springs
Figure 8: Integral dump HCV assembly for VANTRAAX® HKANT suspensions L668 E
9
Non-delay Height Control Valve Installation Procedure Bolted link
/16‑inch shoulder bolt
5
5
/16‑inch flat washer /4‑inch NPT plug 1
/4‑inch NPT tube fitting
1
1 /4-20 locking nut
#10-24 lock nuts (x2) Torque to 40 in. lbs. (5 Nm)
Height control valve
Bolted link
#10 flat washers (x2)
5 /16‑inch shoulder bolt
#10-24 lock nuts (x2)
/16‑inch flat washer
5
/4-20 hex head bolts (x2)
1
Spacer bracket
1 /4-20 locking nut Torque to 7 ft. lbs. (10 Nm)
1 /4-20 locking nuts (x4)
Exhaust fitting Exhaust tube
To supply reservoir
Band clamp
Port C1
To air springs
Port C2 To exhaust
Figure 9: HCV assembly for INTRAAX®-SP AAZL suspensions
10
L668 E
L668 E
Non-delay Height Control Valve Installation Procedure
11
Call Hendrickson at 866.RIDEAIR (743.3247) for additional information.
www.hendrickson-intl.com L668 Rev E 06-16 ECN 24726
Rev D 08-09 ECN 18242
TRAILER COMMERCIAL VEHICLE SYSTEMS 2070 Industrial Place SE Canton, OH 44707-2641 USA 866.RIDEAIR (743.3247) 330.489.0045 • Fax 800.696.4416 Rev C 04-06 ECN 14747 Rev B 01-01
Hendrickson Canada 250 Chrysler Drive, Unit #3 Brampton, ON Canada L6S 6B6 800.668.5360 905.789.1030 • Fax 905.789.1033
Hendrickson Mexicana Circuito El Marqués Sur #29 Parque Industrial El Marqués Pob. El Colorado, Municipio El Marqués, Querétaro, México C.P. 76246 +52 (442) 296.3600 • Fax +52 (442) 296.3601
Rev A 06-99
Information contained in this literature was accurate at the time of publication. Product changes may have been made after the copyright date that are not reflected.
© 2016 Hendrickson USA, L.L.C. All Rights Reserved
Printed in United States of America