Supporting Processors Lecture 8
Supporting Processors • Learn about the characteristics and purposes of Intel and AMD processors used for personal computers • Learn about the methods and devices for keeping a system cool • Learn how to install and upgrade a processor • Learn how to solve problems with the processor, the motherboard, overheating, and booting the PC
2
Types and Characteristics of Processors • Processor – Installed on motherboard – Determines system computing power
• Two major processor manufacturers – Intel and AMD
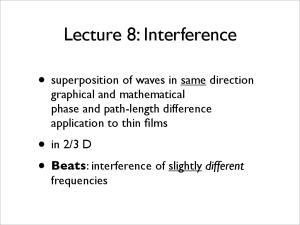
Figure 6-1 An AMD Athlon 64 X2 installed in socket AM2+ with cooler not yet installed 3
Types and Characteristics of Processors (cont’d.) • Features affecting processor performance and motherboards – – – – – – – –
System bus speeds the processor supports Processor core frequency Motherboard socket and chipset Multiprocessing ability Memory cache Amount and type of DDR, DDR2, DDR3 memory Computing technologies the processor can use Voltage and power consumption 4
How a Processor Works • Three basic components – Input/output (I/O) unit • Manages data and instructions entering and leaving the processor
– Control unit • Manages all activities inside the processor
– One or more arithmetic logic units (ALUs) • Performs all logical comparisons, calculations
5
Figure 6-2 Since the Pentium processor was first released in 1993, the standard has been for a processor to have two arithmetic logic units so that it can process two instructions at once 6
How a Processor Works (cont’d.) • Registers – Small holding areas on processor chip • Holds counters, data, instructions, and addresses ALU is currently processing
• Processor internal memory caches (L1, L2, L3) – Holds data and instructions to be processed by ALU
• Busses – Front-side bus (FSB) – Internal – Back-side bus (BSB) 7
How a Processor Works (cont’d.) • Processor frequency (speed) – Speed at which processor operates internally
• Multiplier – Factor multiplied against system bus frequency • Determines processor frequency
– System bus frequency × multiplier = processor frequency
• Motherboard firmware – Automatically detects processor speed, adjusts system bus speed accordingly 8
How a Processor Works (cont’d.) • Overclocking – Running motherboard or processor at higher speed than manufacturer suggests – Override default frequencies • Change setting in BIOS setup
– Disadvantages • Overheating • Voids most warranties • Not recommended in business environment
9
How a Processor Works (cont’d.) • Throttling – Offers some protection against overheating • Throttle down, shut down system prevents permanent processor damage
– Reduces power consumption when demands low – PowerNow! by AMD – Enhanced Intel SpeedStep Technology (EIST) by Intel
10
How a Processor Works (cont’d.) • Three methods to improve performance – Multiprocessing • Processor contains more than one ALU
– Multiple processors • Installing more than one processor on a motherboard
– Multi-core processing • Processor housing contains two or more cores operating at same frequency, independently of each other • Dual core, triple core, quad core, octo core
11
Figure 6-4 Quad-core processing with L1, L2, and L3 cache and the memory controller within the processor housing
12
How a Processor Works (cont’d.) • Memory cache (L1, L2, or L3) – Holds anticipated data and instructions needed by controller – Improves performance – Static RAM (SRAM) • Holds data as long as power on • Lets processor bypass slower dynamic RAM (DRAM)
• Memory controller – Included in processor package – Significant increase in system performance 13
Figure 6-5 Cache memory (SRAM) is used to temporarily hold data in expectation of what the processor will request next 14
How a Processor Works (cont’d.) • Instruction set – Microcode used for basic operations
• Processor computing technologies – MMX (Multimedia Extensions) and SSE(Single instruction, multiple data ) (Streaming SIMD Extension) – 3DNow! and SSE2 – Intel Hyper-Threading and AMD HyperTransport – PowerNow! and Cool’n’Quiet – Enhanced Intel SpeedStep Technology (EIST) – Execute Disable Bit – 32-bit and 64-bit instructions, operating systems 15
Intel Processors
Table 6-1 Current Intel processors 16
Intel Processors (cont’d.)
Table 6-1 Current Intel processors (continued)
17
Intel Processors (cont’d.) • Processor identification – Processor number • Example: Core 2 Quad processors • Use five-character value beginning with “Q”
– eSpec number printed on processor • Intel Processor Spec Finder site identifies exact processor
• Centrino technology improves laptop performance – Processor, chipset, wireless network adapter interconnected as a unit
18
AMD Processors
Table 6-2 Current AMD processors 19
Cooling Methods and Devices • Processor overheating results – Processor damage and instability
• Entire system overheating results – Sensitive electronic component damage
• Devices used to keep system cool – CPU fans, case fans, coolers, heat sinks, liquid cooling systems, dust-preventing tools
• Important – Keep processor and entire system cool 20
Coolers, Fans, and Heat Sinks • Cooler sits on top of processor • Maintains 90–110 degrees F temperature
– – – – –
Consists of fan, heat sink Made of aluminum, copper, combination of both Bracketed to motherboard using wire, plastic clip Thermal compound eliminates air pockets Fan power cord connects to 4-pin fan header
21
Coolers, Fans, and Heat Sinks (cont’d.)
Figure 6-9 A cooler sits on top of a processor to help keep it cool
22
Figure 6-11 Thermal compound is already stuck to the bottom of this cooler that was purchased boxed with the processor
Figure 6-12 A cooler fan gets its power from a 4-pin PWM header on the motherboard
23
Case Fans and Other Fans and Heat Sinks • Rear case fan draws air out of the case – High-end systems have seven or eight fans
• BTX form factor: fewer fans required • Ball-bearing case fans last longer • Cooling graphic cards – – – –
Some come with with fan on side Heat sinks or fans to mount on card may be used Fan card mounted next to graphics card may be used For additional cooling consider a RAM cooler 24
Liquid Cooling Systems • Exotic systems hobbyists use for overclocking – Refrigeration • Units containing small refrigerator compressor inside case • Can reduce temperatures to below zero
– Peltiers • Heat sink carrying an electrical charge • Acts as an electrical thermal transfer device
– Water coolers (most popular) • Small pump sits inside computer case • Tubes move liquid around components and away from them where fans cool the liquid 25
Dealing with Dust • Dust insulates PC parts like a blanket – Causes overheating
• Dust inside fans – Jams fans, causing overheated system
• Ridding PC of dust – Make it a part of regular preventive maintenance – Tools • Antistatic vacuum • Compressed air
26
Selecting and Installing a Processor • PC repair technician tasks – – – –
Assemble PC from parts Exchange faulty processor Add a processor Upgrade existing processor
• Must know how to: – Match processor to system – Install processor on motherboard
27
Select a Processor to Match System Needs • First requirement – Select processor motherboard is designed to support
• Select best processor meeting general system requirements and user needs – May have to sacrifice performance for cost
• General steps – Read motherboard documentation – Select processor by comparing processors board supports – Select cooler assembly 28
Install a Processor • Installing an Intel processor in socket 1366 – – – – – – – – –
1. Read and follow all directions 2. Use a ground bracelet 3. Open the socket 4. Lift socket load plate 5. Remove socket protective cover 6. Remove processor protective cover 7. Lower processor straight down into the socket 8. Verify processor aligned correctly in the socket 9. Return lever to its locked position 29
Install a Processor (cont’d.) • Installing an Intel processor in socket 1366 (cont’d.) – General steps to install the cooler • • • • •
Understand how cooler posts work Apply thermal compound if necessary Verify locking pins turned perpendicular to heat sink Align cooler over the processor Push down on each locking pin until it pops into the hole • Connect power cord from cooler fan to motherboard
– Check BIOS setup to verify the system recognized processor after system up and running 30
Install a Processor (cont’d.) • Installing an Intel processor in socket 775 – Socket 775 has a lever and socket cover – Summary of installation steps • • • • • •
1. Use ground bracelet, read all directions 2. Release lever from the socket, lift socket cover 3. Place processor in the socket 4. Close the socket cover 5. Apply thermal compound and install cooler 6. Connect fan power cord to power connection
– After components installed, verify system works 31
Install a Processor (cont’d.) • Installing an Intel processor in socket 478 – Similar to socket 775 installation – Summary of installation steps • 1. Open the socket, open the load plate, carefully install the processor, return lever to its position • 2. Apply thermal compound and install cooler • 3. Connect fan power cord to power connection
– After components installed, verify system works
32
Install a Processor (cont’d.) • Installing an AMD processor in socket AM2+ – Summary of installation steps • • • • • • •
1. Use ground bracelet, read all directions 2. Open the lever 3. Place processor in the socket 4. Verify processor pins sitting slightly into the holes 5. Press the lever down and gently into position 6. Apply thermal compound and install cooler 7. Connect fan power cord to power connection
– After components installed, verify system works 33
BIOS Power Management Settings for the Processor • Advanced Configuration and Power Interface (ACPI) – Current power management standards • Used by BIOS, hardware, and OS
– Four modes indicate power-saving function levels • S1 state: hard drive, monitor turned off and everything else runs normally • S2 state: hard drive, monitor, processor turned off • S3 state: everything shut down except RAM and enough of the system to respond to a wake-up call • S4 state: everything in RAM copied to hard drive file, then system shuts down (hibernation) 34
BIOS Power Management Settings for the Processor (cont’d.) • ACPI defines CPU P states – Saves power by lowering CPU frequency, voltage – P0 has highest frequency • Higher P state values have lower frequencies
– EIST, PowerNow! • Implements P states if enabled in BIOS setup • If enabled in BIOS, P states are controllable by Windows power management
35
BIOS Power Management Settings for the Processor (cont’d.) • ACPI defines C states – Processor stops its internal operations • Conserves power
– C0 state: processor can execute an instruction – C1 though C6 states • Processor shuts down various internal components
– Deeper the C state, the longer it takes for processor to wake up – Mobile processors usually offer more C states than desktop processors – Feature must be enabled in BIOS 36
Summary • Processor: most important motherboard component – – – –
Basic CPU components: I/O unit, control unit, ALUs Registers: high speed memory used by ALU Internal cache: holds frequently used instructions CPU bus: internal and external
• Overclocking – Running system bus or processor at a faster frequency than recommended
• Throttling offers some protection against overheating 37
Summary (cont’d.) • Multiprocessing, multiple processors, and multi-core processing improve CPU performance • Memory cache (L1, L2, or L3) – Holds anticipated data and instructions – Made of static RAM chips
• Instruction set – Microcode used for basic operations
• Various Intel and AMD processors available • Many cooling options available • Match processor to system to install. 38