Standard Operating Procedure Equipment / Procedure:
Anthropometry Equipment (general)
Filename:
2013.0801SOP_anthropometry_equipment
Assessor’s name & date: Reviewer’s name & date: Review Date:
Andreas Wallbaum, 13/12/2012 Sarah Churchill, 01/08/2013 Aug 2015
2013.0801SOP_anthropometry_equipment
Standard Operating Procedure Anthropometry Equipment Safety Information: This SOP covers all the anthropometry equipment in the ABS lab. One should have completed the necessary competency training or have been briefed in their correct use by a member of staff. Equipment covered: 1. 2. 3. 4. 5. 6. 7. 8.
* Items are kept in the black anthropometry case. Holtain Stadiometer: To measure the height of the participant: Ensure that the stadiometer head plate is higher than they are. Move it slowly (never quickly) Ensure that the participant is in bare feet and that they have their back and head pressed gently against the blue back board. With feet together, heels on the white line, looking forward with eye line horizontal to floor. Bring the head plate down slowly on to the top of their head. Read off the measurement in mm and record. Move head plate back slowly back into a high position and have the participant step away. Cross check the stadiometer regularly with a steel tape measure over several heights to ensure it is giving correct results. 2013.0801SOP_anthropometry_equipment
Weylux 424 Sliding Beam Column Scale: It is up to the researcher to determine if the participant is to be clothed or (partially) naked. Maximum weighing capacity is 160kg. With the Lock lever down in the 6 o’clock position, have the participant step up gently on to the weighing platform. Have them stand steady with their arms by their side and looking forward on the weighing plate. Approximate their weight and lift and slide the large weight to that position (in kg). Unlock the lever by slowly moving it to the 9 o’clock position. Slide the small weight until the red balance arrow aligns with the neighbouring red arrow (at left hand side of machine). If the small weight goes right to the end of the scale without the balance moving, slide it back to 0 and move the large weight up by a further 10kg. Once again try moving the small weight until the two arrows align. This will be the weight of the participant in kilograms and grams. Set the lock lever back to 6 o’clock, have the participant step slowly off and move both weights back to zero. Seca 880 electronic portable scales: Operation is similar to that of a standard set of bathroom weighing scales. If unsure how to use this device then please read the user manual which can be found in the protective carry bag. Rosscraft Campbell Calliper 20: Torso breadths such as acromial, transverse chest etc. is obtained with straight branches. AP Chest, and some head measurements are made using the AP (Extension Pointers) with olive tips. These are exactly 10 cm each (and can be calibrated using the adjustable screw and lock nut). Thus the calliper reading from AP tips will be 20 cm too large (easily corrected by subtracting 20 cm). This calliper works on the Vernier measurement principal.
2013.0801SOP_anthropometry_equipment
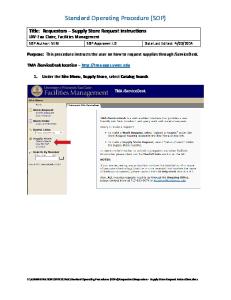
Open the calliper branches and close them gently together on the area of interest. In the measurement window you will see two scales. One major scale (min 100mm up to a max of 560mm) and one minor scale (0 to 10). Both are used in conjunction with each other to give you an accurate measurement with a resolvable resolution down to 0.1mm. To avoid any parallax errors, read the scale directly head-on. Look firstly at the major scale and then see which of the minor scale lines matches up the best with the major scale lines. In this example we know that the object is between 220 and 240mm because the secondary scale falls between the 22 and the 24. major scale
minor scale
We know that it must be between 220 and 221mm because the 0 on the minor scale is just beyond the 22 (220) but just before the next mark on the scale. The line on the minor scale that best matches up with one on the major scale looks to be the 5. Meaning that the actual measurement must be 220.5mm. Rosscraft Tommy 2 Calliper:
2013.0801SOP_anthropometry_equipment
This is the smaller of the two callipers with a measuring range of just 23mm to 143mm. The principal of measuring body parts for this device is similar to that of the larger calliper but it does not have AP extensions and does not use the Vernier principal for measuring. A simple scale (to mm resolution) is all that is used (much like a steel tape measure). MIE Clinical Goniometer: Principal of Operation: This device is quite similar in principal to how a compass works where the needle always points north. The Clinical Goniometer however uses gravity as its reference and thus must be used vertically. Instead of a needle there is a semi-circular column of coloured fluid, the two ends of which are always level with each other. The dial is turned so that the arrow points to the meniscus at the top of the fluid column. Angles relative to the horizontal can now be measured by reading the dial where the meniscus crosses it. General Instructions: Maximum accuracy is obtained by always: o Holding the Goniometer so that the dial is vertical. o Reading the dial from the bottom of the meniscus of the left side of the fluid column. o Ensuring the Goniometer does not move with respect to the limb being tested.
2013.0801SOP_anthropometry_equipment
To set true zero
To set zero
Reading measured angle
To set zero: o With the joint in the neutral position, place the Goniometer on the measurement site. o Rotate dial until the arrow is pointing to the bottom of the meniscus. o The Goniometer is now calibrated for measuring the range of motion of the chosen joint. To set true zero: o Stand Goniometer on its side or end on a flat, horizontal surface. o Rotate dial until the arrow is pointing to the bottom of the meniscus. o The Goniometer is now ready calibrated for reading the true angle to the horizontal or vertical. Reading measured angle: o With the limb in the desired position read the angle at the meniscus. o Use the outer scale for anti-clockwise movements. o Use the inner scale for clockwise movements. For a thorough set of Goniometer placements. See the large poste kept inside the black anthropometry case. Protractor based Goniometer: Principal of Operation: This is essentially a clear plastic protractor disc with two plastic arms whereby one of the arms is fixed to the protractor part and the other arm free to rotate about the central axis. Unlike the fluid filled Goniometer it does not require zeroing calibration. 2013.0801SOP_anthropometry_equipment
General Instructions: Place the protractor disc on a joint centre with the fixed arm running centrally along one part of the limb. Move the other (free) arm until it also runs centrally along the other part of the limb to be measured. The measurement you read will be in degrees and will be a relative measure. Rabone 2m steel tape measure: Narrow steel 2m tape measure (mm resolution) used for measuring limb lengths and girths. Please do not let the spring loaded tape snap back into its holder.