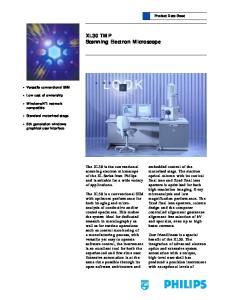
Scanning Electron Microscope (FEI Nova NanoSEM 2300) September 2010
FEI Nova NanoSEM 2300 Filament Column
EDAX Eucentric Height (5 mm)
Condenser Lenses Lens Aperture
Detector
Specimen Chamber
Manual Stage Controls
No magnetic samples for immersion mode; for inquiries contact
[email protected] Specimen Chamber
Home stage Click Stage. Home stage with rotation.
Note: Never connect internet to these two computers and use usb drive to transfer files. Note: Turn off computer to reboot if any software freeze occurs during an experiment. Note: Never touch any button on the front panel or the control panel, report problems.
Single versus Quad Images Toggle between highlighted window and quad view with F5 (Only windows 1 and 4 are available.) 1. Activate window by clicking on it; panel will turn blue.
2. Unpause window by clicking on pause icon at top of screen.
1) Secondary Electrons
2) Backscatter (N/A)
3) Combination (N/A)
4) Camera
Load sample 1. Blow samples with the nitrogen gun before loading samples.
2. Put gloves on and select Vent in the Vacuum submenu. If chamber takes longer than 1 minute to vent, click Pump and notify Instrument Manager. 3. Insert sample stub and tighten using locking screw. 4. Close the chamber door and select Pump. Always wear gloves when loading samples into the chamber. Load sample while nitrogen purge is active to avoid chamber contamination. Do not over-tighten the locking screw, finger tight is adequate.
Start-up Procedure – Pump chamber with sample 1. Wait for chamber to reach desired pressure. Bottom half of icon will turn green when chamber under vacuum.
Start-up Procedure – Establish Coordinates
Open Coordinates to view coordinates on stage (X:0, Y:0 is center).
Start-up Procedure – continued 1. Select proper accelerating voltage and spot size for your sample. Note: Lower kV (3-5) is better for non conducting samples High kV (>10) is better for conducting samples Adjust spot size here Adjust high voltage here 10 kV
2. Turn on the accelerating voltage by clicking on HV button 3. Auto adjust brightness and contrast (F9).
Calibration of Working Distance and Stage Adjustment This is a crucial step that should be conducted very carefully. If the calibration is not performed properly, the microscope can be seriously damaged.
WD: (Working distance) Distance between focal plane and nose piece Z: Distance between sample and nose piece. 1. Focus on the sample with > 2000 X magnification. 2. Click to link Z and WD. 3. Move sample stage up close to 5 mm mark by clicking center button and dragging upward. Do not go past the 5 mm mark. 4. Focus on the sample with > 2000 X magnification at 5 mm. Click to link Z and WD. Magnification is controlled by changing “+” or “-” on the keyboard. The focus can be adjusted by moving the mouse to the left and to the right while pressing the right-button of the mouse Make sure your image looks as focused as possible
Operating Parameters
Field-Free (ETD): Use for imaging large areas or finding your sample. (All samples.) Immersion (TLD): No magnetic samples. Use for higher resolution imaging; only works at certain working distances. WD: 5 mm for 1-15 kV; 6.5 for 20 kV; 6.7 for 30 kV EDX: universal samples, use for elemental analysis (refer to EDS manual).
Beam Optimization – Lens Alignment Select Live mode (Scan/Live)
Select
and Align Tab.
1. Click on “Modulator” in Lens Align and drag on the crossbars to correct image translation. The image should pulse in and out but not move side to side. 1. Right click on modulator and adjust sensitivity to “Fine” to make any final adjustments. Final image should oscillate in/out of focus. Turn off lens modulator.
Beam Optimization – Stigmation Adjustment 1. Obtain best possible focus on image. Image should not be elongated in either direction (see examples below) 2. Right click on the beam shift window to zero out beam shift 3. Drag stigmator cross bars to adjust X & Y until image resolution is well defined. 4. Re-focus image by dragging right mouse button left and right
Unfocused image with severe beam stigmation
Properly focused image with severe beam stigmation
Image Acquisition and File Saving Preset scans: photo (F2, high res) and snapshot (F4, medium res) Scan and capture: pause button Average: useful to non-conductive samples. Integrate: adds up frames to single averaged image. Save files as TIF/JPG/BMP.
Shutdown Procedures 1. Click HV to turn off accelerating voltage. 2. Activate Quad 4 and Unpause. 3. Select Vent in Vacuum. 4. Wait for specimen chamber to come up to atmospheric pressure. With gloved hands, loosen set screw and take out sample stub. 5. Close the chamber door. 6. Select Pump in Vacuum. Wait for chamber vacuum status to turn green. .