s3200xl MIDI STEREO DIGITAL SAMPLER
WARNING To prevent fire or shock hazard, do not expose this appliance to rain or moisture.
Operator’s Manual
WARNING!! To prevent fire or shock hazard, do not expose this appliance to rain or moisture.
1-En
CAUTION RISK OF ELECTRIC SHOCK DO NOT OPEN
CAUTION: TO REDUCE THE RISK OF ELECTRIC SHOCK DO NOT REMOVE COVER (OR BACK). NO USER-SERVICEABLE PARTS INSIDE. REFER SERVICING TO QUALIFIED SERVICE PERSONNEL.
THE SYMBOLS ARE RULED BY UL STANDARDS (U.S.A.) The lightning flash with the arrowhead symbol superimposed across a graphical representation of a person, within an equilateral triangle, is intended to alert the user to the presence of uninsulated “dangerous voltage” within the product’s enclosure; that may be of sufficient magnitude to constitute a risk of electric shock. The exclamation point within an equilateral triangle is intented to alert the user to the presence of important operating and maintenance (servicing) instructions in the literature accompanying the appliance.
5A-En
WARNING WARNING The S3200XL is designed to be used in a standard household environment. Power requirements for electrical equipment vary from area to area. Please ensure that your S3200XL meets the power requirements in your area. If in doubt, consult a qualified electrician or Akai Professional dealer. 120 VAC 220~230/240 VAC 240 VAC
@ 60 Hz for USA and Canada @ 50 Hz for Europe @ 50 Hz for Australia
PROTECTING YOURSELF AND THE S3200XL • Never touch the AC plug with wet hands. • Always disconnect the S3200XL from the power supply by pulling on the plug, not the cord. • Allow only an Akai Professional dealer or qualified professional engineer to repair or reassemble the S3200XL. Apart from voiding the warranty, unauthorized engineers might touch live internal parts and receive a serious electrical shock. • Do not put, or allow anyone to put any object, especially metal objects, into the S3200XL. • Use only a household AC power supply. Never use a DC power supply. • If water or any other liquid is spilled into or onto the S3200XL, disconnect the power, and call your dealer. • Make sure that the unit is well-ventilated, and away from direct sunlight. • To avoid damage to internal circuitry, as well as the external finish, keep the S3200XL away from sources of direct heat (stoves, radiators, etc.). • Avoid using aerosol insecticides, etc. near the S3200XL. They may damage the surface, and may ignite. • Do not use denaturated alcohol, thinner or similar chemicals to clean the S3200XL. They will damage the finish. • Modification of this equipment is dangerous, and can result in the functions of the S3200XL being impaired. Never attempt to modify the equipment in any way. • Make sure that the S3200XL is always well-supported when in use (either in a speciallydesigned equipment rack, or a firm level surface). • When installing the S3200XL in a 19" rack system, always allow 1U of ventilated free space above it to allow for cooling. Make sure that the back of the rack is unobstructed to allow a clear airflow. • In order to assure optimum performance of your S3200XL, select the setup location carefully, and make sure the equipment is used properly. Avoid setting up the S3200XL in the following locations: 1. In a humid or dusty environment 2. In a room with poor ventilation 3. On a surface which is not horizontal 4. Inside a vehicle such as a car, where it will be subject to vibration 5. In an extremely hot or cold environment
S3200XL Operator’s Manual - Version 1.00
i
WARNING
WARNING THIS APPARATUS MUST BE EARTHED IMPORTANT This equipment is fitted with an approved non-rewireable UK mains plug. To change the fuse in this type of plug proceed as follows: 1) Remove the fuse cover and old fuse. 2) Fit a new fuse which should be a BS1362 5 Amp A.S.T.A or BSI approved type. 3) Refit the fuse cover. If the AC mains plug fitted to the lead supplied with this equipment is not suitable for your type of AC outlet sockets, it should be changed to an AC mains lead, complete with moulded plug, to the appropriate type. If this is not possible, the plug should be cut off and a correct one fitted to suit the AC outlet. This should be fused at 5 Amps. If a plug without a fuse is used, the fuse at the distribution board should NOT BE GREATER than 5 Amp. PLEASE NOTE:
THE SEVERED PLUG MUST BE DESTROYED TO AVOID A POSSIBLE SHOCK HAZARD SHOULD IT BE INSERTED INTO A 13 AMP SOCKET ELSEWHERE.
The wires in this mains lead are coloured in accordance with the following code: GREEN and YELLOW
— EARTH
BLUE
— NEUTRAL
BROWN
— LIVE
As the colours of the wires in the mains lead of this apparatus may not correspond with the coloured markings identifying the terminals in your plug, please proceed as follows: The wire which is coloured GREEN and YELLOW must be connected to the terminal which is marked with the letter E or with the safety earth symbol or coloured GREEN or coloured GREEN and YELLOW. The wire which is coloured BLUE must be connected to the terminal which is marked with the letter N or coloured BLACK. The wire which is coloured BROWN must be connected to the terminal which is marked with the letter L or coloured RED.
THIS APPARATUS MUST BE EARTHED Ensure that all the terminals are securely tightened and no loose strands of wire exist. Before replacing the plug cover, make certain the cord grip is clamped over the outer sheath of the lead and not simply over the wires.
6D-En
VENTILATION Do not prevent the unit's ventilation, especially by placing the unit on the soft carpet, in a narrow space, or by placing objects on the unit's chassis—top, side, or rear panels. Always keep the unit's chassis at least 10 centimeters from any other objects.
31C-En
This equipment conforms to No.82/499/EEC, 87/308 EEC standard.
3A-En
CONFORME AL D.M. 13 APRILE 1989 DIRETTIVA CEE/87/308
3B-It ii
S3200XL Operator’s Manual - Version 1.00
WARNING
CHANGES OR MODIFICATIONS NOT EXPRESSLY APPROYED BY THE MANUFACTURER FOR COMPLIANCE COULD VOID THE USER’S AUTHORITY TO OPERATE THE EQUIPMENT.
32-En
FCC WARNING This equipment has been tested and found to comply with the limits for a Class B digital device pursuant to Part 15 of the FCC rules. These limits are designed to provide reasonable protection against harmful interference in a residential installation. This equipment generates, uses, and can radiate radio frequency energy and, if not installed and used in accordance with the instructions, may cause harmful interference to radio communications. However, there is no guarantee that interference will not occur in a particular installation. If this equipment does cause harmful interference to radio or television reception, which can be determined by turning the equipment off and on, the user is encouraged to try to correct the interference by one or more of the following measures: •
Reorient or relocate the receiving antenna.
•
Increase the separation between the equipment and receiver.
•
Connect the equipment into an outlet on a circuit different from that to which the receiver is connected.
•
Consult the dealer or an experienced radio/TV technician for help.
21B-En
AVIS POUR LES ACHETEURS CANADIENS DU S3200XL Le présent appareil numérique n’ément pas de bruits radioélectriques dépassant les limites applicables aux appareils numériques de la Class B prescrites dans le Règlement sur le brouillage radioélectrique édicté par le ministère des Communications du Canada.
27-F
This digital apparatus does not exceed the Class B limits for radio noise emissions from digital apparatus set out in the Radio Interference Regulations of the Canadian Department of Communications.
27-En
FÜR KUNDEN IN DER BUNDESREPUBLIK DEUTSCHLAND Bescheinigung von AKAI Hiermit wird bescheinigt, daß das Gerät AKAI S3200XL in Übereinstimmung mit den Bestimmungen der Amtsblattverfügung 1046/1984 funkentstört ist. Der Deutschen Bundespostwurde das Inverkehrbringen dieses Gerätes angezeigt und die Berichtigung zur Überprüfung der Serie auf Einhaltung der Bestimmungen eingeräumt. AKAI ELECTRIC CO., LTD.
17B-G COPYRIGHT NOTICE The AKAI S3200XL is a computer-based device, and as such contains and uses software in ROMs. This software, and all related documentation, including this Operator’s Manual, contain proprietary information which is protected by copyright laws. All rights are reserved. No part of the software or its documentation may be copied, transferred or modified. You may not modify, adapt, translate, lease, distribute, resell for profit or create derivative works based on the software and its related documentation or any part there of without prior written consent from AKAI Electric Co. Ltd, Tokyo, Japan. S3200XL Operator’s Manual - Version 1.00
iii
WARANTY WARRANTY AKAI Electric Co. Ltd. warrants its products, when purchased from an authorized “AKAI professional” dealer, to be free from defects in materials and workmanship for a period of 12 (twelve) months from the date of purchase. Warranty service is effective and available to the original purchase only, and only on completion and return of the AKAI Warranty Registration Card within 14 days of purchase. Warranty coverage is valid for factory-authorized updates to AKAI instruments and their software, when their installation is performed by an authorized AKAI Service Center, and a properly completed Warranty Registration has been returned to your “AKAI professional” dealer. To obtain service under this warranty, the product must, on discovery of the detect, be properly packed and shipped to the nearest AKAI Service Center. The party requesting warranty service must provide proof of original ownership and date of purchase of the product. If the warranty is valid, AKAI will, without charge for parts or labor, either repair or replace the defective part(s). Without a valid warranty, the entire cost of the repair (parts and labor) is the responsibility of the product's owner. AKAI warrants that it will make all necessary adjustments, repairs and replacements at no cost to the original owner within 12 (twelve) months of the purchase date if: 1) The product fails to perform its specified functions due to failure of one or more of its components. 2) The product fails to perform its specified functions due to defects in workmanship. 3) The product has been maintained and operated by the owner in strict accordance with the written instructions for proper maintenance and use as specified in this Operator's Manual. Before purchase and use, owners should determine the suitability of the product for their intended use, and owner assumes all risk and liability whatsoever in connection therewith. AKAI shall not be liable for any injury, loss or damage, direct or consequential, arising out of use, or inability to use the product. The warranty provides only those benefits specified, and does not cover defects or repairs needed as a result of acts beyond the control of AKAI, including but not limited to: 1) Damage caused by abuse, accident, negligence. AKAI will not cover under warranty any original factory disk damaged or destroyed as a result of the owner's mishandling. 2) Damage caused by any tampering, alteration or modification of the product: operating software, mechanical or electronic components. 3) Damage caused by failure to maintain and operate the product in strict accordance with the written instructions for proper maintenance and use as specified in this Operator's Manual. 4) Damage caused by repairs or attempted repairs by unauthorized persons. 5) Damage caused by fire, smoke, falling objects, water or other liquids, or natural events such as rain, floods, earthquakes, lightning, tornadoes, storms, etc. 6) Damage caused by operation on improper voltages. IMPORTANT NOTE: This warranty becomes void if the product or its software is electronically modified, altered or tampered with in any way. AKAI shall not be liable for costs involved in packing or preparing the product for shipping, with regard to time, labor, or materials, shipping or freight costs, or time or expense involved in transporting the product to and from AKAI Authorized Service Center or Authorized Dealer. AKAI will not cover under warranty an apparent malfunction that is determined to be user error, or owner's inability to use the product. THE DURATION OF ANY OTHER WARRANTIES, WHETHER IMPLIED OR EXPRESS, INCLUDING BUT NOT LIMITED TO THE IMPLIED CONDITION OF MERCHANTABILITY, IS LIMITED TO THE DURATION OF THE EXPRESS WARRANTY HEREIN. AKAI hereby excludes incidental or consequential damages, including but not limited to: 1) Loss of time. 2) Inconvenience 3) Delay in performance of the Warranty. 4) The loss of use of the product. 5) Commercial loss. 6) Breach of any express or implied warranty, including the Implied Warranty of Merchantability, applicable to this product. iv
S3200XL Operator’s Manual - Version 1.00
INTRODUCTION . . . . . . . . . . . . . . . . . . . . . . . . . . . . . . . . . . . . . . . . . . . . . . . . . . . . . . . . . . . . . . . . . . . . . . . . . . . . . . . .1 FEATURES ......................................................................................................... 2 ABOUT THIS MANUAL........................................................................................... 5 FRONT PANEL..................................................................................................... 6 TAKING CARE OF YOUR DISKS.............................................................................. 8 REAR PANEL ...................................................................................................... 10 SETTING UP THE S3200XL .................................................................................... 13 CONNECTIONS ................................................................................................... 13 LOADING THE DEMO FLOPPY DISKS...................................................................... 14 MOUNTING THE S3200XL...................................................................................... 15 GETTING AROUND THE S3200XL ........................................................................... 16 OPERATING MODES ................................................................................ 16 SOFT KEYS ............................................................................................ 16 SELECTING PARAMETERS AND ENTERING DATA......................................... 17 NAMING FILES - THE NAME KEY ................................................................ 19 THE ENT/PLAY KEY ................................................................................. 19 LCD CONTRAST....................................................................................... 19 RECORD LEVEL, MAIN VOLUME, HEADPHONE OUTPUT ............................................ 20 HOW THE S3200XL WORKS................................................................................... 21 S3200XL FLOWCHART.......................................................................................... 22 SINGLE M O D E . . . . . . . . . . . . . . . . . . . . . . . . . . . . . . . . . . . . . . . . . . . . . . . . . . . . . . . . . . . . . . . . . . . . . . . . . . . . . . . . . .2 5 SELECTING PROGRAMS ...................................................................................... 25 VIEWING PROGRAMS .......................................................................................... 26 SETTING PROGRAM LEVELS, PAN, FX SENDS......................................................... 26 SETTING PROGRAMS’ MIDI PARAMETERS .............................................................. 27 SETTING PROGRAM LOUDNESS AND VELOCITY...................................................... 29 LOADING FROM FLOPPY DISK .............................................................................. 30 LOADING FROM HARD DISK.................................................................................. 31 DELETING PROGRAMS ........................................................................................ 32 RENUMBERING PROGRAMS ................................................................................. 34 USING THE S3200XL IN ‘OLD AKAI’ MODE! .............................................................. 35 USING SELECT PROG - PROGRAMS WITH THE SAME NUMBER ...................... 35 LAYERING PROGRAMS ............................................................................ 35 CREATING KEYBOARD SPLITS.................................................................. 35 USING RENUMBERING TO CREATE MULTI-TIMBRAL SETUPS......................... 36 SINGLE VS MULTI.................................................................................... 37 MULTI MODE - COMBINING SEVERAL PROGRAMS. . . . . . . . . . . . . . . . . . . . . . . . . . . . . . . . . . . . . .3 9 ASSIGNING PROGRAMS TO PARTS ....................................................................... 40 SETTING A PART’S MIDI CHANNEL ......................................................................... 40 MIXING THE PARTS ............................................................................................. 40 SENDING PARTS TO THE INTERNAL EFFECTS ......................................................... 40 ASSIGNING PARTS TO THE INDIVIDUAL OUTPUTS ................................................... 41 TUNING AND TRANSPOSING PARTS....................................................................... 41 SETTING A PART’S LOW AND HIGH KEYRANGES ..................................................... 41 SETTING A PART’S PRIORITY................................................................................ 42 INITIALISING A PART ........................................................................................... 42 SETTING UP A MULTI ........................................................................................... 43 MODIFYING THE MULTI ........................................................................................ 44 NAMING A MULTI ................................................................................................. 45 SAVING A MULTI ................................................................................................. 45 LOADING A MULTI ............................................................................................... 45 RENUMBERING PROGRAMS ................................................................................. 46 USING MULTI MODE FOR LAYERING PROGRAMS..................................................... 49 USING MULTI MODE TO SET KEYBOARD SPLITS...................................................... 50 PROGRAM EDITING . . . . . . . . . . . . . . . . . . . . . . . . . . . . . . . . . . . . . . . . . . . . . . . . . . . . . . . . . . . . . . . . . . . . . . . . . . .5 2 WHAT IS A KEYGROUP? ....................................................................................... 53 KEYGROUP ZONES ............................................................................................. 54 OVERLAPPING AND CROSSFADING KEYGROUPS ................................................... 55 ASSIGNABLE PROGRAM MODULATION .................................................................. 56 EDIT SINGLE ...................................................................................................... 60 NAMING PROGRAMS - COPYING AND RENAMING .................................................... 61 DELETING PROGRAMS ........................................................................................ 62 MIDI PAGE ......................................................................................................... 66 OUTPUT LEVELS PAGE ........................................................................................ 68
PAN PAGE.......................................................................................................... 71 THE TUNE PAGE.................................................................................................. 73 MODULATION PAGES .......................................................................................... 74 PITCH BEND ........................................................................................... 74 LFO1 ..................................................................................................... 76 SETTING LFO1 MODULATION DEPTH.......................................................... 79 LFO2 ..................................................................................................... 80 SETTING UP THE SOFT PEDAL .................................................................. 83 PORTAMENTO ........................................................................................ 84 KEYGROUP PARAMETERS - CREATING KEYGROUPS............................................... 87 MAPPING OUT YOUR KEYGROUPS - SETTING KEYSPAN .............................. 90 ASSIGNING SAMPLES TO KEYGROUPS AND ZONES - SMP1...................................... 92 SMP2..................................................................................................... 95 SMP3..................................................................................................... 97 THE FILTERS ...................................................................................................... 98 ENV1 - SHAPING AMPLITUDE ................................................................................ 101 ENV2 - SHAPING THE FILTER ................................................................................ 103 USING THE FILTER AND ENVELOPE GENERATORS...................................... 104 THE SECOND FILTERS ......................................................................................... 105 CREATING 24db/8ve 4-POLE LOWPASS FILTER ........................................... 109 THE TONE PAGE ..................................................................................... 111 ENV3 ................................................................................................................. 113 KEYGROUP PITCH/AMPLITUDE MODULATION ......................................................... 114 EDIT MULTI . . . . . . . . . . . . . . . . . . . . . . . . . . . . . . . . . . . . . . . . . . . . . . . . . . . . . . . . . . . . . . . . . . . . . . . . . . . . . . . . . . . . .1 1 6 SCREEN DIFFERENCES IN EDIT MULTI ................................................................... 116 SAMPLE MODE . . . . . . . . . . . . . . . . . . . . . . . . . . . . . . . . . . . . . . . . . . . . . . . . . . . . . . . . . . . . . . . . . . . . . . . . . . . . . . . . .1 1 8 WHAT IS SAMPLING? ........................................................................................... 118 RECORD MODE ................................................................................................... 120 THE MAIN RECORD PAGE ..................................................................................... 123 NAMING SAMPLES FOR RECORDING ..................................................................... 123 ADJUSTING THE RECORDING AND THRESHOLD LEVELS .......................................... 125 RECORDING ON THE S3200XL............................................................................... 125 DIGITAL RECORDING........................................................................................... 126 EDIT SAMPLE . . . . . . . . . . . . . . . . . . . . . . . . . . . . . . . . . . . . . . . . . . . . . . . . . . . . . . . . . . . . . . . . . . . . . . . . . . . . . . . . . .1 2 8 NAMING SAMPLES - COPYING AND RENAMING ....................................................... 130 DELETING SAMPLES ........................................................................................... 131 TRIMMING SAMPLES ........................................................................................... 132 LOOPING ........................................................................................................... 136 LOOP AUTO FIND AND CROSSFADE LOOPING......................................................... 137 MAKING A GOOD LOOP............................................................................ 139 LEVEL NORMALISATION ...................................................................................... 141 DSP FUNCTIONS - TIMESTRETCH, RE-SAMPLING AND EQ......................................... 142 TIMESTRETCH ........................................................................................ 142 PERFORMING A TIMESTRETCH ................................................................. 145 RE-SAMPLING ........................................................................................ 146 PERFORMING A RE-SAMPLE..................................................................... 147 EQ ........................................................................................................ 148 EQ’ING A SAMPLE ................................................................................... 150 USING THE EQ ........................................................................................ 150 FURTHER EDITING FUNCTIONS ............................................................................. 151 THE PARAMETER PAGE ........................................................................... 151 REVERSING SAMPLES............................................................................. 153 SECTIONAL EDITING ............................................................................... 154 THE JOIN PAGE ...................................................................................... 157 SPLICING SAMPLES ................................................................................ 157 CROSSFADING ....................................................................................... 158 MIXING AND LAYERING SAMPLES ............................................................. 158 SETTING DIGITAL FADES ......................................................................... 160 EFFECTS MODE . . . . . . . . . . . . . . . . . . . . . . . . . . . . . . . . . . . . . . . . . . . . . . . . . . . . . . . . . . . . . . . . . . . . . . . . . . . . . . . .1 6 2 ORGANISATION OF EFFECTS FILES....................................................................... 164 ASSIGNING EFFECTS TO SINGLE PROGRAMS ........................................................ 165 ASSIGNING EFFECTS TO MULTI PARTS.................................................................. 167 ASSIGNING EFFECTS TO INDIVIDUAL KEYGROUPS ................................................. 169 PROCESSING EXTERNAL SOUND SOURCES THROUGH THE EFFECTS ........................ 170
ROUTING EXTERNAL SOUNDS THROUGH THE EFFECTS ........................................... 171 SELECTING THE EFFECTS OUTPUT........................................................................ 171 CHAINING EFFECTS............................................................................................. 172 MUTING EFFECTS................................................................................................ 174 EFFECTS EDIT . . . . . . . . . . . . . . . . . . . . . . . . . . . . . . . . . . . . . . . . . . . . . . . . . . . . . . . . . . . . . . . . . . . . . . . . . . . . . . . . .1 7 5 DISTORTION/RING MODULATION .......................................................................... 176 EQ .................................................................................................................... 177 MODULATION EFFECTS........................................................................................ 179 CHORUS, PHASE SHIFT AND FLANGING EFFECTS........................................ 179 ROTARY SPEAKER EFFECTS .................................................................... 181 AUTOPAN AND FREQUENCY MODULATION EFFECTS.................................... 184 STEREO PITCH SHIFT EFFECTS................................................................. 185 BYPASSING THE MODULATION EFFECTS ................................................... 187 DELAY AND ECHO EFFECTS.................................................................................. 188 MONO DELAY/ECHO EFFECTS .................................................................. 190 PING PONG ECHO EFFECTS ..................................................................... 191 CROSSOVER DELAY................................................................................ 192 STEREO DELAY/ECHO EFFECTS ............................................................... 193 REVERB EFFECTS ............................................................................................... 194 REVERSE REVERB .................................................................................. 197 GATED REVERB ...................................................................................... 198 EFFECTS OUTPUT SECTION.................................................................................. 200 EFFECTS DIRECTION ........................................................................................... 201 SOLOING THE CURRENT EFFECT........................................................................... 203 COPYING EFFECTS ............................................................................................. 204 COPYING EFFECTS BETWEEN DIFFERENT EFFECTS FILES ....................................... 204 SAVE MODE . . . . . . . . . . . . . . . . . . . . . . . . . . . . . . . . . . . . . . . . . . . . . . . . . . . . . . . . . . . . . . . . . . . . . . . . . . . . . . . . . . . .2 0 6 SELECTING FLOPPY OR HARD DISK ...................................................................... 206 SELECTING THE HARD DISK PARTITION ................................................................. 206 SELECTING THE HARD DISK VOLUME .................................................................... 206 SELECTING THE TYPE OF SAVE ............................................................................ 206 SAVING TO FLOPPY DISK..................................................................................... 208 SAVING TO HARD DISK ........................................................................................ 209 RENAMING FILES ................................................................................................ 211 DELETING ITEMS FROM DISK................................................................................ 212 HARD DISK CONTROL .......................................................................................... 213 FORMATTING A FLOPPY DISK ............................................................................... 214 FORMATTING A HARD DISK................................................................................... 216 NOTES ON USING EXISTING S1000/S1100 SOUND LIBRARY...................................... 217 LOAD MODE . . . . . . . . . . . . . . . . . . . . . . . . . . . . . . . . . . . . . . . . . . . . . . . . . . . . . . . . . . . . . . . . . . . . . . . . . . . . . . . . . . . .2 1 8 SELECTING FLOPPY OR HARD DISK ...................................................................... 218 SELECTING THE HARD DISK PARTITION ................................................................. 218 SELECTING THE HARD DISK VOLUME .................................................................... 219 SELECTING THE TYPE OF LOAD ............................................................................ 219 LOADING FROM FLOPPY DISK .............................................................................. 220 LOADING FROM HARD DISK.................................................................................. 221 LOADING S900/S950 SAMPLES AND PROGRAMS..................................................... 223 LOADING S1000/S1100 DATA ................................................................................ 223 AUTO LOADING FROM DISK .................................................................................. 223 SEARCHING FOR FILES - USING THE FIND FUNCTION ............................................... 224 USING THE TAG DIRECTORY SYSTEM .................................................................... 226 NAMING TAGS ........................................................................................ 227 NOTES ON USING THE TAGGING SYSTEM .................................................. 227 HARD DISK CONTROL .......................................................................................... 229 IMPORTING SOUNDS FROM OTHER MANUFACTURER’S CD-ROMS .............................. 230 GLOBAL MODE . . . . . . . . . . . . . . . . . . . . . . . . . . . . . . . . . . . . . . . . . . . . . . . . . . . . . . . . . . . . . . . . . . . . . . . . . . . . . . . . .2 3 2 TUNING THE S3200XL .......................................................................................... 232 SETTING THE MASTER OUTPUT LEVEL................................................................... 232 MIDI FUNCTIONS ................................................................................................. 233 MIDI FILTER............................................................................................ 233 PPM PAGE - MONITORING MIDI ................................................................. 234 MIDI RECEIVE PAGE - ANALYSING MIDI ..................................................... 234 TRANSMIT TEST PAGE - SETTING THE ENT/PLAY KEY .................................. 235 MIDI SAMPLE DUMPS............................................................................... 236
PERFORMING A MIDI SAMPLE DUMP.......................................................... 237 MIDI VIA SCSI ......................................................................................... 238 ME35T DRUM SETTINGS ....................................................................................... 239 DAT BACK-UP AND RESTORE ................................................................................ 241 PERFORMING A DAT BACK UP................................................................... 242 PERFORMING A DAT RESTORE ................................................................. 242 STANDARD MIDI FILE - MIDI SONG FILE PLAY.......................................................... 243 LOADING STANDARD MIDI FILES ............................................................... 244 USING THE SMF FUNCTION ....................................................................... 245 HARD DISK RECORDING....................................................................................... 246 APPLICATIONS ....................................................................................... 246 FORMATTING THE HARD DISK FOR DISK RECORDING .................................. 247 CREATING NEW TAKES ............................................................................ 252 COPYING TAKES..................................................................................... 252 RENAMING TAKES................................................................................... 252 DELETING TAKES FROM DISK ................................................................... 252 RECORDING A TAKE ................................................................................ 257 EDITING A RECORDING............................................................................ 260 PLAYING A TAKE IN THE EDIT PAGE .......................................................... 261 USING THE EDITING FUNCTIONS ............................................................... 261 PLAYING TAKES ..................................................................................... 263 USING THE PLAY PAGE............................................................................ 265 EDITING A TAKE FOR SYNCHRONISED PLAYBACK....................................... 266 NOTES ABOUT SYNCHRONISING TO EXTERNAL AUDIO ................................ 266 USING THE SONG MODE .......................................................................... 267 CREATING A SONG.................................................................................. 267 TRIGGERING TAKES FROM MIDI................................................................ 270 USING MIDI TRIGGERING ......................................................................... 270 USING THE SONG MODE TO CHAIN TAKES.................................................. 273 USING THE NUMERIC KEYPAD IN THE SONG MODE...................................... 274 BLOCK EDITING IN SONG MODE................................................................ 275 NAMING SONGS...................................................................................... 277 SAVING A SONG ..................................................................................... 277 LOADING A SONG ................................................................................... 277 BACKING UP TAKES TO DAT ..................................................................... 278 RESTORING TAKES BACK FROM DAT TO DISK............................................. 279 SMPTE PAGE - USING CUE LISTS .......................................................................... 281 BLOCKS................................................................................................. 282 THE CURSOR .......................................................................................... 282 GETTING AROUND THE CUE LIST - THE NUMERIC KEYPAD ............................ 282 CUE LIST MODES .................................................................................... 283 CREATING AND EDITING CUE LISTS........................................................... 283 GRABBING TIMES ................................................................................... 287 SMPTE PAGE.......................................................................................... 288 NAMING CUE LISTS ................................................................................. 289 SAVING CUE LISTS.................................................................................. 289 LOADING CUE LISTS................................................................................ 289
APPENDIX 1 . . . . . . . . . . . . . . . . . . . . . . . . . . . . . . . . . . . . . . . . . . . . . . . . . . . . . . . . . . . . . . . . . . . . . . . . . . . . . . . . . . . .2 9 0 CONNECTING AN EXTERNAL HARD DISK DRIVE....................................................... 290 CONNECTING TWO SAMPLERS TO ONE HARD DISK DRIVE........................................ 290 NOTES ON USING HARD DISK DRIVES.................................................................... 291 SCSI CABLES ......................................................................................... 291 TERMINATION......................................................................................... 291 SCSI CABLE LENGTH ............................................................................... 292 APPENDIX 2 . . . . . . . . . . . . . . . . . . . . . . . . . . . . . . . . . . . . . . . . . . . . . . . . . . . . . . . . . . . . . . . . . . . . . . . . . . . . . . . . . . . .2 9 3 DATA COMPATIBILITY ISSUES .............................................................................. 293 SOUND DATA .......................................................................................... 293 EFFECTS FILES....................................................................................... 294 MULTIS .................................................................................................. 294 ME-35T DRUM SETTINGS .......................................................................... 294 SONGS AND QLISTS ................................................................................ 294 APPENDIX 3 . . . . . . . . . . . . . . . . . . . . . . . . . . . . . . . . . . . . . . . . . . . . . . . . . . . . . . . . . . . . . . . . . . . . . . . . . . . . . . . . . . . .2 9 5 INSTALLING EXTRA MEMORY ............................................................................... 295 INSTALLING MEMORY EXPANSION............................................................ 295 APPENDIX 4 . . . . . . . . . . . . . . . . . . . . . . . . . . . . . . . . . . . . . . . . . . . . . . . . . . . . . . . . . . . . . . . . . . . . . . . . . . . . . . . . . . . .2 9 7 S3200XL SYNTHESISER PANEL............................................................................. 297 APPENDIX 5 . . . . . . . . . . . . . . . . . . . . . . . . . . . . . . . . . . . . . . . . . . . . . . . . . . . . . . . . . . . . . . . . . . . . . . . . . . . . . . . . . . . .2 9 8 MIDI CONTROLLER LIST ....................................................................................... 298 S P E C I F I C A T I O N S . . . . . . . . . . . . . . . . . . . . . . . . . . . . . . . . . . . . . . . . . . . . . . . . . . . . . . . . . . . . . . . . . . . . . . . . . . . . . .3 0 3 S3200XL MIDI IMPLEMENTATION CHART . . . . . . . . . . . . . . . . . . . . . . . . . . . . . . . . . . . . . . . . . . . . . . . . .3 0 4
INTRODUCTION Welcome to the Akai S3200XL stereo digital sampler and thank you for buying it! The S3200XL features 32-voice polyphony, expandable memory, DSP functions, etc., and using the S3200XL’s resonant lowpass filters, multiple LFOs, envelope generators and extensive modulation possibilities, your new sampler can double as a first class synthesiser as well. Certain new functions are introduced in the S3200XL In software, the new MULTI mode of operation simplifies multi-timbral sequencing and layering. The S3200XL also includes a multieffects processor that offers no less than four channels that include two multi-effects channels with distortion, EQ, ring modulation, modulation effects such as chorus, flanging, pitch shifting, auto panning and rotary speaker effects plus delay and reverb. Two ‘spare’ channels of reverb are also available providing a total of four reverbs. Also included is a second bank of multi-mode resonant filters for sophisticated tonal processing. Bundled with the S3200XL is a software application for the Macintosh™ computer that allows you to operate the sampler from your Macintosh allowing large screen operation of waveform and program editing, sophisticated organisation of your sound library on the Macintosh as well as the ability to integrate your sampler more conveniently with your computer sequencer. Naturally, all sound library developed for the Akai S900, S950, S1000, S1100, S2000 and the S3000 range of samplers is compatible in the S3200XL giving you access to thousands of sounds on floppy disk, hard disk, removable cartridges, MO disks and CD-ROM. The ability to read CD ROMs made for other manufacturer's samplers gives access to an even further range of sounds.
S3200XL Operator’s Manual - Version 1.00
Page 1
INTRODUCTION FEATURES • Polyphony
32 voices
•
A-D Conversion
16-bit stereo with 64-times oversampling
•
Internal processing
28-bit accumulation
•
D-A Conversion
20-bit with 8-times oversampling (L/R outputs) 18bit with 8-times oversampling (individual outputs)
•
Sampling rates
44.1kHz/22.050kHz
•
Phase locked stereo sampling and playback
•
Internal memory
16Mbytes standard, expandable to 32Mbytes using SIMMs
•
Sampling times
16Mbytes 2.97 minutes mono @ 44.1kHz 32Mbytes 5.94 minutes mono @ 44.1kHz (Halve these times for stereo sampling)
•
Inputs
L/Mono and R jack inputs
•
Outputs
L/R stereo jack outputs 8 assignable individual outputs Stereo headphone jack output
•
Display
40 x 6 character backlit LCD with graphic waveform editing.
•
Digital I/O
Digital audio input/output.
•
Effects
4-channel multi-effects processor offering two channels of simultaneous distortion, four-band EQ, ring modulation, modulation (chorus, phase shift, flanging, pitch shift, autopan or rotary speaker), stereo delay and reverb plus two ‘spare’ channels of reverb (four reverb processors in total).
•
DSP Functions
Timestretch, re-sampling and digital EQ.
•
Filters
2-pole (12dB/Octave) resonant lowpass per voice. 2nd bank of 2-pole resonant multi-mode (HP, BP, LP, EQ) filters and tone control.
Page 2
•
Envelopes
1 x ADSR and 2 x multi-stage envelope generators.
•
LFOs
2 x multi-wave low frequency oscillators (triangle, square, sawtooth and random waves).
•
Legato mode
Single trigger playback to emulate old monophonic synths and solo instruments’ playing styles.
•
Portamento
Polyphonic and monophonic portamento.
•
Sound library
Fully compatible with Akai S900, S950, S1000, S1100, S2800, S3000, S3200, S2000 and S3200XL. The S3200XL
S3200XL Operator’s Manual - Version 1.00
INTRODUCTION can also read CD-ROMs made for other manufacturer's samplers1.
1
•
Data storage
A variety of storage devices may be used to store data including floppy disk, hard disk, Syquest™ removable cartridges and Magneto Optical (MO) disks. Hard disk data may be backed up to a normal DAT tape using the digital i/o.
•
Flash ROM
You may install up to 16Mbytes of FLASH ROM over and above the 32Mbytes of ordinary RAM giving you a total of 48Mbytes of memory. FLASH ROM allows you to keep your favourite sounds in memory even when the sampler is switched off.
•
Disk recording
Capable of stereo recording and editing on hard disk.
•
SMF capability
The S3200XL can play Standard MIDI files (sequences) from the floppy disk drive. This allows you, for example, to play sequenced backing tracks directly from the S3200XL.
•
DAT Backup
You can backup the hard disk (sound data and/or disk recordings) to an ordinary DAT recorder.
•
Real-time digital output
This digital audio output can be used to mix down digitally to DAT or any other digital recorder such as DCC, MiniDisk or a hard disk recorder such as the Akai DR4d, DR8 or even the S3200XL’s disk recorder. Using the internal multi-effects processor, you may add four channels of effects processing to the mixdown.
•
OPERATING MODES SINGLE
For playing single programs.
MULTI
For playing up to 16 programs together for multi-timbral sequencing, layering and key splits.
SAMPLE
For making recordings.
EFFECTS
For selecting effects.
EDIT
For editing programs, samples and effects.
GLOBAL
For setting parameters that affect the sampler as a whole plus access to utilities such as DAT backup, MIDI song file play and hard disk recording
SAVE
For saving programs, samples, multis, effects and operating systems, etc., to floppy or hard disk.
LOAD
For loading programs, samples, multis, effects, operating systems, etc., from floppy or hard disk and CD-ROM.
Some sounds may need adjustment and ‘tweaking’ depending on the sampler they were originally created on.
S3200XL Operator’s Manual - Version 1.00
Page 3
INTRODUCTION •
EDITING FEATURES EDIT SAMPLE
Trim, Loop (with FIND and CROSSFADE functions), Join, Merge, Splice, Chop, Extract, Reverse, Gain normalisation, Timestretch, Re-sample.
EDIT PROGRAM
Resonant lowpass filters, 2nd bank of resonant multi-mode filters, ADSR envelope generator (with templates), 2 x multistage envelope generator (with templates), 2 x multi-wave LFOs, sample layering, 4-way velocity crossfade and switching, keygroup crossfade, portamento (rate and time modes), monophonic legato triggering, mute group function, panning and autopanning, held pitchbend mode, separate pitchbend up/down ranges, output selection.
MULTI
Part select, program select, MIDI channel, level, pan, transpose, fine tune, output routing, FX routing, FX send, low key range, high key range, note priority.
EFFECTS
In the two multi-effects channels: DISTORTION - distortion, level EQ - low gain, mid 1 gain, mid 2 gain, high gain, RING MODULATION - frequency, depth MODULATION EFFECTS - chorus, flange, phase shift, rotary speakers, autopan/frequency mod, pitch shift with parameters as appropriate. DELAY - effect select (mono, stereo, ping pong), delay times, feedback. REVERB - effect select (large hall, small hall, large room, small room, gated, reverse, etc.), size, decay time, HF damping, LF damping, pre-delay. FX DIRECTION: dist/EQ/ring mod > mod/delay + reverb (parallel) dist/EQ/ring mod > mod/delay > reverb (series) dist/EQ/ring mod > reverb > mod/delay (series) In the two reverb channels: Effect select (large hall, small hall, large room, small room, reverse, gated, etc.), decay time, HF damping, LF damping, pre-delay, diffusion. A multi-effects channel may also be routed to its ‘neighbouring’ reverb channel for dual reverb multi-effects.
Page 4
S3200XL Operator’s Manual - Version 1.00
INTRODUCTION ABOUT THIS MANUAL This manual has been written to allow you to get the most out of your new sampler. Please take the time to read it as a fuller understanding of the instrument will enable you to use the S3200XL’s remarkable facilities to the full. Not only are the controls and screens explained in detail but you will find hints and tips to help you with your sampling and programming. If you are new to sampling or synthesisers, some of the sections explain the basic principles behind the techniques employed in the S3200XL so if words like “bandpass”, “modulation”, “diffusion”, “multi-timbral” and “sample rates”, etc., are unfamiliar to you, we hope that this manual is not just a boring explanation of functions but something you can refer to for information beyond the scope of the S3200XL. Even if you’re a seasoned programmer, we hope that there is information in this manual that you find useful..
S3200XL Operator’s Manual - Version 1.00
Page 5
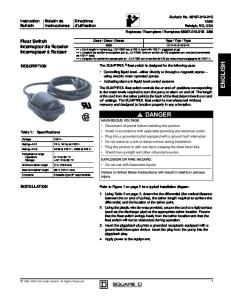
INTRODUCTION FRONT PANEL FLOPPY DISK DRIVE
RECORD LEVEL
DISPLAY CONTRAST $
LCD
MAIN VOLUME
DATA ENCODER
HEADPHONE s3200xl
MIDI DIGITAL STEREO SAMPLER DATA
REC LEVEL
DISPLAY CONTRAST
PUSH ON/OFF
mo
MAIN VOLUME
( 3.5INCH )
DISK DRIVE MIN
F1
F2
F3
F4
F5
F6
F7
SCREEN FUNCTION F1/ A
F2/ B
F3/ C
F4/ D
F5/ E
MAX
MIN
MAX
F8
F6/ F
F7/ G
7/ Q
8/ R
9/ S
MARK/#
4/ T
5/ U
6/ V
JUMP/.
PHONES
F8/ H
CURSOR
POWER ON
HIGH SPEED DIGITAL SIGNAL PROCESSOR
SINGLE/ I
MULTI/ J
SAMPLE/ K EFFECTS/ L
EDIT/ M
GLOBAL/ N
SAVE/ O
1/ W
2/ X
3/ Y
0/ Z
+/
-/
NAME
FOOT SW
LOAD/ P ENT/PLAY
OFF
POWER SWITCH
SOFT KEYS
MO DRIVE SLOT
Page 6
CURSOR KEYS MODE KEYS
FOOTSWITCH
NUMERIC KEYPAD MARK/JUMP, NAME, ENT KEYS
MODE KEYS
Selects the operating mode for the sampler.
‘SOFT’ KEYS
These select functions displayed on the LCD above. They have no fixed function but change according to the page currently displayed on the screen.
LCD
The 40 x 8 character display shows parameters and values and displays the ‘soft’ keys’ function and graphic display of waveforms for sample editing, etc..
CURSOR KEYS
This block of keys moves the cursor up, down and left and right around the screen.
DATA ENCODER
Allows you to enter data values and for scrolling through lists, etc..
NUMERIC KEYPAD
This is used to enter data numerically.
MARK/JUMP
These keys allow you to mark two functions and switch between them using the JUMP key. In this way, it is quick and easy to enter data even across two different screens.
NAME KEY
This takes you the ‘naming mode’ where you may name samples, programs, effects, etc..
ENT/PLAY KEY
Allows you to play a sound without the need for a MIDI controller to be connected.
RECORD LEVEL
Sets the record level for the analogue inputs.
MAIN VOLUME
The MAIN VOLUME control sets the main output level of the L/R stereo outputs (this control does not affect the level of
S3200XL Operator’s Manual - Version 1.00
INTRODUCTION
POWER SWITCH
the signal appearing at the individual outputs or digital output). Applies power to the S3200XL.
PHONES
This stereo jack socket allows you to monitor the L/R (stereo) output of the S3200XL through stereo headphones. The level is regulated using the MAIN VOLUME control (see above).
FOOTSWITCH
The FOOTSWITCH input is actually two switch inputs using a stereo jack. One input is used for sustain and for initiating sampling (see later) and the other is used for the soft pedal (MIDI controller 67). The wiring of the plug is as follows:
RING - SOFT PEDAL
TIP - SUSTAIN/SAMPLING GROUND Both require a press-to-open type of switch. DISPLAY CONTRAST
Sets the viewing angle for the LCD. You will note that pressing this control in switches off the LCD’s backlight thus preserving the life of the LCD (think of it like a ‘screen saver’ on a computer.
MO DRIVE SLOT
You may install a 3.5” Sony 650Mbyte Magneto Optical (MO) drive here (please consult your dealer about this option).
FLOPPY DISK DRIVE
The 3.5 inch floppy disk drive will accept high density and low density disks. Disks are inserted into the drive thus: DISK ACTIVITY LED
WRITE PROTECT TAB
HIGH DENSITY DETECTION TAB
DISK EJECT BUTTON
The label should be facing towards the screen and panel controls when it is inserted (actually, it is physically impossible to insert disks the wrong way round without using an extreme amount of brute force!).
S3200XL Operator’s Manual - Version 1.00
Page 7
INTRODUCTION To eject the disk, simply press the DISK EJECT button. When a disk is loading, saving or formatting, the DISK ACTIVITY LED will be lit. It is important to remember that, unlike a synthesiser, the S3200XL has no means of storing sounds in an internal memory. As a result, it is vital that you save your work to disk before turning the power off otherwise you will lose your work and, unless previously saved, it will be gone for ever. In fact, it is a good idea to regularly save your work as you are working. All good computer users do this and it prevents the accidental loss of data should power be accidentally removed from the instrument. This also serves as a form of ‘undo’ - if you make some kind of mistake in your programming and editing and can’t fix it, you can load the last level of editing back into the sampler. It may be a bit tedious to keep stopping every now and then to save your work but it is better than losing some valuable sounds. TAKING CARE OF YOUR DISKS These floppy disks contain valuable sound data and, as such, should be treated with extreme care. Please observe the following points, therefore: 1
Never slide the metal cover back and touch the disk. Finger marks may render the disk unreadable.
2
Don’t leave the disk in the drive wherever possible. When the disk is in the drive, the metal protective cover slides back exposing the actual disk inside - this makes the disk susceptible to picking up dust which may cause read errors.
3
Do not leave your disks in a hot car.
4
Do not place your disks next to any magnetic sources such as speakers, amplifiers, televisions, etc.. Also, try to avoid X-ray machines. At airports, it is sometimes possible to ask for your disks to be inspected by hand at security desks but, with the added security at airports these days, this may not be possible. Always check with the security officer though, just in case. Security X-ray machines are generally safe with disks, though. If in doubt, make backup copies which should be left at home.
NOTE: Some checked-in luggage is X-rayed by quite powerful machines that are not as safe as those that check hand luggage. It is probably best to take your disks as hand luggage.
Page 8
5
Do not leave your disks around when drinking liquids - one accidental spillage could ruin a lot of work!
6
Always use high quality disks. Whilst cheap ones may be appealing, they are prone to errors more than good ones.
7
Try to ensure that the write protect tab is switched on (i.e. the tab does not block the hole). This will prevent accidental erasure, formatting and loss of data. It may be a nuisance to try to write to the disk and find it write protected but it is less of a nuisance than accidentally over-writing a set of your favourite samples and programs!
8
Try to get into the habit of labelling your disks - it will pay dividends in the end when you are searching for something.
S3200XL Operator’s Manual - Version 1.00
INTRODUCTION 9
Invest in a sturdy carrying case for your floppies especially if you are a gigging musician. Heavy duty metal camera cases are ideal and some flight case manufacturers now make special heavy duty disk flightcases.
10 Even if you are using a hard disk of any sort, please make sure you have backed up your work to floppy disks. It can be time consuming but it will be worth it if you ever have a problem with your hard disk!
S3200XL Operator’s Manual - Version 1.00
Page 9
INTRODUCTION REAR PANEL INDIVIDUAL OUTPUTS
MIDI IN/OUT/THRU
FAN FOR OPTIOAL MO DRIVE
AKAI ELECTRIC CO., LTD. MODEL NUMBER S3200XL MADE IN JAPAN
CH1
CH2
CH3
ANALOG OUTPUT CH4 CH5
CH6
CH7
CH8 MIDI IN
OUT
THRU
ANALOG INPUT D I/O
SMPTE
AES/EBU IN
LEFT(MONO)
RIGHT
PUSH
PUSH
LEFT
OUT
IN
OUT
RIGHT GND SCSI
OPTICAL IN
GAIN
OUT
HIGH MID LOW
L/R OUTPUTS ANALOGUE INPUTS
ANALOGUE AUDIO INPUTS
SMPTE I/O
SCSI
DIGITAL I/O POWER CONNECTION
Two parallel pairs of stereo balanced connectors are provided for connection of sound sources (wired in accordance with American standards - 1-shield, 2-cold, 3-hot), and the other pair is a pair of balanced jack connectors using stereo jack sockets. Unbalanced sources can, of course, be connected to the XLR inputs. If a mono source is used for sampling, use only either the LEFT (MONO) XLR or phone connector.
NOTE: The XLR connector and phone jack on the analogue inputs are connected in parallel. When inputting an analogue signal, use only one pair of them. Associated with the analogue inputs is a 3-position slider switch (LOW, MID, HIGH) used for matching the level of the input source to the recording amplifier of the S3200XL. Fine adjustment should be carried out with the REC LEVEL control on the front panel. Ideally, you should set the REC GAIN so that the REC LEVEL is set about 2 o’clock. Remember that unlike analogue equipment, digital devices produce distortion which is particularly unpleasant, and “soft clipping” and the effect of saturation found in analogue recordings cannot be obtained when recording digitally. You should always allow sufficient headroom for transient peaks when making a sample. Note also, that recording at too low a level will not allow you to make full use of the S3200XL’s dynamic range and signal to noise figures.
NOTE 1: When making a sample, you may not immediately notice any clipping that may have resulted from incorrect level settings and it may only become apparent when playing back samples lower than the original pitch at which they were sampled.
Page 10
S3200XL Operator’s Manual - Version 1.00
INTRODUCTION
NOTE 2: If you set the level too low, the S3200XL’s EDIT SAMPLE pages have a GAIN NORMALISE function that allows you to restore the sample to its optimum level for full use of the sampler’s wide dynamic range. The REC GAIN sensitivities are HI -58dBm, MID -38dBm, LOW - 18dBm. INDIVIDUAL OUTPUTS
There are eight individual audio connectors provided. Use of the INDIVIDUAL OUTPUTS (CH1 through CH8) allows much more flexibility and control (but of course, this will take up more input channels on the mixing console). Programs can be assigned to any one of these output channels and effected separately. Individual keygroups may also be routed via these outputs so that in drum programs, individual drum and percussion sounds may have their own channels on an external mixing console.
NOTE: Programs using stereo samples should be sent to the individual outputs at the keygroup level - i.e. the left samples should go to one output and the right samples to another (usually adjacent) output. The S3200XL uses remote ground sensing circuitry so that the unbalanced outputs are protected against the possibility of ground or earth loops that can sometimes occur in complicated setups where a lot of equipment is connected. L/R OUTPUTS
There are two LEFT/RIGHT connections available - one set is a pair of unbalanced jack sockets, the other a pair of balanced XLR connectors for outputting the main stereo mix from the S3200XL. When connecting to two channels of a mixing console, remember to pan the mixer channels hard left and right to enjoy the full stereo effect.
DIGITAL I/O
The digital input can be used to record digitally from CD or DAT or any other audio source that has a digital output. The digital output carries a digital clone of the main stereo outputs complete with the effects so you may also mixdown digitally from the S3200XL to any digital audio recorder such as DAT or a hard disk recorder/editor such as the Akai DR4 or DR8 thereby ensuring the highest quality audio during mixdown. The digital i/o is also used to back data up to a normal DAT tape.
SCSI
This is used to attach hard disks, CD-ROMs, Magneto Optical (MO) disks and removable cartridges to the S3200XL for data storage and retrieval. You may also connect the S3200XL to a Macintosh™ computer for use with the editing software that is bundled with the S3200XL.
SMPTE IN/OUT
These connectors are used to input and output SMPTE/EBU timecode. These are used when synchronising a Qlist to timecode. The connectors are 6.35 mm stereo (balanced) phone jacks.
S3200XL Operator’s Manual - Version 1.00
Page 11
INTRODUCTION MIDI
Your MIDI controller (keyboard, drum pads, EWI, etc.) should be connected to the MIDI IN. The THRU socket carries a duplicate of the MIDI IN signal ‘thru’ to other modules or MIDI devices that may be connected. The OUT is normally only used to transmit MIDI System Exclusive data to another Akai sampler or to a computer.
POWER CONNECTION
This should be connected to an AC power source.
** IMPORTANT NOTE ** BEFORE CONNECTING ANY AC POWER, PLEASE ENSURE THAT YOUR UNIT IS DESIGNED FOR YOUR AREA’S POWER SUPPLY. A MISTAKE NOW COULD RUIN YOUR WHOLE DAY NOT TO MENTION YOUR S3200XL!!!
Page 12
S3200XL Operator’s Manual - Version 1.00
INTRODUCTION SETTING UP THE S3200XL This short section tells you how to get ‘up and running’ fast. For full details of operation, please refer to the appropriate section in this manual. CONNECTIONS Don’t switch the S3200XL on for the moment. L/R OUTPUTS
SCSI
IND OUTS - to mixer
HARD DISK, CD-ROM, MO DRIVE, etc..
DIGI I/O MIDI IN
DAT
MIDI OUT AKAI
Connect the MIDI output of your MIDI controller (in this example, an Akai MX1000 master keyboard) to the MIDI input of the S3200XL. Connect the L/R audio output to a stereo amplifier (or use the L/MONO output of the sampler if you only have a mono amp) or to two channels of a mixer (remembering to pan each channel hard left and right accordingly to take full advantage of the S3200XL’s stereo outputs). The digital i/o can be connected to a DAT machine (or any other digital recording device) or you could leave the digital outputs of a CD player connected to the S3200XL’s digital input for sampling from the many special sampling CDs that are currently available.. Before turning on the sampler, it’s a good idea to turn its volume down or to turn the volume down on the amplifier or the mixer channels as the power up ‘thump’, although very slight, could damage sensitive speakers, especially if the amp is turned up loud. Now turn on the S3200XL. You will see a message in the LCD informing you of what is going on. After 15 seconds or so, your S3200XL is ready for use. Turn the volume up on the sampler, amplifier and/or mixer. Making sure that the MIDI controller is sending data on MIDI channel 1, play a few notes. You will hear the oh so impressive test tone! Hardly inspiring is it? We want something a bit more interesting than that.
NOTE: If no sound appears, check your MIDI connections and check that your MIDI controller is sending MIDI channel 1. If, after this, you still hear no sound, try pressing the ENT/PLAY key on the S3200XL’s front panel. If you hear a sound, then at least your audio connections are o.k. and it’s the MIDI that needs attention. If you still don’t hear a sound when you press the ENT/PLAY key, check your audio connections, volume controls, etc..
S3200XL Operator’s Manual - Version 1.00
Page 13
INTRODUCTION LOADING THE DEMO FLOPPY DISKS To get you started, some sounds are provided on floppy disk. To load the sound library disk, insert it into the drive and press the LOAD key. Now simply press F7 - CLR. You will receive a prompt asking you if you want to clear the entire memory. Respond by pressing F8 - YES The library disk supplied comes with several programs. In SINGLE mode, these may be selected from the S3200XL’s front panel using the DATA wheel or alternatively, you may use MIDI PROGRAM CHANGE commands from your MIDI controller to select new programs. You will also note that they are laid out in a MULTI for multi-timbral sequencing. You may use this to play the demo sequence that is also supplied on floppy disk with the S3200XL. To play the demo sequence on the S3200XL, assuming the sound data disk has been loaded, follow the procedure below. 1
Insert the DEMO SEQUENCE floppy disk into the disk drive.
2
In GLOBAL mode, press (F5) to get to the MIDI SONG PLAY page and press (F2) to get to the LOAD page for song files.
3
Select and load a MIDI song file from the file list. You can load as many files as you like as long as there is enough memory space.
4
Once the files are loaded, press the file you wish to play and press (F8) to stop playback.
(F1) to return to the MIDI SONG PLAY page. Select (F7) to play the selected MIDI song file. Press
If you have owned an Akai sampler before, you may also have other sounds on CD-ROM or hard disk. Operation is virtually identical to the S3000 series and the S1000/S1100. To load sounds from hard disk, press the LOAD key and select HARD at the top of the screen. Move the cursor to the volume name field and select the volume you wish to load. Press F7 - CLR followed by F8 - YES - to clear the current contents of memory and load the entire hard disk volume. If you have not used an Akai sampler before and you need more detailed information on loading from hard disk or CD-ROM, please see the section LOAD MODE. However you load sounds, whether it’s from floppy disk, hard disk, cartridge or CD-ROM, just load them and enjoy playing with your new sampler. Although we suggest you read the operator’s manual thoroughly, of course, at this stage, you don’t want be bothered with that so just experiment and get a feel for the S3200XL. As long as you don’t press the SAVE key and accidentally overwrite your floppy disk or hard disk volume, you can’t damage your sounds permanently or come to any harm (you can’t damage a CD-ROM as it’s a read only device). If you do start messing with the samples and programs and don’t like the results, simply re-load the sounds in or load another bunch of sounds to play with.
Page 14
S3200XL Operator’s Manual - Version 1.00
INTRODUCTION MOUNTING THE S3200XL If you plan to rack mount the S3200XL, try to leave some ‘breathing space’ around it to prevent overheating. It is recommended you leave 1U of rack space above and below the sampler. If you are placing the sampler on a table, make sure that the table is sturdy and that the sampler is not positioned precariously. If you are using the S3200XL with a hard disk device of any kind, the disk drive MUST be mounted horizontally. If the disk drive is at an angle, even a slight one, you may have unreliability problems and even data corruption. If you are planning to rack mount the hard disk with the sampler, it is recommended you use the ‘padded’ type of rack mount adapter available from most manufacturers of rack and flight cases especially if you are likely to be travelling a lot with the set-up. The padding will help protect the disk drive’s delicate head mechanism against shock and excessive vibration. It goes without saying that the S3200XL and the disk drive are delicate pieces of precision electronics and they don’t take kindly to being thrown around however sturdy your flight case might be!
S3200XL Operator’s Manual - Version 1.00
Page 15
INTRODUCTION GETTING AROUND THE S3200XL The S3200XL is pretty straightforward to use. Basically, it operates in different ‘modes’ which are selected according to what it is you want to do. In these modes, you navigate your way around the functions using the soft keys. You move around the screens using the CURSOR keys and data is entered either using the DATA wheel or numerically from the numeric keypad. OPERATING MODES The S3200XL has various modes in which it works and these are selected using the eight large mode keys found beneath the floppy disk drive. Each key is illuminated to indicate the sampler’s current status. SINGLE/ I
MULTI/ J
SAMPLE/ K EFFECTS/ L
EDIT/ M
GLOBAL/ N
SAVE/ O
LOAD/ P
These modes are: SINGLE
For playing single programs. This mode is best suited for ‘playing’ the sampler (i.e. performing a piano solo or whatever) although it can also be used when sequencing a single sound from the S3200XL.
MULTI
For playing up to sixteen programs together. Typically, this mode would be used for multi-timbral sequencing by setting each ‘part’ to a different MIDI channel but it can also be used for layering and creating key splits by setting two or more parts to the same MIDI channel.
SAMPLE
For making recordings.
EFFECTS
For selecting effects to assign to single programs or to parts in a multi.
EDIT
Puts the sampler into edit mode for any of the four modes described above. For example, EDIT SINGLE allows you to edit single programs; EDIT MULTI allows you to edit the program in the currently selected part; EDIT SAMPLE allows you to edit the recording you have just made (or samples currently in memory, of course); EDIT EFFECTS allows you to edit the parameters of the effects processor.
GLOBAL
Allows you to set certain ‘global’ settings that affect the S3200XL as a whole such as MIDI channel, SCSI ID, output level, overall tuning, etc.. It also gives access to utilities such as disk recording, MIDI song file playback, importing ‘foreign’ CD-ROMs from other manufacturers, etc..
SAVE
For saving data to floppy or hard disk.
LOAD
For loading data into the sampler.
SOFT KEYS The SOFT KEYS directly under the LCD call up various functions and pages within each mode - these vary from mode to mode and have no pre-defined function. As such, they cannot be easily explained here! SCREEN FUNCTION F1/ A
Page 16
F2/ B
F3/ C
F4/ D
F5/ E
F6/ F
F7/ G
F8/ H
S3200XL Operator’s Manual - Version 1.00
INTRODUCTION There are many common keys in many of the functions, however, such as, for example, COPY, RENAME and DELETE which are always on F6, F7 and F8 in those pages where they appear. Commands such as GO, and ABORT always appear on F7 and F8. There is also a convention to the type of functions available which is worth noting. If a key has this highlighted type of display: then this signifies that pressing this key will take you to another page. If the key has this type of display: (i.e. the function simply has a box around it and is unhighlighted) then this signifies that the key is an ‘do it’ key and will instigate some kind action such as SAVE, LOAD, DELETE, GO, ABORT, etc.. If the key has no form of box around it and is not highlighted - i.e: , then this indicates the page you are currently in although this is always shown in the top left corner of the display as well. This type of key switches between two types of display - pressing it once displays note names, pressing it again displays notes as MIDI note numbers. SELECTING PARAMETERS AND ENTERING DATA You move around the screen using the CURSOR KEYS and data is input either from the DATA ENTRY ENCODER or from the NUMERIC KEYPAD. You may move around within digit fields using the +/< and -/> keys found on the numeric keypad. DATA
CURSOR
7/ Q
8/ R
9/ S
4/ T
5/ U
6/ V
1/ W
2/ X
3/ Y
0/ Z
+/
-/
On simple fields like filter cutoff, attack time, MIDI channel, etc., that have two digits, you may simply type in a two digit number - i.e. 23, 45, etc.. On such fields, you will find that the DATA ENTRY ENCODER will cover the whole range quite quickly so you may find that more convenient. The same is true of three digit fields. Turning it clockwise increases numeric values, and turning it counter-clockwise decreases these values. You may also use the +/< and -/> keys to position the cursor on the ‘tens’ or ‘hundreds’ field to make more rapid changes. For non-numeric values (i.e. sample rates, sample type, loop type, etc.), turning the encoder will display all the options in order. Normally, there is no other entry procedure required; simply displaying the correct value of a parameter using the DATA encoder selects and stores it into the S3200XL’s memory. Our sound programmers at Akai usually use a combination of the numeric keypad and the DATA WHEEL for speedy input of parameter values.
S3200XL Operator’s Manual - Version 1.00
Page 17
INTRODUCTION When editing numeric parameters, some of the values can be quite large, and it would be necessary to turn the DATA WHEEL thousands of times (literally!) in order to go through the whole range if the value was only changed by 1 for every click of the DATA control. There is an alternative to turning the control thousands of times, though. When you press the CURSOR keys, you move from one parameter to another and, using the +/< and -/> keys, you may move around within a large numeric field. If a number such as 123456.78 is displayed, and the +/< key is pressed so that only the first three digits are highlighted thus:
Turning the DATA ENTRY ENCODER clockwise by one step now will increase the value of the last highlighted digit, so:
Now if the -/> key is pressed once, the first four digits will be highlighted:
and turning the DATA ENTRY ENCODER one click clockwise will produce:
If you turn the DATA control more than ten clicks, of course, the value of the whole parameter will be incremented or decremented by the number of clicks. In this way, with very little effort, fast accurate editing of numbers can be achieved using only the +/< and -/> keys and the DATA ENTRY ENCODER. The best way to learn how this works is to practise; after a short time, it should become second nature. On ‘signed’ fields (that is, fields that have a + or a - before them), the +/< and -/> will do two things. Pressing the +/< key will move the cursor left within the field and, when it reaches the furthermost left digit, you may use it to switch between + and - depending on the selection you wish to make. The -/> key will move the cursor right and, when it reaches the furthermost right digit you may toggle between + and - again. As mentioned above, as an alternative to turning the DATA control, you can also use the numeric keypad for direct entry of data. When you know the exact number you want to enter, this can be faster than using the DATA control, but when experimenting (for example, when setting loop points or sample start and end times), the DATA control may be faster than the numeric keypad. You’ll probably discover quickly what method works best for you in each situation.
NOTE: The cursor always stays on the last currently selected field in any screen. For example, if you are in, say, the filter pages and are setting envelope 2’s depth and then go to the ENV2 page to make an adjustment there, when you return to the filter page, the cursor will still be on envelope 2’s depth parameter. MARK AND JUMP KEYS These two grey buttons to the right of the number keypad are used in conjunction with each other. MARK/#
JUMP/.
Page 18
S3200XL Operator’s Manual - Version 1.00
INTRODUCTION
If you are carrying out editing operations which require changing display pages a lot, these can save a lot of time and effort. Pressing the MARK/# button when the cursor is on a field will cause the S3200XL to remember the position of the cursor, and pressing JUMP/. will take the cursor back to the MARK(ed) position from any other page. Pressing JUMP/. again will take you back to the page and function you were at before you JUMP(ed). You can reset the MARK position at any time. This position is lost when the power is turned off. At power-on, this position defaults to the program select field in the initial SINGLE mode. NAMING FILES - THE NAME KEY When samples, programs, effects or drum input settings are changed, they should be given a name for easy reference. NAME
Pressing the NAME button in certain pages will enable you to name the data and you will notice that each button has a letter following its primary function (i.e. SAMPLE/K, F4/D, LOAD/P). Up to 12 characters (uppercase only) are entered by pressing the front panel buttons (although you may also scroll through letters and numbers using the DATA control). When actually entering names, pressing the NAME button will switch the function of the numeric keypad between letters and numbers. The CURSOR keys moves the cursor around inside the name field when naming a sample or program. When entering names in letter mode, the +/< and -/> buttons work as backspace and spacebar buttons respectively (when in number mode, they enter the “+” and “-” characters), and the MARK/# and JUMP/. keys enter “#” and “.” respectively. The last button, ENT/PLAY, enters and confirms the name and the S3200XL prompts you to either copy or rename the item. THE ENT/PLAY KEY Underneath the NAME key, you will see the ENT/PLAY key: ENT/PLAY
This is a dual-purpose button. When naming samples, programs, etc., pressing this button will end the naming process in conjunction with COPY and REN(ame) as described above. In other modes of operation, this key will play the sound at a pitch, velocity and MIDI channel as set in the GLOBAL mode. The default may be freely set as you wish.
NOTE: When editing samples in EDIT SAMPLE, pressing this button will play back the sample at its correct pitch and not necessarily the one set in the GLOBAL pages. LCD CONTRAST On top of POWER switch, you will find the DISPLAY CONTRAST CONTROL: DISPLAY CONTRAST
PUSH ON/OFF
You may adjust the viewing angle for the screen using the DISPLAY CONTRAST control.
S3200XL Operator’s Manual - Version 1.00
Page 19
INTRODUCTION
NOTE: To preserve the life of your LCD, this control also has a switch which you can use to turn the backlight of the LCD on or off. At times when you are not actively using the S3200XL’s front panel for programming (i.e. when actually sequencing or recording to tape, for example, or when using the sampler live on stage), you might like to switch this off. All LCD’s of this type progressively get dimmer with age and this switch can help prevent this. The switch should be pushed in to switch the backlight off and pushed in again to switch it back on. RECORD LEVEL, MAIN VOLUME, HEADPHONE OUTPUT Above the numeric keypad, you will find the RECORD LEVEL and MAIN VOLUME controls: REC LEVEL
MIN
MAX
MAIN VOLUME
MIN
MAX
Input level for sampling is regulated using the RECORD LEVEL control and the S3200XL’s overall output level is controlled, not surprisingly, by the MAIN VOLUME control. This also governs the level of the sound appearing at the HEADPHONE OUTPUT.
NOTE: The MAIN VOLUME control does not affect the level appearing at the individual outputs or the real-time digital audio output.
Page 20
S3200XL Operator’s Manual - Version 1.00
INTRODUCTION HOW THE S3200XL WORKS Despite its versatility, the S3200XL is very straightforward and once you have a basic grasp of the flowcharts shown on the next pages, things will make more sense. Basically, you can have SAMPLES. These are the pieces of raw digital audio that are always the basis of any sound in the S3200XL. These may be derived from floppy disk, hard disk (including Magneto Optical (MO) Disks, removable cartridge types), CD ROM or, of course, you may sample your own sounds via the analogue or the digital inputs. Once you have a raw sample, there are many things you can do with it within EDIT SAMPLE. You may TRIM it - that is, remove any unwanted audio from the start or end. You may CHOP it that is, remove a section in the middle and splice the two remaining sections together or you may CUT it - that is, remove a section in the middle and keep the gap thus created. You may also EXTRACT part of the sound - that is isolate a section (such as one snare drum in a breakbeat) and extract that snare hit from the original. You may also TUNE and/or REVERSE the sample. Of course, one problem always associated with sampling is LOOPING. Because any given sample is only a few seconds long, if you want to sustain that sample longer than its original length, some method has to be sought to do this. This is LOOPING. A loop is a section of the sound that repeats as long as you hold your finger on the key and is set by setting a start and end point for the loop. This is something of an art and a science and something we won’t delve into here in great detail. To make looping as easy as possible, the S3200XL has FIND and CROSSFADE functions to help you set good loops. Other sample editing functions include TIMESTRETCH which allows you to lengthen or shorten a sample without changing its pitch (again, we will look at this in more detail later in this manual) and RE-SAMPLING, a technique that allows you to squeeze the optimum performance out of available memory space. On the S3200XL, you may also NORMALISE a sample’s level for optimum signal to noise performance. Once you have edited a sample you place it into a PROGRAM. A PROGRAM is where you assemble your sample(s) for playback. In a program, you allocate a sample to a KEYGROUP (in fact, you can allocate 4 samples to one keygroup for layering, velocity switching and velocity crossfading but more on that later!). A program may have as little as one keygroup spanning the entire keyboard or as many as one keygroup for every key each with four samples in them! To overcome the abrupt tonal discrepancies sometimes experienced when two different samples are placed ‘side by side’ on the keyboard, positional keygroup crossfading can be used for a smoother transition. Once in a keygroup, the sample may be passed through resonant filters for tonal modification, through amplifiers for amplitude control and through a pan section for stereo placement. Keygroups may be freely assigned to the individual outputs for external processing on a mixing console. On top of this, you may apply modulation from 2 x Low Frequency Oscillators (LFOs) for vibrato and other effects. A SINGLE TRIGGER LEGATO mode allows you to emulate solo instruments such as woodwind and brass more realistically and to allow for greater expression when playing synth bass parts or lead sounds. One powerful feature of the S3200XL is the flexible ASSIGNABLE PROGRAM MODULATION known as APM for short) in EDIT PROGRAM. Using this, any modulation source may be routed to virtually any control input. In this way, the S3200XL is a powerful synthesiser as well, except that you may use almost any sampled sound (of your own or from a sound library) as the basis of your own powerful and expressive sounds.
S3200XL Operator’s Manual - Version 1.00
Page 21
INTRODUCTION Once you have placed your sample(s) into a program, you may play them from a MIDI controller in SINGLE mode. You may also add powerful multi-effects such as simultaneous distortion, EQ, chorus/flange, delay and reverb to these programs. Once you have several programs in memory, you may use the MULTI mode to combine them together. Typically, this will be to set different programs to different MIDI channels for multitimbral sequencing but you may also use the MULTI mode for layering programs and for key splits. In MULTI mode, the four channels of the effects processor may be used so that different programs may have different effects applied to them. Furthermore, the MULTI’s internal mixer allows you to mix the level and pan of each program as well as set its effects send level. With the individual outputs, these programs may be assigned to their own output for mixing on an external mixing console. Once you are happy with everything, the whole thing may be saved to disk for recall at a later date. One of the beauties of the Akai samplers is that there are no restrictions on what you do with samples - any sample can be placed into any keygroup in any program. One sample may be placed into a variety of different programs, each of which impose different envelope or filter settings to create a wide range of possibilities from very little. One or more samples may be used in any other programs even on other disks and/or one program can be used as the basis for processing other samples. S3200XL FLOWCHART The following flowcharts will help your understanding of the S3200XL.
SAMPLE(S)
EFFECTS
EFFECTS
PROGRAM(S)
MULTI
Here, samples are made and edited, placed into programs (which can be played singly if you wish) and these programs can be placed into a multi (where several programs may be played together). Programs and multis can use multi-effects.
Page 22
S3200XL Operator’s Manual - Version 1.00
INTRODUCTION
ANALOGUE INPUTS DIGITAL INPUTS FLOPPY DISK HARD DISK/CARTRIDGE CD ROM
SAMPLE(S)
EDIT
SAMPLE
TRIM
CHOP
CUT
EXTRACT
LOOP (X4)
JOIN
XFADE
TUNE
FADE
REVERSE
NORMALISE/RE-SCALE TIMESTRETCH
RESAMPLE
EDIT
PROGRAM
KEYGROUP(S)
FX SEND TO INT EFFECTS
PER KEYGROUP TUNE
IND. OUTPUT ASSIGN
SAMPLE 1
TUNE
SAMPLE 2
TUNE
SAMPLE 3
TUNE
SAMPLE 4
KG PITCH
VEL SW/XFD
IND. OUT 1-8
PAN 12dB/8ve RESONANT FILTER
FILT2
PAN AMP
TONE
PAN
MASTER OUTPUT
AUTO PANNING
PAN
ENV 3 KEYSPAN
ENV 2
ENV 1
MASTER PROGRAM OUTPUT
ENVELOPE TEMPLATES
ASSIGNABLE PROGRAM MODULATION SOURCES ENV 1
ENV 2
MOD.WHL
P.BEND
ENV 3
PRESSURE
S3200XL Operator’s Manual - Version 1.00
LFO 1
KEY.POS
LFO 2
VELOCITY
EXT.MIDI
Page 23
INTRODUCTION
MULTI-MODE
PARTS 1-16
FX SEND LEVEL
PER PART PROGRAM SELECT
MIDI CH
TUNE
OCTAVE
LEVEL
PAN
FX BUSS
PRIORITY
OUTPUT ASSIGN
4-CHANNEL EFFECTS PROCESSOR MULTI-EFFECTS CHANNEL x 2 DISTORTION/EQ
DISTORTION
EQ
MOD/DELAY EFFECTS
RING MOD
CHORUS or FLANGE or PHASE or PITCH SHIFT or PAN/FMOD
DELAY
REVERB
REVERB
REVERB ONLY CHANNEL x 2 REVERB REVERB
Page 24
S3200XL Operator’s Manual - Version 1.00
SINGLE MODE SINGLE MODE SINGLE is where you may select and play programs. Pressing SINGLE gives this screen display.
NOTES REGARDING THE S3200XL’S SINGLE MODE Before we look at the functions in this mode, please bear the following in mind. SINGLE mode, as the name suggests, is essentially designed to play single programs. However, for historical reasons, in order to be compatible with sound disks created on Akai S1000, S1100 and the S3000 series, you can, in fact, play several programs at once. This is done by setting two or more programs to the same program number (see below RENUMBERING PROGRAMS). Furthermore, you may have several programs active at any one time and each of these may have a different MIDI channel so that they play multi-timbrally. However, as mentioned, this is included here so that such disks created on earlier Akai samplers can be used without tedious re-programming or conversion. NOTES FOR EXISTING AKAI SAMPLER USERS If you have used an Akai S1000, S1100 or any of the S3000 series samplers and are familiar with the concept of several programs sharing the same program number, you may continue to work in this way if you wish but we feel sure you will appreciate the speed and convenience of the MULTI mode for layering and multi-timbral sequencing once you give it a try as it has many advantages over the way earlier Akai samplers dealt with multi-timbral applications. However, retaining the old method as well gives you the best of both worlds in that any setups you may have using the older method can still be used plus you can avail yourself of the new functions as and when you like. You may like to convert existing S1000/1100/3000 multi-timbral setups into new MULTI files if you wish. NOTE FOR NEW USERS If you are new to Akai samplers but have had some experience of other sound modules, you will probably feel more at home setting up multi-timbral data, layered programs and key splits in the MULTI mode as this is more in keeping with how other sound modules work these days. You can use the SINGLE mode for playing single programs. With that in mind, you may like to skip a lot of this section as it really refers to the ‘old method’ of using earlier Akai samplers. SELECTING PROGRAMS Selecting sound to play can be done in several ways: 1
In the main SELECT PROG screen as shown above, turning the DATA control will select different programs for playback.
2
In the main SELECT PROG screen, use the numeric keypad to select sounds by number. To do this, press the keys input ‘+’ and ‘-’ to a name. Pressing NAME again reverts you to entering letters from the numeric keypad. Alternatively, in conjunction with the CURSOR keys which can be used to move the cursor around within the name, you can use the DATA control to scroll through characters. When you have entered your name, press ENT and you will get this prompt:
Pressing
will copy the original program - use this to create a new program.
If the program name is an existing one, the boxed area in the bottom right of the screen will show:
You will receive the following prompt:
You must enter a unique new name. Pressing will simply rename the currently selected program with the name just entered. If the name exists, you will be prompted as above and you must re-enter a unique name. Pressing will exit the naming process altogether with no action taking place. Should you press this by mistake, you will see that the boxed area in the lower right of the screen still retains the new name you entered so press NAME immediately followed by ENT and make your choice again.
S3200XL Operator’s Manual - Version 1.00
Page 61
EDIT PROGRAM - SINGLE DELETING PROGRAMS It is possible to delete programs using the following prompt:
key - F8. Pressing this will give you the
You should press F7 or F8 accordingly. If you press GO, you may receive the prompt:
This is asking if you want to delete the samples contained within that program as well. If the samples are used in other programs, then you will not receive this prompt. If you wish to lose the samples, press F8 - YES but if you need to keep them, press F7 - NO.
NOTE: Deleting samples and programs is ultimately destructive. Please ensure that you have saved them to disk before deleting in case you want to come back to them at a later date.
Page 62
S3200XL Operator’s Manual - Version 1.00
EDIT PROGRAM - SINGLE The fields on the main EDIT SINGLE page are: This shows the selected program name. Different programs may be selected for editing by scrolling with the DATA control. You may also select them using MIDI program change. This field is not accessible but shows the number of keygroups used in the selected program. This field is also not accessible and shows the number of samples used in the selected program. Please note that, because each keygroup has four zones, it is possible for there to be more samples in a program than there are keygroups. For example, a stereo program with 5 keygroups would typically show 10 samples (5 x L and R). This allows you to set crossfades for keygroups that overlap. As described above, this can be used to smooth out abrupt transitions between keygroups. You will note that this is a ‘global’ parameter that affects the whole program and so any keygroups that overlap will be subject to crossfading. This special function turns the program into a monophonic program with single triggering. The effect of single triggering is that if you hold one note and play another, the pitch changes to the new note but the attack of the new note is not re-triggered. For example:
Even when is ON, playing each note separately will cause the attack of each note to be re-triggered.
This function is extremely useful for emulating the playing styles and phrasing of solo instruments such as flutes, oboe, clarinet, saxophone, etc.. It can also be effectively used on solo and ensemble strings and brass. It is almost essential when playing synth bass sounds as it emulates the classic monophonic synth keyboard. You will find it useful too, when playing leadlines of any kind. Owners of the Akai EWI wind synthesiser will find this function invaluable in obtaining better expression and phrasing.
S3200XL Operator’s Manual - Version 1.00
Page 63
EDIT PROGRAM - SINGLE
IMPORTANT NOTE REGARDING MONO LEGATO ON/OFF Because this function is playing a single sample (or group of samples when playing stereo or layered sounds) through the sustain or loop, if you were, for example, to do a long legato run from the top of the keyboard to the bottom, you would be transposing the original sample you started with several octaves down. For example, in a 7 keygroup flute program, if you were to start your run on C5 and finish at C2, the sound played on the last note would, in fact, be the C5 sample transposed 3 octaves down - the samples in the other keygroups would not be retriggered as you cross the keygroup boundaries. As a result, if you sustained that last note, it may sound very strange indeed! Similarly, if you ‘trilled’ between C2 and C5, it would also sound quite odd (but then, so would a trill between C2 and C5!). This is brought to your attention so that you may make allowances when playing legato across keygroups. If you bear this in mind, you will find this function very useful and expressive. There is a way around this using the KEYGROUP MUTE function (see below). This field is not accessible and shows you how many other programs are in memory at the time. This field allows you to select whether you wish to listen to other programs that have the same program number as you edit the currently selected program. The selection is ON or OFF. When is switched to ON, you will only hear the currently selected program and when it is OFF, you will be able to monitor any other programs that share the same number.
NOTE: This function is only really of relevance of you are using the ‘old Akai’ method to sequence programs sharing the same program number.
Page 64
S3200XL Operator’s Manual - Version 1.00
EDIT PROGRAM - SINGLE The soft keys along the bottom of the PROGRAM EDIT main screen are: This shows the currently selected MAIN PROGRAM EDIT page. This takes you to the parameters concerned with individual keygroups. These include the keyboard spanning, filters, envelopes, sample assignments, pitch and level adjustments, individual output assignment, etc., for individual keygroups. This takes you to the pages where you may set program modulation parameters such as pitch bend ranges, LFO 1 and LFO 2 parameters and parameters for the sostenuto pedal functions. This takes you to the MIDI page where you may set the program’s MIDI channel, polyphony, transpose and other functions. This takes you to the OUTPUT page where you may set the program’s overall level, individual output assignment, effects send level, pan position and other parameters. This takes you to the AUTO PAN section where you may set parameters that affect the program’s auto pan functions. This takes you to the TUNE pages where you may set the program’s overall tuning as well as select and create alternative tunings and temperaments. This is not a page key but an ‘action’ key for deleting programs. Its function is described above. We will now look at the functions of these pages. We will skip and for the moment and look at the function of , , and first as these affect the program as a whole.
S3200XL Operator’s Manual - Version 1.00
Page 65
EDIT PROGRAM - SINGLE MIDI PAGE Pressing
displays this screen:
The top line of this page contains a field which allows you to change the program currently being edited. You may select different programs for editing here if you wish. The parameters on this page are as follows: This field allows you to set the program number of the program. This is the number which will be called up on receipt of a MIDI Program Change message and corresponds to a patch number on a synthesiser. This parameter selects the program's MIDI channel! The choice is OM (omni) and 1 to 16. This allows you to select how many notes (1 to 32) can be played at a time by this particular program. This should normally be left at the default, 32.
NOTE: This parameter should normally be set to the default of 32. Its inclusion here is mostly for historical purposes. On the S1000/S1100 (and early versions of software for the S2800, S3000 and S3200), it was common to use this parameter for hi-hats and the like layered over a drums program (i.e. the hi-hats would be set to a polyphony of 1 voice so that the closed hi-hat shut off the open hi-hat). With the MUTE GROUP function, however (see later in this section), this parameter is not used so much but is retained should you load an old S1000/S1100 or early S2800, S3000 or S3200 sound library disk. A description of the MUTE GROUP function is given later in this section. This allows you to specify how notes will be 'stolen' by other programs if this is necessary. There are four settings: LOW, NORM, HIGH and HOLD. If a program is set to LOW priority, then notes from this program will be stolen first. If set to HIGH, then notes from other programs with lower priority will be stolen before they are stolen from this program. NORM is, of course, normal priority and, if any note stealing has to take place, this program will be affected no more or less than others with NORM assignment. If you are playing a complex piece of music using many programs, it is a good idea to set important, lead-line sounds to HIGH, and less important background programs to LOW. HOLD is a special priority. If a program’s priority is set to HOLD, notes from this program can only be stolen by the same program. The notes which will be stolen are determined by this parameter either the OLDEST note will stop playing when a note is stolen or the QUIETEST one.
Page 66
S3200XL Operator’s Manual - Version 1.00
EDIT PROGRAM - SINGLE
This allows you to set the overall keyboard range C0-G8 of the program and this will override any keygroup range settings made in the keygroup SPAN page. For example, even though your program's keygroups may extend up to G8, if you set, say, C4 as the high extreme in this field, no sound will be heard above C4. You may use this function to create keyboard splits with other programs of the same program number. This allows you to transpose the program +/-50 semi-tones in semitone increments. You will note that this is not a pitch shift function as such but a MIDI transpose function - this overcomes the problem of playing back samples out of their range. What this function does is introduce an offset so that, with a +12 setting, even if you play C3 on the keyboard, this is offset to play the samples on C4 - it is not playing the samples on C3 an octave higher.
NOTE: Most of the parameters in this page are retained for compatibility with data created on earlier Akai samplers. When editing a program in MULTI mode, the MIDI channel, priority, play range and transpose functions are not shown here as these parameters are irrelevant, being overridden by the MULTI’s parameters. However, if you are using the ‘old Akai’ method for multi-timbral sequencing, you will want to set the parameters shown above (although they may be more easily set in the SINGLE mode on the MIDI page).
S3200XL Operator’s Manual - Version 1.00
Page 67
EDIT PROGRAM - SINGLE OUTPUT LEVELS PAGE Pressing the button takes you to the OUTPUT LEVELS page where you can control the audio output of the program from the S3200XL. You will receive this screen display:
At the top right of the screen is the currently selected program name - in EDIT SINGLE, this may be changed and another selected for editing by scrolling with the DATA control. The parameters on the left of the screen set parameters concerned with output routing and levels, etc.. They are as follows: This sets the level 0-99 of the program as it appears at the L/R stereo outputs. Adjusting this has no effect on the level of the signal appearing at the individual outputs or the real-time digital outputs. By setting this field to 00, you may use this parameter to mix a program out of the L/R mix completely if you are sending it to an individual output (see below). In this way, you may have some programs appearing only at the L/R outputs with other programs appearing only at the individual outputs. This sets the overall pan position of the program. You can set the parameter L50-MID-R50. You will note that this may be affected by other pan settings elsewhere in the program such as when the auto pan facilities are used or when individual keygroups are panned. You will note that this parameter also affects the level of the signal appearing at the individual outputs (see below) and at the real-time digital audio output. This allows you to select which of the 8 individual outputs the whole program will appear at. The default is OFF and you may select 1-8. You will note that these outputs are polyphonic and can use the full 32voice polyphony of the S3200XL.
NOTE: This parameter works in conjunction with a field found in SMP2 (see later) where it is possible to route single keygroups to the individual outputs This sets the level 0-99 of the signal appearing at the output selected above. If OFF is selected, then this control has no effect. This sets the FX channel the program is routed to. You may select OFF, FX1, FX2, RV3, RV4 This sets the effects send level 0-99 going to the selected effects channel
Page 68
S3200XL Operator’s Manual - Version 1.00
EDIT PROGRAM - SINGLE The parameters down the right of the screen allow you to affect the overall loudness of the program. Here you may set the overall output level 0-99 for the program. This also affects the program’s sensitivity to velocity and you will note that if this parameter is set to 99, the program will be quite loud but will have no velocity sensitivity. The default for this parameter is 80. This offers the optimum range for velocity and other dynamics. Setting it higher than this will, of course, turn the overall level up but it will reduce the amount of overhead for dynamics. Reducing this parameter will give greater extremes of velocity range although please note that you will not be using the full resolution of the sampler’s dynamic range. There are three loudness modulation inputs and each one has a default controller selected. If you wish, these need not be changed - it is only in more specialised applications that you may wish to set something other than these defaults. The defaults are: This is a fixed assignment and sets how much velocity will affect the overall loudness of the program. You may set a value of ±50. The default is +20 which gives a sensible dynamic range although this may be changed if you wish. A setting of +50 will give you a very wide dynamic range where soft key presses will produce virtually no sound and hard key presses will output a very loud sound. A setting of -50 will give the opposite effect - a hard key press will produce virtually nothing whilst a soft key press will give a loud output. At first, this may seem a bit strange to allow this but this does enable you to crossfade between programs using velocity - i.e. set one program to +50 and the other to -50.
NOTE: You cannot select any other modulation source in this field. This is one of only two fixed assignments in the APM system. This sets how much key position will affect the overall loudness of the program. You may set a value of ±50. When set to positive value, the sound will be louder in the upper reaches of the keyboard and by setting it to a negative value, the sound will be louder on lower notes. You may use this function to balance the program level across the keyboard. You may change the default modulation source from you like simply by placing the cursor where it says through the modulation options.
to anything and scrolling
This sets how much pressure or aftertouch will affect loudness after a note has been played. You may set a value of ±50. Positive values will cause the sound to get louder as you press harder on the keyboard and negative values will, of course, have the opposite effect. You may use this function for expressive phrasing of such instruments as strings, vocal, wind and other such instruments to great effect. By layering two programs and setting opposite values (i.e. + 50 on one program and - 50 on the other), you may use this function to crossfade between them using pressure. As an example, you could layer a distorted guitar program and a distorted feedback program and introduce the feedback element of the sound using pressure to create a powerful heavy metal guitar.
S3200XL Operator’s Manual - Version 1.00
Page 69
EDIT PROGRAM - SINGLE
You can, of course, change the default selection from anything you like simply by placing the cursor where it says and scrolling through the modulation options.
to
The effect the loudness modulation parameters have on the overall loudness of the program depends on the modulation source you select. Here are some suggestions: LFO 1 or 2
This will impart a tremolo effect on the sound and so is useful for simulating old rock and roll guitars where this effect was common in amplifiers. This may also be useful in simulating the tremolo effect found on organs. It may also be used to simulate the tremolo effect of woodwind on sustained notes. Using a triangle wave for modulation, it is particularly good for vibes sounds, especially those with a static loop. It is probably not suitable to simulate tremolando strings, however, using LFO modulation. Of course, it may be used for special effects.
Modwheel
Use this, perhaps, instead of pressure.
Bend
Use this instead of pressure or modwheel.
External
Depending on the selection made in the GLOBAL MIDI page’s main page, you could apply any MIDI controller to control the program’s overall loudness. The breath option will be very popular with owners of the Akai EWI MIDI wind controller.
These three modulation input sources may be combined and mixed together. When layering programs in MULTI, identical mod sources in other programs may be inverted for crossfade effects.
NOTE 1: You will note that if the parameter is set to full (i.e. 99) the output level of the S3200XL is at maximum and so you will not hear any effect if one or more modulation sources are applied. NOTE 2: In some cases it is possible to overload the S3200XL and cause distortion. This will normally only happen with particularly loud samples recorded at full level when excessive modulation is applied. Increasing the filter resonance may also lead to distortion in some cases. If this happens, back off the parameter.
Page 70
S3200XL Operator’s Manual - Version 1.00
EDIT PROGRAM - SINGLE PAN PAGE In this page you may set the characteristics of the auto panning functions. Pressing display this screen:
will
As usual, the program name of the program currently selected for editing is shown here which you may change if you like. As in the OUTPUT page, we have three modulation inputs which can control panning. The defaults for these three control inputs are: This will produce the classic auto panner effect with the sound gradually moving between left and right at a rate set by LFO 2. You can use this for special effects, of course, but one popular application is to use it to simulate a rotary speaker effect. You may set a value of ±50. This selects that key position will affect overall loudness. You may set a value of ±50. With positive setting (i.e. +50) the sound will pan from left to right across the keyboard and, if set to a negative value (i.e. -50), will pan the sound from right to left across the keyboard. You may use this parameter to create pseudo stereo samples out of mono ones. For example, with samples such as piano or marimba or vibes, you could create the stereo effect of microphones being placed at either end of their keyboards to produce a panning effect. This allows you to control pan position using the modulation wheel. This could be put to good effect in a solo line, perhaps, where, every time you introduce vibrato via the wheel, the sound pans around the stereo image. You may set a value of ±50.
NOTE: Due to limitations with the panning hardware, whilst slow sweeps work well, fast sweeps may, on some sounds, introduce some ‘zipper noise’. Please be aware of this when setting pan modulation. As with all control inputs on the S3200XL, any combination of controllers can be mixed together. Here are a few suggestions: Bend
Use this instead of modwheel perhaps.
Pressure
Use this instead of modwheel or bend.
External
Use maybe a footpedal to pan the sound around. EWI players may use breath control.
Velocity
You can use your keyboard dynamics to pan the sound around with loud sounds appearing at one output and soft sounds at the other.
LFO1
Use this as an alternative to LFO2. This LFO’s extra facilities allow some very odd things to be done. Try applying this and modulating LFO1’s rate with LFO2 so that the pan from side to side gradually speeds up and down or modulate LFO1’s rate with the modwheel to emulate the slowing down and speeding up of a rotary speaker in an
S3200XL Operator’s Manual - Version 1.00
Page 71
EDIT PROGRAM - SINGLE organ program (although the ROTARY SPEAKER effect in the effects processor is probably the best choice for this). ENV1/ENV2/ENV3
These may be put to good effect to pan the sound around according to the envelope of the sound. Perhaps ENV2 or 3 is the most interesting with its multiple rates and levels.
! Modwheel
Use this (and ! Bend or ! External) to reposition each new note according to the position of these controller.
And don’t forget that layering samples in zones and panning them to extreme hard left and right will cause the two samples to crossover in the stereo image when these effects are applied. Layering two programs and setting the modulation amounts to opposite values can also yield some interesting panning effects.
Page 72
S3200XL Operator’s Manual - Version 1.00
EDIT PROGRAM - SINGLE THE TUNE PAGE The next soft key is the tuning page. Pressing
key and this takes us, not surprisingly, to the main program will give you this display:
As usual, the program name is displayed at the top right of the screen - a different one may be selected if you wish. In this page, you set up different tuning temperaments for each program, if desired. If you are playing a percussive sample (for example, congas) in one program, which you do not want to correspond to standard Western chromatic equal temperament tuning, this is where you can alter things. Select the program whose temperament is to be altered on the top line of this screen. Use the CURSOR keys to select the note on the keyboard octave which will be retuned, and use the DATA control to alter the tuning away from equal temperament by ±25 cents (one quarter-tone). If you are re-tuning the C# key, for example, all notes played with the C# keys on the keyboard will be detuned by the amount you have set. You may tune the scale to anything you want which can be very useful for enriching orchestral sounds and also for setting your own special scales To help you with this, there are also some alternative tuning templates which are selected in the field . These offer preset tunings which you can apply to the program. The other parameter in this page is the function. This transposes the program +/-50 semitones. This may be adjusted in very fine steps (100ths of a tone) for fine tuning the program. Those, then, are the master pages for the program where you can set parameters that affect the program as a whole. In any of the pages described, you may always directly access another from the soft keys.
S3200XL Operator’s Manual - Version 1.00
Page 73
EDIT PROGRAM - SINGLE MODULATION PAGES The next group of pages we will look at also affects the program as a whole but also has a direct influence on individual keygroups. These are the modulation pages where you may set the parameters for the two low frequency oscillators and the pitch bend. You may also set the parameters for the sostenuto pedal. These modulation sources may be applied to the filter, loudness, pitch and panning for a wide range of the usual modulation effects such as vibrato or for more outrageous synthesiser effects. These pages are accessed by pressing the key. Pressing the
key displays this screen:
PITCH BEND The first page we encounter is the PITCH page where you may set the parameters associated with pitch bend. As usual, you may select a program for editing at the top right hand of the corner. The pitch bend on the S3200XL allows you to set a different range for bend up and down as well as use pressure and a special mode is also available to make it more flexible. The parameters are: This sets the range for bending pitch up with the pitchbend wheel or lever. The range is 0-24 semitones. The default is 2 semitones. This sets the range for bending pitch down and, again, the range is 024 semitones. The default is 2 semitones. As well as using the pitchbend wheel or lever, you may also use pressure to bend notes. The range is -12 to +12. You may only bend up or down depending on the selection made - unlike the bend wheel/lever, you cannot pitchbend both ways. This is a mode select option that allows you to choose whether the pitchbend will happen on all notes or only on held notes. This is particularly useful on sounds with long releases. The options are NORMAL and HELD. Let us say, for example, that you have a sound that has a long release and you are performing a solo that uses a lot of pitchbend. Using NORMAL, when you pitchbend the note, all the notes currently in the release stage of their envelope will also bend. Sometimes this is what you want but there can be times when this spoils the effect you are trying to create. By selecting the HELD mode of pitchbend, ONLY THE KEY(S) YOU ARE CURRENTLY HOLDING DOWN WILL BEND and all those notes you are not playing but which are fading through their release stage will remain unchanged. If you release your finger from the key with the pitchbend up (or down), as the note dies away, if you let the pitchbend return to zero, that last note’s pitch will not change. If you release just one note of a chord with pitchbend up or down, if you let
Page 74
S3200XL Operator’s Manual - Version 1.00
EDIT PROGRAM - SINGLE the wheel or lever settle at zero, only the notes you are holding will bend. The pitchbend options on the S3200XL allow some very interesting performance techniques. By setting the pitch to UP: 2 and DOWN:12, with a heavy metal guitar sample, you can emulate string bending up and an octave ‘whammy bar dive bomb’ down. Many things are possible.
S3200XL Operator’s Manual - Version 1.00
Page 75
EDIT PROGRAM - SINGLE LFO1 Pressing
will give you this screen display:
This is the page used for setting up LFO1. Again, the program name is shown at the top right of the screen and other programs may be selected for editing if you wish. The parameters for LFO1 are as follows: This allows you to select from three waveforms. They are: TRIANGLE ( ) - This gives a rising and falling effect. At around a setting of 75, this would normally be used for vibrato but can be assigned anywhere you like and can be used for filter sweeps, panning, amplitude modulation and slow pitch sweeps. This is a ‘bi-polar’ modulation waveform that ‘rotates’ around the note you are playing to give a natural vibrato effect.
0 SAWTOOTH ( ) - This waveform is used mostly for special effects. It rises slowly and falls abruptly. This is a ‘uni-polar’ waveform that jumps between the held note and the modulation level set at the destination.
0 SQUARE ( ) - This gives stepped ‘up and down’ effect. When applied to pitch it can be set to give trills or large octave jumps. This is a ‘uni-polar’ waveform that jumps between the held note and the modulation level set at the destination.
0 RANDOM ( ) - This gives a totally random, stepped waveform and is suitable for special effects. The effect that immediately springs to mind, of course, is the classic ‘sample and hold’ effect found on analogue synthesisers - by routing this to pitch you can create random pitch effects suitable for, say, creating computer effects, especially when the LFO speed is set quite fast. When applied to the filter(s), you can create many interesting random tone change effects. You can even use this wave to control LFO1’s rate so that not only will pitch, tone or whatever modulation input this LFO is assigned to be random but the speed of modulation will change randomly. This selects whether the LFO’s (all 32 of them!) are synchronised or not. With ON, all the LFO’s are not synchronised and so give a rich texture to ensemble sounds when being used for vibrato. When is set to OFF, all LFO’s are in sync. This latter option is probably more suited to
Page 76
S3200XL Operator’s Manual - Version 1.00
EDIT PROGRAM - SINGLE use with synthesiser effects. You will find that slower LFO speeds are possible with set to off. The three fixed parameters for setting up LFO1 are: This sets the rate of LFO1. This is variable between very slow (01) for such effects as auto panning and filter sweeps and fast (99) for vibrato and other effects. This sets the output level of LFO1. This acts as a master LFO modulation control for all destinations that have LFO1 routed to them. In this way, if you wish to change the modulation level going to all destinations easily, simply change this parameter. The range is 0-99.
NOTE: You may find that nothing happens when you route LFO1 to a destination and set a modulation level at the destination’s input. This will be because LFO1’s depth is set to 00. This may seem a strange default at first but the reason is to do with the use of the modwheel for vibrato. In order to be able to have the modwheel for vibrato as an immediate effect, the LFO depth needs to be at 00 otherwise, there will be constant LFO modulation of pitch. It is only when you are using LFO1 to apply a constant vibrato or for something other than vibrato in special applications that you will need to specifically set the depth control here. This parameter sets the time it takes for the LFO1 effect to take place after a note-on. At 00, the effect will be instantaneous but at 99 the effect of LFO1 to take effect will be delayed. I.e:
NOTE ON
The three ‘VARIABLE’ fields apply to the modulation inputs of LFO1. Although not specifically named, they relate to the parameters directly to their left - i.e. , and . The default for these parameters is so that you may affect speed, depth and delay according to keyboard position, thereby emulating the fact that, for example, high violins’ vibrato is often slightly faster, deeper and less delayed than low cellos or contrabasses. These parameters allow you to create quite rich orchestral textures where vibrato is never constant across the keyboard range. Of course, you may select other modulation options for these inputs. Here are a few ideas: •
Using LFO1 as an assignment to control its own rate will change the symmetry of the waveform and you can use this to create new modulation waveforms (i.e. using a square wave to modulate itself will create an asymmetric pulse wave). Using LFO1 to modulate its own output level does create an effect but this can best be described as subtle! Applying LFO1 to modulate its own delay is also very subtle to the point that, with the exception of very slow sweeps, you probably won’t hear anything!
•
Applying a slow LFO2 to speed will give a gradual speed up and slow down of LFO1 rate. This can be used for special effects, especially in synth sounds - for example, apply a slow LFO1 mod to the filter cutoff and assign a slow LFO2 to control LFO1’s speed, setting a value of + 50. Assigning it to depth will cause the effect of LFO1 to whatever destination it is applied to increase and decrease at a rate set by LFO2. Applying LFO2 to delay will only have an effect at the point of note-on.
S3200XL Operator’s Manual - Version 1.00
Page 77
EDIT PROGRAM - SINGLE
•
Selecting ENV1 or ENV2 to control speed will give changes in speed according to the shape of the envelope. Applying it to depth allows you to ‘shape’ the output of LFO1. Applying it to delay will have no effect.
•
Selecting any of the continuous controllers will allow to change the parameters in real-time as you play. For example, routing modwheel to speed will let you change the modulation rate as you introduce vibrato (note that routing modwheel to control depth is not really worthwhile as this is a fixed assignment anyway in the EXTRA parameters described below). Assigning any of the continuous controllers to delay is not going to produce much effect except at the point of note on (pressure will have no effect on delay at all, by the way).
•
Any of the ‘!’ continuous controllers will only have an effect at the point of note-on. You may use these to set speed, depth and delay in real-time as you play.
The parameters allow you to introduce more modulation and these have fixed assignments which are: This allows you to set the level of modulation that will be introduced via the modwheel. This works in conjunction with the parameter. Even with set to 00, you may still use the modwheel for vibrato and other modulation. With set at anything other than 00, this will set a basic level of modulation that will be present in the sound all the time and the modwheel will introduce more again. With the LFO set at 99, the modwheel will have no effect because the LFO output is now at maximum. The default for this parameter is 30 so that modwheel is instantly available for vibrato without you having to do anything. As with , this selects that pressure can be used to introduce modulation. The same principles apply that even with set to 00, you may still use pressure for vibrato and other modulation. With the depth set at anything other than 00, this will set a basic level of modulation and pressure will introduce more. With depth set at 99, pressure will have no effect because the LFO output is now at maximum. This allows you to use note-on velocity to introduce LFO1 modulation. With a positive value set here, playing a note hard will introduce a level of modulation which may be augmented using the modwheel or pressure.
Page 78
S3200XL Operator’s Manual - Version 1.00
EDIT PROGRAM - SINGLE SETTING LFO1 MODULATION DEPTH The master output of the LFO is set using the control and this has to be set to something other than 00 for there to be any effect unless the modwheel is moved - you may assign the LFO to a destination and set that destinations modulation level to maximum only to find that there is no effect. The reason for this is that the control in this page is not set or the modwheel is not up. A useful function of this master depth control is that in the case where you have applied LFO1 to several destinations and you wish to increase or reduce the level of modulation going to all the destinations, you may change the modulation level to all destinations with just the one control instead of having to individually adjust every destinations’ modulation input level.
NOTE: Because it is felt that LFO1 will mostly be used for vibrato effects, the default in the PTCH page (see later) is set so that simply setting a value in the field will apply vibrato. If you intend to use LFO1 for something other than vibrato (i.e. slow filter sweeps, panning, amplitude modulation, etc.), then be sure to set the LFO1 parameter in the PTCH page to 00 unless you really want the sound of an American police siren! Once you have set the LFO1 parameters, you may return to the main program edit page by pressing .
S3200XL Operator’s Manual - Version 1.00
Page 79
EDIT PROGRAM - SINGLE LFO2 Pressing the
key will take you to the second LFO page:
This is a simpler LFO for auxiliary modulation purposes. Whilst LFO1 is normally used for vibrato via the modwheel or pressure, LFO2 can be used for secondary modulation purposes such as filter sweeps, amplitude modulation, panning, etc.. As usual, the program name is displayed in the top right hand corner. The parameters are as follows: This selects the modulation waveform. The choices are: TRIANGLE ( ) - This gives a rising and falling effect. At around a setting of 75, this can be used for vibrato but can be assigned anywhere you like and can be used for filter sweeps, panning, amplitude modulation and slow pitch sweeps. This is a ‘bi-polar’ modulation waveform that ‘rotates’ around the note you are playing to give a natural vibrato effect.
0 SAWTOOTH ( ) - This waveform is used mostly for special effects. It rises slowly and falls abruptly. This is a ‘uni-polar’ waveform that jumps between the held note and the modulation level set at the destination. It can be inverted at the modulation input stages of each destination to give downward sweeps.
0 SQUARE ( ) - This gives stepped ‘up and down’ effect. When applied to pitch it can be set to give trills or large octave jumps. This is a ‘uni-polar’ waveform that jumps between the held note and the modulation level set at the destination. Like the sawtooth wave, it can be inverted at the input stages of each destination.
0 RANDOM ( ) - This gives a totally random stepped waveform and is suitable for special effects. Like LFO1’s RANDOM waveform, it can be used to create the classic ‘sample and hold’ effect found on analogue synthesisers. However, the random waveform provided by LFO2 has some other possibilities.
Page 80
S3200XL Operator’s Manual - Version 1.00
EDIT PROGRAM - SINGLE When the parameter is set to 00, the random steps will only change when a new note-on is received and will sustain at that level until a new noteon is received. I.e:
MIDI NOTE ONS
By applying this LFO in this way to, say, FILTER 1, each note you play may have a different tonal colour and this can be made into quite a dramatic synth effect by setting quite high modulation amounts and high resonance. With percussive sounds, this can be a very interesting rhythmic backing for tightly sequenced arpeggios and riffs and the like. By applying this to panning, each note will be in a different position in the stereo image. On single note, you will get a dramatic panning effect as the sound bounces all over the stereo image and in chords, each note will position itself in different positions giving the impression of great depth and spread to the sound. However, this facility can be also used more subtly! By applying a tiny amount of the RANDOM waveform to pitch (try a depth setting of 01), each note may have a very tiny pitch discrepancy. In a layered string or vocal ensemble, by applying this to just one of the layers, you can create interesting chorus effects as each note has a slightly different detune amount. Similarly, when applied in small amounts, this can also be used effectively on ‘ethnic’ sounds such as pan pipes as the ‘real thing’ is rarely perfectly in tune from one note to the next. On a rich analogue synth sound, you can also emulate the fact that these old synths’ tuning left a lot to be desired! There are many possibilities which you will no doubt find for yourself. This sets the rate of LFO1. This is variable between very slow for such effects as auto panning and filter sweeps and fast for vibrato and other effects. The default here is slow as it is assumed you will want to use this LFO for such things as filter sweeps and slow panning effects, etc.. This sets the master output level for LFO2. Unlike LFO1, its default is 99 so you will instantly hear the effect of LFO2’s modulation as soon as you apply it at any destination. This sets the delay between a note-on occurring and the effect being introduced. At 00 the effect will be instantaneous and at 99 the effect will take some 5 or 6 seconds to be introduced. I.e.
NOTE ON
S3200XL Operator’s Manual - Version 1.00
Page 81
EDIT PROGRAM - SINGLE Here, you can set whether or not LFO2 will re-trigger with every new note-on or not. With set to ON, each note you play will reset the cycle of the selected waveform to its leading edge. For example, with the triangle wave selected, you would get this result:
MIDI NOTE ON
This is useful for certain types of modulation effects where you want the effect to start at the same point in the modulation waveform for every note you play. For example, if you are using the square wave, you may want it to always start on the rising edge with each note you play. The same may apply for the sawtooth and random waveforms. However, there are occasions when you want the LFO to be free running in the background. For example, on filter or panning sweeps where you want the effect to be gradual as you play, you will want to switch to OFF to get this result:
MIDI NOTE ON
Here, the modulation waveform will ignore incoming note-on messages and will be rising and falling giving you a gradual sweep through whatever it is applied to. This is particularly useful when triangle is selected and applied to the filter(s) as you can re-create the old filter sweep effects of analogue synths. There are no modulation inputs to LFO2. You may use LFO2 for a number of things. As mentioned above, when LFO1 is tied up doing vibrato via the modwheel, LFO2 may be used to affect things such as panning, filter sweep and amplitude modulation. Of course, there is no reason why you shouldn’t use LFO2 for vibrato either and mixing it with LFO1 as a source of vibrato can create some rich ensemble textures. Many interesting things are possible when modulating LFO1 with this LFO - at extreme settings you can make LFO1’s modulation speed up and slow down for special sound effects or synth sounds but, if you’re trying to breathe some life into some dead string samples, for example, you may like to use LFO2 to slightly modulate LFO1 thereby affecting the vibrato very subtly so as to eliminate the inherent ‘cyclicness’ of LFO modulation. No doubt you will find variations of your own.
Page 82
S3200XL Operator’s Manual - Version 1.00
EDIT PROGRAM - SINGLE SETTING UP THE SOFT PEDAL Pressing will display this screen:
This final page in the modulation section allows you to set the response of the S3200XL to the soft pedal (The FOOTSWITCH input and MIDI controller 67). This can be very useful in obtaining better expression for piano sounds. The parameters are very simple and are as follows. The parameter determines how the volume of the sound will be affected when the pedal is pressed. The higher the number, the greater the amount of volume reduction. The parameter allows you to soften the attack of the sound and affects the attack times of the envelope generators. Again, the higher the value, the greater the effect. For many acoustic instruments, especially string and woodwind sounds, when played quietly, their attack times also change slightly so this parameter can be put to good use. The final parameter, , determines by how much the filter cutoff frequency will be reduced when the pedal is pressed thereby simulating the effect that acoustic instruments generally lose some upper harmonics when played quietly.
S3200XL Operator’s Manual - Version 1.00
Page 83
EDIT PROGRAM - SINGLE PORTAMENTO Portamento is a function that allows you to ‘glide’ from one note to another instead of moving in steps as is normally the case.
P I T C H
TIME
NORMAL PLAYBACK (NO PORTAMENTO)
P I T C H
TIME
WITH PORTAMENTO SWITCHED ON As you can see, when portamento is on, each note ‘slides’ to the next and the speed with which it slides is set by the portamento’s RATE parameter. The portamento effect is useful when playing acoustic sounds such as stringed instruments that have no frets (violins, violas, etc., fretless bass) and instruments such as trombone, penny whistle, etc.. It is also effective on vocal sounds as few, if any, singers hit the note dead on most slide into it. Of course, portamento was also a standard feature on older analogue synths, particularly monophonic ones (where it was often called GLIDE) and was responsible for the creation of some highly distinctive (although often over-used!) synth effects. Pressing F6 -
- in any of the MOD pages will display this screen:
The parameters are: This can be switched ON or OFF. When it is switched ON you will hear the portamento effect as you play. You will note that this parameter responds to the MIDI PORTAMENTO pedal (controller #65). This pedal is like the sustain pedal - when depressed, portamento will be switched on; when released, the effect will be switched off. When the parameter is ON, pressing the portamento pedal will have no effect - portamento will be on permanently. When this parameter is set to OFF, the portamento pedal will allow you to switch it on or off as you please. This may be useful when you wish to play a sound normally but only apply portamento to a few notes. For example, when playing a trombone sample, you may play normally and then switch portamento on to create the slide
Page 84
S3200XL Operator’s Manual - Version 1.00
EDIT PROGRAM - SINGLE effect. Similarly, with fretless bass, the portamento pedal may be used to slide notes whenever you please. TIP: This may also be used to good effect to simulate the TB303 bassline synth so loved in dance music. One of this bass synth’s most distinctive features was (is) the programmable glide effect. To create this sound, take a simple, single sawtooth or square wave sample (no detune - the TB303 has only one oscillator), add simple filtering (preferably highly resonant) and a simple envelope and use the footswitch control of portamento to switch glide on and off at suitable moments. This sets the speed of the portamento. It is difficult to specify its range as this depends on the setting of the parameter described below but the longest portamento effect you can have is over 30 seconds. You will note that if this parameter is set high but you play notes quickly, the portamento effect may be so slow that your notes never hit the right pitches! If you anticipate playing a particular sound quickly, set lower portamento rates. Here you may select two different portamento types, TIME and RATE. TIME sets the portamento effect so that the speed of the effect is constant regardless of the interval played. For example, if the rate is set to give a glide of 1 second, it will take one second to glide up a semi-tone or seven octaves. For example:
1 sec 1 sec 1 sec 1 sec 1 sec
When TIME is selected When set to RATE, the speed the effect takes depends on the interval. For example, if it takes one second to cover an octave, it will take two seconds to cover two octaves, four seconds to cover three octaves, eight seconds to cover four octaves, etc.. For example:
1 sec 2 secs 4 secs 8 secs 16 secs
When RATE is selected You may use these two portamento modes to create a range of different musical effects.
S3200XL Operator’s Manual - Version 1.00
Page 85
EDIT PROGRAM - SINGLE NOTES ON USING PORTAMENTO The portamento effect can be used when playing polyphonically or monophonically. When playing polyphonically, notes in a chord will slide up or down to the next chord accordingly at a speed set by the and parameter. If one note in a chord is held when a new chord is played, it will not be affected. When playing monophonically (i.e. with MONO LEGATO switched ON), the effect is just like that found on an old analogue monosynth and many exciting synth sounds can be created using the portamento function that fit in perfectly with the current fashion for using analogue synths. Of course, when playing monophonically, the effect can be applied equally as effectively to samples of acoustic instruments and the effect can be switched in and out using the MIDI PORTAMENTO pedal for expressive phrasing. The portamento effect is a PROGRAM parameter - that is, it will affect all keygroups equally. When layering sounds in a multi, to apply portamento to some sounds and not to others, create a program with portamento and another program without portamento and place the programs into separate parts, assigning the same MIDI channel to those parts. When you play, one program will hit new notes immediately whilst the other lags behind. Of course, you may stack more than two programs on top of each other in the multi. Alternatively, you may layer programs in this way and set different portamento rates for each one so that they all slide around at different speeds!
Page 86
S3200XL Operator’s Manual - Version 1.00
EDIT PROGRAM - SINGLE KEYGROUP PARAMETERS - CREATING KEYGROUPS All the previous parameter descriptions have so far been concerned with global or master changes to the program - i.e. not keygroup specific. This next section delves deeper into PROGRAM EDIT and examines the individual keygroup parameters. These include keyboard mapping, sample assignment and, of course, the filters and envelope generators. In the main PROGRAM EDIT screen, pressing
will display this screen:
This gives you access to the keygroup pages. The primary function of this page is to create and copy keygroups although it is also possible to set key ranges (although this is possibly best done in the SPAN page - see later). The parameter, , shows you how many keygroups currently exist in the selected program. To copy keygroups, simply move the cursor to this field and press the +/< key on the numeric keypad as many times as you need keygroups. The amount you have copied will be shown in this field. To delete keygroups, simply press the -/> key on the numeric keypad. If you already have some keygroups in the program and you specifically want to copy, say, keygroup 5, move the cursor to the field and select 5. You may also set the keygroups note range in the field but you may prefer to use the graphically assisted SPAN page for that. The and parameters allow you to send individual keygroups to the effects by overriding the main program’s effects routing. The default will be PRG (i.e. the routing is using the program’s effects buss selection) but you may also select OFF (i.e. the selected keygroup is not routed to the effects), FX1, FX2, RV3 or RV4. The parameter allows you to set the amount of effect for each keygroup. In this way, you can, for example, send individual drums in different amounts to the effects. Furthermore, each drum could be routed to a different effect (i.e. bass drum to a tight gated reverb, snare to a large hall, toms to a medium hall, etc.). To set this, select the keygroup in the field (or press and hold the EDIT key and play the appropriate note) and route that keygroup as appropriate and set a suitable level. The function allows you to group several keygroups together so that they are essentially monophonic. The main reason for this is for drums where sometimes you want a sample to stop playing when another is played. For example, you would want a closed hi-hat to stop an open hi-hat. Similarly, you may want an open triangle to be cut off by a closed triangle. To do this, simply assign all the relevant keygroups to the same Mute Group. For example, if all your hi-hats are in keygroups 3-6, assign those keygroups to, say, Mute Group 1. All other keygroups will be unaffected but all those in mute group 1 will be mutually exclusive - that is, if one is sounding when another is played, it will be cut.
S3200XL Operator’s Manual - Version 1.00
Page 87
EDIT PROGRAM - SINGLE For example: OPEN HI-HAT (or triangle, etc)
CLOSED HI-HAT (or triangle, etc)
OPEN AND CLOSED HI-HAT WITH MUTE GROUP OFF
Here, you can see that the open hi-hat continues to play even though the closed hi-hat is triggered. OPEN HI-HAT (or triangle, etc)
CLOSED HI-HAT (or triangle, etc)
OPEN AND CLOSED HI-HAT WITH MUTE GROUP ON
In this example, however, the open hi-hat is shut off by the closed hi-hat thereby creating a more natural effect. This function may also be used to emulate the characteristics of older drum machines. On these early drum machines, whilst they offered maybe 8 voice polyphony, each individual drum sound was sometimes monophonic. This only became apparent when you tried to perform a snare roll or something similar. Instead of the snare’s natural decay being allowed to sound, the next hit would cut the previous one dead resulting in a rather unnatural staccato effect. Of course, at the time, this was undesirable but the dictates of musical fashion now say that this effect is quite popular in some music styles!! By assigning your snare drum into a mute group, you may re-create this effect. For example:
SNARE DRUM ROLL WITH MUTE GROUP OFF
In this example, each snare hit is allowed to decay naturally.
SNARE DRUM ROLL WITH MUTE GROUP ON
In this example, each hit is cut short by the next one.
Page 88
S3200XL Operator’s Manual - Version 1.00
EDIT PROGRAM - SINGLE On the S1000 and S1000 and in early versions of S2800, S3000 and S3200 software, you needed to create a separate program, make it 1 voice polyphonic and assign it the same program number as the rest of your drums. Now, you may do all this within one program which you may find more convenient. Another application for this function is when using the MONO LEGATO mode. When the MONO LEGATO mode is switched ON, the program becomes monophonic. The limitation of this, however, is when you play a mono legato run across a program that has several multisamples in different keygroups. For example, in a multi-sampled flute program, as you play across the keygroups, those keygroup’s samples will not play and you may end up with a situation where, in an extensive run downwards, you are playing a C5 flute sample on C2. This would probably result in an unnatural timbre due to extreme transposition of the sample. To overcome this, by assigning all the keygroups to the same mute group, although the program is monophonic, as you play across each keygroup, so those keygroup’s samples will play in turn and, in the above example, you would be correctly playing the C2 sample on C2. The downside to this, however, is that as you cross into each keygroup, so the samples’ attack will be re-triggered. If the attack of the samples is fairly pronounced, you may hear this but, depending on the setting of the envelope generators, this may not be too noticeable. If, however, the samples have no pronounced attack (i.e. in the case of raw, sampled synth waveforms), then the transition across the keygroups will be smooth. It is up to you to decide which is best. If accurate transposition is more important than the samples re-triggering, then you should use the mute group function in conjunction with the MONO LEGATO mode. If, however, the samples re-triggering every time you cross into a new keygroup not acceptable, then maybe you should use the mono legato mode without the mute group function although you may run into problems associated with extreme transposition of samples. If, as mentioned, the samples do not have a pronounced attack, then a combination of mono legato and the mute group function will give you a smooth transition across the keygroups. The final field on this page is . This may be switched between ONE and ALL and allows you to edit only the keygroup selected in the field (ONE) or all keygroups (ALL). You may select the keygroup you want to edit in the but you may also select the keygroup in any of the keygroup pages.
if you wish
TIP: A very quick way of selecting keygroups on the S3200XL is to press and hold the EDIT key and play a note on the keygroup. This will select that note’s keygroup. For example, in a program with five keygroups spanning C0-B1, C2-B2, C3-B3, C4-B4, C5-G8, playing G3 will select keygroup 3 - i.e. the one spanning C3-B3. In the case where keygroups are layered or overlap, pressing and holding EDIT and repeatedly playing the note will select each keygroup in turn. This is a very fast way of selecting keygroups. Pressing the key will take you back to the main PROGRAM EDIT screen and give you access to the other global pages.
S3200XL Operator’s Manual - Version 1.00
Page 89
EDIT PROGRAM - SINGLE MAPPING OUT YOUR KEYGROUPS - SETTING KEYSPAN Pressing will display this screen:
This is where you can set up the note ranges for the keygroup. You can see a graphic representation of the keyboard to the left of the screen. As you adjust the LOW and HIGH parameters for a keygroup, you will see its range depicted in the graphic representation of the keyboard to the screen’s left. The notes may be represented by name or as note number simply by pressing the SPAN soft key again. The above screen display shows a simple program with one keygroup in it. This next screen shows a typical program with several keygroups side by side.
The parameters are as follows: This toggles between ONE and ALL and allows you to choose between editing either one single keygroup or all keygroups simultaneously. You will find this function of every keygroup page and it can be invaluable in making up and editing programs quickly. In a complex program, you may select ALL to do all the basic work and then switch to ONE to individually fine tune the keygroups. Below this field are the keygroups and their note ranges can be seen alongside them. You may move the cursor directly down this line using the cursor keys for quick access to a particular keygroup. Below these two fields are shown the lowest and highest notes for the keygroups. These may be set by moving the cursor to them and using the DATA control to input notes or, when displaying the notes numerically, you may type in a number from the numeric keypad. Another way to input notes is directly from the keyboard. By setting the soft key to ON and placing the cursor on the low note of keygroup 1, as you play the keyboard, so the notes will be entered. The cursor will jump to each low and high note in the list eventually ‘wrapping round’ to rest on KG1. This is a very fast way to set up keygroup note spans and a whole program can be set up in seconds! N O T E : If ALL is selected in the field, changing a value in the low or high fields will affect ALL notes equally. Pay attention because you could seriously affect your program’s keyspan with one slip. You will note that this does not apply when inputting notes from the keyboard and is on.
Page 90
S3200XL Operator’s Manual - Version 1.00
EDIT PROGRAM - SINGLE This allows you to tune the keygroup up or down in semitones and cents. The range is ±50.00. This introduces a fixed tuning offset and can be used when layering samples to provide a chorus effect. Unlike the TUNE parameter, this offset is constant no matter what the played pitch of the sample is. The range is ±50. This soft key switches on or off the facility to input notes from the keyboard. At first, with the function being so fast and convenient, it may seem a bit strange to want to disable it but there may be times when you need to be able to change note ranges whilst receiving data from a sequencer that is playing. If was on permanently, in the situation, the sequencer would completely re-program the key ranges! This on/off function should guard against that. To exit this page and to access other pages, press - this will give you access to other keygroup functions - or press to return you to the main PROGRAM EDIT page and the master program functions.
S3200XL Operator’s Manual - Version 1.00
Page 91
EDIT PROGRAM - SINGLE ASSIGNING SAMPLES TO KEYGROUPS AND ZONES - SMP1 Samples are assigned to keygroups in the SMPL page. Pressing gives this display:
This is SMP1 (the first page to do with assigning samples - there are three in total). Here, for the first time, we catch a glimpse of the zones mentioned at the start of this section. In this example, the test program has one sample in it in zone 1. This has a velocity range of 1-127 and so will play across the entire keyboard. Compare that with this screen which shows a typical three way velocity switch for a bass program:
Here you should be able to get a feel for the concept of ‘zones’. We have three separate samples SOFT BASS, HARD BASS and PULL BASS and their velocity ranges are split 0-65, 66-95 and 96-127. You will also note the nice graphic depiction alongside it for each of the three zones! Playing within those velocity ranges will play each sample accordingly allowing you to emulate the many tones available from just one note of a real bass guitar. If the velocity ranges overlapped (i.e. 0-70, 63-100 and 93-127) and (seen to the left of the graphic display) is switched to ON, then the velocity zones will crossfade giving a smoother response in some cases. N O T E : If you play between two overlapping ranges (i.e. in the above example, if you play at a velocity of 96), you will actually be playing two voices out of the possible 32. With such generous polyphony, this shouldn’t be a problem unless you are driving the S3200XL particularly hard. Another way to use the zones is for stereo samples and for layering sounds. For example:
This shows the assignment for a stereo piano sample. The left and right samples are assigned to zones 1 and 2 respectively and both given a range of 0-127. These two zones would be panned hard left and hard right in SMP2 (see below) to give stereo reproduction through the L/R outputs. N O T E : For stereo samples to play in stereo, they must be in the same keygroup and set up as shown above.
Page 92
S3200XL Operator’s Manual - Version 1.00
EDIT PROGRAM - SINGLE For layering sounds, you might like to set something like the following:
Here we have assigned two identical synth samples to zones 1 and 2 and, as in the stereo program above, both have a velocity range of 0-127. In the SMP2 page, these can be detuned against each other and panned hard left and right to create a fat, warm, pseudo-stereo synth sound. This is a quick way of achieving this kind of sound. Of course, they don’t have to be identical samples - anything will do. The trick with this method is that both samples share the same processing with the filters and envelope generators making adjustment and editing very simple. If you want to be more adventurous, you could use totally separate keygroups for layering synth sound (or acoustic sounds, for that matter) and each could have different envelope and filter characteristics. The parameters in this page are: This shows the current keygroup’s key range as set in the SPAN page. It can be altered here if you wish. This shows the currently selected keygroup and allows you to select others using the DATA control. As always in PROGRAM EDIT, you may quickly select a keygroup by holding the EDIT select key and playing an appropriate note on the keyboard. Here you can select to edit ONE or ALL keygroups. N O T E : Selecting ALL doesn’t apply to assigning samples when using the DATA control. Only one sample is assigned and the other keygroups remain unchanged even if ALL is selected. Of course, as usual, the name of the current program is shown at the top right hand of the screen. This shows the four zones in the column below. You will notice that in all SMP pages, as you play, a small dot appears alongside the field to signify which zone is playing - this is useful in identifying which sample is playing in a complex velocity switched program. This shows the sample(s) currently assigned to the zone(s). If a sample name is assigned but it does not exist in the S3200XL’s memory, a “?” will appear alongside it to indicate that it is missing. To assign a sample, simply move the cursor to this field and scroll through the available samples in memory with the DATA control. To delete a sample from a zone, simply move the cursor to it, press NAME and replace the name with blanks. To erase a group of samples in the same zone in different keygroups, do the same but with ALL selected.
S3200XL Operator’s Manual - Version 1.00
Page 93
EDIT PROGRAM - SINGLE
USEFUL HINT FOR ASSIGNING SAMPLES! Assuming you have a lot of samples to assign and you have made up a program with sufficient keygroups, go to keygroup 1 and press MARK/#. Now move the cursor to the sample assign field below and select the first sample. NOW PRESS JUMP/. - this will take you to the KG field again and select another keygroup. Now press JUMP again to toggle you back to the sample assign field and select your next sample, press jump, new keygroup, jump, new sample, etc.. Once you get some practice, you can assign the samples to quite a complex program in no time at all. Another quick method for selecting keygroups method is to press and hold the EDIT key and play a note on the keyboard. This will select the keygroup for that note. Please note, that for either method, if you record (or load) your samples in the order they are to be assigned, then the process is even quicker. This sets the low velocity range for the zones. This sets the high velocity range for the zones. This allows you to select between TRACK and CONST. When TRACK is selected, then the sample can be played across the keyboard range as normal. When CONST is selected, then the sample(s) will play at a constant pitch of C3. USEFUL TIP TO DRUM SAMPLISTS! Sample all your drums on C3 in EDIT SAMPLE, assign them to any key you like in the program and simply switch on CONST for all keygroups. They will now play back at exactly the pitch they were sampled at. In this way, you don’t have to worry about setting notes when sampling and then trying to match them up in EDIT PROGRAM. Other non-pitched samples such as sound effects, breakbeats, drum loops, etc., can be treated the same way. As mentioned before, there is a small box to the left of the screen that displays graphically the status of the four zones’ velocity ranges
Page 94
S3200XL Operator’s Manual - Version 1.00
EDIT PROGRAM - SINGLE SMP2 Once you have assigned your samples, you may go to the next sample page by pressing . Here you may tune and pan your samples. You will get this screen:
The top line of the screen is exactly as in SMP1 and displays the currently selected keygroup’s note range and keygroup, whether you are editing one individual keygroup or all of them as well as the program name. The other fields are: Again, this shows the zone number in the column below. This column allows you to tune each sample in each zone separately. You may tune the sample in semi tones and cents over a very wide range (±50.00). You can fine tune the loudness for each zone in each keygroup to balance them up against each other. You will note that if the master loudness parameter in the OUT page of the main PROGRAM EDIT screen is set to 99, this control will only have effect downwards (i.e. when setting a -value). The range is ±50. This parameter allows you to fine tune the filter cutoff slightly to maintain a consistent tone between keygroups. The range is ±50. This allows you to pan each zone in each keygroup between the main L/R outputs. The range is L50-MID-R50.. This allows you to assign each zone in each keygroup to its own output 1-8 for separate processing on an external mixing console if you wish. This has a relationship with field found in the OUTPUT LEVELS page. If the whole program is assigned to an individual output, that output will be shown here - i.e. if the program is set to appear at output 1, then 1 will be shown for every keygroup here. You may change this per keygroup so that some sounds come out of 1 and other keygroups appear at other outputs. This is particularly useful on drums where you often need to mix drums through an external mixer to add EQ, reverb, compression, etc.. Even if the main program field is set to OFF in the OUTPUT LEVELS page, you may still route individual keygroups to separate outputs. This may be useful in a drum program where things like toms, cymbals and some percussion appear at the S3200XL’s stereo outputs whilst important drums like bass drum and snare are assigned to appear at individual outputs. You will note that whatever the output assignment is here, the level is taken from the master OUTPUT LEVELS page and is set at the field. This allows you to change the loop and playback characteristics of the sample. Normally, these are set in EDIT SAMPLE but they may be changed here if you wish. This will not affect the ‘raw’ samples’ loop and playback characteristics but can be used within the context of particular programs. This eliminates the
S3200XL Operator’s Manual - Version 1.00
Page 95
EDIT PROGRAM - SINGLE need for copying the same sample several times (and hence wasting memory) to achieve the same effect. The options available to you are: AS SAMPLE plays back the sample exactly as set up in the MORE page in SAMPLE EDIT. LP in R is the same as the LOOP IN RELEASE mode of the MORE page in SAMPLE EDIT. LP til R is the same as LOOP UNTIL RELEASE. NO LOOPS is self-explanatory! TO END is the same as the PLAY TO SAMPLE END selection in the MORE page in SAMPLE EDIT. The ability to reset the playback parameters of a sample allows you a lot of flexibility - the same sample can be used in different ways in different programs.
Page 96
S3200XL Operator’s Manual - Version 1.00
EDIT PROGRAM - SINGLE SMP3 Pressing takes you to the last of the three sample pages in PROGRAM EDIT. Here you may set the velocity start time for the sample(s) assigned to the currently selected keygroup. The screen display looks like this:
This page allows you to determine the way in which velocity affects the playback starting point for each sample in a keygroup. This parameter is variable from +9999 to -9999. The higher the positive number, the earlier in the sample playback will start relative to the key velocity (i.e. a high key velocity will start playback earlier in the sample). A negative number has the opposite effect (a high key velocity will start playback later in the sample than a low key velocity). This effect is particularly useful for simulating percussion instruments (try it with a bass drum). It can also be very effective with such instruments as a heavily bowed cello - by setting a high positive value, hard keystrokes will play the aggressive bowing whilst soft keystrokes will not. The same could be done with overblown saxes or flutes. Something similar could be done with synth bass samples or other synth noises that have a pronounced filter sweep attack. No other functions are available in this page. In all of the sample pages, you may select between them via the three SMP soft keys. To return to the keygroup screen to access the other keygroup functions, press and to return to the main PROGRAM EDIT screen to access the ‘global’ program functions, press .
S3200XL Operator’s Manual - Version 1.00
Page 97
EDIT PROGRAM - SINGLE THE FILTERS Pressing displays the main keygroup function select where you may access the filter and the envelope generators:
From this page press the
key to take you to the filter page:
The S3200XL is equipped with 12dB/octave lowpass resonant filters as found on many analogue synthesisers. As well as using them for the tonal modification of acoustic samples, they also allow you to totally transform a sound. ‘Lowpass’ means that the filter will allow low frequencies to pass through unaffected whilst high frequencies are removed. CUTOFF FREQUENCY L E V E L
HARMONICS
FREQUENCY
As the cutoff frequency is moved downwards, so high frequencies are gradually removed. CUTOFF FREQUENCY L E V E L
HARMONICS
FREQUENCY
This is very convenient when dealing with samples of acoustic instruments because as notes die away, they tend to lose their higher frequency content first. By applying an envelope generator to the filter’s cutoff frequency, we can emulate that on the sampler. Another property of sound is that when it is played loud (ff) it is generally brighter than when it is played softly (pp). Using the filter and applying velocity (or controlling the output of the filter’s
Page 98
S3200XL Operator’s Manual - Version 1.00
EDIT PROGRAM - SINGLE envelope generator using velocity) we can have a certain amount of control over tonal dynamics as well. The S3200XL’s filters are equipped with resonance. This allows you to selectively boost the area around the cutoff frequency thereby boosting certain harmonics. CUTOFF FREQUENCY WITH RESONANT PEAK
L E V E L FREQUENCY
Although it has some uses when trying to accurately reproduce some acoustic samples, its use is more suited to synthesiser effects. You will note, however, that when resonance is used, because of the gain increase that takes place, it can be easy to overload the output stages of the S3200XL, especially with certain sounds. As a result, take care to watch levels. The distortion produced by digital circuitry is not as pleasant as that produced by the old synths (unfortunately!!) so we can’t expect the pleasant overdriven sound from a sampler - if you are after that sound, then sample the distortion from the synth! Let’s now have a look at the filter’s parameters. The parameters across the top of the page follow the usual convention and allow you to select the keygroup for editing, select whether you wish to edit just one keygroup or all keygroups simultaneously and, of course, you can select another program for editing if you wish. The other fields on this page are: This shows the current keygroups key range. This allows you to set the filters cutoff frequency. As you decrease this from 99, you will remove the upper harmonics resulting in a softer tone. This can be used to great effect on acoustic instruments (especially those that have been looped) with velocity and envelope shaping to restore the natural harmonic dynamics and movement to the sound. On synths, you may sweep this with all sorts of controllers for a wide range of synth sounds. Here you may set the keyboard to track the filter. This is so that you can achieve an even tone across the keyboard range. +12 is the default and this tracks the filter octave for octave - i.e. for every shift of pitch of one octave, there is an according shift in harmonics. This allows you to sharpen the point at the cutoff frequency thereby emphasising the harmonics at that point. The sound changes from a soft ‘waaa’ effect to the characteristic ‘weeow’ effect with high resonance settings. The range is 0-15. High resonance settings can be used for classic synth bass sounds and, simply by sampling raw synth waveforms (i.e. without using the synths filter, etc.), these may be used as the basis for some powerful synth sounds through these filters.
S3200XL Operator’s Manual - Version 1.00
Page 99
EDIT PROGRAM - SINGLE
N O T E : When increasing the resonance, depending on the sound, some very loud peaks may be created as certain strong harmonics get boosted. This can result in distortion. To reduce any distortion you may have, reduce the loudness control in the OUT pages. The next three parameters down the right hand side are the modulation inputs to the filter. The defaults for these are , and respectively. These may be mixed and the range for each modulation input is the usual +/-50. You will note that for there to be any effect, the parameter should be set to something lower than 99. With set to a high positive value, you may use velocity to control tone colour much like you would find on an acoustic instrument with louder notes yielding brighter sounds and, of course, vice versa. may be used for filter sweep effects such as flute tremolando or drastic resonant synth effects whilst is used for shaping the tonal dynamics of the sound and restoring lost harmonic movement due to looping. The multistages of ENV2 allow some interesting possibilities as we shall see in a moment. The other options which you may select for modulating the filters are: Modwheel
This works much like pressure and moving the modwheel will cause the filter cutoff to open and close. Use this for phrasing brass parts, perhaps, or for special synth filter effects in a bass line or lead line.
Bend
This works like pressure and modwheel and allows you to open and close the filter by moving the pitch bend wheel or lever. This can be effective when bending up into a note as the filter will open and sound brighter.
Pressure
This may be used for expressive swells, particularly on brass sounds.
External
This can select from one of the 128 MIDI controllers for control of the filter cutoff.
Key
Although selectable as a mod source, it is not that worthwhile because this is hardwired via the parameter.
Lfo1
This allows you to emulate the natural tremolo of flutes, woodwind, brass and other such instruments when set to small modulation amounts. When set to large modulation amounts, classic synth filter sweeps can be achieved. That LFO 1 can also be modulated leads to some very interesting synth sounds and special effects.
Env1
On occasions, it is good to be able to have the filter’s tonal dynamics match those of the amplitudes. One easy way to achieve this is, instead of copying the amplitude envelope to the filters envelope, simply assign the amplitude envelope ENV1 to the filter.
! Modwheel
This and the other “!” controllers allow you to control the opening and closing of filter cutoff at the point of note on. They don’t have any effect if these controllers change through the course of the note but only when the note is pressed.
Page 100
S3200XL Operator’s Manual - Version 1.00
EDIT PROGRAM - SINGLE ENV1 - SHAPING AMPLITUDE Pressing F5 - will give this screen display:
Here we have the normal parameters across the top of the page where you may select your keygroup, whether one or all keygroups are being edited and the program name. Also, beneath that you can see a graphic representation of the envelope. The keyspan is also shown and this may be changed here if you wish. The other parameters are: This calls up a series of preset envelope templates that have been set within the software of the S3200XL. You can use these to get close to the type of envelope you are after and then maybe fine tune them afterwards if needs be. ENV1 is the ‘manual’ envelope - i.e. the one you can program yourself. If you select a preset envelope and then edit it, you will note that it immediately become ENV1, the programmable envelope. You will notice that any envelope you create is not lost when you select a preset - ENV1 (your own envelope) is always retained as you scroll through the list of available envelopes although ENV1 will be lost if you edit a preset. N O T E : Should you select a preset and then leave this page, when you return, you will note that the template is renamed and becomes ENV1. This sets the time the envelope will take to reach full level. This sets the time it will take to reach the sustain level. This sets the level at which the note will sustain while a key is held. This sets the time it takes for the sound to fade away after the note has been released. This forms the basis of an ADSR envelope generator for shaping amplitude. This envelope generator is hardwired to amplitude control and so always sets the sound’s overall envelope. Pressing
calls up this screen:
S3200XL Operator’s Manual - Version 1.00
Page 101
EDIT PROGRAM - SINGLE Once the basic envelope has been set up, these other factors can be used to affect the speed of the envelope. This is variable from +50 to -50, and determines the amount by which the attack speed will be changed depending on the Note On velocity. A positive value will increase the attack time if the key is pressed fast, while a negative value will slow down the attack rate if the key is pressed fast. Setting a positive value here is the most commonly used way of using this parameter and is useful for imitating the characteristics of some acoustic instruments (for instance, most wind instruments have a faster attack rate when played loudly). This is used to vary the release rate relative to the Note On velocity value (+50 to -50). Again, a positive value will increase the release rate relative to the Note On velocity, and a negative value will shorten the release time. The MIDI specification allows for Note Off velocity as well as Note On velocity. Though some keyboards do not accept or transmit this, assuming a mean value of 64, all AKAI keyboards provide a full implementation of this function. The speed with which the key is released can be used here to affect the release rate (positive values mean that a fast release lengthens the release rate, and vice versa). This allows you to control the amount by which the key position affects the decay and release rates. Setting this to a negative value means that the higher the note played on the keyboard, the shorter the decay and release times (similar to most acoustic instruments). Setting this parameter to a positive value will reverse this effect. This can be set to ON or OFF. When ON, the attack portion of the envelope will be held until looping begins, and when OFF, the envelope will continue along the set values, regardless of loop settings. I.e:
Loop
Attack HOLD: ON Attack
Page 102
Decay
Loop
Sustain
S3200XL Operator’s Manual - Version 1.00
EDIT PROGRAM - SINGLE ENV2 - SHAPING THE FILTER Access to ENV2 is also via the KGRP or FILT page. However you arrive there, the screen looks like this:
This is a 4-stage envelope generator with 4 rates going to 4 levels. Basically, Rate 1 goes to Level 1, Rate 2 to Level 2, Rate 3 to Level 3 (which is also the sustain) and Rate 4 goes to Level 4. Again you have a choice of templates from which to choose a variety of preset envelopes (probably a bit more necessary in light of the added complication of a multi-stage envelope) and this works on the same principle as ENV1’s templates except that there are more of them. Some of the possible envelope shapes you can create using envelope 2 are shown below:
The second page of envelope parameters can be accessed by pressing receive this screen:
. You will
Here we have similar parameters to ENV1. This sets how much velocity will determine the speed of rate 1. This sets how much the note-on velocity will affect the speed of rate 4. This sets the amount by which MIDI note off velocity will affect the speed of rate 4. This will set how much key position will affect both rate 2 and rate 4. This sets how much velocity will control the modulation output of ENV2. This parameter can be used very effectively in regulating dynamics through key velocity. All parameters’ ranges are +/-50.
S3200XL Operator’s Manual - Version 1.00
Page 103
EDIT PROGRAM - SINGLE USING THE FILTER AND ENVELOPE GENERATORS One of the inherent problems of sampling is that, because of memory limitations, it is usually necessary to loop a sample. This often has the effect of reducing (or even removing!) the sound’s natural dynamics making the sample more like a snapshot than a movie. To overcome this, however, we can use the filters and the envelope generators to restore some of those attributes. By bringing the filter cutoff frequency down and using note-on velocity as a controller, you can emulate the characteristics of most, if not all acoustic sounds where loud notes are brighter in tone than quiet ones. Controlling the output of ENV2 using velocity and applying that to the filter is another way of doing this. Furthermore, another natural property of sound is that during a note, the tonal quality changes. We can use envelopes and low frequency oscillators to restore some of those qualities. Usually, the filter will use the multi-stage ENV2 as its controller because tonal changes are usually more complex than amplitude changes in acoustic sounds. This envelope can also be used to imitate such things as brass growls - to actually sample a brass growl would not only take up memory but would speed up and slow down as you play it across the keyboard. ENV2 could be applied to an ordinary brass sample and set so that Rate 3 swells back up from a low Level 2 to not only recreate this effect but also to keep the swell at a constant rate across the keyboard. Pressure may also be used for the same effect although you would be controlling the growl - this may be preferable to the ‘automated’ quality a preset envelope rate would have. Of course, once you are in the realm of sampling synth waveforms and processing them through the filter, you are in different territory but anyone who has used an analogue synth will feel instantly at home with the S3200XL’s filter and envelope section. The only difference here, however, is that instead of relying on a handful of waveforms, any sampled sound may be used as the source. It is here that the modulation possibilities can be used to good effect in the creation of new sounds (and the recreation of a few classic old synth sounds too!) Having the filters, envelope generators and comprehensive modulation facilities in the S3200XL means that instead of having to sample an entire synth sound, you can simply sample the ‘raw’ waveforms from the synth and apply all the other synth processing in the S3200XL. There are several ways this can be done - you could either sample multiple detuned oscillators or you could sample individual oscillators and then layer them in the S3200XL. This might be preferable in a way as single waveforms can easily be looped and take up virtually no memory space (*). With digital synths, you can take the basic waveform material and build up a huge array of waveforms to use as the basis of your synth sounds. * NOTE: Sampled waveforms do not detune in quite the same way as analogue synths. On analogue synths, there are all kinds of pleasant distortion artefacts that give the sound character - in some cases it is best to sample that distortion. Note also that sampled waveforms transposed up and down the whole range of the keyboard do not sound quite the same as ‘the real thing’ so it is probably best to multi-sample these for best results.
Page 104
S3200XL Operator’s Manual - Version 1.00
EDIT PROGRAM - SINGLE THE SECOND FILTERS The second bank of filters is accessed by pressing screen:
. This will display the following
Essentially, this looks very similar to the Filter 1 page except you will notice the extra parameter that selects these filters’ different modes. The second filter offers four different types of filters: LOWPASS, BANDPASS and HIGH PASS plus a special EQ filter selection. The lowpass filter we have already seen and offers this type of response graph: ROLL-OFF SLOPE
CUTOFF FREQUENCY
L E V E L
HARMONICS
FREQUENCY
Here, high frequency components above the cutoff frequency are removed and only lower frequency components will pass through the filter. When the resonance control is increased, the area around the cutoff frequency is boosted to give synthesiser effects. The band pass selection offer this type of response slope: ROLL-OFF SLOPE CUTOFF FREQUENCY
L E V E L
HARMONICS
FREQUENCY
Here, frequencies below the cutoff and above are removed. You may simultaneously remove depth and top end using this selection and the result is a buzzy, thinner type of sound. As the resonance amount is increased, so the width of the response slope gets narrower so that individual harmonics are emphasised.
S3200XL Operator’s Manual - Version 1.00
Page 105
EDIT PROGRAM - SINGLE The high pass filter offers this response slope: ROLL-OFF SLOPE
CUTOFF FREQUENCY
L E V E L
HARMONICS
FREQUENCY
In this example, you can see that low frequency components are removed whilst high frequencies pass through. This filter can be used to make sounds very thin and brittle. For example, this type of filter may be used effectively on an oboe sound or harpsichord sound. When the resonance is increased, the area around the cutoff frequency is boosted and so harmonics around that frequency will be emphasised. The final mode selection is quite unlike those shown above. Selecting EQ turns the second filter bank into a simple one band equaliser with variable frequency and resonant cut/boost that can be used for a variety of different effects. With the EQ selection, the ‘straight’ sound from Filter 1 is also passed through unaffected and you can use this EQ section to highlight specific frequencies in the sound. This filter is also able to be controlled by any of the modulation sources we have seen so far and using it with a high resonance setting in conjunction with any of these modulation sources, you may create interesting sounds not unlike phase shifting. The response slope for the EQ selection is shown below: CUTOFF FREQUENCY Resonance = 31 L E V E L
Resonance = 24
Resonance = 12 Resonance = 0 FREQUENCY
With resonance at 16, the frequency response is flat but as the resonance is increased, the gain of the filter is boosted around that frequency. If the resonance is decreased, the gain is cut as the resonance gets sharper. The fields on the FILTER 2 page are as follows: The parameters across the top of the page follow the usual convention and allow you to select the keygroup for editing, select whether you wish to edit just one keygroup or all keygroups simultaneously and, of course, you can select another program for editing if you wish.
Page 106
S3200XL Operator’s Manual - Version 1.00
EDIT PROGRAM - SINGLE The other fields on this page are: This shows the current keygroup’s key range. When lowpass, band pass and highpass filters are selected, this allows you to set the filters cutoff frequency. When EQ is selected, this control sets the EQ band’s centre frequency. Here you may set the keyboard to track the filter. This is so that you can achieve an even tone across the keyboard range. +12 is the default and this tracks the filter octave for octave - i.e. for every shift of pitch of one octave, there is an according shift in harmonics. This allows you to sharpen the point at the cutoff frequency thereby emphasising the harmonics at that point. The sound changes from a soft ‘waaa’ effect to the characteristic ‘weeow’ effect with high resonance settings. The range is 0-31. High resonance settings can be used for classic synth sounds and, simply by sampling raw synth waveforms (i.e. without using the synths filter, etc.), these may be used as the basis for some powerful synth sounds through these filters. NOTE: The resonance control functions differently when EQ is selected. When EQ is selected, a value of 16 is no cut or boost. Raising the resonance above 16 will boost the selected cutoff frequency and lowering it below 16 will cut the selected cutoff frequency. You will, therefore, experience a tonal change when you switch from LP, BP or HP to EQ. For example, if a value of 16 is set for the resonance on the other three filters, this will be flat when you select EQ. Similarly, if a value of 0 is set on the other three filters, this will cause the cutoff frequency to be cut when you select EQ. This parameters allows you to select the filter mode of your choice and the selection possibilities are LP (lowpass), BP (bandpass), HP (highpass) and EQ. For details on these different filter types, please see the description given above. This parameter allows you to bypass the second filter and tone section if you wish. You may use this parameter to quickly bypass the settings of the second filter and tone control section to make A/B comparisons. NOTE 1: With this parameter set to ON, the polyphony of the S3200XL is restricted to 30 voices. If OFF is selected, the second filter and tone section are bypassed, and the S3200XL may operate with 32 voices. NOTE 2: The setting of this parameter relates to both the second filter and tone section. This allows you to switch in a -6dB pad. This is included to overcome the possibility of distortion should the resonance be set quite high, boosting the sound into overload. NOTE: The attenuator should be enough to overcome distortion that may result from very high resonance settings. If, however, it is not, then you will have to turn the program level down in the OUT page.
S3200XL Operator’s Manual - Version 1.00
Page 107
EDIT PROGRAM - SINGLE The next three parameters down the right hand side are the modulation inputs to the filter. The defaults for these are , and respectively. These may be mixed and the range for each modulation input is the usual +/-50. You will note that for there to be any effect, the parameter should be set to something lower than 99. With set to a high positive value, you may use velocity to control tone colour much like you would find on an acoustic instrument with louder notes yielding brighter sounds and, of course, vice versa. may be used for filter sweep effects such as flute tremolando or drastic resonant synth effects whilst is used for shaping the tonal dynamics of the sound and restoring lost harmonic movement due to looping. The multistages of allow some interesting possibilities. The other options which you may select for modulating the filters are: Modwheel:
This works much like pressure and moving the modwheel will cause the filter cutoff to open and close. Use this for phrasing brass parts, perhaps, or for special synth filter effects in a bass line or lead line.
Bend:
This works like pressure and modwheel and allows you to open and close the filter by moving the pitch bend wheel or lever. This can be effective when bending up into a note as the filter will open and sound brighter.
Pressure:
This may be used for expressive swells, particularly on brass sounds.
External:
This can select from one of the 128 MIDI controllers for control of the second filter’s cutoff.
Key:
Although selectable as a mod source, it is not that worthwhile because this is hardwired via the parameter.
Lfo1:
This allows you to emulate the natural tremolo of flutes, woodwind, brass and other such instruments when set to small modulation amounts. When set to large modulation amounts, classic synth filter sweeps can be achieved. That LFO1 can also be modulated leads to some very interesting synth sounds and special effects.
Env1:
On occasions, it is good to be able to have the filters tonal dynamics match those of the amplitudes. One easy way to achieve this is, instead of copying the amplitude envelope to the filters envelope, simply assign the amplitude envelope to the filter.
Env 2:
This may be used as an alternative to Env3 perhaps.
! Modwheel:
This and the other “!” controllers allow you to control the opening and closing of filter cutoff at the point of note on. They don’t have any effect if these controllers change through the course of the note but only when the note is pressed.
Page 108
S3200XL Operator’s Manual - Version 1.00
EDIT PROGRAM - SINGLE CREATING 24db/8ve 4-POLE LOWPASS FILTER There are two types of filters commonly used in analogue synthesisers. They are sometimes referred to as ‘2-pole’ or ‘4-pole’. These offer two different filter response slopes: ROLL-OFF SLOPE
L E V E L
CUTOFF FREQUENCY
HARMONICS
FREQUENCY 12dB/Octave 2-pole lowpass filter
ROLL-OFF SLOPE
L E V E L
CUTOFF FREQUENCY
HARMONICS
FREQUENCY 24db/Octave 4-pole lowpass filter
A 2-pole filter offers 12dB/Octave cutoff slope and a 4-pole has a 24dB/Octave cutoff slope. Because the 12dB/Octave slope is slightly less severe, you can see that some upper harmonics are still in the signal. The 4-pole filter’s 24dB/Octave slope, however, removes these. Some people claim that 24dB/Octave filters are ‘punchier’ than the 12dB/Octave variety which some people claim to be ‘fizzy’. In the ‘good old days’ of analogue synths, some manufacturers used 2-pole filters, others used 4-pole filters. Moog synthesisers had 4-pole filters and many people attribute the classic MiniMoog’s punchy bass end to this (other factors are actually responsible as well, as it happens). Early ARP and Oberheim synths (the SEM Synth Expansion Module and the Oberheim 4-Voice) had 2-pole filters and yet no-one accuses them of lacking any ‘punch’! Some synths offered a switch to choose the cutoff frequency’s response slope. However, it must be said that for certain sounds, particularly bass synth sounds, a 24dB/Octave, 4-pole filter is better. On the S3200XL, it is possible to create a 4-pole filter with a 24dB/Octave cutoff slope using the second bank of filters. To do this, select LP as the filter type in FILTER 2 and set FILTER 2’s parameters identically to FILTER 1. I.e.:
Because the two 2-pole filters are in series, this creates a 4-pole filter with a 24dB/Octave cutoff slope. You can make ‘A/B’ comparisons between 2-pole and 4-pole using the switch to hear the difference between the two filter types. Whilst you can hear a difference between 2-pole and 4-pole filters, going to 6-pole or higher does not yield any significant differences which is why such filters are rarely, if ever found on analogue synths.
S3200XL Operator’s Manual - Version 1.00
Page 109
EDIT PROGRAM - SINGLE
NOTE: Because the resonance control in FILTER 2 has twice the range of FILTER 1’s, theoretically, you should set FILTER 2’s resonance to twice that of FILTER 1’s but in practice, you will find that this is not strictly necessary. However, by setting both filter’s resonance to maximum (15 and 30 respectively), you can create very resonant and ‘squelchy’ synth sounds, especially synth basses. Watch out for distortion, however, with such high resonance settings. When using high resonance settings, you may find it necessary to switch in the -6dB pad in the field - you may even need to back the programs output level off as well.
Page 110
S3200XL Operator’s Manual - Version 1.00
EDIT PROGRAM - SINGLE THE TONE PAGE The S3200XL also features a simple tone control which is accessed via F8 this will display this screen:
. Pressing
The TONE section can best be described as ‘spectral tilt’. If you imagine a see-saw, the bench is the parameter and the fulcrum over which it rocks is the parameter. For example, when the controls are set as shown in the above screen diagram, the response would be flat but with a setting of 50 for the centre frequency parameter and +50 for the slope parameter, you would have a response graph something like this:
L E V E L
+
CENTRE FREQUENCY
FREQUENCY
CENTRE FREQUENCY=50 SLOPE=+50 Here, bass frequencies are attenuated whilst high frequencies are boosted. Setting the parameter to -50 would reverse the angle, cutting high frequencies and boosting LF. By setting the
lower, you may create a tone response something like this:
L E V E L
+
CENTRE FREQUENCY
-
FREQUENCY
CENTRE FREQUENCY=25 SLOPE=+50 Here, some bass frequencies are cut but some mid and a lot of high frequencies are boosted.
S3200XL Operator’s Manual - Version 1.00
Page 111
EDIT PROGRAM - SINGLE Setting a higher something like this:
value with a negative slope value may produce
L E V E L
+
CENTRE FREQUENCY
FREQUENCY
CENTRE FREQUENCY=75 SLOPE=-50 Here, bass frequencies and some mid range components are boosted whilst high frequencies are cut. The main purpose of this section is to be able to gently remove unwanted noise from a sound. For example, you could use it to remove some mains hum from a sound or some hiss or other high frequency noise. Used together, the second filter and the tone section can be used very effectively to ‘clean up’ samples. You may also use the TONE section to balance the tone of an instrument across the keyboard range - for example, you may give a set of string samples more bottom end to emphasise the bass instruments. Of course, the TONE section can also be used as a simple EQ and, because it is available for each keygroup, you could use it to add depth to a kick drum or snare drum or to add some top end to cymbals, hi-hats and snares. Other sounds may benefit from some simple tonal modification in this section too. Experiment!! The parameter allows you to switch in a -6dB pad. This is included to overcome the possibility of distortion should the resonance of the second filters or the slope of the TONE section be set quite high, boosting the sound into overload. The
parameter allows you to bypass the tone control section.
NOTE: The and fields are a duplication of the ones found in the FILTER 2 page. If you switch them on or off in this page, you will notice that they will be set the same in the FILTER 2 page. The converse is also true - switching them on or off in the FILTER 2 page will have the same effect in the TONE page.
Page 112
S3200XL Operator’s Manual - Version 1.00
EDIT PROGRAM - SINGLE ENV3 A third multi-stage envelope generator is provided which is exactly the same as ENV2. This has no defined function (although its default assignment is to control the cutoff frequency of FILTER 2) but may be freely assigned to anything you wish. Typically it may be used to control FILTER 2 separately but may also be used to control pitch, panning, LFO1 rate, etc., especially if ENV2 is busy doing other things. Pressing will display this screen:
Because its parameters are identical to those in ENV2, please refer to the explanation ENV2. A second page of envelope parameters is also available and is accessed by pressing . This will display this screen:
Again, because the parameters are identical to ENV2, please refer to that for more information.
S3200XL Operator’s Manual - Version 1.00
Page 113
EDIT PROGRAM - SINGLE KEYGROUP PITCH/AMPLITUDE MODULATION The final page in PROGRAM EDIT is where you may assign modulation to pitch and amplitude for individual keygroups. This is accessed via the KGRP page by pressing . You will receive this screen display:
Along the top of the screen we have the usual parameters for selecting the keygroup and the program. The other parameters on this page are: This is a fixed, preset assignment that routes the LFO to pitch. Unlike virtually every other modulation input we have seen so far, this one is fixed in order to maintain compatibility between other Akai samplers. It is also done to allow ease of use when setting up vibrato. The range for this parameter is +/-50 allowing inverted pitch effects to be created (especially useful when using square and sawtooth waves) and the default for this parameter is +50. This means that the modwheel is always active for vibrato without you needing to program or set anything up on LFO1. It also means you only have to set a value in the depth field of the LFO1 page to have a constant vibrato. NOTE: If you wish to use LFO1 for some other modulation application such as filter sweeps, panning, etc., you will need to turn this value to 00 otherwise pitch will also be modulated unless, of course, that’s what you want. It is not possible to route any other controllers in this field. This is a freely assignable modulation input and any source may be selected here. ENV2 is selected as the default again as means of ensuring compatibility between the older samplers and the S3200XL. Feel free to route anything you like to this field. Some suggestions are shown on the next page (SUGGESTIONS FOR THE PITCH MOD2 INPUT). This is another freely assignable modulation field that affects individual keygroups’ loudness and has been ‘inherited’ from the S1000 and S1100 to ensure compatibility between different samplers’ sound disks. You may of course, assign anything you want here. Some ideas are LFO1 or LFO2 for tremolo effects (try layering keygroups and setting one keygroup to a positive value and the other to a negative value to create undulating crossfades between two samples). Any of the MIDI controllers such as modwheel, pressure, bend, etc., may also be used to control loudness. N O T E : The LOUDNESS modulation here is different from that we saw earlier in the OUT page. The OUT page is master control for the level of the whole program - this parameter in this page is applicable to individual keygroups.
Page 114
S3200XL Operator’s Manual - Version 1.00
EDIT PROGRAM - SINGLE SUGGESTIONS FOR THE PITCH MOD2 INPUT Because the second modulation input for pitch is freely assignable, there are many possibilities you may like to try: Pitchbend
Although there is a global pitchbend function in the modulation pages, you might like to use this to individually bend keygroups separately. The values for pitchbend range are: +04 +13 +21 +30 +38 +46
1 semitone minor 3rd fourth fifth 9 semitones 11 semitones
+09 +17 +26 +34 +42 +50
1 tone major 3rd 6 semitones 8 semitones 10 semitones 1 octave
Be sure to turn the pitchbend parameters to 0 in the modulation pages unless you wish to add the above values to the pitchbend set there. Modwheel
Use this instead of pitchbend. The values for pitchbend are the same as above. Be sure to turn modulation to +00 in the field above unless you wish the bent note to also have vibrato.
Pressure
Use this instead of either of the above. The same values apply
External
Any of the 128 MIDI controllers may be used to control pitch. Useful ones that immediately spring to mind are footpedal or breath.
Velocity
Use this so that differing velocities will affect pitch. This may be useful on some percussive sounds which have a different pitch for each note - for example, an African talking drum or pedal tympani.
Key
Although this may appear pointless as the keyboard is also routed, by setting a negative value here you may set up micro tonal scales. By setting a positive value you may extend the usual keyboard tuning.
Lfo2
Add this to LFO1 for a more varied vibrato with ensemble sounds. Alternatively, setting LFO1 and LFO2 accordingly, you may create some odd special effects. LFO2 could also be set to provide a square wave octave jump whilst LFO1 provides vibrato as normal. Many possibilities exist.
Env1
Use this to create pitch sweeps that vary according to the sounds overall level.
! Modwheel
Use this and the other “!” controllers to affect pitch at the point of note-on.
S3200XL Operator’s Manual - Version 1.00
Page 115
EDIT PROGRAM - MULTI EDIT MULTI EDIT SINGLE and EDIT MULTI are both essentially the same but there is one big difference. In EDIT SINGLE, you can select any program for editing or create new ones or delete existing ones but, in EDIT MULTI, you can only edit the sound assigned to the currently selected part. For example, let’s say the attack of the string sound in PART 4 of the multi is too slow - in MULTI mode, move the cursor to PART 4 and then press EDIT - this will take you immediately to the offending strings program that needs adjustment and you may tweak its attack time accordingly. However, you will note that when editing a program in EDIT MULTI, you still hear the other programs in the MULTI. This means that you can edit the program WITHIN THE CONTEXT OF THE MULTI AND THE SEQUENCE THAT IS PLAYING. To use the above example again, as the sequencer is running, you can select PART 4 and press EDIT and adjust the attack time while the string part is being played alongside the other parts. This means that you can make adjustments intuitively within the context of your song. Also, when parts are layered on the same MIDI channel or when you have set up key splits, you can hear the other layer(s) whilst editing a sound. Furthermore, if two identical programs are layered on top of each other (for example, with detune, etc., for a fatter sound), selecting one of them will cause both to be edited simultaneously. Using the above example again, if you feel the attack of the strings program layered in part 1 and 2 is too slow, select one of them, press EDIT and edit the attack time - both programs will be affected. All this differs from most other modules where SINGLE and MULTI are two totally separate modes and the EDIT SINGLE key refers to editing the single sound and the EDIT MULTI key refers to editing or setting up the multi-mode’s parameters. On the S3200XL, the MULTI mode is always active for setting up parts and EDIT MULTI is used for editing the programs assigned to the parts. On most synths or samplers, in the above example, to edit the string’s attack time, you would have to leave MULTI, go to SINGLE, find the string sound, press EDIT and edit it out of context (i.e. you can’t hear the other parts playing ). You would then need to return to MULTI and check it there. Of course, if the sound is still not quite right, you must repeat the whole process again. Not so on the S3200XL - simply select the appropriate part and press EDIT to adjust the sound within the context of the multi until it’s just right. However, there are some program parameters that are not relevant to EDIT MULTI and these are omitted when you enter EDIT from the MULTI mode. These include parameters such as output level, pan, FX sends, MIDI channels, etc., which, of course, are set in the MULTI mode. SCREEN DIFFERENCES IN EDIT MULTI When in the MULTI mode, pressing EDIT will show something like this screen display:
This differs from EDIT SINGLE slightly in that you cannot select another program. To select another program for editing in EDIT MULTI, return to the MULTI mode (i.e. press MULTI) and select the part that contains the program you want to edit. Neither can you rename or delete programs in EDIT MULTI as a safeguard against corrupting a MULTI you may have taken time to create (if you really want to delete a program, go to EDIT SINGLE). You will note that in EDIT MULTI, the part number and the number of active parts are shown on this page for your information.
Page 116
S3000XL Operator’s Manual - Version 1.00
EDIT PROGRAM - MULTI
Whilst nearly every function in EDIT MULTI is the same as EDIT SINGLE, some screens are different. For example, the OUTPUT screen in EDIT MULTI looks like this:
Because stereo level, pan, output and effects assignment are MULTI parameters, these are not accessible in EDIT MULTI. However, you can edit the loudness and the loudness modulation parameters as these are program parameters. The MIDI page also differs:
Parameters such as the program’s MIDI channel, key range, priority and transpose are omitted as these are MULTI parameters set within each part of the multi-file. Apart from these differences, however, EDIT SINGLE and EDIT MULTI are identical so please refer to EDIT SINGLE for more information on editing the other program parameters.
S3000XL Operator’s Manual - Version 1.00
Page 117
SAMPLE SAMPLE MODE In SAMPLE mode, you may record sounds and in EDIT SAMPLE mode you may, amongst other things, trim, loop, join, merge, reverse, re-sample and timestretch recordings. But before we can do any of that, we first need to make some recordings. WHAT IS SAMPLING? Sampling is a process where we record sound digitally. All natural sound comes in the form of variations in sound pressure. Using a microphone, we can convert those changes in air pressure into rising and falling voltages. Once they exist in that format, we can process them through ANALOGUE TO DIGITAL CONVERTERS (ADC) to turn those voltages into streams of digital data. Once they exist as digital data, we can edit them with alarming precision.
SOUND
MIC
VOLTAGE WAVEFORM
ADC
DIGITISED WAVEFORM
In the ADC, the sound is ‘sampled’ at a rate of 44,100 times per second. You can liken this to film. If we take a lot of photographs in very quick succession, when we play it back, we have the illusion of movement. The same is true of sampling. If we take enough samples, we get an accurate reproduction of the sound. To carry this analogy even further, if you think of the very early days of film where they didn’t take so many frames in a second, the results were jerky and distorted. The same could be said about old samplers - because they sampled less (that is, the sampling rate was lower), the sound quality was not so good. In order to reproduce sound accurately, you need to sample at a frequency that is at least twice the upper reaches of the sounds frequency range. In other words, if a sound contains frequencies that extend to, say, 15kHz, you need to sample at 30kHz at least. Instruments such as cymbals which are very bright and contain many overtones need to be sampled at 40kHz. A bass drum, however, which has very few upper harmonics, could feasibly be sampled at 20kHz. The S3200XL samples at 44.1kHz, the same as compact disc so you can be sure you are getting CD quality sound from your sampler. The digitised waveform is loaded into RANDOM ACCESS MEMORY (RAM) where it exists as numbers. As you know, computers and microprocessors are very good at dealing with numbers and so we are able to rearrange those numbers and so alter the sound. At the end of the process, we need to be able to convert those numbers back into an electrical analogue waveform and so the numbers are reconstituted into analogue via DIGITAL TO ANALOGUE CONVERTERS and output to your mixer or amplifier.
Page 118
S3200XL Operator’s Manual - Version 1.00
SAMPLE One of the inherent problems with sampling is the RAM and because of cost, it is not possible to have an endless supply of it installed in the sampler (sadly!) although the S3200XL does allow up to 32Mbytes of RAM and a further 16Mbytes of Flash ROM to be installed offering nearly nine minutes of storage. As a result, our recordings (or samples as they are more commonly known in the music industry) have to be kept fairly short. In order to make them last longer so that long notes can be sustained, we need to loop them. This involves selecting a portion of the sound that will repeat over and over again when we hold our finger(s) on the keyboard.
LOOP ZONE
LOOP
LOOP
LOOP
The biggest problem, though, is the nature of the sounds you sample. Most musical instruments have particular resonant frequencies (or ‘formants’ as they are sometimes called) plus other characteristics such as vibrato, etc.. In the instrument themselves, these characteristics stay constant regardless of the notes being played but, on a sampler, because you are transposing the sound up and down (slowing it down and speeding it up much like a tape recorder), these are also transposed which leads to a phenomena quaintly referred to as “munchkinisation”. We have all laughed at hearing our voice speeded up on a tape recorder sounding like some bizarre cartoon character - the same will happen on a sampler and this is because the voice has formants and other attributes which do not transpose well. Similarly, the sound’s envelope will change - transposed down an octave, a percussive attack will sound quite sluggish. To overcome this, we need to use a technique known as MULTI-SAMPLING - that is, taking various samples of the instrument at a variety of pitches across its range so that, at any one time, the sound is never transposed too much and so avoids serious “munchkinisation” and envelope distortion. Typically, you can get away with one sample per octave but some difficult instruments with strong formants need more. The saxophone and piano are two instruments that spring to mind and which are notoriously difficult to capture. Another property of an acoustic instrument is that it can make so many sounds depending on how it’s played. When played softly, the sound is not only quieter but softer in tone and, when played hard, is louder and brighter. Some instruments have quite extreme ranges in tone. Coupled with playing techniques (i.e. thumbed and slapped bass, bowed and plucked violin), to accurately replicate this on a sampler, we can take different samples according to playing styles. On the S3200XL we have four velocity zones that allow us to use playing technique to switch between these different samples so that you could, for example, use velocity to switch between a slow legato viola and an aggressively bowed viola. Of course, a lot of the time you can take just a few samples, loop them for sustain, map them out across the keyboard and have perfectly acceptable results which are usable in a wide range of applications. For some sounds such as drums and percussion, you don’t need to loop. Let’s now have a look at the recording functions
S3200XL Operator’s Manual - Version 1.00
Page 119
SAMPLE RECORD MODE Pressing SAMPLE enters the record or ‘sampling’ mode. The first screen you see is the RECORD SETUP page where you may set certain parameters related to recording.
This shows that you have named (or selected for over-writing) a sample called STRING C4. You may select another sample for recording over if you wish (assuming they exist, of course!) by moving the cursor to the sample name field and scrolling through the available samples. You may also rename or copy the sample in the usual way by pressing NAME - you will receive this prompt:
The first character of the name will be highlighted. Use the front panel keys to enter a suitable name of up to 12 characters. Press NAME again to use the numeric keypad to enter numbers. As soon as you create a new, unique name, you will see name:
displayed under the sample
Finally, to finish naming, press ENT/PLAY. The fields on this page are: Here you may select between stereo or mono recording. If you select STEREO, the sample will automatically have -L and -R appended to both the left and right samples respectively after the recording has been made. After that, any editing you do will be done in stereo unless you specifically switch back to mono. To the right of this parameter is another (shown LEFT in the above example). This allows you to select which of the channels will initiate the recording when STEREO is selected and you are using INPUT LEVEL to start recording (see below . When MONO is selected, this field defaults to LEFT but, when STEREO is selected you may set which input channel you want to trigger recording.
Page 120
S3200XL Operator’s Manual - Version 1.00
SAM PLE Here you may select the input source. The options are ANALOG (the rear panel jack inputs) or DIGITAL (the digital audio input). When DIGITAL is selected, you may select ELEC (electrical - i.e. the jack sockets on the digital I/O) or OPTI (the optical input on the digital I/O). Although displayed when ANALOG is selected, the ELEC/OPTI field has no function. This field allows you to select how recording will be initiated. The choices are: INPUT LEVEL - this selects that recording will begin once a threshold level has been exceeded. This is the default setting and one that is used by most people. The threshold is set in the REC page. MIDI NOTE - this selects that recording will begin when any MIDI note is received. This is very useful when sampling a sound from a synth because the note-on that makes the sound can also be used to start the recording. FOOTSWITCH - with a suitable footswitch connected to the FOOTSWITCH input, this selects that the action of the footswitch closing will start recording. This may be useful for ‘hands free’ sampling. For example, let us imagine you are sampling a heavy metal guitar though a rather noisy amp and you are doing the playing yourself. Threshold based recording is no use because the background hum would set the sampler off. In this case, the footswitch may help. Here you can select how you will monitor the signal you are sampling. There are two options: ON will select that as soon as you enter the REC page, the signal you are sampling will be heard ‘through’ the S3200XL. At the end of recording, it will automatically switch this ‘through’ signal out so you can hear your new sample. The other option, OFF, switches the through signal off completely (although this may be overridden in the REC page if you wish). This is used when monitoring the signal you are sampling through a mixer.
NOTE: If you are sampling from a mixer it is possible to get ‘feedback’ if the S3200XL is also connected to that mixer, set to ON and its channels are open.. This is not accessible but merely shows the amount of free memory. The percentage of free memory is also displayed. The ‘F’ is in parentheses because this field is shown in other pages of the SAMPLE mode as an abbreviation. This sets the bandwidth for the recording you are about to make and you have two choices - 20kHz and 10kHz. Don’t be put off by the 10kHz option because you can make very respectable recordings at this sample rate. It is not possible to sample at any other rates but, if you wish, you may sample at 44.1kHz (i.e. 20kHz) and then re-sample it later to, say, 15kHz to save on memory space. This sets the base pitch for the sound you are about to sample. At this point, you don’t have to worry too much about this because you can set this parameter in the REC page and you can re-tune your sample in the SAMPLE EDIT mode later if necessary. Here you may set the length of the sample you are about to make. The range is limited only by available memory space and whether the sample is stereo or mono. Again, you needn’t worry about setting this field now as you can set it later in REC if you prefer. As you set this field, the fields below show you how much memory the new sample will take.
S3200XL Operator’s Manual - Version 1.00
Page 121
SAMPLE
If you are not sure how long to set this, it is best to set it longer than you think you need. Samples can always be trimmed and edited later. Once you have set the parameters as you like on this setup page, you don’t have to worry about them for the rest of the sampling session as these are retained from sample to sample as you record them. IMPORTANT NOTE - SAVING RECORD PARAMETERS TO DISK It is possible to save your own set of record parameters to disk. By setting the parameters as you need them, save the operating system to floppy disk (go to SAVE, move the cursor to ‘type of load:’ and select OPERATING SYSTEM. Now press WIPE and/or GO). This will save your personal record parameters to disk. From now on, when you boot up with this floppy in the drive, these record parameters will always be set for you. If you have a particular way of working, this may be invaluable and a great time saver. If you have several different ways of working, you might like to save different record set-up parameters to different disks and use the appropriate operating system as and when you need it. You will note that you cannot save several operating systems on one disk - you will need a separate disk for each system you save. Please refer to the SAVE section for more information on saving files.
Page 122
S3200XL Operator’s Manual - Version 1.00
SAM PLE THE MAIN RECORD PAGE To actually make a recording, press F2. You will see something like this screen::
This is the main record screen. In this example, we can see that a sample called STRING C4 is selected. Before you can do any recording, you must name the sample you are about to record. If you have just switched the S3200XL on with no disk in it, you will have the four synth waveforms in there. Use one of these as the basis of your new sample. NAMING SAMPLES FOR RECORDING To copy or rename a sample, press the NAME key - this turns the front panel keys into letter entry keys and you may type in a name of up to 12 characters (upper case only). The +/< and -/> keys input backspace and spaces accordingly and the MARK and JUMP keys input ‘#’ and ‘.’ respectively. You will see this screen:
Pressing the NAME key again switches the numeric keypad from letters to numbers and you will receive this prompt:
You may press NAME again to access the numeric keypad’s letters. When in the ‘numbers’ mode, the +/< and -/> keys input ‘+’ and ‘-’ to a name. Pressing NAME again reverts you to entering letters from the numeric keypad. Alternatively, in conjunction with the CURSOR keys which can be used to move the cursor around within the name, you can use the DATA control to scroll through characters. When you have entered a unique name, you will see indicating that the name you have entered is unique:
If
appear next to the sample name
does not appear, then a sample of the same name already exists in memory.
TIP 1: It is worth taking the time to name your samples sensibly. It may be quick to simply call them SAMPLE 1, SAMPLE 2, 3, 4, etc., but, when you come to put them into a program, these names may not mean much to you. If you return to them in a week they certainly won’t! Names like PIANO C#3 are best - this tells you the instrument and the note it is sampled on so it will be easier to set your program up later when you come to assign your samples to specific keyranges.
S3200XL Operator’s Manual - Version 1.00
Page 123
SAMPLE
TIP 2: If you are about to make a lot of recordings of a similar type, put the note number first (i.e. C#3 PIANO, E 3 PIANO, G 3 PIANO, etc.). In this way, you don’t have to cursor through the whole name to give the sample its unique note identifier. Once you have named the sample, you are now ready to make a new recording. First, however, let’s have a quick look at the parameters on this page. You may select to record in MONO or STER(eo). When you opt to record in stereo, two samples will be created and -L and -R will be appended to each of them to indicate the left and right sample. This sets the note on which the new sample will be placed when you record it. The default is C 3 but you may set any note you like. You will note that you can set the note by specifically moving the cursor to this field and using the DATA wheel or you may set it by playing the note on your MIDI controller (i.e. keyboard).
NOTE: To set the note from a MIDI controller, you must be monitoring the input signal (i.e. F7 should be showing ) and, of course, the controller should be on the same MIDI channel as the S3200XL. This sets the length of time you will record for. The page also shows what percentage of memory is free, the current sample rate (44100) and the size (expressed as a percentage of available memory) of the sample you are about to make.
Page 124
S3200XL Operator’s Manual - Version 1.00
SAM PLE ADJUSTING THE RECORDING AND THRESHOLD LEVELS Record levels are set by adjusting the front panel ‘REC LEVEL’ control. The level control should be adjusted so that the input meter to the left of the RECORD screen is as near to the top as possible. If you have selected INPUT LEVEL as the start mode in the RECORD SETUP page, you will need to set the threshold level here. The default has been sensibly chosen for most purposes but you may find that some sounds with a slow attack are clipped slightly. To set the threshold, move the cursor to where it says -20dB. As you input your audio signal, set the threshold level accordingly so that it is low enough to catch the signal but not so low as to start recording on a false start. You will see a screen display such as:
You will see the small level meter to the left of the screen bobbing up and down in accordance with the incoming audio signal and the threshold should be adjusted according so that the signal is just going slightly into the threshold box. It maybe that some adjustment of the front panel REC LEVEL control is also necessary. Once you have set the threshold level to your satisfaction, you are ready to make a recording. RECORDING ON THE S3200XL Assuming all your parameters are correctly set, all you need do is press the following prompt:
. You will receive
This indicates that either the threshold level has not been exceeded yet or, if MIDI NOTE is selected as the start type in the RECORD SETUP page, that a MIDI note has not been received. If FOOTSWITCH is selected as the record start type, this screen indiactes that the S3200XL is waiting for to hit the footswitch. You may also start manually by pressing GO. If you change your mind when this prompt is displayed (i.e. because you suddenly realise that continuing with the recording is going to overwrite a valuable existing sample, for example), you may press EXIT. Assuming you press GO (or any of the start types get the thing going), you will receive this display:
The display will fill up with the sound as it is recorded. You may, at any time, abort the recording by pressing F8. This will finish the recording process early and abort that sample. This is useful if some mistake is made during the record process or you were recording over another sample you wanted to keep. After the recording has finished, the monitoring of the incoming signal through the S3200XL is now automatically switched off allowing you to play the new sample directly from the keyboard or the front panel ENT/PLAY key. To switch the monitoring back on again, press -
S3200XL Operator’s Manual - Version 1.00
Page 125
SAMPLE METER ON. When you press , the legend of that key changes to (i.e. this key will switch monitoring OFF). If you wish to take the sample again, there is no need to switch the meter back on again because pressing will do this automatically. If, however, you wish to either listen to the source again (in the event of a mistake, perhaps) or set up for the next sample, specifically press to switch the monitoring back on. If after making a recording, you immediately want to make your next recording, simply switch the monitoring back on again (press ), name the next sample and set a new base note if you need to (the easiest way is from the keyboard but the meter does have to be switched on for this - press ). Press to start recording again. DIGITAL RECORDING Using the digital input, you may record digitally into the S3200XL. This offers excellent sound quality with no deterioration of signal or increase in noise. If you own many sampling CD’s (as distinct from CD ROM which is a different thing altogether), recording digitally is the obvious choice. The digital input is selected in the RECORD SETUP page described earlier. When DIGI is selected as the input source, the RECORD screen looks like this
This is virtually identical to recording analogue except that you can see the message indicating that the S3200XL is receiving digital audio correctly where it says “RECEIVING 44.1kHz”. If there is some problem with the digital audio signal, you will receive the following display:
This indicates that the digital audio signal is not getting to the S3200XL. Please check your connections carefully - it could be that the cable has become disconnected. Also, check that the DAT machine or CD player is switched on. You can rename and copy samples in exactly the same way as we have already seen. Assuming everything is connected properly and set up correctly, when you press will receive the usual prompt:
Page 126
you
S3200XL Operator’s Manual - Version 1.00
SAM PLE If you press GO or when the threshold is exceeded, the MIDI note is received or the footswitch is pressed, the S3200XL will start recording and you will get a display something like the following:
This indicates that the S3200XL is recording digitally. As with analogue recording, the display fills with the incoming sound’s waveform.
NOTE: The S3200XL has difficulty recording at 48kHz (i.e. from a DAT machine). You will receive the following warning if you try to record at 48kHz:
It is advisable not to record at 48kHz. Having successfully made your recording(s), analogue or digital, we can now move on to sample editing. But first... **
SAVE YOUR SAMPLES TO DISK NOW **
It is good practice to repeatedly save your work as you go - all good programmers do this and it is a good habit to get into. You may make a mistake and accidentally record over a precious new sample, you may trip over the power cord and disconnect the mains, you may have a power cut - these things do happen!!
S3200XL Operator’s Manual - Version 1.00
Page 127
EDIT SAMPLE EDIT SAMPLE Assuming you have made a few recordings, let’s move on to see how we can edit these. To edit a sample, press EDIT (of course, you must first be in SAMPLE mode). You will see this screen:
Here we see one of the default sample waveforms, a pulse wave called, not surprisingly, PULSE. Also on this screen is information regarding the current state of your memory and you can see the size of the selected sample, how much memory is free and how many samples are currently in memory. In EDIT SAMPLE, there is an alternative, temporary style of display that allows you to see sample length, etc., in milliseconds and you may toggle between the two types of display by pressing and holding down any of the page keys again. You may also press the page key again to toggle between displaying MIDI notes as numbers or as names. In this page, pressing SLCT will switch between sample point and millisecond displays and will display this screen:
N O T E : The millisecond display is purely for reference - you cannot actually edit in milliseconds. Only two fields are available in the SLCT page allows you to monitor a sample you are making or have made or are editing referenced to the program it is placed in. For example, let us say you have made a snare drum sample and this is placed into a program DRUMS 1. By selecting DRUMS 1 in this field, you will be able to edit it in EDIT SAMPLE whilst listening to the other drums in the program. For example, to trim the start of the snare so that it ‘feels’ just right, you may want to monitor the other drums as well, maybe even sequence them as you are editing. The field allows you to select whether your editing will be in MONO or STEREO. This may be set here and in other pages if you wish.
Page 128
S3200XL Operator’s Manual - Version 1.00
EDIT SAMPLE The soft keys along the bottom are: This indicates you are on the sample select page. Press this to switch between sample points and millisecond displays. This takes to you to the TRIM page where you may edit the start and end of a sample. This takes you to the LOOP page where you may set loops for the sample.. This takes you to the gain normalise page where you may set the sample’s level to its maximum thereby getting the best signal to noise ratio and dynamic range out of the sampler. This takes you to the DIGITAL SIGNAL PROCESSING pages where you may timestretch or re-sample the sample or apply EQ. This offers a set of further editing functions where you may perform ‘sectional’ editing (that is, remove sections from samples), join, splice, mix, tune and reverse samples and set fades. This allows you to delete samples from memory. We will come to these in a moment.
S3200XL Operator’s Manual - Version 1.00
Page 129
EDIT SAMPLE NAMING SAMPLES - COPYING AND RENAMING There are times when you want to rename a sample or copy it. You may want to rename it just to give it a more meaningful name. You may want to copy a sample so that you can work on it with no harm coming to the original. To copy or rename a sample, press the NAME key - this turns the front panel keys into letter entry keys and you may type in a name of up to 12 characters (upper case only). The +/< and -/> keys input backspace and spaces accordingly and the MARK and JUMP keys input ‘#’ and ‘.’ respectively. You will see this prompt:
Pressing the NAME key again switches the numeric keypad from letters to numbers and you will receive this prompt:
You may press NAME again to access the numeric keypad’s letters. When in the ‘numbers’ mode, the +/< and -/> keys input ‘+’ and ‘-’ to a name. Pressing NAME again reverts you to entering letters from the numeric keypad. Alternatively, in conjunction with the CURSOR keys which can be used to move the cursor around within the name, you can use the DATA control to scroll through characters. When you have entered your name, press ENT and you will get this prompt:
Pressing will copy the original sample. If the sample name is an existing one, the boxed area to the top left of the screen will show something like:
You will receive the following prompt:
You must enter a unique new name. Pressing will simply rename the currently selected sample with the name just entered. If the name exists, you will be prompted as above and you must re-enter a unique name. Pressing will exit the naming process altogether with no action taking place. Should you press this by mistake, you will see that the boxed area to left of the screen still retains the new name you entered so press NAME immediately followed by ENT and make your choice again.
Page 130
S3200XL Operator’s Manual - Version 1.00
EDIT SAMPLE It is worth taking the time to name your samples sensibly. It may be quick to simply call them SAMPLE 1, SAMPLE 2, 3, 4, etc., but, when you come to put them into a program, these names may not mean much to you. If you return to them in a week they certainly won’t. Names like PIANO C#3 is best - this tells you the instrument and the note it is sampled on so it will be easier to set your program up later when you come to assign your samples to specific keyranges. DELETING SAMPLES It is possible to delete samples using the following prompt:
key - F8. Pressing this will give you the
and you should press F7 or F8 accordingly.
NOTE: Deleting samples is destructive. Please ensure that you have saved them to disk before deleting in case you want to come back to them at a later date.
S3200XL Operator’s Manual - Version 1.00
Page 131
EDIT SAMPLE
TRIMMING SAMPLES Pressing in the main SLCT page will take you straight to the TRIM page and you will receive a display something like the following:
This shows the waveform of the selected sample. You may edit the start and end of the sample accordingly. The fields along the top allow you to select whether you want to edit is STEREO or MONO (it’s pointless selecting STEREO if the sample is mono, by the way!) and you may, if you wish, select another sample for editing. The figure to the right of the top line shows how much memory is free. Moving the cursor to the field allows you to move the start point. You will remember from the INTRODUCTION that you can change large numbers such as this in several ways. You may type in a number directly from the numeric keyboard or you may use the DATA control. Each number field is separately accessible allowing you a great deal of flexibility in editing such large numbers. In the above example, to make a big change to the start point, move the cursor to the 1 of 1700 using the +/< key found on the numeric keypad - as you move the DATA wheel, you will increment in big jumps. This is good for getting someway into the sound with little effort. When you are close to where you want to be, move the cursor one position right using the -/> key to edit the start point in smaller increments. As you get closer and closer to the point you want to set, you can use finer incrementation until, with the cursor on the furthest right field, you are editing to a resolution of individual sample accuracy. You can use the and keys to zoom in or out of this window to see more or less detail. The key (F7) asllows you to ‘toggle’ between viewing the start or end of the sample. All the time you are editing and changing values here (or in any sample editing fields), you can hear the results in real time by playing the keyboard. Moving the start point will give a display such as:
You will see a vertical line indicating the position of the start point. This is adjusted using the DATA control.
NOTE: If the THRESHOLD parameter was set correctly during record, the start time should be right on the start of the sample and there should be little or no need to adjust this unless you really want to. You can check if there is a delay by playing the sample a few octaves down as this will exaggerate any delay that may exist.
Page 132
S3200XL Operator’s Manual - Version 1.00
EDIT SAMPLE Moving the cursor to the
field and adjusting that will give you a display such as:
As with the field, you may move the cursor around the numeric field using the +/< and -/> keys found on the numeric keypad. Running across the top of the waveform display you will see up to four horizontal lines which show you where you have set your loop point(s). Up to four may be shown simultaneously - the top one is LOOP 1, the second one down is LOOP 2, the next one down LOOP3 and the bottom one is LOOP 4. I.e: LOOP1
LOOP2
LOOP3
LOOP4
The loop points cannot be edited in the TRIM page but these will give you a clearer indication of where you are when setting start and end points for trimming. If you move the start or end points into a loop, you will see this screen:
A similar screen would be shown if you were to move the end point into a loop. The warning will be shown temporarily and you should move the start (or end) point out of the loop. Once you have set the start and end points, press F8 - to discard the unwanted audio either side of the start and end point. You will receive this screen display:
S3200XL Operator’s Manual - Version 1.00
Page 133
EDIT SAMPLE The four cut options are: This will take you out of the CUT screen and return you to the normal TRIM page. Use this if you change your mind when trimming. This will discard audio before the start point and after the end point you have set manually. You will note that if the start or end points are within an active loop zone, the CUT action will be ignored. This will automatically cut audio to a few sample points before the start of the first loop and a few sample points after the end of the last loop irrespective of where you may have manually set the start and end points on the TRIM page. Usually, most people use only one loop and so audio will be discarded just before the start and just after the end of that loop. In the case where more than one loop is used, the S3200XL will automatically work out where the end of the last loop is and where the cut will be made. This area retained
These areas discarded
This may be used when editing sounds that don’t have a definite attack. For example, when sampling detuned synth waveforms, you only really need the loop portion in the middle of the sample so audio either side of that can be discarded. Similarly, when sampling single cycle synth waveforms, you can free a lot of space by discarding audio either side of the loop points. This will discard sample data before the start point you have set manually and after the end of the last active loop. This area retained
These areas discarded
This option should be used when editing sounds that have a pronounced attack which you don’t wish to lose but where there is audio data after the loop points which is unnecessary and which can be discarded.
NOTE: This is a destructive process and, unless you have saved this sample to disk, pressing any of the CUT options here will irrevocably erase the data either side of the start and end points. Whilst it is possible to edit by ear with very good precision, it is sometimes desirable to see what you are doing. It is possible to zoom in on the waveform using the key. Repeatedly pressing this will enlarge the waveform display until you are looking at individual samples that are an inch wide! The display centres around the start point. Of course, now you can’t see the end point so press the key to switch between the start and end points for editing.
Page 134
S3200XL Operator’s Manual - Version 1.00
EDIT SAMPLE
NOTE: To cut or not to cut, that is the question!! Whether you trim your samples and loop them afterwards or loop your samples and trim them afterwards is a matter for you to decide. Our programmers have found in their experience, that it is best to record the sample, loop it and then trim it afterwards. Of course, if there is ‘dead space’ either side of the sample, these should be removed before looping but it is felt that looping first and trimming later is safest.
S3200XL Operator’s Manual - Version 1.00
Page 135
EDIT SAMPLE LOOPING Looping is one of the trickiest areas of sampling but not impossible and the S3200XL makes it as easy as it can with some functions to help you make good loops. In either the SLCT page or the TRIM page, press the key to access the looping page. Again, you will see a display of the sample’s waveform in the left part of the display together with a magnified display of the point where the loop rejoins the original sample sound. You can use the and keys to zoom in or out of this window, but the display of the whole sample remains at a constant magnification.
The parameters are: Here you can select which loop you wish to set. The S3200XL can have four loops for every sample. This may seem excessive but it can help to overcome the repetitiveness of some loops. You may select from 1 to 4 here.
NOTES ON USING MULTIPLE LOOPS: Whilst a sample may have multiple loops in it, there is one restriction you should be aware of and that is that they must be consecutive. That is, LOOP 1 must be followed by LOOP 2 , LOOP 3 and LOOP 4. You cannot have a situation where LOOP 2 is before LOOP 1 or LOOP 4 before LOOP 3 or LOOP 2. If you do set up such loops, certain ones will be ignored. For example, setting LOOP 3 before LOOPs 1 and 2 will cause LOOP 3 to be ignored. Please bear this in mind if you are creating multiple loops. This sets the length of the loop you wish to make. This is expressed in milliseconds. You can set a loop to last from 1mS to 9998mS. This is most useful when you have multiple loops. For example, LOOP 1 may be set to last for 5 seconds (5000mS), LOOP 2 for 1 second (1000mS) and LOOP 3 for 3 seconds (3000mS). If you set 9999mS, this field changes to HOLD and when this is set, the loop will last as long as you hold a note. You may combine timed and held loops as you like. LOOP 1 may be set to last 1000mS, LOOP 2 set to last 200mS and LOOP 3 set to HOLD. When you play a note, regardless of where you are on the keyboard, the sound will play through LOOPS 1 and 2 over the time set and then move onto LOOP 3 which will sustain for as long as hold the note(s). This is a good way to breathe more life into a sample - single loops can sometimes sound repetitive if they are too obvious. A loop will repeat for the greatest whole number of times possible within the loop time set here. For instance, if the total loop time is set to 250mS and the length of the loop is actually 175mS, the loop will only repeat once, not 1.428 times. This can save you a lot of calculation when you’ve set the loop length and you want a particular ‘stutter’ effect or repeated drum beat. For the most part, you will probably find that one loop is sufficient for most sounds so don’t worry about setting multiple loops for every sound - you don’t have to use them.
Page 136
S3200XL Operator’s Manual - Version 1.00
EDIT SAMPLE
NOTE: The easiest way to set HOLD is to type in 9999 - this will select HOLD. The name of the currently selected sample is shown next which can be changed if you wish. The memory percentage indicator is also shown. Below this line are the fields for setting the loop points.
LENGTH
AT
Here you can select the point at which looping will begin. I.e. when playback reaches this point, it will go back to the point determined by the field described below and will loop either for as long as the time: field is set or for as long as you hold the note(s) if HOLD is selected in the time: field. The actual length of the looped portion (as opposed to the length of time that the loop will repeat) is set in this field. As you adjust these parameters, you will see two vertical lines move in the left part of the display, showing the position of the start and end points of the loop. You will note that this value is locked to the point - if you adjust the point, this parameter will also change. This is invaluable in cases where you have found a good loop length and want to reposition it elsewhere. The length field is adjustable in very fine steps to allow you to manually set very accurate loops. In the right half of the display you will see another waveform display. This is the point of the loop (i.e. the point set by the parameter). As you change loop length or adjust the position, this area will display the waveform. The idea is to match these up as well as possible. You may use the and keys to zoom in or out of this display for greater accuracy. LOOP AUTO FIND AND CROSSFADE LOOPING The and keys are there to help you in your search for the perfect loop. The key looks for points of equal amplitude. Repeated pressing of this will make the S3200XL try and try again and you must judge if the loop is acceptable or not. The key is invaluable in creating loops. What this function does is to crossfade a portion of the sound before and after the loop according to the time set in the field next to the field. This will smooth out any glitches you may have. This can be very effective in getting almost perfect loops. FIND and CROSSFADE functions are both non-realtime editing functions and may take a few seconds or more to calculate, depending on the length of the sample.
S3200XL Operator’s Manual - Version 1.00
Page 137
EDIT SAMPLE
NOTE: The FIND function does not work when looping stereo samples - this is because each side would have a different loop point and so go out of phase. It will only look for the best loop point on the currently shown sample. NOTE: The crossfade function is destructive and will affect your sample permanently. Be sure to have saved your work before performing a crossfade in case you don’t like the results or you make a mistake.
Page 138
S3200XL Operator’s Manual - Version 1.00
EDIT SAMPLE MAKING A GOOD LOOP Making a loop is one of the trickiest things in sampling. The trick is to match two points in the sample that are similar in level and tone. For example, this would not make a good loop:
You have selected a high amplitude point in the sample and set a length that loops around a very quiet part. All manner of thumps and clicks would be heard and the loop would look something like this when played:
In this case, the window to the right of the loop page would look something like this:
You can see the abrupt level change. Setting these loop points may sound better however.
and the resulting sound when played would look like this
This is also a longer loop and so won’t sound quite so obvious when held. The window to the right of the loop page would look something like this:
You can see a nice smooth transition. Of course, there may well still be some glitches but this can be overcome using the crossfade key. Pressing that in this case may create something like the following:
Here, the crossfade function has smoothed the whole thing out to create a more uniform amplitude.
S3200XL Operator’s Manual - Version 1.00
Page 139
EDIT SAMPLE
NOTE: Sometimes when crossfading, because part of the area chosen for crossfade may be slightly out of phase with the loop area, you may sometimes get a dip in level where they cancel each other out. This is not a fault of the S3200XL but something that cannot be avoided. Using and are probably your best allies in looping. will automatically look for good points of equal amplitude whilst will ‘smudge’ the whole thing to eliminate glitches, thumps and any other unpleasantness. Long samples work best with long crossfades whilst short loops are better suited to having short crossfades. Perfect results are not always possible but you’ll be surprised at how easy looping can be on the S3200XL. If your sample has just one single loop such as:
you can go to the trim page and remove the bit of audio after the loop as this will not be played. This can save a lot of memory space.
Page 140
S3200XL Operator’s Manual - Version 1.00
EDIT SAMPLE LEVEL NORMALISATION Pressing in either the TRIM, LOOP or SLCT pages will display this screen:
Here you may set new levels for the selected sample and also normalise it. Normalising is a technique where the sampler will analyse the loudest part of a signal and then adjust the whole sound to be at its optimum level - i.e. the loudest part of the signal is at the unit’s maximum level before distortion and the rest of the sound is brought up in level proportionately. This increases signal to noise ratio and dynamic range. It also allows you to compensate for recordings made at too low a level. This page also allows you to set your own level for gain re-scaling if you wish. You may process in mono or stereo (although selecting stereo is pretty pointless if it’s a mono sample!) To normalise a sound, simply press . If you have not named a new sample for the normalised version to be copied to, you will receive the prompt:
to which you must respond accordingly by pressing GO or ABORT. After a ‘BUSY’ message, the new sample will be displayed showing the new level. To re-scale a sample to a level of your own choosing, simply move the cursor to the field, enter a value and press . Again, you will receive the usual prompts if you haven’t created a new sample to copy to and after a few seconds, you will see the sample scaled to the value you set.
NOTE 1: Please be careful when using RESCALE because it is possible to overload the unit if you set this value too high. NOTE 2: Please also note that whilst normalise and rescale can save the day on many occasions when you have recorded a sample at too low a level, it can increase noise levels. For example, if the sample is very quiet, as you boost the level, you will also boost the noise floor. Setting, for example, a rescale value of +15dB to bring the level up to maximum will also boost the noise level by 15dB. Please bear this in mind when using these functions.
S3200XL Operator’s Manual - Version 1.00
Page 141
EDIT SAMPLE DSP FUNCTIONS - TIMESTRETCH, RE-SAMPLING AND EQ The S3200XL has three powerful digital signal processing (DSP) functions which are accessed via the key in the main SLCT page. TIMESTRETCH Timestretch allows you to alter the length of a sample, shortening it or lengthening it, without changing its pitch. Before we look at how to operate the timestretch functions on the S3200XL, let us first look briefly at how timestretch works. Timestretch works by instructing the digital signal processor to analyse the signal and insert or delete blocks of sample data at appropriate places and crossfades are used to make the insertions and deletions as seamless as possible. This has the effect of lengthening or shortening a recording. As you can see from the following diagram, blocks of sample data have been inserted to create a 200% timestretch. The overall envelope of the sound data is preserved but there is twice as much data in it causing it to play back twice as slow. SAMPLE DATA BLOCKS
ORIGINAL RECORDING
WITH 200% TIMESTRETCH
In the following diagram, data has been carefully removed to make the recording play back faster.
ORIGINAL RECORDING
70%
TIMESTRETCH
You can see that the length in both of these examples changes quite drastically but the envelope remains pretty much the same, thereby ensuring the integrity of the sound. The timestretch on the S3200XL works by making a copy of the original. It is necessary to make a copy for two reasons - firstly, the S3200XL needs the original data to get the data to insert. Secondly, in the event of a stretch going wrong, you still have the original to revert to. Unfortunately, however, perfect results using timestretch are sometimes difficult to achieve. It is not a limitation of software or hardware but due to the fact that, although the processor is clever, it is not that clever and can sometimes make mistakes in deciding which sample to insert or remove. The end result of this is that, on occasions, especially with stretch factors
Page 142
S3200XL Operator’s Manual - Version 1.00
EDIT SAMPLE exceeding 10% or so, you may get an echo or ‘flam’ effect on some transients because the processor has inserted a transient. When shrinking a recording, you may find a transient softened because the processor has decided to remove it. You will find this to be the case more or less on all devices that feature some form of time compression or expansion. A lot of these problems depend on the nature of the audio material being processed and settings that process the spoken word perfectly could make a right mess of a percussive dance track. The converse is also true. The biggest problem is in material that has a healthy balance of low and high frequencies because different timestretch parameters are required to process different frequency ranges - in audio material that has a wide frequency composition there is much adjustment to be done to obtain the correct compromise so that both frequency ranges are adversely affected as little as possible. Please be aware that, on occasions, you may never get absolutely perfect results and there may be occasional side effects, especially with extreme settings of stretch - of course, these side effects can be put to good use for the creation of special effects!! Over smaller ranges, however, you will find the timestretch on the S3200XL yields excellent results and will become an invaluable tool in your work, whatever application you are working in. You could use timestretch to alter the length of a drumloop or breakbeat without altering the pitch in order for it to fit in with the rest of the track or you could use it to speed up or slow down a track to change the ‘groove’ or feel. You could even use the timestretch to overcome timing discrepancies of a ‘live’ band or use it to create gradual tempo changes, etc.. It can be used to change the length of, say, a backing vocal part or guitar solo so that it can be played back at a different pitch and so accommodate key changes. You could use it to maintain the same vibrato speed for a number of ‘multi-samples’ created from one original sample. There are many possibilities which you will no doubt discover for yourself. Let us now examine how to operate the Timestretch function on the S3200XL. Pressing will give this screen:
This enables you to lengthen or shorten a sample or a selected part of a sample from 25% of its original length to 2000% (twenty times) without changing its pitch. Two modes are available for stretching: CYCLIC, in which a fixed interpolation rate is maintained throughout the whole of the sample (suitable for individual instrument samples), and INTELL, in which the S3200XL “intelligently” varies the interpolation rate according to the sample content (suitable for speech and music). As usual, you may select the sample to be edited at the top of the page. The parameters on this page are: Here you may set two values to set the start and end of the area of the chosen sample you wish to stretch. You may only want to stretch one part of the sample so it should be set here. The first field sets the start point of the stretched area and the field sets the end. You may audition the area you have set using the key (F6). Here you can set the cycle length (in samples). The soft key can be used to help you find the right sample length. As with autolooping,
S3200XL Operator’s Manual - Version 1.00
Page 143
EDIT SAMPLE the S3200XL applies software logic to the sample to calculate what it believes is the right answer but, like autolooping, whilst the S3200XL will often help you, it is not always infallible. The function only applies to the CYCLIC mode of timestretch. This sets the percentage by which the sample will be stretched or shrunk. The range is 25% to 2000% (although we are the first to admit that such extremes are only going find favour with the truly mad!). As this parameter is adjusted, you will see the length of the sample changing in the adjacent field and in the field above that. As mentioned, there are two ways in which you can stretch a sample and this is selected here. CYCLIC uses a fixed cycle time at which the S3200XL will stretch. When INTELL is selected here, the S3200XL makes its own decisions as it proceeds with the stretching process. Be warned, though! Although the intelligent mode will produce better results, the time taken for this operation is much longer than when the CYCLIC mode (up to several minutes depending on the length of the sample and the amount of stretch). Remember that to perform any of these operations, you will need to have enough free memory. This sets a level of intelligence for the S3200XL to work with when performing an intelligent timestretch. It sets the number of decisions it will make as it works its way through the sample. With lower values set here, it will not make so many examinations of the sound. With higher settings, it will examine the sound in great detail and so produce better results although this will take longer. This control only has a function when INTELL is selected. This sets a crossfade between the original and the inserted data. It is recommended that when low values are set, this should be set high and vice versa. This control only has a function when INTELL is selected.
Page 144
S3200XL Operator’s Manual - Version 1.00
EDIT SAMPLE PERFORMING A TIMESTRETCH Set the parameters as described above - if you are stretching complex samples such as breakbeats, backing tracks, drumloops, voice over, backing vocals, etc., use the INTELL mode of operation. For stretching individual instrumental samples, maybe CYCLIC will be o.k.. First set the zone you want to stretch in the stretch and fields. If you want to stretch the whole sample (which is the usual application), this field will be set as soon as you select the sample. If you are using CYCLIC mode, then set a cycle length (or use the key). If you are using the INTELL mode, set the and as you think necessary (remembering that high values will take more time). Now set the parameter, name the new sample and press . If you haven’t created a new sample, you will receive this prompt:
In this case, please name a new sample or select a sample you know you have no further use for as the destination sample. Whilst the timestretch is processing, you will receive the following display:
Depending on the mode you selected and the settings of the parameters, you may have to wait a while (several minutes in the case of long INTELL stretches). You can abort the procedure by pressing F8 a few times. You will see the display counts down in percentage the time remaining for the process. When the processing is finished, you can play back the original from the ENT/PLAY key or the stretched version from the key. If you are happy with the sound of the stretched sample, you can proceed to edit, trim and loop it, just as if it was a freshly-recorded sample.
S3200XL Operator’s Manual - Version 1.00
Page 145
EDIT SAMPLE RE-SAMPLING The re-sampling page (called RATE on the soft key because we didn’t have enough room!) allows you to re-sample your sounds at different sampling rates. This is to allow you to sample at anything other than 44.1kHz and 22.050kHz and to save memory. High sampling rates and bandwidths are all well and good but if the sound doesn’t have a high harmonic content, what’s the point of wasting valuable memory? For example, you would be justified in using a high sampling rate for cymbals and hi-hats with their high harmonic content but for bass drums, toms, amplified electric guitars and the like whose frequencies may not extend beyond 10kHz, it seems pointless. Of course, this kind of sound can be set to be recorded at 10kHz in the SAMPLE pages but what if the sound needs a bandwidth of 12 or 14kHz? This is where the resampling or RATE page comes in. Pressing
in the DSP pages calls up this screen:
As usual, the sample name and free memory are displayed on the top line. This shows the selected sample’s sample rate. This field is not accessible. This allows you to set the sample rate of the new sample you wish to create. This is variable between 22050Hz (22.050kHz) and 65000Hz (65kHz). There may seem little point in re-sampling upwards but it might come in useful if you need to transfer a sample via a sample editor to a sampler that uses a higher sample rate. The default for this field is 22050 (half bandwidth) but can be set as you like. This field also works in conjunction with the and which enter three quarters and two thirds the sample’s original sample rate. This allows you set the quality of the re-sample. Higher quality values will analyse the signal more closely thereby producing better results. Higher quality re-sampling does take longer, however. This shows the length of the new sample. As usual, as in all pages of EDIT SAMPLE, you may view this in milliseconds by pressing the RATE key again. This shows the new tuning. When sounds are re-sampled, they must adopt a new tuning. This is because, when you re-sample at, say, half bandwidth, you take out half the data making it play at twice the pitch so it is necessary to offset the tuning. This is done automatically for you and this field is not accessible.
Page 146
S3200XL Operator’s Manual - Version 1.00
EDIT SAMPLE PERFORMING A RE-SAMPLE First, create a new sample - re-sampling is a copy process and so you have to create a new sample by pressing NAME, entering a new name and pressing ENT. If you wish to use either of the two preset sampling rates, simply press either or - this will re-sample the original to three quarters or two thirds the original frequency. Alternatively, set a value of your choosing in the field and press . If you have not named the new sample you will receive the prompt:
You should input a unique name. During the re-sampling process (which is very quick but does depend on the length of the sample) you will receive the message:
When the process is complete, you can play the new sample you have created by pressing the key (F8) and you can make very fast comparisons by pressing and the ENT/PLAY key alternatively. You can use the re-sampling facility to save on memory. In the studio where you have time to load in new sounds this may not be so crucial but on-stage, you ideally need to cram as much into the S3200XL as possible. Even with 32 Megabytes of RAM installed, there will be occasions where you need to squeeze that little bit more out of the samplers internal memory. In this respect, the re-sampling functions are ideal. In fact, given that listening conditions at a gig are nowhere near as critical as in the studio, you could afford to make special ‘gig disks’ where the bandwidth is more limited than it could be to save even more space in your memory.
S3200XL Operator’s Manual - Version 1.00
Page 147
EDIT SAMPLE EQ The S3200XL is also equipped with an EQ (equalisation) DSP function. This allows you to add EQ, affecting the tone of the sample. Pressing in any of the DSP pages will give this screen display:
In the EQ, you may select from four different EQ types and apply cut and boost of gain at specific frequencies. The EQ is only one band but you may EQ samples that you have already processed to have an almost unlimited amount of frequency bands! The fields on this page are: Here you may select whether you will edit in mono or, with stereo samples, in stereo. When EQ’ing stereo samples, you can select MONO and EQ each side separately if you wish. This selects the EQ response curve. You may select LOW SHELF. This offers the following response slope:
FREQ
A frequency range below the EQ frequency setting can be cut or boosted. This is good for adding or removing bass end components in a sound. The next selection is BAND WIDE:
FREQ
A wide band either side of the EQ frequency can be cut or boosted. This selection is useful for gently accentuating or removing certain frequencies in the sound. It would be useful to add some mid range frequencies to a snare sound, for example. The next selection, BAND THIN is well suited for removing specific frequencies but the wider frequency response of BAND WIDE makes the EQ effect slightly broader.
Page 148
S3200XL Operator’s Manual - Version 1.00
EDIT SAMPLE The next selection is BAND THIN:
FREQ
Similar to BAND WIDE described above, BAND THIN has a narrower ‘bell’ and so will accentuate or remove a tighter band of frequencies. This selection is useful for picking out a specific frequency in the sound (adding mid-range ‘crack’ to a snare, for example) or for removing a tight band of frequencies (i.e. cutting back some mains hum in a sample or removing some top end noise). The next selection is HI SHELF:
FREQ
This allows you to cut or boost high frequencies above the EQ’s frequency control. This is good for adding or removing some top end in a sound. This sets the frequency of the EQ. The effect it has depends on the setting in the field. With LOW or HI SHELF selected, it sets the point below or above which the cut or boost will take effect. With either of the band EQ types selected, it sets the centre frequency. This sets the cut or boost for the selected frequency. The range is +/-24dB (00dB being no cut or boost, of course). To compensate for extreme gain settings, the control allows you adjust the sample’s overall volume after the EQ effect is applied. It is especially useful when high gain boosting has been set as it is quite likely the sample will distort. In this case, turn the control down accordingly (i.e. if you set a gain boost of +24dB, set a volume cut of -24dB to compensate). When cutting frequencies, you may like to use the control to boost overall level slightly (although this may also be accomplished by re-normalising the sound).
S3200XL Operator’s Manual - Version 1.00
Page 149
EDIT SAMPLE EQ’ING A SAMPLE Select the sound you want to EQ. The EQ process must always make a copy of the source sample so press NAME and enter a suitable name for the copy. Press ENT/PLAY to complete the naming process. Now set the parameters as you think fit. As you adjust the controls, you will see the ‘shape’ of the EQ on the screen: I.e.
Once you think you have set something suitable, press didn’t set a new name, you will see the message:
to start the EQ process. If you
In this case, create a new sample name. Assuming you have named the sample, you will see the following message as the sample is being processed:
Once the processing is complete, you can audition the results of the EQ using the key on F8. You can play the original sample using the ENT/PLAY key and this allows you to ‘A/B’ between the original sample and the processed sample. If the sound is not to your liking, set the controls differently and try again, overwriting the EQ’d sample you just made. If the parameter was set fairly high but you did not compensate for this with the control, you may get the message:
In which case, back the
control off a bit and try again.
USING THE EQ The EQ process is very useful for affecting the sound at source. As mentioned, it can be used very effectively for removing mains hum or other noises that may have crept into the recording. You can use it creatively to accentuate certain elements of the sound as well - you could add more weight to cellos and basses and the like by boosting some low frequencies using the LOW SHELF selection or you could add top end to strings, brass, etc., using the HI SHELF selection. Mid ranges can be boosted or cut using the BAND WIDE and BAND THIN selection. BAND WIDE is best suited for adding gentle boost or cut to a sound whereas BAND THIN is better at homing in on specific, tight frequency ranges. If you need to EQ more than one frequency, select the source sample and set the EQ for that and process it. When that’s done, select the EQ’d sample as the source sample, set the next frequency you want. Repeat the process again on the second EQ’d sample.
Page 150
S3200XL Operator’s Manual - Version 1.00
EDIT SAMPLE
FURTHER EDITING FUNCTIONS The key in the SLCT page gives access to further editing functions such as sectional editing, splicing and joining samples together, reverse and fade up/down. THE PARAMETER PAGE The first page we see is the PARAMETERS page (the first one you access when you press the key) and looks like this:
On the top line is the name of the sample you want to edit. As usual, this may be changed with the DATA control. The parameters on this page are as follows: This allows you to alter the original pitch at which the sample was recorded, so that when you replay it on the keyboard, it will play at the correct pitch. You will note that the ENT/PLAY key which normally plays a sound at a pitch set in the MIDI TRAN(smit) page, plays the sample at its correct pitch (i.e. the pitch it was sampled at) when you are in EDIT SAMPLE. Further fine tuning (in semitones and cents over a range of ±50 semitones) is possible here. This parameter determines the way in which the sample will be played back. There are four options available here. The first is LOOP IN RELEASE. This means that when a key is pressed, the sample will play through all the loops until the first HOLD loop is reached. When the key is released, the HOLD loop will continue to play as the release falls away. This is always selected when you make a sample. LOOP UNTIL RELEASE is slightly different. Again, the sample will play, with all loops, until the first HOLD loop is reached. However, when the key is released, the loop will end, and the remaining portion of the sample (if any) will be played. This is a useful setting for sounds which have a definite attack, an indefinite sustain period (set with the loop), and a definite release characteristic. For example, if you have a double bass sample that has an interesting and realistic finger squeak at the end, this type of loop may be appropriate. NO LOOPING does what its name suggests - it plays the sample through without loops for as long as the key is held down. If the sound is not long enough, it will finish even though you are holding down a note. If the sample is still sounding, as soon as the key is released, the sound will start to decay. PLAY TO SAMPLE END is useful for triggering sampled drums either from a keyboard or sequencer or by drum trigger units such as the ME35T and the like. Like the previous setting, no loops are played, but an instantaneous trigger signal or key press will play the whole of
S3200XL Operator’s Manual - Version 1.00
Page 151
EDIT SAMPLE the sample (the key does not have to be held down for the whole length of the sample). This allows you set a pitch shift of up to ±50 cents (one semitone) for a HOLD loop. This function is useful when you have a small, short, single cycle loop that has latched onto some strange, discordant aspect of the sound and is slightly out of tune with the rest of it.
Page 152
S3200XL Operator’s Manual - Version 1.00
EDIT SAMPLE REVERSING SAMPLES In the PARAMETERS page, when the soft key (F8) is pressed, the sample will be reversed. Pressing it again will reverse the sample back to its original form. Note that any loop points you have set will stay in the same absolute positions, and will not be reversed with the sample.
S3200XL Operator’s Manual - Version 1.00
Page 153
EDIT SAMPLE SECTIONAL EDITING Pressing will take you to this screen:
This is the SECTIONAL editing page and shows a typical drum riff, something for which the sectional editing functions are ideally suited for editing. Whereas TRIM allows you to remove audio data either side of the start and end points, these functions allow you to remove data within the start and end points. This can be used, for example, to remove one single snare beat from a drumloop sample or, in a vocal line, could be used to remove a mistake or a cough. You may extract such pieces of audio in several ways. You may extract it and leave the gap it creates or may extract it and close the gap it creates. You may overwrite the existing sample or you may extract the section to another new sample, keeping the original sample intact. There are many uses for these functions and you will no doubt find your own. As in TRIM, across the top of the waveform display, you can see any loops that have been set (in this example, no loops are set). To create a sectional edit, set the start and end points as appropriate. You may use the and to zoom in or out on the sample and the key toggles between the start and end of the sample. As you set the start and end points, you will receive a screen display such as:
At this point, you may like to create a name for the new sample to be copied to. You don’t have to as it is possible to overwrite a sample with the edited version but, if you want to be safe, it’s probably best to make a copy, assuming you have enough available memory. Now press . You will receive this screen:
Here you are presented with four choices. These offer three distinctly different edits depending on what it is you want to achieve. They are: This will exit this screen and return you to the main SECTIONAL edit screen without having any effect on the sample.
Page 154
S3200XL Operator’s Manual - Version 1.00
EDIT SAMPLE This is an ‘extract’ function that will remove the isolated area and copy it across to the new sample. I.e:
This is particularly useful for isolating such things as single snare or bass drums from a pattern although any sound could be ‘lifted’ in this way. This allows you cut the section you have marked and keep the gap thus created. I.e:
This is good for removing offending noises from a track where the rhythm or pace should be retained. For example, in a vocal line where the singer accidentally knocked the mic stand or sneezed! This will remove the selected area and close the gap thus created. I.e.:
This is good where you want to remove something but the rhythm or the pace is not so important. If you do not name a new sample, you will receive the following prompt when you press
Pressing GO will take you directly to the as you wish. If you change your mind, press
prompt and you may .
,
:
or
Whilst the S3200XL is processing the data, you will receive a ‘busy’ prompt. After a few seconds, the new sample will be shown which may be played in the usual way.
S3200XL Operator’s Manual - Version 1.00
Page 155
EDIT SAMPLE As with TRIM, the S3200XL is very considerate and won’t let you ruin good loops and if you move the start or end points into any loop zone (shown above the waveform) you will receive the warnings:
or
In this case, whatever editing action you perform will be ignored. As with Timestretch and Re-sampling, if you create a new sample from any of the above editing procedures, the original loop points will be lost and you will need to reset them. You may select to edit in mono or stereo accordingly. Of course, this only has relevance if the sample is stereo in which case you may prefer to edit the left and right channels separately.
IMPORTANT NOTE ABOUT SETTING START AND END POINTS: The start and end points are temporary whilst in the sectional edit page They are not stored anywhere. If you leave SECT or select another sample, these will be lost and you will have to set them again.
Page 156
S3200XL Operator’s Manual - Version 1.00
EDIT SAMPLE THE JOIN PAGE In this page, you may join two samples end to end, crossfade them and merge them. This can be very interesting for creating long, evolving sounds and big, thick orchestral and synth textures. Pressing will display this screen:
The samples to be joined together are known here as A and B, and the resulting JOINed sample is called J. Though A and B can be the same sample, the resulting (J) sample cannot be the same as either A or B. Press the NAME key to enter a new sample name for the sample J. Existing samples can be overwritten and therefore can be used for J. As mentioned earlier, this page has three basic functions This will copy part of a sample (A) to another (J) This will splice two samples end to end. You may also crossfade the two samples. This will mix two samples together, effectively layering them on top of each other. SPLICING SAMPLES Select the A and B samples using the DATA control. You must then choose a name for the J sample. This can either be the name of an existing, unwanted sample, or you can enter a new name using the NAME key followed by pressing ENT/PLAY. Now you should select the portions of the A and B samples which are to be combined using the and fields. For example, you may want to splice just the attack portion of sample A to the sustain portion of sample B, or mix just parts of two samples together. If you want to hear exactly what part of a sample you are going to use, you can set the first and last points of A, and then press - this will copy sample A into sample J without sample B so that you audition it in isolation using the ENT/PLAY key (you can overwrite J later, of course, so you’ve done no permanent damage to A if you get things wrong). Notice how the figures at the bottom alter as the lengths of samples A and B are changed. The figure before the (splice) field is the total length of the selected portions of the two samples (minus the X-fade length - see below), and the figure before the (mix) field is the length of the longest sample portion to be included. You may set the respective levels of each of the samples A and B using the but be careful you don’t overload the system by setting too high a level.
parameters
Once you’ve set everything, press . If sample J already contains data, you will be asked if you want to overwrite it (you should press GO or ABORT as necessary). After a few seconds (depending on the length of the samples), you can hear the fruits of your labours by pressing the ENT/PLAY key.
S3200XL Operator’s Manual - Version 1.00
Page 157
EDIT SAMPLE CROSSFADING To avoid a sharp break in sounds when you splice them together, one sound can be crossfaded into another. The crossfading will start before the value set in the point of A, the time at which crossfading starts depending on the number of samples set in the field. This field has no effect, of course, when layering samples. Again, you can adjust the relative volumes of A and B by up to ±25dB, using the parameters. However, if you set these too high, you may get a distorted sound, so use these with care (you will be prompted if the new sample distorted during the process). When you’ve set up the and points for both samples, press . If sample J already contains data, you will be asked if you want to overwrite it (you should press GO or ABORT as necessary). Again, the process will take a few seconds (depending on the length of the samples and the amount of crossfading) and when the operation is complete, you can listen to the new sound by pressing the ENT/PLAY key. MIXING AND LAYERING SAMPLES It is also possible to ‘stack’ samples on top of each other. This can be an effective way of layering sounds without eating into polyphony. The same principles apply as above. Select sample A and B and create a new sample J (or use an unwanted existing sample). You may set the portion you want to mix together (for example, you may want to layer the attack of one sound directly on top of another) and also set the levels and relative balance in the field (please be especially careful here - because you are combining two samples together, the levels will naturally go up. If anything, you may need to use the scale parameters to turn them down). Once you’re happy with everything press . If the J sample already exists, you will be prompted and you should respond accordingly and, after a few seconds, you will be able to play the sound from the ENT/PLAY key. You may repeat these techniques using the J sample as the basis for a new splice, crossfade or layer. For example, you could: •
Crossfade a timpani strike with a deep string orchestra. Use that sample, for example, to crossfade with a big vocal chorus chord and use the result of that to crossfade with a large orchestral finale.
•
Crossfade a thick synth bass with a string pad. Use that to crossfade with a resonant filter sweep sound and crossfade the result of that with some strange percussion loop.
•
Layer some strings on top of a piano. Use the new sample as the basis onto which you layer a marimba.
•
Keep layering different synth string sounds on top of each other for a huge pad sound.
NOTE 1. When mixing, splicing or crossfading samples in this way, any loops which were present in the original samples (A and B) will not be played back when you play back J. You must reset loops in J if you want them. NOTE 2: The samples always use their base note (i.e. the note they were sampled at) when employing any of these techniques. In other words, a string sound sampled at C3 and layered or crossfaded with a choral sound sampled at G3 would be a fifth apart. This cannot be corrected, even through tuning it in the MORE page. NOTE 3: It goes without saying that you need to have sufficient memory available to create these new spliced or mixed samples. You will be reminded by the prompts if you haven’t! Though the process of creating the sound you want may take some time, it’s possible you may discover some new sounds along the way which weren’t quite what you were expecting, but
Page 158
S3200XL Operator’s Manual - Version 1.00
EDIT SAMPLE could find a place in your work. The type of sounds created here can be long evolving sounds which may find a place in soundtrack work as they can be very dramatic.
S3200XL Operator’s Manual - Version 1.00
Page 159
EDIT SAMPLE SETTING DIGITAL FADES It is also possible to set fades on a sample. This may seem unnecessary seeing that you may effectively set fades using the envelope generators in EDIT PROGRAM but it does have uses. Probably the one that springs to mind first is where you have a noisy drum sample. Whilst you could ‘shape’ the noise out in EDIT PROGRAM using envelope generators, it means that you have to do this every time you want to use this particular sample. By setting a digital fade down, you can affect the sound at source. Pressing
in the MORE page will display this screen.
Here we see a string sample and a start and end time has been set (the sample’s loop is shown above the waveform display). Pressing will give you the usual prompts if you have not created a new sample to copy to. If you agree to overwriting the original sample or have created a new one, after a few seconds you will receive a display not unlike this one:
Here, you can see the sample has fades which lead up to the points set by the start and end positions set above. You may play the sample from your keyboard or the ENT/PLAY key. If you try to set fade times that fall within any loop zone(s), you will receive the following warning:
or
In this case, whatever editing action you perform will be ignored. You may zoom in or out of the waveform display using the keys (F5/F6). When zoomed right in, you may use the on F7 to toggle between the start and end of the sample.
IMPORTANT NOTE: One thing to remember when setting fades is that these will speed up and slow down as you play them across the keyboard range so, while it may seem a good idea at the time to set a slow legato fade up and down on a string sample, you may find it would have been better to have used an envelope generator so that attack and release is consistent across the keyboard range.
Page 160
S3200XL Operator’s Manual - Version 1.00
EDIT SAMPLE
IMPORTANT NOTE ABOUT SETTING START AND END POINTS: The start and end points are temporary whilst in the FADE page They are not stored anywhere. If you leave FADE or select another sample, these will be lost and you will have to set them again.
S3200XL Operator’s Manual - Version 1.00
Page 161
EFFECTS EFFECTS MODE The EFFECTS key gives access to the S3200XL’s internal effects. The S3200XL’s effects processor is a 4 channel effects processor. Two channels (FX1 and FX2) offer multi effects that include distortion, ring modulation, EQ, modulation effects such as flanging, chorus and phasing, stereo pitch shift, autopanning, rotary speaker simulations plus delay/echo and reverb. The other two channels are reverb only channels (RV3 and RV4) giving a total of four reverbs. 4-CHANNEL EFFECTS PROCESSOR MULTI-EFFECTS CHANNEL FX1 DISTORTION/EQ
DISTORTION
EQ
MOD/DELAY EFFECTS
RING MOD
CHORUS or FLANGE or PHASE or PITCH SHIFT or PAN/FMOD
REVERB (RV1)
DELAY
REVERB
MULTI-EFFECTS CHANNEL FX2 DISTORTION/EQ
DISTORTION
EQ
MOD/DELAY EFFECTS
RING MOD
CHORUS or FLANGE or PHASE or PITCH SHIFT or PAN/FMOD
REVERB (RV2)
DELAY
REVERB
REVERB ONLY CHANNEL RV3 REVERB REVERB
REVERB ONLY CHANNEL RV4 REVERB REVERB
Page 162
S3200XL Operator’s Manual - Version 1.00
EFFECTS The two multi-effects channels (FX1 and FX2) are divided into three distinct sections: DISTORTION/EQ/RING MOD into MODULATION/DELAY into REVERB. The ‘reverb only’ channels (RV3 and RV4) only offer reverb effects. Single programs may be assigned to these effects channels in the SINGLE mode but the power of the multi-channel processing comes into its own when in MULTI mode as each part may be sent to different effects channels. For example, the drums could be sent to RV3 giving a gated reverb effect, an electric piano sound to FX1 giving EQ, chorus and reverb, an organ sound could be routed to FX2 to give a distorted rotary speaker effect with echo and a large room reverb whilst strings and brass could be routed to RV4 with a large hall reverb. Several parts may be routed to one channel so that programs can share the same effects and each part has its own individual effects send level for setting the amount of effect on each part. Furthermore, individual keygroups in a program may be routed to any of the four effects so that, for example, in a drums program, each drum may have its own reverb send level and reverb type selected.
NOTE: A single program, part or keygroup cannot be sent to more than one effects channel. In this way, the S3200XL becomes almost a complete studio in one box and you could mix down a complete multi-timbral musical performance through the stereo outputs. You can also mix down digitally through the S3200XL’s digital output to DAT or any other digital recorder/editor such as the Akai DR4 or DR8.
S3200XL Operator’s Manual - Version 1.00
Page 163
EFFECTS ORGANISATION OF EFFECTS FILES There are 50 ‘effects’ presets (i.e. combinations of distortion, EQ, ring mod, modulation/pitch shift/rotary speaker and delay effects) and 50 reverb files. FX1 and FX2, (the multi-effects channels) can use any of the 50 effects presets. The reverb sections of FX1 and FX2 (RV1 and RV2) and the two reverb only channels RV3 and RV4 can use any of the 50 reverb presets. The multi-effects presets have associated with them RV1 and RV2 and the multi-effects presets 1-50 ‘remember’ which of the reverb presets have been selected for RV1 and RV2 so that selecting a new multi-effect preset will also recall the reverb effect selected for that channel. For example, if multi-effects preset #25 has reverb preset #12 selected, selecting multi-effect #25 on FX1 will automatically select reverb #12 for RV1. The same would be true for FX2 were you to select multi-effects preset #25. You may change the reverb associated with an effect preset at any time but you do not need to specifically select a reverb every time you select an effect preset.
EFFECTS FILE EFFECT 1
REVERB 1
RV1
FX1 EFFECT 50 EFFECT 1
REVERB 50 REVERB 1
RV2
FX2 EFFECT 50
REVERB 50 REVERB 1
RV3 REVERB 50 REVERB 1
RV4 REVERB 50
Unlike most other sound modules, the S3200XL makes no distinction between effects in SINGLE mode or MULTI mode. This means that effects used with sounds in SINGLE mode can just as easily be used the same in MULTI mode. For example, if effect preset #23 sounds good with a string sound in SINGLE, when in the MULTI mode, route that same string part to a suitable effects channel and select effect #23 for that channel. This makes the effects routing very flexible and any sound, whether it is in SINGLE or in MULTI can share this common ‘pool’ of effects and reverb presets.
Page 164
S3200XL Operator’s Manual - Version 1.00
EFFECTS ASSIGNING EFFECTS TO SINGLE PROGRAMS In the SINGLE mode, you can assign the program to one of the effects channels. The easiest way to do this is to use the MIX page in SINGLE:
Here, you see a list of the programs in memory. You may route them to the effects simply by selecting the effects channel FX1, FX2, RV3 or RV4 in the column. The amount of effect applied to the program is set in the column.
NOTE: You may also select the effects channel you want the program routed to in EDIT PROGRAM in the OUTPUTS pages:
You may find the MIX page slightly easier to use, especially when setting effects for several programs at once. Also, if you are using the ‘old Akai’ method for creating multi-timbral setups, the MIX page is probably the best place to select your effects routings. Once you have selected the channel the program is routed to and set a send level, press the EFFECTS mode key to select the effects you want to assign to the program. You will see this screen:
This shows the selected effects files for all four channels. To select a different effects channel for the program (for example, you may have routed the program to FX2), press CURSOR DOWN to get to FX2 and use the DATA wheel to select that channel’s effect and reverb preset. The effect preset will bring with it a reverb preset when selected (in the above screen example, selecting effect #6, CHORUS+DEL will automatically select reverb preset 23, LARGE HALL, the reverb ‘associated’ with that effect preset). To change that, move the cursor across to the section of the screen and select a reverb preset as appropriate.
S3200XL Operator’s Manual - Version 1.00
Page 165
EFFECTS Furthermore, a single program will ‘remember’ the four effects selected on the other channels. You can use this to offer some alternative effects for a single sound. For example, you may have a guitar sound to which you wish to add effects. For effects channel 1, you could select a filthy, heavy metal distortion sound with copius amounts of chorus, delay and a large hall reverb. For effects channel 2, you could select a mild overdrive effect with a large room and for RV3 and RV4, you could select two different reverb types. When you subsequently come to use this guitar sound again, you may switch between these different effects simply by selecting FX1, FX2, RV3 or RV4 in the MIX page, comparing and contrasting the different effects as you like. This is also used when assigning different keygroups to different effects channels in a single program (for example, assigning different drum sounds to different effects).
NOTE: Please note that it is the program NUMBER that ‘remembers’ the effect selection, not the program name. If you assign a certain set of effects to a program and that program is renumbered, the effects association will be lost. For example, using the above example, if the guitar sound using the heavy metal hero effect is program 5 but you renumber this to program 7 and a strings program to program 5, the guitar sound will use the effects selection for program 7 whilst your string section will turn into the violinists from hell!!
Page 166
S3200XL Operator’s Manual - Version 1.00
EFFECTS ASSIGNING EFFECTS TO MULTI PARTS In the MULTI mode, you route the selected part to the effects in the main MIX page:
column of the
In this example, we see that PART 1 is routed to FX1, PART 2 to FX2, PART 3 also to FX1, PART 4 to RV4, etc.. Each parts’ send level is adjusted in the column. The actual effects presets are selected in the EFFECTS mode. Pressing EFFECTS in MULTI mode will show something like this screen:
Here you may select the multi-effects and reverb presets for the four channels.
NOTE: If you are using the ‘old Akai’ method for multi-timbral sequencing, please refer back to the previous page. If you think of the effects and their interaction with the parts more like you would approach assigning effects to channels on your mixer, things way be easier to follow. For example, let’s say that instead of having the internal effects on the S3200XL, you have assigned each part to its own channel on a mixer. The first thing you would do is patch in the first multi effects processor to AUX 1 on the mixer. You would then patch in the second of your multi-effects processors to AUX 2. You would then patch in two reverb processors to AUX 3 and AUX 4 respectively (of course, this is assuming you have two multi-effects processors and two reverb processors!). You have now assigned the outboard effects to the mixer channels much like routing parts to the S3200XL’s internal effects. On the mixer, you would then set the send levels for AUX 1, 2, 3 and 4 for each channel as appropriate (like setting the SEND level parameter for each part in the MULTI). Finally, you would turn to the effects processors in your rack and select appropriate effects presets for the sounds routed (i.e. much like going to the EFFECTS mode and selecting suitable presets reverb and effects setting).
S3200XL Operator’s Manual - Version 1.00
Page 167
EFFECTS
NOTE ABOUT EFFECTS SELECTION IN MULTI The S3200XL makes no distinction between effects in MULTI or in SINGLE. This means that an effect created for use with a sound in SINGLE mode can be used on the same sound in MULTI mode. This has distinct advantages over other sound modules that have internal effects. Typically, the effects are tied either to the single program or the multi-file and effects created in one cannot normally be used in the other. This means that a single sound that uses a particular effect has to lose them in MULTI mode. As a practical example of this, on a typical keyboard/sound module, let us say you have a raunchy heavy metal guitar leadline sound in its SINGLE mode. It uses all the multi-effects possible including distortion, EQ, chorus, delay and reverb to create this powerful sound. So, you decide to use it in a song and so you place the sound into the module’s MULTI. However, as soon as the sound is placed in the MULTI, it loses the effect and is no longer the overdriven leadline sound it was in SINGLE mode. Disappointment all round! On the S3200XL, you do not have this limitation. In this case, let’s imagine the same scenario you have a guitar program in SINGLE mode to which you have added an effect that offers distortion, EQ, chorus, delay and reverb (let’s say it’s effect #10) that you want to use in a MULTI. Go to MULTI mode and place the guitar program into a part. Now select a suitable effects channel for that part (for example, FX1) and, in the EFFECTS mode, select effect preset #10 on FX1. The part containing the guitar sound will be routed to effect #10 and so will play exactly the same in the MULTI mode as it did in the SINGLE mode.
Page 168
S3200XL Operator’s Manual - Version 1.00
EFFECTS ASSIGNING EFFECTS TO INDIVIDUAL KEYGROUPS It is also possible to send individual keygroups in a program to the effects. This is of particular use in drums and percussion programs. This is done in EDIT SINGLE or EDIT MULTI in the KEYGROUP page:
The and parameters allow you to send individual keygroups to the effects by overriding the main program’s effects routing. The default will be PRG (i.e. the routing is using the program’s effects buss selection) but you may also select OFF (i.e. the selected keygroup is not routed to the effects), FX1, FX2, RV3 or RV4. The parameter allows you to set the amount of effect for each keygroup. In this way, you can, for example, send individual drums in different amounts to the effects. Furthermore, each drum could be routed to a different effect (i.e. bass drum to a tight gated reverb, snare to a large hall, toms to a medium hall, etc.). To set this, select the keygroup in the field (or press and hold the EDIT key and play the appropriate note) and route that keygroup as appropriate and set a suitable level.
S3200XL Operator’s Manual - Version 1.00
Page 169
EFFECTS PROCESSING EXTERNAL SOUND SOURCES THROUGH THE EFFECTS As well as processing programs, parts and keygroups through the internal effects, you may also process external sound sources thereby turing the S3200XL into a very flexible stand alone effects processor as well. You may process internal AND external sounds through the effects for even more flexibility. For example, in a mixdown, you could be mixing tracks off tape whilst running the S3200XL ‘live’ from a sequencer synced to a timecode track. You could feed audio from tape via two of the mixer’s auxilliary sends to the S3200XL:
TIMECODE MIDI
L/R INPUTS
AUX SENDs
To DAT/Tape/Cassette
In this example, an Akai DR8 8-track digital audio recorder/editor is feeding its eight tracks into the mixer providing the ‘non-MIDIable’ parts such as vocals, guitar, etc.. It is also running timecode to a sequencer which, in turn, is ‘playing’ the S3200XL ‘live’ in the mix. The mixer’s aux sends are also being fed to the S32000XL’s inputs so that tracks from the DR8 may be
Page 170
S3200XL Operator’s Manual - Version 1.00
EFFECTS processed through the S3200XL. The S3200XL’s individual outputs are being used here but you could just as easily use the L/R outputs if you are short of mixer channels and set the balance of the programs within the S3200XL. An extention of this may be to also be sequencing older synths that have no effects such as MIDI’d up anaolgue synths or FM synths, etc.. Of course, you needn’t be sequencing the S3200XL during mixdown and it can just be used as a stand-alone two channel effects processor if you like ROUTING EXTERNAL SOUNDS THROUGH THE EFFECTS External sounds are routed via the I/O page in the main EFFECTS page. Pressing F1 give this display:
will
Having only two inputs, you may only use two channels of the effects but you may route the Left input and Right input to any of the four effects using the field. The field alows you to set how much of the ‘staight’ signal will be mixed in with the effected signal. When using a mixer and sending signals to the S3200XL via auxilliary sends, this is best kept at 00 but when playing a sound directly through the effects, you should set an appropriate balance here (you may also set the ‘wet/dry’ balance in the OUTPUTS page in EFFECTS EDIT - see later).
NOTE: An effects channel may share an external input AND internal sounds. For example, you may route some programs/parts to FX channel 1 which also has an external input routed to it. This is so that you don’t have to make an ‘either/or’ decision and allows greater flexibility when bringing in external sound sources. If you want an FX channel for exclusive use by an external sound source, do not route any programs/parts to that FX channel. SELECTING THE EFFECTS OUTPUT You may, if you wish, route the effects to appear at a pair of the individual outputs. This allows you to balance the relative levels of the ‘straight’ signal and the effects signal on an external mixing console. This would also allow you to maybe EQ the effects signal or whatever. This is set in the I/O page in the section and you may select L+R, 1/2, 3/4, 5/6, 7/8 as you wish. You will note, however, that the outputs selected here carries a mix of all four effects channels’ outputs and it is not possible to route individual effects channels to different outputs.
S3200XL Operator’s Manual - Version 1.00
Page 171
EFFECTS CHAINING EFFECTS Not only is it possible to have the multi-effects with distortion/EQ>mod/delay>reverb on FX1 and FX2 but you may also feed the outputs of these two channels to the ‘spare’ reverb channels RV3 and RV4. This allows you to add reverb to reverb. At first this may seem a bit pointless but one use that immediately springs to mind is adding a hint of ‘acoustic’ reverb to a gated or reverse reverb effect. This is done in the main EFFECTS page. By moving the cursor to the RV3 field thus:
You may select RV3’s input. You may select from the following options: RV3
RV3 will be fed with whatever is routed to RV3 in the SINGLE or MULTI modes or in EDIT SINGLE, field.
FX1
This will route anything routed to the FX1 buss to RV3. MOD/ECHO
L/R outs
PATH
FX1 DIST/EQ
PATH CONTROL PATH REVERB
RV3 REVERB
L/R outs
L/R outs
This allows you to send one sound (internal or external to two reverbs. FX1 DIST/EQ
The output of the distortion/EQ section of FX1 will be fed to RV3: MOD/ECHO
L/R outs
PATH DIST/EQ
PATH CONTROL PATH REVERB
RV3 REVERB
Page 172
L/R outs
L/R outs
S3200XL Operator’s Manual - Version 1.00
EFFECTS FX1 MOD/ECHO
The output of FX1’s modulation/echo section will also be fed to the reverb in RV3: RV3 REVERB
MOD/ECHO
L/R outs
L/R outs
PATH DIST/EQ
PATH CONTROL PATH REVERB
L/R outs
Again, you may have two reverbs applied to any sound routed to the FX1 buss. FX1 REVERB
This routes the output of FX1’s reverb to RV3: MOD/ECHO
L/R outs
PATH DIST/EQ
PATH CONTROL PATH REVERB
RV3 REVERB
L/R outs
L/R outs
This routing allows you to ‘reverb reverb’! This has several uses. You can set, for example, a gated reverb or reverse reverb effect in FX1 and add to that ‘normal’ acoustic reverb. You could select gated reverb in FX1 and add to that reverse reverb in RV3. There are many possibilities and in conjunction with the PATH CONTROL and the various sections’ level/pan controls, even more things are possible and some very sophisticated multi-effects can be created.
NOTE: RV3 cannot take as its input FX2. The same may be done with RV4 using FX2. The choices are identical to those described above for RV3 except that RV4 takes as its input FX2. Please refer to the above description for details.
NOTE: RV4 cannot take as its input FX1.
S3200XL Operator’s Manual - Version 1.00
Page 173
EFFECTS MUTING EFFECTS There may be times when you want to temporarily turn the effects off. You could of course, turn the send level down at the program/multi source but a quicker way is to use the soft keys. will mute all four effects channels. When pressed, it changes to this and the four individual mute keys will change to this: indicating that all effects are muted. Press F8 again to un-mute the effects. Soft keys F4-F7 show and you may also mute the effects channels independently using these keys. When these are pressed, they will show according to which key you pressed. Press the appropriate soft key again to un-mute the effects channel.
Page 174
S3200XL Operator’s Manual - Version 1.00
EFFECTS EDIT EFFECTS EDIT As we have seen, there are 50 ‘effects’ presets (i.e. presets for the distortion/EQ/ring mod/modulation/delay effects sections of the multi-effects channels) which can be freely assigned to the two multi-effects channels FX1 and FX2. These multi-effects presets have associated with them, a reverb preset so that multi-effects and reverb are always selected whenever you select a new multi-effect preset. The reverb presets associated with the effects are drawn from the ‘pool’ of 50 reverb presets. Our programmers have put together a wide palette of multi-effects types to suit a variety of different purposes which we hope you find useful. However, with so many effects to choose from and with such a wide range of parameters and possible combinations, it may be that you will need to edit these to your requirements. To edit any of these presets, first press EFFECTS and select the effect you want to edit. Once you’ve done that, press EDIT.
NOTE: Editing an effect and/or reverb preset will, however, affect any sound that uses that preset. For example, you may have a guitar sound that uses effect preset #4 which is set to chorus and delay. However, if for the purposes of the guitar sound, you add distortion and EQ and change the chorus to a flange setting, if there is another program in memory that uses that effect preset (for example, a strings program), it too will be affected.
S3200XL Operator’s Manual - Version 1.00
Page 175
EFFECTS EDIT DISTORTION/RING MODULATION The first page you encounter is the DIST(ortion) page
Here, you can add ring modulation and distortion to a sound. A ring modulator is a device with two inputs and one output. One input carries the audio source and the other a sine wave signal of variable frequency. The two signals are modulated to produce a variety of different effects. If the modulating oscillator’s frequency is low, the effect will be a tremolo effect. At frequencies of 100Hz or so, you can produce the famous ‘dalek’ voices and other robotic, metallic effects on speech. At high frequencies, the results are rather unpredictable and largely depend on the audio input signal but, basically, they can best be described as discordant and clangourous. The parameters on this page are FREQ(uency) and DEPTH. The FREQ parameter sets the frequency of the sine wave oscillator and the DEPTH parameter sets the amount of ring modulation. Distortion is primarily useful for emulating electric guitars but you may also find it useful on electric piano sounds and organ sounds to emulate the sound of these instruments slightly overloading an amplifier. Of course, you can use it on any sound and you could add a bit of ‘dirt’ to a drums program by adding a small amount of distortion. The parameters for distortion are DEPTH and OUTPUT. DEPTH sets the amount of distortion and OUTPUT sets the output level of the distortion device. You will find that higher DEPTH settings will require you to turn down the LEVEL parameter as increasing DEPTH increases the signal gain quite considerably. High DEPTH settings produce extreme distortion effects (i.e. heavy metal overkill) whilst lower DEPTH settings produce milder ‘clipping’ effects. The field allows you to switch out the distortion/ring mod section from the chain of effects. This is useful when you want to switch this section of the effects out but don’t want to upset the control settings.
Page 176
S3200XL Operator’s Manual - Version 1.00
EFFECTS EDIT EQ Pressing in any of the effects pages will give you access to the EQ functions. The EQ section of the two multi-effects channels is a four band EQ offering lowpass control over a low frequency, two bandpass mid frequencies and a highpass high frequency control. I.e.:
LP
GAIN
BP1
GAIN
BP2
GAIN
HP
GAIN
You may set the centre frequency and the gain for each of the four channels (on the two mid frequency ranges, you may also set the width of the EQ effect).
FREQUENCY
G A I N LOW
BP1
BP2
HI
The frequency of each of the four bands is variable and may overlap if you wish and you may selectively boost these frequencies if you wish to enhance certain aspects of the sound. Furthermore, you can modulate the frequencies of either of the two mid range sections to create auto-wah effects such as you find on a wah-wah pedal. It is also possible to create synthesiser filter sweep effects. The EQ screen looks something like this:
The parameters are: This sets the centre frequency for the four bands of EQ, LOW, MID1, MID2 and HIGH. For Khz frequencies, the field is expressed as nknHz. For example, a setting of 6k3Hz represents a setting of 6.3kHz. You will note that the values for these fields cannot be set using the numeric keypad. Only the DATA control may be used. This sets the level of the four frequencies.
S3200XL Operator’s Manual - Version 1.00
Page 177
EFFECTS EDIT
For the two mid-range frequencies, you may also set the width of the EQ. Larger values set a wider width whilst lower settings produce a narrow width.
WID = 00 WID = 99
With narrow WIDTH settings, you can accentuate certain frequencies more tightly whereas with higher width settings, a wider frequency range is covered by this EQ parameter. If you are familiar with synthesiser filters, this control is similar to the resonance control. If you are familiar with parametric EQ devices, this is the same as the ‘Q’ or ‘bell’ control found on outboard EQ devices or some very expensive mixers’ EQ sections. As mentioned, you may also modulate the two bandpass filters to create swept ‘auto wah’ effects. Normally, you would only modulate one of the bandpass filters but you may independently modulate both for more extreme effects. These effects are set along the bottom row of the page using the (frequency modulation) and parameters. The parameter sets the rate of modulation and the parameter sets the amounts of sweep. The arrows indicate which parameter relates to which frequency band the controls to the left of the parameter affect MID1 and those to the right of affect MID2. Many effects are possible using the ‘autowah’ functions. Effects from ‘wahwah’ clavinet and guitar may be created by sweeping just one band (either will do) and more extreme filter sweep effects can be created by sweeping both. Low setting (i.e. tighter ‘bell’) accentuates the effect. The phase shifter option in the MOD section can also be enhanced by sweeping one (or both) of the bandpass frequencies with narrow width settings at exactly the same rate as the phase shifter. You could also experiment with setting the AUTOPAN selection in the MOD section to the same rates so that EQ/filter sweeps pan in synchronisation with each other. Some of the effects presets utilise these effects - you may like to study them for a better understanding of what is going on. The BYPASS field allows you to switch the EQ section out of the effects chain. You may also ‘flatten’ the EQ (i.e. set the parameters so that there is no EQ applied) by setting the LOW and HIGH bands to 500Hz and 00dB and the two MID sections’ level to (the mid bands’ frequencies have no effect when is set).
Page 178
S3200XL Operator’s Manual - Version 1.00
EFFECTS EDIT MODULATION EFFECTS The next group of pages deal with the modulation effects. These include effects such as chorus, flanging and phase shifting. Also in this section are pitch shift, rotary speaker emulation effects and autopanning. The modulation effects section screen looks something like this:
You must first choose which type of modulation effect you want to use in the The choices are
field.
PHA/FLA/CHOR
This selects that the modulation effects are phasing, flanging or chorus.
ROTARY SPKR
This selects that this section of the effects will create rotary speaker emulations.
AUTOPAN/FMOD
This selects that this section of the effects will give autopanning and frequency modulation effects.
PITCH+SHIFT
This selects that this section of the effects are for creating pitch shift and detune effects.
PITCH+FBK
This selects that this section of the effects are for PITCH SHIFT with the delayed feedback.
CHORUS, PHASE SHIFT AND FLANGING EFFECTS If you select PHA/FLA/CHOR, the screen will be as above. The parameters you may set for phasing, flanging and chorus are all the same but the actual algorithm used for each effect type is slightly different and so yields a different sounding effect. All these effects are produced by modulating a short delay with a low frequency oscillator. All these effects are stereo. In the PHASING and FLANGING effects, each side of the stereo image is modulated in anti-phase (i.e. one channel’s control signal is fed via an inverter so that as one channel goes up, the other goes down) to give great depth and stereo width to a sound (the CHORUS effect is more complex and is described in detail on the next page). DELAY R
Audio in
LFO INV DELAY L
These effects are chosen in the PHASING
field and are as follows:
This gives a ‘swooshing’ effect. It uses a very short delay time which is modulated by an LFO.
S3200XL Operator’s Manual - Version 1.00
Page 179
EFFECTS EDIT
FLANGING CHORUS
This also gives a ‘swooshing’ effect but, because it uses a slightly longer basic delay time, the effects are more pronounced and more ‘metallic’. This produces an effect similar to several instruments playing at the same time. It is good for ‘beefing up’ many different sounds and giving the impression of an ensemble effect. CHORUS is an excellent ‘all rounder’ on most synth sounds (bass, pads, string synths, brass), electric piano sounds, guitar, etc..
NOTE: Many chorus units you can buy as pedals or rack mount processors use a single delay line modulated by an LFO. This can sometimes produce a very ‘cyclic’, repetitive sound. To overcome this, some chorus units use two delay lines or two LFOs. The S3200XL’s chorus, however, actually uses four delay lines each modulated at different phase angles of the LFO’s output to produce a very broad stereo effect with little or no ‘cyclicness’. DELAY 1 L50
DELAY 2 L15 Audio in LFO
L/R
DELAY3 R15
DELAY 4 R50
Furthermore, the outputs of these delays are spread across the stereo image to give a wide, expansive (expensive?) chorus sound. The parameters for these effects are: This sets the speed of the phasing, flanging or chorus effect. This sets the depth of the phasing, flanging or chorus effect. For flanging, high depth settings can work well but for chorus effects, you may find lower depth settings more appropriate. To create classic phasing effects, low depth settings are appropriate. This sets the amount of signal that will be fed from the output of the effect back into its input. This has the effect of sharpening or accentuating the effect. This parameter may be inverted and negative settings have the effect of heightening the effect even further.
Page 180
S3200XL Operator’s Manual - Version 1.00
EFFECTS EDIT ROTARY SPEAKER EFFECTS If ROTARY SPKRS is selected in the
field, you will see this screen:
In ‘the good ol’ days’, the sound of an organ was enhanced using a rotary speaker (it was also a popular one-off effect on guitar and other sounds as well). A rotary speaker is a speaker enclosure that has a speaker on a motor that literally spins round and round. This ‘throws’ the sound around giving a very pleasing effect. However, these rotary speakers have two speed settings, slow and fast, and using a switch, you can switch between slow and fast. The slow speed gave a smooth undulating effect whilst the fast setting gave a kind of tremolo-cumvibrato effect. The ROTARY SPKRS selection allows you to simulate this. The parameters are: This sets one of the rotary speaker speeds. Typically, this will be used to set the speed of the slow rotary speaker effect but it may be used as the fast rotary speaker effect if you wish as the S3200XL simply toggles between SPEED1 and SPEED2. This sets the second of the rotary speaker effect speeds. On a ‘proper’ rotary speaker, because of mechanics and inertia, it takes a certain amount of time for the speaker to change from the slow speed to the fast speed and vice versa. This parameter allows you to set the time in seconds it will take to go from SPEED1 to SPEED 2 and vice versa. This sets the depth (or width) of the rotary speaker effect. High settings will give a wide left-right sweep, lower settings will give a narrower sweep. This parameter sets which of the speeds will be the ‘initial’ speed when you select this effect. It also allows you to listen to the speed parameter you may be adjusting. For example, when setting speed 1, select and when setting speed 2, select . This allows you to set up rotary speaker effects without having a MIDI controller to hand. You may switch between the two speeds using any of the 128 MIDI controllers. This is set under the parameters. This selects which MIDI controller will trigger the change from SPEED1 to SPEED2 and vice versa. You may select any of the 128 MIDI controllers.
NOTE: If using MODWHEEL, make sure that this is not used to introduce vibrato to the sound as well otherwise, as you change the rotary speaker speed, you will also increase/decrease vibrato which may or may not be desirable. Depending on the MIDI controller selected in the field, you may select whether crossing a threshold level of 64 that
S3200XL Operator’s Manual - Version 1.00
Page 181
EFFECTS EDIT will cause the speed change or a switch action that will cause the speed change. When LEVEL is selected, once the controller goes past a level of 64, the speed will change. When TOGGLE is selected, the selected controller will switch between speed 1 and speed 2 and vice versa. Confused? Read on! Let’s take a practical example. Let us imagine that you are using the modwheel (controller #1 - the default) to switch between speed 1 and speed 2. With LEVEL selected, pushing the modwheel up will cause the controller to go over the 64 threshold (i.e. as it moves from 0-127) and the rotary speaker effect will change from speed 1 to speed 2 (i.e. typically, get faster). Bringing it back down again will once again go over the 64 threshold (i.e. as it travels from 127-0) causing the rotary speaker effect to go from speed 2 to speed 1 (i.e. typically, get slower). However, with TOGGLE selected, pushing it up will cause it to change from speed 1 to speed 2 but you must bring the modwheel down again and push it back up to go from speed 2 to speed 1. LEVEL is recommended for use with continuous controllers (modwheel, pressure, breath, footpedal, etc.), whilst TOGGLE is recommended for ‘switch action’ controllers (footswitch type controllers such as sustain, etc.). This parameter is really only of any use when in MULTI mode. Because several programs may be sharing the same effect, you must designate which MIDI channel will initiate the change from SPEED1 to SPEED2. If the effect is to be used in a MULTI, select the channel of the controller that will trigger the change in speed (for use in SINGLE mode, select the same MIDI channel as the program’s MIDI channel).
NOTE 1: In practice, it is likely that only one sound will be routed to a multi-effects channel producing a rotary speaker effect (typically, an organ sound) in a multi. In this case, set the parameter to the same channel as the part the organ sound (or whatever) is in. For example, if the organ sound is in PART 5 on MIDI channel 5, set 5 in the field shown here. Of course, more than one part may be routed to a multi-effects channel producing a rotary speaker effect but one channel must be designated to initiate the change from SPEED1 to SPEED2. Select as appropriate. NOTE 2: Please note that because the stereo mod section passes through the echo section, any stereo mod effects you create will be ‘monofied’ when mono delay effects are selected. As a result, you cannot effectively use the rotary speaker effects with mono echo. NOTE 3: You will find that the rotary speaker effect is best created with no ‘straight’ signal. You should use the DIRECT SIGNAL: ON/OFF function in the FX OUTPUT pages to turn off the straight signal. Preset rotary speaker effects have DIRECT SIGNAL set to OFF. TIP: You may find the sound of a rotary speaker is enhanced using just a hint of distortion in the distortion section to re-create the overdrive effect commonly found on rock organ sounds.
Page 182
S3200XL Operator’s Manual - Version 1.00
EFFECTS EDIT AUTOPAN AND FREQUENCY MODULATION EFFECTS If you selected FMOD/AUTOPAN in the field, this selects the autopanner and frequency modulator. This will cause the sound to pan backwards and forwards from left to right and back again. You may also add pitch sweep effects to this to create Doppler effects. You will see this screen:
The FMOD parameters are: This sets the speed of the frequency modulation. This sets the amount of frequency modulation. This sets the amount of feedback from the output of the frequency modulator back to its input. This parameter can be used to accentuate the frequency modulation effect. The AUTOPAN parameters are: This sets the speed of the autopan effect. This sets the ‘width’ of the autopan effect. With high settings the sound will pan across a wider stereo image. This sets the type of the autopan effect. The choices are: The sound will move from left to right but, as the sound crosses the central axis, the level will be constant giving the impression of it simply panning left to right. The sound will move from left to right. As the sound crosses the central axis, however, the effect is of the sound ‘rotating’’ (i.e. as it goes from left to right, the sound becomes more distant and as it travels from right to left it becomes more ‘up-front’ and forward). As above but in the opposite direction. The output of the autopanner is mono and the effect is a tremolo effect (i.e. mono amplitude modulation) This effect selection can be used to produce many different sounds. It can used as an ordinary autopanner (i.e. FMOD parameters all set to 00) or to create vibrato and chorus effects (using just the FMOD parameters; AUTOPAN parameters set to 00) or, using both panning AND frequency modulation, you can create a Doppler effect (i.e as the sound moves, it also changes pitch - the classic ambulance siren effect!).
NOTE: Because the stereo mod section passes through the echo section, any stereo mod effects you create here will be ‘monofied’ when mono delay effects are selected. As a result, you cannot effectively use autopan with mono echo.
S3200XL Operator’s Manual - Version 1.00
Page 183
EFFECTS EDIT STEREO PITCH SHIFT EFFECTS If you selected PITCH SHIFT in the
field, the screen will look like this:
The pitch shifter allows you to set an interval for left and right. More often than not, a small amount of detune is set here (i.e. LEFT = -00.05/RIGHT = +00.05) but you can also set these parameters to specific intervals such as a fifth (+07.00) or an octave (+12.00) or whatever.
NOTE: As with all but the most expensive pitch shifters, there is a small delay in the pitch shifted sound. This can be used to enhance an ensemble effect, however. Also, extreme pitch shifts will exhibit some ‘wobbly’ artefacts. In this case, mix the level of the pitch shifted signal back a bit. If you select PITCH SHIFT+FB (pitch shift plus feedback) in the this screen.
page, you will see
This is exactly the same as before and you may set the pitch shift interval as described above. However, in the PITCH SHIFT+FBK selection, you also have access to a delay line. The delay parameters allow you to set a delay time for the feedback loop. This effects selection looks like this as a block diagram: FBK L DELAY L SHIFT LEFT FBK R
Audio in DELAY R SHIFT RIGHT
The signal from the pitch shifter is fed back into itself via a delay time. If you can imagine it - the sound goes through the pitch shifter and, after a delay, that pitch shifted sound is fed back into the pitch shifter where it is further pitch shifted. After a delay, it is fed back again after the delay and shifted again. The amount of feedback and the delay time for each channel is separately variable and this gives rise to all sorts of weird and wonderful arpeggio effects. The parameters set the delay time for the feedback loop and the parameters set the amount of feedback (repeats) for the sound.
Page 184
S3200XL Operator’s Manual - Version 1.00
EFFECTS EDIT
NOTE: You will please note that when PITCH SHIFT+FB is selected, this uses the delay line normally used for echo effects. In other words, the echo effects described later in this section are not available when PITCH SHIFT+FB is selected.
S3200XL Operator’s Manual - Version 1.00
Page 185
EFFECTS EDIT BYPASSING THE MODULATION EFFECTS The final selection in the modulation effects section is not an effect as such but bypasses the modulation section completely, thereby switching it out of the effect chain:
Although you may move the cursor to the fields and set values, they will have no effect in this BYPASS screen.
Page 186
S3200XL Operator’s Manual - Version 1.00
EFFECTS EDIT DELAY AND ECHO EFFECTS The next section in the effects allows you to set delay and echo effects. The delay line in the multi-effects is dual channel allowing you to create ping pong and many other stereo delay effects. It can also operate in a mono mode and this has the advantage of doubling the available delay time. The echo/delay effects available are MONO LEFT
This will create a mono echo effect and the signal is derived through the delay line’s left input.
FBK HF DAMP DELAY R
LEFT IN MONO L+R
DELAY L
This creates mono echo and delay effects but derives its input signal from the left and right inputs to the delay line. FBK HF DAMP RIGHT IN
LEFT IN
DELAY R
DELAY L
NOTE: Because the stereo mod section passes through the echo section, any stereo mod effects you create (i.e. chorus, flange, phase, rotary speaker or autopan/frequency mod effects) will be ‘monofied’ when MONO LEFT or MONO L+R effects are selected. XOVER L&R
This is a ‘pseudo-stereo’ delay effect that uses the two delay lines the feedback path of which crosses over: LEFT IN
RIGHT IN
DELAY RIGHT
DELAY LEFT
This gives rise to many interesting panning echo effects.
S3200XL Operator’s Manual - Version 1.00
Page 187
EFFECTS EDIT STEREO
This creates stereo echo and delay effects with separate control of the left and right delay times.
FBK R HF DAMP LEFT IN
DELAY RIGHT FBK L HF DAMP
RIGHT IN
DELAY LEFT
NOTE: The delay section of the effects has one large pool of memory to create the echo and delay effects. When in any of the MONO modes of echo, the whole memory is used to create long delays. In the XOVER and STEREO modes, however, the pool of memory is split between the two channels and so such long delay times cannot be set.
Page 188
S3200XL Operator’s Manual - Version 1.00
EFFECTS EDIT MONO DELAY/ECHO EFFECTS If you selected either of the MONO echo effects, the screen you will see is something like this:
The parameters are: Here, you may set a delay time of up to 700mS This sets the amount of repeats the echo effect will have by setting how much of the delayed output is fed back into the delay line.
NOTE: Be careful with high and cause ‘howl around’.
settings as you can cause the delay line to go unstable
This sets the high frequency damping. The HF DAMP parameter filters out some of the high frequency components in the sound in the feedback loop. This is to simulate the effect that in real life, each repeat of the echo gets slightly duller as the surfaces off which the sound is bouncing absorb some of the high frequencies. The value shown is the frequency that will be attenuated in the feedback loop. This selects where you will listen to the output of the delay and allows you to set the direction of the modulation section and the echo section. You may select POST which will give the effect of echo followed by the mod effects or you may select PRE which will give the effect of the mod effects followed by echo.
NOTE: When PRE is selected, you must set a value in the delay effect
parameter to hear any
NOTE REGARDING MONO ECHO EFFECTS Please note that because the stereo mod section passes through the echo section, any stereo mod effects you create will be ‘monofied’ when mono delay effects are selected. To enjoy stereo modulation effects with echo, please choose the stereo delay option (see below).
S3200XL Operator’s Manual - Version 1.00
Page 189
EFFECTS EDIT PING PONG ECHO EFFECTS The field allows you to add another repeat element to the echo effect and takes a ‘tap’ off the delayed signal to produce a secondary repeat. This allows you to create pseudo stereo ‘ping pong’ echo effects that bounce back and forth from left to right. A setting of 00 creates a mono echo effect. A setting of +50 will create a ‘ping pong’ echo effect that goes from right to left and back again. A setting of -50 will create a ‘ping pong’ echo effect that goes from left to right and back again. Settings in between 00 and ±50 will give ‘asymmetric’ or syncopated ‘ping pong’ effects. of ±50, the
For example, with a setting of 500mS and a result will be equally spaced repeats of 250mS. I.e.:
LEFT IN
250mS
750mS
1.25Sec RIGHT
500mS
1Sec
1.5Sec
With settings of, say, ±25, the first repeat will come after 125mS, the second after 500mS, the third after 625mS, etc. (depending on the amount of feedback). I.e.
LEFT IN
125mS
625mS
1.125Sec RIGHT
500mS
The closer the the value set in the
Page 190
1Sec
1.5Sec
parameter is set to ±50, the closer the first echo will be to parameter.
S3200XL Operator’s Manual - Version 1.00
EFFECTS EDIT CROSSOVER DELAY The XOVER delay selection offers an interesting variation on ping-pong echo. Ping-pong simply ‘switches’ between left>right>left>right>etc.. The XOVER delay effect will swap the left/right signals with every other repeat - i.e. left+right>right+left>left+right>etc.. Difficult to describe but fun to use! The parameters are the same as for either of the MONO delays although you will note that because two delay lines are being used for the XOVER effect, the maximum delay time you can set is halved. With XOVER L&R selected, the control allows many interesting ‘syncopated’ delays to be created that pan across the stero field.
S3200XL Operator’s Manual - Version 1.00
Page 191
EFFECTS EDIT STEREO DELAY/ECHO EFFECTS If you select STEREO in the MODE page, the screen display will show something like this:
Here you may set the delay time, the high frequency damping and feedback level for the left and right delay channels. All parameters are identical to those explained in the MONO ECHO effects except, of course, that you have two separate channels of them. You may set completely different values in both channels to create some wild echo and delay effects.
NOTE: The maximum delay times for each of the two delay lines is half that of the MONO delay times we have seen so far.
Page 192
S3200XL Operator’s Manual - Version 1.00
EFFECTS EDIT REVERB EFFECTS Besides all the effects described so far, the effects processor also has a reverb effect on each of the four channels.
NOTE: The multi effects described above relate only to the multi-effects channels 1 and 2. They are not available on effects channels 3 and 4 which are reverb only. Reverb is a delay effect we experience almost everyday. Whether we are in a bathroom or a cathedral, most acoustic environments have some form of reverberant characteristic. It is probably THE most important effect and has the most pronounced effect (no pun intended) on our perception of a sound largely because we are so used to hearing it all around us every day. This is why a sound with reverb (even if it is just the smallest hint) sounds better and more ‘alive’ and realistic than a ‘dry’ sound with no reverb. If you imagine you are in a large hall and you clap your hands, the sound travels outwards to the walls and bounces off them and we hear those reflections. Because the reflections are bouncing off the walls at many different angles, the effect is that you hear the familiar reverberant ‘smudge’ or ring after the initial sound.
In this example, we can only see the one elevation but the sound will also be bouncing off the side walls as well as the walls behind you to build up a dense reverberation pattern. Characteristics of the room determine the sound of the reverberation. For example, a large room or hall will give a long reverberant decay but, the same room or hall filled with wall-to-wall velvet drapes will give a shorter, duller reverberation as the drapes absorb all the high frequencies. In a small tiled room, you can get quite a pleasing short reverb (which is why so many people sing in the shower!) where the highly reflective tiled surfaces cause the sound to bounce around and build up a dense reverberation quite quickly. It also takes a certain time for the sound to get to the walls and then travel back to your ears - this is called the PRE-DELAY time and the larger the acoustic environment, the longer the pre-delay time (usually!). Graphically, reverb ‘looks’ a bit like this: PRE-DELAY
DECAY TIME
SOUND
S3200XL Operator’s Manual - Version 1.00
REVERBERATION
Page 193
EFFECTS EDIT In the effects processor, we have access to parameters that allow you to set up a wide range of reverb effects. The reverb page is as follows:
Here, you can select from a range of reverb types that include large hall, small hall, large room and small room. You may also select certain special reverb effects such as reverse and gated we will come to those a bit later. Assuming you select one of the ‘natural’ reverb effects, the parameters are as follows: This sets the time between the original sound and the onset of reverb. This sets the time it takes for the selected reverb type to die away.
NOTE: These are probably the most important parameters you will want to edit. sets the delay between the direct sound and the onset of the reverb and the sets the length of the reverb decay. Adjusting these will have a profound effect on the ‘size’ of the reverb effect you are creating. Setting longer will give a greater sense of distance as it effectively sets the nearest wall the sound will bounce off first. If this time is long, then we perceive that the room is much larger. By setting long we also increase the effective size of the acoustic environment as larger acoustic environments cause the reverberation to last longer. Normally, you would increase the length of the predelay as you increase the length of the decay. It is uncommon to have a very long pre-delay and a very short reverb decay (but is good as a special effect!). You may, however, set a long decay but have a short (or non existent) predelay. Another quality of reverb is its diffusion - i.e. how well the reflections ‘smudge’ together. Normally, the sound will bounce off the wall at exactly the angle it hits it. This normally gives rise to a smooth reverb decay. Some environments have many odd alcoves or corners and other ‘acoustic obstructions’ (i.e. a gymnasium with bars on the walls) which can cause the sound to bounce off at random angles and this can impart an ‘echoey’ quality to the sound where you can hear some of the individual reflections. The parameter allows you to set the density of the reverb. Lower settings will give a more ‘echoey’ effect whilst higher setting will give a smoother effect. This affects the amount of ‘agitation’ the direct sound will have on the reverb decay and this has an effect on our perception of how close we are to the direct sound. High settings give the impression of being closer to the original sound whilst lower settings gives an enhanced sense of distance. In some acoustic environments, the low frequencies die away more quickly. This control allows you to cut low frequencies from the reverb sound. This has the effect of making the reverb less ‘boomy’ and can be effective on bass instruments that you may be feeding through the reverb as it helps to ‘separate’ the reverb from the main sound thereby making the source sound more distinct.
Page 194
S3200XL Operator’s Manual - Version 1.00
EFFECTS EDIT As we saw in the delay section, as the sound echos so it normally gets progressively duller. The same is true of reverb. As the sound is bouncing all over the place, each time it hits a surface, that surface will absorb some high frequencies. If the room has a lot of furniture, curtains, drapes, cushions, whatever, the high frequencies are absorbed even more rapidly (which is why your living room doesn’t have a pronounced reverberant quality). This has the effect of the reverb decay getting duller in tone as it dies away. It is very uncommon for a room to have absolutely no damping factor and LFDAMP and HFDAMP allow you to re-create this phenomena. If you are trying to simulate a heavily damped environment, set LFDAMP to 10Hz (i.e. bypass) and lower the HFDAMP parameter. If you are trying to simulate a highly reflective environment, raise the HFDAMP parameter. To really emphasise the high frequency content (i.e. to simulate a tiled room), you may try raising the LFDAMP frequency.
SOME TIPS ON USING REVERB •
Firstly, don’t overdo it! One common mistake is to smother a sound in reverb. This just results in an indistinct, ‘mushy’ sound. A lot of reverb can be nice on slow, floating pads and strings, the musical content of which is fairly sedate but, generally, more reverb does not guarantee a better sound - often the reverse, in fact!.
•
Be aware that using long reverbs on fast moving sounds (i.e. fast sequences or arpeggios) can cloud the music creating an indistinct ‘blur’ behind the music (unless the reverb is mixed quite a way back). A nice ROOM reverb on such parts is usually sufficient. If you can, tweak the decay time so that it doesn’t hang over into adjacent notes too much.
•
Small rooms and the like are good on bass sounds. You may also like to try setting the LFDAMP parameter so that only the high frequency content of the sound is reverberated. This will keep the ‘straight’ portion of bass end free for the bass to be heard clearly. Avoid long, boomy reverbs on bass parts as this will clutter up the bottom end of the music.
•
To create more space between the reverb and the direct sound, set longer predelay times. This will allow the attack of the sound to be heard without ‘smudging’ it with reverb. For example, when applying reverb to a snare drum sound, a bit of predelay can help separate the direct snare sound from the reverb.
•
To make a sound seem further away, send a lot of signal to the reverb and pull the level of the direct signal back a bit in the L/R outputs. To make a sound VERY distant, pull the direct sound out completely!
•
When putting drum kits through the reverb, watch out for the hi-hat. Fast hi-hats through the reverb can make the overall mix very ‘splashy’ as the high frequencies get reverberated. If you get this problem, take the high hat out of the reverb altogether using the function in the drums program. With drum and percussion programs, use the function to have more or less reverb on some drums than on others (for example, snares can take a lot of reverb but bass (kick) drums usually have less). The function allows you to send different drum sounds in a program to different effects types (for example, gated on the bass drum, large hall on the snare, medium hall on the toms, small room on selected percussion, etc.) although in a multi-timbral setup this will use up all available effects channels.
S3200XL Operator’s Manual - Version 1.00
Page 195
EFFECTS EDIT REVERSE REVERB So far, we have seen the parameters for the ‘natural’ reverb effects. There are, however, certain special reverb types which can also be selected in the TYPE parameter. If REVERSE is selected, you will see this screen:
This has this effect on the sound: PRE-DELAY
TIME
In this effect, the reverb decay of the sound is read out backwards. The parameters are: This sets the time before the reverse reverb will start sounding. This sets the length of the reverse reverb. This has the effect of making the reverse sound more or less ‘grainy’ and ‘echoey’.
Page 196
S3200XL Operator’s Manual - Version 1.00
EFFECTS EDIT GATED REVERB Gated reverb is ordinary reverb that cuts off abruptly. It was discovered by Peter Gabriel and his enginerr Hugh Padgham when setting up a drum sound and some noise gates were still connected to some mixer channels that had reverb going through them. When the drum was hit, the reverb decay on these drums was being stopped dead by the noise gates creating a dramatic sound where there was just a short burst of reverb after the sound. With the careful adjustment of reverb decay time and noise gate parameters, he found you could add a very controllable amount of dynamic ambience around the sound where the drum has dense ‘space’ around it but the reverb doesn’t hang over into the next beat. The S3200XL’s multieffect processor offers two variations on this effect. With GATED selected, the screen looks like this:
The first ‘gated’ reverb effect, GATED 1, ‘looks’ like this: PRE-DELAY
TIME
The initial sound is heard and then, after a time set by the PREDELAY parameter, a dense reverb sound is heard which cuts off abruptly. The parameters are: This sets the time before the gated reverb will start sounding. This sets the length of the gated reverb. This has the effect of making the gated sound more or less ‘grainy’ and ‘echoey’. The other gated reverb effect (GATED 2) is essentially the same but the decay characteristics are slightly different. PRE-DELAY TIME
Here, the decay is ‘flatter’ giving a more dramatic effect (albeit more artificial).
S3200XL Operator’s Manual - Version 1.00
Page 197
EFFECTS EDIT The parameters for GATED 2 are identical: This sets the time before the gated reverb will start sounding. This sets the length of the gated reverb. This has the effect of making the gated sound more or less ‘grainy’ and ‘echoey’. Of course, GATED reverb is not only suitable for drums but can be used to add space to any sound. Try it on other percussion sounds such as congas or try it on rhythmic guitar parts or arpeggiated sequencer parts, etc.. Try it also with highly rhythmic keyboard parts. Generally, try to set the TIME control so that the sound has its own distinctive ambient space around it.
Page 198
S3200XL Operator’s Manual - Version 1.00
EFFECTS EDIT EFFECTS OUTPUT SECTION The multi-effects section is laid out thus: DIST/EQ
MOD FX
DELAY
REVERB LVL LVL
PAN
LVL
PAN
PAN
L/R OUT You have control over the distortion/EQ section’s level and pan, the modulation/echo section’s output level and pan/balance and the reverb section’s output level and pan/balance. These are made available on the FX PATH & OUTPUT page:
sets the output level for the sections denoted to the left of the fields and sets the pan position/balance of these effects. The (width) control sets the ‘stereoness’ of the MOD/ECHO effects. 00 sets that the effects will be mono (i.e. the left and right channel will be summed as a mono signal) and 99 sets that the output of this effects section will be stereo.
NOTE: The control can be useful when you want to use a chorus type effect but don’t want a wide stereo image. For example, you may wish to add chorus to a bass sound but you may not want this sound to spread over the stereo image and dominate the mix. In this case, set to 00 - this will give you the full effect of the chorus but will ‘monofy’ the effect so that it doesn’t occupy a wide image in the stereo mix.
S3200XL Operator’s Manual - Version 1.00
Page 199
EFFECTS EDIT EFFECTS DIRECTION The parameter allows you to set the flow or direction of the effects. Most multi-effects processors follow a ‘traditional’ path for the effects - i.e.: DIST/EQ
MOD FX
ECHO
REVERB
However, there are times when you want to have the modulation and echo effects in parallel with each other or to be able chorus, flange or phase the reverb to add a shimmer or a ‘swoosh’ to the reverb decay. When using separate outboard effects processors, this is simply a matter of patching the effects in the order you want. Many multi-effects processors don’t allow this, however, and you are limited to just one path as depicted above. The S3200XL’s effects processor allows you to set the path of the effects with one simple control, the . You may have mod/echo followed by reverb; you may have reverb followed by mod/echo or you may have mod/echo and reverb in parallel.
MOD/ECHO
L/R outs
PATH DIST/EQ
PATH CONTROL PATH REVERB
L/R outs
When the is set to 00, the mod/echo section and the reverb section feed the main left/right outputs in parallel. The display will show . When set to +50, the output of the mod/echo section is fed into the reverb. The display will show . When set to -50, the output of the reverb is fed into the mod/echo section. The display will show . You will note that as you change the path control parameter, the direction is shown beneath it:
When set to values in between, this means that part of the signal is going to the reverb or the mod/echo section whilst also feeding the L/R outputs directly. For example, setting the to +25 indicates that some of the mod/echo section is being fed to the reverb whilst also going direct to the L/R outputs. Similarly, a setting of -25 would send some reverb to the mod/echo section whilst some reverb is going direct to the main outputs.
Page 200
S3200XL Operator’s Manual - Version 1.00
EFFECTS EDIT Another way to picture the
is as follows:
REV > MOD/ECHO
MOD/ECHO > REV –50
00
+50
At values of -01 to -50, more of the mod/echo section is fed to the reverb and setting of +01 to +50, more of the reverb is fed into the mod/echo section. As you can see, the offers a great deal of flexibility in the way the effects chain is laid out with just one simple control. Normally, you will probably use a positive setting (i.e. flange followed by reverb) and +25 is a good setting for most occasions but, to change this direction (to flange the reverb, for example), simply set a negative value.
NOTE: Of course, the PATH CONTROL & OUTPUTS screen only applies to the multi-effects channels FX1 and FX2. When editing RV3 or RV4, the OUTPUT screen looks like this:
You only have access to the level and pan/balance of the reverb, of course.
S3200XL Operator’s Manual - Version 1.00
Page 201
EFFECTS EDIT SOLOING THE CURRENT EFFECT There are times when editing the effects that you may want to hear the effect in isolation. For example, you may be setting up a reverb on one of the channels in a MULTI where several instruments are being fed to different effects but the other effects are clouding your judgement of the parameters you are setting in the effect you are currently editing. To solo the current effects channel, simply press F8 - this will mute the channels not currently selected for editing. Every page has this function so you may solo the current effect channel at any time. When pressed, it will show the current effects channel (i.e. FX1, FX2, RV3, RV4) depending on which one you are editing. Press it again to hear the other channels.
Page 202
S3200XL Operator’s Manual - Version 1.00
EFFECTS EDIT COPYING EFFECTS Sometimes, you may find an effects preset that is close to what you want but needs ‘tweaking’ You can, of course, edit the preset immediately but this may affect other sounds using this preset. For example, you may have a clean chorus/delay effect with reverb whcih is being used on a string pad sound but you want to use this same combination of effects on a guitar sound but add distortion and EQ. Pressing F7 in any of the EFFECTS EDIT pages will show this screen:
When you enter this screen, the currently selected effect will be shown in the field. You can change this if you like but it is more than likely you will be copying the currently selected effect to a new destination. To copy one effect to another, simply move the cursor to the field and select the effect you want to copy to (the effect name will be shown as you change the effect number). When you have selected an effect you are happy to overwrite, press F8 . The effect selected in the field will be copied to the new destination, overwriting the effect shown in the field. It will also carry with it the association between the effect and that channel’s reverb preset. However, if you wish, you may select another reverb preset if you wish. Let’s see a practical example. You like effect preset 35, a crossover delay with a large hall reverb, and you want to copy it to another destination so that you can add some chorus or whatever. Move the cursor to the FX TO field and select an effect preset you are happy to overwrite (for example, effect preset 10). Press - XOVER DELAY will be copied to 10 and effect 10 will have associated with it reverb preset 4, LARGE HALL. Now, when you select effect preset 10 it will be XOVER DELAY with LARGE HALL. You may now add the chorus or whatever it is you wish to change. You may also copy a reverb on its own. For example, you may want to copy reverb preset 4 LARGE HALL to preset 7 to work on it there. Without changing anything in the FX FROM or TO fields, simply move the cursor to the REVERB TO field, select preset 7 and press . COPYING EFFECTS BETWEEN DIFFERENT EFFECTS FILES There may be occasions where you have an effect in another effects file that you wish to use in the current effects file. To copy effects between different effects files, load the effects file that contains the effect you are interested in. Select that effect and, in the COPY page, use the soft keys to copy the selected effect to a ‘clipboard’ (a small bit of ‘invisible’ memory in the sampler). Press to copy just the multi-effects section, press to copy just the reverb section and press to copy both the multi-effects section and its associated reverb. Next, load the effects file you wish to copy it to, select an effect that you are happy to overwrite in the field and use the soft keys to paste the effect into the effects file. will paste in just the effects portion, will paste in the reverb portion and, of course, will paste in both sections.
S3200XL Operator’s Manual - Version 1.00
Page 203
EFFECTS EDIT
NOTE: When editing RV3 or RV4, you may only copy reverb presets:
Page 204
S3200XL Operator’s Manual - Version 1.00
SAVE SAVE MODE Once you have some sounds in memory that you have edited, you will no doubt want to save them for future retrieval. Pressing SAVE gives this screen:
SELECTING FLOPPY OR HARD DISK If the cursor is not already on the field, move the cursor to the select or as appropriate using the DATA wheel.
field and
SELECTING THE HARD DISK PARTITION When a hard disk is formatted on the S3200XL, it is divided into sections called partitions (see later for details on formatting disks). This makes disk management slightly easier. Depending on the number of partitions on your disk, the partition is shown as a letter A - ? next to the HARD-: field. You can move the cursor one position to the right to select the partition you wish to save to. You will see something like this screen:
Use the DATA wheel to make your selection. SELECTING THE HARD DISK VOLUME As well as being divided into partitions, each partition is divided into volumes. The volume is selected in the field (in the above example, it shows that the volume is not named - see below for details on naming volumes). To select the volume, move the cursor to the field and select using the DATA wheel. SELECTING THE TYPE OF SAVE The field allows you to select what it is you will save to disk (be it floppy or hard disk). To change the type of save you wish to perform, move the cursor to the field:
The options are: ENTIRE VOLUME
This will save the entire contents of the memory to disk. This will include all programs, samples, the multi and effects file .
S3200XL Operator’s Manual - Version 1.00
Page 205
SAVE ALL PROGS+SAMPLES
This will save all programs and samples only. The MULTI and any effects files will be ignored and not saved.
ALL PROGRAMS ONLY
This will save all the programs in memory but will not save the samples associated with them. This is useful if you have made any changes to one or more programs but you have not edited any samples.
ALL SAMPLES
This will save all the samples currently in memory. This is useful if you have just had an extensive sample editing session.
CURSOR PROG+SAMPLES
This will save the selected program and its associated samples only. This is useful when you make a small edit to a program.
CURSOR ITEM ONLY
This will save the selected individual item be it a program, a sample or a multi. You may also save effects files, ME-35T Drum settings, D-D SONG files (called TL’s - take lists) and Qlists.
OPERATING SYSTEM
You may save the current operating system to disk (more on this later).
MULTI+PROGS+SAMPS
This will save the multi plus its associated programs and their associated samples. It will also save the effects file.
NOTE: If you have programs in memory that you call up in the multi via program change commands in the sequence (for example, you use MIDI program change to change the acoustic piano sound used in the verse to an electric piano sound in the chorus), those programs which are not currently in the multi at the time of saving will not be saved. Your attention is brought to this as you may save a multi and then wonder why it is not playing back correctly when you subsequently re-load it. If you do have programs in memory for selection via the sequencer’s MIDI program change, use SAVE ENTIRE VOLUME.
Page 206
S3200XL Operator’s Manual - Version 1.00
SAVE SAVING TO FLOPPY DISK In the main SAVE page, select the media you wish to save to (i.e. floppy). You will see something like this screen:
Now make your selection in the field by moving the cursor to this field and use the DATA wheel to make your selection. Now, either press WIPE or GO as you wish. WIPE will first erase the disk completely (BE CAREFUL!!) and then save the file(s). You will receive the following prompt:
You should press F7 or F8 as appropriate. GO will simply save the file(s) without erasing the disk first. If no floppy disk is in the drive, you will be prompted accordingly. Similarly, if the floppy disk is write protected, the S3200XL will inform you.
NOTES ABOUT SAVING TO FLOPPY DISK An unexpanded S3200XL is capable of holding more data than will fit onto a single MF2DD or MF2HD disk. If you try to save an entire volume with many programs and samples, you will have to use more than one disk. However, the S3200XL will prompt you accordingly, prompting you to insert new disks as necessary. You cannot save continuous samples across more than one floppy disk. For example, if you have a 24 second sample and try to save it, it cannot store part of that sample on one disk and part on another. If you are using long samples like this, we recommend you invest in a hard disk.
S3200XL Operator’s Manual - Version 1.00
Page 207
SAVE SAVING TO HARD DISK In the main SAVE page, select the media you wish to save to (i.e. hard disk). You will see something like this screen:
To select the partition to save to, place the cursor on the partition field and use the DATA wheel to select the partition. Now move the cursor to the field and select the volume you wish to save to.
NOTE: You may, if you wish, press F2 and select a volume to save to
- to see a list of the selected partition volumes
You may scroll through the list of available volumes on the current partition. If the volumes have been named, you will see the names of the volumes otherwise, the volume name will show VOLUME ??? where ? is the default, unnamed volume number (it is good practice to name volumes to keep better track of things when loading - see below for information on naming volumes). When you have selected the one you wish to save to, press F1 the main SAVE screen for the selected volume.
- which will take you to
Move the cursor to the field and use the DATA wheel to make your selection from the options listed above. Now, either press WIPE or GO as you wish. WIPE will first erase the hard disk volume completely (BE CAREFUL!!) and then save the file(s). You will receive the following prompt:
You should press F7 or F8 as appropriate. GO will simply save the file(s) without erasing the volume first. If, for some reason, there is a problem with the hard disk (i.e. it is not connected or not switched on or, if it’s a removable medium of some sort and the disk/cartridge is not inserted or write protected), you will receive the message:
You will also receive this message if you try to save to a CD-ROM which, of course, is a readonly medium.
Page 208
S3200XL Operator’s Manual - Version 1.00
SAVE
NOTE: You will also receive this message when you select circumstances.
under the same
Setting SCSI ID’s, etc., is discussed later in this section.
S3200XL Operator’s Manual - Version 1.00
Page 209
SAVE RENAMING FILES Pressing F3 ( ) takes you to the RENAME page. In the rename page, you can rename individual files on disk, or rename a volume on disk (a floppy disk can contain only one volume, but a hard disk can contain many volumes). To name/rename a floppy disk, insert the disk which contains data to be renamed. To name a hard disk volume, select the partition and the volume to be renamed. To rename files, either insert the appropriate floppy disk or select the appropriate hard disk volume. Now press the key to enter a new name. You will receive this screen display:
or this if you are using a hard disk:
To enter the name, press the NAME key and type in a suitable name of up to 12 characters. You may enter numbers from the numeric keypad by pressing NAME again and you may toggle between the numeric keypad’s letters or numbers simply by pressing the NAME key. You will get a screen display something like this:
When you have entered the new name, press ENT and then press to rename the hard disk volume or floppy disk or highlight a file with the CURSOR keys and press to rename the highlighted file.
NOTE: It is good practice to name hard disk volumes as it makes life much easier when you come to load them later. Give the volume a sensible name like ORCH STRINGS or POP BRASS#1 so that volumes can be easily recognised when you come to load them. If you think of these volumes as PC directories or Mac™ folders, you will understand the importance of good naming practices as it makes loading so much easier. With a hard disk fitted, MIDI Program Change messages may be used to load volumes. Use the parameter on this page to assign a number from 1 to 128 for the current volume. Once set, you may turn this on and off freely in the field. On receipt of a Program Change message, the S3200XL will scan all the hard disk volumes for a number set in this page which corresponds to the Program Change number in the MIDI message. The volume will then be loaded (the currently selected program number will change to 1 and program number 1 of the volume which has just been loaded will be selected).
Page 210
S3200XL Operator’s Manual - Version 1.00
SAVE
NOTE: To rename a disk or a file on a floppy disk, removable cartridge or Magneto Optical disk, write-protection must be off. At any time, press F1 - SAVE - to return to the main SAVE screen. DELETING ITEMS FROM DISK Pressing the key displays this screen:
You can delete a file (or files) from a floppy disk or hard disk. If you have a hard disk fitted, select the volume using the parameter field on the first line. There are a number of options that you can pick to determine what file(s) will be deleted. CURSOR ITEM ONLY
As its name suggests, deletes only that file which is highlighted by the cursor.
ALL PROGRAMS ONLY
This deletes all programs, but not their associated samples.
ALL SAMPLES
This deletes all samples on the current volume.
ENTIRE VOLUME
This is the most drastic, erasing all data on the volume.
OPERATING SYSTEM
This removes the operating system from the volume.
NOTE: In order to delete a file or files from a floppy disk, removable cartridge or Magneto Optical disk, write-protection must be off, of course. At any time, press F1 - SAVE - to return to the main SAVE screen.
S3200XL Operator’s Manual - Version 1.00
Page 211
SAVE HARD DISK CONTROL SCSI (Small Computer Serial Interface) has become very popular as a means of interfacing devices and because a SCSI interface is fitted as standard on the S3200XL, you may use a wide range of hard disks as a storage device for your sound library. Hard disks offer more in the way of size and also speed. More recently, the removable cartridge types of storage devices have become increasingly popular. The problem with fixed drives is that when they fill up you either have to delete files (or back them up to floppy or DAT) or you need to buy another drive. With the removable types, you simply insert another cartridge. Your hard disk is controlled from the page of the SAVE mode. When pressed, the following screen display is seen:
(F5) is
The parameters on this page are used to set SCSI ID’s. The most important parameters you need to know about are and . SCSI allows up to 8 devices to be on the buss and these each have a unique number 0-7 (it’s similar to the concept of MIDI channels). In order for one SCSI device to ‘talk’ to a hard drive, their SCSI ID’s must match. The field sets the SCSI ID for the sampler’s SCSI interface. The default setting in the field is 5. This parameter must be set to match that of the drive. For example, if your external drive is 1, this parameter must be set to 1. You may, if you wish, have several drives connected and each of these must have different SCSI ID’s. Each one can be selected by changing the ID number in the field. The field allows you to switch between the different MO formats of disk. There are two - 512Bytes per sector and 1kByte per sector. Both offer the same storage, they just have different sector sizes. The S3200XL can use both and this is selected in this field. The default is 512b. The field sets the S3200XL’s SCSI ID (as distinct from the sampler’s SCSI interface’s ID) and is used when communicating between samplers or computer editors over SCSI.
NOTE: If your external drive’s ID is something other than 5 and uses a IkBytes/sector disk, you may set the appropriate settings here and, by saving the operating system to floppy disk and powering up with it in the drive, the S3200XL will default to the SCSI ID and sector size of your drive. If you have the optional SONY HS-D650 3.5 inch magneto optical drive fitted internally in the S3200XL, the : field allows you to turn this off in software. Three options are available. The first is which leaves the MO drive operating at all times. However, because the drive can be noisy due to the fans required for cooling, when not in use, you may like to turn it off. This can be done in two ways. Firsly, you may set this parameter to AUTO which will turn the MO drive off as soon as you attempt to make a smple in the REC page of SAMPLE. In this way, the noise of hte driver’s fan will not spill over into your smple if you are using a microphone in the same room sa your S3200XL. As soon as the smple has been recorded, the drive switches back on immediately. The other option is which, as the function implies, turns the drive off completely. Please note that this does not apply to external MO drives that may be connected.
Page 212
S3200XL Operator’s Manual - Version 1.00
SAVE FORMATTING A FLOPPY DISK Before a floppy disk can be used with the S3200XL, it must be formatted. To format a floppy disk, insert the disk in the drive, and press . You will see this screen display:
There are two types of floppy disk available - DD (double density) or HD (high density). The higher capacity HD disks are recommended. You may select which type of disk you are formatting in the field where you may select LOW or HIGH.
NOTE: The fields and have no function when formatting floppy disks - these are only used when formatting hard disks (see below). To format the floppy disk, select FLOPPY at the top of the screen if it isn’t already selected and press . You will see:
or
Depending on the type of disk you are using (i.e. DD or HD), the process will take about a minute and the track and side number of the disk will be displayed as the operation proceeds. When the operation is complete you should receive the following display:
This indicates that the disk has formatted correctly and is safe to use. If you get an indication that there are bad blocks, the disk may be unreliable. The S3200XL will inform you of this. If you do receive such a message, you may like to try again but it usually means that the disk has become seriously damaged in some way. This is unlikely to happen on brand new disks but may happen on floppy disks that are being re-used, especially if they have been used before on another system. Formatting a disk will permanently remove all data previously recorded on it. Only format new floppy disks or ones which contain data that you are sure you don’t need any more. If you have a hard disk connected as well, be especially careful to select FLOPPY!!
S3200XL Operator’s Manual - Version 1.00
Page 213
SAVE The key is used as a quick format for changing the size of the directory of disks formatted on an S1000 or S1100 (please see below - NOTES ON USING S1000 AND S1100 SOUND LIBRARY). Usually, you must use to format a new disk for use in the S3200XL. Trying un-formatted disk will display the prompt:
You should use
Page 214
on an
.
S3200XL Operator’s Manual - Version 1.00
SAVE FORMATTING A HARD DISK Hard disks can and should also be formatted before use. The maximum size of hard disk which can be formatted and used with the S3200XL is 510Mbytes. If any larger hard disk is attached to the S3200XL, data above this size will not be recognised or used. Switching to will display this screen:
For convenience, large hard disks are split into partitions, which are named A, B, C, etc.. All partitions must be the same size, which you can select with the HARD PARTITIONS parameter to be variable between 1 and 60Mbytes. The last partition on a hard disk takes up all the remaining space on the disk (i.e. on a 120Mbyte disk divided into 50Mb partitions, A and B will both be 50Mbytes, and C will be 20Mbytes). A further field on this page is the field. This allows you to set the number of partitions you wish to create and this is included for the disk recording functions. For example, if you have 300Mb hard disk, you may set it to have 4 x 50 megabyte partitions by setting 50 and 4 respectively in the and fields. This would leave 100Mb free for disk recording giving you 10 minutes of stereo recording at 44.1kHz. In this way, one disk may hold not only sound library but disk recordings as well. This is explained later in this manual in the section that explains the disk recording functions. If you intend to do this, it is best to check this before formatting your hard disk - formatting it later in order to use the disk recording functions will erase any sound library you may have already saved. BE VERY CAREFUL TO CHOOSE THE CORRECT SCSI ID!! To format the hard disk, press either or depending on the action you want to take. You will receive the following safeguard prompt:
Answer NO if you have second thoughts, otherwise answer YES.
FORMATTING AND ARRANGING WILL DESTROY ALL DATA ON THE DISK!! Arranging is a faster operation than a full format (it simply initialises directories into a format suitable for use by the S3200XL). Make sure that there is no data which is only stored on the hard disk which you want to keep. Formatting will take a few minutes, followed by the arrange process. Bad blocks will be automatically ‘swapped out’ in a verification procedure. You can bypass this verification process by pressing SKIP, but it is suggested that you let it run its course as it will end up safer in the long run.
S3200XL Operator’s Manual - Version 1.00
Page 215
SAVE If the drive is not connected or the SCSI ID’s don’t match, you might receive the message when you press or :
or it may say:
Please check your SCSI cables and that the drive is switched on (it does happen!). Also, please check the SCSI ID settings of both the drive and the S3200XL. You will also get this message if a removable type of hard disk is being used and the disk is not inserted in the drive. NOTES ON USING EXISTING S1000/S1100 SOUND LIBRARY The S3200XL allows 510 items to be saved on a floppy or hard disk. On the S1000 and S1100, 64 items could be stored on floppy and 100 on a hard disk volume. As a result, the whole format of the directories is completely different. S1000 and S1100 disks can, of course, be loaded with no problem. However, if you try to save to a disk that was formatted on an S1000 or S1100, because the disk directory has now changed, the S1000/1100 disk has to be reformatted. When you perform a save, if you use , this process is done automatically for you. If, however, you use instead of wipe, the S3200XL will remind you:
You may either specifically go through the formatting procedure yourself or you may simply press . The same is true of hard disk volumes. Simply using the key when you try to save to a hard disk volume that was originally formatted using an S1000 or S1100, will cause this message to be displayed:
This is saying that this volumes directory needs to be re-written in the S3200XL format. To do this, you should use - this will automatically rewrite the directory. After this, you may use the volumes as normal. WARNING! WHEN USING A HARD DISK, THE ACTION OF KILLING A VOLUME APPLIES ONLY TO THAT VOLUME. THIS IS NOT A FULL FORMATTING PROCEDURE. WHEN YOU SEE THE PROMPT, USE - DO NOT FORMAT YOUR HARD DISK AS THIS WILL ERASE EVERYTHING ON IT. If you are at all apprehensive about ‘killing’ the hard disk volume, save to another empty volume.
Page 216
S3200XL Operator’s Manual - Version 1.00
LOAD LOAD MODE The LOAD mode allows you to load data into the S3200XL. The main LOAD page looks something like this:
A list of all files (programs, samples and drum settings) will be displayed on the right side of the page. Programs have a ‘P’ beside their name, samples have an ‘S’, and drum input settings have a ‘D’. Effects files have an ‘X’ beside them. Floppy disks or hard disk volumes that contain S1000 or S1100 samples will have a ‘1’ after these letters to signify they are from this series of sampler. They may be freely loaded into the S3200XL without any problems. Beside the type of file on the disk, there is also a percentage number along side it, which gives the amount of space that this file will take when loaded into memory. Programs and effects files will usually show 0%. The left hand side of the display shows you how many programs, keygroups and samples are free in memory (you may have a total of 1,022 ‘items’) and at the bottom it displays how many programs and samples are currently on the disk. If you cannot see the file you want to load, move the cursor to the list of files and scroll up and down to display all the files on the disk. If the file you want is not on the disk, insert another disk and press LOAD to re-read the disk. If you have a hard disk fitted, then you can choose another volume to read. When you know that you have the right disk or volume, you can proceed. SELECTING FLOPPY OR HARD DISK If the cursor is not already on the field, move the cursor to the select or as appropriate using the DATA wheel.
field and
SELECTING THE HARD DISK PARTITION When a hard disk is formatted on the S3200XL, it is divided into sections called partitions (see SAVE - FORMATTING for details on formatting disks). This makes disk management slightly easier. Depending on the number of partitions on your disk, the partition is shown as a number A - ? next to the HARD-: field. You can move the cursor one position to the right to select the partition you wish to load from. You will see something like this screen:
Use the DATA wheel to make your selection. Note that there will be a slight delay after choosing a partition while the partition is selected and read by the S3200XL. One partition on a hard disk can contain up to 100 volumes and each volume can contain up to 510 ‘items’ - that is, combinations of programs, samples, effects files, Qlists, etc., and you can select the volume from which you want to load data in the next parameter field .
S3200XL Operator’s Manual - Version 1.00
Page 217
LOAD SELECTING THE HARD DISK VOLUME As well as being divided into partitions, each partition is divided into volumes. The volume is selected in the field (in the above example, it shows that the volume is not named - see later for details on naming volumes). To select the volume, move the cursor to the field and select using the DATA wheel. SELECTING THE TYPE OF LOAD The field allows you to select what it is you will load from disk (be it floppy or hard disk). To change the type of load you wish to perform, move the cursor to the field:
The options are: ENTIRE VOLUME
This will load the entire contents of the disk to memory. This will include all programs, samples, the multi and effects file.
ALL PROGS+SAMPLES
This will load all programs and samples only. The MULTI and any effects files will be ignored and not loaded.
ALL PROGRAMS ONLY
This will load all the programs on disk but will not load the samples associated with them.
ALL SAMPLES
This will load all the samples currently on disk
CURSOR PROG+SAMPLES
This will load the selected program and its associated samples only.
CURSOR ITEM ONLY
This will load the selected individual item be it a program, a sample or a multi. You may also load effects files. You may also load ME-35T Drum settings, D-D SONG files (called TL’s - take lists) and Qlists
OPERATING SYSTEM
This will load any operating system that may be on the disk.
MULTI+PROGS+SAMPS
This will load the selected multi plus its associated programs and their associated samples. It will also load the effects file.
NOTE: If you have programs in memory that you call up in the multi via program change commands in the sequence (for example, you use MIDI program change to change the acoustic piano sound used in the verse to an electric piano sound in the chorus), those programs which are not currently in the multi at the time of saving will not be loaded. Your attention is brought to this as you may load a multi and then wonder why it is not playing back correctly . If you do have programs in memory for selection via the sequencer’s MIDI program change, use LOAD ENTIRE VOLUME.
Page 218
S3200XL Operator’s Manual - Version 1.00
LOAD LOADING FROM FLOPPY DISK In the main LOAD page, select the media you wish to load from (i.e. floppy). You will see something like this screen:
Now make your selection in the field by moving the cursor to this field and use the DATA wheel to make your selection. Now, either press CLR or GO as you wish. Pressing (CLEAR) will delete all programs and samples from memory, and then load the chosen file(s) from disk(BE CAREFUL NOT TO ERASE ANYTHING YOU WANT TO KEEP THAT HASN’T BEEN SAVED TO DISK!!). You will receive this prompt to check you want to clear the memory:
You should make the appropriate NO or YES response. Pressing will load the chosen file(s) into memory without deleting anything first. As the disk is being loaded you will receive something like the following display to keep you aware of progress:
It is possible that the chosen file(s) will occupy more memory space than is actually available, in which case the loading process will be halted and you will receive this prompt:
Any files which have been completely loaded into memory prior to the prompt will remain in memory, however. If no floppy disk is in the drive, you will be prompted:
If the disk is un-formatted (or has become seriously damaged in some way) the S3200 will tell you:
You should format the disk (see SAVE - FORMATTING).
S3200XL Operator’s Manual - Version 1.00
Page 219
LOAD LOADING FROM HARD DISK In the main LOAD page, select the media you wish to load from (i.e. hard disk). You will see something like this screen:
To select the partition to load from, place the cursor on the partition field and use the DATA wheel to select the partition. Now move the cursor to the field and select the volume you wish to load from.
NOTE: You may, if you wish, press F2 and select a volume to load from:
- to see a list of the selected partition volumes
You may scroll through the list of available volumes on the current partition. If the volumes have been named, you will see the names of the volumes (otherwise, the volume name will show VOLUME ??? where ? is the default, unnamed volume number (it is good practice to name volumes to keep better track of things when loading - see SAVE - RENAME for information on naming volumes). When you have selected the one you wish to load from, press F1 to the main LOAD screen for the selected volume.
- which will take you
In the main LOAD page, move the cursor to the field and use the DATA wheel to make your selection from the options listed above. Now, either press CLR or GO as you wish. Pressing (CLEAR) will delete all programs and samples from memory, and then load the chosen file(s) from disk (BE CAREFUL NOT TO ERASE ANYTHING YOU WANT TO KEEP THAT HASN’T BEEN SAVED TO DISK!!). You will receive this prompt to check you want to clear the memory:
You should make the appropriate NO or YES response. Pressing will load the chosen file(s) into memory without deleting anything first. As the disk is being loaded you will receive something like the following display to keep you aware of progress:
Page 220
S3200XL Operator’s Manual - Version 1.00
LOAD It is possible that the chosen file(s) will occupy more memory space than is actually available, in which case the loading process will be halted and you will receive this prompt:
Any files which have been completely loaded into memory prior to the prompt will remain in memory, however. Even if a file exists in memory with the same name as a file on disk, the disk file will still be loaded and the file in memory will be overwritten. If, for some reason, there is a problem with the hard disk (i.e. it is not connected or not switched on or, if it’s a removable medium of some sort and the disk/cartridge is not inserted or write protected), you will receive the message:
If the disk is un-formatted (or has become seriously damaged in some way) the S3200XL will tell you:
NOTE: You will also receive this message when you select circumstances.
under the same
SCSI ID’s, etc., are explained a bit later in this section.
S3200XL Operator’s Manual - Version 1.00
Page 221
LOAD LOADING S900/S950 SAMPLES AND PROGRAMS No special command is provided for S900 samples. Inserting an S900 disk will give you this display:
Simply select the appropriate load type and proceed as above. The S3200XL display will inform you when a sample for the S900 is being read, and after each S900 sample has been successfully read, an additional message, ‘unscrambling S900 sample’ will appear, as the S3200XL converts the S900 data to S3200XL format (12-bit to 16-bit). LOADING S1000/S1100 DATA There is no compatibility issue with sounds created on an S1000 or S1100 and these can be loaded with no conversion process. However, there are notes given in the SAVE MODE section that give details about saving such data from the S3200XL back onto an S1000/S1100 formatted disk should you wish to do so. AUTO LOADING FROM DISK If you turn on the S3200XL with a floppy disk in the drive, the contents of the disk will be loaded into memory. If the disk contains a copy of the operating system and this operating system is the same or a higher version number than the ROM version, this will be loaded. If a hard disk is attached and set to SCSI ID 5 and the operating system is on the first volume, the operating system will be automatically loaded from this if it is the same or a higher version than the ROM version and no floppy disk is in the drive at power-on. It is a good idea for you to make a copy of any Operating System disks for your S3200XL and always turn on the S3200XL with the latest version inserted in the floppy disk drive (see SAVE for details on saving operating system to disk).
Page 222
S3200XL Operator’s Manual - Version 1.00
LOAD SEARCHING FOR FILES - USING THE FIND FUNCTION Because of the large amount of data on hard disks, a special ‘find’ function exists to locate files more rapidly. Pressing the key will display this screen:
To locate the file you want, press NAME and then enter a suitable name and press ENT/PLAY. To search for the file, press the soft key which will display the file(s). If the file is found, you will see it displayed with a message and a special, temporary FIND volume is created that contains the found object(s) and this may be loaded in the same way as an ordinary volume. Pressing and/or will load the found files according to the type of load shown on the left of the screen. When using the FIND function, it is not necessary to name the whole file. For example, if you want to search for a bass sound, simply type in BASS - the S3200XL will search the selected partition for ALL files that have those letters in them. In this example, you may see a screen display such as:
Here, several different basses from several different volumes in the partition have been found. You will receive the message and you will also see at the top of the screen (indicating that this is the temporary FIND volume). Now select an appropriate load type (in this example, probably to load just the one sound you want), move the cursor to the file you want to load and press and/or . You do not even have to type in BASS to receive a screen display as shown above. You could just type in BA and receive something similar but, in this case, the search function may also include such filenames as BAD DRUMS, BACKWRDS CYMB, etc.. Using the FIND function, typing in something like SYN may give a screen display such as:
where all files with the characters SYN have been found. If you wanted to limit the search to only synth sounds, it would be best to type in SYNT in which case, those sounds named SYNC or SYNVOX, etc., would not be included in the search.
S3200XL Operator’s Manual - Version 1.00
Page 223
LOAD Once you become familiar with the FIND function, you will find it an invaluable aid to quickly searching for and loading sounds.
NOTE: The FIND function does not work with floppy disks.
Page 224
S3200XL Operator’s Manual - Version 1.00
LOAD USING THE TAG DIRECTORY SYSTEM On the S3200XL, it is possible to ‘tag’ files. This is much the same as placing it in a special subdirectory. In this way, certain files in a partition can be categorised according to type or any other category you wish. For example, you may have a situation where all basses from all volumes in a partition have been tagged BASS and all strings tagged ORCHESTRAL. All vocal sounds may have been tagged VOICE. In this way, it is possible to access sounds much more easily. For example, using one of the above examples, if you want to load some bass sounds, instead of scrolling through volumes and partitions, you may simply select the BASS tag to view, select and load just those sounds. Sounds, however, can belong to several tags. For example, you may have a series of files tagged BASS which may include ALL bass sounds from electric bass to slap bass, synth bass, bass vocal, orchestral string bass, bass sax and flute, etc.. However, the tag SYNTH BASS would only contain those bass sounds of a synthetic origin whilst E. BASS would only contain electric bass (even though those exact same sounds exist in the BASS tag). Acoustic basses may be tagged AC BASSES or something similar, etc.. In this way, a flexible disk management system exists for easy access and loading of sounds. But before you can select a tagged file, you must first mark the files. To access the tagging function, press the
key. This will display a screen such as this:
To tag the files, simply move the cursor to the appropriate file and press , you will see that the file has an asterisk placed next to it thus:
. As you press
This indicates that this file is marked in the currently selected tag. To select files from another volume to mark, simply move the cursor to the field and select the next volume and repeat the above procedure. Eventually, you should have marked all the files you want for the currently selected tag and, in future, when you want to load a particular type of sound, you only need to select the appropriate tag. To use the example above, if you subsequently want to load one or more bass sounds, instead of scrolling though volumes, simply select the BASS tag to view all bass files, select the appropriate file(s) and press and/or to load the sound(s). It is worth going though your library and spending some time tagging them all as this will save you time in the future when you are looking for files to load.
NOTE: It is not necessary to tag the programs and their associated samples - all you need tag is the program as it is possible to load TAG PROGS+SAMPLES. This will load the program you have tagged and the samples associated with them automatically without also having to tag the samples. If you make a mistake and accidentally tag a file you did not wish to tag, simply press again to un-tag it, Similarly, at a later date, should you wish to remove a file from a particular tag, move the cursor to it and press to un-tag it.
S3200XL Operator’s Manual - Version 1.00
Page 225
LOAD
NOTE 1: In order to tag files, if you are using an MO hard disk or removable cartridge, the write protect tab must be off as the tagging process requires writing to disk. NOTE 2: Because CD-ROMs are a read-only medium, you cannot tag files on a CD-ROM. To select a tag for loading, press the
key to display this screen:
Here we can see that the first set of files tagged BASS are in volume 2 and are those shown with the alongside them. Pressing allows you to scroll through the tagged files in the BASS tag sequentially. As you do so, the volumes they are in will be shown at the top right of the screen. When you come to the end of the tagged files, successive pressing of the key will cause the scrolling to ‘wrap around’ and you will be taken back to the first files tagged. If you are happy with the selection, press and/or to load the sounds. You will receive the usual displays for loading. If the sounds you want are not to be found in this tag, select another tag in the field. When you press , you will be taken to the first file(s) in this tag. You may select different types of tag loads. The default is and this will load any tagged programs and the samples associated with them. Selecting will simply load any items in the current tag. Selecting will only load the tagged programs and will load only samples that have been tagged. NAMING TAGS You may also name a tag simply by pressing NAME, typing in a suitable name followed by ENT. It is worth giving your tags useful names to avoid confusion at a later date. NOTES ON USING THE TAGGING SYSTEM The tagging system is very powerful and can save you a lot of time searching for files and this is especially useful if you have a busy deadline to meet or are working in an expensive studio or whatever. For example, you may tag all orchestral sounds including strings, brass, woodwind, orchestral percussion, choir and so forth into one tag TAG A (which, of course, you should subsequently name ORCHESTRA or something similar). You could then tag all your strings (which could also include, say, synth strings, etc.) in TAG B (renamed STRINGS) and your brass (including synth brass, ‘pop’ brass, etc.) in another tag called BRASS. All your orchestral percussion could also be in another tag that also includes your powerhouse rock drums and percussion and synth drums, etc.. Bass sounds could be in one big tag that contains ALL your bass sounds whilst synth bass sounds could also be in a separate tag for synth basses as well as in a general purpose SYNTH tag. In this way, depending on the project you are working on, you may select sounds far more quickly. For example, if you are working on an orchestral piece, you would probably use the ORCHESTRA tag as this would give you all the sounds suitable for creating an orchestral effect but, if you were working on a ballad that requires a strings pad, maybe it would be better to use the STRING tag because, although the ORCHESTRA tag has strings in it, you wouldn’t have to be distracted by orchestral brass, percussion, etc.. Similarly for bass. In a rock track, you would probably use your BASS tag that contains electric basses but, in a dance track, you may head
Page 226
S3200XL Operator’s Manual - Version 1.00
LOAD straight for the SYNTH BASS tag so as to only be presented with synth basses and not be distracted by electric or acoustic basses.
S3200XL Operator’s Manual - Version 1.00
Page 227
LOAD HARD DISK CONTROL SCSI (Small Computer Serial Interface) has become very popular as a means of interfacing devices and because a SCSI interface is fitted as standard on the S3200XL, you may use a wide range of hard disks as a storage device for your sound library. Hard disks offer more in the way of size and also speed. More recently, the removable cartridge types of storage devices have become increasingly popular. The problem with fixed drives is that when they fill up you either have to delete files (or back them up to floppy or DAT) or you need to buy another drive. With the removable types, you simply insert another cartridge. Your hard disk is controlled from the page of the LOAD mode. When pressed, the following screen display is seen:
(F5) is
The parameters on this page are used to set SCSI ID’s. The most important parameters you need to know about are and . SCSI allows up to 8 devices to be on the buss and these each have a unique number 0-7 (it’s similar to the concept of MIDI channels). In order for one SCSI device to ‘talk’ to a hard drive, their SCSI ID’s must match. The field sets the SCSI ID for the sampler’s SCSI interface. The default setting in the field is 5. This parameter must be set to match that of the drive. For example, if your external drive is 1, this parameter must be set to 1. You may, if you wish, have several drives connected and each of these must have different SCSI ID’s. Each one can be selected by changing the ID number in the field. The field allows you to switch between the different MO formats of disk. There are two - 512Bytes per sector and 1kByte per sector. Both offer the same storage, they just have different sector sizes. The S3200XL can use both and this is selected in this field. The default is 512b. The field sets the S3200XL’s SCSI ID (as distinct from the sampler’s SCSI interface’s ID) and is used when communicating between samplers or computer editors over SCSI.
NOTE: If your external drive’s ID is something other than 5 and uses a 1kBytes/sector disk, you may set the appropriate settings here and, by saving the operating system to floppy disk and powering up with it in the drive, the S3200XL will default to the SCSI ID and sector size of your drive. If you have the optional SONY HS-D650 3.5 inch magneto optical drive fitted internally in the S3200XL, the : field allows you to turn this off in software. Three options are available. The first is which leaves the MO drive operating at all times. However, because the drive can be noisy due to the fans required for cooling, when not in use, you may like to turn it off. This can be done in two ways. Firsly, you may set this parameter to AUTO which will turn the MO drive off as soon as you attempt to make a smple in the REC page of SAMPLE. In this way, the noise of hte driver’s fan will not spill over into your smple if you are using a microphone in the same room sa your S3200XL. As soon as the smple has been recorded, the drive switches back on immediately. The other option is which, as the function implies, turns the drive off completely. Please note that this does not apply to external MO drives that may be connected.
Page 228
S3200XL Operator’s Manual - Version 1.00
LOAD IMPORTING SOUNDS FROM OTHER MANUFACTURER’S CD-ROMS On the S3200XL, as well as having access to a vast range of Akai sound library, you may also import sounds from CD-ROMs made for certain samplers made by other manufacturers thereby giving you access to even more sounds. This is done in the SCSI page. Assuming your CD-ROM is on a SCSI ID other that 5, change the SCSI ID here in the field to match that of the CD-ROM drive you are using and press F7 or F8 as appropriate. The following example shows loading sounds from an EXIIIP CD-ROM. Pressing F8 will show the following screen:
To load an Akai volume (as opposed to a whole CD-ROM volume), simply move the cursor to the volume name field and press and/or . All programs that are contained in the volume will be loaded. To load a single program, move the cursor to the program you wish to load and press and/or . To load a program and all programs that follow it, move the cursor to the program field and select the program you want to have as the first in the list of programs you will load. Now place it at the top of the screen by using the DATA wheel, scrolling to place it at the top of the list shown in the right of the screen. Move the cursor to the volume field and press and/or . This will load the program shown at the top of the list and all those shown below it.
NOTE: If any programs below the select program are ‘off screen’, these will also be loaded. For example, if in the above example, you want to load BRIGHT GRAND and all programs after it, move the cursor to BRIGHT GRAND, scroll it to the top of the list using the DATA wheel and press and/or . NOTES REGARDING LOADING OTHER MANUFACTURERS SOUND LIBRARY There are certain restrictions when loading sounds from other manufacturer's CD-ROMs.
NOTE: Although all references in this explanation refer to CD-ROM containing other manufacturer’s sound library may also be used. •
Layered programs using several ‘presets’ or those made using several ‘patches’ will be loaded as a single ‘preset’ or ‘patch’ into the S3200XL. In this case, load all the single ‘elements’ (i.e. presets or patches) and layer them in the MULTI mode.
•
If there are more than 128 programs in the volume, the S3200XL will ‘wrap’ around’ programs 129 and onwards so that #129 becomes #1, #130 becomes #2, etc.. You can renumber these on the S3200XL if you wish in SINGLE or MULTI using the RNUM function.
•
Due to different sound parameter configurations amongst different samples, the S3200XL will convert certain program parameters to make them compatible with Akai program parameters (sample data is not affected). However, this may cause the sound to be slightly
S3200XL Operator’s Manual - Version 1.00
Page 229
LOAD different in the S3200XL and may require some ‘tweaking’ to sound the same as the source sampler . •
You may find with samples that have a short loop that there may be differences in the loop length. Use FIND or adjust the loop length manually on the S3200XL.
•
The S3200XL can only read CD-ROM to 512Mbytes. CD-ROMs or hard disks larger than this can be used but any data stored above 512Mbytes will be ignored.
•
Due to certain restrictions when loading sounds from other manufacturer’s CD-ROMs, the area of memory used for standard MIDI song files (see GLOBAL - SMF) is overwritten when another manufacturer’s sound is loaded from CD-ROM. In other words, any SMFs you may have loaded will be erased should you load sounds from another manufacturer’s CD-ROM. It is best, therefore, to load your sounds first and then load your MIDI song files.
It must be said that whilst the S3200XL can use sounds made for other samplers, the way each of these samplers work is different and so you may find that some ‘tweaking’ will be necessary to optimise the sound for your requirements. However, we hope that the added benefit of having access to other manufacturers’ sound library outweighs this slight inconvenience. If it’s any consolation, Akai programs and samples need tweaking when imported into other samplers!
Page 230
S3200XL Operator’s Manual - Version 1.00
GLOBAL GLOBAL MODE The GLOBAL mode gives access to certain ‘system’ parameters that affect the S3200XL as a whole. It also gives access to functions such as the disk recording, DAT back-up, MIDI song file playback, etc.. Pressing the GLOBAL key will display this screen:
This is, in fact, a menu screen where you may select the functions listed on it. The functions are accessed by pressing the soft keys. TUNING THE S3200XL The first of these is TUNE where you may set the master tuning for the module as well as set its output level:
The S3200XL can be transposed by up to ±9 semitones and fine tuned by up to ±50 cents (one semitone) to enable easy playing in difficult keys and to match tuning with other instruments. When you first press the TUNE/LEVEL key, two scales indicate the current transposition and tuning. Use the CURSOR < and > keys to transpose up or down and the DATA control to provide fine tuning (one click of the knob equals one cent). These transposition and tuning settings will be lost when power is turned off unless they are saved to disk in a full volume save. There are two soft keys and in this screen display on F7 and F8. These will turn an A=440Hz audio signal on and off to the stereo output connectors (and the headphones). This may be used as a tuning reference for the sampler (or any other instruments you have) or as a test tone for checking levels, etc.. SETTING THE MASTER OUTPUT LEVEL As well as the main volume control, it is also possible to set the master level for the S3200XL in this page. The primary benefit of this function is to set the output level to match different mixers’ headroom. It is possible to boost the sampler’s output level for a ‘hotter’ output for professional +4dBm desks but for desks that run at -10dBm, you may prefer to cut the level back a bit to prevent distortion. In order to optimise the S3200XL’s signal to noise ratio, it is recommended you run the outputs as high as possible - this, in turn, will require less gain on your mixer input channels which will keep noise levels down. The level settings will be lost when power is turned off unless they are saved to disk in an entire volume save. Level is adjusted using the
soft keys - F1 and F2.
You will note that this control affects not only the stereo outputs but also the digital audio output and the individual outputs.
S3200XL Operator’s Manual - Version 1.00
Page 231
GLOBAL MIDI FUNCTIONS When you first press the MIDI mode key, the BASIC MIDI CHANNEL CONTROL page is entered.
The parameter sets the MIDI channel for the S3200XL as a whole and this is the MIDI channel used when in SINGLE mode and in SAMPLE mode (in MULTI mode, the S3200XL responds to all 16 MIDI channels and each part has its own channel). This parameter is shown in the SINGLE mode for your information. The parameter allows you to select the external MIDI source used in the PROGRAM ASSIGNABLE MODULATION system used in programs. Whatever you select here becomes one of the choices you can make when assigning modulation sources in a program. You may choose from any of the 128 MIDI controllers (although please note that these are numbered 0-127 in this display). A list of these controllers is given in the appendices. You will note that these parameters are saved to disk whenever you perform a VOLUME save. They are not saved when performing any other type of save. MIDI FILTER Pressing the
key (F2) will display this screen:
This page allows you to filter out specific MIDI information. When you enter this page, the cursor will be at the top left of a grid of ‘+’ signs, in a long rectangular box. You can use the cursor keys to move to any point on the screen. In this grid, the columns represent MIDI channels (1-16), and the rows represent MIDI information which the S3200XL will accept or filter. The first row, ‘ ‘, affects the S3200XL’s receive capabilities for all information on that channel, the next, ‘ ‘, refers to the pitch and modulation wheels, the third line, ‘ ‘, refers to aftertouch, and the last line, ‘ ‘, refers to an external MIDI volume control (controller 7). The last column in each row, ‘ ‘, will affect the appropriate information for all MIDI channels. The ‘+’ signs mean that the S3200XL accepts this information and ‘-’ means that this information is filtered out. If you turn the DATA control counter-clockwise, the ‘+’ which the cursor covers will change to a ‘-’. If you make this change in the row, all ‘+’ signs in the same column below will change to a ‘-’ and you will see a column of ‘-’. If you make this change in the ‘all’ column on the right, the parameter for all MIDI channels will be changed and you will see a row of dashes: ‘-’. The top right corner of the display ( ) is a special case - all parameters will be changed which may be useful for resetting the whole screen.
Page 232
S3200XL Operator’s Manual - Version 1.00
GLOBAL By using this filter, you can control the response of the S3200XL to MIDI events. By filtering out aftertouch on a percussion program where it is not needed, for instance, you can improve the response of the S3200XL when a lot of MIDI data is received. PPM PAGE - MONITORING MIDI Pressing the key (F3) will display this screen:
This page has no parameters. Instead, it provides a real-time display of all Note On information received on the 16 MIDI channels. The higher the bar on the display, the greater the velocity of the received note. This page is called ‘PPMs’ because it simulates the behaviour of audio bargraph Peak Program Meters. Under normal circumstances when playing the S3200XL from a MIDI keyboard, you will receive a display such as is shown above with the bar graph showing incoming MIDI on the selected channel but, when sequencing multi-timbrally on several channels, you will see a display such as:
This is a very useful page that allows you to track down any problems you may be experiencing when sequencing. For example, if a part isn’t sounding, you can check if the S3200XL is receiving MIDI on its channel. If it is, then it may be some other problem such as wrong output assignment, channel fader on the mixer not open, the sound hasn’t loaded, etc.. MIDI RECEIVE PAGE - ANALYSING MIDI Another MIDI receive monitor is available in the of MIDI information received by the S3200XL.
page. Here, you can monitor other types
Again, this is especially useful if you are faultfinding on your MIDI system. Information from the MIDI IN is displayed, and a channel filter may be set at the top of the screen (OMNI or 1 to 16). When idle (i.e. not receiving MIDI), the screen shown above is displayed - when receiving MIDI, something like the following is shown:
S3200XL Operator’s Manual - Version 1.00
Page 233
GLOBAL
Here you will see a constantly changing display as notes are received. If any performance controls are used such as mod wheel or pressure, these too will be shown. If the information is not displayed on this monitor, the information is not reaching the S3200XL. Check your connections or the output channel of the transmitting equipment. If the information appears to be correct, but no sound or unexpected sounds are being produced, then the fault may lie in the MIDI setting of the program(s). You may discover that the piano track of the sequencer is playing the drum samples, for example. You may select to view particular channels using the : field. This defaults to (short for OMNI) so you can view all channels but you may select individual channels 1-16 if you only wish to monitor a specific channel. TRANSMIT TEST PAGE - SETTING THE ENT/PLAY KEY Pressing the soft key (F5) will display this screen.
In the TRANS page, you can produce a test transmission of a MIDI note, and set the channel, key and velocity of the note to be transmitted, using the and keys (F7 and F8). This key value and velocity will also be used by the key when testing samples and programs using the ENT/PLAY key.
NOTE: When in EDIT SAMPLE mode, the raw sample is always played at its base pitch (i.e. the pitch was sampled at) and not at the note value set here.
Page 234
S3200XL Operator’s Manual - Version 1.00
GLOBAL MIDI SAMPLE DUMPS Samples can be transferred between the S3200XL and other samplers via MIDI and this is done in the EXCL page:
To perform a MIDI data dump, you must make a MIDI loop (MIDI OUT of the S3200XL connected to MIDI IN of the other sampler, and vice versa). This is necessary because of the way in which MIDI sample dumps are performed (in computer terms, a handshake protocol with error detection/correction). Though the S3200XL is a 16-bit sampler, it can accept samples from other samplers, including those from other manufacturers which use a lower bit resolution. If transmitting to another sampler which uses fewer bits, the S3200XL simply truncates the low bits during the transfer. Instead of another sampler, samples can be transmitted to and accepted from other devices (such as computers) which are capable of storing and/or editing sample data with the appropriate sample editing software. However, in this section we will always refer to the other device as a ‘sampler’. The fields are as follows: This does not refer to a MIDI channel, but a ‘logical channel’ used in System Exclusive protocol. Both samplers must be set to the same channel for transfer to take place. This parameter refers to what will actually be transmitted over MIDI. This can be , , , , or . The meanings of these values should be self-explanatory. Two protocols for sample transfer are available. conforms to the MIDI sample dump standard and will dump only samples across and , which is a superset of the MIDI sample dump standard which will dump everything including loop and other data. Use the setting only if you are transferring data between two S3200XL-compatible machines. If you have selected transmission, this parameter allows you to specify the program which will be transmitted. If you have selected transmission, this parameter allows you to specify the sample which will be transmitted. You can override the default sample number (based on the order in which samples appear in the S3200XL’s memory) with this parameter.
S3200XL Operator’s Manual - Version 1.00
Page 235
GLOBAL PERFORMING A MIDI SAMPLE DUMP When all the parameters are set up, press the key to initiate transmission. Once the handshake protocol has been successfully initiated between the two devices, data transfer will take place. A new soft key, ABORT , will appear. Press this if you want to terminate the transmission prematurely. There is no receive key on the S3200XL as reception of bulk data will automatically take place once a remote device initiates the dump protocol.
NOTE: It is quite likely (if not certain) that sample editors will not work if you use the S3200XL protocol because the editor will not have the ability to recognise the new file header information present because of the new features in the S3200XL. No doubt, manufacturers of these editors will soon upgrade their software to overcome this. In the meantime, you should use the standard MIDI sample dump protocol to exchange sounds between your editor and the S3200XL.
Page 236
S3200XL Operator’s Manual - Version 1.00
GLOBAL MIDI VIA SCSI The final soft key in this mode, F7, calls up the SCSI screen:
On this page you can enable or disable MIDI bulk data transmission along a SCSI buss, rather than the MIDI connections, and set the SCSI IDs for both the S3200XL ( ) and the other SCSI device ( ). The other SCSI device can be sampler of the S3000 or newer XL series or a personal computer (equipped with the appropriate software). Values for SCSI device IDs can be from 0 to 7 and the two devices must have different SCSI numbers, otherwise there will be a conflict on the SCSI buss as two devices try to share the same ID. SCSI transmission of MIDI is much faster than normal MIDI data dumps which can take an awfully long time!!
NOTE 1: When using the Mac™ editing software supplied with the S3200XL, this page should be set as appropriate. However, you needn’t worry too much about this as the software ‘seeks out’ the device on the SCSI chain when you open it and it will find the sampler’s local SCSI ID automatically. NOTE 2: If you have two samplers sharing the same disk drive thus: SAMPLER A
DISK DRIVE
SAMPLER B
Make sure the parameters on each sampler are different. If they are the same, you will notice difficulty in accessing the disk drive for loading or saving data. The same applies when using two or more samplers and the Mac™ editing software. This is known as ‘buss contention’ and what is happening is that because more than one device has the same SCSI ID, the buss doesn’t know which device to choose and so gets confused.
S3200XL Operator’s Manual - Version 1.00
Page 237
GLOBAL ME35T DRUM SETTINGS Pressing displays the following screen:
The S3200XL is capable of acting as a highly sophisticated percussion sampler using the AKAI ME35T audio/MIDI trigger interface unit to produce MIDI trigger signals from a variety of sources. Two such units may be connected, and programming may be carried out from the S3200XL rather than on the more limited displays and controls of the ME35Ts. For such programming to take place, a ‘MIDI handshake’ must be set up, from IN to OUT and OUT to IN.
MIDI OUT
MIDI OUT
MIDI IN
MIDI IN
MIDI IN MIDI IN
MIDI OUT
When two ME35T units are to be used together to provide 16 drum inputs, they should be connected as shown on the right. Since this is a manual for the S3200XL, full details of the operation of the ME35T will not be given here. Refer to the ME35T manual for operational details. However, note that to set up the MIDI Exclusive channel on the ME35T, the MIDI CHAN and MIDI NOTE keys on the ME35T should be pressed simultaneously. The following parameters on the ME35T may be set up from the S3200XL: The name of the drum input settings may be altered by pressing NAME, typing in the name followed by ENTER. The parameters on this page are as follows: Either one of two ME35Ts may be selected for parameter editing here. Selecting ALL allows the inputs to be globally edited to rough values, and then individual (1-2) inputs may be selected for fine adjustment. This method of working can save you a lot of time. Here you may select the MIDI channel for the selected input. Here you may select the MIDI note number you wish to assign to the input This sets the overall velocity sensitivity for the selected input. This sets the trigger sensitivity of the selected input and should be adjusted to match your playing style and also to the nature of the drum pad, mic or bug you
Page 238
S3200XL Operator’s Manual - Version 1.00
GLOBAL are using. As you adjust the trigger level, this is represented in the box to the right. This allows you to set the capture time of the selected input. This allows you to set the recovery time of the selected input and should be set so that stick bounce doesn’t cause unnecessary false triggering. This sets the length of the note that will be issued from the ME35T’s MIDI output for that channel. In this way, drums can be used to trigger keyboard sounds. Here you may select from 8 different velocity curves to match your playing style. Please see the ME35T manual for details of these curves. As you play your pads or drums, you will see something like the following display with a PPM style bargraph:
For more information on these parameters, please refer to the ME35T’s operators manual. The second page of the DRUM mode is accessed by pressing
:
This page allows you to set up MIDI parameters for up to two ME35T units. Parameters which you can set are: operation (ON or OFF), exclusive channels for programming (1-32) and enable of MIDI THRU operation (ON or OFF). To return to the first DRUM page, press . You may exit the DRUM mode by pressing the GLOBAL mode select key again - this will return you to the main GLOBAL page. Once you have set the ME-35T settings, they can be saved to floppy disk in the SAVE mode and subsequently loaded in the LOAD mode.
S3200XL Operator’s Manual - Version 1.00
Page 239
GLOBAL DAT BACK-UP AND RESTORE One very useful function of the digital interface is that of DAT backup. This allows you to make safety copies of your data on a simple DAT tape. This can be invaluable for archiving a hard disk when it is full and helps you overcome the problem of lost data in the event of a problem occurring with your hard disk. To access the DAT BACKUP functions, press F4 . You will receive this screen display:
Here you may set the parameters and perform a backup or restore. The fields are as follows: This displays the name of the current volume selected in the DISK mode. When the backup or restore process is in operation, this field changes to show the name of the volume currently being backed up or restored. This field is not accessible to the user. This field is also not accessible to the user and merely a progress display to show the number of volumes that have been backed up or restored in the process. Here you may select to backup either your hard disk or just a single memory load of samples - i.e. those in RAM at the present time. Usually the selection is HARD DISK because you mostly want to use this facility to make safety copies of your hard disk however many people, especially those with memory expansion boards fitted in their sampler, use the back up facility to backup long samples from memory rather than tie up an expensive hard disk drive. The sampler’s transmit rate is fixed at 44.1kHz and here you may select between the consumer format for digital audio (SPDIF) or the professional AES/EBU format when transferring digital audio to DAT or some other recording medium or when performing DAT backup. What you select depends very much on your equipment. Some equipment is very forgiving and doesn’t mind either format. Other equipment, however, is not so flexible and you have to choose specifically which format to use.
NOTE: The selection made here also affects the format of the audio as it appears in real-time at the digital audio output (i.e. the digital ‘clone’ of the main L/R outputs).
Page 240
S3200XL Operator’s Manual - Version 1.00
GLOBAL PERFORMING A DAT BACK UP This is simple! Assuming you have made the necessary digital audio connections, simply press RECORD and PLAY on the DAT (or whatever combination is required on your particular DAT machine) and, ensuring that the DAT is actually recording, press - F7. The S3200XL will backup to DAT. If you are saving volumes to DAT individually, 2 Meg will take about 30 seconds. If you are backing up the contents of your hard disk to DAT, each 2 Meg volume takes about 100 seconds - this is due to certain SCSI control considerations. Data is saved in a digital audio format and but the sample headers and program information and other data are stored in a special format. During the save, both DAT channels are used but when restoring, only the left hand side is used. PERFORMING A DAT RESTORE This too is simple. Find the point on the DAT where your backup is, press on the S3200XL and PLAY on your DAT - the contents of the S3200XL’s memory or hard disk will be restored. Please note that when performing a restore, it is not possible to do a partial restore - i.e. when restoring into memory, you cannot selectively restore one snare drum, for example, and when restoring to hard disk, you cannot selectively choose a single volume. As backing up and restoration takes place, the number of samples, programs, Qlists and other items will be displayed on the screen.
PLEASE NOTE THE DAT RESTORE PROCESS WILL ERASE THE CURRENT MEMORY CONTENTS OR HARD DISK DATA - PLEASE BE CAREFUL
NOTE 1: Though backing up to DAT offers many advantages in terms of speed, convenience and cost of the media, Akai does not guarantee the integrity of the data backed up in this way. It is therefore strongly recommended that for archive purposes you also backup to floppy disks. NOTE 2: Only DAT machines may be used for backup/restore. YOU CANNOT BACKUP SAMPLER DATA TO DCC OR MINIDISK
FORMATS
The reason for this is that both these formats for digital audio recording use data compression. These work by actually removing data from the datastream thereby saving space. The data compression algorithms used work on the principle that certain frequencies get masked by others in certain circumstances and so can be removed without too many adverse effects. This does have a slight affect on tonal quality but, generally, the tiny loss in quality is barely noticeable when listening to music. However, because the data compression process removes data, it will corrupt the S3200XL sample and program data should you try to back up to such a machine. These machines are great for digitally mixing down onto from the S3200XL’s digital audio outputs but you cannot perform a backup to them. Should you try to, the restore will fail. Akai Electric Co cannot accept responsibility for any data lost in this way.
S3200XL Operator’s Manual - Version 1.00
Page 241
GLOBAL STANDARD MIDI FILE - MIDI SONG FILE PLAY The S3200XL is able to load Standard MIDI Files (SMF’s) into its memory and play them as standard MIDI sequence files. Of course, you cannot edit these sequence files but this function allows you to use the S3200XL as a sequence data filer so that, if you are playing live and require backing tracks or whatever, you can do so without the inconvenience of taking your sequencer with you. These functions are made available using the key. The SMF function allows: •
Up to 50 MIDI files to be loaded simultaneously (a total of 300kB of data)
•
Support of SMF files up to 999 bars per song (to a total of 300kB).
•
Compatible with SMF formats 0 and 1.
NOTE: Please refer to the S3200XL’s MIDI implementation chart to see what functions are available when working with SMFs on MS-DOS format floppy disks (i.e. note on/off, control change, etc..). Pressing
gives something like this screen:
The parameters are as follows: This shows the name of the currently selected song. When you have some songs loaded in the sampler, use the DATA wheel to select them. If no songs are loaded, this field will be blank. This selects the bar the song will start at. You may use the DATA wheel to set a range of 1-999. This sets the bar the song will end at. Selection is made using the DATA wheel
NOTE: Normally, these parameters are left unchanged. This selects whether the tempo is set as per the MIDI file loaded (i.e. File - as specified in the song data file) or will be set to Manual. When set to Manual, the tempo of the song is set in the field described below. Here, you may set the tempo of the song manually (please note that the field should be set to MANUAL for any tempo changes to take place). When the key is pressed, BAR and BEAT start counting up elapsed bars and beats and the TEMPO field shows the song’s tempo settings as set in the or fields. The soft key functions are:
Page 242
S3200XL Operator’s Manual - Version 1.00
GLOBAL
This will take you to the SMF load page (see below). You may delete the selected song file from memory using this key. This will play the selected song at the tempo specified in the or from the bar selected in the field. As the song plays, so you will see its progress in the fields.
NOTE: Although you may select another song for playback, when the current song reaches the end, it will stop - it will not then play the next SMF. It will not surprise you to know that pressing this key will stop playback of the song! LOADING STANDARD MIDI FILES In the MIDI SONG PLAY screen, pressing F2 -
- will display this screen:
The S3200XL will read the floppy disk and list the song files that it contains.
NOTE: As the title of this page implies, files must be on a DOS format floppy disk. SMF’s on floppy disks other than DOS format cannot be read. If the disk is not an MS DOS formatted disk, you will see the message:
This will occur if the disk in the floppy is a sound library disk. The fields on this screen are: This indicates the percentage of memory free for loading song files. 100% indicates approximately 300kB free for this purpose.
NOTE: If the memory is full with sound data, there may not be enough room to load an SMF. Be sure to leave a bit of memory free for song files. FILE LIST
Although not specifically named, underneath the field, you will see a list of song files available on the currently selected floppy disk. Use the UP/DOWN cursor keys to select the one(s) you want to load. This shows the floppy disk label (if any). This indicates the number of files on the disk. In this case, 12 is shown indicating that there are files ‘off screen’ which may be loaded.
S3200XL Operator’s Manual - Version 1.00
Page 243
GLOBAL The soft key functions are: This will take you back to the MIDI SONG PLAY screen where you may play the songs you have loaded. This will load the selected file into memory. If you try to load a file that is not a standard MIDI file, the S3200XL will remind you with an error message:
NOTE: If you load a file that has the same name as a file that already exists in memory, the existing file will be deleted and replaced with the new one. USING THE SMF FUNCTION To use SMF data on the S3200XL, follow the procedure below. One of the disks supplied with the sampler contains a demo sequence - you can use this to check out the SMF functions. 1
First, load the sounds from the floppy disk supplied. This floppy contains a MULTI file for sequencing for this demo disk. Load the sounds from the LOAD mode (insert the sound data floppy disk and, assuming FLOPPY is selected in the LOAD page, press F7 - CLR and then F8 - GO. See the section LOAD for more details on loading sound data).
2
Now insert the DEMO SEQUENCE floppy disk into the disk drive.
3
In GLOBAL mode, press to get to the MIDI SONG PLAY page and press get to the LOAD page for song files.
4
Select and load a MIDI song file from the file list. You can load as many files as you like as long as there is enough memory space.
5
Once the files are loaded, press file you wish to play and press stop playback.
to
to return to the MIDI SONG PLAY page. Select the to play the selected MIDI song file. Press to
NOTE 1: SMF song playback can only be initiated within the MIDI SONG FILE page. However, once the song is playing, you may go to other pages - for instance, you may go to MULTI mode to change the program assignment as the song plays or to EFFECTS mode to select different effect for the multi. You may even go to EDIT MULTI or EFFECTS EDIT to edit sounds and/or effects. To stop playback, you must return to the MIDI SONG FILE PLAY page. NOTE 2: Be careful to leave a bit of memory free for the SMF when loading sounds. Cramming the memory full of sound data will leave no space for the SMF to be loaded. NOTE 3: Due to certain restrictions when loading sounds from other manufacturer’s CDROMs, the area of memory used for SMFs is overwritten when another manufacturer’s sound is loaded from CD-ROM. In other words, any SMFs you may have loaded will be erased should you load sounds from another manufacturer’s CD-ROM.
Page 244
S3200XL Operator’s Manual - Version 1.00
GLOBAL HARD DISK RECORDING The S3200XL is capable of recording audio to a hard disk. You may record audio whilst sequencing ordinary programs and samples allowing you to effectively overdub onto disk. This may be useful for laying down vocal parts or guitar, saxophone solos and the like over sequenced backing tracks. You may also, of course, play back audio from disk whilst running programs from a sequencer. The hard disk recording functions include: •
Full functional operation of the S3200XL program/multi playback facilities whilst simultaneously recording to or playing back audio material from a hard disk with no loss of internal RAM.
•
Editing of audio material on disk.
•
MIDI triggering of takes recorded on disk.
•
SONG mode which allows sequential chaining of takes with repeats.
•
Advanced editing of take parameters that includes level, pan, fade in, fade out.
•
Mono or stereo recording.
•
Varispeed playback of recordings from disk
•
Disk recordings can be processed on an external mixing console by assigning them to individual outputs.
•
Disk recordings can be sent to the internal effects unit.
•
You can make recordings onto virtually any SCSI hard disk including the Magneto Optical disk.
•
The hard disk can be partitioned to contain a certain amount of space for sound library and a certain amount for disk recordings. The size of each partition may be set by the user. In this way, disk recordings can be associated with programs.
APPLICATIONS The disk record/playback functions have many applications: •
Triggering takes whilst sequencing programs. I.e. ‘spinning in’ backing vocals and the like over sequenced backing tracks either live or in the studio.
•
Music editing in the form of simple ‘topping and tailing’
•
Extended remix work using the sequential playback and step repeat capabilities of the SONG functions.
•
Mastering compilation - i.e. using the disk recording functions to edit and arrange the order of your CD or demo cassette, whatever.
S3200XL Operator’s Manual - Version 1.00
Page 245
GLOBAL FORMATTING THE HARD DISK FOR DISK RECORDING Before you can use the disk record functions, it is necessary to format your hard disk. The S3200XL allows you to allocate a certain part of your hard disk for sound library and a certain part for disk recordings. In this way, you may conveniently have takes and sound library on one disk which is particularly useful if you plan to use the disk record functions to ‘spin in’ recordings over sequenced material because you can have takes and the programs associated with them on one disk. Formatting is done in the SAVE mode. Pressing SAVE and then F6 screen:
- will give you this
BE CAREFUL TO SELECT THE CORRECT DRIVE NUMBER!!! Using the field, you may set the number of partitions you require for sound library storage leaving the rest of the disk free for disk recording. For example, say you have a 300Mb hard disk - you can allocate maybe 4 x 50Mb partitions for library leaving 100Mb free for disk recording. This would give you 200Mb for library and around 10 minutes of stereo recording at 44.1kHz or twice that in mono. You can, of course, set the disk up as you like depending on whether you want more or less sound library relative to takes. While formatting, a message shows to say: FORMATTING (typical 10-30 min)........ to indicate that the disk is being formatted. When the formatting process is finished, the screen display will show you how much space is available for disk recording.
VERY IMPORTANT NOTE Formatting the disk will, of course, erase everything on it. MAKE SURE YOU HAVE EITHER COPIED THE CONTENTS ONTO FLOPPY DISK OR HAVE MADE A DAT BACK-UP BEFORE FORMATTING A DISK THAT CONTAINS SOUND LIBRARY. You have been warned!!
Page 246
S3200XL Operator’s Manual - Version 1.00
GLOBAL HOW THE DISK RECORD FUNCTIONS WORK The S3200XL flowchart is something like this INPUTS
SAMPLE(S)
TAKE(S)
RAM
DISK
PROGRAM(S)
QLIST
SONG
The takes can be played in a number of ways: Takes may be placed into a Qlist. A Qlist allows you to trigger takes at specific timecode times and so is an ideal way of spotting sound effects, music cues, dialogue, etc., to picture. Takes may be used alongside programs in a Qlists so that you may trigger sounds from RAM and disk simultaneously. Typically, you could use this to trigger short sound effects from RAM whilst longer recordings are played from disk. Takes can be placed into what we call a SONG and triggered from MIDI. By assigning a take a MIDI note number and channel, incoming MIDI can be used to initiate playback. This can take place whilst ordinary programs are also being played via MIDI and so, in this way, you could, for example, be sequencing several multi-timbral programs as a backing track whilst simultaneously ‘spinning in’ backing vocals, brass riffs, solos, breakbeats, etc., from disk.
Note: It is also possible to record a take whilst sequencing programs. For example, you may record a guitar solo directly to disk whilst listening to sequenced programs coming from the S3200XL. Takes can also be run sequentially in a song and, in this application, several takes can be ‘butt edited’ to each other and caused to playback sequentially. Furthermore, each step in a song may be set to repeat any number of times so this can be used very effectively for the easy creation of extended remixes. There are some important things to note when using the disk record functions, however. 1
In order to achieve the disk record functions, the process uses 6 of the S3200XL’s voices reducing polyphony in this case to 26 voices when recording to or playing back from disk.
S3200XL Operator’s Manual - Version 1.00
Page 247
GLOBAL 2
It is only possible to playback one take at a time from disk - two takes cannot be played simultaneously. If another take is triggered whilst another is playing, the new one will take priority. Crossfades between takes are therefore also not possible.
3
When triggering takes via MIDI, there is always a delay in the take playing back. This is due to disk access time (i.e. the speed with which the disks heads can find the audio material and get it ready to playback). It is possible to accurately set fixed delays so that these can be accommodated when triggering takes from, say, a MIDI sequencer and the sequencers track shifting functions can cater for this.
It is assumed you have a basic working knowledge of the S3200XL by now. If you are at all unsure about certain functions, please refer to the appropriate section in this manual for more information.
Page 248
S3200XL Operator’s Manual - Version 1.00
GLOBAL USING THE DISK RECORD FUNCTIONS Pressing F6 - takes you directly to the disk record functions and will display this screen:
Here you may select takes and view their record parameters as well as select new takes for recording or deletion, etc.. To return to the main GLOBAL functions, press the GLOBAL mode key. The fields on the DD page are: This shows the name of the currently selected take and you may select others by scrolling through them with the DATA control. If this is the first time you have used the disk record functions or you are using a freshly formatted disk, the name field will be blank. This shows the name of the selected take and here you may copy or rename a take. To copy or rename a take, press the NAME key (this field will become highlighted and will be displayed beneath as soon as a unique name is created) and type in a new name from the front panel and then press ENT. To copy or rename the take, simply press (F6) or (F7) as appropriate. If you change your mind, press to abort the naming process. You may also select takes from here by typing in their names and pressing ENT but remember that the name you type must be the correct one for an existing take otherwise you will be creating a new take. This will be indicated by this field displaying . This allows you to see the free time left on disk or the amount of disk space used expressed as mono or stereo. For example, if you have 10 minutes free on disk when is selected here, if you select , the field (described below) will show 20 minutes. No other fields are accessible but merely show the takes parameters. These are: This shows the length of the currently selected take. This shows whether the take is a stereo or mono recording. This shows the take’s sampling rate. These parameters are explained in detail later in this manual. The other fields are: This indicates how much disk space has been allocated for disk recording. This shows how much space is left on the disk for recording. This shows how many takes are on disk. When you use the disk record functions for the first time or use a freshly formatted disk, this field will show 0.
S3200XL Operator’s Manual - Version 1.00
Page 249
GLOBAL Pressing F7 (
) will display this screen:
The parameters on this page are used to set SCSI ID’s. The most important parameters you need to know about are and . SCSI allows up to 8 devices to be on the buss and these each have a unique number 0-7 (it’s similar to the concept of MIDI channels). In order for one SCSI device to ‘talk’ to a hard drive, their SCSI ID’s must match. The field sets the SCSI ID for the sampler’s SCSI interface and hence the SCSI ID of the drive you will record to and playback from. The default setting in the field is 5. This parameter must be set to match that of the drive. For example, if your external drive is 1, this parameter must be set to 1. You may, if you wish, have several drives connected and each of these must have different SCSI ID’s. Each one can be selected by changing the ID number in the field. The field allows you to switch between the different MO formats of disk. There are two - 512Bytes per sector and 1kByte per sector. Both offer the same storage, they just have different sector sizes. The S3200XL can use both and this is selected in this field. The default is 512b. The field sets the S3200XL’s SCSI ID (as distinct from the sampler’s SCSI interface’s ID) and is used when communicating between samplers or computer editors over SCSI. If you have the optional SONY HS-D650 3.5 inch magneto optical drive fitted internally in the S3200XL, the : field allows you to turn this off in software. Three options are available. The first is which leaves the MO drive operating at all times. However, because the drive can be noisy due to the fans required for cooling, when not in use, you may like to turn it off. This can be done in two ways. Firsly, you may set this parameter to AUTO which will turn the MO drive off as soon as you attempt to make a smple in the REC page of SAMPLE. In this way, the noise of hte driver’s fan will not spill over into your smple if you are using a microphone in the same room sa your S3200XL. As soon as the smple has been recorded, the drive switches back on immediately. The other option is which, as the function implies, turns the drive off completely. Please note that this does not apply to external MO drives that may be connected. The soft keys on these pages are: Takes you to the DD TAKES page. This takes you to the SONG mode where you may compile takes for sequential playback or MIDI triggering. This takes you to the play pages where you may play takes. This takes you to the take editing display. Takes you to the record setup page. Takes you directly to the record page for recording new takes.
Page 250
S3200XL Operator’s Manual - Version 1.00
GLOBAL
Takes you to the HARD DISK CONTROL page (see above). This allows you to delete a take off disk. At any time, you may play the selected take by holding down the ENT/PLAY key. The take will only play for as long as you hold the key down. CREATING NEW TAKES You may create a new take for recording in the DD TAKES page if you wish simply by typing in a new, unique name. Whether the take is an existing one or a new one will be indicated in the display. COPYING TAKES You may copy takes only within this DD page. This is done by pressing the NAME key, typing in a unique name and pressing ENT/PLAY followed by . The process takes a little longer than actual recording. RENAMING TAKES Takes may be renamed only in the DD page. This is done by pressing the NAME key, typing in a new, unique name and pressing ENT/PLAY followed by . DELETING TAKES FROM DISK You may delete takes from within the DD page. This is done by pressing F8 display will prompt you:
. The
Pressing YES will delete the take from disk. Pressing EXIT will cancel the deletion. Be very careful using this feature as deleted takes cannot be retrieved.
S3200XL Operator’s Manual - Version 1.00
Page 251
GLOBAL MAKING A RECORDING To prepare for a recording, press display:
in any of the DD pages. You will receive this screen
This is the disk record set-up page and here you may select and create takes to record as well as set their record parameters. The fields are: This shows the currently selected take. To select another, you can either scroll through the takes on disk using the DATA control or type in their names from the front panel by pressing the NAME key, typing in the name and then pressing ENT. You may also create new takes for recording in the same way but by entering a unique take name. This selects whether the recording will be in mono or in stereo. This selects the input for the recording - whether it will be through the analogue inputs on the front panel or via the digital audio interface. The selection choices are ANALOG or DIGITAL. When DIGITAL is selected, you may select ELEC (electrical - i.e. the jack sockets) or OPTI (the optical input) on the digital I/O. This selects the method by which recording will commence. The options are: - This will cause recording to commence once a certain threshold level has been exceeded. The threshold level is set in the TAKE page (see below). - This will cause recording to be initiated when the footswitch is pressed. - This selects that a MIDI NOTE will initiate recording. The MIDI note number is set in the NOTE field described below. - This selects that recording will start when it receives a MIDI note but with an offset as set in the DELAY field described below. The MIDI note number is set in the NOTE field described below. - This selects that a MIDI SONG START command will initiate recording. This allows you to set an offset for the MIDI note reception when is selected in the field.
Page 252
S3200XL Operator’s Manual - Version 1.00
GLOBAL
NOTE: Because it takes time for a hard disk to actually find the data and play it back, it is necessary to be able to set a fixed offset so that the disk always has enough time to find the take and play it back in sync with any other material that may be playing (for example, when sequencing programs in the S3200XL). The DELAY field is of use in that you can set the S3200XL to start recording after a certain delay when it receives a MIDI note-on. This same note-on can then be used to playback the take in sync with other material. By setting a fixed offset of, say, 400mS in the DELAY field and advancing the MIDI note-on in the sequencer by the same amount (i.e. making it 400mS earlier), you can start recording at a predetermined time. After you have made the recording, you can have that take play back from the same point. The SONG mode (described later) always uses these delays to ensure accurate synchronised playback so being able to select to initiate recording with a fixed delay in the RECORD SETUP page allows you to record a take with the offset and then assign it to a SONG (where the offset is always used) without constantly having to re-edit the position of the note on your sequencer. This allows you to route the take to one of the four effects channels FX1, FX2, RV3 or RV4. This allows you to set the send level of the take to the effects channel selected in the field. This shows the amount of free time left on disk. Here you may set the length of the recording you wish to make. If you are unsure of the length of the recording you are about to make, simply set a long record time. Wasted disk space can always be edited out and retrieved afterwards in the EDIT page. This field sets the note that will initiate the recording when either or is selected in the field. It also sets the note that will trigger playback after it has been recorded. This may be edited after you have made the recording if you wish. This is an abbreviation of CHANNEL and sets the MIDI channel for the recording when triggering from MIDI. The default is 16 but you may select from 1-16. This sets the playback level of the recording. This does not affect the record levels which are set using the front panel REC LEVEL control. This sets the pan position of a mono recording and the left/right balance of a stereo recording. This sets the level of the signal that will be sent to the assignable individual outputs. This sets the destination of the take. The default is OFF but you may set these to any of the individual outputs you want. You will note that the individual output assignment is done in pairs-i.e. 1/2, 3/4, 5/6, 7/8. If the take is stereo then it will be reproduced in stereo through these outputs. If the take is mono, it will appear in mono through both outputs. If, however, the take is mono but you only wish to use one output (perhaps in order to use the other outputs for programs), then select the appropriate pair but set the pan: parameter to L50 or R50 accordingly. If you wish the take to only appear at the individual output(s) you have selected, please set the parameter to 00 - this will
S3200XL Operator’s Manual - Version 1.00
Page 253
GLOBAL mix the take out of the stereo outputs and so it will only appear at the individual outputs selected here. At any time, you can audition an existing take by pressing the ENT/PLAY key which will cause it to play back.
Page 254
S3200XL Operator’s Manual - Version 1.00
GLOBAL The soft keys in this page are: This takes you to the DD TAKES view page This takes you the SONG mode where you may compile takes for sequential playback or MIDI triggering This takes you to the play page where you may play takes This takes you to the take editing display Shows the currently active page Takes you directly to the record page for recording new takes Takes you to the BACK-UP LOAD page where you may restore takes backed up to DAT.
S3200XL Operator’s Manual - Version 1.00
Page 255
GLOBAL RECORDING A TAKE Actual recording is done within the TAKE page. Pressing display:
- F6 - gives you this screen
This is very much like the record page you will probably already be familiar with in the sample recording pages. It shows you the type of recording you are about to make (i.e. stereo or mono), the take name, the threshold level (if INPUT LEVEL is selected in ), the free time left on disk and the length you have set for the new recording. With the exception of the field, all of these parameters may be changed prior to making a recording. You may also create a new take to be recorded by pressing the NAME key, typing in a suitable name and pressing ENT. To setup for a recording, set the levels by playing the source to be recorded and adjusting the front panel REC LEVEL control - the incoming signal level will be shown in the bargraph display to the left of the LCD. If you have selected to start recording using INPUT LEVEL in the page, you should set the threshold level by moving the cursor to the field marked -20dB and adjusting it accordingly. To initiate a recording, press
. You will receive this screen display:
Here, the S3200XL is either waiting for a MIDI NOTE or a SONG START command or for the input level to exceed the threshold level. This all depends on the type of START you have selected in . You may manually initiate a recording by pressing GO (F7). You may cancel this display by pressing EXIT (F8). If the take selected for recording already exists when you press ARM you will receive this prompt:
You may respond accordingly. Pressing YES (F7) will cause the existing take to be erased and replaced with the new one you are about to record and pressing EXIT (F8) will take you back to the TAKE screen shown above where you may create a new take for recording.
Page 256
S3200XL Operator’s Manual - Version 1.00
GLOBAL When a recording is being made, the screen shows the incoming waveform as it is being recorded. I.e:
You may stop recording by pressing F8 at any time. If you are going to record digitally, when you enter the DD RECORD page, the screen will show:
or whatever sample rate is being received. If no digital connection has been made or has become disconnected, the display will tell you:
Please check your digital connections. When recording digitally, the bottom line of the display shows:
and the screen draws the incoming waveform envelope as it is being recorded. Once a recording has been made, you may use the ENT/PLAY key to play it back.
S3200XL Operator’s Manual - Version 1.00
Page 257
GLOBAL The soft keys in the DD RECORD page are: This takes you to the DD TAKES view page This takes you the SONG mode where you may compile takes for sequential playback or MIDI triggering This takes you to the play pages where you may play takes This takes you to the take editing display Takes you back to the RECORD SET-UP page Turns the audio meter on Turns the audio meter off This puts the S3200XL into a ‘record ready’ state awaiting the arrival of a suitable record start command depending on the setting of the START field in
Page 258
S3200XL Operator’s Manual - Version 1.00
GLOBAL EDITING A RECORDING After you have recorded a take, you may need or want to edit it. This is done by adjusting the take’s start and end times and is done within the EDIT page. Pressing F4 - in any of the DD pages will display this screen:
When you enter this page, you see a graphic representation of the take’s waveform and you may move the start and end points around freely. The start and end points are shown both as time values in the start: and end: fields respectively and are also shown as flashing vertical lines in the waveform display. You may zoom in or out on a waveform for greater editing accuracy. The fields are as follows: This shows the ‘now’ position of the left edge of the screen. By adjusting this parameter, any part of the waveform can be placed as the ‘now’ position. Used in conjunction with the zoom in and zoom out keys, this function can be used for identifying key points in a take you want to edit without upsetting the start and/or end marks. When the cursor is placed on this field, pressing ENT/PLAY will cause the take to play back from the left of the screen - i.e. the cursor will play from the ‘now’ position up to the end mark. This shows the ‘width’ of the screen display in time. Here it is showing that the whole screen width is equivalent to 2 minutes. As you zoom in and out, this field changes to show the equivalent size of the screen. This shows the name of the take selected for editing. You may select another by scrolling through the available takes. This allows you to adjust the start time of the take. As you adjust this parameter, a flashing vertical cursor moves across the waveform display. You will note that if you move the start point past either extreme of the waveform display, the waveform will scroll. When the cursor is on this field, pressing ENT/PLAY will cause the take to play back from the start point set here. This sets the end point of the recording. As you adjust this field, a vertical flashing cursor moves across the screen. If the end point is moved past either extreme of the waveform display, the waveform will scroll. When the cursor is on this field, pressing ENT/PLAY will cause the take to play UP TO the end point from the point shown on the far left of the screen and you can use the ZOOM IN/OUT functions as a variable pre-roll function. For example, if you want to audition the last ten seconds or so of a take to check if your end point edit is satisfactory, use the ZOOM keys to set a value close to this in the field and press the ENT/PLAY key. You may quickly switch between the start and end fields by pressing the
S3200XL Operator’s Manual - Version 1.00
key.
Page 259
GLOBAL The soft keys in the EDIT page are: This takes you to the DD TAKES view page This takes you the SONG mode where you may compile takes for sequential playback or MIDI triggering This takes you to the play pages where you may play takes EDIT
Shows the currently active screen Allows you to zoom in on a waveform for greater editing resolution Allows you to zoom out of a waveform for a more general overview of the take This toggles the cursor between the start and end marks This will cause data either side of the start and end points to be discarded thus trimming the take. This is a destructive process so be careful when using this function
PLAYING A TAKE IN THE EDIT PAGE As in all other DD pages, it is possible to play a take directly by holding down the ENT/PLAY key. In the EDIT page, however, when the take is actually playing, a flashing vertical cursor moves across the screen. When you take your finger off the ENT/PLAY key, playback stops and the play cursor stays at the point where it is stopped. You can use this position to place the start or end mark at a suitable position. There are other differences as discussed above but to recap: 1: If the cursor is on the field, pressing ENT/PLAY will cause the take to playback from the point shown on the left of the screen regardless of the setting of the start field. Use this as a means of playing back from anywhere in the take without upsetting edit points. 2: If the cursor is on the end field, pressing the ENT/PLAY key will cause the take to playback from the point shown at the left of the screen up to the end point. You can use this facility to audition the end of an edit and use the ZOOM IN/OUT as a variable pre-roll function.
USING THE EDITING FUNCTIONS The editing functions have been kept deliberately simple to use. Basically, you can trim a recordings start and end points and, to assist in this, a graphic representation of the waveform is shown. Once you have successfully made a recording, the chances are you will want to edit it so go to the EDIT page. Move the cursor to the START field and adjust the start time so that cursor is right at the start of the take. You may use the editing of the start point as well to edit out countins to a song or breaths from a backing vocal ‘spin in’ or whatever. Of course, you can zoom in for greater accuracy. You may audition your edit at any time simply by pressing the ENT/PLAY key. Once you have successfully edited the start mark, move the cursor to the END field either by using the cursor keys or by pressing the soft key and you may set a suitable end point, again, zooming in for greater editing accuracy. Again, use the ENT/PLAY key to hear the result of your edit. Of course, in the case of a very long take, it is very inconvenient to have to hear all of it just to check the end point. When the cursor is on the END field, pressing the ENT/PLAY key will cause the take to play back from the left side of the screen only. In this way, by
Page 260
S3200XL Operator’s Manual - Version 1.00
GLOBAL adjusting the zoom factor accordingly, you may use this as a form of pre-roll so that you only need to audition the last 10 or so seconds of the take in order to assess your end point edit.
HELPFUL HINT: If you are editing a take for use in a song where takes are sequenced, you might find it helpful to quickly place the edit you are working in an empty song and have it repeat a few times. If it cycles round with no glitches or tempo disruption, then you probably have a good edit that will work well with other takes appended to it. If there is a glitch on the repeat, return to this EDIT screen to fine tune the start and/or end points. The process can be a bit hit-and-miss but as all editing is non-destructive here, it certainly beats using a razor blade! Once you have decided that the edit you have done is right, you may wish to discard the unwanted portions in order to free up disk space.
IMPORTANT NOTE: The discard function is destructive and non-retrievable. Be careful when using it!! HELPFUL HINT: If you are recording in small sections to be compiled as a song later on, please be careful when using the discard function. For example, you may make an edit which, in isolation in the EDIT or PLAY pages, sounds fine but glitches slightly and needs adjustment when playing back-to-back with another take in the SONG mode. If you use the discard function, you may lose the ability to adjust the edit at a later stage. It is recommended, therefore, that you don’t use the CUT function until you have successfully compiled your song. Of course, you may want to set a start point some way into the recording. An easy way to do this is to press the ENT/PLAY key and let the take play back up to the point where you want to set the start point. When you take your finger off the ENT/PLAY key, the play cursor will stop at that position and you can move the start point to that position. It is unlikely that such an edit will be particularly precise but you can zoom in for more precise editing. The same thing can be done when editing the END point.
S3200XL Operator’s Manual - Version 1.00
Page 261
GLOBAL PLAYING TAKES There are a number of ways you can play a take within the S3200XL’s DD functions: 1
You can play a take in ANY page using the ENT/PLAY key
2
You can assign a series of takes to a SONG for sequential playback or for triggering from MIDI.
3
You can play ‘raw’ takes from within the PLAY page and this is accessed in any of the DD pages by pressing F3 . Pressing this soft key will give this screen display:
In the PLAY page, you may audition ‘raw’ takes using the START option selected during the record process. The fields on this page are as follows: This shows the selected take. You can select other takes for playback by scrolling through them using the DATA control. This shows the sampling rate at which the selected take was recorded. If the take is an analogue recording, this will always show 44100Hz. If the take was recorded digitally it will show the rate at which it was recorded (i.e. 32kHz, 44.1kHz or 48kHz). You may adjust this in the event that a take recorded digitally was, for some reason, recorded at the wrong sampling rate. This allows you to set the playback rate for the selected take and may be used like a tape machines varispeed control. Normally, this will be 00.00% but, for special effects, you may wish to set a playback rate that is different to the takes sampling rate. This parameter may be adjusted in real-time as the take is playing. This allows you to set a fade-in time for the take. The range is 0-9999 milliseconds (i.e. 0 to 10 seconds). This allows you to set a fade-out time for the take. The range is 0-9999 milliseconds (i.e. 0-10 seconds). This allows you to route the take to one of the four effects channels FX1, FX2, RV3 or RV4. This allows you to set the send level of the take to the effects channel selected in the field. Here, you can set the method by which a take will commence playback. The options are: press
- This will cause the take to commence playback as soon as you - F8.
- This will cause the take to playback when it receives the MIDI note number set in the field described below after is pressed.
Page 262
S3200XL Operator’s Manual - Version 1.00
GLOBAL - This will cause the take to play back upon receipt of a suitable MIDI note but with a delay offset set in the delay: field described below. If is pressed, however, playback is immediate in the PLAY page. - This will cause the take to playback when it receives a MIDI SONG START command after is pressed.
NOTE: In all the above selections, the
key must be pressed before a take is played.
This sets the delay offset used for triggering a takes playback when is selected in the field described above. This allows you to set which MIDI note will cause the take to playback when or is selected. This allows you to set the MIDI channel for the take. In this way, you can set a specific MIDI channel for the MIDI triggering of takes. This field allows you to set the playback level of the take. This allows you to set the pan position of a mono recording or the left/right balance of a stereo recording. This sets the level of the signal that will be sent to the assignable individual outputs. This sets the destination of the take. The default is OFF but you may set these to any outputs you want. The level at which they will appear at the individual outputs or the effects is set in the field. The soft keys on this page are: This takes you to the DD TAKES view page This takes you the SONG mode where you may compile takes for sequential playback or MIDI triggering Shows the currently active page This takes you to the take editing display This takes you to the recording set up page Takes you directly to the record page for recording new takes Takes you to the BACK-UP SAVE page where you may archive takes to DAT via the digital audio interface. This primes the take for immediate playback from within this page
S3200XL Operator’s Manual - Version 1.00
Page 263
GLOBAL USING THE PLAY PAGE Although you may play takes from within any page of the DD functions and whilst the SONG mode is provided either for sequential playback of many takes ‘back-to-back’ or for setting up lists of takes that you may wish to trigger from MIDI, the PLAY page is provided for playing individual takes in isolation and for setting their playback parameters prior to assigning them to a song. Assuming you have successfully recorded and edited a take, to play it back from the PLAY page simply press (an abbreviation of ‘prime’). This gets the S3200XL ready for the incoming MIDI note or song start command by searching for the take selected here. You will receive this screen display:
As soon as it receives the appropriate signal (i.e. that set in the back. As it is playing, the display will show:
field), it will start playing
You may press F8 - STOP - at any time to stop playback of the take. You may adjust any of the parameters in the PLAY page as you wish and these are automatically saved as soon as you leave this page. If the take does not play back successfully, the reason is probably that the S3200XL has not received the appropriate start command as set in the field. For example, if is selected and C3/Channel 16 is set but, for some reason, the sequencer does not send this note on this channel (i.e. maybe the track set aside for take triggering on your sequencer has been muted or switched off or the wrong note or channel are being transmitted), the selected take will not play back. Similarly, if you have selected to trigger the take but your sequencer does not send out a command in certain modes of operation, the take will not trigger.
NOTE: Akai MPC60 owners will please note that a command is only issued when the MPC60 is in its SONG mode. If you revert to the main screen to play an individual sequence, the selection will not be operative. The same is true of other sequencers so please check your sequencer’s manual for more information.
Page 264
S3200XL Operator’s Manual - Version 1.00
GLOBAL EDITING A TAKE FOR SYNCHRONISED PLAYBACK When you make a recording that needs to be synchronised to other audio material (such as sequenced programs, etc.), providing you make the recording referenced to the other audio, there should be no need to worry about synchronisation and the S3200XL will follow exactly. There may be instances, however, where some adjustments need to be made and this can be done in the following ways. 1
If the selection is , you may adjust the DELAY parameter in millisecond steps to achieve accurate playback start times.
2
If the sequencer.
3
Whatever the selection is, you may use the EDIT page to trim a take for better playback start synchronisation.
4
If the take ‘wanders’ during playback, this will be because the external reference’s clock is not stable. For example, if you record a take referenced to an external sequencer playing programs in the S3200XL but, after recording has been done, the take wanders out of sync after a few minutes, it is most likely that the sequencers clock is not entirely accurate and so, eventually, the two will drift apart. In this case, use the parameter to adjust the takes playback speed by minute amounts. Unfortunately, there are no guidelines on setting this up. You will have to make an adjustment, see if it improves - if it does not, you will have to try again with a new value. All being well, however, this is only likely to occur if you use a different sequencer to that which was used during the record process.
selection is
, you may shift the note or track within your
NOTES ABOUT SYNCHRONISING TO EXTERNAL AUDIO In most cases, there should be no problems in synchronising takes to external audio material because the playback response time of the S3200XL is extremely fast and sync accuracy is in the region of a few milliseconds. Also, the take editing and parameter adjustments described above should overcome any discrepancies you may encounter. You will note, however, especially when running takes alongside sequenced material that if you change the tempo of the sequence, the takes will be completely out of sync, even if the tempo change is very small. Of course, you can use the VARISPEED control to bring them back in sync but then, of course, they will be out of tune with each other unless you transpose or re-tune all the sequenced material. Be sure to only make recordings once you have finally settled on the tempo of your sequencer. Similar considerations must be borne in mind when syncing takes to other audio material such as material off tape. If you use varispeed on the tape machine, you will have to set a suitable varispeed setting on the S3200XL to accommodate this. Another consideration is that tape transports are rarely 100% stable so if you are running a sequencer synchronised to code on tape and also running takes from the S3200XL’s disk, you may find that takes will wander slightly out of sync, especially if that are long recordings.
S3200XL Operator’s Manual - Version 1.00
Page 265
GLOBAL USING THE SONG MODE The SONG mode is where you can compile a list of takes for playback. The SONG mode has two functions, in fact. You may use the SONG mode to compile a list of takes for triggering from MIDI notes or you may use the SONG mode to append and playback a sequence of takes ‘back-to-back’. The first application, triggering from MIDI, is most likely going to be used when ‘spinning in’ recordings from a sequencer over other sequenced material. In this way, you may set aside one or more tracks on your sequencer for playing back audio over a sequenced backing track. The other application, sequencing takes, is for creating alternative and extended song remixes. CREATING A SONG Regardless of the application you have in mind, the method for creating a song is identical. Pressing F2 - in any of the disk record pages will give you this screen:
This shows a blank, empty song file. Nothing can actually be done here. To create a song, you must press F2 to take you to the SONG EDIT page as this is where all the work takes place. Pressing F2 gives this screen display:
The fields across the top of the screen are as follows: This is the name field for the song. Names of up to twelve characters can be entered here in the normal way by pressing NAME, typing in the name and pressing ENT/PLAY. NOTE - This sets the MIDI note that the take will be triggered by. This parameter has no function when sequencing takes. CHANNEL - This sets the takes MIDI channel. This has no function when sequencing takes. LEVEL - This sets the playback level of the take. PAN - This sets the pan position of the take if it is a mono recording or sets the left/right balance if it is a stereo recording. FADE IN - This sets the fade in time for the take and is variable up to 9999mS (10 seconds)
Page 266
S3200XL Operator’s Manual - Version 1.00
GLOBAL FADE OUT - This sets the fade out time for the take and is also variable up to 10 seconds. REPEAT - Although not operative when triggering takes from MIDI, this field sets the number of times a take will repeat itself when you run it as a SONG from the RUN key (see below for more information on this function). You will have to excuse the somewhat cryptic and abbreviated nature of these field descriptions on the S3200XL’s screen but it was felt better to design the screen this way and have all these useful functions available within one page rather than you having to keep switching back and forth between various pages when trying to compile your takes - this would have been highly inconvenient as you can imagine.
NOTE: Values set in these fields do not affect the ‘raw’ takes’ parameters; these always remain the same whatever you set in the SONG mode. In this way, each take in the list can be set to its optimum playback characteristics in a song without affecting the raw take. Soft keys F1 to F4 take you to different pages. The soft keys F5 to F8 have the following functions: This marks a step in the song for inserting or deleting. This allows you to mark a block of cues for inserting or deleting. Pressing this will insert the marked step or block at the point of the cursor on the scroll bar. Pressing this will delete the marked step or block. To create a song, whether it is for MIDI triggering or for sequential playback, the method is exactly the same. Follow these steps to create a song. In the SONG EDIT page, move the cursor to the first empty take field. This is done by moving the cursor one position to the right. You will have a screen something like this:
You may now select a take using the data control (or the +/< or -/> keys found on the numeric keypad). Having done that, the selected take’s parameters will be loaded into the step and so the note, level, pan and other fields may change if the raw takes parameters are different from those set as the default shown above. You may change these as necessary. Once you have assigned your first take, you should receive a screen something like this:
S3200XL Operator’s Manual - Version 1.00
Page 267
GLOBAL If you are triggering from MIDI, you will most likely want to edit the MIDI note and channel and if you are creating a song to run takes sequentially, you will possibly want to set a repeat for that step. If you are at all unsure of the take you have selected, you can press the ENT/PLAY key to audition the selected take. There are several ways you can create the next step but the easiest method is probably this: Press F5 . This will mark the first step and a small block will appear beside it. Now press F6 (insert) - and this will copy that step and you will see it appear beneath the first step. Now press 1 on the numeric keypad to move the pointer down to the new step. You may now move the cursor into the take field and select another take as the next step in the list. Of course, you may edit that take’s parameters if you wish. Repeat the above: Press - press - press 1 - move the cursor to the take field to select the next step edit the parameters accordingly using ENT/PLAY to audition.
NOTE: If the cursor is not on the scroll bar down the left hand side of the screen, pressing ENT/PLAY will first return the cursor to the scroll bar. Pressing it again will then play the selected step. Do not be alarmed if pressing the ENT/PLAY key the first time does not play the take. You may repeat that process as many times as you like until you have created your song.
NOTE: If you are creating a song for triggering takes from MIDI, the order in which the takes appear is not important. It is probably just as well to keep some semblance of order, however, so that it is easier for you to keep track of. For example, it seems pointless putting the last chorus’s backing vocal in first and the first verse last! If, however, you are creating a song for sequential playback, it is necessary to assemble the takes in the order you wish them to play back. If, at some point, you wish to delete a take from the list, simply move the cursor to the required step, press and press .
NOTE: If you do not press you may find that you delete the wrong step. Be careful because although this is not ultimately destructive (after all, it’s easy enough to insert the step back in again) it can be annoying. You may give the song a name (if you haven’t already) and then save it to disk. It really is quite simple and whatever your application, whether it be sequencing takes or triggering them, you will soon build up quite complex lists very quickly. Advanced editing such as block editing, copying, deleting and shifting are explained later. You will also want to refer to the section USING THE KEYPAD TO GET AROUND THE SONG which appears later in this section. For the time being, practice the above until it becomes a natural process.
Page 268
S3200XL Operator’s Manual - Version 1.00
GLOBAL TRIGGERING TAKES FROM MIDI This powerful function of the S3200XL’s disk recording capabilities allows you to simultaneously playback audio from the hard disk whilst sequencing programs in the S3200XL. To set up a list of takes for MIDI triggering, press the SONG key (F2 in all disk record pages) to get the following screen:
This shows a blank, empty song or take list. To create a new list of takes, press F2 again. This takes you to the S.ED or SONG EDIT page where you may assemble your list. Pressing gives you this display:
Here we can see that the first take is blank and has some default parameters assigned to it. Assign your takes as described above and edit the parameters if necessary. USING MIDI TRIGGERING The method for assembling a list of takes for triggering from MIDI is described above. Once you have set up a series of takes for MIDI triggering, simply sending the appropriate MIDI notes on the selected channel(s) will cause them to play back. Typically, a list of takes for MIDI triggering may look something like this:
Here we can see a typical setup for spinning in material over a sequenced backing track. We can see that there are two backing vocal recordings which will trigger when they receive C1 and C#1 and a guitar solo will start to playback on C3 with a brass riff playing off C4. All the takes are on MIDI channel 16 although, in practice, there is nothing to stop you setting different MIDI channels for some or all of the takes. For example, you could have set the backing vocals to MIDI channel 15, the guitar solo to MIDI channel 14 and the brass riff on MIDI channel 16. In this way, you can reserve tracks on your sequencer especially for certain audio parts. This may be useful if you need to slip parts using the track shift function on your sequencer. In the above example, you can see that some takes have fades set for them. This facility is useful for ‘softening’ the start and end points of a take whose edit may be a bit abrupt. The range for both fade in and fade out times are 10 seconds (actually 9999 milliseconds but who’s counting one millisecond!). To soften an abrupt attack or end, fades of around 5-20
S3200XL Operator’s Manual - Version 1.00
Page 269
GLOBAL milliseconds will normally do the trick. Fades longer than that can be useful for fading in a take or causing a smooth, gradual decay at the end of a take’s replay. As soon as the S3200XL receives the appropriate note on the appropriate channel (i.e. one that is assigned to a take in a song), the following screen will be displayed:
You may either issue a MIDI ALL NOTES OFF command from your sequencer/keyboard or specifically press F8 - STOP - on the S3200XL.
NOTE: To play takes from MIDI in this way, the takes MUST be set to start from MIDI NOTE or M.NOTE+DEL in the PLAY page. When playing back in this way, triggering from MIDI, there is ALWAYS a fixed delay and the delay is that set in the DREC or PLAY pages. Normally, it is probably best to offset the delay by the same amount for each take. By doing this, you can shift one or all tracks on your sequencer by a consistent amount. If you wish, however, each take may be set to have its own unique offset delay which may help in syncing up some takes. Remember that you can use a combination of your sequencer’s track shifting and the variable delay parameter to get takes exactly in sync. For example, your sequencer’s track shifting functions may not offer enough resolution to obtain precise triggering of the take(s). In this case, adjust the take’s delay time in milliseconds to obtain precise sync.
HELPFUL HINT: If your sequencer does not have a wide enough range for shifting a track, why not insert a blank bar or half bar at the beginning of the sequence and then delete that bar only on the track(s) devoted to triggering takes. You can then use the S3200XL’s MIDI delay to offset the triggering time. One thing to remember, of course, is that if you wish to trigger the same take several times (i.e. in the case of a backing vocal you wish to spin in over every chorus), you do not have to specify it in the list several times when triggering it from MIDI. You only need to select it once and, when the S3200XL receives the appropriate note, that take will play. You will note that, when triggering takes from MIDI, the repeat field has no function - this is for use when running takes sequentially in a song (see below).
Page 270
S3200XL Operator’s Manual - Version 1.00
GLOBAL
IMPORTANT NOTES ABOUT TRIGGERING TAKES FROM MIDI When triggering takes from MIDI, if you stop the sequencer and restart it somewhere in the middle of where a take should be playing, it will not sound. This is because it requires the MIDI note-on to trigger it. In such circumstances, it will be necessary to ‘rewind’ the sequencer to a point somewhere before the MIDI note to ensure that the take receives the note on and will trigger. The same, of course, is true if you are running your sequencer synchronised to tape and triggering takes from MIDI. If you stop the tape, you will need to rewind it to a point before the MIDI note required to trigger the take When a take is triggered from a MIDI note, when you stop the sequencer, assuming your sequencer sends out a MIDI ALL NOTES OFF command, the take will stop playback. If however, your sequencer does not issue an ALL NOTES OFF, the take will continue to play but you may specifically stop playback from the S3200XL front panel using F8 - STOP. Because the S3200XL can only play one take at a time, crossfading between takes is not possible. Also, if one take is playing while another is triggered, the new take will take priority although please note that there will be a short gap between the one take finishing and the next take starting.
S3200XL Operator’s Manual - Version 1.00
Page 271
GLOBAL USING THE SONG MODE TO CHAIN TAKES This mode of operation allows you to playback takes sequentially ‘back-to-back’. This mode will be invaluable to remix engineers for the creation of extended remixes. It will also be of use to jingle writers and TV theme music writers who often have to provide several versions of one piece of music with different lengths. The simplest method of using the song mode is to ‘top and tail’ an entire recording (i.e. record an entire song into the S3200XL and edit its start and end points) and have it play back from within the SONG mode. At a more advanced level, you could use the SONG mode to play back a whole series of entire songs recorded and edited this way and the SONG mode can be a convenient method of sequencing the tracks on an album. A more advanced application for the song mode, however, is to create extended remixes. A typical song will look something like this:
Normally, the takes will be recorded onto disk in sections, one by one, edited and then compiled into a song within the S.ED page. Here we see a series of such takes running ‘backto-back’ to form a typical extended remix. You can see that some steps are set to repeat several times and the repeat field can be used to good effect in this way - it certainly beats having to print several versions of a section onto tape and splicing them all together!! Crossfades are not possible in the song mode but this isn’t such a big disadvantage for most remix work where the material is usually quite percussive and butt editing can be very effective. Of course, a good edit depends on the accuracy of the cuts you make in the EDIT page and hearing a cut out of context may not always give you a true impression of how it will sound back to back with another cut. A typical editing session will probably involve a bit of switching between the EDIT page and the SONG page to fine tune some edits which, on their own sound fine but alongside other takes, exhibit some form of glitch. When you switch from the SONG page to the EDIT page, the take just played will be in the EDIT window and then, when you return to the SONG page, the step you are working on will still be current so a fine edit should only take a few seconds. Often, the fade in and fade out parameters can come in useful for smoothing out such problems. Experimentation is the name of the game here! Once you have a few takes in your song, pressing (F8) in the main SONG page will cause them to play back sequentially. When this happens, you will receive the following screen display:
Pressing F7 will stop playback of the song and pressing F8 - SKIP - will cause the song to skip the current step and proceed playback from the next step.
Page 272
S3200XL Operator’s Manual - Version 1.00
GLOBAL
NOTE: The SKIP function causes playback to start from the next step, not the next repeat of any step. As the song is playing, a small highlighted box appears to the left of the step to indicate your playback position. If the song exceeds five steps, the list of steps will scroll up the screen with the currently playing step being placed in the centre of the screen. The step number at the top left of the screen also changes to show the step currently playing. If a series repeats have been set for a step, they will count down as they are played so you can easily keep track of progress during playback. You may play from any position in the song simply by moving the pointer up or down the scroll bar. This can be done using the DATA control or the numeric keypad (see later USING THE NUMERIC KEYPAD). Pressing RUN will cause the song to commence playback from that step. At the top of the screen to the left of the song name is an indicator showing which step you are on. USING THE NUMERIC KEYPAD IN THE SONG MODE The numeric keypad can be used as a shortcut method of moving around the song steps. You can use the cursor keys if you wish, especially if you are only moving one step down but when you wish to move several steps down or up, the keypad will become very useful to you. The shortcuts are simple and easy to remember. With the cursor on the scroll bar, pressing... 1
will move you one step down
2
will move you two steps down
3
will move you three steps down
4
will move you four steps down
and so on through to 9 which, of course, will move you nine steps down. pressing -/> key and 1 simultaneously will move you UP one step pressing -/> and 2 will move you up two steps pressing -/> and 3 will move you up three steps pressing -/> and 4 will move you up four steps and so forth through to -/> and 9 which will move you up 9 steps. Other keys you can use are: 0
This will take you to the first step in a song
+/
key AND a number key simultaneously, you can move up the list. For example, pressing -/> and 6 will take you six steps backwards in the list. Pressing the +/< key AND the -/> key simultaneously takes you to the start of the block. If you are on a field in the cue list (i.e. the cursor is not in the scroll bar), you may move to the scroll bar instantly by pressing the ENT key. When the cursor is on the scroll bar and pointing to an event, you may press the ENT key to play that event. If the cursor is on a numeric field in the cue list, the numeric keypad functions in the normal way and this cursor control facility only ever works when the pointer cursor is on the scroll bar.
S3200XL Operator’s Manual - Version 1.00
Page 281
GLOBAL CUE LIST MODES There are three basic modes in CUE LIST for playing, creating, editing and setting up cue lists which are accessible through soft keys F1, F2 and F3. These are: This is where you play a cue list and this mode has several ‘transport’ controls for a variety of different playback functions. This is where you can edit and/or create a cue list. This where you set the S3200XL SMPTE receive/transmit parameters. CREATING AND EDITING CUE LISTS Let us now create a cue list so press
(F2) to take you to the cue list edit page:
This shows a typical cue list with sound effects. The fields across the top of the screen are: To the far left of the screen is a highlighted numeric field that is inaccessible to the user. This shows the current event number and, as the cursor is moved up and down the scroll bar, this number changes to indicate the event number in the list. This sets a master offset time for the cue list and data is input using the data wheel or the numeric keypad. The whole cue list can be offset forwards by pressing the +/< key when the cursor is in this field or backwards by pressing the -/> key when the cursor is in this field. This allows you to set the time by which you want to slip a block of events in time and data is input using the data wheel or the numeric keypad. You may slip a block of events forwards using the +/< key when the cursor is in this field or backwards using the -/> key when the cursor is in this field. This facility works in conjunction with the SLIP soft key described below. Before we look at the other fields on this screen, let us first examine the function of the soft keys as these play an important part in the creation of a cue list. Pressing this key sets the start mark of a block as set by the position of the pointer cursor in the scroll bar. Pressing this soft key sets the end mark of a block as set by the position of the pointer cursor in the scroll bar. To mark a block, move the cursor to the event you wish to set and press mark. Now move the cursor down the list using the numeric keypad as described earlier and press at the point you wish to mark as the end. It is possible just to mark one event and this is done by pressing only at the event you wish to set and not pressing .
Page 282
S3200XL Operator’s Manual - Version 1.00
GLOBAL This allows you to copy and insert a marked event or block. To insert an event, place the pointer cursor at the event you wish to copy and press MARK. Now move the cursor using the numeric keypad to the position at which you wish to insert this event and press F5 . The marked event will be inserted at the point indicated by the pointer cursor. You may now edit this event if you wish. You may also copy and insert blocks in the same way. Place the cursor at the point at which you wish to set the start of the block and press MARK. Now, using the numeric keypad, move the cursor to the point you wish to set as the end of the block and press BLCK. You may now move the cursor to the position at which you wish to insert this block and press INS. The marked block will be inserted at the point indicated by the pointer cursor. You may now edit the cues in that block if you wish. This deletes the marked event(s) This allows you to move a marked event or block of events backwards or forwards in time. This is most useful on blocks of cues that need to be shifted very slightly. When you press SLIP, the cursor will automatically be placed on the ‘ ’ (slip time) field at the top right of the screen and you may set this field accordingly. After that, pressing - F7 - will slip the marked event(s) by the amount set in the ‘ ’ field. This allows you to sort a cue list’s events into chronological order. The S3200XL will play events in the right sequence even if they appear out of time on the screen but, to make things clearer for yourself, you may want to place them in strict time order so that they follow consecutively on the screen display. When you first enter the EDIT CUE page, you will always be presented with one cue. This is a MIDI note ON cue ( ) set at 00:00:00:00.0 with no program assigned. I.e.:
The default MIDI note is C3 (note number 60) and the default velocity setting is 127. You may use this as the basis for your cue list using the various copy and insert functions. To create a number of cues, simply press F5 - a few times to create some new cues. Now, simply set the appropriate SMPTE times and assign the relevant program(s) and MIDI note number(s). You may also specify the velocity setting for the cue(s) if you wish to affect a cues loudness or volume. You will note that a SMPTE time other than 00:00:00:00.0 HAS to be specified for any cue as this SMPTE time effectively represents ‘no time’ and so the cue will not sound. If the sound has no looping (i.e. in EDIT SAMPLE, it is either set to “PLAY TO SAMPLE END” or no loop has been set) then it is not necessary to specify a MIDI note OFF for every event only when a sample has a loop set in it is necessary to specify a MIDI note-off or, if a long sample needs to be shut off before it reaches the end of its duration. This is done by changing to . If you wish, you may specify a note off command ( ) at any time to cut a sample short without having to edit its end point in EDIT SAMPLE. You may also select takes to play from disk. This is done simply by changing to (TAKE ON). When you move the cursor to the name field, you will now only be able to select takes for that cue. Set a suitable time for the cue and, in QLIST PLAY (see below), press or
S3200XL Operator’s Manual - Version 1.00
Page 283
GLOBAL and the take will play once the appropriate SMPTE time is reached. You may continue this process until all your takes and programs are assigned and you may freely mix programs and takes to create a Qlist something like that shown in the screen below:
Here we have some sound effects being played from within programs and at around 13 seconds, some background music is triggered from disk. Of course, at any time, you may edit a SMPTE start time to ensure precise synchronisation of takes to SMPTE. This method of operation is probably of most use to A/V engineers for placing long music tracks or dialogue plus sound effects to picture - in this case, the sound effects are being triggered from RAM via programs and the music and/or dialogue from the hard disk. Not only can takes be triggered to start playback at specific SMPTE time within the Qlist, they can also be made to stop at specific SMPTE times. To do this, simply insert a cue and set that to and select the appropriate take. For example:
Here, the same take is specified twice but one is specified as which indicates that at 00:00:14:05.1, the take will stop playing. In this way you can set exactly how long a take is to play for regardless of any edits made to that take within the D-D pages. You may, at any time, change a take cue into a program cue simply by changing and vice versa.
to
If you try to start playback of a Qlist midway through where a take should be playing, you will note that the take will pick up from that point regardless of where it is started. You will note, however, that this will not happen with MIDI cues (i.e. triggered programs) which need to wait until reception of the next MIDI note on command. If two takes overlap in a Qlist, when the second (i.e. the later cue) plays, the first will be cut giving priority to the latest one triggered.
NOTE: When overlapping cues are played in this way, there will be a small gap between the end of the first and the start of the second cue. Similarly, if two cues are set to butt together, you will notice a small gap between them. You may now copy and insert either single events or blocks of events as you wish until the cue list is complete. At any time, to hear the results of your efforts, press F1 - to take you to the QPLAY screen. You will receive this display:
Page 284
S3200XL Operator’s Manual - Version 1.00
GLOBAL
This page allows you to play the cue list from any point and there are several ‘transport’ controls that do this. This is an abbreviation for PLAY EXTERNAL and plays the cue list but only when it is receiving incoming SMPTE from an external source. If the external source stops, then the S3200XL will stop. If the external source is ‘rewound’ to another location, the S3200XL will pick up on the new SMPTE position and re-commence playback from that point although you will note that if playback re-commences at a point that is halfway through a sample, that sample will not play. If no SMPTE is present, then nothing will happen when is pressed!! When the cue list is playing, the cue list will scroll through the cue list and a small highlight appears to the left of the cues to indicate that the event has played. The current cue playing is always the middle cue in the screen except when playing the first three cues at the start of a cue list. This is an abbreviation for PLAY INTERNAL and will play the cue list from its own internal SMPTE generator. It will also transmit SMPTE timecode through the SMPTE out socket on the rear of the S3200XL allowing you to control external devices using the S3200XL as the master controller. When the cue list is playing, the cue list will scroll through the cue list and a small highlight appears to the left of the cue to indicate that the event has played. The current cue playing is always the middle cue in the screen except when playing the first three cues at the start of a cue list. This is an abbreviation of CONTINUE INTERNAL and pressing this after pressing STOP (see below) will play the cue list from the current position of the pointer cursor. This also transmits SMPTE timecode through the SMPTE out socket from the point at which playback is recommenced. You can freely move the pointer cursor to any location in the cue list to commence playback from any point using this key. When the cue list is playing, the cue list will scroll through the cue list and a small highlight appears to the left of the cues to indicate that the event has played. The current cue playing is always the middle cue in the screen except when playing the first three cues at the start of a cue list. This stops playback of the cue list in all play modes. It also stops transmission of timecode from the SMPTE out socket. NAMING CUE LISTS In this page, it is also possible to name a cue list. To do this, press NAME and type in the name (up to 12 characters) followed by pressing ENTER. The ‘time:’ field to the right of the name display shows the current time of either the internal or external timecode.
S3200XL Operator’s Manual - Version 1.00
Page 285
GLOBAL GRABBING TIMES One other soft key that is available for use in the QPLAY mode is the function found on soft key F4. This allows you to input cues in real time as the cue list is playing. To do this, press either (F5) or (F6) and, as the cue list is playing, press at appropriate moments. This will input empty cues at the end of the cue list. You may edit these and assign the relevant programs, MIDI notes and velocity levels in EDIT and pressing in cue list EDIT will place them in their correct chronological order. This method of inputting cues is well suited for creating cue lists ‘on the fly’ - that is, watching the visuals whilst entering cues in realtime. You may use this function to add cues to an existing cue list or to create a cue list ‘from scratch’. Another way to do this is to use the numeric keypad whilst the cue list is playing. This will insert programs 1 to 9 in realtime as the cue list plays according to the key press and you will hear the sound as you do this. Naturally, it is important that your programs are numbered correctly 1-9 if you are to achieve the right results using this facility. Also, if no programs are assigned to any keys that are pressed, no input will be made. The keys will normally insert the appropriate program on MIDI note C3 with a velocity of 127 but this may be changed by changing the parameters set in the TRANS page of the main MIDI mode (please refer to the section that explains the MIDI mode for more details on this function). For either way of inputting cues in real-time, the GRAB soft key has two functions. If you press GRAB whilst the S3200XL is NOT playing, a small ‘G’ appears at the top of the screen next to the ‘time’ field. When this is displayed and any of the PLAY functions are used, you can input cues in real-time (using the GRAB function or by ‘playing’ the programs from the keypad) but the cues will not be displayed as you input them. This allows a far faster response time for ‘grabbed’ cues. You may still input cues in real-time using either method without pressing GRAB first and you will see the cues entered as you ‘play’ them but please note that the response time is slightly slower because, as the screen display changes, so some of the S3200XL’s execution speed is used up and it is possible in such a situation, especially when inputting really fast cues, that some cues may be missed. It is recommended, therefore, that you press GRAB before putting the S3200XL into play if you need to input very fast cues in real-time. If you wish to cancel the ‘G’, press STOP (F8) and this will put you back to the normal GRAB mode. You may not access any other fields in this mode as these are for display only although the CURSOR keys and the numeric keypad can be used to scroll through the cue list. If you wish to edit the cue list, press F2 to return to the EDIT screen.
Page 286
S3200XL Operator’s Manual - Version 1.00
GLOBAL SMPTE PAGE This page is where you set the parameters for the S3200XL’s internal SMPTE reader/generator. Pressing will give you this display:
This field shows the current time being fed to the SMPTE reader from an external source. It will also detect the frame rate used on the external source and this is displayed underneath the ‘f/s’ field shown in the top right hand corner of the screen. This field allows you to set the time at which you want the SMPTE time to start. To the right of this field is another that allows you to set the frame rate for the transmitted SMPTE and the options are 24 fps, 25 fps, 30 fps and 30 drop fps. It is important that this be set to match incoming external timecode otherwise you may find that certain cues ‘misfire’. This field shows the SMPTE time currently being sent. There are four soft keys associated with the reception and transmission of SMPTE. These are: This switches the S3200XL’s SMPTE reader/generator to receive external SMPTE/EBU timecode. When this is switched on and external timecode is sent to the S3200XL, the ‘receive time:’ field shows the current external timecode position and the ‘f/s’ field shows the the external timecode’s frame rate. This generates SMPTE timecode from the S3200XL’s internal SMPTE generator from the point set in the ‘transmit start:’ field. This generates SMPTE from the point at which the timecode transmission was stopped. This stops transmission of SMPTE from the S3200XL’s internal SMPTE generator.
S3200XL Operator’s Manual - Version 1.00
Page 287
GLOBAL SAVING CUE LISTS You may save a cue list and its programs and samples by selecting ENTIRE VOLUME as the save type - this will save all the programs, samples and effects file associated with the cue list to disk. It is also possible to save any number of cue lists to disk. To do this, go to the SAVE page and select CURSOR ITEM ONLY. Place the cursor on the cue list file you wish to save then press F8 - GO. This will save the cue list to disk. Any number of cue lists can be saved to a disk although only one can exist in the S3200XL at any one time. LOADING CUE LISTS When a disk is inserted into the S3200XL’s disk drive on power up, the cue list file will be loaded along with the programs and samples. This also applies if ENTIRE VOLUME is specified as the load type. Loading an individual cue list is done by going to the LOAD and selecting CURSOR ITEM ONLY and placing the cursor on the cue list file –with the suffix ‘Q’ alongside the file– you wish to load. Pressing F8 - GO - will load the selected cue list into the S3200XL.
Page 288
S3200XL Operator’s Manual - Version 1.00
APPENDIX 1 CONNECTING AN EXTERNAL HARD DISK DRIVE SCSI devices (hard disk drives, CD-ROMs, etc.) are connected as follows:
SCSI CABLE SCSI INTERFACE
HARD DISK DRIVE (or CD ROM, etc)
To other SCSI devices
The S3200XL uses a 25-pin SCSI connector. Using a suitable SCSI cable, connect the drive(s) to the S3200XL as shown above. Most drives have two SCSI connections and the other can be used as a ‘thru’ to other SCSI devices such as CD ROM or another hard disk drive, etc.. CONNECTING TWO SAMPLERS TO ONE HARD DISK DRIVE It is possible for two Akai samplers to share one drive. These may be two S3200XLs or even an S3200XL and an S1000/S11003, S3000, S20004, whatever. To do this, connect the devices as follows: SAMPLER A
DISK DRIVE
SAMPLER B Make sure the parameters on each sampler are different (on the S3200XL, this parameter is set in the GLOBAL-MIDI-SCSI or SAVE/LOAD-SCSI pages. If the other sampler is not an S3200XL, please refer to its operator’s manual). If the s are the same on both samplers, you will notice difficulty in accessing the disk drive for loading or saving data. Both samplers must be terminated in the above example (please see next page TERMINATION).
3
Please be aware of certain ‘backwards’ compatibility issues regarding using S3200XL data with S1100/S1100 samplers. A software version exists for these earlier samplers to read S3200XL data. Please refer to Appendix 2 for more information.
4
The (relatively!) inexpensive S2000 makes an ideal polyphony/output/memory expander for the S3200XL. Use the S3200XL for the bulk of your work, taking advantage of its large LCD waveform editing, etc., save the results to disk and use the S2000 as a playback-only device. Note that you should install all the options (EB16, IB304F, etc.), in the S2000 for best results because, despite the cost down achieved by the S2000’s compromised front panel, internally, with all the options fitted, the S2000’s hardware is virtually the same as the S3200XL.
S3200XL Operator’s Manual - Version 1.00
Page 289
APPENDIX 1 NOTES ON USING HARD DISK DRIVES SCSI CABLES Always use high quality SCSI cables. Using cheaper SCSI cables may seem an attractive proposition, especially if you have a tight budget but low quality cables can give rise to data errors. The SCSI connection requires that every connection is individually grounded. There are two main types of SCSI cable you can buy. One is the ‘moulded’ type with moulded connectors either end and a round cable. The other type are flat ‘ribbon’ cables. This type of cable is really intended only for use inside devices. Some moulded cables only have a single ground for all the connections and so can be unreliable. They are probably fine when used with a computer for loading small documents such as word processor files, etc., but with the large amounts of sample data used on the S3200XL, we have had reports of them causing problems. The flat ribbon cables, however, have individual grounding for each connection and so are generally more reliable but, because they are intended for use inside devices (where they are separately screened), they sometimes have insufficient screening which may cause data noises to appear in your audio signal path when any disk activity is going on, especially if your audio connections run parallel with the SCSI lead. However, if this is not a problem for you (and in a studio it may not be), these cables are usually very good and usually perform much more reliably. In a live situation, however, they are probably not ideal. TERMINATION A chain of SCSI devices must be terminated at either end and terminating resistors are fitted to most SCSI devices when you buy them. The S3200XL’s SCSI interface is terminated. It is most likely that the S3200XL will be at one end of the chain and so must be left terminated. Any disks in between the S3200XL and the last SCSI device in the chain must be un-terminated (this can be done by physically removing the resistors or sometimes via a DIP switch on the back of the unit - please check the unit’s documentation). The last device in the chain must be terminated. S3200XL
Terminated
Hard disk
Unterminated
MO drive
Unterminated
CD-ROM
Terminated
Incorrect termination may give rise to data errors and possibly corrupted data so please ensure it is done correctly. If you have any doubts, please contact your dealer who will be able to help.
Page 290
S3200XL Operator’s Manual - Version 1.00
APPENDIX 1 SCSI CABLE LENGTH The SCSI specification states that the total length of the SCSI chain must not exceed 6 metres. “Total length” means the length of the whole chain between the first and the last device and not the length of the cable between each of devices. SCSI chains that are longer than the specified length may cause data errors and possibly corruption of data.
S3200XL
Hard disk 6 metres total MO drive
CD-ROM
S3200XL Operator’s Manual - Version 1.00
Page 291
APPENDIX 2 DATA COMPATIBILITY ISSUES With any advance in technology, certain problems arise regarding data compatibility between older and newer models (witness the chaos with PowerPC software!). At Akai, we have tried to make models as compatible as possible both backwards (i.e. using data from new models on older machines) and forwards (i.e. using data from older machines on new ones). However, there are a few things owners of older Akai samplers should be aware of. SOUND DATA The S3200XL can use programs and samples created on the S900, S950, S1000, S1100, S2800, S3000, S3200, S2000 and S3000XL. When using S900/S950 disks in the S3200XL, you will receive the message:
As the samples are being loaded, you will see the message “UNSCRAMBLING...”. The S3200XL is converting the 12-bit samples from the S900/S950 format into 16-bit sample data the S3200XL can use. An S1000/S1100 disk can be read with no problems but when you save it to an S3200XL disk, there are a few things you should be aware of. The S3200XL allows 512 items to be saved on a floppy or hard disk (on the S1000/S1100 it was 64 items for floppy and 128 for hard disk). As a result, the whole format of the disk directory is different. If you try to save to a floppy disk that was formatted on an S1000 or S1100, because the disk directory is different, the S1000/1100 disk has to be re-formatted to S3200XL format. You can do this ‘manually’ if you wish by formatting the floppy using the FLOPPY FORMAT procedure described in GLOBAL but, when saving, if you use WIPE, this process is done automatically for you. If, however, you use instead of wipe, the S3200XL will remind you:
You may either specifically go through the formatting procedure yourself or you may simply press . The same is true of hard disk volumes. Simply using the key when you try to save to a hard disk volume that was originally formatted using an S1000 or S1100, will cause this message to be displayed:
This is saying that this volumes directory needs to be re-written in the S3200XL format. To do this, you should use - this will automatically rewrite the directory. After this, you may use the volumes as normal.
Page 292
S3200XL Operator’s Manual - Version 1.00
APPENDIX 2
WARNING! WHEN USING A HARD DISK, THE ACTION OF KILLING A VOLUME APPLIES ONLY TO THAT VOLUME. THIS IS NOT A FULL FORMATTING PROCEDURE. WHEN YOU SEE THE PROMPT, USE - DO NOT FORMAT YOUR HARD DISK AS THIS WILL ERASE EVERYTHING ON IT. If you are at all apprehensive about ‘killing’ the hard disk volume, save to another empty volume.
NOTE: If you think you will want to use this disk again in an S1000 or S1100, you are advised to save the S3200XL data to a different S3200XL formatted floppy disk unless you have software for the S1000/1100 that can read S3200XL disks. An S1000/S1100 cannot directly read sample and program data from an S3200XL but a software version does exist for the S1000/S1100 that allows a certain degree of backwards compatibility. Please contact your Akai dealer for information on this if you want to use S3200XL sounds in an S1000 or S1100. The S900 or S950 cannot read S3200XL sound data. If you have an S3000 (or 2800 or 3200), you will be able to use S3200XL sample and program data with no special software required (although it is advisable to have the latest software version for best results). EFFECTS FILES The S3200XL cannot use effects created on the S1100, S3200 or upgraded S3000. Effects files created for the S3200XL’s multi-effects cannot be used in the S1100, S3000 or S3200. MULTIS An older Akai sampler cannot read the new generation of samplers’ MULTI files. ME-35T DRUM SETTINGS The S3200XL can read ME-35T drum settings files created on an S1000, S1100 or the S3000 series samplers.. SONGS AND QLISTS Qlists created on an S1100, S3200 or upgraded S3000 can be used with no problem on the S3200XL. Song files (i.e. ‘TL’ files) created on an S1100, S3200 or upgraded S3000 can also be used on the S3200XL.
S3200XL Operator’s Manual - Version 1.00
Page 293
APPENDIX 3 INSTALLING EXTRA MEMORY To install extra memory, you must remove the top of the case. ** IMPORTANT NOTE ** Consult your AKAI Professional dealer on installation of any options (including memory) to the S3200XL. Self-servicing may cause malfunction of components or the instrument itself. Akai does not guarantee against the unit’s malfunction, damage or any loss caused by self-servicing or improper operation. Remove the top of the case by undoing the two large screws either side of the case and the smaller screw in the centre of the top of the rear panel. Looking inside the S3200XL, you will see something like this:
SCSI Connector for optional MO drive
ROM board sockets Floppy disk drive
Effects processor
SIMMs socket O/S ROM
INSTALLING MEMORY EXPANSION The S3200XL’s internal memory can be expanded to 32Mbytes giving a massive recording time of nearly six minutes. The S3200XL comes with 16Meg of memory ‘hardwired’ and there is an extra slot in which you can install SIMMs chips. Installation is fairly simple. The SIMMs board is inserted at a slight angle and then pushed back where it clips into place. Because SIMMs boards can differ, it is not possible to say “Install them with the components facing the front of the S3200XL” or anything like that because some SIMMs boards have the memory chips mounted on both sides sometimes. However, the boards can only be inserted one way so you shouldn’t have any problems but be careful not to force them into place otherwise they may snap.
Page 294
S3200XL Operator’s Manual - Version 1.00
APPENDIX 3 SIMMs operate at different speeds. SIMMs that operate at 70nS (nanoseconds) are recommended. SIMMs also come in various sizes. Please note the following memory configurations that are possible in the S3200XL. Internal 16M 16M 16M
SIMM Slot None 4M 16M
TOTAL 16M 20M 32M
NOTE: Memory chips are sensitive to static electricity. Please observe the following safety precautions: •
Unplug the S3200XL before installing the board(s).
•
The SIMMs may come with a special wrist strap to discharge static electricity. We suggest you attach the strap to the S3200XL’s case. If a wrist strap or any other such accessory is not supplied, try discharging any static by touching an earthed metal object before handling the boards.
•
Always handle the memory board by its edges - avoid touching the components on the board.
•
To minimise static electricity, avoid carpeted areas and low humidity areas.
INSTALLING THE FMX008 FLASH ROM BOARDS As well as being able to install up to 32Mbytes of RAM (Random Access Memory), you may also install a further 16Mbytes of FLASH ROM giving the S3200XL a total of 48Mbytes of memory. Normally, ROM, being read only, cannot be used to save data and the data contained in ROM is usually ‘blown’ into it at the factory. However, the contents of the ROM are retained when you turn the power off. RAM, on the other hand, allows you to put any sound you like into memory but, of course, this will be lost when you turn the power off requiring you to save it first. However, FLASH ROM has the benefits of both RAM and ROM in that as you can write data to it much like RAM but, when you power down, the contents are retained. This allows you to load your favourite sounds from disk (i.e. the ones you find yourself using regularly) and save them to the FLASH ROM so that they reside in the sampler permanently. Once in the FLASH ROM, you do not need to go through lengthy disk loading routines every time you want to use these sounds. You may install up to two 8Mbyte FMX008 FLASH ROM boards into the S3200XL. To install the boards, insert them into the ROM board sockets. Do not use excessive force to insert these boards.
S3200XL Operator’s Manual - Version 1.00
Page 295
APPENDIX 3 If you are familiar with analogue synthesisers, you may like to visualise your S3200XL as a large and sophisticated modular synth. As you can see, it’s pretty impressive! LFO 2 WAVE RAND
TRI
SQUARE
LFO 1
RATE OUT
WAVE RAND
SAW
DELAY
ENVELOPE 3
DEPTH
ENVELOPE 2
ENVELOPE 1
DELAY OUT
RATE 1 RATE 2 RATE 3 RATE 4 OUT
RATE 1 RATE 2 RATE 3 RATE 4 OUT
VELO
LEVEL 1 LEVEL 2 LEVEL 3 LEVEL 4
LEVEL 1 LEVEL 2 LEVEL 3 LEVEL 4
ATT
DEC
SUST
REL
OUT
TRI
SQUARE
DEPTH
RATE
SAW
EXTRA LFO1 DESYNC MODWL PRESS ON
OFF
LFO1 MODULATION
LFO2 RE-TRIGGER
RATE
DEPTH
DELAY
VEL> R1
VEL> OFF VEL> KEY R4 R4 SCALE
VEL> R1
VEL> OFF VEL> KEY R4 R4 SCALE
VEL> ATT
TEMP
VEL> OUT
TEMP
VEL> OUT
TEMP
VEL> OFF VEL> KEY REL REL SCALE
ON
OFF
LFO1 MOD INPUTS
ATTACK HOLD ON
OFF
PITCH MODULATION KG TUNE BEAT
OSCILLATOR 1 WAVE SELECT OCTAVE TUNE TONE
PITCH LFO1 MOD MOD
VEL> START
LEVEL
PAN
OSCILLATOR 2 WAVE SELECT OCTAVE TUNE TONE
VEL HIGH
VEL LOW
KBD
VEL> START
LEVEL
PAN
KBD
ON
ON
OFF
OFF
LOWPASS FILTER VEL HIGH
FREQ
RESO
KBD
VEL LOW
MOD 1
MOD 2
MOD 3
MOD IN
AMPLITUDE MODULATION
AMP MOD
MOD IN
MODULATION INPUTS
KEYRANGE HIGH NOTE
OSCILLATOR 3 WAVE SELECT OCTAVE
TUNE
OSCILLATOR 4
TONE
VEL HIGH
WAVE SELECT OCTAVE
TUNE
MULTI MODE FILTER
TONE
VEL HIGH
MODE
FREQ
RESO
KBD
TONE FREQ
ATTEN 0dB
LP
EQ
BP
LOW NOTE
VEL> START
LEVEL
PAN
VEL LOW
KBD
VEL> START
LEVEL
PAN
KBD
ON
ON
OFF
OFF
VEL LOW
-6dB
HP
MOD 1
MOD 2
MOD 3
SLOPE
MODULATION INPUTS
CONTINUOUS MIDI CONTROLLERS KEYBOARD
PITCHBEND
MODWHEEL
PRESSURE
VELOCITY
EXTERNAL MIDI
MASTER CONTROL SECTION PITCHBEND UP
DOWN
GLIDE TIME
MODE RATE
SEMITONE TUNING C
C#
D
D#
E
F
F#
G
G#
A
A#
B
TEMPLATE
MASTER TUNE
SOFT PEDAL
FINE
ATTACK
OUTPUT SECTION LOUD STEREO
LOUDNESS
MOD 1
MOD 2
INDIV OUT
PAN
MOD 1
MOD 2
INDIV LEVEL
MOD 3
TIME
HELD
PRESS
LEGATO
ON
ON
OFF
OFF
KEY
OCTAVE
FX BUS FX SEND
FILTER
MODULATION INPUTS
MODULATION INPUTS
Across the top are the controller - the LFOs and envelope generators. Underneath those are the ‘oscillators’ (i.e. the four keygroup zones), the filters and amplifier. Below that are the continuous MIDI controllers and below those, the master control section for tuning, output, etc.. On such a synth, connection between the modules would be made using patch cords but on the S3200XL, of course, they are made in software using the APM functions.
Page 296
S3200XL Operator’s Manual - Version 1.00
APPENDIX 5 MIDI CONTROLLER LIST The following is a list of the controllers that may be used as controllers within a program and which are selected in the main MIDI page in GLOBAL mode. 0 1 2 3 4 5 6 7 8 9 10 11 12 13 14-15 16-19 20-31 32-63 64 65 66 67 68 69 70 71 72 73 74 75-79 80-79 84 85-90 91 92 93 94 95 96 97 98 99 100 101 102-119 120-127
Bank Select Modulation wheel or lever Breath controller Undefined Foot controller Portamento time Data entry MSB Main volume Balance Undefined Pan Expression controller Effect control 1 Effect control 2 Undefined General purpose controllers (#1-4) Undefined LSB for values 0-31 Damper pedal (sustain) Portamento ON/OFF Sostenuto Soft pedal Legato footswitch (vv = 00-3F: NORMAL, 40-7F: LEGATO) Hold 2 Sound controller 1 (default: Sound Variation) Sound controller 2 (default: Timbre/Harmonic content) Sound controller 3 (default: Release time) Sound controller 4 (default: Attack time) Sound controller 5 (default: Brightness) Sound controllers 6-10 (No defaults) General purpose controllers (#5-8) Portamento control Undefined Effects 1 depth (formerly External Effects Depth) Effects 2 depth (formerly Tremolo Depth) Effects 3 depth (formerly Chorus Depth) Effects 4 depth (formerly Celeste (Detune) Depth) Effects 5 depth (formerly Phaser Depth) Data increment Data decrement Non-Registered Parameter Number LSB Non-Registered Parameter Number MSB Registered Parameter Number LSB Registered Parameter Number MSB Undefined Reserved for Channel Mode messages
S3200XL Operator’s Manual - Version 1.00
Page 297
APPENDIX 5 A ABOUT THIS MANUAL 5 Analogue recording 257 APM 21, 56, 297 Assignable Program Modulation 21, 56 Assigning effects, See EFFECTS AUDIO INPUTS 10 Autopan 71, 184 Autopan/FMOD effect 184
C Chorus effect 180 Compatibility, See DATA COMPATIBILITY Connections 13 COPY Keygroups 87 Programs 61 Samples 130 Takes 252 CURSOR KEYS 6
D DAT Backup/Restore 241-242 DATA COMPATIBILITY 293 Effects files 294 ME-35T 294 Multis 294 S1000/S1100 compatibility 293 Songs and Qlists 294 Sound data 293 DATA ENCODER 6, 17 DATA ENTRY 17 DELETE Keygroups 87 Programs 32 Samples 32, 131 Takes 252 Deleting programs 32, 62 DEMO DISKS 14 DEMO SEQUENCE 14 DIGITAL I/O 11 Digital recording 126, 258 DISK ACTIVITY LED 8 DISK EJECT BUTTON 8 DISPLAY CONTRAST 7 Distortion effect 176 Doppler shift effect 184
E Echo effects, See EFFECTS EDIT EDIT PROGRAM 52 Amplitude modulation 69, 114 Amplitude shaping 101 Copying 61 Deleting programs 62 Edit Multi 116 Edit Multi differences 117 Edit Multi screens 117 Edit Single 60 Envelope 1 101 Envelope 2 103 EDIT PROGRAM (cont)
Page 298
Envelope 3 113 FILTER 98 Filter 2 modulation 108 Filter 2 resonance 107 Filter 2 types 105-106, 107 Modulation 100 Resonance 99 Tone control 111 KEYGROUP Amplitude modulation 114 APM 56 Assigning samples 92 Assigning stereo samples 92 Copying 87 Creating 87 Crossfade 55 Deleting 87 FX Send 87, 169 Individual output 95 Layering 54, 93 Level 95 Mapping 90 Mute Group 87 Pan 95 Routing to FX 87, 169 Selecting 89, 94 Tuning 95 Velocity crossfade 54, 92 Velocity switch 54, 92 Velocity to sample start 97 What is a keygroup 53 Zones 54, 93 MODULATION LFO1 76 LFO2 80 Pitch bend 74 Portamento 84 Soft pedal 83 Naming 61 OUTPUT See also SINGLE mode - MIX page Amplitude modulation 69 Individual 68 Level 68 Loudness 69 Pan 68 Velocity sensitivity 69 Pan modulation 71 Pitch modulation 114 Span 90 EDIT SAMPLE 128 Chop/Cut/Extract 154-155 Copying 130 Crossfading samples 158 Cut 133-134 DSP 142 Digital EQ 148-150 Re-sampling 146-147 Timestretch 142-145 Fade in/out 160 Gain normalisation 141 Gain re-scaling 141 Join 157-159 EDIT SAMPLE (cont)
S3000XL Operator’s Manual - Version 1.00
APPENDIX 5 LOOP AT point 137 Auto looping 137, 140 Crossfade length 137 Crossfade looping 137, 140 FIND function 137, 140 Loop length 137 Loop select 136 Loop time 136 Loop tune 152 Loop type 151 Making a good loop 139 Looping 136-140 Mixing/layering samples 158 Naming 130 Pitch 151 Program monitor 128 Renaming 130 Reverse 153 Sample End 133 Sample Start 132 Sectional editing 154 Splicing samples 157 Trimming 132-135 Tuning 151 Zoom in/out 134 EFFECTS 162 Assigning effects to keygroups 169 Assigning effects to MULTI parts 40, 167 Assigning effects to programs 26, 68, 165 Chaining 172 Effects file 164 Effects flowchart 163 Effects presets 164 External input page 171 FX1, FX2, RV3, RV4 162, 164 Multi-effects 162 Muting effects 174 Output assign 171 Processing external sounds 170 Reverb presets 164 EFFECTS EDIT AUTO-WAH EFFECTS 177 Copying effects 204 DISTORTION/RING MOD 176 ECHO EFFECTS Mono echo 188, 190 Ping Pong echo 191 Stereo echo 189, 193 XOver echo 188, 192 EQ 177 MODULATION EFFECTS 179 Autopan/FMOD 184 Bypass 187 Chorus 180 Flanging 179 Phase shift 179 Pitch shift 185 Pitch shift+feedback 185 Rotary speaker 181 Multi-effects 175 EFFECTS (cont) OUTPUT 200
S3200XL Operator’s Manual - Version 1.00
Levels/Pan 200 Path control 201 REVERB 194 Decay time 194 Gated reverb 1 198 Gated reverb 2 198 Reverse reverb 197 Soloing effects 203 ENT/PLAY KEY 6, 19 EQ 177 Filter 2 mode 106 Sample 148-150 EQ effect See EFFECTS EDIT Expanding the memory 295, 296
F FEATURES 2 FILTER 2 See EDIT PROGRAM FILTER RESONANCE See EDIT PROGRAM FILTERS See EDIT PROGRAM Flanging effect 179 FLASH ROM 296 FLASH ROM - Installation, See INSTALLING OPTIONS FLOPPY DISK 7 Activity LED 8 Eject button 8 Inserting/ejecting 8 Loading 30 Taking care of 8 Write protect 8 FLOPPY DISK DRIVE See FRONT PANEL FOOTSWITCH INPUT 7 FORMATTING DISKS Floppy 214 Hard disk 216 FRONT PANEL 6 Cursor keys 6 Data encoder 6 Display contrast 7 ENT/PLAY key 6 Floppy disk drive 7 Footswitch input 7 LCD 6 Main volume 6 Mark/jump keys 6 MO Drive slot 7 Mode keys 6 Name key 6 Numeric keypad 6 Phones output 7 Power switch 7 Record level 6 Soft keys 6 FX1, FX2, RV3, RV4 See EFFECTS
Page 299
APPENDIX 5 G GAIN SWITCH 10 GETTING AROUND 16 Entering data 17 Mark/Jump keys 18 Operating modes 16 Selecting parameters 17 GLIDE See PORTAMENTO GLOBAL 232 DAT Backup/Restore 241-242 HARD DISK RECORDING 246-280 Applications 246 Chaining takes 273-276 Copying takes 252 Creating takes 252 DAT backup 278 DAT restore 279 Deleting takes 252 EDITING 260-262 Discarding audio 261, 262 NOW time 260 Take end point 260 Take start point 260 Trimming a take 261 Zoom In/Out 260, 261 Features 246 Formatting disks 247 Loading songs 277 MIDI Triggering 270-272 Naming songs 277 Naming takes 252 PLAYBACK 263-266 Fade In/Out 263 Level/Pan 264 MIDI Triggering 265 Output assignment 264 Play page 265 Playing takes 263 Priming takes 265 Start type 263 Syncing takes 266 Varispeed 263 Recording 253-259 Recording analogue 257 Recording digitally 258 Recording digitally - warnings 258 Renaming takes 252 Saving songs 277 SONG 267-269 Block editing 275 Creating 267, 268 Fade in 267 Fade out 268 Keypad shortcuts 274 MIDI Note/Channel 267 Pan 267 Parameters 267 Playing a song 273 Step repeat 268 Take level 267 Using the DD functions 250 Master output level 232 ME-35T programming 239-240
Page 300
GLOBAL (cont) MIDI functions 233-238 SMF Loading SMF’s 244 Playing SMF’s 244 Song play 243 Using the SMF function 245 Tuning the S3000XL 232
H HARD DISK RECORDING See GLOBAL HF Damping 190 How the S3000XL works 21
I INDIVIDUAL OUTPUTS 11 INSTALLING OPTIONS 295 Flash ROM 296 Memory configurations 296 Memory expansion 295 SIMMs memory 295
K Keyboard splits 35, 50 KEYGROUP See EDIT PROGRAM
L L/R OUTPUTS 11 Layering programs 35, 49 LCD 6 LCD CONTRAST 19 LFO1 See EDIT PROGRAM - MODULATION LFO2 See EDIT PROGRAM-MODULATION LOAD 218 Autoloading 223 Directory 226 FIND function 224 From floppy 220 From hard disk 221 HARD DISK control 229 Other manufacturer’s data 230 S1000/S1100 data 223 S900/S950 data 223 Searching for files 224 Selecting floppy/Hard disk 218 Selecting the hard disk partition 218 Selecting the hard disk volume 219 Selecting the type of load 219 Tagging system 226 LOOPING SAMPLES See EDIT SAMPLE
M MAIN VOLUME 6, 20 MARK/JUMP keys 6, 18 MEMORY - Installation, See INSTALLING OPTIONS Memory configurations 296 MIDI 27 Connections 12 Controller list 298 Global functions 233-238 MIDI (cont) IN/OUT/THRU 12
S3000XL Operator’s Manual - Version 1.00
APPENDIX 5 Monitoring 234 Multi part channel 40 Program change 25, 37 Program channel 27 Sample dump 236 Song files 243-245 Take channel 264 Triggering takes 265, 266, 267, 270 MO DRIVE SLOT 7 MODE KEYS 6 Mono echo effects 190 Mounting the S3000XL 15 MULTI 39 Assigning programs to outputs 41 Assigning programs to parts 40 HI/LOW keyranges 41 IMPORTANT NOTES 48 Initialising parts 42 Key splits 50 Layering programs 49 Loading 45 Mixing the parts 40 Modifying 44 Naming 45 Part priority 42 Renumbering programs 46 Saving 45 Sending parts to the effects 40 Setting the part’s MIDI channel 40 Setting up 43 Transposing parts 41 Tuning parts 41 MULTI EDIT See EDIT PROGRAM Multi-sampling 52 Multi-timbral setups 36, 39 MUTE key See EFFECTS Muting effects 174
N NAME KEY 6, 19 NAMING DD Takes 252 Disk files 211 Disk volumes 211 General 19 Multi 45 Naming samples 120, 123 Program 61 Renaming DD takes 252 Renaming samples 130 Samples 130 Songs 277 Normalise gain See EDIT SAMPLE NUMERIC KEYPAD 6, 17
O Output level 6, 20, 232
P Phasing effect 179 PHONES OUTPUT 7 Ping-pong echo effects 191
S3200XL Operator’s Manual - Version 1.00
PITCH BEND See EDIT PROGRAMMODULATION Pitch shift effects 185 PORTAMENTO See EDIT PROGRAMMODULATION Power connection 12 POWER SWITCH 7 PROGRAM EDIT See EDIT PROGRAM
R REAR PANEL 10 Analogue inputs 10 Digital I/O 11 Gain switch 10 L/R outputs 11 MIDI 12 SCSI 11 SMPTE i/o 11 RECORD See SAMPLE RECORD LEVEL 6, 20 Renumbering programs 34, 46 RESONANCE See EDIT PROGRAM Reverb effects 194 Reverb only effects, See EFFECTS REVERSE See EDIT SAMPLE Reverse reverb effects 197 Ring modulation effect 176 Rotary Speaker effects 181
S SAMPLE 118 Deleting samples 131 Naming new samples 123 RECORD Digital recording warnings 126 Duration 121, 124 Input monitor 125 Input select 121 Level meter 125 Monitor select 121 Pitch 121, 124 Record levels 125 Recording analogue 125 Recording digitally 126 Setup page 120 Start method 121 Stereo/Mono 120, 124 Threshold level 125 RECORD page 123 Renaming samples 120 Sampling rate 118, 121, 124 Saving record parameters 122 What is sampling? 118 SAMPLE EDIT See EDIT SAMPLE Sampling rate 118, 124, 250, 263 SAVE 206 Deleting from disk 212 FORMAT Floppy disk 214 hard disk 216 Hard disk control 213 Renaming files 211 SAVE (cont)
Page 301
APPENDIX 5 SCSI 213 Selecting floppy/hard disk 206 Selecting the hard disk partition 206 Selecting the type of save 206 Selection the hard disk volume 206 To floppy 208 To hard disk 209 To S1000/S1100 disks 217 SCSI 11, 213, 229, 291 SCSI CONNECTIONS 290 Cable length 292 Connecting hard disks 291 SCSI Cables 291 Termination 291 Setting up the S3000XL 13 SIMMs 296 SINGLE 25 Deleting rpograms 32 DISK 30, 31 Load from floppy 30 Load from hard disk 31 Loudness/Velocity 29 MIDI parameters 27 Old Akai SELECT PROG mode 25, 35 Keyboard splits 35 Layering programs 35 Multi-timbral setups 36 Program level/pan/FX send 26 Renumbering programs 34 Selecting programs 25 Single Vs Multi 37 Viewing programs 26 SMF Song play 243 SMPTE I/O 11 SOFT KEYS 6, 16 Stereo echo effects 189, 193 Synth panel 297
T TAKES See GLOBAL-HARD DISK RECORDING TIMECODE See SMPTE TIMESTRETCH See EDIT SAMPLE TRIMMING SAMPLES See EDIT SAMPLE TUNING Keygroups 95 Loop 152 Multi part 41 Program 73 S3000XL 232 Sample 151 Zones 95
V Velocity sensitivity 29, 69 VIBRATO See LFO1
Z ZONE See KEYGROUP Zoom In/Out 134, 136, 137, 154, 160, 260
Page 302
S3000XL Operator’s Manual - Version 1.00
SPECIFICATIONS SPECIFICATIONS Model Name
: MIDI Stereo Digital Sampler S3200XL
Sampling Data format
: 16-bit linear encording
Sampling rates
: 44.1 KHz 22.05 KHz
Sampling time (unexpanded memory)
: 3 minute 07 seconds - mono 6 minute 14 seconds - mono 1 minute 33 seconds - stereo 1 minute 07 seconds - stereo
Internal Memory
: 16 Mbyte standard, expandable to 32 Mbytes using 72 pin SIMMs.
Polyphony
: 32 Voices
Maximum number of Samples
: 255
(20 Hz~20 KHz audio band width) (20 Hz~10 KHz audio band width) Fs=44.1 KHz (187.24 sec) Fs=22.05 KHz (374.48 sec) Fs=44.1 KHz (93.62 sec) Fs=22.05 KHz (187.24 sec)
Maximum number of Programs : 254 Filter
: Digital dynamic low-pass filter (–12 dB/octave with resonant)
Envelope generators
: 3 x digital Envelope generators (1 multi-stage)
L.F.O
: 2 x Multi Wave Low Frequency Oscillators
Display
: Backlit 320 characters/240 x 64 graphic LCD
Diskette drive
: 3.5" dual density drive (2HD, 2DD)
Connectors REC IN STEREO OUT ASSIGNABLE OUTS HEADPHONES FOOTSWITCH MIDI
: 2 x XLR (balanced) 2 x 1/4-inch phone (balanced) : 2 x XLR (balanced) 5.0 dBm/600 Ω 2 x 1/4-inch phone (unbalanced) 5.0 dBm : 8 x 1/4-inch phone (unbalanced) 7.5 dBm : 1 x 1/4-inch stereo phone : 1 x 1/4-inch phone : 3 x DIN5P (IN, OUT, THRU)
SCSI Interface
: 1 x 25P D-sub
AES/EBU digital IN/OUT
: 2 x 1/4-inch phone (balanced) and Optical input/output
SMPTE time code IN/OUT
: 2 x 1/4-inch phone (balanced)
REC GAIN
: HI-56 dBm, MID-37 dBm, LO-15 dBm
Power Requirements
: 120 V AC 60 Hz 45 W for U.S.A and Canada 220~230 VAC 50 Hz for Europe 240 VAC 50 Hz for Australia
Dimensions
: 483W x 133H x 410
Weight
: 8.8 Kg
Accessories
: Ac power cable ...................................................... 1 Sound Library Disks ............................................... 2 SMF Sequence Disk .............................................. 1 Modular Editing System Disk (for Macintosh™) .... 1 Operator’s Manual ................................................. 1
Optional Accessories FMX 008 HS-D650
(*429) Dmm (EIA 2U size) (*) maximum
: 8 Mbyte flash memory board : 3.5-inch MO disk drive set for S3200XL
* Above specifications are subject to change without prior notice. S3200XL Operator’s Manual - Version 1.00
Page 303
S3200XL MIDI IMPLEMENTATION CHART S3200XL MIDI IMPLEMENTATION CHART Date : MAY. 1995 Function
....
Basic Channel
Default Changed
X X
O 1 O 1-16
Without disk Memorized (disk)
Default
X
Without disk Memorized (disk)
Messages Altered
************
Mode 3 Mode 1-4 OMNI ON/OFF, P/M X
True Voice
X ************
21-127 4-127
Note on Note off
X X
O 9n V=1-127 X 8n V=1-127
Key’s Ch’s
X X
X O
X
O
0-24 semitone steps (8-bit resolution)
X X X X X X
O O O O O O
Modulation wheel EWI Breath controller (*1) Foot switch controller (*1) Volume Sustain pedal Soft pedal
Program Change True No.
X ************
1-128
System Exclusive
O
O
System : Common :
Song position Song select Tune
X X X
X X X
System : Real time :
Clock Commands
X X
X X
Aux : Messages : : :
Local ON/OFF All Notes OFF Active Sense Reset
X X X X
X O (123) X X
Mode
Note Number
:
Velocity
Aftertouch Pitchbend
Control Change
1 2 4 7 64 67
Mode 1 : OMNI ON, POLY Mode 3 : OMNI OFF, POLY
Transmitted
Recognized
Remarks
Release Velocity
by Preset number Value AKAI ID : 47H S3200XL ID : 48H
Mode 2 : OMNI ON, MONO Mode 4 : OMNI OFF, MONO
O : Yes X : No
(*1) Use external Modulation.
Page 304
S3200XL Operator’s Manual - Version 1.00