Pauli Sievinen
Retrieval of Urban Morphology by Means of Remote Sensing
School of Electrical Engineering
Thesis submitted for examination for the degree of Master of Science in Technology. Espoo 16.6.2011
Thesis supervisor: Prof. Martti Hallikainen Thesis instructor: M.Sc. Jaan Praks
A!
Aalto University School of Electrical Engineering
aalto-yliopisto sähkötekniikan korkeakoulu
diplomityön tiivistelmä
Tekijä: Pauli Sievinen Työn nimi: Kaupunkialueen muotojen havainnointi kaukokartoitusinstrumentteja hyväksikäyttäen Päivämäärä: 16.6.2011
Kieli: Englanti
Sivumäärä:10+63
Radiotieteen ja -tekniikan laitos Professuuri: Avaruustekniikka
Koodi: S-92
Valvoja: Prof. Martti Hallikainen Ohjaaja: FM Jaan Praks Tämän työn tarkoituksena on luoda kaupunkialueesta morfologinen tietokanta. Kaupunkialueen morfologia sisältää tietoa kaupunkialueen ominaisuuksista. Tälläisiä ominaisuuksia ovat esimerkiksi ihmislähtöinen lämpö, rakennusten sijainti, muoto ja korkeus sekä liikennevirrat. Tälläista kaupunkialueen morfologista tietokantaa voidaan käyttää esimerkiksi kaupunkisuunnittelussa tai kaupunkialueen ilmakehämallinnuksessa. Kohdealueena on Ranskan pääkaupunki Pariisi. Tietokanta on jaettu kahteen tarkkuusalueeseen, joista korkeamman tarkkuuden alue, kooltaan 6x3 km2 , käsittää vain pienen osan eteläistä Pariisia, kun taas karkean tarkkuuden alueeseen, joka on kooltaan 13x10 km2 , kuuluu koko Pariisin kaupunki. Tietokannan lähteenä on käytetty kaukokartoitussatelliiteista saatua tietoa, esimerkiksi optisia ja synteettisen apertuurin tutkan (SAR) kuvia, mutta myös digitaalisia karttoja. Optisten kuvien ja digitaalisten karttojen lähteinä on käytetty Google Maps- ja Microsoft Virtual Earth-palveluja, kun taas tutkakuvia on hankittu Euroopan avaruusjärjestöltä (ESA). Lisäksi on käytetty Yhdysvaltain ilmailu- ja avaruushallinnon (NASA) julkisia tietokantoja. Tietokanta rakentuu useista kerroksista. Nämä kerrokset sisältävät tietoa kaupungin rakenteesta, esimerkiksi katujen ja teiden sijainnit, puistoalueet, rakennusten sijainnit ja niiden korkeudet, puuston sijainnin sekä maanpinnan digitaalisen korkeuskartan. Nämä tiedot on irroitettu lähteistään käyttäen hyväksi niin ohjattua luokittelua kuin interferometrisen koherenssin manipulointia. Tässä työssä luotua tietokantaa voidaan käyttä hyväksi esimerkiksi rajakerroksen mallinnukseen kaupunkialueella tai hiukkasten leviämismallien simuloinneissa.
Avainsanat: morfologia, kaukokartoitus, synteettisen apertuurin tutka, luokittelu, koherenssi, tietokanta, Pariisi, Euroopan avaruusjärjestö, Yhdysvaltain ilmailu- ja avaruushallinto
aalto university school of electrical engineering
abstract of the master’s thesis
Author: Pauli Sievinen Title: Retrieval of Urban Morphology by Means of Remote Sensing Date: 16.6.2011
Language: English
Number of pages:10+63
Department of Radio Science and Engineering Professorship: Space Technology
Code: S-92
Supervisor: Prof. Martti Hallikainen Instructor: M.Sc. Jaan Praks The purpose of this thesis is to create an urban morphological database. An urban morphological database contains information about features of the urban area. These features consist of e.g. anthropogenic heating, location, shape and height of built structures and traffic flow. Urban morphological database can be used e.g. in city planning or in atmospheric boundary layer modeling of urban areas. The target of this database is the capital of France, Paris. The database has two resolution levels and areas. The surface area for the high resolution area is 6x3 km2 covering only a small portion of Paris, and 13x10 km2 , respectively, for the coarser resolution covering the whole Paris. The database is created using optical images, digital maps and SAR interferometry i.e. it is solely based on remotely sensed data. The sources of optical images and digital maps are public Internet map services e.g. Google Maps and Microsoft Virtual Earth. Another public source for the morphological database is the National Aeronautics and Space Administration (NASA) Shuttle Radar Topography Mission (SRTM) database. A set of Synthetic Aperture Radar (SAR) images is obtained from the European Space Agency’s (ESA) Envisat satellite’s ASAR instrument database archives. The database consists of several layers. These layers hold information about streets and roads, parks and cemeteries, water bodies, buildings, trees, digital terrain elevation model as well as building height. The layer extraction and creation methods include supervised classification and interferometric coherence manipulation. The created database can be used e.g. in atmospheric boundary layer modeling in urban areas or in dispersion model simulations.
Keywords: Morphology, Optical Images, Synthetic Aperture Radar, Digital Elevation Model, Coherence, Database, Paris, European Space Agency, National Aeronautics and Space Administration
iv
Preface I would like to present my gratitude to supervising professor Martti Hallikainen for giving me the chance to work as a part of the research group. I also give my compliments to instructor Jaan Praks for giving me valuable advice and feedback. Also worth mentioning are professor Jarkko Koskinen, professor Jaakko Kukkonen and Dr. Antti Hellsten from the Finnish Meteorological Institute. They have given me advice during this process. I also give my thanks to the working community and to my closest colleagues from the research group. Thank you.
Helsinki, 30.5.2011
Pauli Sievinen
v
Contents Abstract (in Finnish)
ii
Abstract
iii
Preface
iv
Contents
vi
Symbols
vii
Acronyms
viii
List of Tables
ix
List of Figures
x
1 Introduction 1.1 The MEGAPOLI Project . . . . . . . . . . . 1.2 Urban Morphology in Atmospheric Modeling 1.3 Urban Morphological Databases . . . . . . . 1.4 Retrieval of Urban Morphology . . . . . . .
. . . .
1 1 1 2 3
. . . .
5 5 7 7 9
2 The 2.1 2.2 2.3 2.4
Database Design and Specifications Area of Interest and Spatial Resolution . Datum and Projection . . . . . . . . . . Data File Types . . . . . . . . . . . . . . Layer Structure . . . . . . . . . . . . . .
. . . .
. . . .
. . . .
. . . .
. . . .
. . . .
. . . .
. . . .
. . . .
. . . .
. . . .
. . . .
. . . .
. . . .
. . . .
. . . .
. . . .
. . . .
. . . .
. . . .
. . . .
. . . .
. . . .
. . . .
. . . .
. . . .
. . . .
. . . .
3 The Database Material and Methods 3.1 Derivation of Elevation Information from Synthetic Aperture Radar Measurement . . . . . . . . . . . . . . . . . . . . . . . . . . . . . . 3.1.1 Synthetic Aperture Radar Interferometry . . . . . . . . . . . 3.1.2 Interferometric Coherence in Urban Areas . . . . . . . . . . 3.1.3 Material: Used SAR Images . . . . . . . . . . . . . . . . . . 3.1.4 Coherence Derivation . . . . . . . . . . . . . . . . . . . . . . 3.1.5 Building Height Derivation . . . . . . . . . . . . . . . . . . . 3.1.6 Ground Elevation Derivation . . . . . . . . . . . . . . . . . . 3.2 Derivation of Buildings and Vegetation from Optical Satellite Measurements . . . . . . . . . . . . . . . . . . . . . . . . . 3.2.1 Optical Space Borne Instruments and Image Classification Methods . . . . . . . . . . . . . . . . . . . . . . . . . . . . . 3.2.2 Material: Optical Image and Digital Map . . . . . . . . . . . 3.2.3 Derivation of Building and Tree Shapes and Locations . . . 3.2.4 Street, Park and Water Derivation . . . . . . . . . . . . . . 3.3 Thermal Parameter Layer Derivation from Satellite Images . . . . .
13 . . . . . . .
13 13 14 15 16 17 17
. 18 . . . . .
18 23 24 26 27
vi 3.3.1 3.3.2 3.3.3 4 Results 4.1 The 4.2 The 4.3 The 4.4 The 4.5 The 4.6 The 4.7 The 4.8 The 4.9 The
Thermal Infrared Images . . . . . . . . . . . . . . . . . . . . . 27 Material: Thermal Infrared Images . . . . . . . . . . . . . . . 27 Heat Flux Derivation . . . . . . . . . . . . . . . . . . . . . . . 28
Water Layer . . . . . . . . . . . . . . Street Layer . . . . . . . . . . . . . . Park Layer . . . . . . . . . . . . . . . Trees Layer . . . . . . . . . . . . . . . Building Layer . . . . . . . . . . . . . Building Height Layer . . . . . . . . . Terrain Digital Elevation Model Layer Heat Flux Layer . . . . . . . . . . . . Coherence Layer . . . . . . . . . . . .
. . . . . . . . .
. . . . . . . . .
. . . . . . . . .
. . . . . . . . .
. . . . . . . . .
. . . . . . . . .
. . . . . . . . .
. . . . . . . . .
. . . . . . . . .
. . . . . . . . .
. . . . . . . . .
. . . . . . . . .
. . . . . . . . .
. . . . . . . . .
. . . . . . . . .
29 29 31 33 35 37 39 41 43 46
5 Conclusions
49
References
51
Appendix A: Building Height Calculations
56
Appendix B: Coherence Calculation
58
Appendix C: Heat Flux Calculation
59
vii
Symbols b B c ~ H h I J k l λ P~ P~k or Pk P~⊥ or P⊥ R r0 ~ R σ τ Θ T
Wien’s displacement constant (2.8977685 × 10⁻³ m·K) Pulse bandwidth [Hz] Speed of light (299 792 458 m/s) Height [m] Planck constant (6.626069 ∗ 10−34 J·s) Radiance Heat flux or irradiance Boltzmann constant (1.380654 ∗ 10−23 KJ ) Antenna length [m] Wavelength [m] Interferometric baseline [m] Parallel baseline [m] Perpendicular baseline [m] Spatial resolution Range distance Slant range [m] Stefan-Boltzmann constant (5.6704 ∗ 10−8 mW 2 K4 ) Pulse length [s] Look angle Temperature [K]
viii
Acronyms ASAR
Advanced Synthetic Aperture Radar (An instrument onboard Envisat Satellite) GIS Geographical Information System DEM Digital Elevation Model DTM Digital Terrain Model Envisat Environmental Satellite ESA European Space Agency InSAR Synthetic Aperture Radar Interferometry JPL Jet Propulsion Laboratory Lidar Light detection and ranging MEGAPOLI Title of project Megacities: Emissions, urban, regional and Global Atmospheric POLlution and climate effects, and Integrated tools for assessment and mitigation NASA National Aeronautics and Space Administration NUDAPT National Urban Database and Access Portal Tool NUTM31 Universal Transverse Mercator, Northern zone 31 RTI Repeat Track Interferometry SAR Synthetic Aperture Radar SRTM Shuttle Radar Topography Mission UTM Universal Transverse Mercator WGS84 World Geodetic System 1984
ix
List of Tables 1 2 3 4 5 6 7 8 9 10 11 12 13
14
Coordinate information for areas of interest. . . . . . . . . . . . . . . GeoTiff world file example. . . . . . . . . . . . . . . . . . . . . . . . . ER Mapper vector header file compulsory block and entry explanations. ER Mapper vector file polygon element explanation. . . . . . . . . . . Layer definitions. . . . . . . . . . . . . . . . . . . . . . . . . . . . . . Raster layer names for coarse resolution area. . . . . . . . . . . . . . Raster layer names for high resolution area. . . . . . . . . . . . . . . Vector layer names for coarse resolution area. . . . . . . . . . . . . . Vector layer names for high resolution area. . . . . . . . . . . . . . . Used data products: SAR images. Date is the image acquisition date. Used data products: Digital map and optical image. . . . . . . . . . . Used data products: TIR images. . . . . . . . . . . . . . . . . . . . . Unfiltered coherence image Check Point Total Error and minimum and maximum RMS errors for single check points in Ground Control Point rectification. Calculated with Imagine 9.3 GCP Tool. . . . . . . Filtered coherence image Check Point Error and minimum and maximum RMS error for single check points in Ground Control Point rectification. Calculated with Imagine 9.3 GCP Tool. . . . . . . . . .
6 7 8 8 10 11 12 12 12 16 25 28
47
48
x
List of Figures 1 2 3 4 5 6 7 8 9 10 11 12 13 14 15 16 17 18 19 20 21 22 23 24 25 26 27 28 29 30 31 32 33
Optical image of the test site, Paris, France. . . . . . . . . . . . . . . Optical image of the detailed test site, Place d’Itale, Paris, France. . . The geometry of SAR interferometry. . . . . . . . . . . . . . . . . . . A block diagram of coherence process. . . . . . . . . . . . . . . . . . Block diagram of SAR interferometry computing. . . . . . . . . . . . Basic steps in supervised classification. . . . . . . . . . . . . . . . . . An example of training statistics collection from an optical image. . . Illustration of the minimum distance to means classification. . . . . . Illustration of the parallelepiped classification. . . . . . . . . . . . . . Illustration of the parallelepiped classification with stepped decision region boundaries. . . . . . . . . . . . . . . . . . . . . . . . . . . . . Illustration of the gaussian maximum likelihood classifications equiprobability contours. . . . . . . . . . . . . . . . . . . . . . . . . . . . . . . Block diagram of supervised classification. . . . . . . . . . . . . . . . Presentation on of street map process. . . . . . . . . . . . . . . . . . Water layer for the high resolution area . . . . . . . . . . . . . . . . . Water layer for the coarse resolution area . . . . . . . . . . . . . . . . Street layer for the high resolution area. . . . . . . . . . . . . . . . . Street layer for the coarse resolution area. . . . . . . . . . . . . . . . Park layer for the high resolution area. . . . . . . . . . . . . . . . . . Park layer for the coarse resolution area. . . . . . . . . . . . . . . . . The trees layer for the high resolution area. . . . . . . . . . . . . . . . The trees layer for the coarse resolution area. . . . . . . . . . . . . . . The building layer for the high resolution area. . . . . . . . . . . . . . The building layer for the coarse resolution area. . . . . . . . . . . . . The building height layer for the high resolution area. . . . . . . . . . The building height layer for the coarse resolution area. . . . . . . . . The terrain DEM layer for the high resolution area. . . . . . . . . . . The terrain DEM layer for the coarse resolution area. . . . . . . . . . The heat flux for the high resolution area on May 18, 2005. . . . . . . The heat flux for the high resolution area on Sept. 23, 2005. . . . . . The heat flux for the coarse resolution area on May 18, 2005. . . . . . The heat flux for the coarse resolution area on Sept. 23, 2005. . . . . The coherence layer for the high resolution area. . . . . . . . . . . . . The coherence layer for the coarse resolution area. . . . . . . . . . . .
5 6 14 16 18 19 20 21 22 23 24 25 26 29 30 31 32 33 34 35 36 37 38 39 40 41 42 43 44 44 45 46 47
1 1.1
Introduction The MEGAPOLI Project
This work is done under the project “Megacities: Emissions, urban, regional and Global Atmospheric POLlution and climate effects, and Integrated tools for assessment and mitigation - MEGAPOLI” and it is funded under European Union Seventh Framework Programme. This project has 23 participants from all over Europe. These participants include national meteorological institutes, universities and research institutes. The project is coordinated by Danish Meteorological Institute from Denmark and the co-coordinators are Foundation for Research and Technology, Hellas, University of Patras from Greece and Max Planck Institute for Chemistry from Germany. The aim of the MEGAPOLI project is to link spatial and temporal scales that connect local weather conditions, including emissions and air quality, with global atmospheric chemistry and climate. The emphasis in the project is in modelling. The three main objectives for the project are the following: Objective 1 is to asses impacts of megacities and large air-pollution “hot-spots” on local, regional, and global air quality and climate. Objective 2 is to quantify feedback between megacity emissions, air quality, local and regional climate, and global climate change. Objective 3 is to develop and implement improved, integrated tools to assess the impacts of air pollution from megacities on regional and global air quality and climate, and to evaluate the effectiveness of mitigation option. To achieve these objectives the project is divided into nine work packages. One of these work packages focuses on urban features and the processes in the boundary layer. One aim of this work package is to develop either morphological databases or land use classifications for megacities. Another aim of this work package is to develop sub-grid parameterizations of urban layer processes for models of different scale. The objective for this thesis project, concerning the urban morphological database, is to create it at low cost and to explore different possibilities how to find the information from free sources.
1.2
Urban Morphology in Atmospheric Modeling
Megacities are localized, heterogeneous and variable sources of the anthropogenic impact on air quality and on climate. A major difficulty in evaluating the atmospheric dispersion and climate forcings due to megacities arises from the parametrization of the urban and local scale features. They are typically unresolved in climate models and barely resolved in regional scale dispersion models. [1] The transport of momentum, heat and pollutants over urban areas takes place within a layer known as the atmospheric boundary layer (ABL), also known as the mixed layer. The mixing properties of the ABL depend strongly on the ground air
2 interactions, and thus on the surface morphology. Computational Fluid Dynamics (CFD) models of various degrees of description of involved physical processes are used in studies of the ABL processes over urban areas. [1] In large-scale models the surface morphology is typically modeled by means of simple scalar measures of surface roughness such as the roughness length. This is a highly simplified approach and cannot provide new insight into the details of the ground-air interactions processes taking place in the lowest part of urban ABL, the roughness layer. To understand these processes and to assess and further develop better simplified models for them [2], so called obstacle resolving numerical simulations are needed. This means that a morphology model of the urban area is needed. [1]
1.3
Urban Morphological Databases
Urban morphology studies structures and shapes of urban environment and can be used to describe those complex conditions inside urban area that affect particle dispersion and micro-meteorology. One description of urban morphological information is given by Cionco and Ellefsen [3] and another by Grimmond and Souch [4]. Urban morphological information consists of various structure descriptors, e.g. road information, building location and height information, information about water bodies, etc. There are morphological models for various purposes, e.g. ABL modeling or city planing. One of the most relevant morphological database, used e.g. in city planning, is the French system called BDTopo produced by the French National Geographic Institute (IGN). Another relevant morphological database, used e.g. in ABL modeling, is the US National Urban Database and Access Portal Tool (NUDAPT). BDTopo is a part of a bigger database created by the IGN and it is mainly used in environment studies, city planning and transport development and agriculture studies. As this database is directed toward commercial use it is not widely used in scientific studies. The database covers mainland France and its overseas domains. BDTopo is a vector geographic database with a resolution of 1 m [5]. It was created with analytical stereophotogrammetric restitution and field collection [6]. The projections in witch the database comes are Lambert-93, Lambert II extended and Lambert zones for the mainland France and for the overseas areas it comes with Universal Transverse Mercator (UTM) and local projections. The BDTopo database includes buildings, vegetation, road and hydrographic networks, topography etc [7]. The BDTopo supports several output formats. These output formats consist of 3D/2D shapefiles, MIF/MID and Geoconcept export formats. There also exists software that allow extraction of features and transformation from vector format to raster format of the BDTopo database product [7]. Another well known morphological database is US NUDAPT. It is a data resource used in advanced urban meteorological, air quality and climate modeling systems. The NUDAPT is initiated by the United States Environmental Protection Agency (U.S. EPA) and is supported by several US agencies and both private and academic institutions. [8]
3 NUDAPT consists of a three-dimensional building database, digital elevation model (DEM), digital terrain model (DTM), a micro meteorological database, gridded urban canopy parameters (UCP), population, anthropogenic heating and land use/land cover database. [8] For the NUDAPT data a lidar (Light Detection And Ranging) was installed onboard of an aircraft and was flown over major urban areas in the U.S. to collect high resolution building data, DEM and DTM. The high resolution building data include size, shape, orientation and location relative to other buildings and to other urban morphological features such as trees and highway overpasses. The advantage of lidar is good coverage with few flyovers and the downside of lidar is the price and the amount of data it creates. [8] In NUDAPT the anthropogenic heating is given in representative summer and winter days. The anthropogenic heating in urban areas is concentrated but not evenly distributed. In the urban area there are areas that produce significant amounts of anthropogenic heating. These areas vary spatially and temporally. [8] The NUDAPT also has a database for day time and night time population. The population database was created using business directories and U.S. governmental data. This data was modified so that population is concentrated closer to roads instead of being scattered like it actually is. Although the database does not contain shopping, tourist, school event and traffic population it is a powerful set of information for assessment studies to hazardous material exposures. [8] NUDAPT also includes a set of tools to ease the researchers’ needs for geographical information systems. These tools allow easy data exploration and provide the possibility to clip, reproject, resample, reformat and compress subsets of the data. These tools have modern capabilities such as selecting a subdomain using either coordinates or bounding box. The reprojection tool permits the change between different coordinate types such as Universal Transverse Mercator (UTM), latitudelongitude and Albers equal area to mention a few. The resampling tool allows to use nearest-neighbor bilinear interpolation and cubic convolution methods. The NUDAPT provides several output formats such as Network Common Data Form (NetCDF), Imagine image and GeoTiff. [8]
1.4
Retrieval of Urban Morphology
There are two major ways to retrieve urban morphological data: one is using in situ measurements and the other is to use remote sensing data. Both approaches have advantages and disadvantages which are discussed below. In situ measurements are accurate and methodically easy to do if the area of interest is small. On the other hand in situ measurements are time consuming and require a vast number of people. There is also the question of the cost of workforce. Also creating of desired products from manually collected data is time consuming. Remote sensing data has the advantage of covering large areas in a very short time. When using multi sensor data, e.g. optical and radar instruments, researcher can receive the same information as with in situ measurements and in some cases even collects data that cannot be obtained with ease using in situ measurements.
4 Existing remote sensing data is easy to obtain, it does not take long to receive it and it can be updated with minimum effort. The possible downside of the remote sensing data is that it does take some time to derive desired products and it may sometimes be behind somewhat complex procedures. The costs of remote sensing products are also rather small compared to the costs of in situ campaigns. With the in situ measurements the data accuracy and results are high quality when conducted properly. With remote sensing the accuracy of the data is lower when compared to in situ measurements. A reason for this difference is that the data acquired with remote sensing is taken from a distance and the measurement is often indirect. The optimal option to retrieve accurate and detailed morphological data is to use the combination of in situ measurements and remote sensing data and receive benefits from both methods, e.g. large area coverage with excellent data accuracy. However, this method is rather expensive at the moment. Therefore, the best method to produce a morphological database at low cost is to use only remote sensing data. In this work we try to create a morphological database with minimal resources. Our goal is to produce urban morphological information database that is usable for fine scale ABL modeling. Our database is mostly based on public sources of remote sensing data and some additional satellite images. The organization of this work is the following. In Chapter 2 the areas of interest, coordinate system, layer structure and file types are defined. In Chapter 3 the material and methods used in the creation of the database are examined. In Chapter 4 the created database is presented with possible error sources. The conclusions are in Chapter 5. Appendixes A to C contain the Matlab programs used in the creation of layers.
5
2 2.1
The Database Design and Specifications Area of Interest and Spatial Resolution
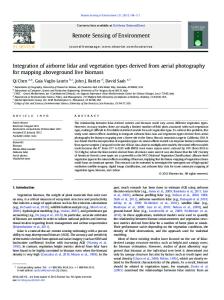
The selected test site for MEGAPOLI task 2.1 was Paris, France and it was defined by the project. The FMI requested two different resolution levels for the database in two areas. The resolution level for the coarse resolution area raster maps was selected to be 10 m and the resolution level for the high resolution area raster maps was selected to be 1 m, respectively. Figure 1 shows the coarse resolution area of interest, which includes the whole Paris inside the beltway and its surroundings and covers an area of 13x10 km2 . This area was selected as the database area. Information of the bounding coordinates for this database area is in Table 1, under Paris section.
Figure 1: Optical image of the test site, Paris, France. This is an overview of the area of interest, approximately 13x10 km2 . The Louvre is in the middle of the image. The River Seine flows gracefully through the image. The datum is WGS84 and the projection is NUTM31 in the image and the top left corner coordinate is in easting and northing (444898.24, 5416698.99). The source of the image is Microsoft Virtual Earth. For detailed dispersion modeling a domain in southern Paris was defined by the project, it can be seen in Figure 2. The reason for this selection were dispersion
6 tests done in the vicinity. The area selected as the high resolution area for the database, is approximately 6 km wide and 3 km long and in the center of this area is Place d’Itale. The coordinates for this database area are in Table 1, under the Place d’Itale section.
Figure 2: Optical image of the detailed test site, Place d’Itale, Paris, France. Place d’Itale is in the center of the image, the River Seine is on right and Mont Parnasse is in the top left corner of the image. The size of the area is approximately 6x3 km2 The datum is WGS84 and the projection is NUTM31 in the image and the top left corner coordinate is (449742.52, 5410633.54) in eastings and northings. The source of the image is Microsoft Virtual Earth.
Table 1: Coordinate information for the areas of interest and for the database. For the Paris area the raster database resolution is 10 m and for the Place d’Itale area the raster database resolution is 1 m. Corner Top left Bottom right
Paris Eastings Northings Lat (deg:min:s) 444898.24 5416698.99 48:54:02N 458248.24 5406338.99 48:48:31N
Lon (deg:min:s) 2:14:53E 2:25:52E
Corner Top left Bottom right
Place d’Itale Eastings Northings Lat (deg:min:s) 449742.52 5410633.54 48:50:47N 455792.52 5407369.54 48:49:03E
Lon (deg:min:s) 2:18:53N 2:23:52E
7
2.2
Datum and Projection
The Coordinate system for the database images was selected to be Universal Transverse Mercator (UTM), northern hemisphere zone 31 (NUTM31), because of its wide spread use and because it is a conformal projection. The datum for the database is World Geodetic System 1984 (WGS84).
2.3
Data File Types
The Finnish Meteorological Institute’s (FMI) atmosphere modeling team, which has the lead for the task at hand, requested two formats, raster file format and vector file format for the database. For the raster file type a GeoTiff format was selected because it is highly compatible with different programs and it is widely spread. The GeoTiff raster file format [9] was created in 1997 at NASA Jet Propulsion Laboratory (JPL). GeoTiff is a extension to tiff-file format. It consists of two files, the tiff file and the geocoding file also known as the world file. They have the same name, but a different extension. The image itself has a tiff-extension and the world file has a tfw-extension. An example of GeoTiff world file content is in Table 2. Table 2: GeoTiff world file (*.tfw) content. This is an example of the world file. Row Content 1. 1.000000 2. 3. 4. 5. 6.
Explanation Pixel spacing in x-direction (east-west direction) 0.0 Rotation component 0.0 Rotation component -1.000000 Pixel spacing in y-direction (north-south direction) 449742.52830644895 Top left latitude coordinate 5410633.5481587145 Top left longitude coordinate
For the vector file type an ER Mapper vector file system was selected. The ER Mapper vector file system is a simple vector format and therefore easily transferable to different programs. The ER Mapper vector file system consists of two files: the header file, with erv-extension, and the vector data file, with no extension. The header file consists of compulsory blocks and entries seen in Table 3. Those blocks and entries, that are used or required for the clarity of the system, are explained below. These blocks are CoordinateSpace and VectorInfo. The CoordinateSpace block contains detailed information on the coordinate system e.g. datum, projection, coordinate type and rotation. The VectorInfo block contains detailed information of the image; it also has a sub block called Extends, which describes the top left and bottom right coordinates of the image. The header file compulsory entries define the version of data creation software, byte order of the data, data type e.g. vector and data set type which only has one allowed value e.g. ERStorage.
8 Table 3: ER Mapper vector header file compulsory block and entry explanations. Name Version DataSetType DataType ByteOrder CoordinateSpace Datum Projection CoordinateType VectorInfo Type FileFormat Extends
Type Entry Entry Entry Entry Block Entry Entry Entry Block Entry Entry (Sub) Block
Explanation Defines the version The type of dataset (ERStorage) The type of the dataset (Raster or Vector) Defines order of bytes (MSBFirst or LSBFirst) Dataset projection definitions The datum for map projection The dataset map projection Definition of coordinate expression Dataset format definitions Type of the data in the dataset (ERVEC or ERS) Either ASCII or BINARY Consists of delimiting coordinate information
Below is an syntax for ER Mapper vector file polygon element. The elements are explained in Table 4 and there is also an example of one polygon element. polygon(attribute,N,[x1 ,y1 ,...,xN ,yN ],fill,width,pen,curved,r,g,b,page) Table 4: ER Mapper vector file polygon element explanation. Name attribute N x y fill width pen curved r, g, b
Type alphanumeric character integer real real integer real integer boolean integer
page
boolean
Comment Text that is associated with object, optional. Number of points. X coordinate. Y coordinate. Specifies fill type (0 = no fill). The thickness of line in points. Specifies pen pattern. Straight (0) or curved lines (1). 0 – 255 color component. -1, -1, -1 indicates that layer color is default. 0 indicates object coordinates are in image coordinates. 1 indicates object coordinates are relative to the page dimensions.
polygon(,14,[449961.123,5410623.953,...,449961.123,5410624.953],0,1,0,0,-1,-1,-1,0)
9 In the example above, which is taken from a produced vector layer, there is no attribute and therefore it has no value, N is 14 and there should be 14 coordinate pairs inside brackets, fill is zero (no fill), width is one, pen is zero, curved is zero meaning straight lines, r,g,b has a value of -1,-1,-1 meaning default layer color, page is zero meaning that coordinates are not relative to page dimensions. For more detailed information on ER Mapper vector format we refer to the ER Mapper manual.
2.4
Layer Structure
The information in the database is divided into different layers. These layers are raster or vector images containing information about a single feature. The initial database consists of the street layer, the water layer, the park layer, the trees layer, the building layer, the building height layer, the terrain Digital Elevation Model (DEM) layer, the coherence layer and the heat flux layer. If needed in the future, additional layers can be introduced with two different resolutions for areas defined in Section 2.1. These layers are produced and their definitions are presented in Table 5 and the naming scheme is presented in Tables 6 - 9. The street layer contains information about streets and roads. Railroads that are on the surface are also included in this layer as well as pathways in the parks and cemeteries with the assumption that they are noted in the digital map. It should be noted that the bridges over the water element are also present. The layer is presented in raster and vector format. The raster image of this layer contains a binary parameter, separating streets from other areas. The water layer contains information about bigger water masses; the River Seine, lakes, ponds and even some fountains found in the area. The layer is presented in raster and vector format. The raster image of this layer contains a binary parameter, separating water from ground. The park layer contains information about large continuous areas with a significant amount of vegetation which consists of trees, bushes, grass etc. One prominent feature for the layer is that there is an insignificant amount of buildings. Cemeteries are also included in this layer due to the park like nature of these areas. The layer is presented in raster and vector format. The raster image of this layer contains a binary parameter, separating parks from other areas. The trees layer contains information about trees present in the area. This consists of single and small groups of trees in the boulevards, yards, parks and cemeteries. The layer is presented in raster and vector format. The raster image of this layer contains a binary parameter, separating trees from treeless areas. The building layer contains information about buildings. However, this layer does not include those buildings or groups of buildings that are inside parks and cemeteries. It also includes partly those areas where railroads are above ground and thus providing a built structure. The layer is presented in raster and vector format. The raster image of this layer contains a binary parameter, separating buildings from other areas.
10 Table 5: Layer definitions. Layer column gives the name of the layer, Type column reveals the image type, Format column tells the format of the image, Unit column shows the unit of the layer if appropriate and Comments column has the definition of the layer and value range. Layer Street
Parameter value Format binary integer
Unit
Water
binary
integer
Park
binary
integer
Trees
binary
integer
Building
binary
integer
Building height
Grayscale
integer
m
Terrain DEM
Grayscale
float
m
Coherence
Grayscale
float
Heat Flux
Grayscale
float
Wm−2
Comments Includes the streets, roads and railroads in the area that are on the ground. Allowed values are zero and one. Zero means no road. Shows the larger water bodies in the area. Allowed values are zero and one. Zero means no water. Shows the parks in the area. Cemeteries are included. Allowed values are zero and one. Zero means no parks. Shows all trees in the area, including those in the parks. Allowed values are zero and one. Zero means no trees. Buildings located in the area. Excludes those inside the parks. Allowed values are zero and one. Zero means no buildings. Shows the height of the buildings relative to the ground defined by DEM layer. All values are zero or above. Shows the elevation of the ground, relative to the sea level. Values are zero and above. Shows the temporal stability of the area. Allowed values range from zero to one. Zero means low stability and one means high stability. Shows the heat flux at the moment the image was taken. All values are above zero.
11 The building height layer contains information about building height. Essentially it is the same layer as the building layer but it also has the height element included. The layer contains building height in meters and is presented as a grayscale image. The terrain DEM layer contains information about the ground elevation. Values in the image are greater than zero. The layer contains ground elevation in meters and is presented as a grayscale image. The coherence layer is the Synthetic Aperture Radar Interferometry (InSAR) coherence image. In the image all values are between zero and one. The layer contains coherence values and is presented as a grayscale image. The heat flux layer gives an estimate of the heat flux radiation in the area at the moment the image was taken. The layer contains heat flux in Wm−2 and is presented as a grayscale image. Table 6: File naming scheme for produced raster layers of the coarse resolution area. Layer Street Water Park Tree Building Building height Terrain DEM Coherence Heat flux Heat flux
GeoTiff World file paris_streets.tif paris_streets.tfw paris_water.tif paris_water.tfw paris_park.tif paris_park.tfw paris_trees.tif paris_trees.tfw paris_buildings.tif paris_buildings.tfw paris_building_height073.tif paris_building_height073.tfw paris_DEM.tif par_DEM.tfw paris_coh.tif paris_coh.tfw paris_heatFlux_200505181057.tif paris_heatFlux_200505181057.tfw paris_heatFlux_200509231057.tif paris_heatFlux_200509231057.tfw
12
Table 7: File naming scheme for produced raster layers of the high resolution area. Layer Street Water Park Tree Building Building height Terrain DEM Coherence Heat flux Heat flux
GeoTiff World file test_streets.tif test_streets.tfw test_water.tif test_water.tfw test_park.tif test_park.tfw test_puut.tif test_puut.tfw test_buildings.tif test_buildings.tfw test_building_height100.tif test_building_height100.tfw test_DEM.tfw test_DEM.tfw test_coh.tif test_coh.tfw test_heatFlux_200505181057.tif test_heatFlux_200505181057.tfw test_heatFlux_200509231057.tif test_heatFlux_200509231057.tfw
Table 8: File naming scheme for produced vector layers of the coarse resolution area. Layer Header Street paris_streets_vec.erv Water paris_water_vec.erv Park paris_park_vec.erv Trees paris_trees_vec.erv Building paris_buildings_vec.erv
Vector paris_streets_vec paris_water_vec paris_park_vec paris_trees_vec paris_buildings_vec
Table 9: File naming scheme for produced vector layers of the high resolution area. Layer Header Vector Street test_streets_vec.erv test_streets_vec Water test_water_vec.erv test_water_vec Park test_park_vec.erv test_park_vec Trees test_trees_vec.erv test_trees_vec Building test_buildings_vec.erv test_buildings_vec
13
3 3.1 3.1.1
The Database Material and Methods Derivation of Elevation Information from Synthetic Aperture Radar Measurement Synthetic Aperture Radar Interferometry
Synthetic aperture radar (SAR) is an active remote sensing instrument which operates at microwave frequencies. It does not need any outside illumination of the target and therefore it can make measurements in daylight and at night. [10]. SAR systems can be mounted on different platforms e.g. airplanes and spacecraft (satellite or shuttle). SAR systems are used for e.g. polar ice research [11]-[13], vegetation and biomass monitoring [14]-[16] and land use [17]-[19], etc. The first space borne SAR system was the National Aeronautics and Space Administration (NASA) SEASAT satellite in 1978 [20]. SEASAT demonstrated that a SAR system can reliably map Earth’s surface. SEASAT was followed by several satellites and space borne platforms e.g. ERS-1 & 2 [21, 22], JERS [23], ENVISAT [24], NASA Shuttle Radar Topography Mission (SRTM) [25] and TerraSAR-X [26]. With Synthetic Aperture Radar it is possible to measure elevation of landscape and even minute height variations in the landscape. The method used in measuring the variations in the landscape elevation and the landscape elevation is called Synthetic Aperture Radar Interferometry (InSAR). In the following paragraphs the basic consepts of InSAR imaging and the imaging geometry are presented. In InSAR two SAR images, acquired from slightly different positions, are used. The images used are taken either with one or two antennas. If one antenna is used it is usually called as Repeat Track Interferometry (RTI) or repeat pass interferometry. In the case of two antennas it is called single pass interferometry. As an example of these two different methods are Envisat ASAR for RTI and NASA’s SRTM for single pass interferometry. RTI is commonly used in space borne instruments due to reduced costs; an exception to this was NASA’s SRTM. In RTI the instrument moves over the target twice at separate times. This time interval is dependent of the satellite orbit; for Envisat ASAR the interval is around 35 days. With SAR the emitted signal is known and when it reflects back from the target the difference between sent and received signal is measured. For InSAR, in the case of single pass interferometry, one of the two antennas is only receiving the emitted signal while the other is sending and receiving the signal. Because there is a known distance between the antennas, a baseline, a phase difference is measured between the signals received by the two antennas. This measured phase difference needs to be unwrapped because it is discrete. In unwrapping the discrete phase difference field is made continuous using different methods, e.g. branch cut [27] or least square method [28]. [29, 30] The geometry of SAR interferometry is presented in Figure 3. The shown geometry is the same with single pass interferometry and RTI. In InSAR an important variable is the baseline P~ , it is the distance between the two antennas. Other vari-
14 ~ the distance between antenna and scene center, look angle ables are slant range R, ~ Sometimes “a Θ, the angle between nadir and slant range, and satellite height H. temporal baseline” is mentioned and it is used in conjunction with RTI.
~ is the Figure 3: The geometry of SAR interferometry. Θ is the look angle, H ~ ~ height of satellite, R is the slant range, P⊥ is the perpendicular baseline, P~ is the baseline and P~k is the parallel baseline. The image was taken and modified from the interferometry guide of the Erdas Imagine 9.3. program. Coherence, or magnitude of the correlation, is the relationship between scattered fields at the interferometric receivers after image formation [10, pp. 349] and it is an essential part of InSAR. Coherence is denoted as γ and its mathematical expression is hE1 E2∗ i γ=p (1) h| E1 |2 ih| E2 |2 i where E1 and E2 are correlating signals and h...i denotes averaging. If | γ |= 1 the signals are fully coherent and if | γ |= 0 the signals are incoherent. 3.1.2
Interferometric Coherence in Urban Areas
In urban areas coherence is influenced by many factors, e.g. building height variance and temporal delay between the images. According to Franceschetti et al. [31] the relationship between the baseline and coherence is particularly affected by the vertical distribution of scatterers. This feature should allow the measurement of urban topography with coherence data. The use of coherence to extract building
15 height has been studied by Fanelli et al. [32], Gamba et al. [33] and Luckman and Grey [34]. Estimation of building height is based on a model which uses the interaction between the surface coherence (γsurface ) and the vertical distribution of scatterers. Luckman and Grey [34] have created a model to estimate coherence E(γ) as r √ 1 π exp (−(0.96 N + 0.91)γtotal ) (2) E(γ) ≈ γtotal + 2 N where γtotal is the calculated coherence value from SAR images and N is the filter size. The size of the filter can vary from 2x2 to 11x11 or even bigger and it can vary in shape e.g. 1x5 or 3x15. The total coherence (γtotal ), which is used in the model, is modeled as a product of slant range coherence (γslantrange ), surface coherence (γsurface ) and system and temporal based coherence (γother ). γtotal = γslantrange γsurface γother
(3)
The slant range coherence (γslantrange ), which Luckman and Grey use is described by Zebker et al. [35] and Franceschetti et al. [31], and is γslantrange = 1 −
2Rs P⊥ λr0 |tan (Θ − α)|
(4)
where Rs is the range resolution, P⊥ is the perpendicular baseline, λ is the wavelength, r0 is the range distance, Θ is the look angle and α is the slope in range direction. If we assume that the area is relatively flat we can also assume that α becomes insignificant and thus can be ignored. The surface coherence (γsurface ), used in the model, is described by Franceschetti et al [31], is " � �2 # 1 4πhσ sin (Θ)P⊥ (5) γsurface = exp − 2 λr0 where hσ is the height variance. With this kind of surface coherence model the variance in the building height is assumed to be gaussian distributed. 3.1.3
Material: Used SAR Images
In this work SAR images from the Envisat ASAR instrument and NASA SRTM are used. From the ESA’s Envisat ASAR instrument data archives twelve images were bought and downloaded. The instrument acquired these twelve images between December 2006 and May 2010. NASA’s SRTM was conducted in February 2000 with two different frequency bands, in C band at 5.3 GHz and in X band at 9.6 GHz. The C band has a spatial resolution of 89 m and the X band has a spatial resolution of 30 m. The used SAR images with baseline, spatial resolution and acquisition date information are presented in Table 10.
16 Table 10: Used data products: SAR images. Date is the image acquisition date. Product ASAR
SRTM
3.1.4
Date Mar 15th 2008 Dec 16th 2006 Jan 20th 2007 Feb 24th 2007 Mar 31st 2007 Jul 14th 2007 Aug 18th 2007 Mar 16th 2008 May 24th 2008 Jun 28th 2008 Sept 6th 2008 Nov 15th 2008 May 29th 2010 Feb 2000
Coherence Derivation
Creation of the coherence layer is straightforward. The process of creating the coherence image from two SAR images is shown as a block diagram in Figure 4 [36]. The chain is similar with every processing software with a slight variation in terminology. In image registration the image pair is focused. In subset selection
Figure 4: A block diagram of coherence process. [36] a coarse subset is selected for further computing. This is done in order to reduce computing time. This is a very coarse selection because geocoding of images has not been done. In the following sections, raw coherence computing, regional filtering and pixel spacing and rectification, the coherence image is processed automatically using predetermined values by the program. After this the final image is selected and raster and vector layers are produced. The coherence layer was produced with a trial version of ERDAS Imagine 9.3. software.
17 3.1.5
Building Height Derivation
The building height was derived from coherence images, produced with Next ESA SAR Toolbox (NEST) software, and using Matlab to implement the model created by Luckman and Grey [34] which is described in Section 3.1.1. The implementation of the model was done by the writer of this thesis. The model of Luckman and Grey [34] describes interferometric coherence as a product of three components, γslantrange , γsurface and γother . To derive building height from the SAR data the coherences were calculated from interferometric pairs and geocoded to NUTM31, resampled to the database coarse level. Resulting images were stacked in an ascending order relative to baseline. This stack of coherence images is then given to the model, described in Section 3.1.1, as input. Other inputs for the model are baseline (P⊥ ), range resolution (Rs ), filter size (N ), wavelength (λ), range distance (r0 ) and look angle (Θ). For the selected stack of coherence images the values of the parameters were the following; P⊥ varies from 7.6 m to 143.9 m, Rs is 9 m, N is 125, λ is 0.056 m, r0 is 844.7 km and Θ is 19.3◦ . There was no prior information about the values of system and temporal based coherence (γother ) and height variance (hσ ). When fitting the measured coherence values to the model, γother and hσ are considered as floating parameters. These inputs and variables formulate the γslantrange (4) and γsurface (5). To improve the quality of the model output a threshold value was calculated for the coherence stack. A weighted average of the stack was used to determine whether the pixel belongs to urban area or not, a value of 0.32 was selected after visual comparison of several images with different weighted average value. After the fit, the two unknown parameters, γother and hσ , received values optimal for the model. The height variance (hσ ) is considered as the estimate of the area height. The Matlab code of the fitting is in Appendix A. Finally, the area height map is masked with the building layer map so that the result prevails building height. 3.1.6
Ground Elevation Derivation
Ground elevation is derived using SAR interferometry processing. In this work the SAR interferometry processing was not used as there is an existing and well known DEM, the NASA’s SRTM DEM. In the following the InSAR process, in Figure 5, is reviewed to demonstrate the complexity and work behind the process. In the following paragraphs it is shown how it would be done using Envisat ASAR images and a trial version of the commercial ERDAS Imagine 9.3 software. This also describes the idea of the method used in the creation of the SRTM DEM that is used in this work as a DEM source as it needs a very small amount of post processing e.g. resampling and reprojecting. The InSAR process begins with coregistration. In this step the image pair is matched together using correlation and interferogram samples. In some cases the coregistration was done automatically by the program; in other cases this process was made semi-manually, because sometimes the image pairs are too noisy for the program and it cannot find suitable registration points. In semi-manual coregistration, the registration points were found visually and then a set of correlation and
18 interferogram samples were calculated to evaluate success.
Figure 5: Block diagram of SAR interferometry computing. [36] In the subset selection step, a rough area selection is made. The subset selection is made in order to speed up the process at later stages. It is a coarse limitation to the area of interest and it also prevents undesired effects from surrounding areas. The reference DEM step is an optional step, in which a SRTM DEM can be used as a reference to give to the resulting interferogram an explicit height value instead of a relative height value. In the interference step the interferogram is calculated. This calculation is made using phase information of the images. In the unwrapping the discrete wrapped image is unwrapped to be a continuous image. The height step calculates either a relative height value or an exact height value. The relative height value is received if a reference DEM is not used. The exact height value is received if a reference DEM is used. The image is also georectified to the selected datum (WGS84) and projection (NUTM31). In the final subset selection subsets are cut out from the image to receive either the whole Paris or just the Place d’Itale area. In this step these subsections are also checked in case of georectification errors. If an error is found the image is manually georectified using a reference image and ground control points (GCP).
3.2 3.2.1
Derivation of Buildings and Vegetation from Optical Satellite Measurements Optical Space Borne Instruments and Image Classification Methods
Optical space borne instruments have been used since the 1970’s. There are several instruments available for scientific and commercial use. These instruments and platforms are used in different fields of science and they include Landsat series (newest of the series is Landsat-7) [37], GeoEye-1 and 2, QuickBird, SPOT-5 and Ikonos [38]. In the following pages different classification methods are shortly examined as they are presented by Lillesdand et al. [37]. The objective of image classification is to assign every pixel of the image to different classes. These classes can be predetermined or they can be created during the classification process. Classification types/activities can be categorized into
19 three families; spectral pattern recognition, spatial pattern recognition and temporal pattern recognition. [37] In the spectral pattern recognition the pixel is categorized by the its individual spectral value. In the spatial pattern recognition pixels are categorized based on their spatial relationships with surrounding pixels. These relationships might include pixel proximity, feature size, shape and context. This family tends to mimic human classification processes and is, therefore, more complex and heavier to the computers than spectral pattern recognition algorithms. [37] Spectrally oriented classification can be divided into two styles, supervised classification and unsupervised classification. In supervised classification there is a training data set that is used as a base for the process. In unsupervised classification the process itself decides the classes and it is a very autonomous process. [37] The supervised classification process can be divided into three separate stages shown in Figure 6. The first stage is a training stage, the second stage is the classification stage and the third stage is the output stage. [37]
Figure 6: Basic steps in supervised classification. [37] The result of the supervised classification is solely dependent on the success of the training stage. In the training stage the analyst collects training statistics from the multi spectral data to distinguish desired classes as shown in Figure 7. In the simplest case this statistical data is only one sample and in the most complex it is over a dozen samples. A simple illustration of this is water: if there is one water body and it is only clear water without any turbidity it then requires only one sample, but if there are several water bodies with different levels of turbidity it then requires several samples to cover all possible hits. The size of the task when creating training data becomes quite large if the amount of desired classes is large and the image is complex. On the other hand the task can be very easy if only one or two simple classes with a simple image are wanted. [37] In the classification stage the image is categorized into classes predetermined in the training stage using the spectral patterns of the image. For spectral classification there are numerous mathematical methods to categorize the image. These methods
20
Figure 7: An example of training statistics collection from an optical image of Paris. Three classes exist, water, road and buildings, as do few samples for these classes. (Image source Microsoft Virtual Earth.) include a minimum distance to means classifier, a parallelepiped classifier and a gaussian maximum likelihood classifier. [37] One of the mathematically simplest and computationally most efficient methods is the minimum distance to means classifier. In this approach the pixel class is determined by its distance to the closest class. To determine the center point of each individual class the mean of the spectral value for each class is determined. Then the distance from the pixel to each center point is determined and the closest class is selected. Figure 8 shows an example of the minimum distance to means classification method. As one can see the target pixel, marked as one, is closest to the center point of class 4 and is therefore assigned to that class. [37] The minimum distance to means classification method has its limitations. If the classified pixel is equally apart from all of the classes its value cannot be determined and therefore would be classified as unknown. When dealing with classes that are spectrally close to each other and have high variance it is preferable to avoid this method. [37] In the parallelepiped classification method the region of every class is determined by its highest and lowest digital number (DN) value of each class, thus resulting in rectangular regions like those shown in Figure 9. The unknown pixel is then put in to class it belongs to if it is inside one of the regions. If the pixel lies outside these regions it is determined as unknown. A problem in this method is that the regions can overlap each other and cause confusion where to put the pixel in question. To avoid the overlapping problem parallelepiped classification regions can be modified using a series of rectangles with stepped border, shown in Figure 10. [37]
21
Figure 8: Illustration of the minimum distance to means classification. The classified pixel is marked as “1” and the classes are marked with “CN”, where N is from 1 to 6. Also the distance between the pixel and center points, marked with +, of the classes is marked with a line. [37] In the gaussian maximum likelihood method an assumption of normally distributed data is made. With this assumption only two parameters (mean vector and covariance matrix) are required for computation of statistical probability of a pixel value to belong into certain class. These surfaces are bell shaped if plotted as a three-dimensional graph and are called probability density functions. [37] These probability functions are used to classify unidentified pixels by computing the probability of the pixel value belonging to each category. After the evaluation of probabilities in each category the pixel is assigned to the most likely class or they are marked as unknown if certain thresholds set by the user are not achieved. The maximum likelihood classifier delineates ellipsoidal equiprobability contours in the scatter diagram shown in Figure 11. The shape of the contours indicates
22
Figure 9: Illustration of the parallelepiped classification. [37] sensitivity and how appropriately the pixel is assigned to the class. [37] A drawback of this method is the large number of computations required to classify the pixels when there are numerous classes to be sorted or large number of spectral channels are involved. To increase efficiency of this classification method a lookup table implementation can be used. [37] In the output stage the result of the classification process is shown. It is either in tabular form or in digital information files or in both ways. Either way the quality of the result is highly dependent on the success of the training stage and the method used in the classification stage. If tabular form is used then the data processed is in a table which contains the summary statistics from the classification process. From this material statistical measurements and derivations are easy to make. The digital information files are a modern way of representing and saving the data. It also eases the possibility to refine the data to different uses e.g. GIS systems. [37]
23
Figure 10: Illustration of the parallelepiped classification with stepped decision region boundaries. [37] The unsupervised classification does not use training data as the basis of the classification. The classifier uses algorithms that examine the pixels in the image and place them into a number of classes based on the groupings or clusters present in the image. [37] In this work spectral and minimum distance to means supervised classification method was used. This method was chosen because it is a simple and computationally efficient method compared to the other methods presented above. This method was suitable for this task and also easy to use. 3.2.2
Material: Optical Image and Digital Map
The digital map and optical image used in this work are obtained from Google maps (digital map) and Microsoft Virtual Earth (optical image). More detailed
24
Figure 11: Illustration of the gaussian maximum likelihood classifications equiprobability contours. If a pixel hits inside one of these contours it is then assigned to that class. [37] information is found in Table 11. Originally both of these sources use Mercator projection and WGS84 datum. 3.2.3
Derivation of Building and Tree Shapes and Locations
Optical image used in this thesis is extracted from Microsoft (MS) Virtual Earth service. This image was acquired on Feb 2nd 2009. MS Virtual Earth receives its optical images from GeoEye’s IKONOS satellite. The best resolution of this instrument is 0.82 m; resolution of the images used in this work is 1.19 m. The Datum and projection of the image are WGS84 and Mercator. The optical image is processed using supervised classification. The classification process is shown in Figure 12 and the classified images in Figures 1 and 2. In general, supervised
25 Table 11: Used data products: Digital map and optical image. R is the spatial resolution. Product Source Date Instrument R Optical Image Microsoft Virtual Earth Feb 2nd 2009 Ikonos 1.19 m Digital Map Google Maps Dec 11th 2008 N/A 1.19 m
Figure 12: Block diagram of supervised classification, the way it was done with ERDAS Imagine 9.3. The process is reviewed in text. classification is a straightforward but time consuming process due to the possibility of an error. As the image is in Mercator projection it is reprojected to UTM before anything else is done. The whole classification process presented in Figure 12 is reviewed step by step. The process begins with sample collection. It means that a set of samples are collected from the image to represent different classes. On the other hand many classification programs give the possibility to merge similar types of classes if e.g. two classes represent the same thing and are close to each other in spectrum. These samples represent as many classes as necessary, e.g. roofs, paved streets, trees, water and open areas such as athletics tracks and other outdoor sports sites etc. These samples must also represent full spectrum of the image for the classification to succeed. The classification process itself is of statistical nature. Usually the classification process uses spectrum as a decision-making feature, but it could also use shape as such a feature. In this case the spectrum is the only feature used in decision-making. The program calculates a statistical value for each pixel and that value tells to the program in what class each pixel belongs to. Visual validation of classification acts as negative feed back. If the result of the classification is not adequate enough the whole process needs to be started again from sample collection. This process can take quite many iterations. Misinterpretation is one reason for a new round of sample collection and classification. In our case
26 two different misinterpretations occurred. The first one occurred when buildings were extracted from the image. Some roofs and paved roads have similar spectrum causing mixing between streets and roofs. The second misinterpretation occurred when extraction of trees was in making; water and trees mixed together. The reason for this is organic material within the water giving it a spectrum similar to that of trees. Another reason for a new iteration was a poor result caused by poor sample collection. After successful classification the image is masked with existing thematic layers e.g. water layer or street layer. For example in building extraction the image is masked with all three existing layers (the water layer, the park layer and the street layer) to remove still existing misinterpretations. In tree extraction the image was only masked with the water layer for the same reason as in building extraction. Filtering the classified image is an important step of the process. It reduces noise, cleans up the image and removes objects too small for modeling needs. It also smoothens the borderlines of objects. Finally the image is ready for layer construction. As the image already has correct datum and projection it does not need reprojection. Instead it requires resampling to desired pixel spacing, e.g. the Place d’Itale test site is resampled to one meter resolution and the whole Paris area is resampled to 10 meter resolution. Accuracy of the information remains the same despite the oversampling of the image. In the case of coarse resolution area the resampling process removes detail from the image making it more robust and approximate. Resampled images are also converted to GeoTiff and vector format. Two thematic layers were produced with this method: building layer and tree layer. 3.2.4
Street, Park and Water Derivation
Digital maps were acquired from Google Maps service. The retrieval date was Dec 11th 2008 and the pixel spacing is 1.19 m. Google Maps uses World Geodetic System (WGS) from year 1984 as datum and Mercator projection. The process of street map conversion to layers is presented in Figure 13 and the whole process is reviewed step by step. The first step is reprojection of image. Because in specifications of the
Figure 13: Presentation on of street map process. The way it was done with the ER Mapper software. database decision was made to use WGS84 datum and UTM zone N31 projection. Since the image is in another projection (datum does not change) it is reprojected. The second step in the process is characteristics extraction. Image manipulation is a straightforward process because the only thing done is extraction of different
27 colors. This is done by manipulating the color histogram. After information extraction raw layers are ready. The next step, as presented in Figure 13 is filtering, which is done to reduce noise in the image. In raster and vector layer construction the image is transformed into GeoTiff and vector format. This whole process to extract different layers from street map is straightforward and therefore an easy task. This method produced three thematic layers: Water layer, street layer and park layer.
3.3 3.3.1
Thermal Parameter Layer Derivation from Satellite Images Thermal Infrared Images
Heat flux can be derived from thermal infrared (TIR) images. There are two simple ways to obtain this, an elemental way using Wien’s displacement law or a more fundamental way using Planck’s law. Wien’s law states λ=
b T
(6)
where b is Wien’s displacement constant and T is the temperature in Kelvins and λ is the wavelength. A drawback of Wien’s law is that it only applies to longer wavelengths. Planck’s law states I=
2hc2 1 hc 5 λ e λkT − 1
(7)
where I is the radiance, h is Planck constant, c is speed of light, λ is wavelength, k is Boltzmann constant and T is temperature in Kelvins. Planck’s law does not have the same drawback as Wien’s law. From Wien’s law and from Planck’s law it is possible to solve temperature (T ). This is then used in Stefan-Boltzmann law J = �σT 4
(8)
where J is the desired heat flux, � is emissivity (in black body case � = 1) and σ is the Stefan-Boltzmann constant. 3.3.2
Material: Thermal Infrared Images
Thermal Infrared (TIR) images were acquired with the ASTER (Advanced Spaceborne Thermal Emission and Reflection Radiometer) instrument. The ASTER instrument has five bands in the far infrared range. Detailed information on the images used is found in Table 12. The data used is a level 2 product with a product code 2B01T. The used ASTER data was ordered from ASTER Ground Data Services (GDS). ASTER TIR products include surface radiance and sky irradiance. Surface radiW ] and sky irradiance’s SI unit is, respectively, [ m2W·mλ ], where ance’s SI unit is [ m2 ·sr·m λ sr is the solid angle and mλ is wavelength in µm.
28 Table 12: Used data products: TIR images. Date is the image acquisition date, λ is the wavelength band, λC is center wavelength of the band and R is the spatial resolution.
3.3.3
Product TIR
Date May 18th 2005
Band No. 10 11 12 13 14
TIR
Sept 23rd 2005
10 11 12 13 14
λ [µm] λC [µm] 8.125 - 8.475 8.30 8.475 - 8.825 8.65 8.925 - 9.275 9.10 10.25 - 10.95 10.6 10.95 - 11.65 11.3 8.125 8.475 8.925 10.25 10.95
-
8.475 8.825 9.275 10.95 11.65
8.30 8.65 9.10 10.6 11.3
R [m] 90 90 90 90 90 90 90 90 90 90
Heat Flux Derivation
To create a heat flux layer equations from Section 3.3.1 were used. To simplify the process two variables are ignored; emissivity (�) and reflection (τ ). The calculation of a more accurate temperature value is possible using emissivity (�) and reflection (τ ), but it is a complex process and it includes iterative calculations due to coupling of temperature and emissivity. This Temperature Emissivity Separation (TES) is examined e.g. Sobrino et al. [39], Barducci et al. [40], Gillespie et al. [41] and Xu et al. [42].
29
4 4.1
Results The Water Layer
The obtained water layers are presented in Figures 14 and 15. The layers were produced with the method described in Section 3.2.4. Figure 14 shows the water layer for the high resolution area. In the center of the image is a fountain at Place d’Itale. In the right hand side of the image, slicing it in two, is the River Seine. The image lacks all small water bodies such as small fountains, etc., as these are insignificant to the dispersion models.
Figure 14: Water layer for the high resolution area. Place d’Itale is in the center of the image and River Seine is on right. In Figure 15 is the whole Paris. River Seine shows up clearly in the image as well as the water elements in forested areas in the left and right of the image. The image lacks all smaller water bodies that are significantly smaller than 10 m. Possible error sources are the reprojection of images and resampling of the images. The accuracy estimate of this layer is close to 100 %. When doing a visual comparison between the optical image of the area and the layer it is obvious that all elements are included, but as there is the human element in the process the accuracy estimate is decreased to approximately 95 %. The accuracy is sufficient for ABL modeling in very high detail.
30
Figure 15: Water layer for the coarse resolution area. River Seine flows through the image. Several other water bodies inside forestry can be detected on the left hand side and on the right hand side of the image. Also a man made canal in the upper right of the image can be clearly seen.
31
4.2
The Street Layer
The street layer is computed with a method described in Section 3.2.4. The street layer provides information about streets, roads, boulevards and rail transport routes above ground. These layers also contain information about bridges that cross the River Seine. Some errors are possible as there might be some underground streets and underground rail transport routes in the image. The underground structures are insignificant and they do not produce any kind of information for dispersion models. Also some rail transport routes are not present as processing methods, mainly filtering but also the histogram manipulation, remove them. Other sources of errors are the reprojection of the image and the resampling of the image. Raster outputs of the street layers are presented in Figures 16 and 17.
Figure 16: Street layer for the high resolution area. Place d’Itale is in the center of the image. In the high resolution area, Figure 16, all major traffic routes are clearly visible. Some of the rail transport routes are also visible in the right hand side of the image on both sides of the River Seine. For the rough level information, Figure 17, the beltway surrounding Paris is clearly visible as well as the traffic routes next to the river; these are mainly streets and roads. Also some bigger traffic routes are visible e.g. streets crossing at Arc de Triomphe in the upper left corner of the image. Also highways from and to Paris can be detected. Regarding to the accuracy estimate for this layer it is for the high resolution area between 90 % and 95 % and for the coarse resolution area it is between 80 % and 90 % with visual comparison. The lower accuracy estimate for the coarse resolution area is due to the resampling phase in the layer creation process. The accuracy is sufficient for ABL modeling in very high detail.
32
Figure 17: Street layer for the coarse resolution area. The beltway surrounding Paris can be detected, as well as several highways from and to Paris.
33
4.3
The Park Layer
The park layer contains information about major parks and cemeteries, shown in Figures 18 and 19. It does not, however, contain smaller parks, which are not marked as parks in digital maps.
Figure 18: Park layer for the high resolution area. From left to right the parks in the image are Cimetière du Montparnasse, Jardin du Luxembourg, Parc Monsouris, Parc Kellerman, Jardin des Plantes and Bercy. The accuracy estimate for this layer is 100 %, if the comparison is done to the original image. If the comparison is done between the park layer and the trees layer, as it should, then the accuracy estimate drops between 80 % and 90 %. It was clearly discovered from this comparison that some of the green areas, that could be considered as parks, are left outside. The accuracy is, however, sufficient for ABL modeling in very high detail.
34
Figure 19: Park layer for the coarse resolution area. The biggest forested areas are Bois de Bologne on the left hand side of the image and Bois de Vincennes on the right hand side of the image.
35
4.4
The Trees Layer
The trees layer contains information about the shape and location of trees and groups of trees. This layer does overlap with the park layer. All of the trees inside parks and cemeteries are also present in this layer. The layer contains trees growing in the streets and boulevards. The overall accuracy estimate for the high resolution area is between 90 % and 95 %. For the coarse resolution area the overall accuracy estimate is between 80 % and 90 %. The accuracy estimate is done visually by comparing the optical image and classification result; therefore, the accurasy estimate might be overestimated. However, the accuracy is sufficient for ABL modeling in very high detail. This layer does have errors due to spectrum similarities between water and trees. In the classification process a small fraction of trees was misinterpreted as water and vice versa. This process was conducted many times to ensure that the misinterpretation of trees to water was minute. Nevertheless, a small portion of the trees might be missing. As the water areas are masked off the misinterpretation of trees located in water is not a problem. Another problem comes from resampling. In the coarse resolution area some 6 % of the pixels overlap with the building layer, in the high resolution area this is not a problem. As the image is resampled the area that the trees cover grows, as this also happens in the building layer they overlap in some occasions. Wether the location is occupied by tree or building is left to the users discretion.
Figure 20: The trees layer for the high resolution area. Place d’Itale is in the center of the image.
36
Figure 21: The trees layer for the coarse resolution area.
37
4.5
The Building Layer
The building layer was produced using a method described in Section 3.2.3. This layer contains information about shape and location of buildings and other built structures with the exception of bridges and other similar features. This layer has two error sources; the first is misinterpretation between paved roads and rooftops, the second is masking. The paved roads and rooftops have occasionally similar spectrum and therefore parts of the paved road might be misinterpret as rooftops and vice versa. When the outcome of the classification process is masked the misinterpretation of the paved roads as rooftops is corrected. Masking has three undesired effects; first, it removes any buildings from the parks; second, it occasionally slices buildings into two; and third, it removes the parts of the buildings that are above water. One should note that this layer has overlapping with the trees layer as told in Section 4.4. The accuracy estimate for this layer is done comparing visually the classification result and the optical image. The accuracy estimate for the high resolution area is between 75 % and 85 %. For the coarse resolution area the accuracy estimate is between 70 % and 80 %. The lower accuracy estimate for the coarse resolution area is a caused by the resampling in the creation process of the layer. The accuracy is sufficient because it contains information about all major road canyons. In Figure 22 the building layer for the high resolution area is shown and in Figure 23 the building layer for the coarse resolution area is shown.
Figure 22: The building layer for the high resolution area. Place d’Itale is in the center of the image.
38
Figure 23: The building layer for the coarse resolution area.
39
4.6
The Building Height Layer
The building height layer is produced from coherence using a method described in [34] and equations described in Section 3.1.5. Paris has a very strict regulation of building height. This regulation does not allow very tall buildings, but there are exceptions, such as the Tour Montparnasse, a skyscraper with a height of 210 meters and the Bibliothèque Nationale de France with a height of 79 meters.
Figure 24: The building height layer for the high resolution area. There are problems in the creation of this layer; first, the model that is used seems to produce exaggerated values; second, the coherence images are noisy and, therefore, not ideal for the calculations; third, there is the shadowing effect caused by the SAR imaging geometry. The noise in the coherence images reduces the accuracy of the model and the shadowing effect blocks some buildings and, therefore, shadowed areas possibly have wrong height information. The model created by Luckman and Grey [34] assumes the distribution of the scatterers to be gaussian in the urban area, but findings of Zhu and Bamler [43] suggest that this is not the case. The model produces an inaccurate estimate of the building height. As shown in Figures 24 and 25 the building height is in many cases over 100 m what it should not be, a more realistic value would be around 50 m and below. The accuracy estimate for this layer is difficult to do as there is no reference data from the area, but it seems, using visual assessment, that the model overestimates the building height by a factor that is between 1.5 and 2.0.
40
Figure 25: The building height layer for the coarse resolution area.
41
4.7
The Terrain Digital Elevation Model Layer
The digital elevation models (DEM) were acquired from the NASA SRTM mission database. The modifications to these layers were selecting and cropping the areas of interest, reprojecting and resampling to 1 m and 10 m resolution. From both of the images shown in Figures 26 and 27 the basin of the River Seine is clearly noticeable.
Figure 26: The terrain DEM layer for the high resolution area. The vertical accuracy of the SRTM DEM is 16 m [44] and as the only difference to the original product is the reprojecting and resampling, nothing is added, it is safe to assume the same accuracy applies.
42
Figure 27: The terrain DEM layer for the coarse resolution area.
43
4.8
The Heat Flux Layer
The heat flux layer is presented in Figures 28 to 31. This layer demonstrates the possibility of creating the heat flux from space borne instruments. However, this layer is not a real heat flux, as it represents a heat flux estimate at the moment of image capture when heat flux should be calculated from continuous long term measurements. Measured values for a heat flux in the urban area range from around W W 300 m 2 to roughly 500 m2 [45, 46]. The heat flux mainly depends on two things; time of day and season. In the high resolution area the train yard and industrial area in the lower right corner are clearly visible as hot spots. Also the river bank has substantially more hot spots than the rest of the area. The heat flux for the area is high but in a W W realistic range (300 m 2 - 500 m2 ).
Figure 28: The heat flux for the high resolution area on May 18, 2005 at 10:57:44.6 UTC. In the coarse resolution area the heat flux is also high but in a realistic range W W (300 m 2 - 500 m2 ). One should note the less emitting regions in the image that are parks in the city and the River Seine. There are hotter areas clearly visible in the upper right hand side and lower right hand side. These areas are near the railroad and mainly consist of industrial buildings. As noted above the range of values is reasonable but high. What is the effect of leaving out emissivity, reflection and temperature emissivity separation? My estimate is that when conducting the heat flux calculations from several images and implementing a temperature emissivity separation solution, the values will decrease by a factor which is between 0.90 and 0.95.
44
Figure 29: The heat flux for the high resolution area on Sept. 23, 2005 at 10:57:14.9 UTC.
Figure 30: The heat flux for the coarse resolution area on May 18, 2005 at 10:57:44.6 UTC.
45
Figure 31: The heat flux for the coarse resolution area on Sept. 23, 2005 at 10:57:14.9 UTC.
46
4.9
The Coherence Layer
The retrieved coherence layers are presented in Figures 32 and 33. The coherence images were processed with a method described in Section 3.1.4. These provide the mean values of the five coherence images with different baselines. One problem with coherence image calculation was an error in the coordinates. The images coordinates were off circa 200 meters in the north-south direction and circa 2000 meters in the east-west direction. This spatial deviation is most likely caused by an error in the header of the ASAR images or an error in the processing program (ERDAS Imagine 9.3 radar toolbox) or a combination of both. In case of an error in the header of the ASAR images the precise orbit parameters were downloaded from ESA’s ftp server and entered into the SAR image. These precise orbit parameters did not correct the coordinate error in the resulting image. The source for this error remained a mystery and it was corrected with Ground Control Points (GCP’s). The rectification values can be seen in Tables 13 and 14. In the high detail area, seen in Figure 32, the River Seine is clearly visible in the right, the dark band slicing the image in two. Other noticeable features of the image are dark areas that are parks. One of them is in the middle section of the image next to the River Seine, another is a bit left of this. These are low coherence areas as they are constantly altered by winds and other weather elements as well as growth. This makes them to appear totally different from one SAR image to another SAR image.
Figure 32: The coherence layer of the high resolution area. White means high coherence and dark means low coherence. For the coarse resolution area, seen in Figure 33, there is a blurred spot in the lower left corner. This blurred area is a result of the error in the image registration. As the smaller sub images were taken to reduce computing time there was an unintentional error in the sub image size. However, because of the size and location of this blurred area, it is not considered as a critical error.
47
Figure 33: The coherence layer for the coarse resolution area. White means high coherence and dark means low coherence. Table 13: Unfiltered coherence image Check Point Total Error and minimum and maximum RMS errors for single check points in Ground Control Point rectification. Calculated with Imagine 9.3 GCP Tool. Baseline 73 m 100 m 158 m 191 m 234 m
Error X 1.9032 1.4747 1.4937 2.1274 2.1963
Error Y 1.5144 1.7119 1.9204 1.7629 1.6508
Total Error RMS min 2.4322 1.105 2.2595 1.295 2.4329 1.438 2.7629 1.351 2.7475 1.640
RMS max 4.946 4.054 3.737 5.125 5.032
In general all of the parks seen in Figure 19 can also be found in Figure 33. Parks are noticeably darker, since they have much lower coherence, compared to other parts of the city. Also the River Seine is clearly visible like in Figure 15.
48
Table 14: Filtered coherence image Check Point Error and minimum and maximum RMS error for single check points in Ground Control Point rectification. Calculated with Imagine 9.3 GCP Tool. Baseline 73 m 100 m 158 m 191 m 234 m
Error X 1.2423 1.1215 1.7111 1.8312 1.0302
Error Y 1.4995 1.2485 1.8517 0.9713 1.9284
Total Error RMS min 1.9473 1.690 1.6783 1.126 2.5123 0.954 2.0728 0.736 2.1863 1.036
RMS max 2.218 2.124 4.256 3.801 3.712
49
5
Conclusions
In this thesis work it was shown that it is possible to create an urban morphological database with a small budget and solely using remote sensing data. The produced morphological database was successfully used in the MEGAPOLI project for atmospheric boundary layer modeling by other groups. The FMI requested nine layers; the water layer, the street layer, the park layer, the trees layer, the building layer, the building height layer, the DEM Layer, the heat flux layer and the coherence layer. All these layers were produced. From this point of view this thesis has fulfilled its purpose. The layers created in this work can be divided into three groups; to the first group belong the layers that had a light and straightforward creation process e.g. the street layer, the park layer, the water layer and the DEM layer, to the second group belong the layers that had a more complex creation process e.g. the trees layer and the building layer, to the third group belong the layers that had the most complex creation process e.g. the heat flux layer, the building height layer and the coherence layer. Layers belonging to the first group have by far the best accuracy and are most satisfactory compared to the other layers. Layers belonging to the second and third group could be done with better accuracy. The building and trees layer accuracy was sufficient for our project. However, we suggest that the accuracy of these layers can be improved by using classification which makes assumptions about the shape of the feature. The building height layer is inaccurate and, therefore, the extraction process for the layer needs to be revised thoroughly. For the building height layer better resolution SAR images are needed as well the possibility to use multibaseline interferometry instead of coherence method. It is my conclusion that the model I have been using, described by Luckman and Grey [34], has issues concerning the height retrieval and, therefore, the results should be considered as suggestive only. The selected method was found poorly suitable for our purposes, but due to time and resource limitations it was not possible to start over with another approach. Regarding to the heat flux layer it is only a demonstration of the possibility to use remote sensing as a source for the heat flux. In the future, if the goal is to obtain the heat flux more easily, a different ASTER product might come in question e.g. the Earth surface temperature. The coherence layer might become better with high resolution SAR images. If one wishes to receive even better results for the layers belonging to the first group the use of classification and digital map extraction should be used. Regarding to the terrain DEM layer, if a more accurate terrain DEM is needed then the new ASTER DEM product might come into question. In the future the most intriguing topics of study are the retrieval of building height and the retrieval of heat flux. To retrieve building height the use of high resolution SAR images, e.g. TanDEM-X images, and multibaseline interferometry should be considered. Because of the heterogenic nature of the urban areas and the complex nature of heat transfer in urban areas the retrieval of heat flux is remains a challenging task. After the conclusions above it is appropriate to evaluate the whole task. One
50 question should be asked: Was the task properly confined? The French database (BDTopo) was under construction for over a decade, and it is still a national project to which many have contributed their time and effort. The US database (NUDAPT) was done with significant investment in time, money and workforce. This thesis was done by a single person with a lot of help from a few persons. Many of the goals were achieved, for some of the parameters the resulting accuracy is adequate enough and for some parameters the required accuracy was not achieved. We did show that a morphological database can be done solely with remote sensing data, but the cost effectiveness restricts the accuracy levels.
51
References [1] P. Sievinen, J. Praks, M. Hallikainen, J. Koskinen, A. Hellsten, and J. Kukkonen, “Urban morphology retrieval by means of remote sensing for the modeling of atmospheric dispersion and micro-meteorology,” in Proc. IEEE 2009 International Geoscience and Remote Sensing Symposium (IGARSS 2009), Cape Town, South Africa,, vol. 3, 12-17 2009, pp. III–877 – III–880. [2] S. Zilitinkevich, T. Elperin, N. Kleeorin, I. Rogachevskii, I. Esau, T. Mauritsen, and M. Miles, “Turbulence energetics in stably stratified geophysical flows: Strong and weak mixing regimes,” Quarterly Journal of the Royal Meteorological Society, vol. 134, no. 633, pp. 793–799, 2008. [3] R. M. Cionco and R. Ellefsen, “High resolution urban morphology data for urban wind flow modeling,” Atmospheric Environment, vol. 32, no. 1, pp. 7 – 17, 1998, conference on the Benefits of the Urban Forest. [4] C. S. B. Grimmond and C. Souch, “Surface description for urban climate studies: a GIS based methodology,” Geocarto International, vol. 9, no. 1, pp. 47 – 59, 1994. [5] F. Lecordix, J. Trévisan, J. Le Gallic, and L. Gondol, “Clarity experimentations for cartographic generalisation in production,” in ICA Workshop on Generalisation and Multiple Representation, June 25th, Portland, U.S.A., 2006. [6] F. Lecordix, J. Gallic, L. Gondol, and A. Braun, “Development of a new generalization flowline for topographic maps,” in 10th ICA workshop on Generalisation and Multiple Representation, August 2nd–3rd, Moscow, Russia, 2007. [7] N. Long, P. Mestayer, and C. Kergomard, “Urban database analysis for mapping morphology and aerodynamic parameters: The case of st jerome sub-urban area, in marseille during escompte,” in Proceedings of the 5th International Conference on Urban Climate, September 1st–5th, Lodz, Poland, 2003, pp. 1–5. [8] J. Ching, M. Brown, S. Burian, F. Chen, R. Cionco, A. Hanna, T. Hultgren, T. McPherson, D. Sailor, H. Taha, and D. Williams, “National Urban Database and Access Portal Tool, NUDAPT,” Bulletin of the American Meteorological Society, Apr. 2009. [9] N. Ritter and M. Ruth, “The GeoTiff data interchange standard for raster geographic images,” International Journal of Remote Sensing, vol. 18, no. 7, pp. 1637 – 1647, May 1997. [10] P. Rosen, S. Hensley, I. Joughin, F. Li, S. Madsen, E. Rodriguez, and R. Goldstein, “Synthetic aperture radar interferometry,” Proceedings of the IEEE, vol. 88, no. 3, pp. 333–382, Mar 2000.
52 [11] W. Dierking and T. Busche, “Sea ice monitoring by L-band SAR: an assessment based on literature and comparisons of JERS-1 and ERS-1 imagery,” IEEE Transactions on Geoscience and Remote Sensing, vol. 44, no. 4, pp. 957–970, April 2006. [12] M. Thomas, C. Geiger, and C. Kambhamettu, “High resolution (400 m) motion characterization of sea ice using ERS-1 SAR imagery,” Cold Regions Science and Technology, vol. 52, no. 2, pp. 207 – 223, 2008. [13] K. Nakamura, K. Doi, and K. Shibuya, “Estimation of seasonal changes in the flow of Shirase Glacier using JERS-1/SAR image correlation,” Polar Science, vol. 1, no. 2-4, pp. 73 – 83, 2007. [14] R. Treuhaft, B. Chapman, J. dos Santos, L. Dutra, F. Goncalves, C. da Costa Freitas, J. Mura, P. de Graca, and J. Drake, “Tropical-Forest Density Profiles from Multibaseline Interferometric SAR,” in Proc. IEEE 2006 International Geoscience and Remote Sensing Symposium (IGARSS 2006), Denver, U.S.A., 31 2006-Aug. 4 2006, pp. 2205–2207. [15] J.-M. Martinez and T. L. Toan, “Mapping of flood dynamics and spatial distribution of vegetation in the amazon floodplain using multitemporal SAR data,” Remote Sensing of Environment, vol. 108, no. 3, pp. 209 – 223, 2007. [16] A. Minchella, F. D. Frate, F. Capogna, S. Anselmi, and F. Manes, “Use of multitemporal SAR data for monitoring vegetation recovery of mediterranean burned areas,” Remote Sensing of Environment, vol. 113, no. 3, pp. 588 – 597, 2009. [17] C. Freitas, L. Soler, S. Sant’Anna, L. Dutra, J. dos Santos, J. Mura, and A. Correia, “Land use and land cover mapping in the brazilian amazon using polarimetric airborne P-band SAR data,” IEEE Transactions on Geoscience and Remote Sensing, vol. 46, no. 10, pp. 2956–2970, Oct. 2008. [18] C. Lardeux, P.-L. Frison, J.-P. Rudant, J.-C. Souyris, C. Tison, and B. Stoll, “Use of the SVM classification with polarimetric sar data for land use cartography,” in Proc. IEEE 2006 International Geoscience and Remote Sensing Symposium (IGARSS 2006), Denver, U.S.A., 31 2006-Aug. 4 2006, pp. 493– 496. [19] F. Henderson and Z.-G. Xia, “SAR applications in human settlement detection, population estimation and urban land use pattern analysis: a status report,” IEEE Transactions on Geoscience and Remote Sensing, vol. 35, no. 1, pp. 79– 85, Jan 1997. [20] S. McCandles, “The origin, evolution and legacy of SEASAT,” in Proc. IEEE 2003 International Geoscience and Remote Sensing Symposium (IGARSS ’03), Toulouse France,, vol. 1, July 2003, pp. 32–34.
53 [21] E. Attema, “The active microwave instrument on-board the ERS-1 satellite,” Proceedings of the IEEE, vol. 79, no. 6, pp. 791–799, Jun 1991. [22] R. Zandbergen, J. M. Dow, M. R. Merino, R. Píriz, and F. M. Fadrique, “ERS-1 and ERS-2 tandem mission: Orbit determination, prediction and maintenance,” Advances in Space Research, vol. 19, no. 11, pp. 1649 – 1653, 1997, Proceedings of the PSD 1 Symposium of COSPAR Technical Panel on Satellite Dynamics. [23] T. Nishidai, “Early results from ’Fuyo-1’ Japan’s Earth Resources Satellite (JERS-1),” International Journal of Remote Sensing, vol. 14, no. 9, pp. 1825 – 1833, Jun 1993. [24] B. Gardini, G. Graf, and G. Ratier, “The instruments on Envisat,” Acta Astronautica, vol. 37, pp. 301 – 311, 1995, 45th International Astronautical Federation Congress, October 9th–14th, Jerusalem, Israel. [25] B. Rabus, M. Eineder, A. Roth, and R. Bamler, “The shuttle radar topography mission–a new class of digital elevation models acquired by spaceborne radar,” ISPRS Journal of Photogrammetry and Remote Sensing, vol. 57, no. 4, pp. 241 – 262, 2003. [26] A. Moreira, G. Krieger, I. Hajnsek, D. Hounam, M. Werner, S. Riegger, and E. Settelmeyer, “TanDEM-X: a TerraSAR-X add-on satellite for single-pass SAR interferometry,” in Proc. IEEE 2004 International Geoscience and Remote Sensing Symposium (IGARSS ’04), Anchorage, U.S.A., vol. 2, Sept. 2004, pp. 1000–1003 vol.2. [27] R. M. Goldstein, H. A. Zebker, and C. L.Werner, “Satellite radar interferometry: Two-dimensional phase unwrapping,” Radio Science, vol. 23, no. 4, pp. 713 – 720, July/Aug 1988. [28] D. C. Ghiglia and L. A. Romero, “Direct phase estimation from phase differences using fast elliptic partial differential equation solvers,” Optics Letters, vol. 14, no. 20, pp. 1107 – 1109, 1989. [29] R. A. Ryerson, F. M. Henderson, and A. J. Lewis, Manual of Remote Sensing, 3rd ed., Volume 2. New York (NY): Wiley & Sons, 1998. [30] I. H. Woodhouse, Introduction to Microwave Remote Sensing. Taylor & Francis, 2005.
Boca Raton:
[31] G. Franceschetti, A. Iodice, M. Migliaccio, and D. Riccio, “The effect of surface scattering on IFSAR baseline decorrelation,” Journal of Electromagnetic Waves and Applications, vol. 11, no. 3, pp. 353–370, 1997. [32] A. Fanelli, M. Ferri, M. Santoro, and A. Vitale, “Analysis of coherence images over urban areas in the extraction of buildings heights,” in Remote Sensing and Data Fusion over Urban Areas, IEEE/ISPRS Joint Workshop 2001, November 8th–9th, Rome, Italy, 2001, pp. 69–73.
54 [33] P. Gamba and B. Houshmand, “Digital surface models and building extraction: a comparison of IFSAR and LIDAR data,” IEEE Transactions on Geoscience and Remote Sensing, vol. 38, no. 4, pp. 1959–1968, Jul 2000. [34] A. Luckman and W. Grey, “Urban building height variance from multibaseline ERS coherence,” IEEE Transactions on Geoscience and Remote Sensing, vol. 41, no. 9, pp. 2022–2025, Sept. 2003. [35] H. Zebker and J. Villasenor, “Decorrelation in interferometric radar echoes,” IEEE Transactions on Geoscience and Remote Sensing, vol. 30, no. 5, pp. 950– 959, Sep 1992. [36] U. Wegmuller, C. Werner, and T. Strozzi, “SAR interferometric and differential interferometric processing chain,” in Proc. IEEE 1998 International Geoscience and Remote Sensing Symposium Proceedings (IGARSS ’98), Seattle, U.S.A.,, vol. 2, jul 1998, pp. 1106 –1108 vol.2. [37] T. M. Lillesand, R. W. Kiefer, and J. W. Chipman, Remote sensing and image interpretation /. New York :: John Wiley & Sons„ 2004. [38] G. Dial, H. Bowen, F. Gerlach, J. Grodecki, and R. Oleszczuk, “IKONOS satellite, imagery, and products,” Remote Sensing of Environment, vol. 88, no. 1-2, pp. 23 – 36, 2003. [39] J. Sobrino, J. Jimenez-Muoz, G. Soria, M. Romaguera, L. Guanter, J. Moreno, A. Plaza, and P. Martinez, “Land surface emissivity retrieval from different VNIR and TIR sensors,” IEEE Transactions on Geoscience and Remote Sensing, vol. 46, no. 2, pp. 316 –327, Feb 2008. [40] A. Barducci and I. Pippi, “Temperature and emissivity retrieval from remotely sensed images using the “grey body emissivity” method,” IEEE Transactions on Geoscience and Remote Sensing, vol. 34, no. 3, pp. 681 –695, May 1996. [41] A. Gillespie, S. Rokugawa, T. Matsunaga, J. Cothern, S. Hook, and A. Kahle, “A temperature and emissivity separation algorithm for Advanced Spaceborne Thermal Emission and Reflection Radiometer (ASTER) images,” IEEE Transactions on Geoscience and Remote Sensing, vol. 36, no. 4, pp. 1113 –1126, July 1998. [42] W. Xu, M. Wooster, and C. Grimmond, “Modelling of urban sensible heat flux at multiple spatial scales: A demonstration using airborne hyperspectral imagery of Shanghai and a temperature-emissivity separation approach,” Remote Sensing of Environment, vol. 112, no. 9, pp. 3493 – 3510, 2008. [43] X. X. Zhu and R. Bamler, “Very High Resolution Spaceborne SAR Tomography in Urban Environment,” IEEE Transactions on Geoscience and Remote Sensing, vol. 48, no. 12, pp. 4296 –4308, Dec. 2010.
55 [44] P. A. Berry, J. Garlick, and R. Smith, “Near-global validation of the SRTM DEM using satellite radar altimetry,” Remote Sensing of Environment, vol. 106, no. 1, pp. 17 – 27, 2007. [45] A. J. Arnfield and C. Grimmond, “An urban canyon energy budget model and its application to urban storage heat flux modeling,” Energy and Buildings, vol. 27, no. 1, pp. 61 – 68, 1998. [46] B. Offerle, C. S. B. Grimmond, K. Fortuniak, K. Kłysik, and T. R. Oke, “Temporal variations in heat fluxes over a central European city centre,” Theoretical and Applied Climatology, vol. 84, pp. 103–115, 2006.
56
Appendix A: Building Height Calculations Matlab code listing for building height calculations. function [G_oth,h_est] = fit_calculation25(raja) clear gamma pka h_est G_oth g_tot; % ladataan koherenssit / load the coherence images gamma = load(’cohs2.mat’); % this is gamma_tot % loppujen parametrien määrittely / definition of other parameters % slant range resolution (c/2B) (in meters) R_s = 9; % radar wavelength (in meters) lam = 299792458/(5331.004416e6); % Look angles for the images, muuttuu kuvan mukana (in degree) theta_look = 19.2651922;
% perpendicular baseline, muuttuu kuvan mukana (in meters) B_perp = [7.5699 24.779 27.5135 69.4195 77.2169 85.6733... 94.5829 97.1932 102.1999 104.3575 105.0741 105.475... 109.4094 124.1627 141.7121 143.9026]; pka = trapz(B_perp,gamma.coh,3)/(B_perp(16)-B_perp(1)); % slant range, muuttuu kuvan mukana (in meters) r_0 = 8.4468324733e+005; % coherence window size (10x2, 15x3, 25x5) N = 125; % slantrange coherence, vakio per coherenssi kuva gsl = (2*R_s)/(lam*r_0*abs(tand(theta_look))); gsf = (4*pi*sind(theta_look))/(lam*r_0); h_est(1:1035,1:1334) = G_oth(1:1035,1:1334) = g_tot(1:16) = NaN; % G_est(1:1035,1:1334) % sse(1:1035,1:1334) =
NaN; NaN; = NaN; NaN;
57 % % % %
rsquare(1:1035,1:1334) = NaN; dfe(1:1035,1:1334) = NaN; adjrsquare(1:1035,1:1334) = NaN; rmse(1:1035,1:1334) = NaN;
for xx=1:1334 for yy=1:1035 g_t = double(gamma.coh(yy,xx,:)); for kk=1:16 g_tot(kk) = g_t(1,1,kk); end; B = B_perp; if pka(yy,xx)>= raja % to column vectors g_tot = g_tot’; B = B’; % sovitus, the fit s = fitoptions(’method’,’NonLinearLeastSquares’... ,’lower’,[0,0]... ,’upper’,[324,1]... ,’startpoint’,[5 0.5]); f = fittype(’((1-(gsl*B))*exp(-0.5*(gsf*B*h)^2)*goth)+... (0.5*sqrt(pi/N)*exp(-(0.96*sqrt(N)+0.91)*... (1-gsl*B)*exp(-0.5*(gsf*B*h)^2)*goth))’,... ’independent’,’B’,’problem’,{’gsl’,’gsf’,’N’},... ’coefficients’,{’h’,’goth’},... ’options’,s); G_est = fit(B,g_tot,f,’problem’,{gsl,gsf,N}); h_est(yy,xx) = G_est.h; G_oth(yy,xx) = G_est.goth; else h_est(yy,xx) = NaN; G_oth(yy,xx) = NaN; end; clear g_tot g_t B; end; end;
58
Appendix B: Coherence Calculation An example Matlab code listing for coherence calculations. rw = 3263; cl = 6049; coh = zeros(rw,cl,5,’single’); coh(:,:,1) = imread(’coh073_testialue.tif’); coh(:,:,2) = imread(’coh100_testialue.tif’); coh(:,:,3) = imread(’coh158_testialue.tif’); coh(:,:,4) = imread(’coh191_testialue.tif’); coh(:,:,5) = imread(’coh234_testialue.tif’); cl = mean(coh,3); clear coh; fileWritten = ’test_coh.tif’; t = Tiff(fileWritten,’w’); tagstruct.ImageLength = size(cl,1); tagstruct.ImageWidth = size(cl,2); tagstruct.SampleFormat = Tiff.SampleFormat.IEEEFP; tagstruct.Photometric = Tiff.Photometric.MinIsBlack; tagstruct.BitsPerSample = 32; tagstruct.Compression = 5; tagstruct.PlanarConfiguration = Tiff.PlanarConfiguration.Chunky; tagstruct.Software = ’MATLAB’; t.setTag(tagstruct); t.write(cl); t.close();
59
Appendix C: Heat Flux Calculation Matlab code listing for heat flux calculations. function calculateHeatFlux(site) % parametri site kertoo kumman alueen lämpövuo lasketaan, joko % Pariisin (1) tai testialueen (2). DN(1:5) = [6.822e-3 6.780e-3 6.590e-3 5.693e-3 5.225e-3]; if site==1 fileWritten = ’paris_heatFlux_200505181057.tif’; rw = 1036; cl = 1334; sR(1:rw,1:cl,1:5) = NaN; sR(:,:,1) = ... imread(’C:\Pauli\dippa-aster\date1\paris_band10_surfRad.tif’)... *DN(1); sR(:,:,2) = ... imread(’C:\Pauli\dippa-aster\date1\paris_band11_surfRad.tif’)... *DN(2); sR(:,:,3) = ... imread(’C:\Pauli\dippa-aster\date1\paris_band12_surfRad.tif’)... *DN(3); sR(:,:,4) = ... imread(’C:\Pauli\dippa-aster\date1\paris_band13_surfRad.tif’)... *DN(4); sR(:,:,5) = ... imread(’C:\Pauli\dippa-aster\date1\paris_band15_surfRad.tif’)... *DN(5); elseif site==2 fileWritten = ’test_heatFlux_200505181057.tif’; rw = 3263; cl = 6049; sR = zeros(rw,cl,5,’single’); sR(:,:,1) = ... imread(’C:\Pauli\dippa-aster\date1\test_band10_surfRad.tif’)... *DN(1); sR(:,:,2) = ... imread(’C:\Pauli\dippa-aster\date1\test_band11_surfRad.tif’)... *DN(2); sR(:,:,3) = ... imread(’C:\Pauli\dippa-aster\date1\test_band12_surfRad.tif’)... *DN(3); sR(:,:,4) = ... imread(’C:\Pauli\dippa-aster\date1\test_band13_surfRad.tif’)...
60 *DN(4); sR(:,:,5) = ... imread(’C:\Pauli\dippa-aster\date1\test_band15_surfRad.tif’)... *DN(5); elseif site==3 fileWritten = ’paris_heatFlux_200509231057.tif’; rw = 1036; cl = 1334; sR = zeros(rw,cl,5,’single’); sR(:,:,1) = ... imread(’C:\Pauli\dippa-aster\date2\paris_band10_surfRad.tif’)... *DN(1); sR(:,:,2) = ... imread(’C:\Pauli\dippa-aster\date2\paris_band11_surfRad.tif’)... *DN(2); sR(:,:,3) = ... imread(’C:\Pauli\dippa-aster\date2\paris_band12_surfRad.tif’)... *DN(3); sR(:,:,4) = ... imread(’C:\Pauli\dippa-aster\date2\paris_band13_surfRad.tif’)... *DN(4); sR(:,:,5) = ... imread(’C:\Pauli\dippa-aster\date2\paris_band14_surfRad.tif’)... *DN(5); elseif site==4 fileWritten = ’test_heatFlux_200509231057.tif’; rw = 3263; cl = 6049; sR = zeros(rw,cl,5,’single’); sR(:,:,1) = ... imread(’C:\Pauli\dippa-aster\date2\test_band10_surfRad.tif’)... *DN(1); sR(:,:,2) = ... imread(’C:\Pauli\dippa-aster\date2\test_band11_surfRad.tif’)... *DN(2); sR(:,:,3) = ... imread(’C:\Pauli\dippa-aster\date2\test_band12_surfRad.tif’)... *DN(3); sR(:,:,4) = ... imread(’C:\Pauli\dippa-aster\date2\test_band13_surfRad.tif’)... *DN(4); sR(:,:,5) = ... imread(’C:\Pauli\dippa-aster\date2\test_band14_surfRad.tif’)... *DN(5); else
61 fprintf(’Argumentit virheelliset\n’); end; heatFlux = zeros(rw,cl,5,’single’); T_b = zeros(rw,cl,5,’single’); % Määritetään vakiot sig = 5.6704e-8; % Stefan-Boltzmannin vakio h = 6.62607e-34; % Planckin vakio k = 1.38065e-23; % Boltzmannin vakio c = 2.9979246e8; % Valon nopeus tyhjiössä c1 = 3.74151e-22; c2 = h*c/k; % TIR kanavien keskiarvot l(1:5) = [8.3e-6 8.65e-6 9.1e-6 10.6e-6 11.3e-6]; % Lasketaan kirkkauslämpötila for ss=1:5 for jj=1:cl for ii=1:rw T_b(ii,jj,ss) = ... single((c2)/(l(ss)*log((c1)/... (l(ss)^5*pi*sR(ii,jj,ss))+1))); end; end; end; for ss=1:5 for ii=1:rw for jj=1:cl heatFlux(ii,jj,ss) = single(sig*T_b(ii,jj,ss)^4); end; end; end; clear T_b; hF = double(mean(heatFlux,3)); clear heatFlux; % Kirjoitetaan koko roska tiff tiedostoon t = Tiff(fileWritten,’w’); tagstruct.ImageLength = size(hF,1); tagstruct.ImageWidth = size(hF,2); tagstruct.SampleFormat = Tiff.SampleFormat.IEEEFP; tagstruct.Photometric = Tiff.Photometric.MinIsBlack; tagstruct.BitsPerSample = 64;
62 tagstruct.Compression = 5; tagstruct.PlanarConfiguration = Tiff.PlanarConfiguration.Chunky; tagstruct.Software = ’MATLAB’; t.setTag(tagstruct); t.write(hF); t.close(); clear all;