Remote Sensing Raster Programming
Dr. Yann H. Chemin
Remote Sensing Raster Programming Second Edition Dr. Yann H. Chemin ISBN 978-1-4092-6689-1 “How can I load input satellite imagery, compute input rasters into a given result and write that result as a new image to the hard disk”. This book gives a range of programming options to answer this question, using high-level and low-level programming languages, some serial (C, Python, R) but also some in parallel (OpenMP, MPI-C, CUDA, OpenCL). Additionally, it also demonstrates how to perform various levels of integrations into few programming languages and environments having GUI functionalities (WxPython and GRASS GIS).
2
Foreword This book is about satellite imagery processing. It answers to the one single question: “How can I load input satellite imagery, compute input rasters into a given result and write that result as a new image to the hard disk”. It gives a range of programming options to answer this question, using high-level and low-level programming languages, some serial but also some in parallel. Additionally, it also demonstrates how to perform various levels of integrations into few programming languages and environments having GUI functionalities. Why Programming? If you need to research or have to make a custom-fit solution, there are few other ways to have full control on your data. Also, algorithm development is difficult without programming it. The languages used in this booklet are: • In the C family: C, OpenMP, MPI C, CUDA, OpenCL and C in GRASS GIS • In the Python family: Python and WxPython • and R, the statistical high-level programming language Both the GRASS GIS and wxPython codes include Graphical User Interfaces (GUIs). All of these codes execute the same functions: • Loading satellite images, • Calculating an index or a physical value, • Writing the index or physical value to an image file on the hard disk. Once you have mastered this very basic functionality in the programming context of your choice/need, you can easily modify/add additional processing functions, so as to reach the output you are looking for. Greetings and good luck, Yann Chemin
3
4
Contents 1 Introduction 1.1 Typical remote sensing work-flow . . . . . . . 1.1.1 High-Level programming . . . . . . . . 1.1.2 Lower-Level programming . . . . . . . 1.2 Downloading free satellite data from Internet
. . . .
. . . .
. . . .
. . . .
. . . .
. . . .
. . . .
. . . .
. . . .
. . . .
. . . .
. . . .
7 8 8 8 9
2 GDAL 2.1 Image Processing in C with GDAL API 2.1.1 Introduction . . . . . . . . . . . 2.1.2 Code explanation . . . . . . . . . 2.1.3 C code . . . . . . . . . . . . . . . 2.2 Python-GDAL scripting . . . . . . . . . 2.2.1 Introduction . . . . . . . . . . . 2.2.2 Code explanation . . . . . . . . . 2.2.3 Python Code . . . . . . . . . . .
. . . . . . . .
. . . . . . . .
. . . . . . . .
. . . . . . . .
. . . . . . . .
. . . . . . . .
. . . . . . . .
. . . . . . . .
. . . . . . . .
. . . . . . . .
. . . . . . . .
. . . . . . . .
. . . . . . . .
. . . . . . . .
. . . . . . . .
11 11 11 12 16 19 19 19 22
3 R Statistical Language 3.1 R raster scripting . . . . 3.1.1 Introduction . . 3.1.2 Code explanation 3.1.3 R code . . . . . .
. . . .
. . . .
. . . .
. . . .
. . . .
. . . .
. . . .
. . . .
. . . .
. . . .
. . . .
. . . .
. . . .
. . . .
. . . .
. . . .
. . . .
. . . .
. . . .
25 25 25 26 28
4 Parallel & Distributed Computing 4.1 OpenMP parallel computing . . . . 4.1.1 Introduction . . . . . . . . 4.1.2 Code explanation . . . . . . 4.1.3 OpenMP C code . . . . . . 4.2 MPI cluster computing . . . . . . . 4.2.1 Introduction . . . . . . . . 4.2.2 Code explanation . . . . . .
. . . . . . .
. . . . . . .
. . . . . . .
. . . . . . .
. . . . . . .
. . . . . . .
. . . . . . .
. . . . . . .
. . . . . . .
. . . . . . .
. . . . . . .
. . . . . . .
. . . . . . .
. . . . . . .
. . . . . . .
. . . . . . .
. . . . . . .
. . . . . . .
29 29 29 30 32 34 34 35
. . . .
. . . .
. . . .
. . . .
5
. . . .
CONTENTS 4.2.3
MPI C code . . . . . . . . . . . . . . . . . . . . . . . . . . .
5 GPGPU Computing 5.1 CUDA with GDAL . . . . . . . 5.1.1 Introduction . . . . . . 5.1.2 Code explanation . . . . 5.1.3 CUDA code . . . . . . . 5.2 OpenCL with Python & GDAL 5.2.1 Introduction . . . . . . 5.2.2 Code explanation . . . . 5.2.3 PyOpenCL code . . . . 5.3 OpenCL with C & GDAL . . . 5.3.1 Introduction . . . . . . 5.3.2 Code explanation . . . . 5.3.3 OpenCL code . . . . . .
38
. . . . . . . . . . . .
. . . . . . . . . . . .
. . . . . . . . . . . .
. . . . . . . . . . . .
. . . . . . . . . . . .
. . . . . . . . . . . .
. . . . . . . . . . . .
. . . . . . . . . . . .
. . . . . . . . . . . .
. . . . . . . . . . . .
. . . . . . . . . . . .
. . . . . . . . . . . .
. . . . . . . . . . . .
. . . . . . . . . . . .
43 43 43 44 47 49 49 50 53 55 55 56 59
. . . . . . . . . . . . . . . . . . . . . code
. . . . . . . .
. . . . . . . .
. . . . . . . .
. . . . . . . .
. . . . . . . .
. . . . . . . .
. . . . . . . .
. . . . . . . .
. . . . . . . .
. . . . . . . .
. . . . . . . .
. . . . . . . .
. . . . . . . .
63 63 63 64 69 72 72 72 78
7 Appendices 7.1 Appendix A: Remote Sensing functions in C . . . . . . . . . 7.1.1 Remote sensing functions compendium: rs.c and rs.h 7.1.2 GRASS GIS dedicated functions . . . . . . . . . . . 7.2 Appendix B: GRASS GIS module & companion files . . . . 7.2.1 Module directory . . . . . . . . . . . . . . . . . . . . 7.2.2 Makefile . . . . . . . . . . . . . . . . . . . . . . . . . 7.2.3 i.vari.html . . . . . . . . . . . . . . . . . . . . . . . . 7.3 Appendix C: Arrays functions in C . . . . . . . . . . . . . . 7.4 Appendix D: kernels holding file for OpenCL . . . . . . . . 7.5 License for the code in this book . . . . . . . . . . . . . . .
. . . . . . . . . .
. . . . . . . . . .
. . . . . . . . . .
. . . . . . . . . .
83 83 83 85 86 86 86 87 87 88 89
. . . . . . . . . . . .
. . . . . . . . . . . .
. . . . . . . . . . . .
. . . . . . . . . . . .
6 Algorithms with GUI 6.1 GRASS GIS . . . . . . . . . . . . . . . 6.1.1 Introduction . . . . . . . . . . 6.1.2 Code explanation . . . . . . . . 6.1.3 GRASS GIS C code . . . . . . 6.2 WxPython . . . . . . . . . . . . . . . 6.2.1 Introduction . . . . . . . . . . 6.2.2 Code explanation . . . . . . . . 6.2.3 WxPython, Python and GDAL
6
. . . . . . . . . . . .
. . . . . . . . . . . .
Chapter 1
Introduction In this age of increasing information recording, geographically-aware information (geoInformation) is becoming of paramount importance for many parts of our civilizations. More and more Earth Observing Satellites (EOS) are circumnavigating the various depths of our Earth orbits. Airborne imagery which has long been recording high spectral and temporal information, is rising to a new level with the availability of low-cost drones. These drones, most of the time equipped with spectrum-corrected digital cameras, provide basic spectral and very high-resolution in terms of space and time. All of these are raster-based geoInformation that need storage, correction, and eventually to find a use, have to be computed into some value that the users needs to classify/quantify/identify. This booklet addresses this rising need of computation of raster-based geoInformation by leveraging the entry point to data access, modification and writing to disk. Most of the time, we are using an external library to facilitate our data access, this library is called the Geospatial Data Abstraction Layer (GDAL; gdal.osgeo.org). You will have to install it on your computer to make most of this booklet code come to life. In other cases, GDAL is most certainly used in the background (as it is in R, through Rgdal plugin) or GDAL is used to initially import data (through the r.in.gdal module in the GRASS GIS environment). GDAL is not only facilitating access to the data inside a geographical data, it also manages the geographical meta-data for the user, so as to provide support while the programmer can concentrate on data computation. When GDAL is writing the output file to disk, the geographical meta-data along with other meta-data of interest are passed to the output file with a minimum of programming. 7
Introduction
1.1
Typical remote sensing work-flow
Human perception is how we conceptualize what we need to make out of our image data. In a simple case, we would formulate such a mental setup: “Those two images should be summed together so as to make a third image.” Though it is clear, the structure needs clearly to be split into atomic actions. According to the level of programming, the atomicity expansion will be different.
1.1.1
High-Level programming
High-level programming is designed to reduce systematic operations for the user. Our problem ends up being a short script consisting of 5 steps. • Load appropriate libraries • Specify locations/filenames for image 1, 2 and output. • Load image number 1 and 2 in memory • Perform the algebra operation of image 1 on image 2, and store in memory • Save the output image on disk As we will see later, some computer memory maybe smaller than the input data. Some high-level languages have functions to avoid step 1 and 2 to read all data, but instead load file description, in order to perform step 3 on a row by row basis.
1.1.2
Lower-Level programming
Low-level programming is lengthier than high-level programming. It takes more time to reach, but it rewards with high control on operations at pixel level. • Specify locations/filenames for image 1, 2 and output. • Set up image file handlers, load row&column numbers, allocate row data memories • Start row loop, load row data for each input • Start column loop, load pixel data values for input 1 and 2. • Perform the addition operation of image 1 pixel on image 2 pixel, store in row memory at column location. • Leave column loop, save row data on file. • Leave row loop. • Free memory, close input and output image files. 8
1.2
Downloading free satellite data from Internet
Downloading satellite imagery from Internet is now common. From 2009, Landsatclass satellites is having all its imagery freely downloadable online. Terra and Aqua satellites have always been freely downloadable since their launch. Typically, a safe way to start with is to reach the Warehouse Inventory Search Tool (WIST), a NASA website (wist.echo.nasa.gov) holding a large amount of free satellite imagery. Below is the initial choice available on WIST.
If you are downloading Modis images, be sure to have at hand a proper tool to manipulate the .hdf file format. The Modis Reprojection Tool (MRT) is such a tool and is available at (lpdaac.usgs.gov/landdaac/tools/modis/). MRT can convert to a more standard GeoTiff file format the Modis images. It can also reproject them to more common projection systems than its storage-purpose projection system the Integrated Sinusoidal. Alternatively, you can use a combination of tools from GDAL. GDAL has a set of small tools that are practical to access information from header file and to perform repeated information on a dataset. You can use gdalinfo (www.gdal.org/gdalinfo.html) for extracting detailed information from the image file header, it extracts proper information about MODIS subdatasets and their naming conventions, add to it gdal translate (www.gdal.org/gdal translate.html) to extract specific bands from the HDF format file into single bands common 9
Introduction formats like GeoTiff. The script below automatically reads and exports each subdataset of any MODIS HDF file in the directory into a subdirectory called processed. #This Unix Shell script automatically extracts MODIS subdatasets # into processed/ subdirectory as GeoTiff (*.tif) files #--------------------------------------------------------#/bin/bash mkdir processed for file in *.hdf do IFS=$’\012’ #Change separator to ’\n’ SDS_list=$(gdalinfo $file | grep "SUBDATASET_.*_NAME.*") for subdataset in $SDS_list do out=$(echo ${subdataset#*=} | sed ’s/[\"\:\.\ ]/\_/g’) #Clean to alphanum gdal_translate -of GTiff ${subdataset#*=} processed/$out.tif done done
Another tool, gdalwarp (www.gdal.org/gdalwarp.html) is dedicated to extract part of images and geolocate them properly. It would reproject the image data, it is useful to note that it also change the file format if you request it to do so. The script below does that with a target projection EPSG:4326 which actually means the following proj4 crs: +proj=longlat +ellps=WGS84 +datum=WGS84 +no defs. #/bin/bash for file in *.hdf do IFS=$’\012’ #Change separator to ’\n’ SDS_list=$(gdalinfo $file | grep "SUBDATASET_.*_NAME.*") for subdataset in $SDS_list do out=$(echo ${subdataset#*=} | sed ’s/[\"\:\.\ ]/\_/g’) #Clean to alphanum gdalwarp -of GTiff -s_srs ’+proj=sinu +R=6371007.181 +nadgrids=@null +wktext’ \ -t_srs EPSG:4326 ${subdataset#*=} processed/$out.tif done done
The Landsat satellite is far more famous among a larger audience, bringing up a more numerous and diverse websites offering download. • http://glovis.usgs.gov/ • http://landsat.gsfc.nasa.gov/ • http://eros.usgs.gov/products/satellite/landsat ortho.html For more information about Landsat and MODIS satellites, their Science websites are located respectively at: • http://landsat.gsfc.nasa.gov/. • http://modis.gsfc.nasa.gov/. 10
Chapter 2
GDAL 2.1 2.1.1
Image Processing in C with GDAL API Introduction
C language is a most widely used computing language, its combination of control and robustness provides generations of programmers with standardized code-base. In this section, we will use the GDAL C API to provide the image handling capacity to our software. GDAL provides functions to open raster files and retrieve their meta-data as well as their image data. Once we have retrieved the image data, it is possible to apply mathematical operations to that data. This part is the algorithmic calculation that the raster input images undergo in order to provide an image result of a certain meaning sought by the user. Once the result is found, it is written to the output file using another GDAL function. If you want to use C language on your Operating System, you have to know that it is always available. On Unix and Linux, the C compilers are generally installed by default and often called either “cc” or “gcc” (C compiler and Gnu C compiler). On MacOSX, “gcc” can be downloaded from www.mac.com or available in the companion DVD of your computer. On MS Windows, you can download MinGW (www.mingw.org). Standard compilation of a C file “cfile.c” for scientific purpose can be done (in case you use gcc) by gcc -o myProg.exe cfile.c -lm. In this case of scientific application, the trailing “-lm” is to tell the compiler that its needs to include mathematical software library which is needed in our case. A Makefile, is a special text file which name is exactly “Makefile” and which is holding information about the compilation of our software. It is convenient, as some software may require complex configurations. An example of a Makefile to replace the compilation command seen above would be as be11
GDAL low. So a compilation command would now be reduce to typing “Makefile” in the Command Line Interface (CLI), also called command prompt in MS Windows. In italic is the specific GDAL Makefile requirement. #A short Makefile contents myProg.exe: cfile.c rs.c gcc -o myProg.exe cfile.c rs.c -lm -I/usr/include/gdal/ -L/usr/lib -lgdal1.7.0
This C code is the basis also for the parallel codes available in the next sections, where the parallelizations structure are emphasized more than the data access. Therefore, this section is a must read as a foundation to concentrate later on the parallelization structures of the next chapters.
2.1.2
Code explanation
Every C code starts with calling definitions of certain types of functions (header files hold them), they are used in the application written after being called. In all cases the header files called start with “stdio.h”, additionally we will also call two very specific header files. The first one (“gdal.h”) holds functions and variables dedicated to make us benefit from the GDAL library to access image datasets having various geographical format structures. The second one “rs.h”, is our header file, holding definition of our algorithms, it is expanded in Appendix A, alongside its C file holding the algorithms themselves. #include #include #include "rs.h"
The main code holds two functions, one called usage(), being essentially a graceful exit in case of problem understanding the input arguments to the application. It has no additional reason to be else being informative, that is. The second function, on the opposite, is the essential part of the application, and for that reason is rightfully called main(). This function, which is also the application itself, takes two sets of arguments. The first one int argc, is a count of all the arguments received by the application, char *argv[] is actual list of all arguments, starting with argv[0] being the application name itself. If the count of arguments argc in inferior to the number of input arguments necessary to run the application (in this case, if argc < 6), then the application launches the function usage(), and exits with a value = 1 (non-zero values on exit is an error report). After that, several variables have to be defined so that they can be used later in the program. Row and columns are integers, access to x-axis and y-axis are always required when working on images. Float (a decimal number type) is used for various pixel values, and temporary ones too. Finally, char (character type) is used for variables holding the input filenames. 12
int main( int argc, char *argv[] ) { if( argc < 6 ) { usage(); return 1; } int row, col; float ndvix, waterx; float temp, tempval; char *inB1, *inB2, *inB7; char *in250QC, *in500QC; char *waterF;
/* /* /* /* /*
Processing pixels */ Temporary pixels */ Input file names */ Input file names */ Output file name */
Once this is done, we load the input and output raster file names into their respective name holders. Note argv index numbering. //Loading the input files names inB1 = argv[1]; inB2 = argv[2]; inB7 = argv[3]; in250QC = argv[4]; in500QC = argv[5]; waterF = argv[6];
Define and load raster files using GDAL functions. //Defining the GDAL input files holders GDALDatasetH hDataset1; //Red Band GDALDatasetH hDataset2; //NIR Band GDALDatasetH hDataset7; //SWIR2 Band GDALDatasetH hDataset8; //Quality Assessment 250m GDALDatasetH hDataset9; //Quality Assessment 500m //Register all GDAL image drivers to memory GDALAllRegister(); //Open the raster images through GDAL hDataset1 = GDALOpen(inB1,GA_ReadOnly); hDataset2 = GDALOpen(inB2,GA_ReadOnly); hDataset7 = GDALOpen(inB7,GA_ReadOnly); hDataset8 = GDALOpen(in250QC,GA_ReadOnly); hDataset9 = GDALOpen(in500QC,GA_ReadOnly); //Fail the application if unable to load any input file if(hDataset1==NULL||hDataset2==NULL||hDataset7==NULL|| hDataset8==NULL||hDataset9==NULL){ printf("Unable to load one or more input file\n"); exit(1); }
Define holders and load individual image file format types. //Loading the file infos GDALDriverH hDriver1 = GDALGetDatasetDriver(hDataset1); GDALDriverH hDriver2 = GDALGetDatasetDriver(hDataset2); GDALDriverH hDriver7 = GDALGetDatasetDriver(hDataset7); GDALDriverH hDriver8 = GDALGetDatasetDriver(hDataset8); GDALDriverH hDriver9 = GDALGetDatasetDriver(hDataset9);
Define and create the output file and its constituting band. Note the use of input file number 1 information to create a copy for the output file. 13
GDAL
//Creating output file: Water Mask GDALDatasetH hDatasetOut0 = GDALCreateCopy( hDriver1, waterF,hDataset1,FALSE,NULL,NULL,NULL); GDALRasterBandH hBandOut0 = GDALGetRasterBand(hDatasetOut0,1);
Defining and loading the file bands. //Defining the file bands and loading them GDALRasterBandH hBand1 = GDALGetRasterBand(hDataset1,1); GDALRasterBandH hBand2 = GDALGetRasterBand(hDataset2,1); GDALRasterBandH hBand7 = GDALGetRasterBand(hDataset7,1); GDALRasterBandH hBand8 = GDALGetRasterBand(hDataset8,1); GDALRasterBandH hBand9 = GDALGetRasterBand(hDataset9,1);
Once we have access to each image data (composed of one band in this example), the access to each row inside the band should be defined. We do that by discovering the amount of columns and rows in raster input number 1. By knowing the row dimension, we can allocate a row memory (called lines here) of that size for each of the input and output raster files. We would like to bring to your attention the size of line7 and line9, the memory allocation function malloc() uses a length value of nXSize1 divided by 2. This is due to the fact that our reference image for nXSize1 is having a resolution of 250m, and the images referred to by the line7 and line9 rows are at 500m spatial resolution (i.e. half the row size). //Loading Input file number 1 rows and columns int nXSize1 = GDALGetRasterBandXSize(hBand1); int nYSize1 = GDALGetRasterBandYSize(hBand1); //Preparing float float float int int float
processing *line1; //Red Band row *line2; //NIRed Band row *line7; //SWIR3 Band row *line8; //Quality Assessment 250m Band row *line9; //Quality Assessment 500m band row *lineOut0; //Output Band row
//Defining the data rows line1 = (float *) malloc(sizeof(float)*nXSize1); line2 = (float *) malloc(sizeof(float)*nXSize1); line7 = (float *) malloc(sizeof(float)*nXSize1/2); line8 = (int *) malloc(sizeof(int)*nXSize1); line9 = (int *) malloc(sizeof(int)*nXSize1/2); lineOut0 = (float *) malloc(sizeof(float)*nXSize1);
Finally, we access the data row by row, here again the row size is not common to all files, watch out for resizing requirements of line7 and line9. The data is read from hBandx using GDALRasterIO() with the GF Read specification and put in linex, x being a input raster file number. Note the data in line8 and line9 are kept as integer type, since they are not a satellite image physical measurement but in this case a quality control flag binary bit field (i.e. MODIS surface reflectance products Quality Assessment flags). //Accessing the data rowxrow for(row=0;row=1.0){ /*skip it*/ if(temp>1.0) lineOut0[col]=10.0; else if (tempval>=1.0) lineOut0[col]=100.0; else lineOut0[col]=-28768; } // if pixel are correct, process our algorithms else { //NDVI calculation ndvix = ndvi(line1[col],line2[col]); //Water calculation waterx = water_modis(line7[col/2]*0.0001,ndvix); lineOut0[col] = waterx; } }
Once the output row data is in lineOut0 it can be copied to the output raster file using GDALRasterIO() this time with the GF Write specification. //Write image to disk through GDAL GDALRasterIO(hBandOut0,GF_Write,0,row,nXSize1,1,lineOut0,nXSize1,1,GDT_Float32,0,0);
The processing is now over, we need to free the row data memory holders and close the input and output raster files properly with GDALClose(). if( line1 != NULL ) free( line1 ); ... GDALClose(hDataset1); ....
15
GDAL
2.1.3
C code
#include #include #include rs.h void usage() { printf( "-----------------------------------------\n"); printf( "--Modis Processing chain--Serial code----\n"); printf( "-----------------------------------------\n"); printf( "./wm inB1 inB2 inB7\n"); printf( " in250QC in500stateQA\n"); printf( " outWATER\n"); printf( "-----------------------------------------\n"); printf( "inB[1-7] files are surface reflectance files (250&500)\n"); printf( "inB1 and inB2 are Modis 250m\n"); printf( "inB3-7 are Modis 500m, they will be split to 250m\n"); printf( "in250QC is Modis 250/500m Quality Assessment\n"); printf( "in500stateQA is Modis 500m State Quality Assessment\n"); printf( "outWATER is the Water mask output [0-1]\n"); return; } int main( int argc, char *argv[] ) { if( argc < 6 ) { usage(); return 1; } int row,col; float ndvix, waterx; /* Processing pixels */ float temp, tempval; /* Temporary pixels */ char *inB1, *inB2, *inB7; /* Input file names */ char *in250QC, *in500QC; /* Input file names */ char *waterF; /* Output file name */ //Loading the input files names inB1 = argv[1]; inB2 = argv[2]; inB7 = argv[3]; in250QC = argv[4]; in500QC = argv[5]; waterF = argv[6]; //Defining the GDAL input files holders GDALDatasetH hDataset1; //Red Band GDALDatasetH hDataset2; //NIR Band GDALDatasetH hDataset7; //SWIR3 Band GDALDatasetH hDataset8; //Quality Assessment 250m Band GDALDatasetH hDataset9; //Quality Assessment 500m Band //Register all GDAL image drivers to memory GDALAllRegister(); //Open the raster images through GDAL hDataset1 = GDALOpen(inB1,GA_ReadOnly); hDataset2 = GDALOpen(inB2,GA_ReadOnly); hDataset7 = GDALOpen(inB7,GA_ReadOnly); hDataset8 = GDALOpen(in250QC,GA_ReadOnly); hDataset9 = GDALOpen(in500QC,GA_ReadOnly);
16
//Fail the application if unable to load any input file if(hDataset1==NULL||hDataset2==NULL|| hDataset7==NULL||hDataset8==NULL||hDataset9==NULL){ printf("Unable to load one or more input file\n"); exit(1); } //Loading the file infos GDALDriverH hDriver1 = GDALGetDatasetDriver(hDataset1); GDALDriverH hDriver2 = GDALGetDatasetDriver(hDataset2); GDALDriverH hDriver7 = GDALGetDatasetDriver(hDataset7); GDALDriverH hDriver8 = GDALGetDatasetDriver(hDataset8); GDALDriverH hDriver9 = GDALGetDatasetDriver(hDataset9); //Creating output file //Water Mask GDALDatasetH hDatasetOut0 = GDALCreateCopy(hDriver1,waterF,hDataset1,FALSE,NULL,NULL,NULL); GDALRasterBandH hBandOut0 = GDALGetRasterBand(hDatasetOut0,1); //Defining the file bands and loading them GDALRasterBandH hBand1 = GDALGetRasterBand(hDataset1,1); GDALRasterBandH hBand2 = GDALGetRasterBand(hDataset2,1); GDALRasterBandH hBand7 = GDALGetRasterBand(hDataset7,1); GDALRasterBandH hBand8 = GDALGetRasterBand(hDataset8,1); GDALRasterBandH hBand9 = GDALGetRasterBand(hDataset9,1); //Loading Input file number 1 rows and columns int nXSize1 = GDALGetRasterBandXSize(hBand1); int nYSize1 = GDALGetRasterBandYSize(hBand1); //Preparing float float float int int float
processing *line1; //Red Band row *line2; //NIRed Band row *line7; //SWIR3 Band row *line8; //Quality Assessment 250m Band row *line9; //Quality Assessment 500m band row *lineOut0; //Output Band row
//Defining the data rows line1 = (float *) malloc(sizeof(float)*nXSize1); line2 = (float *) malloc(sizeof(float)*nXSize1); line7 = (float *) malloc(sizeof(float)*nXSize1/2); line8 = (int *) malloc(sizeof(int)*nXSize1); line9 = (int *) malloc(sizeof(int)*nXSize1/2); lineOut0 = (float *) malloc(sizeof(float)*nXSize1); //Accessing the data rowxrow for(row=0;row=1.0){ /*skip it*/ if(temp>1.0) lineOut0[col]=10.0;
17
GDAL
else if (tempval>=1.0) lineOut0[col]=100.0; else lineOut0[col]=-28768; } // if pixel are correct, process our algorithms else { //NDVI calculation ndvix = ndvi(line1[col],line2[col]); //Water calculation waterx = water_modis(line7[col/2]*0.0001,ndvix); lineOut0[col] = waterx; } } //Write image to disk through GDAL GDALRasterIO(hBandOut0,GF_Write,0,row,nXSize1,1,lineOut0,nXSize1,1,GDT_Float32,0,0); } if( line1 != NULL ) free( line1 ); if( line2 != NULL ) free( line2 ); if( line7 != NULL ) free( line7 ); if( line8 != NULL ) free( line8 ); if( line9 != NULL ) free( line9 ); if( lineOut0 != NULL ) free( lineOut0 ); GDALClose(hDataset1); GDALClose(hDataset2); GDALClose(hDataset7); GDALClose(hDataset8); GDALClose(hDataset9); GDALClose(hDatasetOut0); }
18
2.2 2.2.1
Python-GDAL scripting Introduction
Python (www.python.org), is an object-oriented high-level programming language, also called by some a scripting language, because it does not need explicit compilation into an application binary file to be used. Python-GDAL bindings (pypi.python.org/pypi/GDAL/) are a number of tools for programming and manipulating geospatial raster data. The purpose of this example code is to calculate band-wise top of atmosphere reflectance, and use them to calculate NDVI and Albedo for a Landsat 7 ETM+ image of around Ubon Ratchathani in North Eastern Thailand. The image can be downloaded from the Global Land Cover Facility website (glcf.umiacs.umd.edu), or alternatively a direct download link is available in the beginning of the code itself. It has to be added that top of atmosphere reflectance can be converted to surface reflectance by using an atmospheric correction model such as 6S (6s.ltdri.org), this is not covered in here.
2.2.2
Code explanation
The initial part of the program requires to load GDAL libraries and its dependent friend, the numerical python (numpy.scipy.org) library. This provides the supporting functions for opening files (gdal array. LoadFile()), saving the output array (SaveArray()), and towards the end of the code, some more functions used for saving the last output file (Albedo) with projection and georeference information. # For Image Processing from math import * import numpy from osgeo import gdalnumeric from osgeo import gdal from osgeo.gdal_array import * from osgeo.gdalconst import *
Since we are going to convert Level 1G Digital Numbers (DN) into Top of Atmosphere reflectance, we need to load appropriate constants. There are DN to radiance conversion parameters (L1Max, L1min, etc.), exo-atmospheric band-wise irradiances (KEXO1, etc.), sun elevation (sun elevation), day of year (doy), and a combined solar/astronomical constant (constant). # DN to radiance conversion factors #(Check if they are correct for your image) LMax = [191.6,196.5,152.9,241.1,31.060,10.8] Lmin = [-6.2,-6.4,-5.0,-5.1,-1.0,-0.35] #Exo-Atmospheric band-wise irradiance KEXO = [1970.0,1843.0,1555.0,1047.0,227.1,80.53] # Unless you use p127r049 2000/11/04, these must be changed sun_elevation = 51.3428710
19
GDAL
doy = 311 # Cos(sun zenith angle) / (pi * (Sun-Earth distance)^2) constant=(cos ( (90-sun_elevation) * pi/180 ) / ( pi * (1+0.01672 * sin ( 2 * pi * (doy - 93.5 ) / 365))**2))
Let us suppose we try to do the same processing on each band. It starts with the creation of an object “b”, by loading the file with python-GDAL into an array. “b” is then used into the creation of “result”, an array holding the top of atmosphere reflectance in the respective band processed. Finally, the array “result” is saved in a file on disk with an appropriate filename. It has to be noted in this case that the file will not be having any projection and other georeference. Finally, all the objects in memory are flushed out of the RAM (del result,b). # Landsat Band 1 b =gdal_array. LoadFile(’b1.tif’) result = ((b * ((L1Max-L1min)/255.0) + L1min) / (constant * KEXO1)) SaveArray(result,’b1_ref.tif’,’GTiff’) #Empty memory objects del result,b
This is nice, but not really efficient to repeat several times the same for each of the input band files. So we implement a loop over the filenames and input parameters. This makes more sense then, since we now have the power to import Digital Number (DN) values and compute them into reflectance at top of atmosphere, this for each band in one list of tasks repeated over all input files. We start by creating a object have 5 subscript slots, each one to hold the 5 bands to be processed. After that, we can start our loop, loading each of the 5 input files using LoadFile() with their filenames. We return the output array “b[i]” and we set ourselves to create the output file name, making a case to skip the number 6, since band 6 of Landsat 5TM is a temperature band, thus not of our interest for NDVI and Albedo processing. Once the object “b[i]” received its data, we are interested in saving it to file with projection and georeference information, so that it can be used in GIS and remote sensing software later. This involves copying this specific information from another file, here it is band 1 (“b1.tif”). We use GetGeoTransform() and GetProjection() for that purpose. Once this information in memory, we open the albedo array with gdal array.OpenArray() and set the projection/georeference of its object (“out”) using SetProjection() and SetGeoTransform(). We then set the definition of the output image format driver (here ENVI), once this is initialized, we can use the driver to create a GeoTiff output file, using the filename “albedo” and the projected/georeferenced GDAL array “A”. Once we are through we clear the memory from the unnecessary objects, including the GDAL array “A”. #satellite has 5 bands, so 5 array handle objects b=[0,0,0,0,0,0] #Top Of Atmosphere Reflectance for i in range (0,6): DN = LoadFile(F[i]) b[i] = (DN * ((LMax[i]-Lmin[i])/255.0) + Lmin[i]) / (constant * KEXO[i])
20
#Create output file name if i != 5: output_filename=’b’+str(i+1)+’_ref’ else: #skip band 6 which is temperature, not shortwave reflectance output_filename=’b’+str(i+2)+’_ref’ #Create output file with projection A = OpenArray(b[i]) geot=A.SetGeoTransform( geoT ) proj=A.SetProjection( proJ ) output=driver.CreateCopy(output_filename, A) #Empty memory objects del A, DN, output, geot, proj
Once all bands are processed to their respective Top Of Atmosphere Reflectance (TOAR), NDVI is calculated in the same way, using Landsat 5TM band 3 and 4 at TOAR, which are respectively “b[2]” and “b[3]” in our memory handling object “b”. #NDVI=(NIR-Red)/(NIR+Red) ndvi = (b[3]-b[2])/(b[3]+b[2]) #prepare/create output file with projection ndvi = OpenArray(ndvi) ndvi.SetGeoTransform( geoT ) ndvi.SetProjection( proJ ) driver.CreateCopy(’ndvi’, ndvi) #Empty memory objects del ndvi
Eventually, the Albedo TOAR can also be calculated and written on disk with geographical information attached. #Broadband Albedo (0.3-3 micrometers) albedo = (0.293 * b[0]) + (0.274 * b[1]) + (0.233 * b[2]) + ( 0.156 * b[3]) + (0.033 * b[4]) + ( 0.011 * b[5]) #prepare/create output file with projection albedo = OpenArray(albedo) albedo.SetGeoTransform( geoT ) albedo.SetProjection( proJ ) driver.CreateCopy(’albedo’, albedo)
Finally, free the last memory objects. #Empty memory objects del albedo, b
21
GDAL
2.2.3
Python Code
# Landsat 7 ETM + image downloaded from GLCF #ftp.glcf.umiacs.umd.edu/glcf/Landsat/WRS2/p127/r049/ # p127r049_7x20001104.ETM-EarthSat-Orthorectified/ #p127r049 2000/11/04 around Ubon Ratchathani, North East Thailand. # Metadata in the text file: p127r049_7x20001104.met #Requires >8Gb RAM to run completely #Purpose: Calculate NDVI and Albedo #Usage: /usr/bin/python -u "ndvi_albedo.py" #if problem of libgrass: MAPSET is not set #then: set GDAL_SKIP = GRASS F=[] F.append(’p127r049_7t20010518_z48_nn10.tif’) F.append(’p127r049_7t20010518_z48_nn20.tif’) F.append(’p127r049_7t20010518_z48_nn30.tif’) F.append(’p127r049_7t20010518_z48_nn40.tif’) F.append(’p127r049_7t20010518_z48_nn50.tif’) F.append(’p127r049_7t20010518_z48_nn70.tif’) # For Image Processing from math import * import numpy from osgeo import gdalnumeric from osgeo import gdal from osgeo.gdal_array import * from osgeo.gdalconst import * # Set our output file format driver driver = gdal.GetDriverByName( ’ENVI’ ) # Set our output files Projection parameters # from input file number 1 tmp = gdal.Open(F[0]) geoT = tmp.GetGeoTransform() proJ = tmp.GetProjection() del tmp #DN to radiance conversion factors #(Check if they are correct for your image) LMax = [191.6,196.5,152.9,241.1,31.060,10.8] Lmin = [-6.2,-6.4,-5.0,-5.1,-1.0,-0.35] #Exo-Atmospheric band-wise irradiance KEXO = [1970.0,1843.0,1555.0,1047.0,227.1,80.53] #Unless you use p127r049 2000/11/04, these must be changed sun_elevation = 51.3428710 doy = 311 #Cos(sun zenith angle) / (pi * (Sun-Earth distance)^2) constant=(cos((90-sun_elevation) * pi/180 ) / (pi * (1+0.01672 * sin (2 * pi * (doy - 93.5) / 365)) ** 2)) #satellite has 5 bands, so 5 array handle objects b=[0,0,0,0,0,0] #Top Of Atmosphere Reflectance for i in range (0,6): DN = LoadFile(F[i]) b[i] = (DN * ((LMax[i]-Lmin[i])/255.0) + Lmin[i]) / (constant * KEXO[i]) if i != 5: output_filename=’b’+str(i+1)+’_ref’
22
else: #skip band 6 which is temperature, not shortwave reflectance output_filename=’b’+str(i+2)+’_ref’ #Create output file with projection A = OpenArray(b[i]) geot=A.SetGeoTransform( geoT ) proj=A.SetProjection( proJ ) output=driver.CreateCopy(output_filename, A) #Empty memory objects del A, DN, output, geot, proj
#NDVI=(NIR-Red)/(NIR+Red) ndvi = (b[3]-b[2])/(b[3]+b[2]) #prepare/create output file with projection out = OpenArray(ndvi) out.SetGeoTransform( geoT ) out.SetProjection( proJ ) driver.CreateCopy(’ndvi’, out) #Empty memory objects del out, ndvi #Broadband Albedo (0.3-3 micrometers) albedo = (0.293 * b[0]) + (0.274 * b[1]) + (0.233 * b[2]) + ( 0.156 * b[3]) + (0.033 * b[4]) + ( 0.011 * b[5]) #prepare/create output file with projection albedo = OpenArray(albedo) albedo.SetGeoTransform( geoT ) albedo.SetProjection( proJ ) driver.CreateCopy(’albedo’, albedo) #empty memory objects del albedo, b
23
GDAL
24
Chapter 3
R Statistical Language 3.1 3.1.1
R raster scripting Introduction
R statistical software (www.r-project.org), is actually a high-level programming language in itself, initially designed after the S statistical language, it has now become a large open source repository of complex algorithms and scientific models. Because of its high-level, R is short-handed, yet a powerful analytical tool that new generation of Life scientists should have in their toolbox. In this example we will use the “RemoteSensing” (remote sensing operations) package, available directly from inside the R command prompt by typing: install.packages(“RemoteSensing”,repos=“http://R-Forge.R-project.org”) The “RemoteSensing” package has the following dependencies: “raster” (rasterbased operations), “bitops” (bit operations), “sp” (spatial operations) and “rgdal” (GDAL for R). All dependencies are installable in the same way as any other R package using install.packages(“package name”). The “raster” dependency package deals with basic spatial raster (grid) data access and manipulation. It can deal with very large files and includes standard raster calculations such as overlay, aggregation, and merge. It builds on two other packages, a spatial data handler “sp” and our most known GDAL library wrapped into R under the name of “rgdal”. The “RemoteSensing” package provides basic satellite image processing functions such as pre-processing, some indices like Albedo, water mapping and vegetation indices (NDVI, SAVI, etc...). 25
R Statistical Language
3.1.2
Code explanation
In R, you first start by setting your working directory, using the function setwd(). This will define where your input/output data will be found/generated. The example below show a typical Unix/Linux working directory. # Set Working Directory setwd("/home/user/RSDATA/Modis")
After that, you need to load the geoInformation handling library “raster” and the remote sensing library “RemoteSensing”. This will enable you to call, process and write geoInformation on the fly. # Load Libraries library(raster) library(RemoteSensing)
Once this is ready, load your satellite images in R memory, using the rasterFromFile() and rasterReadAll() functions. The first one sets up the raster information the second one loads data into the R memory object. # Load files from Hard Disk band1
CUDA code
#include #include #include __global__ void waterid(float *red, float *nir, float *band7, float *water, int N) { int i = blockIdx.x * blockDim.x + threadIdx.x ; if ( i < N ){ water[i]=(nir[i]-red[i])/(red[i]+nir[i]); if(water[i] < 0.1 && band7[i] < 0.04) water[i] = 1; else water[i] = 0; } } int main() { /**GDAL STUFF***************/ //Loading the input files GDALDatasetH hDatasetRed; //Red band GDALDatasetH hDatasetNir; //NIR band GDALDatasetH hDatasetBand7; //band7 GDALAllRegister(); hDatasetRed = GDALOpen("/home/user/MODIS_b1.tif",GA_ReadOnly); hDatasetNir = GDALOpen("/home/user/MODIS_b2.tif",GA_ReadOnly); hDatasetBand7 = GDALOpen("/home/user/MODIS_b7.tif",GA_ReadOnly); if(hDatasetRed==NULL||hDatasetNir==NULL||hDatasetBand7==NULL){ printf("At least one input file could not be loaded\n"); exit(1); } //Loading the file infos GDALDriverH hDriverRed; hDriverRed = GDALGetDatasetDriver(hDatasetRed); //Creating output file GDALDatasetH hDatasetWater; hDatasetWater=GDALCreateCopy(hDriverRed,"water.tif",hDatasetRed,FALSE,NULL,NULL,NULL); GDALRasterBandH hBandWater; hBandWater = GDALGetRasterBand(hDatasetWater,1); //Loading the file bands GDALRasterBandH hBandRed,hBandNir,hBandBand7; hBandRed = GDALGetRasterBand(hDatasetRed,1); hBandNir = GDALGetRasterBand(hDatasetNir,1); hBandBand7 = GDALGetRasterBand(hDatasetBand7,1); int nX = GDALGetRasterBandXSize(hBandRed); int nY = GDALGetRasterBandYSize(hBandRed); /**CUDA STUFF***************/ /* pointers to host memory */ float *red, *nir, *band7, *water; /* pointers to GPU device memory */ float *red_d, *nir_d, *band7_d, *water_d; int N=nX*nY; N=row x col processing in Device Memory
47
GPGPU Computing
/* Allocate arrays on host*/ red = (float*) malloc(sizeof(float) * nir = (float*) malloc(sizeof(float) * band7 = (float*) malloc(sizeof(float) water = (float*) malloc(sizeof(float)
N); N); * N); * N);
for(int i=0; ilabel =_("Calculates Visible Atmospherically Resistant Index."); module->description = _("Uses red, green and blue bands.");
Another set of variables allocations is the “Option”, this will define input and output files, they maybe any kind of files, though in this case the GRASS function G define standard option() is set with G OPT R INPUT or G OPT R OUTPUT. The “ R ”, specifies that our set of instructions is regarding input/output files of type raster. After that initialization, we can modify the structures elements (i.e. key, label, etc...) as we see fit to our purpose. In the case of the output structure, we just initialize it with default raster type output arguments: G OPT R OUTPUT. struct Option *input1, *input2, *input3, *output; /*CLI/GUI input options */ input1 = G_define_standard_option(G_OPT_R_INPUT); input1->key = "red"; input1->label =_("Name of the red channel surface reflectance map"); input1->description = _("Range: [0.0;1.0]"); input2 = G_define_standard_option(G_OPT_R_INPUT); input2->key = "green"; input2->label =_("Name of the green channel surface reflectance map"); input2->description = _("Range: [0.0;1.0]"); input3 = G_define_standard_option(G_OPT_R_INPUT); input3->key = "blue"; input3->label =_("Name of the blue channel surface reflectance map"); input3->description = _("Range: [0.0;1.0]"); output = G_define_standard_option(G_OPT_R_OUTPUT);
Two more additional structures are set up, one holding metadata support, the other one holding a color table. Here we also attach their complete use (as can be seen at the end of the example code) to provide clarity about their use. The history incantation is self consistent and rarely needs change. The color structure is first initialized by Rast init colors() and then a greyscale is applied from -1.0 to +1.0 image range values. This is done using Rast add c color rule(), c for CELL. It associates a pixel value to a RGB triplet, in this case pixel value -1.0 is associated with RGB triplet (0,0,0) which is black color. Likewise, pixel value +1.0 is associated with RGB triplet (255,255,255) which is white color. /* Beginning of code: Create memory slot for metadata */ struct History history; /* End of code: Copy metadata */ Rast_short_history(result, "raster", &history); Rast_command_history(&history); Rast_write_history(result, &history); /* Beginning of code: Create memory slot for color rules */ struct Colors colors; CELL val1, val2; /* For colors range*/ /*End of code: Color table from -1.0 to +1.0 in grey */ Rast_init_colors(&colors);
65
Algorithms with GUI
val1 = -1.0; val2 = 1.0; Rast_add_c_color_rule(&val1, 0, 0, 0, &val2, 255, 255, 255, &colors);
Next variable set to be initialized is relating to the input/output raster files, respectively, their file names variable holders, their file descriptors, file row values holders, and finally pixel values. It is to be noted here that generally row data and pixels can be set to DCELL (GRASS double type), as it is converted automatically when reading the data in from the raster files as we will see later. /*Input/Output Files name holders*/ char *bluechan, *greenchan, *redchan, *result; /*Input/Output Files descriptors */ int infd_redchan, infd_greenchan, infd_bluechan, outfd; /*Input row data variables*/ DCELL *inrast_redchan, *inrast_greenchan, *inrast_bluechan; /*Output row data variable*/ DCELL *outrast; /*Input Pixel variables*/ DCELL d_bluechan, d_greenchan, d_redchan;
After variables initialization, the module is being initialized within the GRASS processing environment with G gisinit(). After this point, as we mentioned earlier, the module is defined, its inputs, outputs are set up, and the user can input the appropriate arguments to order the module to process raster files. /* Initialize Module in GRASS GIS */ G_gisinit(argv[0]);
Once the user has provided the module with input arguments, the code is running G parser() on all the input argument set. If not appropriate, the module exists gracefully with meaningful information about what it feels did not go well, and a full instruction set about the module appropriate input arguments. /*Check module input arguments */ if (G_parser(argc, argv)) /*if check failed, exit gracefully */ exit(EXIT_FAILURE);
From this point onwards, the access to the raster files is starting, first by their file names taken from the module input arguments. /* load file names */ redchan = input1->answer; greenchan = input2->answer; bluechan = input3->answer; result = output->answer;
Once the filenames are stored, the files are accessed using the Rast open old() internal function and given each a file descriptor. Finally, a row data memory 66
is allocated for each file using Rast allocate d buf(), since GRASS GIS typically processes raster files on a row by row basis, which is a robust way to handle more raster files data than your computer memory can handle. Similarly, a new raster file is created to receive the module output data using the Rast open raster new() function. Also, as for input raster files, the output raster has a row data being allocated for row-based processing. The various row data are allocated as double type using Rast allocate d buf(), thus the “ d ”. /* Open access to image files and allocate row access memory */ infd_redchan = Rast_open_old(redchan, ""); inrast_redchan = Rast_allocate_d_buf(); /* Create New raster file and row access memory allocation */ outfd = Rast_open_new(result, DCELL_TYPE); outrast = Rast_allocate_d_buf();
Once all this is set up, we can initialize the image processing, by getting the number of rows (Y-axis) and columns (X-axis) from the GRASS computational region window. /* Load max rows and max columns */ nrows = Rast_window_rows(); ncols = Rast_window_cols();
Once inside the row-based loop (in Y-Axis), the code loads the row data from raster images, opens a column-based loop (in X-axis) and loads the pixel values for each raster input based on their (col, row) pair identification. /* Process pixels, access rowxrow first */ for (row = 0; row < nrows; row++) { /* Load rows for each input image */ Rast_get_d_row(infd_redchan, inrast_redchan, row); Rast_get_d_row(infd_greenchan, inrast_greenchan, row); Rast_get_d_row(infd_bluechan, inrast_bluechan, row); /* process the data for (col = 0; col < { d_redchan d_greenchan d_bluechan
on pixel basis*/ ncols; col++) = inrast_redchan[col]; = inrast_greenchan[col]; = inrast_bluechan[col];
Once the pixel is accessed on a case by case basis, the code checks if any of the inputs is holding a NULL value using the G is d null value(), in the positive, the output pixel is directly set to NULL too, by the function G set d null value(). In the negative, the output pixel is filled by the algorithm result coming from the vari() function. /* process NULL Values */ if (Rast_is_d_null_value(&d_redchan)|| (Rast_is_d_null_value(&d_greenchan))|| (Rast_is_d_null_value(&d_bluechan))) Rast_set_d_null_value(&outrast[col], 1);
67
Algorithms with GUI
else /* if not NULL process index values */ outrast[col] = vari(d_redchan, d_greenchan, d_bluechan);
Once the full output row data is given resulting values, it can be sent to the proper row in the output file with the function Rast put d row(). /* Write data to disk */ Rast_put_d_row(outfd, outrast);
Finally, after all the process finished, memory is freed using G free(), and file handles are closed by Rast close(). /* Free memory */ G_free(inrast_redchan); Rast_close(infd_redchan); ...
68
6.1.3 #include #include #include #include #include #include #include
GRASS GIS C code "grass_rs.h"
/* Declare requirements of vari() function */ // double vari(double redchan, double greenchan, double bluechan); int main(int argc, char *argv[]) { int nrows, ncols; int row, col; struct GModule *module; struct Option *input1, *input2, *input3; struct Option *output; struct History history; struct Colors colors;
/*max number of rows/columns*/ /*GRASS GIS Module setup*/ /*CLI/GUI input options */ /*CLI/GUI output options */ /*metadata */ /*Color rules */
char *result; /*output raster name */ int infd_redchan, infd_greenchan; /*File descriptors */ int infd_bluechan, outfd; /*File descriptors */ char *bluechan, *greenchan, *redchan; /*File names holders*/ DCELL *inrast_redchan, *inrast_greenchan; /*Input raster variables*/ DCELL *inrast_bluechan; /*Input raster variables*/ DCELL *outrast; /*Output raster variable*/ DCELL d_bluechan, d_greenchan, d_redchan; /*Input Pixel variables*/ CELL val1, val2; /* For colors range*/ G_gisinit(argv[0]); /* Define CLI/Graphical User Interface inputs and options */ module = G_define_module(); G_add_keyword(_("imagery")); G_add_keyword(_("vegetation index")); G_add_keyword(_("biophysical parameters")); module->label = _("Calculates Visible Atmospherically Resistant Index."); module->description = _("Uses red, green and blue bands."); input1 = G_define_standard_option(G_OPT_R_INPUT); input1->key = "red"; input1->label = _("Name of the red channel surface reflectance map"); input1->description = _("Range: [0.0;1.0]"); input2 = G_define_standard_option(G_OPT_R_INPUT); input2->key = "green"; input2->label = _("Name of the green channel surface reflectance map"); input2->description = _("Range: [0.0;1.0]"); input3 = G_define_standard_option(G_OPT_R_INPUT); input3->key = "blue"; input3->label = _("Name of the blue channel surface reflectance map"); input3->description = _("Range: [0.0;1.0]"); output = G_define_standard_option(G_OPT_R_OUTPUT); if (G_parser(argc, argv)) exit(EXIT_FAILURE); /* load file names */
69
Algorithms with GUI
redchan greenchan bluechan result
= = = =
input1->answer; input2->answer; input3->answer; output->answer;
/* Open access to image files and allocate row access memory */ infd_redchan = Rast_open_old(redchan, ""); inrast_redchan = Rast_allocate_d_buf(); infd_greenchan = Rast_open_old(greenchan, ""); inrast_greenchan = Rast_allocate_d_buf(); infd_bluechan = Rast_open_old(bluechan, ""); inrast_bluechan = Rast_allocate_d_buf(); /* Load max rows and max columns */ nrows = Rast_window_rows(); ncols = Rast_window_cols(); /* Create New raster file and row access memory allocation */ outfd = Rast_open_new(result, DCELL_TYPE); outrast = Rast_allocate_d_buf(); /* Process pixels, access rowxrow first */ for (row = 0; row < nrows; row++) { /* Display row process percentage */ G_percent(row, nrows, 2); /* Load rows for each input image */ Rast_get_d_row(infd_redchan, inrast_redchan, row); Rast_get_d_row(infd_greenchan, inrast_greenchan, row); Rast_get_d_row(infd_bluechan, inrast_bluechan, row); /* process the data for (col = 0; col < { d_redchan d_greenchan d_bluechan
on pixel basis*/ ncols; col++) = inrast_redchan[col]; = inrast_greenchan[col]; = inrast_bluechan[col];
/* process NULL Values */ if (Rast_is_d_null_value(&d_redchan)|| (Rast_is_d_null_value(&d_greenchan))|| (Rast_is_d_null_value(&d_bluechan))) Rast_set_d_null_value(&outrast[col], 1); else /* if not NULL process index values */ outrast[col] = vari(d_redchan, d_greenchan, d_bluechan); } /* Write data to disk */ Rast_put_d_row(outfd, outrast); } /* Free memory */ G_free(inrast_redchan); Rast_close(infd_redchan); G_free(inrast_greenchan); Rast_close(infd_greenchan); G_free(inrast_bluechan); Rast_close(infd_bluechan);
70
G_free(outrast); Rast_close(outfd); /* Color table from -1.0 to +1.0 in grey */ Rast_init_colors(&colors); val1 = -1.0; val2 = 1.0; Rast_add_c_color_rule(&val1, 0, 0, 0, &val2, 255, 255, 255, &colors); /* Copy metadata */ Rast_short_history(result, "raster", &history); Rast_command_history(&history); Rast_write_history(result, &history); exit(EXIT_SUCCESS); }
71
Algorithms with GUI
6.2
WxPython
6.2.1
Introduction
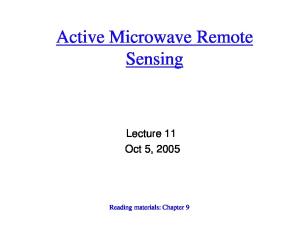
Using python-GDAL bindings is attractive as we have seen earlier, but often a user-friendly interface is required. Creating a GUI is therefore often demanded to programmers while it is not their expertise and often not their interest. To be able to generate a single code, handling both processing and GUI, is a nice homogeneity exercise. Here we use WxPython (www.wxpython.org) alongside the Python-GDAL bindings and NumPy (Numeric Python, www.numpy.org) to load, process and write our raster-based geoInformation all in one code block, providing us with a graphical user interface for arguments input.
Above is the GUI generated by our example code, along with its Help dialog in a Linux Operating System. WxPython is using the Operating System GUI features to display your code exactly the same as any other native applications, using styles and coloring used for your display. The code can be run in different ways, directly from the CLI with “python thiscode.py”, or on some Operating Systems, (double-)clicking on the file directly. It can also be compiled into an executable, on MS Windows O/S, it is handled by a software called py2exe that can be found in www.py2exe.org, for other O/S see www.python.org for more details.
6.2.2
Code explanation
The code (which is actually a script too) starts with indicating its nature and how the Operating System should set its interpretation to Python. #!/usr/bin/python
72
After that, it needs to load libraries to manage for us different parts of our software, namely the GUI aspects first, the O/S libraries essentially to acquire the working directory. Later comes the image processing libraries, numpy for its array handling capacities and finally the GDAL bindings. # For the GUI import wx import wx.lib.filebrowsebutton as filebrowse # For getting the working directory import os # For Image Processing import numpy from osgeo import gdalnumeric from osgeo import gdal from osgeo import gdal_array from osgeo.gdalconst import *
Following that, we need to define our basic global variable, the overview text used in the Help/Info. # Define Info Message overview = """Vegetation Index Processing. Calculates vegetation indices based on biophysical parameters. NDVI: Normalized Difference Vegetation Index NDVI = (band 2 - band 1) / (band 2 + band 1) NDVI = (NIR - Red) / (NIR + Red) Rouse J., Haas R., Schell J. and Monitoring vegetation systems in with ERTS. In Proceedings of the Resources Technology Satellite-1
Deering D. (1974). the Great Plains Third Earth Symposium, Greenbelt."""
The WxPython integration code has only few parts really, a window frame of type wx.Frame inside a main application definition of type wx.App. The widow frame is defined first, then the main application. At the end of the code, an “if statement” is set, so as to run the code if it is alone to be run. # Main Window Frame Definition class MyFrame(wx.Frame) # Main Application Definition class MainApp(wx.App) #When the code is run alone, this gets activated if __name__ == ’__main__’: app = wx.App() frame = MyFrame(None) frame.Show() app.MainLoop()
The Window frame is defined by overriding some of its default parameters such as giving it a title, an initial position on the screen and a display default size. All this is included in a new function definition, the function is an internal wxPython function specific of the wx.Frame, called init (). Additionally, this is where we 73
Algorithms with GUI are going to set up the look of the main GUI window, as you can read, we first use wx.LogNull() to hide any reporting (which may not be safe initially) for aesthetic reasons essentially. Then we declare the input filenames (initialized as null text) and construct the interface. The latter is made in 2 parts, first we call 3 functions (self.make text(), self.make buttons(), self.make fb()) to construct the necessary objects to display inside the window frame. After that we create a wx.BoxSizer object to fit them all with automatic relative locations into the window frame. Once the wx.BoxSizer object called self.mbox is created, we can add object into it with self.mbox.Add(). Once all display object have been added, we set the self.mbox sizer to be activated with self.SetSizer(self.mbox). Finally, we call the function self.bindEvents(), which sets the connection (bindings) between mouse clicks on our display objects and functions we defined inside this application, without bindings, no user interaction ! # Main Window Frame Definition class MyFrame(wx.Frame): def __init__(self,parent, id=-1, title=’Normalized Difference Vegetation Index Processing’, pos=(0,0), size=(400,400), style=wx.DEFAULT_FRAME_STYLE): wx.Frame.__init__(self, parent, id, title, pos, size, style) # Hide warning reporting self.lognull = wx.LogNull() # Input Filenames self.redchan = ’’ self.nirchan = ’’ self.output = ’’ # Construct Interface # Create window frame contents self.make_text() self.make_buttons() self.make_fb() # Arrange objects position in the window frame self.mbox = wx.BoxSizer(wx.VERTICAL) self.mbox.Add((10,10)) self.mbox.Add(self.text, 1, wx.EXPAND|wx.CENTER, 10) self.mbox.Add((10,10)) self.mbox.Add((10,10)) self.mbox.Add(self.cc2, 1, wx.EXPAND, 10) self.mbox.Add(self.cc3, 1, wx.EXPAND, 10) self.mbox.Add(self.cc6, 1, wx.EXPAND, 10) self.mbox.Add((10,10)) self.mbox.Add((10,10)) self.mbox.Add(self.bbox, 1, wx.CENTER, 10) self.mbox.Add((10,10)) self.SetSizer(self.mbox) self.bindEvents()
The three Window Frame display functions are self.make text(), self.make buttons(), self.make fb(). self.make text() is displaying a text in the upper part of the window display frame. self.make buttons() is displaying OK/Cancel/Help buttons in the lower part of the GUI. You can see that even the button images are default from the O/S you run it from. self.make fb() is creating the main interaction, that 74
is a set of three raster file access browsing boxes (filebrowse.FileBrowseButton()), two of them dedicated to opening files and one for saving the output file. For each of these, a companion function, a callback (fbbCallback6(self, evt)), handles the conversion of the raster file (path+name) into the appropriate format inside its allocated variable name. # Front text display def make_text(self): self.text = wx.StaticText(self, -1, "\n\tThis is a full Python + WxPython application,\n\tprocessing NDVI through the use of \n\tGDAL Python bindings and numpy") # Bottom buttons def make_buttons(self): self.bbox = wx.BoxSizer(wx.HORIZONTAL) # OnOK bmp0 = wx.ArtProvider.GetBitmap(wx.ART_TICK_MARK, wx.ART_TOOLBAR, (32,32)) self.b0 = wx.BitmapButton(self, 20, bmp0, (20, 20),(bmp0.GetWidth()+50, bmp0.GetHeight()+10), style=wx.NO_BORDER) self.b0.SetToolTipString("Process") self.bbox.Add(self.b0,1,wx.CENTER,10) # OnCancel bmp1 = wx.ArtProvider.GetBitmap(wx.ART_CROSS_MARK, wx.ART_TOOLBAR, (32,32)) self.b1 = wx.BitmapButton(self, 30, bmp1, (20, 20),(bmp1.GetWidth()+50, bmp1.GetHeight()+10), style=wx.NO_BORDER) self.b1.SetToolTipString("Abort") self.bbox.Add(self.b1,1,wx.CENTER,10) # OnInfo bmp2 = wx.ArtProvider.GetBitmap(wx.ART_HELP, wx.ART_TOOLBAR, (32,32)) self.b2 = wx.BitmapButton(self, 40, bmp2, (20, 20),(bmp2.GetWidth()+50, bmp2.GetHeight()+10), style=wx.NO_BORDER) self.b2.SetToolTipString("Help/Info.") self.bbox.Add(self.b2,1,wx.CENTER,10) # Path+filename seek and set def make_fb(self): # get current working directory self.dirnm = os.getcwd() self.cc2 = filebrowse.FileBrowseButton( self, -1, size=(50, -1), labelText=’RED:’, startDirectory = self.dirnm, fileMode=wx.OPEN, changeCallback = self.fbbCallback2, ) self.cc3 = filebrowse.FileBrowseButton( self, -1, size=(50, -1), labelText=’NIR:’, startDirectory = self.dirnm, fileMode=wx.OPEN, changeCallback = self.fbbCallback3 ) self.cc6 = filebrowse.FileBrowseButton( self, -1, size=(50, -1), labelText=’OUT File: ’, startDirectory = self.dirnm, fileMask=’*.tif’, fileMode=wx.SAVE, changeCallback = self.fbbCallback6 ) # Collect path+filenames def fbbCallback2(self, evt):
75
Algorithms with GUI
self.redchan = str(evt.GetString()) def fbbCallback3(self, evt): self.nirchan = str(evt.GetString()) def fbbCallback6(self, evt): self.output = str(evt.GetString())
With that, it is necessary to set up the basic functionalities of the window frame, there are four of them, three being linked to the main buttons (OnCancel(), OnInfo(), OnOK()), the last one (OnCloseWindow()) is for closing the window frame itself from the Upper Right X button common to all windows. Here we will define three of them, of short and common description and use. The last one (OnOK()), is discussed in the next paragraph. OnCancel() has the function of exiting from the application, this is bound to a button defined in make button(), called self.b1 using the function self.Bind(wx.EVT BUTTON, self.OnCancel, self.b1) in BindEvent(). # Main GUI Operative functionalities (OnCloseWindow,OnCancel,OnInfo,OnOK) #-----------------------------------------------------------------------# Main Window Close button clicked, close application def OnCloseWindow(self, event): self.Destroy() # Cancel button clicked, close application def OnCancel(self, event): self.Destroy() # Display Info/Help def OnInfo(self,event): dlg = wx.MessageDialog(self, overview,’Help’, wx.OK | wx.ICON_INFORMATION) dlg.ShowModal() dlg.Destroy() # Process Equations, Handling and saving of output def OnOK(self,event):
The function OnOK() is the main function, as it is where raster processing is happening. It first check if both input raster filenames are not empty, if they are, it fails gracefully through self.OnFileInError() otherwise it loads the raster files into GDAL arrays. Once loaded, it processes the raster files through the self.ndvi() functions. Finally, the creation, preparation and loading of data into the output file is taken care by first copying geo-transform and projection information from one input file, then loading the processing result GDAL array and copying geotransform and projection data into it. Once the file data is ready, it finds out the output driver info (GeoTiff here), and it creates a copy into a file on disk having a filename and a GDAL array with all proper geographical metadata enabled. # Process Equations, Handling and saving of output def OnOK(self,event): print "red: ", self.redchan, " nir:",self.nirchan, " out:", self.output if(self.redchan==’’): self.OnFileInError() elif(self.nirchan==’’): self.OnFileInError() else:
76
self.redband = gdal_array.LoadFile(self.redchan) self.nirband = gdal_array.LoadFile(self.nirchan) # NDVI self.result=self.ndvi(self.redband, self.nirband) # prepare/create output file tmp = gdal.Open(str(self.redchan)) geoT = tmp.GetGeoTransform() proJ = tmp.GetProjection() out = gdal_array.OpenArray(self.result ) out.SetGeoTransform( geoT ) out.SetProjection( proJ ) driver = gdal.GetDriverByName( ’GTiff’ ) driver.CreateCopy( self.output, out ) self.Destroy()
Finally, we will define the main application that will handle our window frame. We define inside of it a function called OnInit(), creating a frame object, and setting it up to display when the application is launched. Finally we make the frame object the highest level display object so the we are sure no other window will hide it on start. # Main Application Definition class MainApp(wx.App): def OnInit(self): frame = MainFrame(None) frame.Show(True) self.SetTopWindow(frame) return True
77
Algorithms with GUI
6.2.3
WxPython, Python and GDAL code
#!/usr/bin/python import wx import wx.lib.filebrowsebutton as filebrowse import os # For Image Processing import numpy from osgeo import gdalnumeric from osgeo import gdal from osgeo import gdal_array from osgeo.gdalconst import * # Define satellite bands redchan = ’’ nirchan = ’’ # Define output file name output = ’’ # Define Info Message overview = """Vegetation Index Processing. Calculates vegetation indices based on biophysical parameters. NDVI: Normalized Difference Vegetation Index NDVI = (band 2 - band 1) / (band 2 + band 1) NDVI = (NIR - Red) / (NIR + Red) Rouse J., Haas R., Schell J. and Monitoring vegetation systems in with ERTS. In Proceedings of the Resources Technology Satellite-1
Deering D. (1974). the Great Plains Third Earth Symposium, Greenbelt."""
class MyFrame(wx.Frame): def __init__(self,parent, id=-1, title=’Normalized Difference Vegetation Index Processing’, pos=(0,0), size=(400,400), style=wx.DEFAULT_FRAME_STYLE): wx.Frame.__init__(self, parent, id, title, pos, size, style) self.lognull = wx.LogNull() # Input Filenames self.redchan = redchan self.nirchan = nirchan self.output = output # Construct Interface self.make_text() self.make_buttons() self.make_fb() self.mbox = wx.BoxSizer(wx.VERTICAL) self.mbox.Add((10,10)) self.mbox.Add(self.text, 1, wx.EXPAND|wx.CENTER, 10) self.mbox.Add((10,10)) self.mbox.Add((10,10)) self.mbox.Add(self.cc2, 1, wx.EXPAND, 10) self.mbox.Add(self.cc3, 1, wx.EXPAND, 10) self.mbox.Add(self.cc6, 1, wx.EXPAND, 10) self.mbox.Add((10,10)) self.mbox.Add((10,10)) self.mbox.Add(self.bbox, 1, wx.CENTER, 10) self.mbox.Add((10,10)) self.SetSizer(self.mbox)
78
self.bindEvents() # Process Equations, Handling and saving of output def OnOK(self,event): print "red: ", self.redchan, " nir:",self.nirchan, " out:", self.output if(self.redchan==’’): self.OnFileInError() elif(self.nirchan==’’): self.OnFileInError() else: self.redband = gdal_array.LoadFile(self.redchan) self.nirband = gdal_array.LoadFile(self.nirchan) # NDVI self.result=self.ndvi(self.redband, self.nirband) # prepare/create output file tmp = gdal.Open(str(self.redchan)) geoT = tmp.GetGeoTransform() proJ = tmp.GetProjection() tmp = None out = gdal_array.OpenArray(self.result ) out.SetGeoTransform( geoT ) out.SetProjection( proJ ) driver = gdal.GetDriverByName( ’GTiff’ ) driver.CreateCopy( self.output, out ) self.Destroy() def ndvi( self, redchan, nirchan ): """ Normalized Difference Vegetation Index ndvi( redchan, nirchan ) """ result = 1.0*( nirchan - redchan ) result /= 1.0*( nirchan + redchan ) return result def OnFileInError(self): dlg = wx.MessageDialog(self, ’Minimum files to add:\n\n Input files => Red and NIR\n One Output file’, ’Error’,wx.OK | wx.ICON_INFORMATION) dlg.ShowModal() dlg.Destroy() # Path+filename seek and set def make_fb(self): # get current working directory self.dirnm = os.getcwd() self.cc2 = filebrowse.FileBrowseButton( self, -1, size=(50, -1), labelText=’RED:’, startDirectory = self.dirnm, fileMode=wx.OPEN, changeCallback = self.fbbCallback2, ) self.cc3 = filebrowse.FileBrowseButton( self, -1, size=(50, -1), labelText=’NIR:’, startDirectory = self.dirnm, fileMode=wx.OPEN, changeCallback = self.fbbCallback3 ) self.cc6 = filebrowse.FileBrowseButton( self, -1, size=(50, -1), labelText=’OUT File: ’,
79
Algorithms with GUI
startDirectory = self.dirnm, fileMask=’*.tif’, fileMode=wx.SAVE, changeCallback = self.fbbCallback6 ) # Collect path+filenames def fbbCallback2(self, evt): self.redchan = str(evt.GetString()) def fbbCallback3(self, evt): self.nirchan = str(evt.GetString()) def fbbCallback6(self, evt): self.output = str(evt.GetString()) # Front text def make_text(self): self.text = wx.StaticText(self, -1, "\n\tThis is a full Python + WxPython application,\n\tprocessing NDVI through the use of \n\tGDAL Python bindings and numpy") # Bottom buttons def make_buttons(self): self.bbox = wx.BoxSizer(wx.HORIZONTAL) # OnOK bmp0 = wx.ArtProvider.GetBitmap(wx.ART_TICK_MARK, wx.ART_TOOLBAR, (32,32)) self.b0 = wx.BitmapButton(self, 20, bmp0, (20, 20), (bmp0.GetWidth()+50, bmp0.GetHeight()+10), style=wx.NO_BORDER) self.b0.SetToolTipString("Process") self.bbox.Add(self.b0,1,wx.CENTER,10) # OnCancel bmp1 = wx.ArtProvider.GetBitmap(wx.ART_CROSS_MARK, wx.ART_TOOLBAR, (32,32)) self.b1 = wx.BitmapButton(self, 30, bmp1, (20, 20), (bmp1.GetWidth()+50, bmp1.GetHeight()+10), style=wx.NO_BORDER) self.b1.SetToolTipString("Abort") self.bbox.Add(self.b1,1,wx.CENTER,10) # OnInfo bmp2 = wx.ArtProvider.GetBitmap(wx.ART_HELP, wx.ART_TOOLBAR, (32,32)) self.b2 = wx.BitmapButton(self, 40, bmp2, (20, 20), (bmp2.GetWidth()+50, bmp2.GetHeight()+10), style=wx.NO_BORDER) self.b2.SetToolTipString("Help/Info.") self.bbox.Add(self.b2,1,wx.CENTER,10) def bindEvents(self): self.Bind(wx.EVT_CLOSE, self.OnCloseWindow) self.Bind(wx.EVT_BUTTON, self.OnOK, self.b0) self.Bind(wx.EVT_BUTTON, self.OnCancel, self.b1) self.Bind(wx.EVT_BUTTON, self.OnInfo, self.b2) def OnCloseWindow(self, event): self.Destroy() def OnCancel(self, event): self.Destroy() def OnInfo(self,event): dlg = wx.MessageDialog(self, overview,’Help’, wx.OK | wx.ICON_INFORMATION) dlg.ShowModal() dlg.Destroy() class MainApp(wx.App): def OnInit(self): frame = MainFrame(None) frame.Show(True) self.SetTopWindow(frame)
80
return True if __name__ == ’__main__’: app = wx.App() frame = MyFrame(None) frame.Show() app.MainLoop()
81
Algorithms with GUI
82
Chapter 7
Appendices 7.1
Appendix A: Remote Sensing functions in C
7.1.1
Remote sensing functions compendium: rs.c and rs.h
/* File rs.c * Compendium of RS functions for C language */ /* MODLAND QA Bits 250m Unsigned Int bits[0-1] * 00 -> class 0: Corrected product produced at ideal quality -- all bands * 01 -> class 1: Corrected product produced at less than ideal quality -some or all bands * 10 -> class 2: Corrected product NOT produced due to cloud effect -- all bands * 11 -> class 3: Corrected product NOT produced due to other reasons -some or all bands maybe fill value (Note: value of [11] overrides value of [01]) */ int qc250a (int pixel) { return (pixel & 0x03); } /*MODLAND QA Bits * 00 -> class 0: * 01 -> class 1: * 10 -> class 2: * 11 -> class 3: */
500m State QA Cloud State unsigned int bits[0-1] clear cloudy mixed not set, assumed clear
int stateqa500a(int pixel) { /* Select bit 0 and 1 (right-side). hexadecimal "0x03" => binary "11" this will set all other bits to null */ return (pixel & 0x03); } /* Normalized Difference Vegetation Index. */ /* Rouse J., Haas R., Schell J. and Deering D. (1974). Monitoring vagetation systems in the Great Plains with ERTS.
83
Appendices
In Proceedings of the Third Earth Resources Technology Satellite-1 Symposium, Greenbelt.*/ float ndvi(float red, float nir) { double result; if(red+nir class 2: * 11 -> class 3: some or all bands */
250m Unsigned Int bits[0-1] Corrected product produced at ideal quality -- all bands Corrected product produced at less than ideal quality -Corrected product NOT produced due to cloud effect -- all bands Corrected product NOT produced due to other reasons -maybe fill value (Note: value of [11] overrides value of [01])
#include "grass/gis.h" CELL qc250a (CELL pixel) { CELL qctemp; qctemp = pixel & 0x03; return qctemp; } /*MODLAND QA Bits * 00 -> class 0: * 01 -> class 1: * 10 -> class 2: * 11 -> class 3: */
500m State QA Cloud State unsigned int bits[0-1] clear cloudy mixed not set, assumed clear
#include "grass/gis.h" CELL stateqa500a(CELL pixel) { CELL qctemp; /* Select bit 0 and 1 (right-side). hexadecimal "0x03" => binary "11" this will set all other bits to null */ qctemp = pixel & 0x03; return qctemp; } /* File grass_rs.h * Compendium of RS functions headers for C language */ CELL qc250a (CELL pixel); CELL stateqa500a(CELL pixel);
85
Appendices
7.2
Appendix B: GRASS GIS module & companion files
Besides from main.c which is our example file, the remote sensing functions dedicated files (grass rs.c, grass rs.h), building a GRASS GIS module requires a Makefile and a help file named after the module it is describing (i.vari.html). These two files, are joining the three other files into the module directory i.vari/ If you need to have your new module accessed from the main GRASS GIS menu, place the following XML code in grass/gui/wxpython/xml/menudata.xml file, where you feel suitable: VARI Visible Atmospherically Resistant Index. self.OnMenuCmd i.vari
7.2.1
Module directory
Our module is called i.vari, in GRASS GIS, i.* denotes an imagery related module and remote sensing processing of a vegetation index fits that description. Within the GRASS GIS source tree, we will create a directory (i.e. grass/imagery/i.vari/) where we can put the following files in. The checklist for i.vari module directory: • main.c • grass rs.c • grass rs.h • Makefile • i.vari.html
7.2.2
Makefile
MODULE_TOPDIR = ../.. PGM = i.vari LIBES = $(GISLIB) $(RASTERLIB) DEPENDENCIES = $(GISDEP) $(RASTERDEP) include $(MODULE_TOPDIR)/include/Make/Module.make ifneq ($(USE_LARGEFILES),) EXTRA_CFLAGS = -D_FILE_OFFSET_BITS=64 endif default: cmd
86
7.2.3
i.vari.html
DESCRIPTION i.vari calculates VARI: Visible Atmospherically Resistant Index VARI: Visible Atmospherically Resistant Index VARI = (green - red ) / (green + red - blue) it was designed to introduce an atmospheric self-correction Gitelson A.A., Kaufman Y.J., Stark R., Rundquist D., 2002. Novel algorithms for estimation of vegetation fraction Remote Sensing of Environment (80), pp76-87. SEE ALSO i.vari AUTHORS Yann Chemin, International Water Management Institute, Sri Lanka
Last changed: $Date:$
7.3
Appendix C: Arrays functions in C
/* File arrays.c * Compendium of arrays functions for C language */ #include #include /*Create 1D arrays*/ int* ai1d(int X) { int* A = (int*) malloc(X*sizeof(int*)); return A; } float* af1d(int X) { float* A = (float*) malloc(X*sizeof(float*)); return A; } double* ad1d(int X) { double* A = (double*) malloc(X*sizeof(double*)); return A; } /*Create 2D arrays*/ int** ai2d(int X, int Y) { int i; int** A = (int**) malloc(X*sizeof(int*)); for (i = 0; i < X; i++) A[i] = (int*) malloc(Y*sizeof(int)); return A; }
87
Appendices
float** af2d(int X, int Y) { int i; float** A = (float**) malloc(X*sizeof(float*)); for (i = 0; i < X; i++) A[i] = (float*) malloc(Y*sizeof(float)); return A; } double** ad2d(int X, int Y) { int i; double** A = (double**) malloc(X*sizeof(double*)); for (i = 0; i < X; i++) A[i] = (double*) malloc(Y*sizeof(double)); return A; } /* File arrays.h * Compendium of arrays functions headers for C language */ #include /*Create 1D arrays*/ int* float* double*
ai1d(int X); af1d(int X); ad1d(int X);
/*Create 2D arrays*/ int** float** double**
7.4
ai2d(int X, int Y); af2d(int X, int Y); ad2d(int X, int Y);
Appendix D: kernels holding file for OpenCL
/* File kernels.cl * Compendium of RS kernel functions for OpenCL language */ //Define NDVI Kernel //This kernel outputs in (1+NDVI)*100, range [0-200] __kernel void nd_vi( __global const float * red, __global const float * nir, __global float * ndvi) { int i = get_global_id(0); if((nir[i]+red[i])