Real Time Simulation of Fire Extinguishing Scenarios DIPLOMARBEIT zur Erlangung des akademischen Grades
Diplom-Ingenieur im Rahmen des Studiums
Computergraphik/Digitale Bildverarbeitung eingereicht von
Matthias Maschek Matrikelnummer e0325975
an der Fakultät für Informatik der Technischen Universität Wien
Betreuung Betreuer/in: Univ.Prof. Dipl.-Ing. Dr.techn. Werner Purgathofer
Wien, 09.07.2010 (Unterschrift Verfasser/in)
(Unterschrift Betreuer/in)
Technische Universität Wien A-1040 Wien ▪ Karlsplatz 13 ▪ Tel. +43-1-58801-0 ▪ www.tuwien.ac.at
Abstract Around the world most of fires originate from accidentially disposed glowing litter. These fires could be easily extinguished with the right kind of training and encouragement. Since many years there are trainings for employees in fire extinguishing but these trainings are expensive and inefficient. One way to generate sufficient training might be virtual reality. Virtual reality is used to train people around the world in the most complex tools like surgical instruments with success. The aim of the project was to tie those worlds together. In this thesis we try to give an overview how to train people using virtual reality. Furthermore, we explore which technology is needed to create enough realism to immerse the user. We will discuss how we chose the technologies we used to create a system for fire extinguishing training. Then we will explain how we implemented a system based on virtual reality methods. We tried to immerse the user by tracking, stereo rendering and modern rendering techniques to create a convincing output. In this system the fire spread and reaction to the extinguishing agents are calculated in real time. In addidtion, our system provides a powerful content pipeline to create new scenes for the training on the fly.
2
Abstract
Kurzfassung Die meisten Feuer auf der Welt entstehen durch unabsichtliches Entsorgen von noch gl¨uhenden Abf¨allen. Mit der richtigen Ausbildung k¨onnten die meisten Menschen solche kleinen Feuer selbst bek¨ampfen und verhindern. Seit vielen Jahren gibt es bereits f¨ur Mitarbeiter Feuerl¨osch¨ubungen aber diese sind zumeist teuer und nicht besonders akkurat. Ein L¨osungsansatz w¨are Virtual Reality Technologien einzusetzen f¨ur dieses Training. Heutezutage werden schon viele Menschen mit Virtuellen Technologien trainiert die komplexesten Aufgaben zu erf¨ullen, wie zum Beispiel Chirurgen auf feinste Operationsvorg¨ange. Das Ziel dieser Arbeit war es diese beiden Welten zu vereinen. ¨ In dieser Diplomarbeit werden wir versuchen einen Uberblick dar¨uber zu geben wie man am besten mit Vituellen Technologien Unterrichtet und Trainiert. Weiters werden wir Beleuchten welche Vorraussetzungen dieses an die Technologie setzt um die gr¨osst m¨ogliche Immersion zu erreichen. Ausserdem werden wir einen Einblick geben wie wir all dieses Wissen benutzt haben um solch ein System in die Realit¨at umzusetzen. Dieses System benutzt Tracking, Stereo Rendering und moderne Rendering Technologien um die gr¨osst m¨ogliche Immersion zu erreichen. Die Feuerausbreitung und die Reaktion des Feuers auf die L¨oschmittel werden hierbei in Echtzeit berechnet. Weiters ist es sehr einfach m¨oglich neue Szenen f¨ur das Trainig mit den von uns entwickelten Werkzeugen zu erstellen.
Contents 1. Introduction . . . . . . . . . . . . . . . . . . . . . . . . . . . . . . 1.1
5
History of virtual reality in the NASA . . . . . . . . . . . . . . .
5
2. Previous Work . . . . . . . . . . . . . . . . . . . . . . . . . . . . .
7
2.1
2.2
2.3
Learning and training in virtual reality . . . . . . . . . . . . . . .
7
2.1.1
Learing and training fundamentals . . . . . . . . . . . . .
7
2.1.2
Educational use of virtual reality . . . . . . . . . . . . . .
10
Emergency training . . . . . . . . . . . . . . . . . . . . . . . . .
16
2.2.1
Nuclear Training . . . . . . . . . . . . . . . . . . . . . .
16
2.2.2
Fire fighter training . . . . . . . . . . . . . . . . . . . . .
18
2.2.3
VIRTUALFIRES . . . . . . . . . . . . . . . . . . . . . .
21
Medical Applications . . . . . . . . . . . . . . . . . . . . . . . .
22
2.3.1 2.3.2
Haptic Display for a Virtual Reality Simulator for flexible Endoscopy . . . . . . . . . . . . . . . . . . . . . . . . .
22
Haptics in Minimally Invasive Surgical Simulation and Training . . . . . . . . . . . . . . . . . . . . . . . . . . .
27
3. Concept Design . . . . . . . . . . . . . . . . . . . . . . . . . . . . 33 3.1
Previous System . . . . . . . . . . . . . . . . . . . . . . . . . . .
33
3.2
Real fire training . . . . . . . . . . . . . . . . . . . . . . . . . .
34
3.3
Target group . . . . . . . . . . . . . . . . . . . . . . . . . . . . .
35
3.4
Medical Training as good example . . . . . . . . . . . . . . . . .
36
3.5
Repeatability and replayability . . . . . . . . . . . . . . . . . . .
37
3.6
Tracking System . . . . . . . . . . . . . . . . . . . . . . . . . .
38
3.7
Display System . . . . . . . . . . . . . . . . . . . . . . . . . . .
39
3.8
Software decisions . . . . . . . . . . . . . . . . . . . . . . . . .
40
Contents
4
3.9 Modeling . . . . . . . . . . . . . . . . . . . . . . . . . . . . . . 3.10 Collaborative training . . . . . . . . . . . . . . . . . . . . . . . . 4. Implementation . . . . . . . . . . . . . . 4.1 Basic Structure . . . . . . . . . . . . . 4.2 Virtual Reality . . . . . . . . . . . . . . 4.2.1 Stereo Projection . . . . . . . . 4.2.2 Tracking . . . . . . . . . . . . 4.3 Simulation . . . . . . . . . . . . . . . . 4.3.1 Fire spread simulation . . . . . 4.3.2 Wind . . . . . . . . . . . . . . 4.3.3 Fire extinguishing . . . . . . . 4.3.4 Action Objects . . . . . . . . . 4.3.5 Parameter Loading . . . . . . . 4.4 Design Patterns . . . . . . . . . . . . . 4.4.1 Singleton . . . . . . . . . . . . 4.4.2 Factory method . . . . . . . . .
. . . . . . . . . . . . . .
. . . . . . . . . . . . . .
. . . . . . . . . . . . . .
. . . . . . . . . . . . . .
. . . . . . . . . . . . . .
. . . . . . . . . . . . . .
. . . . . . . . . . . . . .
. . . . . . . . . . . . . .
. . . . . . . . . . . . . .
. . . . . . . . . . . . . .
. . . . . . . . . . . . . .
. . . . . . . . . . . . . .
. . . . . . . . . . . . . .
. . . . . . . . . . . . . .
42 42 43 43 45 45 47 47 47 51 51 54 54 55 55 56
5. Results . . . . . . . . . . . . . . . . . . . . . . . . . . . . . . . . . 57 6. Summary . . . . . . . . . . . . . . . . . . . . . . . . . . . . . . . . 68 7. Appendix . . . . . . . . . . . . . . . . . . . . . . . . . . . . . . . . 70 7.1 Example Files . . . . . . . . . . . . . . . . . . . . . . . . . . . . 70 8. Acknowledgments . . . . . . . . . . . . . . . . . . . . . . . . . . 76
Chapter 1
Introduction The aim of this thesis was to create a system to train users in the handling of fire extinguishers. The project was developed in cooperation with the VRVis1 in Vienna. Upon starting on the project we decided to base our training on virtual reality methods. Crucial to our project development was the question when to use virtual reality methods and if used, how to apply it properly into the scenario. Training and learning supported by virtual reality has a long history. Virtual reality has the ability to immerse the user in situations which either are too dangerous, too expensive or completely out of reach for humans. Thus enabling the training of scenarios including these environments. A long lasting history of training in difficult environments has for example the National Aeronautics and Space Administration (NASA).
1.1
History of virtual reality in the NASA
Most of the environments NASA tries to reach are either not reachable or too dangerous for humans to explore directly. How to prepare astronauts to walk and work on the Moon, Mars or even more exotic places like the Venus? Even without trying to send astronauts to these places, roving vehicles are used. Operators have to understand the characteristics of the ground they are driving on. How can you obtain such experience, when noone has never seen or touched these grounds? 1
http://www.vrvis.at
6
Chapter 1. Introduction
NASA has therefore a long history of virtual reality research. It started with the moon program. Astronauts where sent to areas on earth with similar characteristics of the moon surface like the deserts of Arizona or Nevada. The first shots of the moons surface from close fly by satellites where intriguing at the beginning. In 1966, the first unmanned spacecraft Surveyor 1 landed on the moon. Surveyor 1 and its successors Surveyor 2-5 had video cameras that took images from its surroundings and sent those images back to earth. Over the time within the Surveyor program, 87632 images where taken by the spacecrafts. Those images were used to pad hemispheres with a photo mosaic inside. These hemispheres are used to immerse the astronauts in the panorama of the moon. Astronauts summon a feeling for the surrounding on the moon surface. Thus, the first virtual environment for planetary exploration was created. For mission planning real size models of the satellite were used. The landscape calculated out of the images of the other satellites were used to create rocks and ridges around the module. With digitalization of all images the technique to create the environments was shifted more and more towards the computer. Therefore, NASA invested more and more in visualization of the created images directly on the computer. In the beginning large screens seemed sufficient and then more and more heavy and big head mounted displays took their places. In parallel to the moon missions, the eyes of the scientist wandered even further into space toward the Mars. The first images from satellites in orbit around Mars were put together again in a mosaic onto a sphere. Like a globe to visualize the layout of the land on mars. One can see through this long history of virtual reality many facts are already known. What is possible and what is not. We will try to use all that existing knowledge and integrate the best ideas of it into our simulation.
Chapter 2
Previous Work The idea of training and learning using virtual reality has been previously explored. Many researchers and papers are already published regarding how to best utilize the unique features of virtual reality for learning and training.
2.1
Learning and training in virtual reality
Before we can explore existing training systems we should examine the basics and groundworks of learning.
2.1.1
Learing and training fundamentals
Robert Gagne defined learning as ”the process by which human behaviors are changed within certain identifiable situations” [GBW88]. This means that the learning process in humans is triggered by interacting in special environments. Thus, leaving the question what environments are the most stimulating environments for learning purposes? Another basic question is, when does learning occur? The answer is quite easy, basically, every time a sensory nerve is triggered. How do we now trigger the right sensory inputs to integrate the instructions into the knowledge base of the trainee. Still it remains to explore how we learn. David C. Traub sows a simplified
Chapter 2. Previous Work
8
three step learning process [Tra94].
1. Data acquisition. This comprises classic learning. The consumption of information and symbols needed for the understanding of patterns and correlation of patterns. This is the main phase of learning, where virtual reality techniques can be used most effective. By increasing the number of used sensory channels of the human mind the learning is strongly enforced. 2. Collaborative learning. Learning can be enhanced by social interaction with other learners or teachers. Hearing the same theory or explanation through different words or from the viewpoint of someone on the same knowledge level as the learning person can help to deeper understanding of the topic. Here virtual reality is not as strongly rooted as in data acquisition but there are projects trying to use exactly this human behavior in virtual reality to enhance the learning process. 3. Reflection. The learned information can be deepened and remembered for a longer time when the information is applied and reflected over a longer time period. In this point, the applications for virtual reality are limited since the access to virtual reality to the learner are mostly limited. According to this model each step needs its own strategies and technologies to support the learning process. Yet, we begin to understand where and how we can integrate virtual reality technologies into the learning process to support the most efficiently. One can see that even with the best technological equipment the learning process cannot work without human interaction. At last we have to consider the importance of reflection. A point often completely neglected in adult education. Another interesting observation of Robert Gagne was that learning can be divided in different types of learning. Each of them again more or less suited for the application of virtual reality technologies.
2.1. Learning and training in virtual reality
9
1. Verbal information. Gagne puts all common learning into this category. Verbal information is all information that can be learned by studying and understanding of information. The knowledge of each person in an information learning process increases. This is the common application of modern learning techniques. In this field, new technology like virtual reality and interactive learning might be applicable. 2. Intellectual skills. Those are skills like learning of a language or quantification. They are best trained by mentored learning and repetition of application. 3. Cognitive strategies. A high order learning skill, which includes self structuring of learning and the ability of a person to understand a pattern. Since these strategies are based upon self reflection, it is one of the hardest skills to teach. Here a technological approach is hard to find. 4. Attitudes. The change of behavior as taught by a trainer. Currently, the most powerful training device in this area is television which changes the behavioral pattern of millions. 5. Motor skills. Physical skills, involving both skeletal and muscular activities. Those skills are trained best through extreme repetition. Virtual reality is hard to implement here and can only be used as a support system at the moment. Each class has its own characteristics and needs a different approach. Stephen M. Alessi and Stanley R. Trollop [AT85] did posit six methods of computer supported learning.
1. Tutorial instruction. Learning through a strong dialog with the Student. 2. Drills: A sequence of questions or tasks repeatedly presented to the student. 3. Simulations: Representation of physical phenomenons.
Chapter 2. Previous Work
10
4. Instructional games: Motivation for the student through involvement of play elements. 5. Tests: Drills to test the student. 6. Problem-solving environments: Complex environments and their outcome are changed through the students input. Now we have established the basic principles of learning and divided the learning skills into different classes. Still, several questions remain unsolved: How do we implement these findings into educational training simulations? How easy is it for the students to use the systems? And how to integrate the system in the normal education system?
2.1.2
Educational use of virtual reality
In 1991, Bricken et al. [BB] conducted a study with pupils from the age of five to eighteen at the Pacific Science Center in Seattle. The research study was embedded into the Technology Academy. The Technology Academy is a summer day camp where the students have the possibility to explore various scientific fields. In 1991 they tried for the first time to implement a distinct virtual reality course in cooperation with the University of Washington Human Interface Technology Laboratory (HITL). Each week of the course a group of about ten students participated in the virtual reality group. The students were guided through the week by teachers that were not specialized on virtual reality before. The HITL just provided information, training courses for the teachers and the necessary hard- and software. The aim of this project was, that the students should create a virtual world within one week. On the last day of the course they were driven to the HITL lab to see their world in a virtual reality setup. A head mounted display was used for the visual output and a data glove for the input. Throughout the week the students were put together in small groups of two or three. The students used Swifel3D to create the world they imagined. They
2.1. Learning and training in virtual reality
11
had to decide on their own, how to divide the work between the groups. The design and layout of the world was complete open to the students. Interestingly, it was not that hard for them to get used to the modeling program. However, we must note that in 1991 modeling was more primitive like spheres and cubes than polygon modeling which is the standard nowadays. They liked the sense of immersion when using the head mounted display and the Data Glove, even though the head mounted display was fairly low resolution and the input was far from intuitive. While one of the students was immersed in the virtual reality setup the other students could watch what he saw on a normal screen in a higher resolution. The students watching had a better orientation than the student using the head mounted display. Most likely, this is because of the low resolution and field of view of the head mounted display. The analysis of the whole project in the end was quite simple. Mostly they tested whether the students liked the system and if they did, whether they would do it again. Surprisingly, many students liked the system and wanted to work again with virtual reality, even though the system presented to them was neither very immersive or intuitive to use. More recently, in 1999 a team of the university of Illinois at Chicago conducted a one and a half year long study in the Abraham Lincoln Elementary School in Oak Park in Illinois [JMOL01]. The hardware they used was a ImmersaDesk. The ImmersaDesk is a stereo back-projection screen with build in head tracking and audio stereo output. The whole project emphasized on two questions. First, how does virtual reality influence the cognitive process of learning and how to use this knowledge to develop better teaching systems including virtual reality techniques. Second, how can virtual reality be incorporated into the class room without interfering too much with the learning system at the moment. The idea that multiple representations of one problem can help the student to understand the problem itself is not a recent idea. The learning of scientific ideas works by constructing mental models that incorporate those. These models have to support argumentation, explanations and prediction. Visualization helps to construct such models. However, construction of such models is not enough. The student has to coordinate multiple models and their connections. The keys of visualizations for constructing a mental model of a presented problem are:
12
Chapter 2. Previous Work
1. Integration. A visualization can provide parallel information, where a textual description can only provide a sequential description. Thus, supporting to see connections in the presented problem. 2. Dynamics. Dynamic visualizations can provide information of the system, over time. Thus, helping to understand how a system evolves. 3. Reification. By showing some specific instances of the problem, a visualization can help to understand the underlying problem. 4. Activity. Interactive visualizations incorporate the basic idea that learning is facilitated through activity. 5. Immersion. By creating the feeling of experiencing directly the visualization, the user experiences the natural capacity to learn through experimentation. One of the most important goals of scientific teaching is to train the understanding of different representations of the same model. One of the most common mappings in virtual reality is between exocentered and endocentered representations.
• Time. The different representations differ in time, like a time lapse of a plaza or the change of mountains in millions of years. • Transformation. The change of the geometric shape of an object, for example, the change of a planets surface depending on its distance to the sun. • Scale. The same object in different scales, for example, a zoom of the earth in orbit around the sun to the street map of a city. • Part-whole. The understanding of a small working piece and how it affects the whole system, for example, how a piston works and how it affects a whole car.
2.1. Learning and training in virtual reality
13
• Form-function. How the shape of an object affects its working. Again a piston is a good example here. The shape and size of the piston highly affects greatly the power of the motor. • Abstraction. The relation between an abstraction and a real object. For example a blueprint of a building and the real house. • Interpretation. The relation between a hypothesis and evidence or another hypothesis. All these mappings are somehow involved in learning a scientific concept. Analogy and schema articulation comprise two more mappings important for learning a scientific concept. The analogy hypothesis states that the mapping of a new model to an already understood model is easier than learning a new model. Thus, helping to show relationships between one model and another can really ease the learning of the new model. The hypothesis that presentation of different representations of the same model can itself help to understand the underlying model is a theory but not a proven concept. There are studies which show that learning with two representations of the same model helps the students to understand the model faster. Anyway, this hypothesis is not accepted as a basic learning principle by everyone. That two representations can also be irritating for students showed Ainsworth et al. [ABW97]. The students in this study had a hard time to map the two models onto one problem and therefor spending more time on the mapping instead of the understanding of the underlying problem. Furthermore, it is shown that children and adults have the same problem with the mapping task. So teachers or trainers are still necessary to explain the mapping between the representations to make the transition easier. Johnson et al. took an ImmersaDesk to an elementary school in Oakpark to really incorporate the virtual reality equipment right into the school. Using an ImmersaDesk instead of head mounted displays has the advantage that multiple users can view the same scene simultaneausly and it is easier and less stressful to use over a long period of time. They decided to use an own room for the virtual reality equipment next to a Media Center in the school so, that the pupils could use
14
Chapter 2. Previous Work
the virtual reality center instead of the Media Center at the same time. This has the great advantage that the Media Center is as well a nice alternative to normal learning as the virtual reality is. This makes the comparison of engagement of the pupils easier. The conducted research was divided in three separate tracks. A cognitive study track where they studied the building of mental models from multiple perspectives. The QuickWorlds track, where they tried to augment the existing classroom material with virtual reality material to give the students a more in depth look at the same topic. And finally the Virtual Ambients track which focused on the teaching of scientific methods for research. The cognitive study track focused on learning and cognitive understanding of the pupils. The pupils were presented with an asteroid, on which they could walk around. The air was to give them a feeling of walking around on a small spherical world. In a dialogue afterwards they tried to enlarge that understanding towards walking on a sphere the size of the earth. This studies were done first with second graders and then with first graders. The first graders had the most problems in working together. When one pupil was immersed and a second pupil watching on a second screen in an exocentric view, they had difficulties to give directions to the immersed pupil. That shows that the ability to imagine the view of another is an ability that can be learned. This will be a future project of the team. The aim of the QuickWorlds track is to augment the normal lessons for the pupils with new interactive material. The advantages of virtual reality are that the fabrication of new digital models to show the students is way cheaper than producing a new physical representation and some models would be too big to show in a classroom. Since this is the most common usage of modern media in class rooms. And thus the primary target to embed the technology into the classes. In those one and a half year various examples were created for the teachers to support their material. From a pumping animated heart to the eruption of St. Helena they implemented many different scientific models. Introduciong virtual reality on their behalf was approved by teachers and pupils.
2.1. Learning and training in virtual reality
15
The third and last track was the Virtual Ambients. Scientific methods seldom get a course or teaching on its own. Scientific methods like data acquisition can be best taught in a controlled environment with characteristics already known to the teacher. In virtual environments teachers have complete control over the environment and the rules it follows. Also virtual reality environments can show the pupils environment they could not travel to. They tried this theory on three different classes from the first grade, the sixth grade and the fourth grade. All classes were presented with the same environment, a large area the size of several football fields. It was divided in three by three areas. In the environment several kinds of plants were growing. Depending of the grade the classes were presented with a different set of tasks. For the first graders a small team had half an hour to freely explore the environment and report afterwards all their findings to their colleagues. They then had to form a plan how to divide and survey the whole field. Their task was to find how many and which plants are growing in the environment. Each of these small groups hat 20 minutes to explore and take notes. In this time they took turns to take notes and control the virtual reality system. The six graders where confronted with a more complex task. They had to find out correlations which plants grow together. In the last year they tried a third system with fourth graders. The task for them was to survey the scene over a longer period of time and survey the growing habits of the plants. Throughout the time in the school the team from the University of Illinois[JMOL01] learned a great deal of information. The pupils had a hard time using the isometric joystick they provided, which did not surprise us at all. Furthermore, the research team wondered whether it would be easier to use a normal game pad from a game console to control for the pupils. Generally, isometric joysticks are not common in the normal environment of pupils, where as normal game pads are like a natural interface for pupils that age. Since they already know how to use a game pad to navigate in a virtual environment the immersive feeling would be greater. Another more relevant finding was that the pupils tended to get cybersick when looking at the screen while another pupil was head tracked. The fast uncontrolled change of perspective was sometimes too much to handle.
Chapter 2. Previous Work
16
2.2
Emergency training
Now we will focus more on training for extreme situations and emergencies using virtual reality. For each of these works we can ask the question, what have they done right and what can we learn from it.
2.2.1
Nuclear Training
First, we will discuss training for first responders to nuclear facilities using 3D visualization technology [SL05]. The goal of the system Robert L. Sanders et.al. in 2005 presented was to create a training scenario for first responders at a nuclear reactor environment. First responders is a term that describes emergency personnel that is not highly trained for one purpose who can react and arrive at the emergency site in the shortest time. Since this personnel is not specially trained to work in a radioactive environment they have to undergo briefing before they can enter such facilities. The system should help train personnel stationed around such facilities in case of emergency. What is most important in such an scenario is to know what are the critical points inside the facility like the areas where the safe shut down equipment is contained, how to use geiger counters and other equipment to measure the radiation and to understand the warning symbols throughout the facility. In addition, they need a brief knowledge about the dangers of direct radiation and long lasting contamination. The aim was to create a training system which can be distributed to all personnel surrounding the facility. So they created an affordable solution which can be used on normal computers without any expensive equipment. Their solution was to use an established game engine to recreate the facility. They used the Unreal Engine from Epic because it features an easy to use editor and is very flexible through scripting. Also they coupled the system with a simulator that calculates the probability of core damage in a nuclear facility.
2.2. Emergency training
17
The advantages of using a complete game engine like the Unreal Engine are manifold. First, the development can focus on the content and scripting without wasting too much time on creating a render engine and content pipeline. A modern game engine like the Unreal Engine create graphics that are quite realistic compared to many other competing products, since they are focused on impressive graphics. The Unreal engine had already a system build in to simulate things like a radiation field. Radiation is one of the most important things that has to be simulated since it ca not be seen, only measured. In Unreal it is called a ”LavaVolume” but it can easily be exploited so that it can be used as an radiation volume. Since the engine is scriptable, equipment like a geiger counter can be incorporated. This geiger counter simple has to ”measure” whether the user is inside the volume or not. Using this principle they where able to simulate a geiger counter that is displaying the actual amount of radiation and the affect of the radiation on the user using the ”health” of the player in Unreal. They discussed the usability of artificial intelligence to simulate other non players like workers, spectators or other personnel. The lighting situation is flexible which means the scenario can be trained in daylight and at night. Since a nuclear reactor has to be cooled all time, it makes it extremely vulnerable for attacks. To simulate the failure of multiple systems of the power plant a Visual Interactive Site Analysis Code (VISNAC) from ORNL is used. It is a Java based expert system that precalculates the effect of a failure. The system needs a 3D model of the power plant which can be build from CAD drawings or by customizing the models which are provided by the system. As a sample implementation a small experimental reactor was implemented. The scenario is placed in a small university with a nuclear test facility, see figure 2.1. With regard to this thesis project we found the idea most applicable. So, in order to fit our training program into the best suitable and affordable, already existing, engine we decided tu use a free open source engine that fitted our needs.
Chapter 2. Previous Work
18
Fig. 2.1: A research nuclear facility as test scenario. From [SL05]
2.2.2
Fire fighter training
Tazama U. St. Julien et.al. developed a training simulation for fire company officers [SJS03]. A fire officer has to lead a team of four to eight fire man from the outside of the building. A fire officer has typically years of experience and was on site in many emergencies. Furthermore, a fire officer has to take classes in emergency theory and has to undergo practical training. The idea of using a virtual reality system for training is simple. First, not all fire companies encounter all kinds of fire, for example, for the Atalanta Fire Department only 3% of all emergencies are fires. Also the onsite training happens in an heavily controlled environment. This means the fire man does not have to think about structural integrity of the building. At last the onsite trainings create a heavy pollution through the smoke of the fires. The system can be divided into three subsystems. The rendering of the house, fire and smoke, the fire simulation and the command input. The command input was a graphical user interface. The commands are controlled on a second computer and sent over TCP/IP to the simulation. At first a textual command line input was used but since the trainees did not learn all possible commands it has proven unusable. For the graphics and firefighter simulation the Simple Virtual Environments
2.2. Emergency training
19
(SVE) library is used. The fire man are drawn and animated in 3D Studio Max. The animations are exported in a custom file format. At the moment the fireman support cutting, chopping, walking, crawling, climbing, pulling and operating a hose and carrying some tools like axes and ladders, see fig. 2.2. The fire man find their way through the house using a A* path finding algorithm. The A* algorithm is a graph based simple but robust way to get the shortest path to a specific node within that graph.
Fig. 2.2: Firefighters with working tools. From [SJS03]
The fire simulation itself is done off line with the Fire Dynamics Simulator (FDS) from NIST. It is based on numerical solutions of Navier-Stokes equations to approximate the flow of hot air and smoke. The fire spread is calculated in one second intervals. With their system, a 1GHZ based computer it took eight hours to precompute one minute of data. Each time step of the precomputed data has
20
Chapter 2. Previous Work
5.3MB with a resolution of 165x80x20 cells. Certainly, this is too much data to load per second in real time. Since, they did not need all information of the simulation, just 2 out of 5 data samples, they were able to reduce size to roughly 2MB. Finally they used a run length encoding on the data to get to data sizes between 160KB up to 2MB. The fire and smoke are rendered using volume rendering techniques. They used a splatting algorithm as proposed by Jang [JRSF02]. They simply rendered a screen aligned quad with a gauss texture per volume cell. Depending on the smoke density they changed the color and opacity of the texture. They use the same quad and texture for the fire by coloring the texture red, orange and yellow depending on the temperature of the cell, see figure 2.3. This results in moderate frame rates between 8 to 15 frames per second. Since the fire spread is precalculated they have to consider every possible user interaction and calculate a different scenario for those situations. They propose that a split in the decision tree every 15 seconds should be enough to give a interactive response. Since in our case the simulator has to be completely interactive this approach was not usable. We decided to use a simplified fire simulation so that we are able to do all calculations at run-time.
Fig. 2.3: Fire rendering. From [SJS03]
2.2. Emergency training
2.2.3
21
VIRTUALFIRES
Previous work from the University of Technology in Graz used a simmilar approach. The framework is called VIRTUALFIRES [Bee06]. VIRTUALFIRES is focused on real time simulation of fires in tunnels. It presents the tunnel in a full virtual reality environment in either a CAVE or a HMD. The user is able to navigate trough the tunnel and observe the influence of fire and smoke to visibility and heat in the tunnel. For user interaction they are using a PDA which is connected to the simulation through W-LAN. In contrast to our application, VIRTUALFIRES is using mostly precalculated fire spread. The precalculation is outsourced to a server cluster in Sweden and takes considerable time to be done. The fire simulation is based on the Lattice Boltzmann Equation method (LBE) through the application ICE. The calculation is done on a 3D grid which is laid into the tunnel. To keep the calculations stable a minimum of 50 calculations per simulated second have to be done. Only small variations can be done in real-time like switching fans inside of the tunnel on and off. But to keep the simulation real-time only a selected area around the fire is simulated in 3D the rest is simulated in a simplified 1D environment. At the moment only 60.000 to 70.000 cells can be simulated in real-time. Considering the scope of an actual tunnel this numbers are small.
(a) Components of VIRTUALFIRES
(b) Result of VIRTUALFIRES
Fig. 2.4: Figure a shows a diagram of the components of VIRTUALFIRES. Figure b shows a result image of VIRTUALFIRES. [Bee06]
Chapter 2. Previous Work
22
2.3
Medical Applications
2.3.1
Haptic Display for a Virtual Reality Simulator for flexible Endoscopy
Endoscopy is an increasingly important tool for interventional treatment [KM02]. Endoscopic devices are tubular formed, flexible devices for examination of the digestive system. They are used for colonoscopies and gastroscopies. The tip of the tube is flexible and can be bent into two orthogonal directions which is operated by wheels on the head. The tip and the head are connected by a optical link to examine the colon walls. A endoscope is depicted in figure 2.5.
Fig. 2.5: A endoscope with its three parts tip, tube and head. From [KM02]
Endoscopy is especially well suited for virtual reality training because of its limited and constrained environment. The team around O. K¨orner already developed a virtual training for eye surgery. In an endoscopy scenario forces have to be applied on the tube and the two wheels to operate the tip of the endoscope and a bio-mechanical model of the body is needed. Based on that model they simulated a real time haptic feedback of forces on the wheels and the tube. This setup allows the training of the doctors only by means of this software and hardware setup. Since force feedback can be handled differently in this situation we have to distinguish between active and passive force feedback. When inserting the endoscope into the body the friction increases over the length of the endoscope thus the force the doctor has to apply. This can be simply modeled by a brake on the tube which increases the braking force this is called passive force feedback. Another
2.3. Medical Applications
23
scenario is the bending of the tip when approaching flexures in the colon. Here the tip has to be bended accordingly. This should also happen if the doctor does not have his hands on the wheels. This means a motor has to be mounted on the wheels to turn them accordingly, which is called active force feedback.
Their goal was to build a haptic display for the force feedback. A haptic display simulates the touch sense in a realistic way. Situations like this, where the user uses a tool to interact with the simulation are perfectly suited to implement a haptic display. The forces only have to be applied to the rigid tool and thus be transferred to the user.
Since the movement of the endoscope is limited the input can be limited to four degrees of freedom, the translation and rotation of the tube and the bending of the tip in to local axes.
Force feedback on the tube of the endoscope The important part for the simulation is the head of the endoscope. As long as realistic forces and torques are applied to it, the whole simulation seems realistic. The bending of the tube does not have to be recreated. Since the endoscope can not be compressed or twisted, it is enough to apply the forces on the tube at one point inside of the simulator. The solution they found was to mount the tip of the endoscope on a toothed drive belt and thus creating a direct force transfer between the actuators and the endoscope, see figure 2.6. The endoscope is threaded through a tube which is cut open on one side to prevent shifting. A motor is connected to the conveyor belt to create the necessary forces. This takes away the capability of the tip to bend into the two directions. However, this behavior will be simulated directly on the wheels of the head, the bending of the tip itself is no longer necessary.
Chapter 2. Previous Work
24
Fig. 2.6: Force feedback on the tip of the endoscope. From [KM02]
Force feedback on the tip of the endoscope The force feedback is directly applied to the navigation wheels, so bending of the tip is no longer necessary. Since the user does not see the tip, there is no difference for the user noticeable. The force on the wheels is applied by wires or twines which are connected to a motor on the other side to avoid the mounting of the motors inside of the small head, see figure 2.7. Since the force transmission in the real endoscope works in exactly the same way, the tip is connected with the wheels by wires, this gives it a realistic feeling. The wires give for example small forces when the tip touches the wall of the colon which has to be simulated since this is the best navigation point for the doctor. These wires have the same response latency and dampening as the real wires in the endoscope, thus creating a more realistic simulation.
Haptic rendering To create a convincing simulation of forces on the endoscope a bio-mechanical simulation of the colon is needed. There are two approaches, a physical model which uses physical and mechanical laws to simulate the forces on the tube and descriptive modeling which uses free parameters which are used to create the desired behaviour of the endoscope. In a previous work A. Poon [Poo91] uses a bio-mechanical model to simulate
2.3. Medical Applications
25
Fig. 2.7: Force feedback on the wheels of the endoscope. From [KM02]
the behavior of an endoscope in the colon. He uses an implicit function to simulate the behavior of the endoscope. He is evaluating every collision point of the colon with the endoscope to calculate the resulting forces. This leads to a very time consuming calculation. The algorithm presented in the work of K¨orner is also using a descriptive model for real time purposes, but in contrast to the work of Poon they use only the collisions of the tip with the colon for collision response and for the rest of the endoscope they use an analytical model of the colon.
Collision detection and response In normal collision detection and response algorithms the algorithm reacts at the moment, when two objects already penetrate each other and sets them apart again. In contrast, we are now interested in a real object which position can not be changed from one calculation to the next. So we have to distinguish between the calculated position of the endoscope and the real physical position. They used the god-object-algorithm from C. Zilles [ZS95] to determine the surface contact point.
26
Chapter 2. Previous Work
Translational repulsive force on the tube The translational repulsive force on the tube cumulates from two forces. Forces are applied first from the collision of the tip with the walls of the colon and second the dynamic repulsive friction forces of the colon on the tube of the endoscope. Most of the friction occurs in the bends of the colon because of the stiffness of the tube. So the bending of the endoscope is a measure of the friction of the endoscope in the colon. The bending of the endoscope can be estimated with the bendings of the colon since it has to follow its curvature. Torque on the navigation wheels A repulsive torque on the navigation wheels can occur out of two reasons. First, it can happen because of the collision of the tip with the colon wall or second as an indication of a strong bending of the tube. The second reason mostly happens shortly before the tube forms a loop. When the tube forms an abrupt bending the outer wire which connects the tip with the navigation wheels applies a torque on the tip and the navigation wheels, see figure 2.8. The bending of the colon is already known so the torques can be applied accordingly.
Fig. 2.8: An acute bending of the tube causes a torque on the navigation wheels. From [KM02]
2.3. Medical Applications
27
Implementation In the final implementation they used the same polygonal mesh for the visual and haptic representation. They decided to use brush-less motors for the actuation because they do not overheat in stand still and holding positions. Their system provides an update rate of over 100Hz which is sufficient for a realistic experience.
2.3.2
Haptics in Minimally Invasive Surgical Simulation and Training
Minimal invasive surgery (MIS) has changed the routines in operation theaters around the world [BDK+ 04]. Instead of big incisions the surgeon only makes three small incisions where a camera and two tools are inserted. Through this procedure the infection risk can be minimized and the healing process is shorter. The disadvantage is the loss of direct haptic feeling for the surgeon. Since the touch of an organ is the second most important indication for the surgeon after the color and texture. When using the tools in minimal invasive surgery the sense of touch is diminished so the surgeon need a lot more training to understand the more subtle changes of tissue. In addition, the surgeon has a very limited field of view through the camera that gets inserted into the body of the patient in contrast to an open surgery. Since the field of minimal invasive surgery is one of the most important fields in surgery at the moment and training possibilities are limited much research has been conducted for virtual training systems. Both scientific research as well as commercial projects are on going to find a better and easier way to train those scenarios.
28
Chapter 2. Previous Work
Integration of force-reflecting robotic devices Since it is not possible with the technology available today to develop a training system for a complete surgery they focused on part tasks of the whole procedure. They started by replacing the already used mechanical surgical testbeds by a computer driven haptic display. By this they hope to reduce the number of needed kinds of testbeds and create a more realistic experience for the surgeon.
Fig. 2.9: The minimal invasive surgery simulator used by C. Basdogan2004 et.al. From [BDK+ 04]
The system is composed of a high-end personal computer with a powerful graphics card and a box with laprascopic tools. The laprascopic tools are connected to a force feedback device on their distal ends. The whole mechanical system is hidden inside a box.
Haptic rendering for simulation of tool-tissue interactions The purpose of the haptic rendering algorithms is to reflect all tissue collisions in forces on the tools. To create realistic interaction the tools were divided in two distinct kinds of tools based on their functionality, see figure 2.10. Tool group A which are long thin probes to puncture tissue and tool group B for gripping and cutting. To proof the concept they implemented a tool for each group. For the group A they implemented a simple probe and for group B they implemented a forceps.
2.3. Medical Applications
29
Fig. 2.10: The tool groups for lapracopic devices. From [BDK+ 04]
For the rendering part of the real-time simulation they displayed virtual representations of the tools to give the user a visual clue of the positioning of the tools. For the haptic rendering of the tool interactions they implemented a ray rendering algorithm which is based on connected line segments. This is a superior approach toward haptic rendering against most of the already used point based approaches. They also simulated the interaction of the laprascopic tools with surgical material like a catheter. For this they used a combination of ray based and point based collision detection. They used this to implement the task of a catheter insertion. Deformable objects The support of deformable objects to realize soft body tissue like organs is one of the most important factors in realizing a surgery simulator. A deformable body simulation has to give a stable force response, calculate and display smooth deformations and handle the boundary conditions that have to be met. At the moment there are two contrary approaches towards organ deformation models, particle based methods and finite elements methods. The team of C. Basdogan mostly focused on the development of finite element methods and a mesh-free modeling concept. The finite element methods are based on differential equations which model the behavior of the tissue. Those differential equations are then numerically solved per time step. Even though finite element methods are computationally more demanding, they seem more promising for the develop-
30
Chapter 2. Previous Work
ment of soft organ models. One of the big advantages of the finite element methods is, that they only require few parameters to physically work and these parameters can be measured on real life tissue. Also the problem of multi layered and anisotropic elasticity can be modeled easier in finite element methods.
Mesh-based finite-element modeling techniques The complexity of the calculations needed for the finite element method rises with the size of the mesh and the degrees of freedom needed for the simulation. Even though there are already many implementations of finite element methods none of them are suitable for simulating large scale models in real-time. To reduce the workload, they only use the most significant vibration modes of the organs for the simulation.
Mesh-free techniques A good solution a for problem like remeshing after a surgical cut in finite element methods is to use a numerical method that does not rely on a mesh. The method of finite spheres is such a mesh free method [DKS01]. Instead of using a regular mesh, this method uses a scattered set of points or nodes. Each node has an equation that is non zero around the center of the node which is used as the distance field, see figure 2.11.
Fig. 2.11: A regular mesh with its distance function a) vs. a mesh less method b). From [BDK+ 04]
2.3. Medical Applications
31
As well as the normal finite element method MFS uses a Galerkin formulation to generate the discretized version of the differential equations. So the MFT is a generalized form of the mesh based finite element method.
Haptic recording of tissue properties Haptic data of tissue (eg. organs) can be obtained by two different approaches. Parameters like density or geometrical form need to be recorded. Either the user holds a tool which is equipped with sensors r a computer controlls a robotic arm which holds a probe. The main problem is the acquisition of living tissue since the density and texture changes rapidly after death.
Playing back haptic stimuli for training A generally agreed important topic within professionals and researchers is training and performance assessment in minimal invasive surgery. Up until now it was not easy to find quantifiable standardized parameters of the skills of a surgeon. This system could be used to find and standardize such parameters. One of the parameters which can be used to quantify the process is the force profile which is used to move the tools. Those force profiles have already been recorded and used to quantify the skill level of a surgeon using a Markov model. The studies showed that the force profile varies greatly between a skilled and a novice user. The play back of pre-recorded haptic stimuli could be used for further medical training. The force feedback equipped simulator could be used to guide the trainee on a pre-recorded trajectory to show the best possible procedure. A good way to implement such a training would be to use a force that pulls the user back to the trajectory whenever he leaves the perfect line of incision and return the user back to it.
32
Chapter 2. Previous Work
When using a needle inside of the epidural space, haptics are greatly important to find the correct trajectory towards the target. To train this procedure C. Basdogan et.al. implemented two techniques. First the time depended where the user was presented with a prerecorded trajectory of a skilled user and had to follow exactly that trajectory in the same speed and time as the professional. When the trainee used the same trajectory and speed as the skilled user the trainee felt the same forces and torques as the skilled surgeon. When he left the pre-recorded path or used another speed he was pulled back to the pre-recorded path with a force. The other technique was time independent. Here the user only had to stay on the same trajectory. When he is on the same trajectory he again felt the same forces and torques as the skilled surgeon. When leaving the trajectory he was pulled back into it with forces.
Chapter 3
Concept Design In this chapter we focus on what can be learned from the previous work and how we implemented it into our system. We try to evaluate the usefulness of a virtual fire extinguishing training and who should be trained with.
3.1
Previous System
The reasoning behind developing such a system was, that the company we developed the system for was already using a previous one with quite a success, even though the system was in some way simpler than ours. It featured a magnetic tracker to track the extinguisher, which is very coarse in such dimensions and does not provide a really exact measurement of direction and position. Another limitation of the system was that the fire was only simulated and displayed in 2D. The simulation environment was an image of a scene and the fire was an overlaid video. The visual feedback of the extinguishing was done by showing a green reticle on the screen where you are spraying. There was no choice of different agents. But exactly this is a key element in fire extinguishing. If the wrong agent is chosen it can either result in a bad extinguishing performance or in the worst case in rapid boost of fire spread. All this factors resulted in a reduced feeling of immersion. Another quite important factor that is missing here, is that you have to extinguish a fire from front to back, from bottom to top. This could not be implemented in 2D, also the extinguishing of fire behind a ledge was not possible. Those are the reasons why we implemented a complete 3D simulation. Obstructing the view of the user via
Chapter 3. Concept Design
34
smoke was another key point we implemented. This adds another layer of realism to the simulation.
3.2
Real fire training
Common fire extinguishing training takes place on big parking lots or similar. There the trainees are confronted with a small fire. This fire is either a small pan filled with petrol or a bucket that is fueled from below with gas like a stove. In this scenario fire can neither spread nor create enough smoke to really obstruct the view, see figure 3.1.
Fig. 3.1: A typical real fire training
Generally, learning capacity within such trainings is rather limited. Most importantly, trainees learn how to physically handle the fire extinguisher. In those scenarios, you train the correct handling of the extinguisher and the hand eye coordination but not how to approach a real fire. Some extinguishers have to be prepared before they can actually release their agent. Furthermore, the extinguishers are heavier than most of the trainees expect. Another important factor is that the trainer can influence the training at any time. If we want to provide a comparable and better system we should at least be able to train the same facts and exercises that are trainable from this scenario. We came up with the idea of using real digitally tracked extinguishers. To ensure some kind of realism we filled the extinguishers to simulate the weight of the
3.3. Target group
35
agents inside of the extinguishers. We implemented the buttons and valves that have to be operated before the extinguishers are ready. The physical production of these prototypes was done by the TGM1 in Vienna, see figure 3.2. The TGM is a technical school which includes a department for fire safety. In the final version those extinguishers contain a small laptop to send the release signals to the tracker system and to generate a sound. This sound can be configured to be different for the various agents. The trainer can interact anytime with the simulation through an user interface that runs on a dedicated screen.
Fig. 3.2: The extinguishers we used for the simulation.
3.3
Target group
Next we had to think about who we wanted to train. The target group decided on were non professionals. So we did not have to simulate whole burning buildings, 1
http://www.tgm.ac.at/
36
Chapter 3. Concept Design
since in that case a non professional should evacuate the building as fast as possible. Also we did not have to simulate change in the physical state of the scene like collapsing cupboards. Which means we wanted to train localized fires in a controlled environment. Examples for that are burning litter bins or deep fryers. Scenarios like these should be the key point of our training simulation. Non professionals have mostly never used an extinguisher before. So they do not know that there are valves or buttons which have to be pressed before the extinguisher is usable. Also many never realized that extinguishing of an oil fire with water is dangerous because the fire would rapidly spread throughout the scenario in an explosion. Another problem a trainee could encounter when trying to extinguish a fire would be that the agent of the extinguisher runs low or out. This scenario is also included in our simulation, each extinguisher is filled with a specific amount of agent and over the time the pressure of the extinguisher falls, affecting the throwing distance of the agent until in the end no agent is left anymore.
3.4
Medical Training as good example
Apart from the NASA (as mentioned in chapter 1.1) various specialities train with virtual reality. Due to the sometimes risky procedures medicine comprises a field, worth looking at, especially minimal incision surgery. Here we can observe some interesting facts. In this seldom area where augmented reality really started to create a hold. It is already widely used to train young medical personnel. The big advantage of such devices is that complex incisions can be trained without risking the life of patients, as shown in chapters 2.3.1 and 2.3.2. In addition, each training session can be repeated under the same conditions. Some conditions like specific kinds of cancer are not very common, so training of that exact kind of surgery is hard to do without such a system. Another advantage of a virtual training is the replayability. Watching yourself after the training performing the task from various viewpoints can help to understand the mistakes taken while doing the training. As in the real fire training, a physical interface is used in those medical trainings. There is no direct hand interaction with the simulation and the interaction
3.5. Repeatability and replayability
37
is a one to one mapping between the real world and the simulation. This physical interaction layer makes it easier to create a force feedback. In our case the force feedback is simply the weight of the extinguisher. If there is a small lag from the tracking and the simulation it is less recognizable when using a physical device to interact with the simulation. We concluded that it is important to insert a physical layer between the user and the simulation. As in chapter 3.2, we see that the usage of a real extinguisher as input device is a good idea. Another observable fact is that in medical engineering they also have to deal with high risk scenarios. When a surgeon fails the patient can be harmed or, in a worst case scenario, die. This is quite similar to our situation. Since training with real fire can be dangerous. Simulating the fire extinguishing virtually makes it way more save. Comparable to the medical applications costs can be lowered since no gasoline or gas is used and the extinguishers do not have to be refilled after each use.
3.5
Repeatability and replayability
Two important facts for the success of a training system are its replayability and the repeatability. Repeatability means that the same fire should always spread in the same way, so that the same scenario can be trained a couple of times. Repetition has a much higher learning effect than training a lot of different scenarios in a sequence as shown in chapter 2.1.1. We implemented discrete time steps in the simulation to ensure the same fire spread each time. By replaying the trainees actions and pointing out what he has done right or wrong the learning factor is also greatly increased. That is the reason we planned a replay system from the beginning, so that all actions done by the user and the reaction of the fire can be reviewed. We implemented recording and replay features in all subsystems of the simulation to be able to replay a sequence again. This includes the user position and viewing angle and for the extinguisher position, orientation and state. The state of the extinguisher consists of the agent which is filled into the extinguisher and whether the user triggers the release of the agent. Also the state of the simulation gets stored, including the simulation grid and the
Chapter 3. Concept Design
38
action objects.
3.6
Tracking System
To track the interaction of the user we used an optical infrared tracking system from A.R.T. GmbH2 . Ideally it uses four cameras to track markers in six degrees of freedom. We use the tracker to track the position and orientation of the extinguisher nozzle. Also we are tracking the position of the user to set the view in the simulation accordingly. For this the user wears glasses with markers. This enhances the immersion and gives the user the ability to look at the scene from various perspectives.
Fig. 3.3: An infrared tracking camera. Image from A.R.T. GmbH
Infrared tracking systems are based on cameras which only sense images in the infrared spectrum, that is accomplished by filters, see figure 3.3. Each camera has a flash that creates bursts of infrared light to find objects that are retro reflective. Since the view and physical parameters of the cameras are known it is possible to calculate the three dimensional position of such a retro reflective ball when more than one camera image is given, see figure 3.4. In a preparation step the cameras have to be calibrated. To measure the orientation of an object in space more than one retro reflective ball is needed. They are set in a specific arrangement that is unique for each object that has to be tracked. From the position of those balls it is 2
http://www.ar-tracking.de/ARTtrack2.52.0.html
3.7. Display System
39
possible to calculate the orientation of the object. A disadvantage of such systems is that the cameras need an unobstructed sight of the retro reflective balls to track the user. But since normally only one or two persons stand in front of the screen and holding the extinguishers in front of them, occlusion is not a real problem in this case.
Fig. 3.4: The infrared markers used.
3.7
Display System
We decided to use stereo projection to increase the immersive effect and give the user a better feeling for the scenario. Also it is easier to aim into the third dimension when you can really see it. At first we used a dual projection system with circular polarized glasses. For this system two projectors are equipped with two circularly polarized filters to filter either clockwise or counter clockwise turning light, see figure 3.5. Both projectors have to project on the same area, thus requiring a calibration to align both images. Every viewer has to wear special glasses to filter out the opposite image. So the left glass has to filter out the image for the right eye and vice versa. The advantages of this system are that it can be viewed by many people at the same time and that those glasses are very cheap compared to the active glasses mentioned below. The big disadvantage of this system was the bad transportability, the system had to be calibrated after each relocation. Since
Chapter 3. Concept Design
40
the system is planned to be used on the road that was close to unusable. So we replaced the projectors by another system from Projectiondesign1 . The new system is based on active stereo, here the images for the left and the right eye are shown in rapid succession. The user has to wear active glasses, which means the glasses are switching from opaque to transparent to block the incoming light. This has the advantage that no calibration of the projector is necessary and the setup is build up quite fast. In addition, the channel separation is better than in circular polarization filters, thus achieving a better image quality. Also this projector had the advantage that it features two independent video inputs, which simplified the the switch to the new system.
Fig. 3.5: Two projectors for stereo projection.
3.8
Software decisions
As we learned from 2.2.1 it is not necessary to build your own rendering engine. In contrary, it takes a massive effort to build an engine to realize the same visual quality as a commercial rendering engine. Another advantage of using an engine is the reusability. If someone continues the development, just a fast introduction 1
http://www.projectiondesign.com
3.8. Software decisions
41
Fig. 3.6: The active stereo projector used. Images from Projectiondesign
into the simulation is necessary. The needed knowledge for the graphics engine is freely available in the Internet. Since our budget did not include license an commercial engine like the Unreal Engine we decided upon an open source engine which can be used for free. Some of us already had good experiences with the Ogre3D Engine1 and no other engine seemed better suited, so we started the development with it.
For the simulation itself we had to think about a representation of the scene that is in some way accomplishable in real time. In the beginning we where thinking about using the vertices of the models as sparse simulation points which are storing the local temperature. But since the simulation would get really complex in such a scenario and the heat transfer over the air to the next object would be considerably hard to implement we decided to use a regular grid to store the simulation data.
To further enhance the simulation speed we are using an octree to simulate only those cells which are actively participating in the simulation. It has proven that in most cases a grid size of 64x64x64 is enough to simulate a convincing fire in our limited training volume.
1
http://www.ogre3d.org
Chapter 3. Concept Design
42
3.9
Modeling
The concept for the on-the-road trainings is to recreate a scene from the working place of the trainees. This involves a two step process to get the the scene into the simulation. In the first step we use a photometric system to create a 3D mesh out of many photos taken at the scene. We use a commercially available complete solution for this step. The model is then loaded into a custom built 3D editor where the user can edit each object and set its material which is later used for the simulation. If the trainer encounters a material needed for the simulation which is not already included he can simply add it by writing a small configuration file with the burning characteristics of the new material. Also things like ignition points and special objects like oil pans or spray cans can be placed in this editor.
3.10
Collaborative training
We also wanted to include collaborative training into our simulation. Which means the training of the interaction of multiple trainees. When trying to extinguish a fire with two persons new challenges for the trainees arise. They have to coordinate their approach and their actions to extinguish the fire. It is more useful when they try to extinguish the fire from two different sides. It can also be a problem that the agent of one user completely obstructs the view of the second user, this can happen easily when using powder as agent. The decision on the new projector supported this approach as it was able to switch to a non stereo mode which presents the two alternating images to the two users instead of the two eyes, which results in the possibility to give the two users a different point of view. Thus, we were able to implement head tracking for two persons.
Chapter 4
Implementation The simulation was implemented in C++ using the Ogre3D rendering engine as middle ware. Ogre3D was chosen because it is an open and free rendering environment which can be extended with plugins and new features. Ogre3D features already a simple but powerful content tool chain. This tool chain enabled us to start directly at the simulation without wasting too much time on considering and tweaking our own rendering and content pipeline. The simulation now supports loading of ogre scene files through our own defined scene format which contains the simulation material information of the simulation cells. The scene setup and simulation control is done in a dedicated user interface. I did not emphasize on the user interface in this project, i just implemented an interface already existing for this interaction. This chapter is divided into four parts. First we will describe how the basic structure of our system works. Next we explore the implementation of the virtual reality setup. After this we take a look at the simulation of fire spread and extinguishing including how we implemented special cases like exploding oil or electricity in action objects. Finally, we take a quick look into the software engineering basics we used to implement our methods.
4.1
Basic Structure
Our system consists of three main components. One component for the simulation of fire spread, extinguishing, smoke propagation and handling of special objects
Chapter 4. Implementation
44
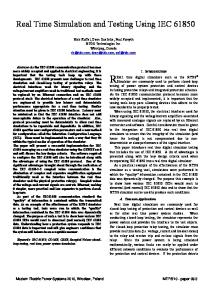
like oil explosions. Also we need a component to render the scene as plausible as possible. And the last component is for input which has to handle the tracker data of the head of the user, the tracker data of the extinguishers and the input signals of the extinguishers themselves. All the components are controlled centrally from the FireSimApp class. This class is implemented as a singleton to give all components access to all other components (See chapter 4.4.1). This class also directly holds the SceneManager. The SceneManager is a class from the Ogre3D engine. It holds the scene of 3D objects and particle systems. A scene in Ogre is build up as a scene graph. Each node in the graph has its own transformations and can hold graphic representations of objects. The simulation is controlled by the FireSimManager class. This class holds the simulation representation of the scene in an octree in the FireOctree class, it handles the representation of the extinguishers and the update of the simulation and visual representation. It initializes and starts the physical simulation of the agents. The agents simulation itself is handled in its own singleton in the physXHandler class. The basic structure is represented in figure 4.1
FrameListener
FireSimFrameListener
FireSimApp +getFrameListener() : FrameListener +getSettingsMap() : map +getFireSimManager() : FireSimManager
1
FireManager
+frameStarted() 1
+AddFirePos() +RemoveFirePos() +SetSmokeVisibility() +updateRoomSmoke() +updateWind()
1
+getRoot() : FireNode +Update()
FireSimManager 1
+getFireOctree() : FireOctree +update()
0...n
implemented as Singleton
8
1
ActionObject
FireNode
+Update() +Extinguish()
+getChild() : FireNode +getFireElement() : FireElement +Update() 0...1
OilObject +Update() +Extinguish()
physXHandler
FireOctree
SprayCan +Update() +Extinguish()
FireElement +Update() +CoolDown()
Fig. 4.1: Class diagram
implemented as Singleton
4.2. Virtual Reality
4.2 4.2.1
45
Virtual Reality Stereo Projection
As mentioned in chapter 3.7 we decided to use stereo projection for the presentation. Since Ogre3D does not support stereo projection out of the box we had to implement it. This gave us the opportunity to get an inside look of the engine and its mechanics, so we decided to start at this point. Our stereo setup in Ogre3D happens in three steps. First, two windows are created, this is already fully supported by Ogre3D. Those windows are then set to full screen on each of the screens. Now for each eye a specific camera with its own view and projection matrix is created. For these cameras a special perspective matrix is needed, we used the offaxis matrix from [Spl03]. This camera model is derived from the simplest camera model the offaxis model, here the cameras are simply set apart with the same offset as the eyes on the user. The problem with this method is that it is very unnatural for the eyes and the brain to focus in such a way. This method is shown in figure 4.2(a). The first step to enhance the viewing experience is to tilt the cameras towards each other, this is shown in figure 4.2(b). As the final step the projection itself is changed, so that the projection planes of both cameras are parallel. It is the basis of our offaxis model, see figure 4.2(c).
(a) A simple offset matrix
(b) The toe in method
(c) The offaxis cameras used
This offaxis matrix is given by equation 4.1a. Where n is the nearplane, f the
Chapter 4. Implementation
46
farplane, r (4.1b) and l (4.1c) the right an left border of the nearplane and t (4.1d) and b (4.1e) the top and bottom border of the nearplane. The top and bottom of the nearplane are for the left and the right eye the same. The left and right borders are calculated differently for both eyes. In the equations for the borders xe , ye and ze are the coordinates of the eye point in the real world. xs and ys are the size of the screen and n is again the distance to the near plane.
2∗n r−l
0 0 0
0
r+l r−l t+b t−b −(f +n) f −n
0
−1
0 2∗n t−b
−2∗n∗f f −n 0
xe − ys ∗ −n 2 ∗ ze xe + ys ∗ −n l= 2 ∗ ze ye − ys ∗ −n t= 2 ∗ ze ye + ys ∗ −n b= 2 ∗ ze
r=
0 0
(4.1a)
(4.1b) (4.1c) (4.1d) (4.1e)
The offset between the left end the right eye is set to 0.61cm, this is anatomically the average distance between human eyes. Those cameras are then also set apart in the virtual world by the same offset. The cameras are connected together in a scene graph node, so that they can easily be moved together. In the last step two Viewports are created, one for each window. Viewports are the targets which Ogre3D uses to draw to. On the hardware side we were using two projectors with circular polarized filters and a polarization conserving screen in the beginning. The final solution is an active stereo system with shutter glasses because it is easier to transport and needs no calibration of the projectors against each other. The new projector also had two video inputs. Which meant, we did not have to change the output from our system.
4.3. Simulation
4.2.2
47
Tracking
For tracking we are using OpenTracker [RS01]. OpenTracker is a virtual reality input library which is freely configurable through XML scripts. The data is processed on a tracker server and then sent to the simulation client over a network. The tracking hardware consists of two infrared cameras which are producing flashes in the infrared spectrum to light up retro reflective balls. Those balls are grouped together in an unique way to identify different objects. Each user has those markers on their glasses for head tracking and each fire extinguisher has their own set on the nozzle. Within the software of the simulation the code is quite simple. We created an interface to the OpenTracker library which only reveals the position and rotation of these objects.
4.3
Simulation
The simulation is based on a fixed update rate and is integrated in the update and render cycle of the engine. The whole simulation is encapsuled in the class FireSimManager. This class again contains an octree to store the state of the simulation and a class to control the display of fire and smoke, the FireManager. The FireSimManager also holds the extinguishers which are handling the tracking of the extinguisher position and the release of the agent. The Player class is also contained in the FireSimManager class, this class is primarily responsible for the tracking of the user and setting up the display, see chapter 4.2.1.
4.3.1
Fire spread simulation
The core of the simulation is an octree. From now on we will distinguish between nodes and cells. Nodes are the nodes of the octree and cells are contained in the leaves of the octree and used for the simulation itself. The octree can be found in
Chapter 4. Implementation
48
the class FireOctree, the nodes in the FireNode class and the cells in the FireElement class. The loading of the scene happens in two steps. First the octree is build with all cells set to non flammable. The scene file contains the description of all flammable cells with their material and burn parameters. So in the course of loading the scene all cells which are flammable are automatically set to their material. The loading is implemented in the FireSimManager class. Each cell can switch between different states. Those states are disabled, active and burning. Burning cells are waking surrounding cells and set them to update. Cells in the update state start to heat up. The rate in which they are increasing their temperature depends on the heating power of the cell itself. The calculation of the heating power is based on the heating power of the surrounding cells, see figure 4.2. So in the first simulation cycle just the cells surrounding the burning cells receive a heating power. Then in each update cycle this heating power can be transfered to the surrounding cells. It takes a couple of update cycles to distribute the heating power, but since we update each thirty milliseconds this lag is not conceivable. The heating power inside of a cell is calculated by a simple formula, see equation 4.2.
n X
e=
i=1
n
ei −
ti ∗ tf 1 + n−1 2
(4.2)
Where e is the transfered heating power, ei is the heating power of the surrounding cells (6-connected), n is the number of active cells in the neighborhood, ti and tf are two scriptable parameters representing the maximum heating power and a falloff. Burning cells have a constant scriptable heating power which is the same as ti . Cells which do not contain flammable material, like air never get a constant heating power. Those cells can only transfer their remaining heating power to the surrounding cells. It is repeated until the heating power is consumed through the falloff parameter, thus limiting the influence of a burning cell. Based
4.3. Simulation
49
Fig. 4.2: Heat Distribution, where the red arrows represent the first, the orange the second, the yellow the third and the green the fourth step of the distribution.
Chapter 4. Implementation
50
on this heating power each cell increases its heat based on a simple formula, see equation 4.3. Where tempi+1 is the temperature to calculate at the actual simulation step, tempi is the temperature of the cell in the previous simulation step, m is a material parameter to control the temperature increase on a material level, ti is the heating power of the cell, w is a wind factor (see chapter 4.3.2) and size a factor to account for different simulation grid sizes. Figure 4.3 shows the simulation where green cells are burning cells and blue cells are just updating. Cells which are disabled are not shown to create a more useful insight.
tempi+1 = tempi + t ∗
m ∗ ti + w size
(4.3)
Fig. 4.3: A screenshot of the fire spread in the simulation. Green cells represent burning cells, blue cells are just updating.
The temperature of the cells is decreased each cycle to simulate the cool down process through the surroundings. Again this decrease is scriptable. Disabled cells are not updated at all. The status of a cell is propagated upwards through the nodes of the octree. In the case all child nodes of a node are disabled, the node
4.3. Simulation
51
itself is not updated too. This way we are able to speed up the whole update cycle.
4.3.2
Wind
The whole simulation can be influenced by wind. The wind is a simple vector pointing into the direction of the wind and the length of the vector representing its strength. We implemented the influence of the wind quite simply. When a cell gets activated we store the direction from which the cell got ignited. In the update steps we multiply the temperature increase with a wind factor. This wind factor is just the dot product of the wind and the direction of ignition. So, when the wind blows in the same direction as the fire spread the cells heat up faster, thus ignite sooner. This creates a realistic simulation of wind.
4.3.3
Fire extinguishing
The fire extinguishing agents emitted by the extinguishers are based on nVidia PhysX1 fluids. PhysX fluids are interconnected points which act together like a fluid. In the end, it is a physically plausible particle effect. We exploit exactly that behavior and use the particles to simulate the extinguishing. The PhysX particle is again wrapped in another particle system. We use the plugin ParticleUniverse for that since the normal particle systems in Ogre do not support PhysX as simulation. ParticleUniverse brings PhysX simulation out of the box and also has a very flexible scripting interface. We use depth impostors [USK05] to render the particles. Depth impostors is a simple effect where you first render the complete scene but only store the depth into the fragments. When rendering the particles you simply compare the depth of the particle with the rendered depth and fade the particles close to a surface by the simple formula 4.4. Where alpha is the resulting transparency of the fragment, depths the depth of the scene at that fragment, depthp the depth of the particle and invP articleDepth is the depth of the particle itself. In this way you can simply get rid of the billboard intersections of the particles 1
http://www.nvidia.com/object/physx_new.html
52
Chapter 4. Implementation
and thus create a more volumetric effect, see figure 4.4.
alpha = saturate(depths − depthp ) ∗ invP articleDepth ∗ 0.5
(4.4)
Fig. 4.4: Agents rendered with the depth impostors effect
ParticleUniverse manages all of our particle systems, including those of smoke and fire. An example of such a ParticleUniverse script can be found in listing 7.4. The specific parameters for the simulation such as the reaction to different materials or the evaporation rate can be controlled through agent configuration files, see listing 7.2. When the user presses the button on the real extinguisher a signal is broadcast through the OpenTracker library and triggered in the simulation loop. When triggered, the extinguishers add particles at the position of the nozzle of the extinguisher and the direction it is pointing, which is again acquired through OpenTracker. The fluid simulation is then done in PhysX. The PhysX simulation also runs
4.3. Simulation
53
with a fixed time step. The time steps for the PhysX simulation are the same as the time steps of the simulation, which is set in a central configuration file. If a nVidia Geforce 8600 or higher is installed, PhysX uses the graphics card to process the fluid simulation. When calculated without the support of the graphics card, fluids take a large amount of processing power and the frame rate drops considerably. In each update of the simulation the particle data is fetched from the graphics card. We then loop over all particles of all agents. Each particle which intersects an active cell cools down the cell. Depending on the cell material and the agent the particle is part of the temperature drain varies. For example water will not cool down a cell which material is set to oil. In the contrary the cell will explode and ignite other cells, but this behavior is modeled by action objects which are explained later. Each particle has its own parameters like the evaporation of the particle which has again impact on the cooling of the node. The temperature drain is calculated by the formula 4.5. Where t is the temperature drain in the cell, ta is the scriptable temperature drain of the specific agent, pmass is the mass of the particle which decreases over time to simulate evaporation, ar is the agent reaction to the material, scale is a global value that can be set to control the difficulty of the simulation and time is the time since the last update of the simulation. The parameter ar is scriptable through the material scripts. For each combination of material and agent this parameter varies.
t = ta ∗ pmass ∗ ar ∗ scale ∗ time
(4.5)
When the temperature of a burning cell drops below its flammable temperature point, the cells state is set to update again. If all burning cells are extinguished, no cell can add heating power to the system, so all cells start to cool down on their own until they reach a certain scriptable low temperature. When this temperature is reached the cell is set to disabled and and will not get updated any more. The other implemented reaction to agents is the drop in oxygen. If CO2 or powder hits a surface it will not cool down the cell as much as others like water. The main extinguishing factor in this case is the diminishing of oxygen. Again how much oxygen is drained out of a cell is scriptable in the agent files. When the oxygen
Chapter 4. Implementation
54
in a burning cell drops below a certain scriptable point the cell is again switched to updating. While a cell is in the updating or burning state, oxygen is constantly added to the cells.
4.3.4
Action Objects
In addition, to be more flexible and create more interactivity we added action objects. All action objects are derived from the base class ActionObject. This class provides the method Update, which is called in every update cycle of the simulation and the method Extinguish, which is called when an agent particle intersects the action object, see listing 7.5. Extinguish is called with the point of intersection with the particle and the agent of the particle. Also Replay and Pause have to be implemented to support the replay feature for training. For example we implemented a OilExplosion object which should add another particle system for an explosion and ignite various points in the scene. At first a simple class OilExplosion is added with the two methods Update and Extinguish. In Extinguish the particle is checked whether it intersects with one of the containing cells. if one of the cells is indeed of the material oil, the cell is set to be exploding. In the next update cycle an explosion is added to the FireManager and ignited. This explosion is a special explosion based on PhysX which creates flares. When these flares hit a surface, they ignite the position of the impact if it is flammable, see figure 4.5.
4.3.5
Parameter Loading
Materials and agents are stored in configuration files, see listing 7.1 - 7.2. On the start up of Ogre3D all resource file directories are searched for parseable files. The directories which should be parsed are defined in the ’resources.cfg’ file in the application root directory. We defined our own files for materials, agents, scenes and action objects. Each class like the FireMaterial class is responsible for parsing its own script files. Those script files contain all parameters needed to make the system expandable at a later state. If a new agent should be added later on, all the
4.4. Design Patterns
55
Fig. 4.5: An explosion caused by extinguishing burning oil with water.
user has to do is to create a new agent script file containing all extinguishing characteristics and the ParticleUniverse script that should be used for the simulation and representation of the agent.
4.4 4.4.1
Design Patterns Singleton
Our whole project is controlled centrally from the class FireSimApp. This class implements a singleton [GHJV95]. A singleton ensures that a class can only be instantiated once. Thus providing the interface to access its methods and public members from one well-known access point. All settings and parameters used for the simulation are stored in this class, thus providing it throughout the whole system. A singleton is implemented by creating a static instance of the class itself and
Chapter 4. Implementation
56
overriding its constructor in a way to just return that static member or, if it is not instantiated, create it. In this way you insure that just one instance of the implemented class can be instantiated at any given moment. We use this mainly to store all our parameters for the simulation in a central point. Also it provides access to the FireSimManager from all points at all time. The FireSimManager is the central point where all simulation steps are cumulated. The FireSimManager contains the FireManager which provides access to all particle systems to simulate fire and smoke. Input through OpenTracker is also accessible throughout the whole project through the singleton pattern. Another point where we implemented the singleton pattern is the physXHandler class. This class is responsible for the physical simulation of the extinguishing agents. It has to provide the render system the position of the particles it controls.
4.4.2
Factory method
We use a factory method to create the action objects for more flexibility in the system. For a more detailed description of action objects see 4.3.4. The idea in using a factory method was to create a possibility to easily extend the simulation. The class ActionObjectFactory contains the factory. All objects created by the factory are subclasses of the ActionObject class. By calling the static GetObject method of the ActionObjectFactory class with the desired action objects name as a string, it creates an instance of the object. In this specific factory we also pass a vector of cells which should react to the simulation.
Chapter 5
Results Finally, in this section we present the system in toto and additional discussion. The first image shows the whole system used by a trainee, see figure 5.1
Fig. 5.1: The system used by a trainee
The realistic rendering of smoke decreases the visibility in the scene. To achieve a realistic look of the scene we implemented various particle effects, this increases the immersion and training effect. This is shown in figure 5.2. To demonstrate the fire spread we show a series of images depicting a specific set of time, see figure 5.3 The complete content creation tool chain enables us the create many interest-
Chapter 5. Results
58
Fig. 5.2: Realistic smoke to increase the immersion
Fig. 5.3: Fire spread in a scene over time
ing scenarios to learn from, some of them are shown in figure 5.4, 5.5 and 5.6. The easy configuration of the fire extinguishing agents allows us to include many different agents. At the moment, we have implemented water which on the one hand reacts on on the other oil and extinguishes the fire mostly by decreasing
59
Fig. 5.4: A heating central as training scenario
Fig. 5.5: A small kitchen with a burning deep fryer
60
Chapter 5. Results
Fig. 5.6: A chemical laboratory to train the handling of burning chemicals
the temperature, this is shown in figure 5.7. We also implemented CO2 which is the opposite of water, it does not decrease the temperature a lot but drains the oxygen and thus suffocates the fire, shown in figure 5.8. Powder is a particularly problematic agent, since it can be easily blown away by wind. This agent is shown in figure 5.9. Finally, we also have a foam agent which is not evaporating like water and therefore stays even after the user has stopped the agent, shown in figure 5.10. As mentioned before reactions of certain agents to materials can be modeled by action objects. For example, we show here what happens when the trainee extinguishes burning oil with water, see figure 5.11. Another example is shown in figure 5.12, here the trainee starts to extinguish even though the electricity in the kitchen is still on. Our system already proved useful for collaborative training, a typical scenario is shown in figure 5.13. Here two extinguishers with different agents are used to extinguish a fire in a kitchen. As mentioned before, the deep fryer should not be extinguished with a water extinguisher, a small explosion would start fire around
61
Fig. 5.7: Water as extinguishing agent
Fig. 5.8: CO2 as extinguishing agent
Chapter 5. Results
62
Fig. 5.9: Powder as extinguishing agent
Fig. 5.10: Foam as extinguishing agent
63
Fig. 5.11: Extinguishing oil with water
Fig. 5.12: Extinguishing while electricity is still on
Chapter 5. Results
64
the fryer.
Fig. 5.13: Collaboration training
The user interface to control the simulation is shown in the following figures. In figure5.14 the setup screen is shown. Here the trainer can choose which scene should be loaded, where the fire should start and whether the the fire would already burn for a while. Also the trainer can configure here what extinguishers are used in the simulation. In figure 5.15 we show the user interface while the simulation runs. Here general information about the state of the simulation is shown, like the time since the fire started and the simulation can be paused and stopped from here. On the last part of the simulation, as shown in figure 5.16, the trainer can rewind the simulation and review the training with the trainee. In the end we give an example how a complete training of a trainee could look like in table 5.1.
65
Fig. 5.14: The user interface to setup the scene.
Fig. 5.15: The user interface to control the running simulation.
Fig. 5.16: The user interface to review the training.
66
Chapter 5. Results
The trainer sets up the scene, including the point where the fire starts and the extinguishers to use.
The trainer starts the simulation. The fire starts to spread from the ignition point.
The trainee tries to extinguish the fire. Note how the pressure of the extinguisher is dropping in the trainers view.
67
The trainee has successfully extinguished the fire.
The trainer rewinds the scene and reviews the extinguishing process together with the trainee. Tab. 5.1: An overview of a typical training scenario
Chapter 6
Summary First, we gave an overview over the state of the art in training with virtual reality. We started with a glance into the learning and training fundamentals which are needed to create a learning effect for the user of the system. In this section we learned how to engage the user in interactions and create an immersive environment. Then we show common learning examples from a school. This school used virtual environments to present the pupils with repeatable and interesting challenges in environments the pupils would not be able to explore otherwise. Due to the experience of this school we were able to come up with the right environment to train. Afterwards we looked at two simulations for emergency training. For emergency training one of the most important things to grasp is the urgency of the situation and how to react accordingly. Exactly this situation was explored with a simulation in a nuclear facility to train the arriving emergency personnel about the evaluation of the danger in this situation. The advantages of using a full render engine instead of a self build engine was therefore most applicable. Another emergency training system we discussed was a fire fighting training simulator. It is mainly used to train the leader of a fire squad how to use the man power in his control most efficiently. At last we looked at medical examples. Here we learned from a minimal incision system and a colonoscopy system, that a virtual reality system always works
69
better if you have a physical interaction layer between the user and the simulation itself. We then gave an overview how the decision process worked that brought us to our implementation. We had to think about how training works at the moment, and how we could improve from there on. We evaluated what we can learn from the medical examples since in medical science virtual reality is already widely used. We discussed the importance of repeatablility and replayablility. Then, the target group needed to be established. Since there was already a proven system for virtual fire extinguishing we integrated the basic ideas as applicable best to our system. Then, we had to decide which tracking system and presentation system should be used. We decided upon an infra red tracker system and a stereo projection system to accomplish the best possible immersion. We also had to decide, whether we wanted to build upon an existing graphics engine or to build our own. We decided to use the freely available open source engine Ogre3D because of its practicability and availability. In order to obtain the users attention we incorporated a photometric system to model workplace scenarios from the place of the trainees. Last, we had the idea to implement a method for collaborative training. We then gave an overview how our system works internally, how we implemented the fire spread simulation and the extinguishing simulation without loosing the ability to operate in real time. Another point of this thesis is how to acquire the tracker data for the users. Also we have shown how we implemented all these features into the Ogre3D engine. In the end we show some results from the implementation.
Chapter 7
Appendix 7.1
Example Files Listing 7.1: Material file
[MaterialConstants] Name=std FlameTemp=600.0 Flamable=true TempCurve=0.4 SmokeCurve=1.0 SmokeColour=0.75 0.60 0.45 SmokeSystem=woodSmokeSystem FireSystem=videoFireSystem FireSystemNum=3 MaxFireTemp=900.0 [Agents] Water=1.0 Foam=1.0 CO2=1.0 Powder=1.0
Listing 7.2: Agent file [AgentConstants] Name=Water TempDrain=10000.0 OxygenDrain=200.0 Evaporation=2.0 ParticleSize=0.2 WindScale=100.0 #restParticlesPerMeter - particle per linear meter resolution, #measured when the fluid is in its rest state (relaxed). restParticlesPerMeter=3.0 #restDensity - target density for the fluid (water is about 1000). restDensity=1000.0 #kernelRadiusMultiplier - sphere radius of influence for particle interaction. kernelRadiusMultiplier=2.3
7.1. Example Files
71
#stiffness - stiffness of the particle interaction related to the pressure. stiffness=50.0 #viscosity - defines the fluid’s viscous behavior. viscosity=10.0 #damping - velocity damping constant, globally applied to each particle. damping=0.1 #packetSizeMultiplier - parallelization of the fluid. packetSizeMultiplier=16.0 motionLimitMultiplier=4.0 surfaceTension=100.0 restitutionForStaticShapes=0.005 dynamicFrictionForStaticShapes=0.1 collisionResponseCoefficient=0.5 collisionDistanceMultiplier=1.05 twoWayInteraction=false gravity=true #externalAcceleration - acceleration, applied to all particles at all timesteps. #simulationMethod - defines whether or not particle interactions are #considered in the simulation. particleInteraction=2
Listing 7.3: Action object file [ActionObjectSettings] Class=OilObject
Listing 7.4: Particle universe script file // ---------------- Begin: Water system with PhysX -------------------system WaterSystem { technique physX { material ParticleUniverse/Water default_particle_width 1 default_particle_height 1 position 0 0 0 visual_particle_quota 8000 renderer Billboard { sorting true render_queue_group 70 } // Emission of smoke particles emitter Box { position emission_rate circle_em_radius circle_em_random circle_em_normal
0 0 -2 400 0.25 true 0 0 -1
Chapter 7. Appendix
72
sphere_surface_em_radius box_em_width box_em_height box_em_depth
0.25 0.2 0.2 4
all_particle_dimensions { min max }
dyn_random
angle direction velocity { min max } time_to_live { min max }
4 0 0 -1 dyn_random
0.5 1
170 180 dyn_random 3 4
} extern
PhysX PhysX
{}
affector { tex_rot_use_own_rotation tex_rot_rotation { min max } tex_rot_speed } affector {
TextureRotator true dyn_random 0 360 0
Scale xyz_scale {
dyn_curved_linear control_point 0 2 control_point 0.25 0 control_point 1 -1
} } affector {
Colour colour_aff_time_colour colour_aff_time_colour colour_aff_time_colour colour_aff_time_colour colour_aff_time_colour
} } }
0 1 1 1 0.025 0.01 1 1 1 0.75 0.25 1 1 1 0.5 0.5 1 1 1 0.1 1 1 1 1 0
7.1. Example Files
73 Listing 7.5: Action object header
#pragma once #include "ParticleUniverseSystemManager.h" #include "ExampleApplication.h" #include "Settings.h" #include "Recorder.h" struct ActionCell { int id; Vector3 position; }; typedef vector::iterator ActionCellsIterator; class Agent; class ActionObject { public: ActionObject(void); virtual ˜ActionObject(void); virtual void Update(RecordedFrame* rf); virtual void Init(Settings settings, vector &cells); virtual void Replay(RecordedFrame* rf); virtual void Extinguish(Vector3 pos, Ogre::String agentType); virtual void Pause(bool pause); virtual void Reset(); protected: Vector3 mPosition; vector mCells; };
List of Figures 2.1
A research nuclear facility as test scenario. From [SL05] . . . . .
18
2.2
Firefighters with working tools. From [SJS03] . . . . . . . . . . .
19
2.3
Fire rendering. From [SJS03] . . . . . . . . . . . . . . . . . . . .
20
2.4
Figure a shows a diagram of the components of VIRTUALFIRES. Figure b shows a result image of VIRTUALFIRES. [Bee06] . . .
21
2.5
A endoscope with its three parts tip, tube and head. From [KM02]
22
2.6
Force feedback on the tip of the endoscope. From [KM02] . . . .
24
2.7
Force feedback on the wheels of the endoscope. From [KM02] . .
25
2.8
An acute bending of the tube causes a torque on the navigation wheels. From [KM02] . . . . . . . . . . . . . . . . . . . . . . .
26
The minimal invasive surgery simulator used by C. Basdogan2004 et.al. From [BDK+ 04] . . . . . . . . . . . . . . . . . . . . . . .
28
2.10 The tool groups for lapracopic devices. From [BDK+ 04] . . . . .
29
2.11 A regular mesh with its distance function a) vs. a mesh less method b). From [BDK+ 04] . . . . . . . . . . . . . . . . . . . .
30
3.1
A typical real fire training . . . . . . . . . . . . . . . . . . . . . .
34
3.2
The extinguishers we used for the simulation. . . . . . . . . . . .
35
3.3
An infrared tracking camera. Image from A.R.T. GmbH . . . . .
38
3.4
The infrared markers used. . . . . . . . . . . . . . . . . . . . . .
39
3.5
Two projectors for stereo projection. . . . . . . . . . . . . . . . .
40
3.6
The active stereo projector used. Images from Projectiondesign . .
41
4.1
Class diagram . . . . . . . . . . . . . . . . . . . . . . . . . . . .
44
2.9
List of Figures
4.2
75
4.4 4.5
Heat Distribution, where the red arrows represent the first, the orange the second, the yellow the third and the green the fourth step of the distribution. . . . . . . . . . . . . . . . . . . . . . . . 49 A screenshot of the fire spread in the simulation. Green cells represent burning cells, blue cells are just updating. . . . . . . . . . . 50 Agents rendered with the depth impostors effect . . . . . . . . . . 52 An explosion caused by extinguishing burning oil with water. . . . 55
5.1 5.2 5.3 5.4 5.5 5.6 5.7 5.8 5.9 5.10 5.11 5.12 5.13 5.14 5.15 5.16
The system used by a trainee . . . . . . . . . . . . . . . . . . . Realistic smoke to increase the immersion . . . . . . . . . . . . Fire spread in a scene over time . . . . . . . . . . . . . . . . . . A heating central as training scenario . . . . . . . . . . . . . . . A small kitchen with a burning deep fryer . . . . . . . . . . . . A chemical laboratory to train the handling of burning chemicals Water as extinguishing agent . . . . . . . . . . . . . . . . . . . CO2 as extinguishing agent . . . . . . . . . . . . . . . . . . . . Powder as extinguishing agent . . . . . . . . . . . . . . . . . . Foam as extinguishing agent . . . . . . . . . . . . . . . . . . . Extinguishing oil with water . . . . . . . . . . . . . . . . . . . Extinguishing while electricity is still on . . . . . . . . . . . . . Collaboration training . . . . . . . . . . . . . . . . . . . . . . . The user interface to setup the scene. . . . . . . . . . . . . . . . The user interface to control the running simulation. . . . . . . . The user interface to review the training. . . . . . . . . . . . . .
4.3
. . . . . . . . . . . . . . . .
57 58 58 59 59 60 61 61 62 62 63 63 64 65 65 65
Chapter 8
Acknowledgments First i want to thank my family and friends who supported me throughout my whole studies. I would also like to thank Anton Fuhrmann and Rainer Splechtna from VRVis for their never-ending patience with my time schedule. Thanks goes to the whole computer graphics institute at the TU Wien for all the support and engagemant they brought.
Bibliography [ABW97] Shaaron E. Ainsworth, Peter A. Bibby, and David J. Wood. Information technology and multiple representations: new opportunities new problems. Journal of Information Techology for Teacher Education, 6:93–105, 1997. [AT85]
Stephen M. Alessi and Stanley R. Trollop. Computer-Based Instruction: Methods and Development. Prentice-Hall Inc., 1985.
[BB]
Meredith Bricken and Chris M. Byrne. Summer students in virtual reality: A pilot study on educational applications of virtual reality technology. In Virtual reality: applications and explorations.
[BDK+ 04] Cagatay Basdogan, Suvranu De, Jung Kim, Manivannan Muniyandi, Hyun Kim, and Mandayam A. Srinivasan. Haptics in minimally invasive surgical simulation and training. IEEE Comput. Graph. Appl., 24(2):56–64, 2004. [Bee06]
Gernot Beer. Virtual training. pages 1–8, 2006.
[DKS01]
Suvranu De, Jung Kim, and Mandayam A. Srinivasan. A meshless numerical technique for physically based real time medical simulations. Proc. Medicine Meets Virtual Reality (MMVR01), 9, 2001.
[GBW88] Robert Gagne, Laslie Briggs, and Walter Wagner. The Principles of Instructional Design. Holt, Rinehart and Winston Inc., 1988. [GHJV95] Erich Gamma, Richard Helm, Ralph Johnson, and John Vlissides. Design Patterns. Addison-Wesley, Boston, MA, January 1995.
78
Bibliography
[JMOL01] Andrew Johnson, Thomas Moher, Stellan Ohlsson, and Jason Leigh. Exploring multiple representations in elementary school science education. Virtual Reality Conference, IEEE, 0:201, 2001. [JRSF02]
Justin Jang, William Ribarsky, Christopher D. Shaw, and Nickolas Faust. View-dependent multiresolution splatting of non-uniform data. In VISSYM ’02: Proceedings of the symposium on Data Visualisation 2002, pages 125–ff, Aire-la-Ville, Switzerland, Switzerland, 2002. Eurographics Association.
[KM02]
Olaf K¨orner and Reinhard M¨anner. Haptic display for a virtual reality simulator for flexible endoscopy. In EGVE ’02: Proceedings of the workshop on Virtual environments 2002, pages 13–ff, Aire-la-Ville, Switzerland, Switzerland, 2002. Eurographics Association.
[Poo91]
A. Poon. Real time simulation of colonoscopy using dynamic models. PHD Thesis, 1991.
[RS01]
Gerhard Reitmayr and Dieter Schmalstieg. Opentracker-an open software architecture for reconfigurable tracking based on xml. In VR ’01: Proceedings of the Virtual Reality 2001 Conference (VR’01), page 285, Washington, DC, USA, 2001. IEEE Computer Society.
[SJS03]
Tazama U. St. Julien and Chris D. Shaw. Firefighter command training virtual environment. In TAPIA ’03: Proceedings of the 2003 conference on Diversity in computing, pages 30–33, New York, NY, USA, 2003. ACM.
[SL05]
Robert L. Sanders and Joseph E. Lake. Training first responders to nuclear facilities using 3-d visualization technology. In WSC ’05: Proceedings of the 37th conference on Winter simulation, pages 914– 918. Winter Simulation Conference, 2005.
[Spl03]
Rainer Splechtna. Comprehensive Calibration Procedures for Augmented Reality. 2003.
Bibliography
79
[Tra94]
David C. Traub. The promise of virtual reality for learning. The Virtual Reality Casebook, 0:107–117, 1994.
[USK05]
T. Umenhoffer and L. Szirmay-Kalos. Real-time rendering of cloudy natural phenomena with hierarchical depth impostors. In In Eurographics Conference. Short papers, 2005.
[ZS95]
C. B. Zilles and J. K. Salisbury. A constraint-based god-object method for haptic display. In IROS ’95: Proceedings of the International Conference on Intelligent Robots and Systems-Volume 3, page 3146, Washington, DC, USA, 1995. IEEE Computer Society.