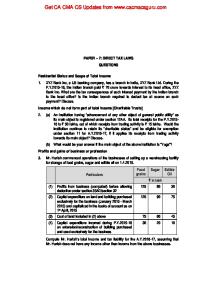
Provider-1 CMA Migration The purpose of this paper is to document the process of moving a CMA from one MDS into another. This new CMA can be created on an existing MDS, or a new unpopulated MDS. In the example used in this paper, both MDSs were at R65 and on SPlat. I have seen this method used to successfully move other versions (R60 to R65), as well as across different platforms (R55 Solaris MDS to R65 SPlat 2.6 MDS in one step). This process will work for SPlat or Solaris. Migration Process There are several steps for this process: • • • • • •
Global Object Cleanup Remove Global Policy Global Migration Individual CMA migrations Recreation of the Administrators Reassigning of the Global Policy
The first thing that needs happen is a “Global Object Cleanup.’ This means that all Global Objects must be either removed or replaced from local rules. Once this is done, you can attempt to remove the Global Policy form the CMA that you wish to migrate. If there are any Global Objects used in Local Policies, you will see the following error:
Patrick Waters, Fireverse LLC. Copyright 2009 www.fireverse.org
A successful policy removal will look like the following:
Patrick Waters, Fireverse LLC. Copyright 2009 www.fireverse.org
After you have successfully removed the Global Policy, you will now need to migrate the original Global Policy and objects. Copy the entire ‘conf’ directory from $MDSDIR and move it to your new MDS. From here you will use the ‘migrate_global_policies’ command. This will require you to point to the ‘conf’ directory you copied over. So for example if I copied the Global ‘conf’ directory to ‘/migrate’, you would issues the following command: ‘migrate_global_policies /migrate/conf’ The migration utility will perform several sanity checks during the migration, including prompting you to stop the MDS.
Patrick Waters, Fireverse LLC. Copyright 2009 www.fireverse.org
When it is finished, you can launch your MDG to see that the Global Policy and Objects have been migrated into the new MDS:
Patrick Waters, Fireverse LLC. Copyright 2009 www.fireverse.org
The next step from here is to migrate the individual CMA(s). This is done by copying five directories from each CMA: $CPDIR/conf $CPDIR/database $CPDIR/registry $FWDIR/conf $FWDIR/database First, run an ‘mdsenv’ to make sure you are in the root. Next run ‘mdsenv’ and the IP or name (as listed in ‘mdsstat’) of the CMA. For example: ‘mdsenv 192.168.10.11’ From here, switch to $CPDIR and $FWDIR to copy the directories to a temporary directory. One piece to be aware of (and this is extremely important!) is the naming convention you use for the copied directories. If you wee to copy all five directories into one temporary directory, you would overwrite two of them. The way around this is rename the ‘conf’ and ‘database’ directories for ‘$CPDIR.’ What you should see in your temporary directory is the following: conf.cpdir database.cpdir registry conf database
(this is ‘conf’ from $CPDIR) (this is ‘database’ from $CPDIR) (this is ‘registry from $CPDIR) (this is ‘conf’ from $FWDIR) (this is ‘database from $FWDIR)
Move all of this to a temporary directory on your new MDS. The easiest way to migrate this in, is through the MDG. First create a CMA on the new MDS. It is very important that you do not ‘start’ the new CMA:
Patrick Waters, Fireverse LLC. Copyright 2009 www.fireverse.org
From the MDG we go back to the new CMA and select “Import Customer Management Add-on”
Patrick Waters, Fireverse LLC. Copyright 2009 www.fireverse.org
Supply the path to the temporary directory on the new MDS that contains the five directories from above:
You will see an “Are you sure?” message:
The imported directories will be verified (this can take a few minutes), and you will see the following message to start the newly imported CMA if everything is successful:
Patrick Waters, Fireverse LLC. Copyright 2009 www.fireverse.org
It is now alright to start the CMA. After the CMA is started, reassign the Global Policy, and view the CMA with SmartDashboard to verify that everything looks to be in place (it will be). Step by Step Template You can cut and paste the commands below to help simplify a CMA migration. All of these commands are run from the legacy MDS. *Note: Do not copy the italicized text, only the portion before it. Also be sure to fill-in the appropriate IP address when needed* On the legacy MDS: mkdir /var/migrate mdsenv switches the environment to that of the CMA you wish to migrate cd $CPDIR cp –r conf /var/migrate/conf.cpdir cp –r database /var/migrate/database.cpdir cp –r registry /var/migrate cd $FWDIR cp –r conf /var/migrate cp –r database /var/migrate cd /var/migrate tar –czvf migrate.tgz *
Now to move this data over to the new MDS: ssh –l admin ‘mkdir /var/migrate’ creates the directory on the new MDS via ssh scp migrate.tgz admin@host:/var/migrate securely copy over directory to new MDS ssh –l admin ’ tar –xzvf /var/migrate/migrate.tgz’ untar and unzip the directories ssh -l admin 192.168.10.10 'rm -r /var/migrate/*' Cleanup the ‘migrate’ directory on the new MDS Launch the MDG Create a new “Customer” Create a new CMA Do not start the CMA Right click the CMA object, and choose “Import Customer Management Add-on” Point it to: /var/migrate Start the CMA Assign the Global Policy Be sure to clear out the /var/migrate directory in both MDSs. Conclusion Hopefully this paper has given you a more defined process for migrating CMAs in an NGX environment. Keep in mind that this process can also be used to upgrade your CMAs if they are moved to an MDS of a newer version.
Patrick Waters, Fireverse LLC. Copyright 2009 www.fireverse.org