Momenta™ App Software Guide for Apple® Mobile Devices
1
Contents How to Download the Momenta™ App ........................................................................................ 3 Equipment Requirements ........................................................................................................... 3 How the App Is Organized .......................................................................................................... 4 Setting Up Groups and Shades .................................................................................................. 5 Operating Your Window Coverings by Group ............................................................................ 11 Operating Your Window Coverings Individually ......................................................................... 12 Setting Up Scenes .................................................................................................................... 14 Operating Your Window Coverings by Scene ............................................................................ 20 Using the Timer Function .......................................................................................................... 21 Sunrise/Sunset Feature ............................................................................................................ 24 Additional Momenta App Features ............................................................................................ 27 Troubleshooting ........................................................................................................................ 28 Appendix A: Planning Worksheets ............................................................................................ 30 Appendix B: Frequently Asked Questions ................................................................................. 34
© 2015. All rights reserved.
2
How to Download the Momenta™ App SM
Using your iPad®, iPhone®, or iPod touch®, go to the App Store by clicking on its icon. •
In the “Categories” search window, type “Momenta”.
•
Press the “Search” key.
•
In the search results window, press the “FREE” button to the right of the Momenta™ App icon.
• FREE will change to “INSTALL”. •
Press the INSTALL button.
That’s all there is to it. Once your equipment set-up is complete, you’re ready to begin using the Momenta App.
Equipment Requirements If you haven’t already done so, you will need to purchase a Momenta App Bridge Kit from your window coverings dealer. The kit includes the necessary components to connect to your home’s wireless network and communicate with your motorized window coverings. (Additional Momenta Extender Kits may be needed depending upon the location of your window coverings.) Quick Start Guides are included in the Momenta App Bridge Kit to make set-up easy. Momenta App Bridge Kit (Includes One Momenta Extender Kit) Momenta App Bridge
Momenta Extender Kit DC Power Supply
Momenta Extender
USB Power Supply Cable DC Power Supply Ethernet Cable
3
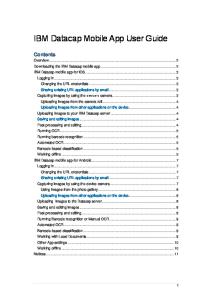
How the App Is Organized The Momenta™ App is organized into three distinct levels: groups, shades*, and scenes. First, you create a group; then you populate the group with shades; and, after you create and populate all your groups, you create scenes to operate groups of shades in specific ways.
GROUPS SHADES SCENES You can operate your window coverings as soon as you populate your groups with shades. Scenes are not mandatory; but once you understand how they can enhance the operation of your window coverings, you will likely want to use this powerful feature of the Momenta App. For example, one good reason to create scenes is to automatically operate your shades using the Momenta App Timer. Multiple operations per day are possible. Timer usage is explained in its own section beginning on page 21.
Momenta App timer
* Throughout the Momenta App and its documentation, “shades” is used as a generic term for window coverings. Motorized window coverings that can be operated using the Momenta App include: Cellular Shades, Roller and Screen Shades, and Sheer Shadings.
4
Setting Up Groups and Shades When you first open the Momenta™ App, you’ll see the Welcome screen with a message reading “Attempting to connect . . .”. After making the connection, you’ll automatically be taken to the “Groups” screen. This is where you begin adding shades and start customizing the Momenta App to your home.
Welcome screen
Groups screen
To create a Group: •
Enter your personalized Group name in the pop-up window; for example, “Living Room South”. (In this example, two shadings are on the south wall of the living room.)
•
Press “Accept”.
•
You will be taken to a shade selection screen where you select the type of window covering from the Album View that matches the shades installed in the Living Room. Swipe left or right across the images until the correct window covering type is highlighted in the center. Press “Select”.
PRESS
PRESS
Name the Group
Shade selection screen
5
With Cellular Shades, you would have needed to make a second selection to further describe the type of window covering. Cellular Shades offer four configuration options: Standard, Bottom-Up Top-Down, Day/Night, and Skylight.
Types of Cellular Shades
Now let’s get back to creating a group. After selecting the window covering type, you will asked to name the Sheer Shading. • •
Choose a descriptive name — in this case, “Sheer Left”.
PRESS
Press “Accept”. Name the shade
After accepting the shade name, you will be taken to a screen showing you how to synchronize the window covering to the Momenta™ App. •
•
Press the “Sync” button on the screen and, within 15 seconds, press the manual control button on the window covering. The shade should move slightly, or “jog,” to indicate a successful synchronization.
4. PRESS
2. PRESS
If you did not see the shade move, press the “Jog” button to test. Re-sync if necessary. 3. PRESS
•
Press the “Done” button. “Sync” screen
6
1. PRESS
You now have your first window covering ready to operate in your first group. To add and sync more window coverings in the Living Room, press the “+” button next to the group name. You can add up to eight window coverings to a group, but they must all be the same type of shade. In this example, there are two Sheer Shadings in the group.
PRESS
PRESS
Press the “+” button
Name the shade and press “Accept”
Completed Group
The home’s living room also has a Roller Shade on the west wall. Because a “Group” in the Momenta™ App can have only a single shade type, a different Group must be created for the Roller Shade. To add the second Group: •
Press the return arrow in the lower left of the Living Room South window. This takes you back to the Groups screen.
•
Press the “+” button next to “Groups”.
•
Enter the new Group name (“Living Room West” in this example) and press “Accept”.
PRESS
PRESS
Press the “+” button
Name the new Group and press “Accept”
7
You’ll again be taken to the shade selection screen to select the type of window covering. Choose Rollers and press “Select”.
PRESS
After selecting the type of shade, name it and press “Accept”. Then sync the shade and press “Done”. Shade selection screen
PRESS
PRESS
Name the shade
Sync the shade and press “Done”
The final task in our example is to set up the master bedroom, where there are four shades installed — two Standard Cellular Shades in the north windows and two Day/Night Cellular Shades in the east windows. Because there are two types of shades, two Groups must be created. Let’s call them “Master Bedroom North” and “Master Bedroom East”. Press the return arrow to return to the Groups screen to start adding the Groups.
PRESS
PRESS
Press the return arrow
Name the first master bedroom Group 8
Shade selection screen for Master Bedroom North
Shades in Master Bedroom North
Shade selection screen for Master Bedroom East
Shades in Master Bedroom East
Shown above are the shade selection screens for the two Groups, as well as the shades in each Group. In this example, after we name and sync the shades in each Group, we are done creating Groups and populating them with shades. The screen at right shows the four Groups we will be working with for the rest of this guide.
The Four Groups
9
Deleting Shades from a Group We’ve explained how to add shades to Groups, but how do you delete them? To delete a shade: •
On the Groups screen, press the “i” button next to the group in which the shade is located — in this case, it’s the Master Bedroom East.
•
Once in that group, press the “Edit” button to the left of the group name.
•
Then press the red “minus” button next to the shade’s name.
•
Next press the red “Delete” button to delete the shade.
PRESS
PRESS
Press the “i” button
Press the “Edit” button
PRESS
PRESS
Press the red “minus” button
Press the “Delete” button
Deleting Groups The procedure is very similar if you need to delete a Group. Simply press the “Edit” button on the Groups screen and then delete the group the same way a shade is deleted. Note that you can also change the name of Groups or shades after pressing the “Edit” button. Press the name window to bring up the keyboard to make changes.
10
Operating Your Window Coverings by Group To operate all of your window coverings in a Group at the same time, on the Groups screen press the group name and then operate the slider bar(s). In the Living Room South, we have Sheer Shadings. There are two slider bars on the custom control panel for these shadings — one to open and close the shade, the other to open and close the vanes. The vanes cannot be operated until the shadings are closed (fully lowered); if you move the slider bar to open the vanes, the shade will close automatically so that your vane command can be carried out.
Shading half-open
Vanes open with shading fully closed
If using an iPad®, tap anywhere outside the slider bar window to go back to the Groups screen. If using an iPhone® or iPod touch®, press the “Back” button to get to the Groups screen. The Master Bedroom North has two Standard Cellular Shades. Because Cellular Shades have no vanes to operate, there is only one slider bar displayed on the custom control panel to open and close the shades. Note that when you operate shades by Group, all the shades in the Group are the same shade type and are all operated at the same time by the slider control. Even if the shades are in different positions to begin with, they will all move to the same position when operated by Group.
Slider bar for Groups with standard shades
11
Operating Your Window Coverings Individually To operate your window coverings individually, on the Groups screen press the “i” button next to the Group in which the shade is located — in this example, the Master Bedroom East. Then press the name of the shade you wish to operate.
PRESS
PRESS
Press the “i” button
Select shade to operate
Because this is a Day/Night shade, it has two slider bars on the custom control panel. The left slider bar operates the bottom rail of the shade and the right slider bar operates the middle rail. The left slider bar can only be used when the middle rail is fully raised, with its button at the top of the slider bar; and the right slider bar can only be used when the bottom rail is fully lowered, with its button at the bottom of the slider bar. By moving either slider bar to any position, the other slider will automatically move to the correct position and the shade rails will move accordingly.
Operate bottom rail with middle rail raised
Operate middle rail with bottom rail lowered
Operation of a Top-Down/Bottom-Up shade is the same, which is why these two Cellular Shade designs may be considered the same type when adding shades to a Group.
12
Setting Up Scenes Now that you know how to set up Groups and shades, and how to operate the shades by Group or individually, you’re ready to learn how to begin using Scenes, a very powerful feature of the Momenta™ App. To create a new Scene: •
Press the Scenes icon at the bottom of the Groups screen.
•
You’ll be taken to a blank scenes screen. Press the “+” button to add a scene.
•
Enter the name of the Scene you are creating — in this example, “Good Morning” — and press “Accept”.
You’ll then be taken to the “Good Morning” screen where you can select the Groups you want to be part of the Scene.
PRESS
PRESS
Press the Scenes icon
Press the “+” button
PRESS
Name of Scene
“Good Morning” screen
13
In this example, we want all the Groups to be part of the “Good Morning” scene except Master Bedroom North. •
First, press the box next to Living Room South. The custom control panel will appear.
•
Set the position for both Sheer Shadings. For the “Good Morning” scene, that position is fully lowered with the vanes open.
PRESS
Set the shade position in Living Group South
After setting the position, tap anywhere outside the slider bar window (iPad®) or press the back button (iPhone® or iPod touch®) to return to the “Good Morning” screen. •
Press the box next to Living Room West and position the Roller Shade fully open.
•
Then, press the box next to Master Bedroom East and position the middle rail on the Day/Night shades to be fully open. This allows the sheer top shade to cover the window opening.
PRESS
PRESS
Shade position in Living Room West
Shade position in Master Bedroom East
The Good Morning scene is now complete. When the Scene name is pressed on the Scenes screen, the vanes on the Sheer Shadings in the living room will open all the way; the Roller Shade will open all the way; and the middle rail will fully lower on the Day/Night shades, covering the window with the sheer fabric panel.
14
Press the “Back” button to return to the Scenes screen. If you wish to add another scene: PRESS
•
Press the “+” button.
•
Then enter the new scene name and press “Accept”.
Press the “Back” button
PRESS
PRESS
Press the “+” button
New scene name
In this example, “Good Night”, we want all shades closed and all vanes closed; so all Groups are selected, beginning with Living Room South. We fully close the shades in each Group using the appropriate slider bars.
Shade position in Living Room South
Shade position in Living Room West
15
Shade position in Master Bedroom North
Shade position in Master Bedroom East
In the Master Bedroom East, where the Day/Night shades are located, the middle rail is fully raised and the bottom rail is fully lowered. This covers the window with the bottom fabric panel, which is usually opaque. Removing Shades from a Scene Not all shades in a Group need to be included in a Scene. In the “Good Morning” scene, let’s exclude the left Sheer Shading in the south window of the Living Room. •
First press the “Edit” button on the Scenes screen.
•
Press the “i” button next to the “Good Morning” Scene name.
PRESS
PRESS
Press “Edit” button
Press the “i” button
16
•
Then press the “i” button next to the Living Room North name. This brings up a list of the shadings in that Group.
•
Press the check mark next to Sheer Left. This “unchecks” the shading and it is no longer part of the scene.
PRESS
PRESS
Press “i” button next to Living Room South
Press check mark to “uncheck” the shading
Removing Groups from a Scene Start by pressing the “Edit” button on the Scenes screen and then the “i” button next to the Scene name, just as you did to delete shades from a Scene. Then, to remove a Group, simply press the check mark next to the Group name to deselect it.
PRESS
Press check mark to deselect a Group
Master Bedroom East deselected
17
Deleting Scenes Start by pressing the “Edit” button on the Scenes screen.
PRESS
•
Then press the red “minus” button next to the Scene name.
•
Next press the red “Delete” button to delete the Scene.
Press “Edit” button
PRESS
PRESS
Press red “minus” button
Press “Delete” button
18
Operating Your Window Coverings by Scene To operate your window coverings by Scene, simply press the Scene name on the Scenes screen. All shades in the scene will go to their preset positions. PRESS
Press scene name to activate
Notice the two labeled icons at the bottom of the Scenes screen. •
The first icon takes you back to the Groups screen.
•
The second icon takes you to the Scenes Calendar, which shows all the timed events for each day of the week. The calendar is currently empty; we will be adding timed events in the next section. Two labelled icons
Groups screen
Scenes Calendar screen
19
Using the Timer Function The Momenta™ App timer is an easy way to automatically activate Scenes at specific times of day. •
On the Scenes screen, start by pressing the clock icon next to the Scene name.
•
This will take you to the timer screen, which is titled by the Scene name — “Good Morning” in this example. The current time of day is displayed in the timer box.
PRESS
Press clock icon
Timer screen
•
Press to highlight the days for which you are setting an activation time; in this example, Monday through Friday.
•
Then rotate the timer wheels to set the time you want the Scene to operate on those days.
•
Press the “Set” button to lock in the times. The day buttons will change from blue to white, and the set time will be listed under each day.
PRESS
PRESS DAYS ROTATE WHEELS
PRESS
Press days, rotate timer wheel, press “Set” button
Monday through Friday time
20
To set a different “Good Morning” time for Saturday and Sunday: •
Press those days to highlight them and set the desired time for those two days.
•
Press the “Set” button.
•
Then press the “Done” button.
PRESS
Saturday and Sunday time
Pressing “Done” takes you back to the Scenes screen. The clock icon for “Good Morning” is now black, indicating that the Scene has been timed. You can repeat the process for the “Good Night” Scene we created by pressing the clock icon next to that name. Here we have set the same time for each day — 8:30 p.m. All shades (and all vanes) will automatically close every day at that time.
PRESS
Press clock icon
Set time
It’s easy to change the time of day for activating a Scene. For example, when it begins to get darker earlier, you can easily change the shade closing time. Simply highlight all the days and move the timer clock to an earlier time. Then press the “Set” button. Scene timing can also be turned ON and OFF using the slider switch under the timer clock.
Time changed to one-half hour earlier 21
After setting the activation times for your Scenes, the calendar that you can access from the bottom of the Scenes screen is no longer empty. The activation times are shown for each day of the week.
Sunday calendar
Monday calendar
Note that the timer can only be used to time scenes, not groups or shades. If you want to time a group or an individual shade, you must first create a scene with just that group or just that shade in it.
22
Sunrise/Sunset Feature The first step to use the Sunrise/Sunset Feature is to recalculate the times based on your location. •
Press the Settings button in the upper right of an iPad® or at the bottom of the screen on an iPhone® or iTouch®. Then press “Recalculate Sunrise/Sunset.”
•
The screen below right will appear. If “Location is available” is on the screen with numbers in the two windows, press “OK.” If your location is not available, manually enter your approximate latitude and longitude. PRESS
PRESS
PRESS
Press the Settings icon, then “Recalculate Sunrise/ Sunset.
Press “OK” if numbers appear in the windows; otherwise, manually enter your latitude and longitude.
The Settings screen will re-appear. Press “Groups” to go to the Groups screen, then press the Scenes icon to bring up the selection of scenes that you have programmed. Press the clock icon next to the scene you want to be activated at sunrise. The clock icon will dim, showing that it has been selected.
PRESS PRESS
PRESS
Press “Groups”.
Press the “Scenes” icon.
23
Press the clock icon for the scene you are activating.
To finish activating the Sunrise feature: •
On the timer screen, press the Sunrise button.
•
Next, press the days of the week you want to schedule. If you want the scene to activate before or after sunrise, rotate the timer to set the time, then press “before” or “after.” Press “Set”.
•
This turns on the Enable Scene indicator. Press “Done”.
Press the Sunrise button.
PRESS
PRESS DAYS
ROTATE TO SET TIME
PRESS
The Enable Scene switch is turned on. Press done to return to the Scenes screen.
Press the days you want to schedule. If desired, rotate to adjust the time before or after, then press “Set”.
Back on the Scenes screen, press the clock icon next to the scene you want to be activated at sunset. When the timer screen appears, press the Sunset button.
PRESS
Press the clock icon for the scene you are activating.
Press the Sunset button.
24
Complete the procedure as you did for Sunrise: •
Press the days of the week you want to schedule. If you want the scene to activate before or after sunset, rotate the timer to set the time, then press “before” or “after.” Press “Set” when finished.
•
Pressing “Set” moves the Enable Scene indicator to the “on” position. Press done. This completes the setting of the Sunset feature.
PRESS PRESS DAYS ROTATE TO SET TIME
PRESS
25
Additional Momenta™ App Features If using an iPad®, two icons are located in the upper right of the Momenta™ App screens: the Settings icon and the Information icon. For iPhone® and iTouch® users, the Settings icon is at the bottom of the screen and the Information icon is at the bottom of the Settings screen. •
The Information screen includes Help information, as well as information about working with Groups, Shades, and Screens.
•
The Settings screen includes an ON/ OFF slider switch for the Intermediate Stop feature. It also includes a slider bar to set the brightness of the light bar on your Momenta App Bridge and a “Test Extender” function, plus network information and Sunrise/ Sunset recalculation.
Settings
Information
Settings icon and information icon
Information screen
Settings Screen
The Intermediate Stop is a position where the shade travels when the Intermediate Stop button is pressed. This can be a position in the up-down travel of the shade, or it can be a specific degree of vane opening. The Intermediate Stop button is available on slider bar operating screens, and can also be incorporated into scenes. Consult the documentation that came with your Momenta Remote or Wireless Wall Switch for details about setting Intermediate Stops. Intermediate stop button on slider bar operating screen 26
Troubleshooting Problem: I can’t get past the opening screen of the Momenta™ App. The screen says, “Attempting to connect . . .”. Solution: Check that the light on the Momenta App Bridge is green, not red. If it is red, check that the bridge is plugged into a working outlet and securely connected to a LAN port on your wireless router. See the Quick Start Guide that came with your Momenta App Bridge Kit. Be sure your Apple® mobile device is connected to the same wireless network as the Momenta App Bridge. Problem: Some shades do not respond to the Momenta App commands. Solution: Test your Momenta Extenders to check that they are receiving signals from the Momenta App Bridge. Either press the “Test Extender” button on the Settings menu of the Momenta App or the button labelled P on the back of the bridge. The green light on each Momenta Extender should blink once. If not, move the extender closer to the bridge or add more extenders. See the Quick Start Guide that came with your Momenta App Bridge Kit or Momenta Extender. Problem: My window covering has vanes, but there is no slider bar for vane control. Solution: You may have chosen the wrong type of shade when adding the window covering to a Group. Press the “i” button to the right of the shade name to check that the shade type matches your window covering. If not, first delete the Group (see page 10), then create a new group and choose the correct type of window covering. Name and re-sync the new Group’s window coverings. See pages 5 and 6. Problem: My shade does not operate when moving its slider control. Solution: Move the slider bar again to send another command. Use a Momenta remote or Momenta wireless wall switch to test the shade to make sure it is operating properly. Re-sync the window covering. See page 6.
27
Problem: None of the shade information I entered appears on the Groups or Scenes pages. Solution: Check that the light on the Momenta™ App Bridge is green, not red. Refer to the first problem on page 27. Exit the Momenta App by pressing the Home button on your device. Then press the Momenta App icon to restart. Press the RESET button on the back of the Momenta App Bridge. You may have accidentally pressed the erase button ( X ) on the back of the Momenta App Bridge. If so, you need to re-enter all of your shade information. Problem: My Momenta App screen is frozen. Solution: Exit the App by pressing the Home button on your device. Then press the Momenta App icon to restart.
28
Appendix A: Planning Worksheets Use the worksheets on the following pages to help you plan your Groups, Shades, and Scenes.
NW N NE
Group Worksheet Standard Cellular Standard Left
Use this worksheet to plan Groups, Group names, Shades, and Shade names. These sample worksheets are based on the examples used in this guide.
Standard Cellular Standard Right Day/Night Cellular Day/Night Left
Room: Master Bedroom Group name(s): Master Bedroom North and
Master Bedroom East NW N NE
Draw rectangles along the borders of the room to indicate the location of of window coverings to be controlled by the Momenta™ App. Enter the type and name of each window covering next to its rectangle.
Day/Night Cellular Day/Night Right
Room: Living Room Group name(s): Living Room South and
Living Room West Roller Shade Roller Draw rectangles along the borders of the room to indicate the location of of window coverings to be controlled by the Momenta™ App. Enter the type and name of each window covering next to its rectangle.
Sheer Shading Sheer Right
Sheer Shading Sheer Left 29
Group Worksheet
NW N NE
Room: Group name(s):
Draw rectangles along the borders of the room to indicate the location of of window coverings to be controlled by the Momenta™ App. Enter the type and name of each window covering next to its rectangle.
30
Scene Worksheet Use this worksheet to plan Scenes and their timing. This sample worksheet is based on the examples used in this guide.
Room names:
Scene name:
1. Living Room
6.
2. Master Bedroom
7.
3.
8.
4.
9.
5.
10.
Good Morning
Rooms in Scene: 1, 2
Description of Scene: Vanes fully open in Living Room South, Roller Shade open in
Living Room West, middle rail of Day/Night shades lowers all the way in Master Bedroom East Scene timing: 7:30 a.m. M-F, 9:00 a.m. Sat. and Sun. Scene name:
Good Night
Rooms in Scene: 1, 2
Description of Scene: All window coverings closed with vanes closed
Scene timing: 8:00 p.m. every day Scene name:
Rooms in Scene:
Description of Scene:
Scene timing:
31
Scene Worksheet
Room names:
1.
6.
2.
7.
3.
8.
4.
9.
5.
10.
Scene name:
Rooms in Scene:
Description of Scene:
Scene timing: Scene name:
Rooms in Scene:
Description of Scene:
Scene timing: Scene name:
Rooms in Scene:
Description of Scene:
Scene timing:
32
Appendix B: Frequently Asked Questions Question: What window covering products are compatible with the Momenta™ App? Answer:
All Momenta products are compatible with the app. These include Cellular Shades, Sheer Shadings, and Roller Shades.
Question: How many window coverings can I control from my Momenta App? Answer:
A nearly limitless number of Momenta window coverings can be controlled from a single device running the Momenta App. As long as your shades can receive signals from the Momenta Extender(s) installed in the room with the shades, you will be able to control them.
Question: How many Momenta Extenders do I need to operate my shades? Answer:
We recommend one Momenta Extender for each room that has motorized products you would like to control with the Momenta App.
Question: Do I still need a Momenta Remote or Wireless Wall Switch to operate my shades? Answer:
A Momenta Remote or Wireless Wall Switch is highly recommended. These devices allow for alternate control and also serve as a set-up tool — for example, to create intermediate stop positions.
Question: Do I need an Internet connection to use the Momenta App to control my shades? Answer:
No, an Internet connection is not necessary. However, you still need a wireless router connected to the Momenta App Bridge for communication with your mobile device; and its wireless “network” must be the one used by the mobile device.
Question: What is a “Group” in the Momenta App? Answer:
A Group is a collection of eight or less of the same shading types. (These actually do not need to be physically located in the same room of the home.) Once a Group is created, all shades assigned to that group can be controlled from a single control slider.
Question: How many shades can be in a Group within the Momenta™ App? Answer:
The maximum number of shadings that can be assigned to a Group grouping within the Momenta App is eight.
33
Question: Can different shade types be saved in the same Group within the Momenta™ App? Answer:
No. Only one shade type is allowed within a Group to ensure the proper control slider is displayed. For multiple shading types in a room, simply create multiple Groups.
Question: What is a “Scene” in the Momenta App? Answer:
A Scene is a pre-programmed shade position created by the user to manage light and privacy. For example, a Scene called “Good Night” can be created in which all the shadings in the home move to the closed position.
Question: Can I operate my shades from anywhere in the world using the Momenta App? Answer:
No. The current release of the Momenta App will allow homeowners to operate their shades only while the mobile device can communicate to their wireless home network. Future updates may include the ability to control your shades remotely via the Internet.
Question: Will the timer feature work even if my Apple® mobile device is not at my home? Answer:
Yes, the timer feature will continue to operate shades at the set time(s) of day even if the wireless device is not in the home. All timer data is stored in the Momenta App Bridge.
Question: How do I set a timed event? Answer:
The timer feature is available for Scenes only. Once a Scene is created, pressing the clock icon on the Scenes screen accesses the timer feature. See pages 20 to 22.
Question: Does the timer feature automatically change for Daylight Savings Time? Answer:
Yes, the timer will adjust for Daylight Savings Time automatically.
Question: Is the Momenta App available for Android™ mobile devices? Answer:
Yes. The Momenta App is available for both Apple and Android mobile devices.
34