Installation Instructions Road King Classic Saddlebag Bezels Thank you for your purchase of Bagger Audio™ Road King Classic Saddlebag Bezels for your Harley-Davidson motorcycle. We have carefully engineered these products to work with Harley-Davidson motorcycles to give you the best quality possible. Cycle Sounds® strives to bring you the highest quality audio products for your motorcycle. Donʼt forget to check our website www.cyclesounds.com for the most up-to-date product availability. Taking your valuable investment into consideration, we have detailed the installation instructions for our products. We would like to suggest that you refer to your HarleyDavidson factory service manual for removal of any factory parts. Should you not have this information available, we strongly recommend that your local dealership or professional installation facility assist with your installation. NOTE: YOU MUST APPLY SOME TYPE OF FINISH TO BAGGER AUDIO SADDLEBAG BEZELS AND GRILLS TO PROTECT FROM MOISTURE AND UV RAYS WHICH CAN CAUSE FADING, DISCOLORATION OR RUSTING OVER TIME. THIS STEP IS ESSENTIAL TO ENSURE THE LONGEVITY OF YOUR BAGGER AUDIO PRODUCTS. BEFORE YOU BEGIN, PLEASE READ INSTRUCTIONS THOUROUGHLY AND MAKE NOTE OF THE FOLLOWING PRECAUTIONS: Take proper precautions to protect your paint in the areas that you will be working near. Triple check all placement before cutting saddlebag to ensure proper fitment. Prior to removal of any parts, confirm that you have all tools necessary to complete the installation. If you get to a point where you are unsure of how to continue, please review the instructions again and confirm the steps that you have already completed.
If additional assistance is needed please contact Cycle Sounds at 1-866-427-2346 (toll free) or 816-525-2628.
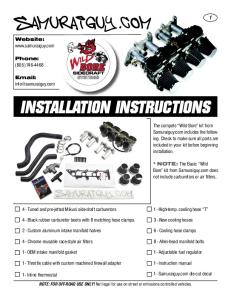
PARTS LIST: (check for all parts before beginning installation) ALL KITS (2) Polyurethane Saddlebag Bezels (2) Metal Speaker Grills (2) Hydrophobic Speaker Material (2) Speaker Bezel Paper Patterns (2) Speaker Grill Fabric Paper Patterns (8) Bezel Mounting Screws (8) Bezel Mounting Washers COMPLETE KITS ONLY (1) Mini Amplifier (2) 6x9 Marine Grade Speakers (1) Power Harness (8) Stainless Steel Screws (16) Stainless Steel Washers (8) Stainless Steel Lock Nuts (1) Long Speaker Wire Harness (front) (1) Short Speaker Wire Harness (back) (2) Black Plastic Quick Connects (2 male / 2 female) (2) Rubber Grommets (2) Red T-Taps (2) Blue Male T-Tap Inserts (4) Speaker Connectors (2 sizes) (4) 6” Wire Ties (4) 8” Wire Ties (4) Adhesive Wire Tie Mounts OPTIONAL PARTS NOT INCLUDED IN KITS: Amplifier Mounting Bracket - (p/n: 4405-0091) $74.95 MP3 Universal Mounting Bracket - (p/n: 4405-0066) $56.95
BEZELS ONLY KITS WILL NEED TO GET THESE PARTS TO MOUNT SPEAKERS: (NOT INCLUDED IN BEZELS ONLY KITS) (8) BOLTS 10 – 32 X 1” (8) NYLON LOCKING NUTS 10 X 32 (16) #10 WASHERS FAILURE TO USE THE RECOMMENDED HARWARE FOR MOUNTING SPEAKERS MAY RESULT IN DAMAGE TO YOUR MOTORCYCLE.
BAGGER AUDIO™ SADDLEBAG BEZELS INSTALLATION 1) Remove Saddlebags: Remove leather saddlebags from motorcycle. Consult your ownerʼs manual or factory service manual for additional instruction on saddlebag removal. 2) Cut Out Paper Pattern: Use the provided pattern cut along the necessary lines so your pattern resembles the drawing. Cut as close to lines as possible. It is recommended to use a sharp Exacto or razor knife for best results. Be careful not to tear the paper pattern when cutting, as it could alter your pattern when cutting leather bag.
Cut Out Paper Pattern
3) Align Pattern With Saddlebag Stitching Align the paper patternʼs outer edge with the stitch line on the saddlebag as shown. It is important that the pattern edge lay directly over the stitch line on both the sides and the front. If there is any overlap side to side make sure it is an even amount on each side. Once the pattern is in place you may want to tape the pattern onto the bag.
Align Pattern With Saddlebag Stitching
4) Transfer Pattern Onto Saddlebag Using a Sharpie or marker draw on the bag the areas to cut making sure to stay as close to the pattern edges as possible. Only the inside bezel opening and screw holes need to be marked and cut out. DO NOT mark the outside edge that lines up with the stitching.
Transfer Pattern Onto Saddlebag
5) Check Pattern Transfer and Bezel Placement on Bag Remove the paper pattern and make sure there are clearly defined lines where the pattern was transferred onto the bag. If there are not clearly defined lines either go back over them with a marker or refer back to Step 3. The saddlebag should resemble the drawing once pattern has been transferred.
Check Pattern Transfer and Bezel Placement on Bag
Check the placement of the pattern lines by setting the bezel piece on top of the bag and aligning it with the lines from the transfer. Look straight down at the top of the bezel to see that it properly aligns with the seam edges and the front of the bag. Triple check bezel placement before moving on to the next step.
CAUTION: When lining up the paper bezel template for cutting the saddlebag lid, be aware that the Road King Classic Saddlebags may vary slightly in the width and stitch line placement. This generally does not negatively affect fitment, but please note do not to cut through your saddlebag lid hinges. You can simply cut around them and the bezel should cover the hinges without modification. If you do end up in a spot where the bezel absolutely will not bolt down flush onto the lid because of the hinge placement, carefully use a dremel tool or something similar to notch out the bezel and/or hinge until it will sit down flush on the bag after being bolted down. Most importantly, do not try and cut through your saddlebag hinges!
6) Cut Pattern into Saddlebag Once the pattern has been successfully transferred and bezel placement triple checked, use a sharp razor knife to cut the pattern into the saddlebag. Cut as close to the pattern lines as possible. Be aware that there is plastic underneath the leather and it will take several scores in the plastic to cut all the way through it. For best results use a drill to open up the 4 mounting holes.
Cut Pattern into Saddlebag
7) Cut Speaker Grill Fabric to Provided Pattern Cut out the speaker grill fabric patterns (right/left) using a pair of scissors or razor knife. Then lay the pattern onto the speaker grill fabric and trace around it using a suitable marker (white china marker). Once the pattern is transferred to the speaker grill fabric cut the fabric to size. 8) Glue Speaker Fabric to Bezels Using a suitable plastic adhesive, glue the speaker grill fabric to the top of the bezel in the speaker grill opening. Plastic adhesives are available at any auto parts store (car emblem adhesive works well). Press the speaker grill fabric firmly into the glue making sure to stretch the fabric so there are no ripples. Once the glue is dry and fabric is secure, punch out the 4 speaker mounting holes using a sharp knife or tool.
Glue Speaker Fabric to Bezels
9) Mount Speakers in Bezels (Hardware Provided with Complete Kits Only!) Lay out the mounting hardware that came with your kit to ensure there are no missing pieces. There should be 8 screws and 8 lock nuts with 16 washers. Put a bead of silicone around the speaker mounting holes to help prevent water from getting through. Put one washer on all the bolts and insert bolts through the four holes from the top side of the bezel. Next, put the screws through the mounting holes on the speaker and add another washer to each bolt before securing the speaker using the supplied lock nuts.
Mount Speakers in Bezels Mounting the speaker works best by inserting bolts through the top of the bezel and then setting the bezel on its side to attach the speaker. When securing the speaker make sure the connection terminals on the speaker are pointed towards the front of the bag. Once all screws, bolts and washers are attached tighten the lock nuts until there is no movement of the speaker. DO NOT over tighten these bolts. Tip: Before installing the speaker grill use a Sharpie to darken the chrome bolt head and washer so it is not noticeable through the speaker grill. 10) Install Speaker Bezels Install speaker bezels into saddlebags using the provided screws. When securing bezels, snug the mounting screws and check placement of bezel on the bag. Once the desired location is found tighten the bezel mounting screws. Note: Optionally you may want to use blue Lock-Tight on the speaker bezel mounting screws. Also, you can put a bead of silicone on the saddlebag around the bezel area to create a watertight seal. 11) Attach the Speaker Grill Note: You may need to cut some of the fabric away from the speaker grill slots on the lid to get the grill to go in.
Insert the tabs on the speaker grill into the mounting slits from the top of the bezel. Then, from underneath the bezel bend the tabs on the speaker grill to a 90 degree angel while holding the grill in place to keep it tight. Once you have the grill in place with tabs bent put silicone over the tab slots on the bezel from the bottom side to help prevent water from getting into your bag.
Attach the Speaker Grill & Bend Tabs
Silicone the Speaker Grill Tab Openings
REPEAT THIS PROCESS FOR THE SECOND SADDLEBAG INSTRUCTIONS FROM HERE ON ARE FOR COMPLETE KITS ONLY
SPEAKER HARNESS INSTALLATION
(Read electrical connections prior to connecting power and ground wires)
1) Disconnect battery (negative cable first!) 2) Remove the screw holding seat and remove seat. 3) Remove side panel cover 4) Route long speaker wires from neck area through tank channel to seat area. 5) Route one pair of speaker wires under the frame to come out in the side panel area; purple and purple/black wires to the right and green and green/black wires to the left.
AMPLIFIER INSTALLATION
The amplifier can be mounted anywhere that you like; under the seat, behind the headlight or under a side panel on the side of the bike. Since our amplifier is show chrome plated you may want to purchase the optional amplifier mounting bracket (p/n: 4405-0091) that will place it on the front of the A frame so it is visible.
SPEAKER WIRING INSTALLATION 1) Drill Holes & Insert Grommets A 1/4” hole must be drilled into each saddlebag for running the speaker wires to the speakers. Holes can be positioned at the ownerʼs discretion, but the holes should be placed in a location that is discrete when the bag is mounted on the bike. After drilling holes place the provided grommets into the drilled holes before running any wires. 2) Connect Speakers Take the short piece of sleeved wire and attach the terminal connectors to the speaker. The lager connector attaches to the green wire and the smaller to the black wire. Use the small adhesive wire tie mounts along the inside of the bag to secure your speaker wires using the 4 inch wire ties supplied in your kit. Now push the wire through the grommet from the inside. Use WD-40 or a similar lubricant to make it easier to push the wire through the grommet. 3) Route Rear Speaker Wires Remove the side panel below the seat to gain access to route the speaker wires. Set the bag into place while routing wires taking care to keep away from all moving and high temperature parts. Attach bag back to the bike by replacing the 2 mounting pins. 4) Attach Front/Rear Speaker Wire Quick Connects Take the 2 mating connectors (male/female) provided in the kit and attach to wires that come from the front (amplifier) and from the bag (speaker). When securing these wires to the connectors you must unclip the keeper door on the back of the plugs before sliding the wire pins into the connectors. When pinning the wires into the connectors make sure that the pins snap into position and will not pull back out. Once wires are pinned correctly close the keeper door on the plug. (See Illustration Below)
Attach Front/Rear Speaker Wire Quick Connects
Note: Once these wires are locked into position a special tool (terminal removal tool) is required to remove them. Before locking into place make sure wires are in the correct locations on each plug as shown above.
ELECTRICAL CONNECTIONS 1) 1)Connect ConnectSpeaker SpeakerWires: Wires: Speakers be connected to eitherattach of the green/black female plugs wire on the amplifierto with Speakerswires must can be connected as follows: connector the disregard for right/left orientation. Generally though,the thepurple/black grey and grey/black pair of wires green/white connector on the amp. Then attach wire connector to theare for the right connector channel. See drawing blue/grey on the amp.below. 1 AM P 2
Speaker Quick Connects SpeakerWire Wire(s) Quick Connects 2) Locate Accessory Power: Using a multi-meter, locate the 12-volt accessory power wire or consult your local Harley- Davidson dealer to verify location of accessory wire for your particular model. Most Harley touring bikes have an extra positive and negative accessory wire usually taped near the 3-prong headlight connector. (See Illustration Below)
Headlight Plug with OEM Accessory Power and Ground in Harness
3) Determine Power/Ground on Bike: Using a multi-meter determine which connector on the bike is power and which is ground. Cut off the 2 pins on the power harness and crimp the BLUE T-Tap Inserts to the red and black wires. Then connect the red and black wires on the power harness to their proper connections on the bike (red=power/black=ground).
Crimp Blue T-Tap Connectors
If there is already an accessory connected to these wires on the bike find an alternate accessory power location and use the BLUE and RED T-Tap electrical connectors in combination to make the power and ground connections.
Red T-Taps and Blue T-Tap Connectors
4) Connect Amplifier: Next, plug the male (red/black) connector on amplifier harness into the female (red/black) connector on the power harness. (See Illustration Below)
Amplifier Connections (Power/Ground)
FINISHING UP a) Properly secure all wiring with supplied wire ties and wire tie mounts. b) Check all connections before you reconnect your battery! c) Reinstall all factory parts that have been removed for this installation to factory specifications. Consult your factory service manual for additional information.
CAUTION: The speakers we recommend for use in our saddlebag bezels are water resistant (marine grade), however when washing your bike be careful not to directly use a pressure washer or spray water on the opening of the speaker grills.
If additional assistance is needed please contact Cycle Sounds at 1-866-427-2346 (toll free) or 816-525-2628.
BAGGER AUDIO™
SADDLEBAG BEZELS WIRING DIAGRAM
3.5mm Input
AMP Quick Disconnect
Mp3 Player
Switched Ignition (12v) Ground
Amp Harness
Amplifier Jumper Settings Addendum CAUTION: The amplifiers included without our Bagger Audio speaker kits (except Ultimate Upgrades) should have the jumpers set on the back of the amp as follows for proper audio rendering. Note that when looking at the back of the amp the wiring harness should be facing down. If the jumpers are placed incorrectly simply use a pair of needle nose pliers to carefully remove and re-attach the jumpers in the correct locations. If by chance you are missing one or more jumpers please contact Cycle Sounds about obtaining replacement jumpers. A-SIDE AMPLIFIER JUMPER SETTINGS Please note that re-arranging the jumpers in any orientation other than what is shown is highly discouraged as you may damage the amplifier, speakers or both.
AMPLIFIER JUMPER SETTINGS
B-SIDE