How to Restring Your Acoustic Guitar Restringing a guitar is simple process that should take no more than 30 minutes. There are three main components in restringing a guitar: removing the old strings, polishing the guitar, and installing the new strings. This instruction set guides you through these three components as one flawless process. These instructions are intended for use on right-handed acoustic guitars. To accommodate left handed guitars, information boxes marked with a hand symbol describe the differences you must make. Yellow text boxes indicate extra instructions and precautions to take on each step. A figure has been included with each step to assist you. All parts of the guitar necessary for you to know are labeled in Figure 1. Before you begin, there are a few tools you will need to gather such as the following: Wire snips Toothbrush Clean rag Flathead screwdriver Guitar polish Pack of strings Towel Guitar tuner
Figure 1. 1-Headstock, 2-Fretboard, 3-Soundhole, 4-Soundboard, 5-Bridge, 6-Tuning knob, 7-Tuning post, 8-String peg Now you that you have your materials gathered and have familiarized yourself with the parts of the guitar, let us begin.
Step 1: Setting Up Place your guitar face-up on a towel on the flat surface you will restring the guitar. This will prevent dirt from scratching the finish on your guitar.
Guitar placed on a towel on a flat surface.
Step 2: Loosening the Strings Turn the tuning knob on each string clockwise to loosen it. Loosen until the strings are no longer wrapped around the tuning posts. If the strings do not immediately loosen, you are turning the wrong way. This could cause the old strings to break. Pull the end of each string back through the hole of its tuning post. The red arrow shows the clockwise direction. Note that the neck of the guitar goes to the right.
Step 3: Removing the String Pegs Carefully pry the string pegs upward using a flathead screwdriver, exposing the bottom end of each string. You may need to use a finger on your other hand placed under the screwdriver to get leverage as shown in the figure. Pull the bottom of each string out of the hole. You now have now successfully removed the old strings. Notice the thumb being used as a fulcrum to get leverage for the screwdriver.
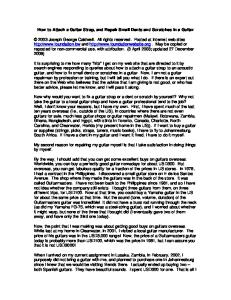
Step 4: Polishing the Guitar Use guitar polish and a clean rag to remove any dust off the soundboard, fretboard, headstock, bridge, and tuning posts. This will prevent dust or burrs from snapping your new strings. .
Toothbrush being used on the fretboard for extra cleaning.
Special Instructions for the Fretboard Spray polish on and between each fret. Scrub these areas with a toothbrush and wipe dry. This will remove hand oils from the fretboard, increasing the life of the new strings.
Step 5: Re-installing the String Pegs Place the beaded end of each string into its respective hole on the bridge and replace the string peg, i.e. string 1(thinnest string) in hole 1. Then pull the string to remove excess string from the body of the guitar. Top: String peg being placed over the bead of the new string in the hole. Bottom: Labeled holes on the bridge when the guitar is placed vertically upright in front of you.
Tip Generally, the beaded end of each string is color coded with the package so that you can tell the strings apart.
For a left handed guitar, hole numbers are opposite of the figure.
Step 6: Placing the Strings through the Tuning Posts
Place the thin end of each string through its respective hole in the tuning post and pull the string through. The respective tuning posts are labeled in the figure.
Labeled tuning post numbers on headstock.
For a left handed guitar, tuning post numbers are opposite of the figure.
Step 7: Bending the Strings Place a 90 degree bend in each string one to two inches away from the outside of the tuning post. This bend will catch inside the hole when you begin to tighten.
90 degree bend is on the outside of the tuning post. It does not matter which direction you place the bend.
Step 8: Tightening the Strings Turn the tuning knobs counterclockwise to tighten the strings. Allow the string to wrap below the hole as shown in the figure. You may have to use your other hand to guide the wraps down the tuning posts. Stop tightening just as the strings become taut.
Wraps of the string go under the hole. The red arrow shows the direction to turn.
Step 9: Tuning the Guitar Tune each string to your desired tuning, using a tuner of your choice. Only turn the knob a quarter turn every few seconds to allow the strings to settle. This prevents the new strings from snapping.
This shows a tuner mounted on the headstock. Many guitars have built in tuners.
Tip You will have to retune each string several times. As the strings settle, they will elongate under the tension and lose their tuning.
Step 10: Removing the Excess String Cut the excess string off about a half inch past the tuning post using wire snips. You have now successfully restrung your guitar.
Wire snips cutting off excess wire past the tuning post.
For Extended Care of Your Strings Now that you have successfully restrung your guitar, you want to preserve the sound of the strings as long as possible. To maintain the bright tone of brand new strings, wipe the guitar with a clean rag after each use. To get a muddier tone, play without wiping the strings. Once you have achieved the tone you want, begin to wipe the guitar. This may take several weeks of playing to accomplish.