GRID IN TRIMLESS 1 MOUNTING KIT GRID IN TRIMLESS 2 MOUNTING KIT GRID IN TRIMLESS 3 MOUNTING KIT GRID IN TRIMLESS 4LINE MOUNTING KIT
R
DEEL PARTIE TEIL PART PARTE PARTE
R
Delta Light nv. Muizelstraat 2 B- 8560 Wevelgem (Moorsele) Belgium Phone: +32(0)56 435 735 Fax: +32(0)56 435 736 E-mail:
[email protected] www.deltalight.com
L.E.B. A4
231 231 55 55 310 171
171
171
GRID IN TRIMLESS 1 MOUNTING KIT 202 61 95 01
GRID IN TRIMLESS 2 MOUNTING KIT 202 61 95 02
231
231
55
55
453
593
171 171
WAARSCHUWING AVERTISSEMENT WARNUNG WARNING AMMONIZIONE EDVERTENCIA
GRID IN TRIMLESS 4LINE MOUNTING KIT 202 61 95 04LINE
Lees de algemene gebruiksvoorwaarden : DEEL B Lire attentivement les conditions générales d'utilisation : PARTIE B Lesen Sie die allgemeinen Gebrauchsanweisungen : TEIL B Read the general directions : PART B Leggere attentamente le condizioni generali di utilizzazione : PARTE B Leer atentamente las condiciones generales de uso : PARTE B
Bevestiging plafond inbouw Montage plafond encastré Montage decke eingebaut Fixation ceiling recessed Montaje techo empotrado Montaggio soffitto incasso
Wijzigingen in ontwerp, technische specificaties en handleiding voorbehouden. Sous réserve de modifications au niveau de la conception, des spécifications techniques et de la notice. Änderungen von Entwurf, technischen Daten und Bedienungsanleitungen bleiben vorbehalten.
R
R nv. Light Delta t2 (Moorsele) lstraa Muize Wevelgem B- 8560 735 m )56 435 Belgiu +32(0 736 Phone: )56 435 t.com Fax: +32(0 @deltaligh enter E-mail: ight.com www.deltal
Light Delta akt door ers van Gemameedewerk for Use uso toffe ral Directions ales de azione utilizz Gene iciones gener ali di Condizioni gener Cond
DEELIE PART TEIL PARTE PARTE PART Last update : 15/01/2004
GRID IN TRIMLESS 3 MOUNTING KIT 202 61 95 03
Installeer het armatuur enkel in ruimten waar direct contact met water onmogelijk is. Cet êquipement doit être installé dans des pièces hors de toute projection d'eau. Diese Leuchte darf nur in Räumen verwendet werden, in denen ein direkter kontakt mit wasser nicht möglich ist This fitting should only be installed in rooms where direct contact with water is impossible Este aparato solamente puede ser instalado en habitaciones donde el contacto directo con el agua sea imposible Questo apparecchio di illuminazione deve essere installato solamente in locali in cui il contatto con l'acqua è impossibile.
Alterations in design, technical specifications and manuals reserved. El fabricante se reserva el derecho de realizar modificaciones en el diseño, las especificaciones técnicas y el folleto. Sotto riserva di modifica per quanto riguarda la concezione, le specifiche tecniche e la nota informativa.
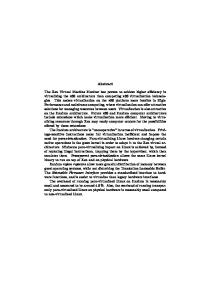
GRID IN TRIMLESS 1 MOUNTING KIT GRID IN TRIMLESS 2 MOUNTING KIT GRID IN TRIMLESS 3 MOUNTING KIT GRID IN TRIMLESS 4LINE MOUNTING KIT INSTALLATION INSTRUCTIONS - PART A 01
GRID IN TRIMLESS 1 MOUNTING KIT
173 x 173
GRID IN TRIMLESS 2 MOUNTING KIT
312 x 173
GRID IN TRIMLESS 3 MOUNTING KIT
455 x 173
GRID IN TRIMLESS 4LINE MOUNTING KIT
595 x 173
02
PLACE THE SHAPE FIXATOR* *NO SHAPE FIXATOR FOR GRID IN TRIMLESS 1 MOUNTING KIT
HOLE PATTERN
MOUNTING
03
IN THE CEILING / WALL
MOUNTING
03
PREPARATION
ON THE CEILING / WALL
PREPARATION
PUSH
PUSH
TIGHTEN
TIGHTEN PUSH
PUSH
TIGHTEN
TIGHTEN
SAME THICKNESS AS CEILING
SAME THICKNESS AS PLASTER
TIP: PLACE DEVICE ON A TABLE FOR PREPARATION
TIP: PLACE DEVICE ON A TABLE FOR PREPARATION
B
04
04
CONCRETE
SAME THICKNESS AS PLASTER
A A
05 05
A
B
06
GRID IN TRIMLESS 1 MOUNTING KIT
A x B 93 x 203
GRID IN TRIMLESS 2 MOUNTING KIT
232 x 203
GRID IN TRIMLESS 3 MOUNTING KIT
375 x 203
GRID IN TRIMLESS 4LINE MOUNTING KIT
329 x 203
90°
07 06
REMOVE SHAPE FIXATOR
1x(*)
ACCESSORY SET
ACCESSORY SET
ACCESSORY SET
08
4x (*) ONLY FOR 2,3 AND 4 VERSION DELTA LIGHT BELGIUM ©
last update : 13/04/2010
ACCESSORY SET
!
ATTENTION for Grid in trimless 1 mounƟng kit in combinaƟon with Streamer Trimless W!!!
!
SCREWS FACING WALL
Only for: Streamer Trimless W L50 EVG DIM1
SCREWS NOT FACING WALL
Ceiling finishing for trimless kits and trimless Profiles A good result after installing a trimless Kit/ trimless profile is achieved by finishing the gap between the Kit/ Profile and ceiling with a two-component filler. A normal filler hardens because the water or turpentine evaporates out of it. The result is a final layer which is flatter than the layer that was put originally. A two-component filler hardens by a chemical reaction between 2 different components and remains at the same level as applied. A two-component filler is composed of an asbestos free polyester resin that, when mixed with a hardener turns into a filler which then sets and hardens. They typically remain elastic, are easy to sand and they have a high filling capacity. This is the type of filler we recommend when installing our mounting/trimless Kits and the profiles Splitline, Borderline, Endless Trimless, Uniline TR and Uniline TRT. Corresponding sequence : 1) 2) 3) 4) 5)
Install the kit or profile – see corresponding manual Apply the 2 component filler And if necessary to the proper shape Prime and paint like the ceiling or wall Install the luminary in the Kit – see corresponding manual
Remark on trimless profiles : For a perfect finish between endcap and ceiling : leave a gap of 3mm between endcap and ceiling and fill this gap with a elastic filler such as silicone which can be painted over.
Plafondafwerking bij toepassing van Trimless kits en trimless profielen Om een goed resultaat te bekomen na installatie van een trimless kit of trimless profiel dient de opening tussen kit/profiel en plafond afgewerkt te worden met een 2-componenten vulpasta. Een gewone vulpasta hardt uit doordat het water of de terpentijn eruit verdampt. Het resultaat is een finale laag die dunner is dan de oorspronkelijk aangebrachte laag. Een 2-componenten vulpasta hardt uit door een chemische reactie tussen twee verschillende componenten en blijft z’n dikte behouden zoals aangebracht. Een 2-componenten vulpasta bestaat uit een asbest vrije polyester die, na menging met een verharder, een pasta vormt die dan uithardt. De typische kenmerken zijn : behouden van een zekere elasticiteit, gemakkelijk te wrijven en een hoog vullend vermogen. Dit is het type van vulpasta die wij aanbevelen voor het afwerken van onze mounting/trimless kits en de profielen : Splitline, Borderline, Endless Trimless, Uniline TR en Uniline TRT. Te volgen stappen : 1) 2) 3) 4) 5)
Installeer de kit of profiel – Zie corresponderende handleiding Pas de 2-componenten vulpasta toe Zo nodig bijwerken met glaspapier Aanbrengen van de grondlaag en afwerkingslaag Installeer het toestel in de Kit – Zie corresponderende handleiding
Opmerking bij trimless profielen : Om een perfecte afwerking te bekomen tussen eindplaat en plafond : voorzie een speling van 3mm tussen eindplaat en plafond en vul die met een elastische kit zoals een overschilderbare silicone.
Finition plafond pour les kits trimless ou profilés trimless (sans rebord) Afin d’avoir un résultat impeccable en installant un kit trimless ou profilé trimless est d’utiliser un joint 2 composants pour remplir le trou. Un joint normal devient dur puisque l’eau ou thérébenthine s’évapore trop vite et donne ainsi une fine couche de finition plutôt qu’un joint bien rempli. Un joint de 2 composants se durcit plus vite car c’est une réaction chimique de 2 composants différents mais qui se maintient dès l’application. Le joint des 2 composants est scindé par de la résine en polyester libre d’amiante que lorsqu’il est mélangé avec un durcisseur, celui-ci se définit et se durcit. Il reste élastique, facile à polir et a une capacité de remplissage élevé. C’est pourquoi on conseille d’utiliser ce mélange pour l’installation des kits ou profilés trimless comme notre Splitline, Borderline, Endless trimless, Uniline TR ou Uniline TRT. A utiliser comme les étapes suivantes : 1) 2) 3) 4) 5)
installer le kit ou profilé : voir le manuel correspondant appliquer le joint 2 composants si nécessaire utiliser du papier de verre mettez une couche primer puis mettez en peinture installez le luminaire dans le kit – voir manuel correspondant
Remarque pour le montage d’un profilé trimless : pour obtenir une finition impeccable entre les embouts et le plafond, laisser une distance de 3 mm et recouvrir le trou par un mastique élastique ou silicone qui peut être mis en peinture.
Decken Fertigstellung für Trimless (randlose) Kits und Trimless Profile Ein gutes Ergebnis nach der Installation eines Trimless Kits / Trimless Profils wird erreicht, wenn die Lücke zwischen dem Kit / Profil und der Decke mit einem Zweikomponenten-Füller verschlossen wird. Ein normaler Füller härtet, weil das Wasser oder Terpentin aus ihm heraus verdunstet. Das Ergebnis ist eine Füllschicht, die flacher ist als die ursprüngliche aufgetragene Schicht. Ein Zweikomponenten-Füller härtet mittels einer chemischen Reaktion von 2 verschiedenen Komponenten aus und bleibt auf der gleichen Ebene wie aufgebracht. Ein Zweikomponenten-Füller ist aus einem asbestfreien Polyesterharz zusammengesetzt, das beim Vermischen mit einem Härter zu einem Füllstoff wird der sich setzt und aushärtet. Er bleibt in der Regel elastisch, ist leicht zu verarbeiten/streichen und hat eine hohe Füllkraft. Das ist der Typ von Füllstoff den wir zur Installation unsere Montage/Randlos Kits und den Profilen Splitline, Borderline, Endless Trimless, Uniline TR und Uniline TRT empfehlen. Entsprechende Reihenfolge: 1) Installation des Kits oder Profiles – siehe entsprechende Anleitung 2) Anwenden des Zweikomponenten-Füllers 3) Wenn nötig in die richtige Form bringen, z.B. durch Schleifen 4) In der Farbe der Decke oder Wand streichen 5) Installieren Sie die Leuchte in das Kit – siehe entsprechende Anleitung Bemerkung zu trimless Profilen : Für eine perfekte Verarbeitung zwischen Endkappe und Decke : lassen Sie einen Abstand von 3 mm zwischen Endkappe und Decke und füllen Sie diesen Spalt mit einem elastischen Füllstoff wie z.B. Silikon aus, den Sie noch mit Farbe streichen können