TEXT ON
Chiropractic Spinography BY
E. A. THOMPSON, D.C., Ph.C. Professor of Spinography in the Palmer School of Chiropractic Chiropractic Fountain Head
FOURTH EDITION 1923
Copyright, 1923 E. A. THOMPSON, D.C., Ph.C. Davenport, Iowa, U. S. A.
Out of the great unknown there has come to me and mine an inspiration, the imprint of which will always remain. He came as a tiny bundle of sweet innocence, stayed but a few brief years, and was gathered again into the mystery which gave him. And still the memory is with me always, leading me on, as nothing else could do. To him and to the tiny fingers that grip my heart; to the joyous ring of his laughter, which lingers with me yet; to his supreme confidence in his Daddy; to these I owe the inspiration which has led me on and up. It is but fitting then, that I dedicate this book to my little son, Ernest Thompson.
CONTENTS PREFACE .............................................................................................................13 INTRODUCTION ..................................................................................................15
PART I CHIROPRACTIC SPINOGRAPHY ..............................................................24 Principles of Spinograph Analysis............................................................25 Curvatures as Shown by Spinograph.........................................................75 Spinographs Are Great Aid.......................................................................76 Rotatory Scoliosis ....................................................................................76 Two Kinds of Curvatures ..........................................................................77 When Caution Is Necessary ......................................................................78 When to Correct Scoliosis.........................................................................80 One of the Methods to Correct Scoliosis...................................................81 Close Attention Necessary in Procedure ...................................................82 Curvatures Easily Detected .......................................................................82 Lateral Scoliosis .......................................................................... 82 Direction of Spinous Process in Curvature ...............................................83 The Adjustment of the Curvature ..............................................................83 The Adjustment on the Apex of the Curvature..........................................84 More Accurate Perception of the Curvature by Spinograph......................84 Description of Spinographic Negatives.....................................................85 Lumbar Spinographs ................................................................................87 Lower Dorsal Spinographs......................................................................135 Lower Cervical and Upper Dorsal Spinographs......................................153 Atlas and Axis Spinographs....................................................................181 Lateral Spinographs ...............................................................................206 PART II X-RAY ELECTRICITY ...............................................................................215 Definitions and Terminology ..................................................................215 Electrical Conductors .............................................................................223 Electrical Non-Conductors .......................................................... 223 MAGNETS AND MAGNETISM .................................................................224 Electro-Magnetic Induction ...................................................................225 OHMS LAW ................................................................................................226 ELECTRICAL CIRCUITS ..........................................................................229 Series Circuits ........................................................................................229 Parallel Circuits .....................................................................................229 ALTERNATING CURRENT ......................................................................230 Induction ................................................................................................234
CHIROPRACTIC SPINOGRAPHY ELECTRICAL PRESSURE APPARATUS..........................................................235 The Transformer ...........................................................................................235 Step-Down Transformer ...............................................................................238 Auto-Transformer .........................................................................................239 ELECTRICAL RESISTANCE APPARATUS .....................................................241 The Rheostat .................................................................................................241 The Filament Control.....................................................................................243 OTHER X-RAY ELECTRICAL APPARATUS...................................................244 Synchronous Motor ......................................................................................244 Rotary and Synchronous Converters..............................................................246 Rotary Rectifying Disc or Switch ..................................................................246 ELECTRICAL MEASURING INSTRUMENTS .................................................249 The Milli-Ampere-Meter ..............................................................................249 The Ampere-Meter ........................................................................................250 The Volt-Meter .............................................................................................250 The Spark-Gap ..............................................................................................250 The Polarity Indicator ....................................................................................252 THE X-RAY MACHINE .....................................................................................252 Motor Type of Apparatus...............................................................................252 Motorless Type X-Ray Apparatus..................................................................255 PART III X-RAY PHYSICAL PROPERTIES .....................................................................256 Discovery of X-Rays......................................................................................256 X-Rays ..........................................................................................................258 The Laws of Production.................................................................................260 Secondary Radiation .....................................................................................261 Physics of X-Ray Production........................................................................ 212 PART IV X-RAY TUBES AND THEIR ACCESSORIES...................................................269 THE GAS TUBE ............................................................................................269 Descriptive Parts of the Gas Tube..................................................................270 Testing and Operating a Gas Tube.................................................................271 How to Raise the Vacuum of a Gas Tube ......................................................273 THE HYDROGEN X-RAY TUBE..................................................................273 Description of the Hydrogen X-Ray Gas Tube ..............................................273 THE COOLIDGE X-RAY TUBE ....................................................................275 Types of Coolidge Tubes ...............................................................................276 Universal Type of Coolidge Tube ..................................................................276 Construction of Universal Tube ................................................................276 Cathode Terminal .....................................................................................277 Anode or Anti-Cathode Terminal..............................................................278 High Tension Circuit of the Universal Coolidge Tube ..............................279 Capacities of the Universal Tubes .............................................................279
CHIROPRACTIC SPINOGRAPHY General Remarks ................................................................................280 Method of Operation...........................................................................281 THE RADIATOR TYPE COOLIDGE TUBE .................................284 Construction of the Radiator Tube .............................................284 Cathode Terminal ..................................................................285 Anode or Anti-Cathode ............................................................286 The High Tension Circuit of Radiator Tube .................................287 Theory of Operation on Unrectified Current (A. C.) ......................287 Capacities of Radiator Tubes ....................................................288 Focal Spots ...........................................................................288 The Spark Gap .......................................................................288 General Remarks ...................................................................289 DETERMINING THE SIZE OF FOCAL SPOTS ................................292 THE POTTER-BUCKY DIAPHRAGM..................................................293 Secondary and Scattered Radiation ...................................................293 Theory of Operation of Potter’s Bucky Diaphragm ......................295 H. E. Potter’s Bucky Diaphragm ..............................................295 Different Types and Makes .....................................................297 INTENSIFYING SCREENS .........................................................297 X-Ray Negatives ...................................................................298 Why Good Screens Are Necessary .............................................298 What Constitutes a Good Intensifying Screen ..............................299 Directions for Use of Intensifying Screens ..................................301 Single Screen Technique ..........................................................301 Double Screen Technique.........................................................302 Method of Mounting Single intensifying Screens..........................303 Method of Mounting Special Intensifying Screens ........................304 Care of Intensifying Screens .....................................................304 PART V THE PREPARING AND PLACING OF THE PATIENT FOR TAKING SPINOGRAPHS .....................................................................................307
Number of Films Required .......................................................309 Rules to Follow ......................................................................311 Placing of Patient on Spinograph Table ......................................312 Placing of Film or Plate for the Various Regions of the Spine .........313 Other Regions .......................................................................314 Method of Verification ............................................................316 Placement for Lateral Views .....................................................318 PART VI PROTECTION OF PATIENT AND OPERATOR ..................................322 Effects of X-Rays on Tissues .............................................................322 Factors Which Determine the Amount of Exposure Permissible .......322 Factors Which Should Be Used for the Patient’s Protection ..............323 Testing of Apparatus .........................................................................324 Filtering the Rays ...............................................................................324
CHIROPRACTIC SPINOGRAPHY The Target Skin Distance........................................................................325 Amount of Exposure Which May Be Given Without Danger to the Patient ......................................................................................326 Sufficient Penetration .............................................................................326 Value of Intensifying Screens .................................................................327 Use Lead-Glass Bowl and Lead-Lined Cones.........................................327 Protection of Patient from Static and High Tension Current...................327 Protection of Operator from Shock .........................................................332 PART VII SPINOGRAPHIC EXPOSURE TECHNIQUE .............................................334 The Photographic Effect by Distance-Time Relation..............................334 By Voltage-Time Relation ......................................................................338 By Current-time Relation........................................................................338 Summary of the Above Relationships .....................................................339 Tissue Absorption and Time Relation.....................................................339 Tube Condition Tests for Current and Spark Gap...................................340 Machine Precautions ..............................................................................344 Milli-Ampere Seconds ...........................................................................345 SPINOGRAPHIC EXPOSURE TABLES.....................................................346 Spinograph Exposure Table with the Use of X-Ray Plates.....................347 Spinograph Exposure Table with the Use of Duplitized Films and Double Intensifying Screens ....................................................348 Spinographic Exposure Table with the Use of Duplitized Films, Double Intensifying Screens, and Bucky Diaphragm .....................358 Spinographing Children .........................................................................359 Method of Recording and Checking on Spinographs..............................360 PART VIII RADIOGRAPHS OF OTHER OSSEOUS STRUCTURES ...........................362 RADIOGRAPHY OF THE LOWER EXTREMITIES...............................363 Part—Foot .............................................................................................363 Part—Os Calcis .....................................................................................364 Part—Ankle ...........................................................................................365 Part—Knee ............................................................................................365 Part—Hip ...............................................................................................366 RADIOGRAPHY OF THE UPPER EXTREMITIES.......................................367
Part—Hand (Fingers and Metacarpals)...................................................367 Part—Wrist ............................................................................................369 Part—Elbow ..........................................................................................370 Part—Clavical .......................................................................................371 Part—Scapula and Shoulder Joint ..........................................................372 Part—Sternum .......................................................................................373 Part—Ribs .............................................................................................374 RADIOGRAPHY OF THE HEAD ..................................................................375
Part—Frontal Sinus and Frontal Bone ....................................................375 Part—Antrum ........................................................................................376
CHIROPRACTIC SPINOGRAPHY Part—Skull (Inferior to Superior) ..................................................................377 Part—Occipital Bone ....................................................................................377 Part—Mastoid ..............................................................................................378 Part—Mandible ............................................................................................378 X-RAY DENTAL RADIOGRAPHS ...................................................................379
PART IX SOFT TISSUE RADIOGRAPHY.........................................................................383 Part—Oesophagus .............................................................................. 384 Part—Stomach .................................................................................... 385 Part—Small Intestines ..................................................................................387 Part—Large Intestines .......................................................................... 387 RADIOGRAPHY OF THE THORAX.............................................................389 Part—Heart ...................................................................................................389 Part—Lungs ....................................................................................... 390 RADIOGRAPHY OF THE URINARY TRACT..............................................391 Part—Kidney ................................................................................................392 Part—Ureters ................................................................................................393 Part—Urinary Bladder ......................................................................... 394 RADIOGRAPHY OF THE GALL-BLADDER LIVER AND GALLSTONES 394 PART X PHOTOGRAPH CHEMISTRY AND DARKROOM PROCEDURE ..................396 Plate Loading ............................................................................................... 397 Loading Cassette with Duplitized Films ........................................................400 Developing Process .......................................................................................401 Rinsing of the Film or Plate ...........................................................................402 Fixation Procedure ........................................................................................403 Washing of the Film After Fixation ...............................................................403 Drying the Film or Plate ................................................................................403 Developing Procedure (Tank Method)...........................................................404 Formula for Special Hardening......................................................................407 Developer Formula for Tank Use...................................................................408 Developing Duplitized X-Ray Films..............................................................408 Developing Dental Films ...............................................................................409 Developer Formula for Tray Use ...................................................................409 Fixing Bath or HYPO ....................................................................................410 Hypo Fixing Bath Formula ............................................................................410 Intensification Process ..................................................................................411 Intensifier Formula .......................................................................................412 Reducing Process ..........................................................................................412 Reducer Formula ..........................................................................................413 Storage of Photographic Sensitive Material and Accessories ........................413 Dark-Room Equipment .......................................................................................415 Dark-Room “Don’ts” ....................................................................................417 Plate or Film Troubles ...................................................................................418 CONCLUSION ...................................................................................................419
PREFACE Chiropractic is a progressive science and, as is true of all progressive movements, it employs the progressive ideas which will add to its effectiveness. Early in its development Dr. Palmer realized the necessity of, in some manner, determining conditions of the spine which could not be sensed by palpation. Certain conditions occasionally prevail which baffle even the most skilled palpator, and it is in these cases that the employment of the X-Ray, as a verifier of the Chiropractor’s findings, should be utilized. Perhaps there is no one who has had the opportunity to become more proficient in the art of palpation than Dr. Palmer himself and yet he refers to the X-Ray operator many cases. This is merely mentioned to show the value of spinography even to the expert, and proves conclusively the necessity of it to the practitioner who does not have these advantages. With the realization of this fact in view, the science of spinography has been developed and this book has been written, not to deal with the various phases of Roentgenology, but with that particular branch which applies to the study of the spinal segments and their juxtaposition. At this time I wish to acknowledge the valuable and kindly suggestions of Dr. B. J. Palmer in preparing this work. I also wish to thank Mr. Wm. F. Meyer for supplying cuts, and his assistance in preparing definitions. I personally wish to thank Mr. G. M. Ellis for the idea of preparing this work and for the many suggestions he has given me pertaining to X-Ray Technic. I am very grateful to my friend, Dr. J. W. Healey for his many helpful suggestions and to my friends and co-workers, Drs. Clyde C. Hall, Harry E. Vedder, Ray Richardson, R. W. Stephenson, W. L. Heath, Jr., Mr. P. A. Remier, B. B. Bryant and Lillie M. Williams for the valuable assistance and co-operation in compiling this work. ERNEST A. THOMPSON.
INTRODUCTION DEVELOPMENT OF SPINOGRAPHY AND ITS VALUE As to the discovery of X-Ray work I am not conversant except in a general way. As to mechanical details, I possibly know less. The history of the X-Ray was a struggle of many ups and downs. In its experimental stage I watched the work with interest and let the other fellow have his grief. Also, I made yearly trips to Chicago to the electrical show and watched the progress of the X-Ray work, always hoping that some day a machine would be made which could and would penetrate the body to make pictures of spinal columns. Nowadays it seems impossible that once upon a time this could not be done. I visited the factories which made X-Ray machines, telling them of my hopes and desires. Finally the machine I wanted appeared. I immediately ordered one shipped to the P. S. C. We fitted up a laboratory and began work. For two years we made as many plates as time and finance permitted daily. We never made a charge. Were we not merely doing our share of the experimental work even upon spines? At the end of two years we began to charge $1 per plate. It was five years before we charged $2 and $5 per plate. All this free and low rate work, notwithstanding the lowest priced plate that could be purchased in some X-Ray laboratories, was $25 for even a wrist. It was during these experimental years that we went through the starvation scientific period. We developed the technic that is today known as P. S. C. Spinography—taught here from then until now. It started here, radiated from here and comes back to us tenfold, with many lives saved. We introduced the X-Ray into spine work back in 1910. We were the first people in the world to do so. Up until that period internal visual spine work was practically an unknown quantity. The living human spine was as the shores of Africa were before Livingston or Stanley had set foot upon them. Many times in our earlier years our spine plates were 15 2—May, 1923
CHIROPRACTIC SPINOGRAPHY exhibited at the different “regular” medical conventions, without name and address, of course. Many were the compliments passed upon that work done in deeper tissues, especially the spine. The X-Ray was originally used by physicians, pathologists and diagnosticians to ascertain the location and condition of pathology, the position of traumatic conditions, the location of foreign substances, and, experimentally, it was being tried as a cure-all for diseases, more particularly for cancer. The Chiropractic purpose was not to use the X-Ray for therapeutic purposes, to ascertain normal or abnormal tissues, the character of fractures or whether there was renal calculi or a bullet in the body. We had already settled how a cure occurred; we did not care about pathological plates; we did not deal with fractures or dislocations; and if there was a bullet or any other foreign substance, that was a case for a physician or surgeon, not for a Chiropractor. We knew our place and proceeded to strengthen our position accordingly. Chiropractic had long maintained, even at this period, that a vertebral subluxation produced pressure upon nerves which interfered with the normal and free transmissions of mental impulses between the brain and its body; that this unequal state of balance between generation, transmission and expression produced dis-ease; that that summum bonum of all life and death, health or dis-ease issues pivoted around a study of the correct or incorrect position of vertebrae. Therefore, the Chiropractor palpated the spine, found irregular bumps which we called vertebral subluxations (since they were something short of a dislocation or fracture), “adjusted” the subluxations, reduced its position to normal, and the patient got well. Physicians, who ought to know, denied any of our realities. If a subluxation could exist they would have found it “long ago.” Vertebral subluxations could not be without fracture or dislocation, in which event the patient would be dead. 16
CHIROPRACTIC SPINOGRAPHY When we saw the bump, the physician showed us bumps or knuckles—“Does that prove subluxation thereof?” Under adjustment the vertebrae crack when adjusted; he pulled his fingers and they cracked—did that prove anything? We said that the patients felt them move; this he claimed was psychological—they just thought so. All we offered him was “theory and art”; what we thought and what the patient thought; what we said we felt, or saw, and what the patient said he felt in the back and with his disease. This he said did not prove any of our contentions. He offered scientific and laboratorical proofs why this could not be so. He could scientifically reason us out of our Chiropractic house and home. We were, plainly speaking, “buffaloed.” Inasmuch as everything we did, what we went after or secured, our statements and logical facts, that patients’ pains and reliefs revolved about that vertebral subluxation, could be scientifically denied, it was up to us to prove with that same degree of scientific proof that vertebral subluxation did exist. The advent of the X-Ray into Chiropractic was to prove that vertebral subluxations did actually exist and could, by use of the X-Ray, be made visible to the eye. Physician after physician would stand aghast at the actual clinical changes taking place in case after case, as a result of vertebral adjustment. They would stand amazed at the disappearance of pathology which they knew was positive. They tested our cases before adjustment and were thoroughly satisfied that the patients had to die; they tested them after adjustment and found the patients well; but when it came to acknowledge that an adjustment of a vertebral subluxation was responsible for the results obtained they bucked and refused to credit it. Once we had perfected a technic and begun taking hundreds of plates, the evidence was before them beyond all dispute. One by one they acknowledged the fact, and then their attitude underwent a radical change from ridicule of our fundamental working principle to a serious consideration of it 17
CHIROPRACTIC SPINOGRAPHY and of the philosophy which had to accompany that principle to be consistent with the results delivered. Whereas once medical books said that a vertebral subluxation was impossible without a fracture or dislocation; whereas other books had said that two teams of “Percheron horses pulling against themselves could not budge one vertebra from the other, in the recent state,” now almost every book acknowledges them as of common occurrence; in fact some books go so far as to state that almost every one has them. Medical dictionaries, recognized as standard, now include in them our common nomenclature of “subluxations,” “adjustment,” “spinography,” etc., most of these words being quoted from the writings of the author of this chapter in this book. Having established this phase of our work, the X-Ray would have gone into the discard, but there was a more valuable use for it. To prove the clinical hypothesis of a vertebral subluxation, we palpated with our fingers on the surface of the skin, found “a bump” established which direction it was in, proceeded with our work. We succeeded in many cases, failed in others. Why? Perhaps the position that we thought we felt was not correct. Suppose we take a picture and see exactly the conditions existing inside. In proving the primary purpose, we found that in many cases what we thought existed under palpation was not so. Reasons: Palpation could be in error. Judgment could be false. Spinous processes could be bent. Exostosis could exist and fool us. Process tips could be hypertrophied. Acromegaly and other conditions could bewilder us. This necessitated some form of scientific work which would let the Chiropractor’s eye look into and see exactly what existed. We wanted to know the position of the sub18
CHIROPRACTIC SPINOGRAPHY luxated vertebra exactly as the surgeon would want to know the location of the bullet before he probed. Cabot studied carefully 1,000 cases and made actual comparisons of diagnosis in the living and proved them by autopsy on the dead. He diagnosed them from the best means at his command. Working from the outside he named what he thought was inside and prescribed accordingly. He palpated, ausculated, used stethoscope, felt the pulse, looked at the tongue, examined feces, urine, etc. In 1,000 cases of comparisons he stated that as high as 85 per cent of some cases were wrong in diagnosis and that 50 per cent were wrong in the gross. Why? Because he was trying from the outside to determine what was inside. The Chiropractor took several thousand cases, made accurate and careful analyses of their vertebral subluxations and then compared them with the spinographic plates showing the exact facts of the living case, not waiting for an autopsy to be of benefit to the dead case. As many spines as the author has palpated in 23 years, as varied as those spines have been, and as accurate as he aims to make his work, we tell you candidly that about 25 per cent of our analyses do not tally with the facts the spinograph reveals to our eye. The Chiropractor palpates, makes analyses, from the surface, of the conditions he thinks are more deeply embedded. Dozens of points or combinations thereof might throw him entirely off, no matter how experienced he may be. We are thoroughly convinced from the comparison of over scores of thousands of spinographs that a percentage is bound to be wrong. Why? Because we are trying from the outside to determine what is inside. Cabot’s diagnosis is as good as it can be; our analysis is as correct as we can make it. Neither Cabot’s nor our honorable intention can be questioned. We have done the Best we can with the means at our command. 19
CHIROPRACTIC SPINOGRAPHY Is it possible to eliminate this percentage of errors, be it large or small? Is there some way by which we can know rather than hypothecate? Yes. As a result—the scientific art of spinography. No longer need we rely on theory or art. Science proves. It has been said that “spinography” was but a newly coined word to express the ordinary X-Ray work on the spines; therefore, spinograph. The word was especially coined by us, as Eastman coined “Kodak.” There are hundreds of X-Ray experts, but nowhere are they touching the characteristic P. S. C. spine work. Anyone can be taught to operate an X-Ray machine in an hour or two. The manufacturer teaches the purchaser in two days. It takes us exactly one month, six school days a week, to somewhat inculcate the principles of this work to the student; and, at that, all this instruction is Greek except to him who is first a Chiropractor, knows Chiropractic, and practices its work. Even in this time we can but lay the principles and teach the art, all of which must be practically applied to his practice after he leaves here for the field. Today spinography is used to interpret spines which have not been palpated; to learn why our palpation may have been at fault, in living people, in order that absolute readings may be determined beyond a shadow of doubt and the proper adjustment given with a perfect degree of assurance, with all elements of doubt entirely obliterated. Spinography does more than to read subluxations—it proves the existence, location and degree of exostosis, ankylosis, artificial, abnormal shapes and forms, all of which may prevent the early correction to normal position of the subluxation. It shows the Chiropractor why his patient could not get well and gives him information as to what to do, where and how to work, in order to restore early health to the case he would otherwise fail upon. 20
CHIROPRACTIC SPINOGRAPHY Spinographs are not photographs. A photograph is graphic recording of that which is superficial to the object being pictured. A spinograph is a graphic recording of that which is deeply imbedded in the object being spinographed. To make a photograph the surface lights and shadows must be thrown on the object. To make a spinograph the lights and shadows must be thrown through the object. In a photograph that which is light and dark was light and dark on the object when photographed. In a spinograph the conditions are reversed; that which was solid will be light and that which was thin will be dark. Spinographs then are but shadowgraphs. That which is solid, which intervenes between the light and the plate, will leave a light shadow, and vice versa. Reading spinographs, then, is but a study of shadows, high lights and middle tones. Every human body has size, rotundity and depth. The emulsion on the plate is a flat tissue thickness, yet it records the shadows made by the entire body, regardless of thickness. Assume a body sixteen inches thick from the anterior to the posterior and the region being spinographed is the spine. The tube is placed above the abdomen, the plate beneath. The X-Ray passes from the tube to the plate, the shadows and lights being recorded. The patient was sixteen inches thick when placed on the table; the graphic recordings are but a tissue. In reading this plate we must differentiate the depth of the shadow, thus placing its position. If it were possible to place three copper pennies, one on the umbilicus, one on the stomach and one on the spine of a vertebra, each at a different level, I could tell which was on top, all because of the different degree of light recorded. Thus are the different positions of vertebrae determined. The centrum, pedicles and spinous process tips are as flat as a tissue on the plate, yet were not so in the body. Reading spinographs is an art of science, which should be cultivated, upon which too much experience cannot be had. 21
CHIROPRACTIC SPINOGRAPHY Your work primarily divides into three important divisions: 1st—Proper palpation. 2nd—Proper analysis. 3rd—Proper adjustment. As the latter two depend on the former, it is necessary to start right in all events. Case No. 1: You palpate the spine. Make an analysis. Secure a record. Adjust your case. He gets well. Your palpation was correct, or he could not get well. Case No. 2: You palpate the spine. Make an analysis. Secure a record. Adjust your Case. Case Gets worse, does not improve, or improves extremely slow. You must conclude that your palpation was not correct or in line with the facts, which a well taken spinograph can readily prove. To spinograph that case is to save failure with it. You are poor, you are just starting, you cannot afford a spinograph outfit. Your case is poor, the distance is too great from you to us— what can you do? You can’t do it. If you are poor, you can’t buy; if your case is poor, he can’t buy railroad fares. If you are just starting and cannot afford an outfit, and your case is poor and cannot afford to come, send the case to some place where spinography has been properly studied; where this work is correctly done; where the price is within reach; where the tremendous overhead is assumed by others; where the work is so abundant that it is excellent: and where 22
CHIROPRACTIC SPINOGRAPHY the spinographers cannot afford to do otherwise than do for you that which you cannot do for yourself. Invariably, the report returns to us showing success where before it showed failure. The length of time taken to obtain results is cut down where before it was prolonged. Pain is decreased where before it was increased; and life is saved where before it was lost. Success is based, Chiropractically, on results—first, last, and all the time. Can you afford to lose a single case, either in death, failure or non-delivery of results? Hundreds of Chiropractors, from Coast to Coast, Canada to Old Mexico, says “No.” All the states in the Union and almost all the countries in the world have sent cases to our laboratories. The spinograph means the difference between failure and success: No results and results. Guess and knowledge. Doubt and positiveness. Theory and fact. We extend to you, each and all, an invitation to visit our spinograph laboratories. See the hundreds of plates on daily exhibit. See the exposures made. Study the plates and their value. We take a pleasure in writing this introduction to this able and excellent work on Spinographic Technic. Dr. E. A. Thompson has been with us more years than any other teacher on this subject. He has unquestionably seen more work, read more plates, taught more students than any other man living, not excepting the author himself. It is because he is so eminently fitted for this peculiar line of work that his work on this question becomes a paramount, valuable addition to the world’s scientific publications. Judge not this work by its size, but by the actual definite working knowledge it contains. Chiropractically yours, B. J. PALMER, President, P. S. C. 23
PART I CHIROPRACTIC SPINOGRAPHY The subject of Radiography is one which has occupied the attention of the scientific world for a number of years, but only within the last few years has it reached the high degree of perfection which it now possesses. Never before have there been as many phases available for general use. Experiments and investigations have been carried on in many different directions, and because of this, the science of radiography has taken on a new aspect, both in the commercial world and in the professions. This has all been made possible because of many different minds, each working toward a certain end. Among these the spinographer holds a position of first rank. First, because he has perfected the work of radiography in its connection with the spine, and second, because of the far-reaching facts which this systematizing of knowledge has produced. Whereas, the medical profession has followed the use of the radiograph in a limited sense, the Chiropractor has broadened the field by showing its definite application to every disease to which the body is subject. It is by its use that the relative positions of the spinal segments are determined, and this is done with an accuracy which cannot be equaled through palpation. Without doubt, the laboratory equipment in the Palmer School of Chiropractic is the most complete in the world for experimental and scientific investigation along the lines of spinography. The author has been engaged in research and practical work for the past several years, devoting his entire time to this subject as a specialty. Much of his labor has led to results which added nothing of practical value to this particular branch of the science. On the other hand, much of it has been productive of results 24
CHIROPRACTIC SPINOGRAPHY which are vital to every Chiropractor. It is the purpose in this book to correlate only those facts which are of practical value to the profession, omitting the great mass of material which is of no special use. PRINCIPLES OF SPINOGRAPH ANALYSIS Spinographic reading is a science in itself, and is one that requires a great deal of study and practice. It differs very much from the work you do from day to day in palpating your cases. It is necessary that the student of spinography should have a thorough knowledge of Chiropractic Orthopedy, thereby being familiar with the characteristics of the vertebrae in each region of the spine. Knowing these characteristics makes it easier to apply the methods used in reading the spinographic negative. In spinographic reading you must train the eyes in such a way that you are always able to discriminate among the various shadows shown in a spinograph, and then compare these shadows with one another in such a way that your listings will be correct. In spinographic reading we do not only take into consideration the spinous processes, as is the case with palpation, but we must also consider all parts and attachments of the vertebra itself and their relations to each other. The spinograph reveals not only the tip of the spinous process, but also the center of the spinous process or junction of the laminae from which the spinous process is formed. It also shows the articular processes and surfaces, the body of the vertebra, the attachment of ribs and transverse processes, and the spaces above and below the vertebrae in which are found the intervertebral discs. In all systems of teaching there are certain fundamentals, rules or principles laid down by the educator whereby the particular subject being taught is more easily grasped by the student. The rules I have prepared for spinographic reading 25
CHIROPRACTIC SPINOGRAPHY are not infallible, nevertheless they are the foundation upon which anyone who is thoroughly familiar with Chiropractic Orthopedy and Chiropractic analysis may become proficient in the science of spinographic reading or analysis. From there on it is a question of using good judgment in applying the rules or fundamentals laid down for this work. When beginning the study of reading spinographic negatives do not measure your progress by the number of films you read during a study period, but rather rate yourself on the accuracy with which you may read a few. Accuracy in this particular field is very important and can only be attained by careful study and visualization, attempting as it were to picture how each process would palpate should you be palpating the case, or picture your standing position and the direction in which your force should be applied to correct the subluxation. When you begin to consider the above mentioned factors, together with the symptoms of your patient, it not only becomes easier to read films, but you will find that such visualization will assist you greatly in your palpation and in giving the adjustment. In teaching this work I am preparing and giving you a foundation, and it is upon this foundation that you must build as your findings depend upon the proper application of the fundamentals used in making spinographic readings. Every day we have films to read that present a new and interesting condition; something that must be carefully studied. There are none of us who can claim to be thoroughly proficient in this work because of the new conditions constantly presenting themselves for our study and analysis. It is for this fact that we must be over cautious and train our eyes in such a way that we can readily detect the slightest change from the normal. It is, therefore, advisable to become thoroughly familiar with all the fundamentals laid down for the proper study of spinographic negatives and the methods used in making the proper listings so that these may be readily understood by all Chiropractors. 26
CHIROPRACTIC SPINOGRAPHY Rule No. 1 The first rule for spinographic reading concerns the method of properly placing the film in the reading box for observation. An X-Ray picture is a shadow picture. Thus when we take a picture of the spine by placing a plate or film next to the patient’s back and directing the X-Rays through the body from the anterior to posterior, we have a shadow of the spine cast upon the plate or film. In reading this spinograph we should have it so placed that we will be getting the same view as we would get of the patient’s spine if we were standing back of the patient and looking at the spine itself. If the spinographs are taken on X-Ray plates the emulsion side of the plate should be placed next to the patient. When reading this negative the emulsion side of the glass plate should be nearest the light and the glass side away from the light. I have made it a practice in taking spinographic negatives to place a marker always upon the right side of the negative when the exposure is being made. In this way it is photographed upon the negative. When the negative is ready for reading, place it in the reading box with the marker always at your right, then you are sure of your direction. The reason for having the marker on the right side, and this side only, is that sometimes mistakes will be made in placing these plates or films in the envelopes or holders before exposure is made. In case the plate is wrongly placed you will find upon reading that the emulsion would be away from the light, but the marker is still upon the right side, and you are sure that this plate should be read with the emulsion side away from the light. When using films, it is absolutely necessary that a marker be used as they have emulsion on both sides so that it is impossible to tell which is right or left without a marker. Whenever the marker is forgotten on a film it is not advisable to attempt to make a reading but rather take another picture. Quite often I return films to Chiropractors without any read27
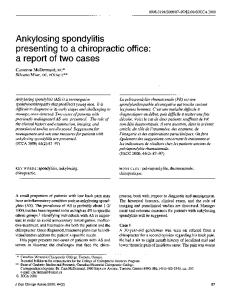
CHIROPRACTIC SPINOGRAPHY ing simply because they have failed to mark the film properly. This factor is very important and should never be overlooked either in taking or reading the spinograph. Rule No. 2 This rule is to determine a median line of the spine and compare the shadow of the spine shown upon the negative with the median line of the normal spine. The question arises, where do we find this median line? I refer you to the study of Orthopedy, which teaches the normal spine, the normal articulation of one vertebra with another; it is through the study of this work that you should have obtained a mental picture of a normal spine. If the spine were normal in every instance and the technic followed as given in the proper placing of the patient and negative, the spine would always show in the center of the film. This rule is given for the purpose of determining any deviation from this center whether it be a deviation of one vertebra with the one above or below it, or whether or not we find a curvature to the right or left of this center. In this way we are accurately able to determine the subluxations and the particular kind of curvature existing, whether it be a lateral scoliosis or a rotatory scoliosis. Rule No. 3 This rule is given for the purpose of determining the various landmarks that we may be sure of the correct count of the vertebrae when making a listing of any of the regions of the spine. The first dorsal vertebra has the following characteristics: It is the first vertebra inferior to the cervical region having large transverse processes that are curved to the superior directly above the first pair of ribs, or to which the first pair of ribs are attached. This first pair of ribs are found to be smaller and shorter and give the appearance in the negative as crossing the second, third and sometimes fourth pair of ribs, as illustrated in figure No. 1. After locating this vertebra we are then ready to obtain our count, either up into the lower cervical or down into the dorsal region. 28
CHIROPRACTIC SPINOGRAPHY Sometimes we find large transverse processes upon the seventh cervical vertebra. Do not mistake these for the transverse processes of the first dorsal as these you will find above the first pair of ribs and tilting superior, while the transverse
FIG. 1 Schematic drawing representing the region of the first dorsal, with characteristic land-marks
processes of the seventh cervical vertebra invariably tilt toward the inferior. To accurately determine the count when reading a lower dorsal spinograph, it is necessary to know 29
CHIROPRACTIC SPINOGRAPHY the characteristic features of the twelfth dorsal vertebra so that we are always able to distinguish it. This vertebra is known as a transitional vertebra, meaning that it has the characteristics of a dorsal vertebra in its superior articulation or its articulation with the eleventh dorsal vertebra, while its inferior articulation is characteristic of the lumbar articulations in that the lumbar articulations interlock with one another, while those of the dorsal articulate over one another. It is to this vertebra that the last pair of ribs are attached, which may be full grown in length or may be rudimentary. These ribs can always be located by the other features of the vertebra, by observing whether or not the head of the rib can be distinguished in its articulation with the body or the articular space showing between the two, while the transverse process of the first lumbar shows as one continuous shadow. This rib has a full facet in its articulation with the twelfth dorsal and will be found in the majority of cases to articulate near the middle of the vertebra. To verify these characteristics on the twelfth dorsal, it sometimes becomes necessary to observe the tenth and eleventh pair of ribs in their articulations with their respective vertebra. It will be found that the eleventh rib has a full facet and articulates a little nearer the superior margin of the vertebra. The tenth dorsal vertebra possesses a whole facet and articulates with the superior border of the tenth dorsal but in a majority of spinographic negatives appears to articulate with the inferior border of the body of the ninth dorsal vertebra and the superior of the tenth, or apparently opposite the intervertebral discs or space. It will also be noticed that the transverse process of the tenth dorsal articulates with the tenth rib, while the transverse processes are very seldom found on the eleventh and twelfth dorsal and when they are they are very small or rudimentary. All of the above characteristics should be carefully observed when obtaining the count in this region. There is also one other characteristic relative to the tenth dorsal that will always assist in helping to obtain the count in the majority of cases. There are exceptions to this nevertheless from my 30
CHIROPRACTIC SPINOGRAPHY
FIG. 2 Schematic drawing of the lower dorsal region, representing the characteristic land-marks
31
CHIROPRACTIC SPINOGRAPHY observations it holds good in over ninety percent of the cases that I have had under observation. It will be found, if closely observed, that the spinous process of the tenth dorsal appears as a small one showing much smaller than the spinous process of the ninth, which is usually a long one, much smaller than the eleventh, which is usually a large one, and from there down into the lumbar region they continue to get larger. It is because this process appears small in so many cases that the Chiropractor is very apt to overlook it upon palpation, thinking it to be an anterior subluxation merely because it is small and does not palpate as prominent as the one above it or the one below. I have found this vertebra to be just as important in looking for a K. P. subluxation as either the eleventh or twelfth and would advise careful consideration when listing in this region. The above characteristics are shown in figure No. 2. There are certain features about the fifth lumbar which often enables one to determine the count in the lumbar region and that is that the laminae of this vertebra are narrow and tip more to the superior, making the spinous process of this vertebra appear very close to the spinous of the fourth lumbar, or apparently tipped superiorly. This is very noticeable on a lumbar film, especially when the fifth lumbar vertebra is shown at the end of the film, but does not show this way when the fifth lumbar is in the center of the film. This is due to the natural lordosis in the lumbar region and a slight distortion due to the X-Rays striking the fifth lumbar at an angle. Be very careful about listing ankylosis in this region as the mammillary processes, or articular processes, are very large and are likely to mislead one to think there is exostosis and ankylosis between the outer margins of the fourth and fifth lumbar. Rule No. 4 The method of determining laterality from a spinographic negative embraces really more factors than is ordinarily considered from the standpoint of palpation. When palpating, the tip of each spinous process is compared with the one above 32
CHIROPRACTIC SPINOGRAPHY and the one below it to determine whether or not that process is to the right or left of the spinous processes of the adjacent vertebrae. The spinograph not only shows the tip of the spinous process but also shows the center of the spinous processes, or junction of the laminae from which center the spinous process is formed. It also shows the bodies of the vertebrae with all its attachments, which help materially in accurately proving the existence of a subluxation. The first step in determining the laterality of a vertebra is to find the center of the spinous processes and it is advisable that the reader thoroughly acquaint himself with the appearance of these centers in each region of the spine. When you know that these centers are not found in the same relative position in each region of the spine, due to the fact that these processes are longer and over-lap other vertebrae in some regions, or become larger in some regions and bifide in the cervical region, it is imperative that you be sure of determining the exact center of all of these processes. The spinous processes in the cervical region are bifide with the exception of the atlas and the seventh cervical, and this bifurcation is always shown on the spinographic negatives, but the center of these spinous processes is determined by tracing the outer margins of the prongs belonging to these processes to the superior. It will be found by making this tracing that the two lines meet superior to the center of the bifurcation and this point, or junction, is the center of the process which is used in making comparisons with the one above and below it. It will be found, however, that the center of the bifurcation will line up with the center of the process in the majority of cases because these spinous processes are not usually bent as they often are in other regions of the spine. The spinous processes in the upper dorsal region are found to be nearer the superior margin of the body of the vertebra and gradually drop a little inferior as we count down from the first dorsal, so that in the region of the third, fourth and fifth dorsal the center of the process will be found almost 33
CHIROPRACTIC SPINOGRAPHY in the center of the vertebra, considering it from its superior and inferior margins. From the sixth dorsal vertebra to the ninth dorsal vertebra, inclusive, the laminae and spinous processes become longer and begin to overlap the body of the vertebra immediately below. Because of this overlapping feature in this region, it is very necessary that extreme care be exercised in determining the center of the spinous process. For instance, the spinous process of the eighth dorsal vertebra will overlap the entire body of the ninth dorsal vertebra, and in some cases the tip of this spinous process will even overlap the superior border of the tenth dorsal. These spinous processes are different in their appearance from those of the upper dorsal or lumbar region and for this reason it is more difficult to determine their centers. Considering the outer margins of the spinous process, as shown on the film, with the inferior edge of the laminae, we have the appearance of a large letter “Y” and the center of this process is always determined at the junction of the “Y.” Whenever it is necessary to use dividers in this region for the purpose of measuring the distance from the center of the process to the outer edges of that particular vertebra, you will find the center of the process is below the body of the vertebra to which it belongs and it becomes necessary to tip the dividers at an angle from the center of the process in question to the superior or outer margins of its own body. There is one spinous process in this region that I wish particularly to call your attention to and that is the spinous process of the tenth dorsal. This spinous process has been and is neglected by the majority of Chiropractors from the standpoint of palpation because it very seldom palpates as a posterior subluxation. This is because the spinous process of this vertebra is a small spinous process in the majority of cases, a fact I have determined after a great deal of study and observation in reading thousands of negatives. This is not a hard and fast rule, however, for sometimes we find that 34
CHIROPRACTIC SPINOGRAPHY the spinous process of the eleventh dorsal is smaller than that of the tenth. It will be found that the spinous processes of the eleventh and twelfth dorsal vertebrae become larger or broader than those above and do not have the appearance of overlapping the vertebra below them as do the spinous processes previously mentioned. The centers of these spinous processes are found to be nearer the centers of their bodies considering them from the superior to the inferior margins of the vertebra. To accurately determine the count in a lower dorsal spinograph we must first find the body of the twelfth dorsal and its spinous process. Determine the count by always counting the spinous processes and bodies starting with the twelfth, eleventh, tenth, etc. Should you attempt to determine the count by counting the bodies of the vertebrae only instead of the spinous process, there is danger of making a mistake due to the long spinous processes. The centers of the spinous processes of the lumbar region are found to be near the centers of their bodies considering them from the superior to inferior margins of the vertebra with the exception of the fifth lumbar, whose center is usually found nearer the superior margin of the vertebra. After becoming familiar with the methods of determining these centers, we are then in a position to make our readings. At this time I wish to refer you to your work in palpation where you were taught to locate lateral subluxations by comparing the tip of the spinous process of the vertebra in question with the tip of the spinous process of the vertebra above and the one below. In looking for subluxations, as shown by the spinograph, we are looking for exactly the same condition we were palpating for, namely, the spinous process that has changed its position so that it is out of alignment with adjacent vertebra. In listing subluxations from spinographs, we see the vertebra with its various parts and our compari35
CHIROPRACTIC SPINOGRAPHY son is made by using the junction of the laminae as our point of measurement rather than by using the tips of the spinous processes as we do in cases of palpation. The first step is to compare the center of the spinous process of the vertebra in question with the center of the spinous processes of the adjacent vertebrae to determine whether or not the vertebra in question is subluxated to the right or left of the one above and the one below it, this is done either from observation after careful training or by placing a straight edge from the center of the spinous process of the vertebra in question to the center of the spinous process below it. In this manner we are able accurately to determine whether or not the center of the spinous process in question is to the right or left of a line drawn from the center of the spinous process above to the center of the one below. It is sometimes necessary to include more than three vertebrae when making comparisons with the straight edge as we may find the vertebra above or below the one in question is also subluxated, which would make the vertebra in question appear to be subluxated even though it had not changed from its normal position. In cases of this kind place the straight edge on the center of the spinous process of the vertebra next above or below, according to which is nearer the center. In cases where the center of the spinous processes of two adjacent vertebrae are found to be subluxated in the same direction, list both of them as right subluxations, always checking the one of these two vertebrae that is more to the right. For instance, if you find the second and third dorsal are both to the left of a perpendicular line drawn between the center of the first and fourth dorsal, list both and check the one that extends farther to the left. This check would indicate that this vertebra is the greater subluxation of the two and should always be adjusted first, as there is a possibility of bringing about a greater pressure upon the nerve fibers if the lesser subluxation is adjusted first. The above method of using the straight edge is illustrated in figure No. 3. 36
CHIROPRACTIC SPINOGRAPHY After we have determined the laterality of the subluxation, we can then prove our findings by employing an ordinary pair of dividers. Place one point of the dividers in the center of the spinous process and the other point at the outer edge of the vertebra. In this manner it can be accurately proved whether the spinous process has moved to the right or
FIG. 3 Schematic drawing representing the use of the straight-edge for determining laterality of a vertebra
left. For example, if the spinous process of the vertebra in question is found to be to the right of the one above and the one below it, then by measuring in the above manner, the spinous process will appear as nearer the right edge of its own body and farther away from the left edge. In finding the outer edges of the body of the vertebra look for the sharper white line, or the line which is slightly concave in the dorsal 37
CHIROPRACTIC SPINOGRAPHY and lumbar regions. This line can also be determined by observing the articular processes, especially the outer margins of these articular processes which appear to be in alignment with the outer edges of the bodies of the vertebrae in these regions. It is well always to place one point of the dividers at the outer inferior margins of these articular processes, which will bring this point to the center of the concavity of the vertebra. In this way your DIVIDERS will ALWAYS be placed in the same relative position on either side of the vertebra and your measurement will be correct. Be very careful not to mistake the shadow of the lower edge of the transverse processes for the edge of the body, as this shadow is always a little darker, due to the fact that it is a thinner structure and the X-Rays have penetrated it. The above method of determining the laterality of a subluxated vertebra is used in the dorsal and lumbar regions only, and if carefully studied and practiced it is more readily grasped by the student. This method is used to determine the laterality in all spinographs regardless of abnormalities, except in extreme curvatures and rotatory scoliosis when the straight edge should be placed from the center of one process to the center of another, tipping the straight edge with the curvature found upon the film to determine the subluxations in the curvature or rotatory scoliosis existing as illustrated in figure No. 4. I particularly wish to call to your attention, to the tendency of Chiropractors using dividers only, to determine subluxations when doing spinographic work. Dividers only prove the existence of a subluxation after you have first made a comparison of the spinous processes in question with the ones above and below them. They merely verify your first finding which should always be made with a straight edge and not with dividers. For example, we may find a curvature or rotatory condition in which the spinous processes are all nearer one edge of the body; dividers would prove this, but would not prove that these vertebrae were subluxated, as the 38
CHIROPRACTIC SPINOGRAPHY
FIG. 4 Schematic drawing representing the use of the straight-edge when determining laterality of a vertebra in a lateral scoliosis as indicated by the arrows “A” and “B.”
spinous processes themselves may be in perfect alignment, therefore we could not list an individual subluxation. Also, when the dividers show a difference in distances from the center of a process to either edge of its own body, do not under any consideration attempt to compare these measurements, with similar measurements on a vertebra above or below it except in extreme rotations or curvatures. Remember, 39
CHIROPRACTIC SPINOGRAPHY the spine tapers. The vertebrae are small in the cervical region and continue to get larger thru the dorsal and lumbar region, and any comparison or measurement of this nature is not accurate. Therefore, let the use of dividers be a second consideration and the use of the straight edge your first consideration when trying to determine laterality. After having determined the laterality of the subluxations, we then consider the tip of the spinous processes for the sole purpose of determining whether or not the tip of that spinous process is bent to the right or left of its own center. This can easily be determined by placing the straight edge from the center of the process to the tip of the process, which will show whether or not the tip is bent to the right or left of its own center; or we can place the straight edge from the center of the vertebra above to the center of the one below and if all three centers are found to be in alignment, but the tip of the spinous process of any one of these vertebrae to the right or left of the straight edge, then we should know this process was bent. Again, if, in a subluxated vertebra, the center of the spinous process is found nearer the right edge of its own body and farther away from the left edge, but the tip nearer the left edge of the body and farther away from the right, then, that should be listed as a right subluxation with the spinous process bent to the left. Bent spinous processes should always be listed whether there is a subluxation of the vertebra or not as it is the tip of the spinous process that the Chiropractor is palpating and these bent spinous processes are very misleading and should always be mentioned in the spinographer’s listing. Sometimes this apparent bending of a process is due to a slight exostotic growth on the side or tip of the spinous process and may lead the Chiropractor when palpating to believe there is a subluxation when in reality the vertebra is in alignment. These conditions should also be listed as an exostosis or enlargement on the right or left of the spinous process thereby giving the Chiropractor the reason why that particular vertebra palpates as a subluxation. 40
CHIROPRACTIC SPINOGRAPHY These particular conditions are found more often to exist in the lumbar region and it is necessary to be very careful in determining the tip of the spinous process in this region; the true bone of the spinous process will show very white, while a slight exostotic growth or cartilage on the tip of this process is partially penetrated by the rays and in some cases may be overlooked. Rule No. 5 After having determined the laterality of a vertebra the next step to consider is the superiority or inferiority, if any, adding our findings to that of the laterality. The reader again must visualize the normal position of a vertebra; that is, the body of the vertebra from right to left should be level or on a horizontal plane, and any deviation to the superior or inferior of that particular vertebra indicates a tipping of the body of that vertebra from the normal. The tipping, whether superior or inferior on either right or left of the body of the vertebra, should always be added to the laterality which has been first determined. Keep in mind, however, that all tipped vertebrae do not indicate a superior or inferior subluxation. Especially in curvatures and rotatory conditions it will be found that these vertebrae are tipped adaptatively to the curvature; that is, all vertebrae superior to the apex of the curvature will be tipped to the superior on the side of the curve, and below the apex they will be tipped inferior on the side of the curve. Thus, on the concave side of the curve we get inferiority above the apex and superiority below the apex. It is advisable to take notice of this tipping, however, as it will assist materially in the direction of drive when the adjustment is given, as the vertebra will move easier if the line of drive is directed with the tipping of the vertebra even though this tipping is merely adaptative to the curvature. There are several principles which should be used to accurately determine the existence of superiority and inferiority 41
CHIROPRACTIC SPINOGRAPHY of the body of a vertebra, and it is advisable that each and every one of these principles be utilized when determining superiority and inferiority. The first one of these principles is to find the superior and inferior margins of the body of the vertebra, which will show as a heavy white line from right to left. This white line is always the posterior edge of margin of the vertebra, and the reason it is shown to be much whiter in shade is that these margins are harder and that the posterior margin is closer to the film. Be very careful when trying to trace this line across the vertebra that the anterior margin is not mistaken for the posterior margin, especially so in the lumbar region where the vertebrae are more wedge shaped, being wider anterior and narrower posterior. Sometimes all four margins will show upon the film, but the whiter lines always indicate the posterior margin. The anterior edges of the bodies cast a separate and distinct shadow due to the fact that they are farther from the film. The posterior edges being nearer the film cast a shadow nearer the exact side of the posterior edge of the vertebra. After determining these margins place a straight edge on a horizontal plane from right to left, first on the superior margin of the vertebra to determine whether or not that margin is level or tipped superior on either the right or the left side and inferior on the opposite side. After using the superior margin, then compare the inferior margin in the same manner to determine whether or not the tipping of this margin is parallel to the superior margin. The next principle is to locate the articular processes found at the outer superior margins of the vertebra, comparing these in the same manner by placing the straight edge from one articular process to the other, being careful that your straight edge is placed in the same relative position on each articular process, preferably the inferior margins of the process, proving whether or not the vertebra is tipped superiorly or inferiorly. These articular processes are fixed attachments upon a vertebra and thus will tip with the body of the vertebra. 42
CHIROPRACTIC SPINOGRAPHY The next principle Is to place the straight edge from the tip, or superior margin of one transverse Process, to the tip, or superior margin, of the opposite transverse process to verify the first three factors, as the transverse processes are fixed attachments and will also tip with the body of the vertebra. It is advisable at this point to remind you that quite often transverse processes are found to be bent either superior or inferior; therefore one should not at any time rely upon this factor alone in trying to determine superiority or inferiority of a vertebra. The fourth and last principle in determining superiority and inferiority is the articulating spaces between the vertebra. I say space, because the cartilage or intervertebral disc being a softer structure than bone, the rays penetrate it leaving the appearance of a dark space between the vertebrae except as the anterior edges of the bodies cast a shadow that sometimes overshadows this space. These articular spaces actually prove the existence of a superior or inferior subluxation as the cartilage will become pinched on one side and relaxed upon the other, thus making the space appear smaller on the inferior side and wider on the superior, while the opposite side of the vertebra would show just the reverse with a larger space on the inferior margin and a smaller space on the superior margin. The width of these spaces, varying either on the right or left side, would indicate laterality of the vertebra in its relationship with the one above and below it and therefore it is best always to determine your laterality first and then add the superiority or inferiority to the laterality. For example, if we find a vertebra subluxated to the right and tipped superior on the right side and inferior on the left side, we would add the superiority on the right to the right laterality and our listing would be R S, but if the laterality of this same vertebra were left our listing would be L I. Sometimes in an acute curvature, or an acute rotatory scoliosis, we may find that the spaces between these vertebra will change, due to the excessive tipping of the vertebra in this acute condition, which 43
CHIROPRACTIC SPINOGRAPHY would produce an impingement even though the spinous processes were found to be in alignment. In conditions such as this, it would become necessary to adjust for the purpose of correcting the curvature to relieve such a pressure as illustrated in figure No. 4. The foregoing pertains to superiority and inferiority where laterality may be involved, but we still have the posterior superior, or posterior inferior subluxation to consider. In this particular type of subluxations, we consider the articular spaces found between the bodies of the vertebrae. In subluxations of this kind it will be found that the inferior space becomes greater in width and the superior space becomes smaller in width as the vertebra tips superior, and the posterior superior margin of the vertebra will be found closer to the inferior margin of the vertebra above, while the inferior margin of the vertebra appears farther away from the superior margin of the vertebra below it. In a subluxation of this type the inferior anterior margin of the vertebra is usually visible and may appear in close proximity to the vertebra below it, which sometimes is confusing and is mistaken in many cases for ankylosis. The inferior subluxation would be the reverse of the above. Be very careful in applying the foregoing methods of determining superiority and inferiority as they are just as important as posteriority or laterality and are conducive of producing an impingement upon nerve fibers just as quickly as any other direction in which a vertebra may be subluxated. By applying the factors as given we can prove conclusively the existence of superiority and inferiority. Rule No. 6 This rule is given to enable the reader to determine a rotatory scoliosis and to differentiate between it and the lateral scoliosis. The term rotatory scoliosis means a curvature or scoliosis that has been produced because of the rotating of the bodies of the vertebrae in such a manner as to produce a 44
CHIROPRACTIC SPINOGRAPHY curvature to the right or left of the normal median line. It takes at least three adjacent vertebrae to produce a rotatory scoliosis, but in the majority of conditions of this type more than three vertebrae are involved. Occasionally we will find spinographs of the various regions wherein the vertebra are rotated without any apparent curvature, which condition is spoken of as a rotation only. This condition, however, is found to be an adaptative condition to a curvature existing either above or below it or sometimes a tipped pelvis, and for this reason the term right or left rotation is the correct manner in which it should be listed, while the term rotatory scoliosis is used whenever a curvature has been produced by the rotating of the vertebra. It must be remembered that the rotation, or rotatory scoliosis, is listed for the purpose of being a guide to the adjustor in the method of adjustment he wishes to employ. When reading a film showing a curvature, the first step is to apply the straight edge through the center of the film to determine the direction of the curvature, whether right or left. After having determined the direction we then consider the spinous processes as to their relative position with the centers of their own vertebrae. If we find the curvature of the spine to be to the right, but find that the spinous process of each individual vertebra in this curvature appears to the left of its own body, or nearer the left margin of its own boa, which is also the concave side of the curvature, it would indicate that the bodies of these vertebrae have rotated to the right thus producing a curvature in that direction. The apparent nearness of the spinous processes to the left edges of the bodies of the vertebrae is due to the fact that as these bodies have rotated to the right the spinous processes have been carried to the left. This does not indicate that all of these vertebrae are left subluxations, and should not be so construed as the method of determining subluxations in rotations is the same as in any other region except in extreme rotatory scoliosis where the vertebra that has rotated the most 45
CHIROPRACTIC SPINOGRAPHY becomes the subluxation. The vertebrae in question would depend upon the symptoms manifested by the patient, and in a rotatory scoliosis it would be a question of determining which one or ones of the spinous processes possessed the more laterality. This would also indicate that that particular vertebra was rotated more than the one above and the one below it in order to throw that spinous process out of alignment with the one above and below. We will find many rotations, or rotatory scoliosis, without any subluxations, due to the fact that all of the spinous processes are in alignment with one another and the articulations of these vertebrae have not been interfered with. We must, in all cases of rotations, compare the center of each spinous process with the center of the one above and the one below to determine the subluxations existing within the rotation. However, in cases of extreme curvatures, due to the curve, the spinous process of the vertebra in question may have been carried to the right or left, as the case may be, until the spinous process may appear in perfect alignment, until wee note the position of the spinous process of this vertebra in relation to its own body, when we find it to be much closer to the right or left edge of its body than the spinous processes of the vertebra above or below are to the respective edges of their bodies; this comparison proves that the vertebra in question has rotated farther than the one above and below and would produce an impingement in this rotation even though the spinous process of these three vertebrae appear in perfect alignment. It must be remembered that the bodies of the vertebrae of the spine vary in size, therefore in listing subluxations according to this exception an allowance must be made for this variation. It is well to remember that in a left rotatory scoliosis the spinous processes will always be found appearing nearer the right edges of the vertebrae and vice versa. When there is a curvature existing due to the rotation of the vertebrae, it can always be listed properly if the spinous processes are taken into consideration as to their relative po46
CHIROPRACTIC SPINOGRAPHY sition with the concavity of the curvature, as the spinous processes in a rotatory scoliosis are always found with the concavity produced by the curvature as illustrated by figure No. 5.
FIG. 5 Schematic drawing representing relative positions of the spinous processes with the concavity of the curvature
You will also find that the articulating processes in a rotatory scoliosis will show larger and plainer on the rotated side of the vertebra, as this vertebra is rotated posteriorly on the side of the rotation and brings the articular surface nearer the film and carries the opposite one away from the film making the latter appear smaller. The question is often asked: Can we have a right subluxation in a right rotatory scoliosis, or a left subluxation in a left rotatory scoliosis? To make this clear we will take, for example, a left rotatory scoliosis. The bodies of these vertebrae 47
CHIROPRACTIC SPINOGRAPHY have rotated left, producing a curve to the left. This in turn throws the shadow of the spinous processes to the right of their own bodies. We would not, therefore, find a spinous process in a condition of this kind that would be to the left of its own body, but we will find spinous processes to the left of the one above and below it, but still to the right of its own body. A vertebra of this type could be listed as a left subluxation and if the symptoms manifested by the patient are sufficient to warrant an adjustment of this type it should be given. We must bear in mind, however, that we are rotating this particular vertebra still more by bringing or adjusting the spinous process into alignment with the one above and the one below it. Nevertheless, we are reducing impingement upon nerve fibers in this locality. On the other hand we may find in a condition of this kind that the vertebrae above and below are both subluxated to the right of their adjacent vertebrae; in this case we might adjust one or two vertebrae from the right, relieving the same pressure and at the same time helping to decrease the rotation of these vertebra instead of increasing it by adjusting the vertebra that has not rotated nearly so much. Cases of This type require careful study and consideration and whenever a subluxation of this kind is listed it Is well to make a thorough explanation to the adjustor as to the possible results that may be expected. It is well to bear in mind that the symptoms and their relief are your first consideration, and the curvature, either lateral or rotatory, should be your secondary consideration; at all times aim to find the subluxations within these conditions rather than to attempt to correct the curvature. There are exceptions to this, however, when the curvature should be the first consideration, especially in children Do not attempt to list the apex of a rotatory scoliosis and Advise adjusting the apex unless the apex happens to be a subluxation within that rotation considering its relationship with the one above and below it. Often times adjusting the apex without considering its relationship with the one above 48
CHIROPRACTIC SPINOGRAPHY and below will produce a greater pressure instead of relieving it. The subluxation causing nerve pressure may be found either above or below the apex in a rotatory scoliosis or any other type of scoliosis. Rule No. 7 In order to determine a lateral scoliosis it is first necessary to know what it is. A lateral scoliosis is a permanent lateral bending of the spine. A true lateral scoliosis, then, is one in which the bending of the spine, which would include the body of the vertebra and all its attachments, is curved to the right of the median line. In a lateral scoliosis we may find the spinous processes in either one of two positions; they may be directly in the center of their own bodies, or they may be nearer the edges of the bodies toward the convexity of the curve. Such conditions as the latter are often mistaken for rotatory scoliosis, merely because the spinous processes are nearer one edge of the body of the vertebra than the other; the fact that the bodies are rotated in the opposite direction from the curve and therefore the scoliosis has not been produced because of the rotating of the bodies, but has been produced in spite of the rotation and has apparently been overlooked. The subluxations in a lateral scoliosis are usually found to be in the same direction as the scoliosis. For instance, with a right lateral scoliosis the spinous processes of the subluxated vertebrae are nearly always found to the right of the one above and below them, although occasionally we find a left subluxation in a right scoliosis, which in reality is the individual rotation of that vertebra to the right throwing the spinous process to the left. These conditions are rare but nevertheless are found to exist. The question of listing the apex of a lateral scoliosis is very much the same as that of a rotatory scoliosis. Often times the subluxation causing the symptoms may be found directly above or below the apex of the scoliosis and should be considered in the adjustment rather than the apex; for this 49
CHIROPRACTIC SPINOGRAPHY
FIG. 6
Schematic drawing representing the three types of lateral curvatures “1A” a left rotary scoliosis; “2A” a left lateral scoliosis, “3A” a left lateral scoliosis with a greater degree of laterality to the spinous processes
50
CHIROPRACTIC SPINOGRAPHY reason it is not wise to list the apex unless the apex is a subluxated vertebra. The above figure, No. 6, gives an illustration of the rotatory scoliosis and the two types of lateral scoliosis. If the reader will always consider the relationship of the spinous processes to the curve and to the bodies of the vertebrae, the correct listing may be readily determined. Rule No. 8 This rule is given for the purpose of determining laterality, superiority and inferiority in the cervical region, with the exception of the atlas. In the cervical region, with the exception of the atlas, the laterality is determined by finding the center of the spinous process and comparing this center with the center of the one above and the center of the one below it. The spinous processes in the cervical region, with the exception of the atlas and the seventh cervical, are bifurcated but we can not always depend upon the centers of the bifurcation as the processes are sometimes bent the same as spinous processes of other regions. It has been found, however, that bent spinous processes are few in this region and in most cases the center of the bifurcation will line up with the center of the process directly above it. The center of the spinous processes are more easily determined by tracing the outer margins of the prongs from the center of bifurcation to the point where these margins unite, this junction being directly above the center of bifurcation except in cases of bent spinous processes. To verify the laterality as determined by the above method, we use the dividers in measuring the distance from the center of the process to the lateral edges of the body of the vertebra. The outer edges of the vertebrae in the cervical region appear somewhat different from those of the dorsal and lumbar region. They do not appear concave from superior to inferior and are much smaller, with the exception of the axis. 51
CHIROPRACTIC SPINOGRAPHY which is the largest vertebra in this region. The bodies of the vertebrae below the axis down to and including the seventh cervical vertebra, possess what is known as the lateral lips found on the lateral superior edges of the body, these lips are continuous with the lateral margin of the body and appear on a spinograph negative as two points on the outer superior margins of the body. These lips make the vertebra appear wider transversely. The inferior margin of a cervical vertebra appears smaller transversely, due to a depression at the inferior margin of the body into which the lateral lips of the vertebra below are received. It is necessary that the reader have a mental picture of the appearance of these bodies that he may recognize the various shadows and know what points to use for comparison in making measurements to verify the laterality of a subluxation. The first step in proving your laterality by measurement would be to place one point of the dividers on the center of the spinous process in question, the other at the outer superior point formed by the lateral lips. After measuring the distance on one side in this manner, it is then necessary to compare that measurement from the center of the process to the outer superior point of the opposite lateral lip. After comparing the measurement by using the lateral lips, then measure the distances from the center of the spinous process to the outer inferior margin of the vertebra. This gives two points on these cervical vertebrae that may be used as land marks to verify our listings. Along the lateral margins of the cervical vertebrae below the axis, we have the shadow of an irregular mass of osseous structure and at no time should any part of this shadow be used to determine or verify subluxations. This shadow is that of the articular processes of the cervical vertebrae spoken of as the zygapophyses. The reason that these shadows cannot be depended upon for measurement is that the transverse processes of the cervical vertebrae are just anterior to them and the shadows of both running together make the appearance of this mass irregular and therefore unreliable; therefore 52
CHIROPRACTIC SPINOGRAPHY always look for the body of the cervical vertebrae which is found just inside of these articular processes and use the points mentioned above for measurements. Figure No. 7 illustrates the shape of the body of the cervical vertebrae as mentioned above showing the articular processes and all the points for measurement.
FIG. 7 Schematic drawing representing the method of using the straight edge in determining subluxations of the cervical region
The bifurcation of the spinous processes in this region is often misleading to the palpator as the prongs that form this bifurcation are not always of equal length and breadth. When listing a spinographic negative of this region it is very essential that note be made of all long prongs or large prongs, regardless of the direction of the subluxation. Making note of these facts enables the palpator to more easily understand 53
CHIROPRACTIC SPINOGRAPHY why some vertebrae palpate more prominently subluxated than others, yet may not be subluxated at all. Superiority and inferiority in this region is determined in the same manner as in the dorsal or lumbar region, with the exception of the transverse processes which in this region are very seldom shown in the spinograph. The straight edge is used across the superior margins of the vertebra, or from one lateral lip to the other and if the vertebra is tipped on one side, either superior or inferior, the straight edge will prove it. After comparing the superior margin with the straight edge we then compare the inferior margin in a like manner for verification of the findings on the superior margin. After using the straight edge in this manner we then consider the spaces between the vertebrae, or the space between the superior margin of one vertebra and the inferior margin of the vertebra above it. In this manner we can actually prove the existence of superiority or inferiority in the same manner as previously given for the dorsal or lumbar region. Rule No. 9 Listing of Atlas and Axis and importance of properly placing patient for this region. Due to the fact that the vertebrae in the cervical region rotate very freely as the head is rotated in either direction it is very important that the patient be properly placed and that the head be absolutely quiet while the picture is being taken. Before listing subluxations of the atlas and axis from the spinographic plate or film, it is necessary that we have a perfect mental picture of the normal atlas and axis as they appear in relation to themselves and to surrounding structures. Relative position of Atlas and Axis with each other when neither one is subluxated. If neither atlas or axis is subluxated the odontoid process of the axis will be found mid-way between the inner edges 54
CHIROPRACTIC SPINOGRAPHY of the lateral masses of the atlas, providing the odontoid process is not bent laterally and the extreme right inferior edge of the right lateral mass of the atlas will be in the same relative position to the extreme right superior edge of the axis, that the extreme left inferior edge of the left lateral mass would be to the left superior edge of the axis. Relative position of the Atlas with all parts of surrounding structures in their normal position. The atlas and axis being taken through the mouth with the mouth wide open, we get a shadow of the descending ramii of the jaw, and it is with these shadows that we may compare the atlas providing the shadows are the same width on both sides. If the center of the film, atlas and axis and target of the tube are perpendicular to each other, and if when the patient opens the mouth the center of the chin remains in the median line of the body, the shadows of the ramii of the jaw will be the same width; however, if the chin is drawn to either side of the center, which is often the case, the ramii would not be in the same relative position to the target and therefore would not cast the same width shadow. By noting the size of the triangular spaces on each side formed by the occiput, the ramii of the jaw, and the lateral edge of the atlas and axis, we will be aided in determining whether the chin is in line with the median line of the body. If the shadows of the ramii are the same width, and the atlas is not subluxated, the lateral masses of the atlas will be in the same relative position to the ramii of the jaw on each side, being made from the inner edges of the lateral masses to the inner edge of the ramii of the jaw, and the transverse processes of the atlas will be in the same relative position to the ramii, providing they are the same length, or are not bent. Always list the Axis first. We shall first consider the axis, as it is always necessary to know the exact position of the axis before listing an atlas, 55
CHIROPRACTIC SPINOGRAPHY the latter being listed mainly by comparing it with the axis. The axis, like any other vertebra of the spine except the atlas, changes its position when it becomes subluxated, so that the shadow of the spinous process is closer to the side of the vertebra corresponding to the direction of the subluxation. If the axis is not subluxated the center of the spinous process of the axis will be directly in line with the center of the odontoid process, providing the odontoid process is not bent, and it will also be directly in the center of the axis, measurement being made from the center of the spinous process to the extreme superior lateral edges of the axis. Superiority and inferiority of the axis is determined by placing the straight edge from the outer left superior margin to the outer right superior margin; this should show whether or not the axis is level from right to left, or whether it is tipped inferior or superior on either side. Add this tipping to the laterality, which has already been determined. We may also measure the distance from the outer superior edges of the axis to the occiput on each side, and if both sides measure the same it would indicate no tipping of the axis, providing the occiput is regular in shape. The articular spaces between the superior surface of the axis and inferior surface of the lateral masses of the atlas are also utilized in proving the superiority or inferiority of an axis. Also the spaces shown on the right and left of the odontoid process and lateral masses will help to verify this finding. For example we will assume that we have determined the laterality of the axis as being right. By using the straight edge across the superior margins of the axis we find the left margin is inferior and the right margin superior. This would indicate that the axis is right and superior upon the right side. The atlas being normal we would find the space between the articular surfaces smaller on the right side and greater on the left side. If the body of the axis tips inferior on the left side, the odontoid process being a fixed attachment will also tip or incline to the left. The tipping of the odontoid process nearer the left lat56
CHIROPRACTIC SPINOGRAPHY
FIG. 8
Schematic drawing representing the land-marks used to determine laterality of the Atlas and Axis vertebrae. Upper drawing a right subluxation of both vertebrae. The lower drawing represents a left subluxation Atlas and a right subluxation of the Axis.
57
CHIROPRACTIC SPINOGRAPHY eral mass of the atlas would make the space smaller between the inner margin of the left lateral mass and odontoid process and greater on the right of the odontoid process as illustrated in figure No. 8. If the laterality of this spinous process were found to be left instead of right, the listing of the axis would be left and inferior, which would produce the same tipping of the axis and like spaces. Superiority and inferiority are also found to exist on the axis without laterality. In the case of inferiority the spinous process of the axis will be found overlapping the body of the third cervical to a marked degree and the anterior superior articulating surfaces of the axis would show closer to the lateral masses of the atlas, while the space between the posterior margins would appear much greater. If it were a superior subluxation only, our findings would be reversed. The spinous process would show superior to the base of the odontoid process, while the articular space between the axis and the third cervical would appear much greater and the articular space between the posterior margins of the atlas and axis would show smaller. The spinous process of the axis being larger and the prongs wider than those of the cervical vertebrae, one should be very careful to list these long or large prongs, if they should in any way be misleading in palpation. The palpator should also be very careful in that he should always try to determine the center of the bifurcation rather than palpate the bumps or prominences that will appear on the left or right of the median line due to these large and long prongs. Listing them from the spinograph will materially assist the palpator. Subluxations of atlas with occiput adaptative to axis subluxations in the majority of cases. Due to the fact that the axis often carries the atlas and third cervical with it when it becomes subluxated, we many times find cases in which the atlas will palpate as a pronounced subluxation in the opposite direction from which the
58
CHIROPRACTIC SPINOGRAPHY axis is subluxated, for, as the spinous process of the axis goes in one direction, the odontoid process, being on the anterior edge of the axis, swings in the opposite direction, and the atlas is carried with it. This will cause the atlas to palpate as a lateral subluxation and in reality it has produced a subluxation between the atlas and condyles of the occiput, yet in cases of this type the atlas and axis have retained their normal position with each other and if the subluxation of the axis be corrected the atlas will again assume its normal position with the occiput. In cases of this kind we list only the axis as the subluxation, because the atlas has only been carried with the axis. Atlas and axis subluxated in opposite directions. Referring to the above paragraph we have the axis subluxated right and the atlas carried to the left with the odontoid, but with no subluxation between atlas and axis. Now supposing we subluxate the atlas to the left so that we have a subluxation between the atlas and axis, we will then find that the odontoid process will be closer to the right lateral mass of the atlas and that the outer inferior lateral edges of the lateral masses of the atlas will be to the left of the outer superior edges of the axis. Relative position of atlas and axis with atlas normal and axis subluxated right. As the spinous process goes to the right, the body of the axis together with the odontoid process swings to the left, and as a result of this the odontoid process will be found closer to the left lateral mass of the atlas, and farther from the right lateral mass. The superior lateral edges of the axis will also be to the left of the outer and inferior lateral edges of the lateral masses of the atlas. In case we had superiority added to the laterality of the axis, the odontoid process would be still closer to the left lateral mass of the atlas and the outer superior edges of the axis would be still farther to the left of the outer inferior edges of the lateral masses of the atlas. On the 59
CHIROPRACTIC SPINOGRAPHY other hand, if we were to get much inferiority added to our laterality, we might not find the odontoid process closer to the left lateral mass of the atlas, and if the inferiority were very pronounced we might even find the odontoid closer to the right lateral mass of the atlas, because of the extreme tipping of the axis.
Atlas and axis subluxated in the same direction. Let us imagine a picture showing the atlas and axis both subluxated to the right. In the case of a right subluxation of the axis only, we find the condition as illustrated in the first part of the above paragraph. Now let us imagine the atlas also subluxated to the right, in which case we would find the odontoid process still closer to the left lateral mass of the atlas and also more of an offset between the outer inferior lateral edges of the lateral masses of the atlas and the superior lateral edges of the axis on each side.
Axis normal and atlas subluxated. If the axis is found to be in its normal position with the odontoid process normal in shape and closer to either lateral mass of the atlas, and a corresponding unevenness at the outer lateral edges of the lateral masses and the axis, it would indicate that the atlas is subluxated.
Superiority and inferiority of the atlas. Superiority and inferiority of the Atlas Is determined by using the straight edge from the outer inferior lateral Edges of the lateral masses of the atlas, noting whether the atlas is tipped. We also consider the width of the spaces between the lateral masses of the atlas and the superior of the axis on each side. We may also measure from the outer inferior edge of the lateral masses to the occiput on either side to see if they are the same distance.
Abnormalities of the atlas and axis. The abnormalities in the development of the atlas are 60
CHIROPRACTIC SPINOGRAPHY found by comparing all shadows such as the lateral masses and transverse processes as to size and development. Again we may find abnormalities in the posterior arch of the atlas which may not be fully developed thus showing an opening in the center of the arch as illustrated in figure No. 58. To find this posterior arch it is best first to locate the inferior margin of the transverse processes of the atlas. Tracing this inferior margin to the center, we will find a very dim shadow crossing the base of the odontoid process and the articular spaces between atlas and axis. This arch being of a thinner structure than that of the lateral masses and odontoid process the X-Rays penetrate more easily. The superior margin of this posterior arch will be found about one-fourth to three-eighths of an inch directly above the inferior margin. This superior margin of the posterior arch of the atlas, as shown in the anterior posterior view, is often mistaken for the anterior arch of the atlas. The anterior arch of the atlas does not show here as it is only shown by taking the lateral view. Whenever an opening is found in this posterior arch, it should be listed as a cleft posterior arch and due warning given in the analysis that extreme care should be used in adjusting such an atlas. Bent transverse processes are determined by first comparing the lateral masses of the atlas with one another to ascertain if they are on the same plane. If they are, we then determine whether this plane corresponds to the plane of the transverse processes. Should be find the lateral masses of the atlas on a plane with each other, but find the left transverse process tipped inferior to the normal plane and inferior to the right transverse process, it should be listed as a bent transverse process inferiorly on the left. Often times we find that one transverse process is longer than the other or that it has an enlargement or exostosis on the end of it or on the inferior or superior margin. This is misleading in palpation, and it is such conditions that should be carefully noted in the spinographic analysis. Ankylosis between the articulations of atlas and occiput 61
CHIROPRACTIC SPINOGRAPHY and atlas and axis is easily detected in a spinograph because the articular spaces will reveal a partial or complete fusion of the two surfaces. A partial ankylosis could be broken by adjusting the subluxated vertebra, but it is not advisable to attempt breaking the ankylosis when the articular cartilage has been destroyed and a complete fusion of the articular surfaces has taken place. There are cases, however, where the atlas and axis have been ankylosed with a marked subluxation of the axis, which could be adjusted to relieve the impingement between it and the third cervical as the atlas would move with the axis as though it were one vertebra. The odontoid process of the axis may occasionally be found bent either right or left. This can be determined by first deciding whether the superior articulations of the axis are on the same plane; if the odontoid process tips either to the right or left of its own base it should be listed accordingly as a bent odontoid process will change the size of the spaces between it and the inner margins of the lateral masses of the atlas which would cause confusion or be misleading in listing a subluxation of the atlas. It is for this reason that bent odontoid processes should be listed. Importance of comparing the third cervical with the axis when making listings in this region. While it is true that in a large percentage of cases the axis carries the third cervical with it, we also find many instances in which the third cervical has been subluxated independently of the axis. It is in cases of this kind that the third cervical may be a greater subluxation than the axis and should be listed and adjusted first. The third cervical should always be compared with the axis and fourth cervical when looking for subluxations in this region. Numerous cases have been brought to my attention in which the axis had been adjusted without results, and then with a few adjustments on the third cervical, good results were obtained. There is a tendency to overlook this vertebra, both when 62
CHIROPRACTIC SPINOGRAPHY palpating and when listing the spinograph, because of its very small spinous process, making it difficult to palpate and also hard to see on the spinograph. Rule No. 10 Reading the lateral views of the spine requires careful study in judging the different angles assumed by the vertebrae
FIG. 9 Schematic drawing representing lateral views of the cervical vertebrae. The left represents a normal column of the cervical vertebrae. The right represents a lateral view of the cervical column showing two subluxations; 3rd vertebrae listed Posterior and Inferior, the 5th vertebrae listed Posterior and Superior.
in the different regions of the normal spine. For instance, in the cervical region we have a slight lordosis in the normal spine with a slight kyphosis in the upper dorsal which changes 63
CHIROPRACTIC SPINOGRAPHY again to a lordosis in the lower dorsal and lumbar region. The reader must carefully consider these normal curves and will note that the vertebrae in the upper part of the lordosis will invariably tip inferior and in the lower part of the lordosis will tip superior. However, this is a normal tipping and is adaptative to the normal anterior curve and should not be construed as inferior or superior subluxations until all other factors have been considered. Lateral views are taken for the purpose of revealing subluxations that exist but are not shown by the anterior posterior view. These subluxations are posteriority, inferiority and superiority, and are successfully taken of the cervical, lower dorsal and lumbar regions. The lateral view of the upper dorsal region is rather difficult to photograph and read accurately although it is possible to obtain such a view in smaller individuals. The first step in reading the lateral view is to determine posteriority of the subluxated vertebrae by comparing the anterior margin of the body of the vertebra in question with the anterior margins of the vertebrae above and below it. If the vertebra is subluxated posterior the anterior margin of this vertebra will be found posterior to the vertebra above and below it. After making this comparison we then compare the posterior margins of the body of the vertebra with those above and below which, if found posterior, will verify our first finding in that the posterior margin is also posterior to that of the one above and below and that the inferior posterior margin of this vertebra will be found changing the size of the intervertebral foraminae. This changing in size can only be determined in the dorsal and lumbar region when a right to left lateral view is taken, while in the cervical region the foraminae project a little anteriorly and will not show unless the film is tipped at an angle anteriorly. This would be termed a semi-lateral view. Knowing that posteriority is a term used to designate the direction in which the body of a vertebra has moved, our attention should be centered on com64
CHIROPRACTIC SPINOGRAPHY paring that body in question with the one above and below it to determine the posteriority. The inferiority and superiority are determined by judging the spaces between the bodies of the vertebrae, the spaces between the articular processes, and the spaces between the spinous processes. The angle of the body of the vertebra from anterior to posterior is also considered to verify the change in spaces between the parts mentioned. If a vertebra is found posterior and superior, we find the anterior of the body of that vertebra tipped more inferior while the spinous process is tipped superior and found closer to the spinous process above. This tipping compresses the intervertebral disc superiorly at the posterior margin making this space appear smaller while the corresponding space at the anterior margin will appear wider. The space inferior to this vertebra will be just the reverse, the posterior showing wider and the anterior smaller as illustrated in figure No. 9. The spaces between the articular processes in the superior subluxation will show wider, while the inferior subluxations will be compressed or closer together. From the above explanation of how a superior subluxation is determined it will be seen that the inferior subluxation would be just the reverse, and the spinous process would tip closer to the one below in which case the anterior of the body of the vertebra would be tipped superior. The lateral view should always be taken whenever there is a suspected case of Caries of the spine or Potts Disease as this view will readily show the degree and extent of the necrosis resulting from such disease much better than any other view. Often times in an advanced case of this type in which an ankylosis has taken place, the bodies of the vertebrae will be found wedge-shaped. Sometimes this ankylosis will only be on the anterior margins of the vertebrae and would not show very clearly in the anterior posterior view. Whenever an ankylosis is suspected in the cervical region the lateral view will reveal it much better than the anterior posterior view with the exception of atlas and axis. In the lateral view all 65
CHIROPRACTIC SPINOGRAPHY of the spaces are clearly shown, such as the space occupied by the intervertebral discs and the space between the articular processes, and if there is any exostosis or ankylosis between these vertebrae it will be clearly shown. In all cases of suspected dislocation the lateral view should be taken which will reveal the extent of the dislocation and the possibility of correcting it. Rule No. 11 Determining subluxations of the sacrum.
The sacrum should be very carefully considered in cases of sciatica, neuritis and many other painful disturbances of the lower extremities, as often times a subluxation or rotation of the sacrum will produce conditions in the lower extremities that a lower lumbar vertebra adjustment will not relieve; it is only through experience and observation that I make these statements. I have termed the sacrum one of the neglected regions of the spine, for the Chiropractor often fails in his analysis to note that a rotated sacrum will cause a tension upon certain fibers that may produce the same symptoms that a lumbar subluxation would produce. I do not mean, however, that the lumbar vertebrae should be overlooked as the above conditions can be produced from subluxations in either location. To list the laterality or rotation of a sacrum the fifth lumbar should always be included in the exposure in order to obtain an accurate comparison between the center of its spinous process and those of the sacrum. Do not attempt to compare the first tubercle of the sacrum with that of the fifth lumbar as often times there is a malformation in this first tubercle which makes it appear either right or left of the fifth lumbar, while the tubercles below it may appear in alignment. The first step, then, would be to compare the tubercles of the sacrum with one another to determine whether or not they are in alignment or if any malformation does exist between them. After we have determined this fact, we then compare these processes with that of the fifth to determine whether or not 66
CHIROPRACTIC SPINOGRAPHY the sacrum is to the right or left of the fifth lumbar, or whether the fifth lumbar is to the right or left of the sacrum. If the sacrum is found to be to the right of the fifth lumbar, by using the above method, we then use the dividers to verify our findings by placing one point of the dividers in the center of the first tubercle and measuring the distance to the outer superior margin of the sacrum; if it is subluxated, the distance upon the left side will be greater. After making the first comparison in this manner, we then take the second and third tubercles measuring the distance in the same way from the center to the inferior margin of the sacrum where it articulates with the ilium. This measurement will verify the above measurement. Finding the distance upon the left from center of left margin of the sacrum, we therefore prove that the sacrum is rotated left and therefore is posterior on the left and should be listed accordingly. It is not advisable to attempt to make a listing of a sacrum when only the superior margin of the sacrum shows upon a film as is the case with a lumbar exposure. In pictures of this kind we only have the first tubercle of the sacrum for comparison and should there be a malformation in the formation of this tubercle, we would be misled in our deduction. We could, however, list the sacrum in cases where both the first and second tubercle are shown. The posteriority of the base of the sacrum and the apex of the sacrum is determined from palpation but in some cases a lateral view can be taken, especially in children. Rule No. 12 Determining subluxations of the ilii
To determine subluxations of the ilii from the spinograph careful observation should be taken of the inferior articulation of the ilii with the sacrum. If the ilium is superior to this inferior articulation with the sacrum list it accordingly, as the inferior articulation of the sacrum should line up evenly with that of the ilium. In the majority of cases the pelvis may appear tipped higher on one side than the other, while the articulation with the sacrum remains normal in that the 67
CHIROPRACTIC SPINOGRAPHY
FIG. 10
Schematic drawing representing the pelvis, with characteristic land-marks for listing subluxations of the Sacrum, Ilii, and Coccyx. Illustrating the Sacrum rotated right, and the Coccyx subluxated slightly left.
68
CHIROPRACTIC SPINOGRAPHY sacrum HAS tipped with the pelvis. A tipping of THIS nature would indicate that it is adaptative to a scoliosis or rotation within the spine, or to a condition in which one limb is shorter than the other. Be very careful that an ilium is not listed as a subluxation when it is only tipped adaptative to some other existing condition. Superior or inferior subluxations of the ilii are very rare, but you find them subluxated posteriorly, which can be determined by comparing the distance from the tubercles upon the sacrum to both the right and left inner margins of the ilium. If, for instance, the sacrum is found to be normal without any rotation right or left, but the inner margin of the right ilium closer by measurement to the tubercles or center of sacrum, it would indicate that this ilium is posterior. The posteriority can also be determined by careful palpation. Rule No. 13 Subluxations of the coccyx.
To determine subluxations of the coccyx we must first obtain a picture showing the pelvis in order that we may see the articulation of the coccyx with the apex of the sacrum. To determine the laterality of the coccyx it is necessary to line up the tip of the coccyx with the apex of the sacrum or with a line extended through the center of the sacrum, thus proving whether or not the tip of the coccyx is to the right or left of the apex of the sacrum and the line drawn through its center. This will reveal the laterality only. The posteriority or anteriority will show when a lateral view can be obtained, or may be determined from careful palpation. Rule No. 14 Determining exostosis and ankylosis.
There are two classifications of exostoses, namely, the true and the false. The Chiropractor should be familiar with both types as it will enable him to decide whether or not to attempt to break an ankylosis that has formed from either type. A true exostosis is an enlargement due to the growth or 69
CHIROPRACTIC SPINOGRAPHY development of a new bony tissue. This type of exostosis is shown in many cases where exostosis and ankylosis are present and is usually found where an inflammatory condition has existed, such as rheumatism, arthritis, osteitis, spondylitis and in cases where the inflammation is the result of traumatism. Such exostosis as revealed by the spinograph will be easily detected because the growths appear around the outer margins of the vertebrae. If found at the inferior of a vertebra it nearly always extends down towards the vertebra below it, and if found on the superior margin of the vertebra it will extend towards the inferior margin of the vertebra above. Exostoses of this kind appear to be forming a bridge work between the vertebrae and across the intervertebral discs. Often times this exostosis is of such a character that a solid ankylosis is formed between the vertebrae above and below, while the intervertebral discs, or cartilage, may be intact. It is such ankylosis as this that may be broken by adjustments. The Chiropractor should use judgment as to whether or not it would be advisable to break such an ankylosis in elderly people in whom this type shows and he should let the symptoms manifested in the case be his guide as well as the age of the patient. In cases where the intervertebral discs have been destroyed, due to an excessive inflammation, and the body of the vertebra above drops down and becomes ankylosed to the one below making these vertebrae appear as one, with the exception of their several attachments, care should be exercised in adjusting with the intent of breaking such ankylosis. Exostotic growths will sometimes be found on the tips of spinous processes and should always be listed, as such growths are misleading when palpating. In some curvatures, exostosis will be found as an apparent adaptative condition forming a bridge work on the lateral margins of the vertebrae and between the vertebrae thus producing ankylosis. Such adaptative exostosis and ankylosis is usually found first on the concave side of a scoliosis and later may develop on the convex side of the curve.
70
CHIROPRACTIC SPINOGRAPHY
FIG. 11 Schematic drawing representing a section of the vertebral column showing wedge-shaped bodies, exostosis, and ankylosis, as they are revealed by the Spinograph
71
CHIROPRACTIC SPINOGRAPHY False exostosis. False exostosis is due to a pathological process wherein the bone becomes soft and, due to the weight of the body upon the particular vertebra involved, is compressed and broadened or bulged and appears very irregular in shape. Tuberculosis or Potts Disease is a characteristic example of false exostosis. Ankylosis can be and is formed by false exostosis just as readily as with the true, but such ankylosis is usually an adaptative process. For instance the bodies of the vertebrae may be found to be partially destroyed from disease, or to be wedge-shaped, and ankylosis may have taken place between the vertebrae to strengthen that particular region; in such cases it is not advisable to attempt to break the ankylosis. However, at no time should force enough be used to break an ankylosis with a single adjustment, but only a reasonable amount of force should be used and sufficient amount of time allowed for the exostosis and ankylosis to be torn down. Whenever exostosis or ankylosis is shown around or between vertebrae, regardless of what type it may be, it should always be listed and, if the ankylosis is of such a nature that it should not be broken, it should be mentioned in the spinographic listing. The reader should also list any other abnormal conditions showing upon a film that would be of assistance to the adjustor. There are many abnormal conditions other than the subluxation, such as exostosis, ankylosis, fractures, tubercular conditions, lateral curvatures and rotatory scolioses. Another very common abnormality is that of a single cleft spinous process wherein the laminae have failed to meet to form a true spinous process. In the cervical region we may find two prongs with an opening between them. This condition is also found occasionally in the atlas in that the posterior arch of the atlas has failed to unite, leaving a gap or opening usually in the center of the posterior arch. From observation these particular conditions are more manifest in the region of the sev72
CHIROPRACTIC SPINOGRAPHY enth cervical and first dorsal, tenth or eleventh dorsal, fifth lumbar and first segment of the sacrum, although they have been found to exist in all other regions. Be sure that all such conditions are listed and advice is given as to the possibility of adjusting such a process. Another abnormality that is often found in spinograph negatives is that of several adjacent cleft spinous processes, or spina-bifida. This condition is most commonly found in the lower lumbar vertebrae and sacrum, although it may exist in any region of the spine. The appearance of spina-bifida on a spinographic negative is that of an opening between the cleft processes where they have failed to unite to form the normal spinous process. In some instances they appear as prongs, and under palpation palpate as a bifurcated spinous process, while in other cases there is no formation of a spinous process at all and the opening is then between the laminae. There are some cases in which there is an absence of the laminae that may involve one or more vertebrae within a given region. There are some cases of spina-bifida in which there is a protrusion of parts of the spinal coverings and their fluid forming a tumor in the region of the spina-bifida. This condition is usually found in infants and adjustments are not advisable within this region as there is no point upon which to obtain a contact to give the adjustment. Such conditions as the above should be clearly stated in the spinographic analysis. Rule No. 15 In making spinographic analysis of the cervical, dorsal or lumbar vertebrae, the reader is admonished against trying to list a subluxation by using only a part of any one of the rules or fundamentals for plate reading as they must all be taken into consideration to make a correct analysis. It is well to remember that the posteriority of a subluxation does not show in a negative taken from the anterior to the posterior, and the subluxations listed in a negative of this kind will only reveal the two-letter position of the subluxation as laterality, supe73
CHIROPRACTIC SPINOGRAPHY riority and inferiority. The posteriority is determined either by taking a lateral view or from palpation. When listing a spinograph it is advisable to list all vertebrae that are subluxated and this means that the vertebrae under consideration must necessarily be compared with the adjacent vertebrae to determine the subluxation. Do not list all vertebrae as subluxations merely because the spinous processes are all found to appear to the right or left of their own bodies, as would be the case in a rotatory scoliosis or in a lateral scoliosis, in which the spinous processes are nearer the convexity of the scoliosis. The complete listing of all subluxations will give the Chiropractor adjusting the case a better mental picture of the vertebrae in the particular location in which he wishes to adjust for a specific disorder. Also mention every other abnormality that may exist, particular attention being paid to bent spinous processes, long prongs in the cervical region, or any little growth or exostosis on the spinous process as it is these conditions that cause error in palpation and by having them listed the Chiropractor knows why such a spinous process palpates as a subluxation even though it has not changed its position. The direction of rotatory scolioses and the number of vertebrae involved should also be listed as this particular method will better enable the adjustor to determine what contact he should employ in correcting subluxations within this condition. The same thing is true of the lateral scoliosis. Rule No. 16 This rule is to emphasize the fact that major subluxations for a condition manifesting certain symptoms cannot be selected from a spinographic negative without first going into the history of the case, using palpation and nerve tracing, as all of these essentials must be considered when selecting a major. We find many spinographs that show subluxations to a marked degree but all such are not necessarily the major subluxation for symptoms manifested. True, the greatest subluxation showing upon a film would be the major subluxation as to degree of its laterality, superiority or inferiority but this 74
CHIROPRACTIC SPINOGRAPHY does not indicate that all such subluxations would be the major for the particular condition for which the patient is being adjusted. Do not overlook the subluxations that appear to have a slight degree of laterality, as often times a slight subluxation may produce a pressure upon some nerve fibers that will cause trouble in that particular zone. It is true that the more pronounced the subluxation the greater the pressure, and the Chiropractor having this fact in mind usually overlooks the subluxation of lesser degree when reading a spinographic film. This concludes the lecture embracing the rules on the methods used in reading a spinographic negative. I would advise the reader to visualize as much as possible the spinographs that he reads, thereby picturing to himself just how this and that spinous process would palpate if he were palpating the case. Visualize your standing position and place of contact that you may better know the proper direction to apply your forces in moving the vertebra in the easiest manner. When the Chiropractor learns to read films in this manner he will find that the spinograph will not only be of assistance to him in determining the direction of the subluxation but it will also enable him to be more exact in his palpation and adjusting and the ultimate result will be a better Chiropractor. CURVATURES AS SHOWN BY SPINOGRAPH The subject of curvatures is one that may be treated extensively. The Chiropractor finds that the majority of patients possess a curvature of some type but this does not mean that an attempt should be made to correct every form of curvature or that a promise be made to do so. The adjustor should always take into consideration the symptoms given by the patient and should look for the subluxations causing the nerve pressure which in turn produces such symptoms. The curvature itself should be a secondary consideration. This, from my experience, is the one great fault of many Chiropractors. They seem to think that correcting the curvature will 75
CHIROPRACTIC SPINOGRAPHY relieve the patient of all symptoms. They do not stop to consider that curvatures may be produced by conditions such as habit, occupation, static curvature, due to one’s limb being shorter than the other, congenital, rachitic, and many others that might be named. In some cases subluxations have been produced by adjusting the apex to correct the curvature, and for this reason it is best to consider symptoms first and curvatures last. Also the practitioner in making his examination should be very careful to determine the cause of the curvature before he adjusts to correct it. It is true that some curvatures are produced either directly or indirectly by a subluxation, and can be corrected when that subluxation is found and adjusted. SPINOGRAPHS ARE GREAT AID The spinograph is a great aid to the Chiropractor in determining subluxations in curvatures, thus making it easier for him accurately to make a listing of the subluxations existing and at the same time helping him to determine what adjustment would be the most effective. The curvatures that seem to cause the most confusion to the Chiropractor and Chiropractic students are the rotatory scolioses and total scolioses and it is with the listing of this type of curvatures from a spinographic standpoint that I wish to deal. ROTATORY SCOLIOSIS First: A rotatory scoliosis is produced when the bodies of three or more adjacent vertebrae are rotated to the right or left of the median line and produce a curvature, the spinous processes always being in the opposite direction of the curve; that is, they are always to the concave side of the curve. In other words, in a right rotatory scoliosis the curvature is to the right, such curvature being produced by the bodies of the vertebrae being rotated to the right. Naturally the spinous 76
CHIROPRACTIC SPINOGRAPHY processes would thus be thrown to the left. On the other hand they would be thrown to the right in a left rotatory scoliosis. When listing a spinographic negative the Chiropractor should first consider his median line, then consider the curve, if any, determining whether it is a right curvature or a left curvature. After determining what kind of a curvature exists, whether it is a rotatory scoliosis or a lateral scoliosis, then proceed to list the subluxations in the scoliosis by comparing the center of each spinous process with the one above and the one below it to actually determine the subluxations causing the impingement, except in cases of extreme curvatures where, due to the curve, the spinous process of the vertebra in question has been carried to the right or left, as the case may be, until the spinous process of this vertebra may be in perfect alignment with the one above and the one below. In the latter case, however, the position of the spinous process in relation to the body of the vertebra itself will be found to be much closer to the right or left edge of its body than the spinous process of the vertebra above or below are to the respective edges of their bodies. This proves that the vertebra in question has rotated farther than the ones above and below, and would produce an impingement in this rotation even though the spinous processes of these three vertebrae are in perfect alignment. It must be remembered that the bodies of the vertebrae of the spine vary in size, therefore in listing subluxations according to this exception an allowance must be made for this variation. TWO KINDS OF CURVATURES In the accompanying cuts we present two kinds of curvatures: the first one “A” 1 represents a right rotatory scoliosis, the next one a lateral scoliosis. Notice in the rotatory scoliosis that the spinous processes are thrown to the left or near the left edges of the vertebrae, therefore we would naturally look for a left subluxation in 77
CHIROPRACTIC SPINOGRAPHY right rotation as the spinous processes are already thrown left of their own bodies and it would merely be a matter of comparing the center of the processes in question with the ones above and below to determine which is the subluxation. In studying this picture visualize what would happen should you adjust any one of these spinous processes from the right, or in other words listing a right subluxation in a right rotatory scoliosis. With the spinous process already nearer the left edge of the body, it will readily be seen that the rotation of any one vertebra would be increased. Thus, the Chiropractor making the spinographic listings should be very cautious and avoid listing right subluxations in a right rotatory scoliosis or left subluxations in a left rotatory scoliosis. Although a spinous process may be found to the right of the one above and below it in a right rotatory scoliosis, it is only because that particular vertebra has not rotated so much as the adjacent ones. A vertebra of this kind may be adjusted in an acute case but should never be made as a permanent spinographic listing. WHEN CAUTION IS NECESSARY Regardless of the fact that by listing and adjusting a right subluxation in a right rotation you will sometimes give relief to the suffering patient in an acute case, under no circumstances should you continue an adjustment of this kind after you have given the patient relief. Should the adjustment be continued it will increase the rotatory scoliosis. It is for this reason that I never make a listing of this kind. Many of my readings are being sent to other Chiropractors who know nothing of reading spinographic negatives and trouble would inevitably result. Should a listing of this kind be received the adjustor might continue to adjust and might produce more trouble for the patient later. If you who are making your own spinographic readings, knowing the symptoms of each patient, wish to list a right subluxation in a right rotation, I will say it is possible, but remember that you are increasing the rota78
CHIROPRACTIC SPINOGRAPHY
FIG. 12
“A” 1 Right Rotatory Scoliosis
“A” 2 Right Scoliosis
79
CHIROPRACTIC SPINOGRAPHY tion of that vertebra being adjusted, so do not adjust it very long. The same may be said for a left subluxation in a left rotation. WHEN TO CORRECT SCOLIOSIS The question is often asked, would you attempt to correct a rotatory scoliosis if there were no symptoms involving that particular region of the spine wherein the rotation is found? My answer is always no, and this brings to mind an incident that took place here some time ago. A Chiropractic student, apparently well, having been pronounced physically perfect, decided to have spinographs taken of his entire spine just to determine whether or not his spine was in perfect condition. After the films were finished there was revealed a rotation in the lumbar region. Even though a rotation of the bodies of the vertebrae was revealed, the spinous processes were in alignment. This patient had the idea that he wanted to be one hundred per cent perfect and decided to take adjustments merely to straighten the rotation. The result was that subluxations were produced and he developed a severe attack of sciatica. Why should he develop sciatica? In the first place, he had a rotation but the spinous processes were in alignment, and if the spinous processes are in alignment, even though the spine is rotated, the intervertebral foramina remain the same size. So adjusting any one vertebra in this rotation to correct it will change the size of the foramina, and nerve pressure will be the result. That is precisely what happened in this individual’s case. If one intends to adjust to correct a rotation he should not confine his adjustments to any one vertebra in the rotation but alternate adjustments above and below the apex of the rotation and at the apex itself. Adjusting in this manner he is correcting the rotatory scoliosis of the entire region involved. This method of adjustment, in my opinion, is the only method to employ to successfully correct a rotation or subluxation in rotations. This statement is based entirely on 80
CHIROPRACTIC SPINOGRAPHY my experience from reading spinographic negatives and observing results obtained Often times the question is asked, supposing we have a film which shows a left or right rotation and the spinous processes in alignment, with no individual subluxation, what could be adjusted if there are symptoms indicating trouble in this region? In a case of this kind it would be necessary to adjust as described in the preceding paragraph with the idea of correcting the rotation as much as possible, bearing in mind that as this spine has rotated it has produced a tension of muscular tissue, ligaments, and nerve fibres on the rotated side. This tension upon nerve fibers will produce just as much trouble and as many symptoms in some cases as an actual impingement upon a nerve and to relieve the patient it is necessary to adjust the mammillary processes or the transverse processes to ease this tension and thereby reduce the symptoms. We may, however, find a posterior subluxation in the above condition which will produce an impingement upon the nerve fibers causing the manifested symptoms; therefore, be very careful that this important feature of subluxated vertebrae is not overlooked. ONE OF THE METHODS TO CORRECT SCOLIOSIS The method to be employed in adjusting subluxations in rotatory scoliosis is one upon which Chiropractors differ. However, the method which will successfully correct them in the shortest length of time is to adjust the transverse processes in the dorsal region, third to tenth inclusive, and the mammillary processes from the first to the fifth lumbar, inclusive, in the lumbar region. For example, in a right rotation adjust the right transverse processes in the dorsal region because the bodies, rotating to the right, rotate the right transverse processes posterior; in the lumbar region use the right mammillary processes as they offer a good contact. This method of adjustment is the one being taught in the Palmer School of Chiropractic. While it is true that the spinous 81
CHIROPRACTIC SPINOGRAPHY process could be adjusted from the left to correct a subluxation in a right rotation, it must be borne in mind that the direction of your adjustment is opposed to the correction of the curvature which is already right, and for this reason the transverse adjustment is preferable as well as more effective. CLOSE ATTENTION NECESSARY IN PROCEDURE The Chiropractor can learn to palpate the transverse processes as well as the spinous processes, or learn to detect the trouble by observing the muscles on either side of the spine. Wherever there is a right or left rotation the muscular tissue will show higher on the rotated side and under palpation shows greater prominence. Should the adjustor use this method of palpation he must at the same time take into consideration the occupation of the patient. There are occupations that will develop muscles of the back which may make some regions appear more prominent than others and by taking these things into consideration the Chiropractor will become more proficient in his palpation. CURVATURES EASILY DETECTED Conditions such as rotatory scoliosis and lateral curvatures are easily detected through palpation by the student or Chiropractor who has studied spinography. He learns to visualize the spine and is able to tell why a certain condition palpates so and so from his experience in reading spinographic negatives. This because from his study of a large number of spinographic negatives, he has gained a much clearer impression of the spine and the positions which vertebrae can assume. He is also able to give, after careful reasoning, the adjustment that will correct the position of the vertebra in the shortest possible time. LATERAL SCOLIOSIS Now that we have considered the rotatory scoliosis, which I might say forms the greatest percentage of curvatures, we 82
CHIROPRACTIC SPINOGRAPHY will now consider figure No. 12, “A” 2, which represents a right lateral scoliosis, sometimes spoken of as a true scoliosis. The definition given for a true scoliosis is a permanent lateral deviation of the spine to the right or left. A true lateral scoliosis, then, is one in which the bending of the spine, which would include the body of the vertebra and all of its attachments, is curved to the right or left of the median line. In lateral scoliosis we may find the spinous processes in either one of two positions; they may be directly in the center of their own bodies, or they may be near the edge of the bodies in the convexity of the curve. Such conditions as the latter are often mistaken for rotatory scoliosis merely because the spinous processes are nearer one edge of the body of the vertebra than the other, no attention being paid to the fact that the bodies are rotated in the opposite direction from the curve and therefore have not produced the curve. DIRECTION OF SPINOUS PROCESS IN CURVATURE Subluxations in a condition of this kind are listed the same as in any other type of curvatures, by comparing the center of the spinous process in question with the one above and the one below to determine their juxtaposition. In the majority of curvatures of this type the subluxations are found in the direction of the curvature. For example, if it were a right scoliosis the spinous processes of the subluxations would be found to the right of the processes above and below them. Although it is possible to find a left subluxation in a right scoliosis, such cases are very few. THE ADJUSTMENT OF THE CURVATURE The adjustment in a true lateral scoliosis should be on the spinous processes themselves driving them toward the median line, as it must be remembered that the entire curvature is right or left of the median line and the spinous process adjustment is the most logical adjustment to give and the only 83
CHIROPRACTIC SPINOGRAPHY one that will correct the curvature. Some authorities state that this type of scoliosis forms about ten per cent of all types of scoliosis. From my experience it is safe to say that this percentage is approximately correct, as most curvatures are those of the rotatory type. THE ADJUSTMENT ON THE APEX OF THE CURVATURE There are some Chiropractors who seem to feel that to correct the curvature is the first consideration rather than to relieve the symptoms as given by the patient. They invariably attempt to find the apex of the curvature whether it be a lateral scoliosis or a rotatory scoliosis, thinking that adjustment of the apex will relieve the patient of all symptoms. This is folly, as adjustment of the apex of the curvature is likely to produce a new subluxation, for it must be borne in mind that the apex is not always the subluxation. This may be either above or below the apex. MORE ACCURATE PERCEPTION OF THE CURVATURE BY SPINOGRAPH It is from the study of spinography that the Chiropractor obtains a clearer conception of different types of curvatures, and then by careful reasoning is able to decide which vertebra in the curvature to adjust to successfully correct the subluxations producing the pressure. Keep in mind that a Chiropractor can make a much better analysis from a spinographic negative when he knows all of the symptoms manifested by the patient. It is the aim of the Spinographic Department of this school to convey to the student the rules and foundation for reading spinographic plates successfully, and to impress upon him that he will be more successful in his readings when he knows the symptoms of his own patients that he is spinographing and adjusting. 84
CHIROPRACTIC SPINOGRAPHY DESCRIPTION OF SPINOGRAPH NEGATIVES The following spinographs have been selected to clearly illustrate to the spinographer the many abnormal conditions that the Chiropractor has to deal with in his daily practice. The spinographs illustrated will show the near normal spine, the abnormal spine, and the extreme abnormal spine, with the different degrees of lateral scoliosis, and rotatory scoliosis. These illustrations have been lettered and marked in such a way that the student will readily grasp the methods employed to properly analyze a spinograph. With each spinograph is given a complete description and analysis of the abnormal conditions. The spinographs are arranged in order as the subject is taught. Starting with the study of the lumbar region which is given first before studying the more complicated regions. Enabling the student to obtain a more concise idea of the principles employed to correctly analyze each region of the spinal column. The student is requested to study each spinograph carefully that he may become familiar with the conditions illustrated, being able to recognize the conditions when observed in other spinographs. The following form given is a method by which the spinographer should make a record of the spinograph analysis, affording a means to the Chiropractor for a ready reference. The spinographer should at all times retain the films of his own patients, and keep a complete filing system with the analysis properly recorded of all cases spinographed. By following such a system the Chiropractor is able to check up on the work he has accomplished when future spinographs are taken. 85
CHIROPRACTIC SPINOGRAPHY
86
CHIROPRACTIC SPINOGRAPHY SPINOGRAPHIC ANALYSIS FOR FIGURE No. 13 Figure No. 13 is the first lumbar spinograph to be shown as it has been selected from many as being nearly perfect in that there is only one subluxation and no curvature or rotation. If the reader will carefully note the shadows shown upon this spinograph, such as the spaces shown between the bodies, the articulation of the pre- and post-zygapophyses, noting how the post-zygapophyses overshadow a part of the intervertebral disc in the upper lumbar region, while in the lower lumbar both the preand post-zygapophyses cover a part of this space. These shadows are sometimes mistaken for ankylosis within the lumbar region, and it is for this reason that I call your attention to them so that in the following spinographs of this region you will be familiar with these shadows. The light spots or shadows appearing in the centers of the bodies of the vertebrae are openings into the spinal canal in that the inferior margins of the post-zygapophyses interlock over the bodies of the vertebrae below them and the laminae of the vertebra is lower upon the body of the vertebra. Letter “A” represents the center of the spinous process of the first lumbar. Letters “B” and “C” represent the centers of the spinous processes of the twelfth dorsal and second lumbar vertebrae. Placing a straight edge from “B” to “C,” it will be found that “A” is to the left of “B” and “C,” Measuring the distance from “A” to “D,” comparing this with the measurement from “A” to “E,” we find that “A” appears closer to “E,” proving the first lumbar to be subluxated left. The laminae of the fifth lumbar appears more narrow and tipped to the superior, which is a characteristic land mark upon the fifth lumbar and aids in determining the count in this region. The spinous process also appears tipped superior with its center very close to the superior margin of its own 87
CHIROPRACTIC SPINOGRAPHY
FIG. 13
88
CHIROPRACTIC SPINOGRAPHY body and very close to the tip of the spinous process of the fourth lumbar. The spinographic listing would be as follows: First lumbar left. SPINOGRAPHIC ANALYSIS FOR FIGURE No. 14 Figure No. 14 represents a lumbar spinograph with two subluxations and several bent spinous processes that would be misleading under palpation. Letter “A” represents the tip of the spinous process of the twelfth dorsal vertebra. The dotted line around the right of this spinous process indicates the shadow of an exostosis or cartilaginous growth upon the right of this spinous process that would cause this process to palpate to the right of the spinous process of the first lumbar vertebra. This should be listed in the spinographic analysis that the adjustor may know why the twelfth dorsal palpates as a right subluxation. Letter “B” represents the center of the spinous process of the third lumbar vertebra; letters “C” and “D,” the centers of the spinous processes of the second and fourth lumbar vertebra. Placing a straight edge from “C” to “D,” it will be shown that “B” is to the left of “C” and “D” and would be listed as a left subluxation. Measuring the distance from “B” to “E,” and from “B” to “F,” we find that “B” appears closer to “F” and farther away from “E,” therefore proving the left subluxation. The dotted lines around the tip of the spinous process of the third lumbar indicate a cartilaginous growth upon the tip of this spinous process, which when compared with the tip of the one above and one below would cause it to palpate to the right. Letter “G” represents the tip of the spinous process of the fourth lumbar vertebra, which is bent to the left of its own CENTER “D.”
89
CHIROPRACTIC SPINOGRAPHY
FIG. 14
90
CHIROPRACTIC SPINOGRAPHY Letter “H” represents the center of the spinous process of the fifth lumbar. Letter “L” represents the center of the first tubercle of the sacrum. Placing a straight edge from “D” to “L,” we find that “H” is to the left of “D” and “L” Measuring the distance from “H” to “I” and “H” to “J,” we find that “H” appears nearer “J” and farther away from “I,” proving the left subluxation. Letter “K” represents the tip of the spinous process of the fifth lumbar, which is bent to the right of its own center. “H.” When the Chiropractor realizes that he is palpating the tips of the spinous processes, as shown in this spinograph, he can realize the value of a spinograph in such a case, as the palpation of the third, fourth, and fifth lumbar vertebra would be very misleading. The spinographic listing would be as follows: Twelfth dorsal, exostosis on right of spinous process. Third lumbar left and bent right with enlargement on tip of spinous process. Fourth lumbar bent left. Fifth lumbar left and bent right. SPINOGRAPHIC ANALYSIS FOR FIGURE No. 15 Figure No. 15 shows a slight right rotatory scoliosis, in that the shadow of all of the spinous processes are found to be nearer the left lateral edges of the vertebrae. In this particular spinograph the scoliosis is slight, even though we find quite a marked degree of rotation. This case also presents six lumbar vertebrae, which may be determined by locating the twelfth dorsal, which has the 91
CHIROPRACTIC SPINOGRAPHY transitional characteristics, as well as the last pair of ribs. Counting from this point downward, we find six lumbar vertebrae. This, however, is not an unusual finding as it is more common to find six lumbar vertebrae than it is to find eight cervical, or eleven or thirteen dorsal, or four lumbar. Letter “A” represents the tip of the spinous process of the twelfth dorsal vertebra, which is bent to the right. Letter “B” represents the center of the spinous process of the first lumbar vertebra. “C” the tip of the spinous process, which is bent slightly left. Letter “D” represents the center of the spinous process of the second lumbar vertebra, while letter “E,” as indicated by the arrow, represents an exostotic growth extending to the right from the tip of the spinous process, which is outlined. This would cause this spinous process to palpate as a right subluxation. The spinous processes of the fourth and fifth lumbar are bent slightly left, the fifth being a trifle more so as indicated by letter “F,” and would cause this spinous process to palpate to the left of the fourth spinous process and to the left of the tip of the spinous process of the sixth lumbar “G,” which is bent to the right. The center of the spinous process of the sixth lumbar will be found left of the center of the spinous process of the fifth and should be listed as a left subluxation even though we are unable to compare it with the tubercles of the sacrum. The spinographic listing would be as follows: Twelfth dorsal bent right. First lumbar bent left. Second lumbar exostosis on right of spinous process. Fourth lumbar bent left. Fifth lumbar bent left. Sixth lumbar is left and bent right 92
CHIROPRACTIC SPINOGRAPHY
FIG. 15
93
CHIROPRACTIC SPINOGRAPHY SPINOGRAPHIC ANALYSIS FOR FIGURE No. 16 Figure No. 16 shows a slight curvature in the lumbar vertebrae to the right and it will be well to refer to rule No. 7, which covers lateral scolioses. In reading a spinograph the first thing to determine is the direction of the curve, if there is any, and in this case we find it is to the right. Observing the spinous processes we find that they are all to the right of their own bodies, or with the convexity of the curvature and farther away from the concavity of the curvature. It is by determining the relationship of the spinous processes with the concavity and convexity of the curvature that we are able to determine the kind of curvature existing, as the spinous processes are always found to be with the concavity of the curvature in a rotatory scoliosis, and they may be in the centers of their own bodies, or with the convexity of the curvature in a lateral scoliosis. Often times a scoliosis such as this one is mistaken for a left rotation, merely because the distance from the center of the spinous processes to the edges of the bodies appears greater upon the left, and the fact that the curvature is to the right of the median line is lost sight of. True these vertebrae are rotated to the left of their own centers, but they are still in a right curvature and would be listed as a right scoliosis because of this fact. Letter “A” represents the center of the spinous process of the third lumbar vertebra; letters “B” and “C” the centers of the spinous processes of the second and fourth lumbar vertebrae. Placing the straight edge from “B” to “C” we find that “A” is to the right of “B” and “C” and would be listed accordingly. It is unnecessary to measure the distance from the center of the spinous process to the right and left edges of this vertebra as it can be seen from observation that it appears nearer the right edge and farther away from the left. Observing the left margin of the spinous process of the fourth lumbar, it will be found that this process is larger upon this side than upon the right which would cause the spinous 94
CHIROPRACTIC SPINOGRAPHY
FIG. 16
95
CHIROPRACTIC SPINOGRAPHY process to palpate as a left subluxation and note should be made of this fact in the spinographic listing. The fifth lumbar shows a marked cleft laminae, therefore an absence of the spinous process. There is also an ankylosis existing between the fourth and fifth lumbar upon the right side as these two vertebrae appear united upon this side while there is the appearance of a cartilage existing upon the left, as indicated by the white space just left of the tip of the spinous process of the fourth lumbar vertebra. The spinographic listing would be as follows: First lumbar bent right. Third lumbar right. Fourth lumbar enlargement on left border of spinous process. Fifth lumbar cleft spinous process. Ankylosis between fourth and fifth lumbar on right side. Right scoliosis from the twelfth dorsal to the fifth lumbar inclusive. SPINOGRAPHIC ANALYSIS FOR FIGURE No. 17 Figure No. 17 presents a left rotatory scoliosis in the lower dorsal and lumbar region. It will be noted that the spinous processes within this rotatory scoliosis appear very close to the right margins of the vertebrae, while the shadows of the left margins of the vertebrae appear rotated beyond the pre- and post-zygapophyses. Comparing this spinograph with figure No. 16 we find that the spinous processes in both cases are to the right of the bodies of the vertebrae, but the curvature assumed by the spine is in the opposite direction, and the spinous processes are with the concavity of the curvature in this case, while they were with the convexity in figure No. 16. 96
CHIROPRACTIC SPINOGRAPHY
FIG. 17
97
CHIROPRACTIC SPINOGRAPHY Letter “A” represents the center of the spinous process of the tenth dorsal vertebra; letters “B” and “C,” the centers of the spinous processes of the ninth and eleventh dorsal vertebrae. Even though these two spinous processes appear to the right of their own bodies, it will be shown by placing the straight edge from “B” to “C” that “A” is still more to the right and should be listed as a right subluxation. It is unnecessary to measure the distance from “A” to “D” or from “A” to “E” as it is plainly visible that this process appears closer to the right margin of the vertebra. We will find by placing a straight edge from “D” to “E,” or just inferior to the articulation of the ribs, that this vertebra is tipped inferior upon the right. Naturally the vertebra will tip in a curvature such as this and this tipping is adaptative. It would be wise, however, to list this tenth dorsal vertebra as right and inferior because of this tipping, and should the adjustor use the spinous process contact to adjust this vertebra, such a listing would enable him to assume the proper standing position that his force may be directed at right angles to the position that this vertebra has assumed. It is for this reason only that I list superiority or inferiority within curvatures when, in reality, the vertebra is merely tipped inferior or superior adaptatively to the curvature. The eleventh dorsal is also right of the twelfth dorsal and would cause an impingement between these two vertebrae. It would be well to list it but indicate that the tenth is the greater subluxation. Comparing the tips of the spinous processes of the eleventh and twelfth dorsal vertebrae, it will show that the tip of the spinous process of the twelfth would palpate to the right of the tip of the eleventh dorsal and would be listed as spinous process bent to the right. The spinous processes of the first, second, and third lum98
CHIROPRACTIC SPINOGRAPHY bar also appear bent to the right when compared with the spinous processes of nine, ten, and eleven, and that of the fifth lumbar. Letter “F” represents the center of the spinous process of the second lumbar vertebra, which, when compared with the center of the spinous processes above and below it, will be found to the left of the first and third lumbar vertebrae; but still to the right of its own body. This is a very good illustration of the only way that it is possible to find an apparent left subluxation within a left rotation. By adjusting this second lumbar as a left subluxation, we would increase the rotation of the second lumbar vertebrae to the left, but at the same time it may be possible to relieve an impingement by such an adjustment. Such listings and adjustments should be made only when the Chiropractor handling such a case realizes what he is doing by giving such an adjustment. Letter “G” represents the center of the spinous process of the fourth lumbar vertebra, which is to the right of the center of the spinous process of the third and fifth lumbar vertebrae, and the body of this vertebra being tipped superior upon the right with the laterality, it should be listed right and superior for the same reason as given for the inferiority that was listed upon the tenth dorsal. Letter “H” represents an exostotic growth or enlargement upon the tip of the spinous process of the fourth lumbar vertebra. The spinographic listing would be as follows: Tenth dorsal right and inferior, indicating this as the greater subluxation. Eleventh dorsal right. Twelfth dorsal bent right. First, second and third lumbar bent right. Listing of the third lumbar would depend upon the symptoms manifested. 99
CHIROPRACTIC SPINOGRAPHY Fourth lumbar right superior, exostosis on tip of spinous. Left rotatory scoliosis from the ninth dorsal to the fifth lumbar inclusive. SPINOGRAPHIC ANALYSIS FOR FIGURE No. 18 Figure No. 18 represents a lumbar spinograph with a curvature that is somewhat misleading as to its type because of the fact that we only have one end of the curvature. If we should cover this spinograph above the third lumbar, we would find the existence of a right rotation in the third, fourth, and fifth lumbar vertebrae without any apparent curvature. After making this comparison, then cover the lower half of the spinograph, and we will find that the curve begins to bend to the right, indicating that this spinograph shows the end of a right rotatory scoliosis, which is undoubtedly more pronounced in the lower dorsal region. We would, therefore, list this as a right rotation of the lumbar region with the greater amount of scoliosis appearing in the lower dorsal. Letter “A” represents the center of the spinous process of the fourth lumbar vertebra. Letters “B” and “C” represent the centers of the spinous processes of the third and fifth lumbar vertebrae. Placing a straight edge from “B” to “C” we find that “A” is to the left of “B” and “C” and should be listed as a left subluxation in this region. True, the spinous processes of all of these vertebrae appear to the left of their own bodies, but that does not indicate that they are all left subluxations as the first, second and third lumbar vertebrae are in alignment with one another, while the fourth lumbar vertebra is out of alignment with the adjacent vertebrae. Letters “D-1” and “D-2” represent the superior and inferior margins of the fourth lumbar vertebra. Placing a straight edge across the superior and inferior 100
CHIROPRACTIC SPINOGRAPHY
FIG. 18
101
CHIROPRACTIC SPINOGRAPHY margins of this vertebra, it will be found inferior upon the left. Comparing the space between the third and fourth lumbar upon the left, it will be found greater than upon the right. These factors indicate that this vertebra is inferior upon the left side and therefore our listing would be left inferior. Letters “F” and “F” indicate the position of the right ilium in relationship to the left ilium and shows that the right ilium appears very much superior to the left. This, however, should not be listed as a superior subluxation unless a spinograph was taken of the sacro-iliac articulation as this apparent superior ilium may be due to a tipping of the pelvis adaptative to the rotation. The arrows upon the ilii are to indicate the distance existing between the left transverse process of the fifth lumbar and left ilium and the right transverse process and right ilium which is also due to the rotation of the lumbar vertebrae. The spinographic listing would be as follows: Twelfth dorsal bent left. Fourth lumbar left inferior. The ending of a right rotatory scoliosis from the twelfth dorsal to the fifth lumbar inclusive. SPINOGRAPHIC ANALYSIS FOR FIGURE No. 19 Figure No. 19 presents an unusual spinograph of the lumbar region wherein we find six lumbar vertebrae with an acute rotation of the fifth and sixth lumbar. Letter “A” represents the center of the spinous process of the fourth lumbar vertebra. Comparing this center with the center of the spinous process of the third lumbar “B,” we find that “A” is slightly to the left of “B.” Measuring the distance from “A” to “D,” and from “A” to “E,” we will find that this process appears closer to the left margin of the vertebra. 102
CHIROPRACTIC SPINOGRAPHY Letter “C” represents the center of the spinous process of the fifth lumbar vertebra, which can be compared only with the center of the spinous process of the sixth lumbar “F” and with its own body. We can not compare the spinous process with the fourth lumbar vertebra “A,” as we have already determined that this process was left. Comparing “C” with “F” we find it to be very much to the right of “F.” Measuring the distance from “C” to “G” and from “C” to “H,” we find that the distance is much greater upon the left and lesser upon the right, proving the existence of laterality and rotation of the body of the vertebra. Placing a straight edge transversely across the superior margin of the fifth lumbar vertebra, it will show that this vertebra is inferior upon the right and the straight edge placed across the inferior margin of the vertebra will verify this finding. Also compare the spaces between the fourth and fifth lumbar vertebrae, which are greater upon the right, lesser upon the left, proving that this vertebra is also subluxated inferior upon the right and the listing would be right and inferior. Letter “I” represents the tip of the spinous process of the sixth lumbar vertebra which is bent to the right of its own center “F.” Letter “J” indicates an exostosis upon the left superior margin of the fourth lumbar vertebra. Immediately below the spinous process of the sixth lumbar vertebra we find the first and second tubercle of the sacrum as indicated by the white dots. The two outer arrows upon the ilii indicate the outer lateral margins of the sacrum as shown upon the spinograph, while the inner arrows indicate the inner margins of the ilii. Placing the dividers from the center of the second tubercle of the sacrum to the outer arrow upon the left, and comparing this measurement from the center to the outer arrow upon the right, indicating that the sacrum has rotated left, which has brought the tubercles of the sacrum closer to the right ilium 103
CHIROPRACTIC SPINOGRAPHY
FIG. 19
104
CHIROPRACTIC SPINOGRAPHY and farther away from the left. Comparing the First tubercles of the sacrum with the center of the spinous process of the sixth lumbar, the center of the sacrum is also shown to be the to right of the sixth lumbar vertebra. The spinographic listing would be as follows: Fourth lumbar slightly left with exostosis on the left of the tip of the spinous process. Fifth lumbar right and inferior with exostosis on left superior margin of the vertebra. Sixth lumbar bent right. Sacrum rotated left. Base posterior on left. Left rotation of the fourth and fifth lumbar and sacrum. SPINOGRAPHIC ANALYSIS FOR FIGURE No. 20 Figure No. 20 represents a left rotatory scoliosis of the eleventh and twelfth dorsal and lumbar vertebrae. Comparing this rotatory condition with figure No. 17, we will find that we have the same type of rotation but with a lesser degree of scoliosis accompanying the rotation. The spinous processes are found to be nearer the right margins of the vertebrae, while the bodies of the vertebrae appear rotated almost to the same degree as shown in figure No. 17. The articulation of the left pre- and post-zygapophyses are clearly shown and because of the degree of rotation, they appear nearer the center of the spinal column in this region. A clear understanding should be had of the appearance of this articulation so that these shadows will not be mistaken for the spinous processes as is sometimes done by the student in plate reading. Letter “A” represents the spinous process of the first lumbar vertebra; letters “B” and “C,” the center of the spinous processes of the twelfth dorsal and second lumbar vertebrae. Comparing these three centers, “A” will be found to the right of “B” and “C” would be listed as a right subluxation. The dotted line around the tip of the spinous 105
CHIROPRACTIC SPINOGRAPHY
FIG. 20
106
CHIROPRACTIC SPINOGRAPHY process of the first lumbar vertebra indicates an exostotic growth on the tip of this spinous process. Letter “D” represents the center of the spinous process of the fourth lumbar vertebra which, if compared, with the center of the spinous process of the third lumbar vertebra “E” and with the center of the spinous process of the fifth lumbar vertebra “G” would show as a left subluxation within a left rotation, which again illustrates the apparent left subluxation within a left rotation. The reason that the fourth lumbar appears as a left subluxation here is because this vertebra has not rotated as much as the third and fifth lumbar vertebrae. Letter “H” represents the first tubercle of the sacrum, which appears more to the right than “G” and is undoubtedly rotated left with the lumbar rotation, but it would be more advisable before listing a sacrum with only the first tubercle shown to obtain a picture of the sacro-iliac articulation. The spinographic listing should be as follows: First lumbar right with exostosis upon tip of spinous. Third lumbar bent right. Fourth lumbar bent right. Fifth lumbar right superior. Left rotatory scoliosis from the eleventh dorsal to the fifth lumbar inclusive. SPINOGRAPHIC ANALYSIS FOR FIGURE No. 21 Figure No. 21 represents a spinograph of the lumbar region with a slight left rotatory scoliosis with an ankylosis of the second and third lumbar vertebrae. This is a typical illustration of an ankylosis wherein the intervertebral disc has been destroyed allowing the two surfaces of these vertebrae to come into contact with one another and uniting. This fact is also illustrated by comparing the spaces found immediately above and below these two vertebrae. The space shown be107
CHIROPRACTIC SPINOGRAPHY
FIG. 21
108
CHIROPRACTIC SPINOGRAPHY tween the third and fourth lumbar vertebra appears normal, while the spaces shown between the twelfth dorsal, first and second lumbar vertebrae appear smaller, indicating a tendency for a compression of the cartilages at these points as the second lumbar was gradually let down to its present position with the superior surface of the third lumbar vertebra. Even though we find an ankylosis between these vertebrae, there are no indications of a pathological condition within the osseous structure of the vertebrae themselves, nor are there sign of any breaking down of the osseous structure in any way more than an exostosis and ankylosis overlapping the right margins of these vertebrae. Such an ankylosis is undoubtedly the after effect of excessive inflammation and suppuration of the intervertebral disc or spondylitis wherein the same has been destroyed. It is this type of ankylosis that it would be unwise to attempt to break because of the absence of an intervertebral disc. The fourth lumbar vertebra would be listed as a right subluxation as it is to the right of the third and fifth lumbar. The spinographic listing would be as follows: Second and third lumbar ankylosed. (Do not adjust). Fourth lumbar right. Left rotatory scoliosis from the first lumbar to the fifth lumbar inclusive. SPINOGRAPHIC ANALYSIS FOR FIGURE No. 22 Figure No. 22 is a very unusual right rotatory scoliosis of the lumbar region. Letter “A” represents the center of the spinous process of the first lumbar vertebra; letters “B” and “C,” the center of the spinous processes of the twelfth dorsal and second lumbar vertebrae. Comparing these three spinous processes with one another 109
CHIROPRACTIC SPINOGRAPHY
FIG. 22
110
CHIROPRACTIC SPINOGRAPHY by the use of a straight edge, the first lumbar will be found to the left of “B” and “C” and measuring the distance from “A” to “D” and from “A” to “E,” we find that “A” is closer to “E” and farther away from “D,” proving the existence of a left subluxation of this vertebra. Letter “F” represents the center of the spinous process of the fifth lumbar vertebra. Comparing it with the center of the spinous process of the fourth lumbar “G” and first segment of sacrum “H,” it will be found to the left and should be listed as a left subluxation. Letter “I” indicates an exostosis beginning to form between the second and third lumbar vertebrae on the right side. Letter “K” represents a marked exostosis and ankylosis between the third and fourth lumbar vertebrae on the left. It will be noticed that this ankylosis is due to the exostosis only, while the spaces between the bodies of the vertebrae occupied by the intervertebral disc is normal. This type of ankylosis is one that if deemed necessary may be broken and would be determined by the symptoms manifested in this region. Exostosis and ankylosis of this type is quite often found in the rotatory scoliosis and nearly always on the concave side of the curvature. Letter “J” represents the tip of the spinous process of the fourth lumbar vertebra which is bent to the right. The spinographic listing would be as follows: First lumbar left. Exostosis and ankylosis of the third and fourth lumbar on the left side. Fourth lumbar bent right. Fifth lumbar left. Right rotatory scoliosis from the first to the fifth lumbar inclusive. 111
CHIROPRACTIC SPINOGRAPHY SPINOGRAPHIC ANALYSIS FOR FIGURE No. 23 Figure No. 23 presents an interesting case of malformation of the third lumbar vertebra, which is undoubtedly a congenital condition as there is no history of any traumatic or pathological condition within this region. The malformation appears within the center of the body of the vertebra as the outer lateral margins of the vertebra appear normal, while the center of the vertebra, as outlined by the white lines, shows a depression within the center of the body. It would be rather doubtful as to whether or not it would be advisable to adjust a vertebra of this type if it were found to be subluxated and, should it be adjusted, extreme care should be exercised and as little force as possible applied in giving the adjustment. In this particular instance it would be unnecessary to give an adjustment at this point as the vertebra is not subluxated. Letter “A” represents the center of the spinous process of the twelfth dorsal vertebra; letters “B” and “C,” the center of the spinous processes of the eleventh dorsal and first lumbar. Comparing these three spinous processes with a straight edge the twelfth dorsal will be found to the left. Measuring the distance from “A” to “D” and from “A” to “E” it will be found that this process appears closer to the left edge of the vertebra and would therefore be listed as a left subluxation. The spinous processes of the second and third lumbar vertebrae appear bent to the left of their own centers as indicated by letter “F” on the third lumbar vertebra. Letter “G” represents the tip of the spinous process of the fifth lumbar vertebra which is bent to the right. Immediately below the spinous process of the fifth lumbar will be found the first and second tubercles of the sacrum, the first tubercle being cleft as the right and left laminae of this first segment have failed to unite. There is a right rotatory scoliosis from the eleventh dorsal 112
CHIROPRACTIC SPINOGRAPHY
FIG. 23
113
CHIROPRACTIC SPINOGRAPHY to the fifth lumbar, without any lateral subluxations within the lumbar region. The spinographic listing would be as follows: Twelfth dorsal left inferior. Second lumbar bent left. Malformation of the third lumbar vertebra, spinous process bent left. Fifth lumbar bent right. First tubercle of sacrum cleft. Right rotatory scoliosis from the eleventh dorsal to the fifth lumbar. SPINOGRAPHIC ANALYSIS FOR FIGURE No. 24 Figure No. 24 presents an unusual acute left rotatory scoliosis within the lumbar region involving only four vertebrae, from the second to the fifth lumbar inclusive. The eleventh and twelfth dorsal and first lumbar vertebrae represent the ending of a right rotatory scoliosis. If the observer will carefully note the relationship of the spinous processes of the eleventh and twelfth dorsal and first lumbar with their own bodies, it can be seen that they appear very much to the left, while the curvature is very much to the right. Considering the spinous processes of the lumbar vertebrae from the second to the fifth inclusive, it will be found that they appear very close to the right of their own bodies, while these four vertebrae appear in an acute left curvature. The interesting feature within this region is the acute change from the right rotatory scoliosis to the left rotatory scoliosis existing between the first and second lumbar vertebrae. Letter “A” represents the center of the spinous process of the first lumbar vertebra. Measuring the distance from “A” to the right lateral edge of its body “B” and comparing this measurement from “A” to the left lateral margin “C,” we will find that this vertebra is rotated to the right. Observ114
CHIROPRACTIC SPINOGRAPHY ing the processes of the eleventh and twelfth dorsal in like manner it will be found that they also appear nearer the left edges of their own bodies, proving that these three vertebrae show the ending of a right rotatory scoliosis. Measuring the distance from “D” to “E” and from “D” to “F,” we find the second lumbar vertebra has rotated to a much greater degree to the left than has the first lumbar rotated to the right. Nevertheless, such an acute rotation of these two vertebrae in the opposite direction would produce a severe impingement between these two vertebrae, and it would be advisable to list the second lumbar as subluxated right and inferior and should be adjusted on the left mammillary process. Comparing the lateral margins of these two vertebrae “C” and “E” upon the left and “B” and “F” upon the right, it will reveal the extent of this acute change, which is an offset of approximately one-half inch between the lateral margins of these two vertebrae. The arrows between the twelfth dorsal and first lumbar on the left side and first and second lumbar upon the right, indicate a slight exostosis with ankylosis. Letter “G” represents an exostosis and ankylosis existing between the third and fourth lumbar vertebrae on the right side. Such an ankylosis is usually found in acute rotations such as this, and especially so in elderly people wherein the curvature has existed for some time, and clearly illustrates the adaptability of innate in building up a bridge work to strengthen the weakened area. The center of the spinous process of the fourth lumbar vertebra, when compared with the center of the third and fifth lumbar spinous processes, would appear to the left, but still to the right of its own body. This illustrates another example of the only way that it is possible to have a so-called left subluxation within a left rotatory scoliosis, and, if adjusted within 115
CHIROPRACTIC SPINOGRAPHY
FIG. 24
116
CHIROPRACTIC SPINOGRAPHY this acute rotation, would be more likely to produce greater pressure than relieve it, because of the acute tipping of the vertebrae within this rotation. This case clearly illustrates the advisability of adjusting the left mammillary processes in the lumbar region from the second to the fifth inclusive, and also the advisability of alternating the adjustments within this area. The adjustments upon the first lumbar vertebra would be upon the right mammillary process, and in this way we are directing our forces towards the median line rather than away from it, which would be the case if the spinous processes were adjusted. The spinographic listing would be as follows: Second lumbar right inferior. Exostosis and partial ankylosis between the twelfth dorsal and first lumbar on the left side and between the first and second lumbar on the right side. Exostosis and ankylosis on the right side between the third and fourth lumbar vertebrae. Right rotatory scoliosis of the eleventh and twelfth dorsal and first lumbar vertebrae. Left rotatory scoliosis from the second to the fifth lumbar inclusive. SPINOGRAPHIC ANALYSIS FOR FIGURES Nos. 25 AND 26 Figures Nos. 25 and 26 represent an anterior posterior and lateral view of the lower dorsal and lumbar region of the same case. In the anterior posterior view, or figure No. 25, we find a pronounced case of spine bifida involving all of the lumbar vertebrae as indicated by the dotted line “B.” The last spinous processes shown upon the negative are that of the eleventh and twelfth dorsal vertebrae. There is also a marked rotatory scoliosis within this lum117
CHIROPRACTIC SPINOGRAPHY
FIG. 25
118
CHIROPRACTIC SPINOGRAPHY bar region. The rotation being determined by the prominence and clearness of the left mammillary processes, and also by the lateral margins of these vertebrae appearing slightly beyond or more to the left of these articular processes. Spina bifida is a condition usually found in infants and children up to the ages of sixteen or seventeen years, and from the statistics gathered relative to these cases, they seldom live beyond this age, and especially so when there is a tumor or meningocele within the area of spine bifida. It would be impossible for the Chiropractor to adjust within this area in this particular case as there is a meningocele existing as indicated by the dark area in the anterior posterior view within the region of the second, third, fourth, and fifth lumbar vertebrae. This tumor extends so far to the posterior that it would be impossible to obtain a contact on the mammillary processes even though they be developed. The lateral view of this case, figure 26, clearly shows the extent of the meningocele or tumor as indicated by the dark shadow marked “X,” the presence of which makes it impossible to adjust this case below the twelfth dorsal vertebra. The spinographic listing would be as follows: Spina bifida with meningocele existing from the first to the fifth lumbar inclusive. Do not adjust in this region. Left rotatory scoliosis from the eleventh dorsal to the fifth lumbar. SPINOGRAPHIC ANALYSIS FOR FIGURE No. 27 In this spinograph of the lumbar region we have presented for study a case of spine bifida occulta, extending from the twelfth dorsal to the fifth lumbar inclusive. Letter “A” and “B” indicate the right and left laminae of the fourth lumbar, which have failed to unite and form a spinous process. By tracing the outline of the laminae of the 119
CHIROPRACTIC SPINOGRAPHY
FIG. 26
120
CHIROPRACTIC SPINOGRAPHY vertebrae above and below the fourth we find that none of them have united, consequently no spinous processes have been formed. This is a congenital condition and if adjustments were given in cases of this kind the point of contact would necessarily be on the laminae or mammillary processes. Conditions of this kind are usually found in the lower cervical and lumbar regions. It is not at all uncommon to find the fifth lumbar or first tubercle of the sacrum cleft. Letter “E” indicates the outline of a shadow cast by an exostotic growth on the left edges of the bodies of the second and third lumbar vertebrae and this growth has ankylosed these two vertebrae. By noting the outline of the lateral edges of the vertebrae as indicated by “C” and “D” and the corresponding points of the other vertebrae, we find that the bodies of all the vertebrae in this region seem to be normal in shape. The transverse processes are somewhat malformed and peculiar in shape. The spinographic listing would be as follows: Spina bifida from the twelfth dorsal to the fifth lumbar inclusive, and exostosis and ankylosis on left side of the second and third lumbar. SPINOGRAPHIC ANALYSIS FOR FIGURE No. 28 The condition revealed by this cut is the result of traumatism. This is an anterior posterior view of the lower dorsal and lumbar region and shows a fracture and dislocation, and would be spoken of as a broken back. Letter “A” indicates the center of the spinous process of the first lumbar and “B” the center of the spinous process of the second lumbar. Letter “C” indicates the left pre-zygapophyses of the sec121
CHIROPRACTIC SPINOGRAPHY
FIG. 27
122
CHIROPRACTIC SPINOGRAPHY ond lumbar and there also appears to be a small piece of the body of this vertebra which has been broken off. This articulating process and piece of the body have retained their normal position with the first lumbar, and the remainder of this body, together with the vertebrae below, have been carried to the right so that there is a lateral offset of nearly one inch between the lateral edges of these two vertebrae. Notice also that the center of the spinous process of the second lumbar is approximately one-half inch to the right of the center of the spinous process of the first lumbar. It is needless to say that it would be unwise to attempt to adjust a condition of this kind, especially where there is a fracture of the body of zygapophyses of the vertebra. Following this accident there developed immediately a complete paralysis of all organs and structures supplied with nerves from below the first lumbar, due to the great pressure produced upon the cauda equina just inferior to this vertebra. The listing in this case is as follows: Fracture and dislocation of the second lumbar. SPINOGRAPHIC ANALYSIS FOR FIGURE No. 29 Figure No. 29 reveals a right rotatory scoliosis of the lower dorsal and lumbar vertebrae in which the rotation is of a marked degree while the scoliosis accompanying the rotation is very slight. Letter “A” represents the center of the spinous process of the tenth dorsal vertebra. Comparing this center with the center of the spinous process of the ninth dorsal “B” and the eleventh dorsal “C,” we find that “A” is to the left of “B” and “C.” Measuring the distance from “A” to “D,” and from “A” to “E,” we find that the process appears nearer “E” and farther away from “D,” proving that this is a left subluxation. We may make the same measurements on the ninth and eleventh dorsal or any other vertebrae within this rotation, and 123
CHIROPRACTIC SPINOGRAPHY
FIG. 28
124
CHIROPRACTIC SPINOGRAPHY find that the spinous processes all appear closer to the left margins of the vertebrae. This does not prove that all of these vertebrae are left subluxations. The only vertebrae that would be listed as subluxations are the ones that have rotated farther than the one above and below, as illustrated by the tenth dorsal. Letter “F” represents the tip of the spinous process of the ninth dorsal which is bells to the left of its own center “B” and would be listed accordingly. Letter “C” represents the tip of the spinous process of the eleventh dorsal, which is also bent to the left of its own center “C “ Letter “H” represents the tip of the spinous process of the twelfth dorsal, which would palpate left because of an enlargement on the left of the tip of this spinous process. Letter “I” represents the tip of the spinous process of the first lumbar which is bent to the left of its own center. Letter “J” represents the tip of the spinous process of the second lumbar vertebra, which appears very much to the superior of its body and very close to the tip of the spinous process of the first lumbar “I,” while the spinous processes of the third and fourth lumbar vertebrae are also very close together. This condition is caused by a breaking down of the bodies of these vertebrae as would be found in Potts Disease. Due to the fact that the bodies of these vertebrae have been partially destroyed by the necrosis very little of them are shown and those that do show appear irregular because of the ankylosis. There is also an ankylosis existing between the bodies of the second, third, fourth, and fifth lumbar vertebrae, which usually accompanies, or follows Potts Disease and because of this fact it is not advisable to break such an ankylosis. The arrows at the right inferior of the film are to indicate 125
CHIROPRACTIC SPINOGRAPHY
FIG. 29
126
CHIROPRACTIC SPINOGRAPHY the CLOSE proximity of the transverse process of the third, fourth, and fifth lumbar vertebrae, and from the appearance of the fourth and fifth transverse processes, it would appear that the bodies of these two vertebrae have been affected by the destructive process to a greater degree than the second and third lumbar. The spinographic listing would be as follows: Ninth dorsal bent left. Tenth dorsal left. Eleventh dorsal bent left. Twelfth dorsal bent left due to an enlargement on tip of process. First lumbar bent left. Second, third, fourth and fifth lumbar wedge shape and ankylosed, due to destruction by Potts Disease. Right rotatory scoliosis from the ninth dorsal to the fifth lumbar vertebrae. SPINOGRAPHIC ANALYSIS FOR FIGURE No. 30 Figure No. 30 presents a spinograph of the lumbar region and base of sacrum in which is found a typical case of spine bifida existing from the third lumbar down and including the base of the sacrum. Letter “A” represents the center of the spinous process of the second lumbar vertebra. Comparing “A” with the center of the spinous process of the first lumbar vertebra “B,” we find it to the right. Measuring the distance from “A” to “C” and from “A” to “D” we find that the process appears closer to the right margin of the vertebra than the left. We cannot make any comparison with the vertebra BELOW because of the absence of a spinous process or a center with which to make our comparison, and we could only list the second lumbar as a right subluxation by comparing it with the vertebra above and the relation of the spinous process with its own body. 127
CHIROPRACTIC SPINOGRAPHY
FIG. 30
128
CHIROPRACTIC SPINOGRAPHY The dotted lines just inferior to the spinous process of the second dorsal indicate the laminae upon the left and part of the laminae and articular process upon the right, which have failed to unite to form the spinous process. It will be noticed that the articular processes within this area of spine bifida are intact and the vertebra do interlock with one another, while the dotted lines indicate the extent of the formation of the laminae in the fourth and fifth lumbar vertebrae and base of sacrum. It would be rather difficult to determine any laterality within this area if a lateral subluxation were present and the only possible way would be to observe the shadows of the articular processes. For instance, if the fourth lumbar were subluxated to the right, the body of this vertebra would rotate to the left causing the left articular process to show a little larger and more plainly than the right articular process. If such a condition were found, it would be possible to adjust a vertebra of this kind by obtaining a careful contact upon the left mammillary process or articular process, using the same method as adjusting a rotatory scoliosis in the lumbar region. This is the manner in which this case was adjusted with excellent results. The spinographic listing would be as follows: Second lumbar right and bent right. Spina bifida extending from the third lumbar vertebra down to the base of the sacrum inclusive. SPINOGRAPHIC ANALYSIS FOR FIGURE No. 31 Figure No. 31 presents an anterior posterior view of the lower lumbar vertebrae, sacrum and coccyx and sacro iliac articulation. It is this region of the spine that is quite often neglected by the Chiropractor in making his analysis, as we will often find a subluxated sacrum that may produce just as much or 129
CHIROPRACTIC SPINOGRAPHY more trouble in the lower extremities as a lower lumbar subluxation. This is especially true in cases of sciatica wherein a subluxated or rotated sacrum, as shown by the spinograph has, when adjusted, given immediate relief to such conditions. This is not true in all cases, however, as we can and do find subluxations in the lower lumbar that will also relieve the patient. It is well to bear in mind that there are nerve fibers from this entire area that help make up the great sciatic nerve, and we may have a subluxated or rotated sacrum that will cause an impingement between the fifth lumbar and sacrum. It is also from a spinograph of this type that we are able to accurately determine the existence of a superior subluxation of the ilium. Letters “A” and “B,” as indicated by the arrows, show the inferior articulation of the sacrum with the ilii, which in this spinograph appear to articulate evenly or normally. If either one or both of the ilii “B” were subluxated to the superior, we would find an apparent unevenness of the articulation upon the subluxated side at the point indicated by the arrows at “A” and “B.” For instance, if the left ilium were subluxated superior the inferior articulation, “B” would be found superior to the inferior articulation of the sacrum at “A.” It is this inferior articulation that the spinographer should always consider when attempting to make such a listing. Letter “C” represents the center of the second tubercle of the sacrum, while the dot above and below this center represents the center of the tubercles above and below. Letters “D” and “F” indicate the outer lateral margin of the sacrum, while “E” and “G” represent the inner margins of the ilium as they overlap or overshadow the sacrum from “E” to “D” and from “G” to “F.” Comparing the center of the second tubercle of the sacrum “C” with the center of the fifth lumbar it will be found that “C” is to the left of the lumbar vertebra. 130
CHIROPRACTIC SPINOGRAPHY
FIG. 3 1 131
CHIROPRACTIC SPINOGRAPHY Measuring the distance from “C” to the right lateral margin of the sacrum “D,” it will show that this distance is greater than from “C” to “F” indicating that this sacrum has rotated right. If, for any reason, the shadows of the sacrum do not show clearly behind the ilii, we could measure the distance from “C” to the right inferior articulation-“A” and compare this measurement from “C” to the left inferior articulation “A.” Such a measurement would also prove that the sacrum has rotated right. If the sacrum is found to be rotated, as in this illustration, it should be listed as rotated right, or base posterior on right, as it will go to the posterior on the side of the rotation. The coccyx would be listed to the right. This is determined by placing a straight edge thru the center of the sacrum, or in alignment with the tubercles upon the sacrum, and it will be found that the tip of the coccyx extends to the right of this line and would be listed accordingly. It is well to mention here that the fifth lumbar vertebra should never be neglected when considering the sacrum. We may find a sacrum rotated such as this one and the center of the sacrum appearing left of the fifth lumbar, in which case the sacrum is the subluxation. We will also find cases in which the sacrum is rotated as this one, but the fifth lumbar may be still more to the left, and in such cases, it would be advisable to list the fifth lumbar as the subluxation rather than the sacrum. The spinographic listing would be as follows: Fifth lumbar bent left. Sacrum base posterior on right. Coccyx right. 132
CHIROPRACTIC SPINOGRAPHY SPINOGRAPHIC ANALYSIS FOR FIGURE No. 32 Figure No. 32 presents another view of the lower lumbar and sacro-iliac articulations Considering this spinograph in the same manner as figure No. 31, we find that this sacrum is not so wide across the base, and the appearance of the ilii, as indicated by the dotted lines, does not overlap the outer lateral margins of the sacrum “D” and “E” as much. This clearly illustrates the fact that the spinographer must at all times be familiar with the difference in shadows, and never expect to find two spinographs exactly alike. This makes the reading of spinographs an interesting subject in that there is always a changing field for study and observation. Letters “A” and “B” indicate the right and left inferior sacro-iliac articulations which are found to be even. It might be well to mention here that very few superior subluxations of the ilii are found. Letter “C” represents the center of the second tubercle of the sacrum. Comparing this center with the center of the first tubercle, it would appear as though the first tubercle of the sacrum were more to the right. This is due to a malformation of the tubercle of the first segment of the sacrum, and because of the fact that the first tubercle is so often malformed, it should never be relied upon to make an accurate listing of a rotated sacrum. Measuring the distance from “C” to “D” and comparing this measurement with that from “C” to “E,” we find that the distance is greater upon the left and lesser upon the right, proving that this sacrum has rotated left. It will also be observed that the center of the sacrum “C” is also to the right of the fifth lumbar vertebra, and the tip of the spinous process of the fifth lumbar is bent to the left of its own center. The three white spots showing over the apex of the sacrum indicate gas within the intestines, and on the spino133
CHIROPRACTIC SPINOGRAPHY
FIG. 32
134
CHIROPRACTIC SPINOGRAPHY graphic negative these spots would show black, and the bone shows white. These black spots are often mistaken for pathological conditions within the osseous structure of the sacrum, but by taking another spinograph we may find the spots moved to a different area. The spinographic listing would be as follows: The spinous process of the fifth lumbar bent left. Sacrum base posterior on left. SPINOGRAPHIC ANALYSIS FOR FIGURE No. 33 Figure No. 33 represents an anterior posterior view of the lower dorsal region. This view is always taken so that the twelfth dorsal vertebra, or first lumbar is always shown upon the film making it possible to accurately determine the count within this region. It is this view that causes a great deal of confusion to the beginner because of the overlapping long spinous processes superior to the tenth dorsal. It is advisable to always find the spinous process of the twelfth dorsal counting the spinous processes and bodies up into the middle dorsal region. The method of determining this count and the center of the processes in this region is covered in rule No. 3. Counting the spinous processes from the twelfth superiorly to the spinous process of the seventh dorsal, which is the first spinous process that appears peculiar in its relationship with the one above and below it. Letter “A” represents the center of the spinous process of the seventh dorsal, which is overlapping the body of the vertebra of the eighth dorsal. Comparing the center of the spinous process “A” of the seventh dorsal vertebra with the center of the spinous process “B” of the sixth dorsal vertebra, and placing a straight edge from “B” to the center of the spinous process of the eighth dorsal vertebra “C,” we find that “A” is to the right of “B” and “C.” Measuring the distance from “A” to the outer left lateral margin of the vertebra “D.” 135
CHIROPRACTIC SPINOGRAPHY we find that the distance is greater upon this side than the distance from “A” to the right lateral margin of the vertebra “E,” proving that this spinous process is to the right of its Own body as well as to the right of the one above and below it as proved by our first finding with the straight edge. Placing a straight edge transversely across the superior margin of the seventh dorsal vertebra, as well as from one articular process to the other, “D” and “E,” we find that this vertebra is tipped inferior upon the right side. Also observing the spaces indicated by the arrows above and below this vertebra, we find the space greater on the right superior and lesser on the right inferior, while the spaces on the left side are just the reverse. This proves that the vertebra is not only subluxated right but is inferior on the right and should be so listed. Figure 2—“B” represents the tip of the spinous process of the sixth dorsal vertebra which is bent to the right of its own center “B “ Letter “F” represents the tip of the spinous process of the seventh dorsal vertebra which is bent to the left of its own center “A.” The seventh dorsal vertebra, which is subluxated right, may palpate as a left subluxation. The sixth dorsal vertebra is O. K. but may palpate as a right subluxation because of the bent process to the right. Visualize the direction the fingers would take in palpating over the tips of these spinous processes. Letter “C” represents the center of the spinous process of the eighth dorsal vertebra. Letter “G” represents the tip of the spinous process of the eighth dorsal which is also bent slightly left. Letter “H” represents the center of the spinous process of the twelfth dorsal vertebra. Letters “I” and “J” represent the centers of the spinous processes of the eleventh dorsal and first lumbar vertebrae. 136
CHIROPRACTIC SPINOGRAPHY
FIG. 33
137
CHIROPRACTIC SPINOGRAPHY Comparing the centers of these spinous processes with a straight edge, we find that “H” is to the right of “I” and “J.” Measuring the distance from “H” to the left lateral margin “K,” we find that this distance is greater than from “H” to “L.” proving that this spinous process is to the right. The spinographic listing would be as follows: Sixth dorsal bent right. Seventh dorsal right inferior or R I and bent left. Eighth dorsal bent left. Twelfth dorsal right. SPINOGRAPHIC ANALYSIS FOR FIGURE No. 34 Figure No. 34 is another view of the lower dorsal vertebrae showing unusually long spinous processes on the seventh, eighth and ninth dorsal vertebrae. Determining which is the twelfth dorsal vertebra, we count the spinous processes up to the seventh dorsal and we find that it is not subluxated. We then start comparing the vertebrae below this point to make our listing. Letter “A” represents the center of the spinous process of the eighth dorsal vertebra, which appears to be to the left of the center of the spinous process of the seventh dorsal “B,” but is not to the left of the center of the spinous process of the ninth dorsal “C.” Placing a straight edge from the center “B” to the center of the spinous process of the tenth dorsal “D,” we find that both “A” and “C” are to the left, “C” being more to the left than “A.” We could, in a case of this kind, list both eighth and ninth dorsal vertebrae as left subluxations, indicating in our listing, however, that the ninth dorsal is the greater subluxation and should be adjusted first. This is also proved by measuring the distance from “C” to “E,” comparing this measurement with that from “C” to “F,” which will show that “C” is nearer “F” than to “E.” Letter “G” represents the tip of the spinous process of 138
CHIROPRACTIC SPINOGRAPHY the eighth dorsal, which is bent to the left of “A.” The tip of this process being bent in this manner would naturally make this vertebra palpate as a greater subluxation when in reality the ninth is the greater of the two. Comparing the tip of the spinous process of the ninth dorsal with its own center, it appears to be bent slightly right. Letter “H” represents the spinous process of the twelfth dorsal overlapping the superior border of the first lumbar vertebra. Letters “I” and “J” represent the centers of the spinous processes of the eleventh dorsal and first lumbar vertebrae. Comparing these three centers with a straight edge, the twelfth dorsal “H” will be found to the right of the eleventh dorsal and first lumbar vertebra. Measuring the distance from “H” to “K” and comparing this measurement with the distance from “H” to “L.” “H” will be found nearer “L” and farther away from “K,” proving that this spinous process has moved to the right. The dotted lines around the outer lateral margins of the eleventh and twelfth dorsal is to call to your attention the appearance of an ankylosis between the eleventh and twelfth dorsal, which appears as a solid ankylosis with no cartilage existing between the vertebrae as seen between the vertebrae above and below them. It is such ankylosis as this that should not be broken as the cartilage has been destroyed, and there would be nothing to protect the surfaces between those vertebrae should they be broken apart. The spinographic listing would be as follows: Eighth dorsal left and bent left. Ninth dorsal left and bent right, indicating the ninth as the greater subluxation. Twelfth dorsal is right. Ankylosis existing between the eleventh and twelfth dorsal vertebrae. 139
CHIROPRACTIC SPINOGRAPHY
FIG. 34
140
CHIROPRACTIC SPINOGRAPHY SPINOGRAPHIC ANALYSIS FOR FIGURE No. 35 Figure No. 35 represents an anterior posterior view of the lower dorsal vertebrae which, from first appearances, might be mistaken for a right lateral scoliosis. Placing one end of a straight edge in the center of the spinous process of the twelfth dorsal vertebra, which appears in the center of the radiograph, and the other end of the straight edge to the top of the film in a straight line with the twelfth dorsal, it will be found that the curvature existing is really to the left of the straight edge from the fifth dorsal to the ninth dorsal, while the tenth, eleventh, and twelfth dorsal vertebrae appear straight. This would indicate that there is a left rotatory scoliosis existing in the middle dorsal region. This condition undoubtedly begins in the upper dorsal, and the part of the rotatory scoliosis showing in this picture is in reality the lower end of the curvature and ends at the ninth dorsal vertebra. From this point upward to the spinous of the fifth dorsal, it will be observed that all of the spinous processes appear nearer the right margins of the vertebrae while the curvature is to the left from this same point upward. Letter “A” represents the center of the spinous process of the ninth dorsal vertebra, which from first appearances comparing it with “B” and “C” would seem to the right, but measuring the distance from “A” to either edge of its own body “D” and “E,” it will be found that the distance to each edge is equal. The reason for this vertebra appearing as it does is because it is the ending of the rotatory scoliosis. The spinographic listing would be as follows: Fifth dorsal spinous process bent right. Seventh dorsal spinous process bent right. Left rotatory scoliosis from the fifth to the ninth dorsal inclusive. 141
CHIROPRACTIC SPINOGRAPHY
FIG. 35
142
CHIROPRACTIC SPINOGRAPHY SPINOGRAPHIC ANALYSIS FOR FIGURE NO. 36 Figure No. 36 is an anterior posterior view of the lower dorsal vertebrae with very few subluxations existing and the subluxations that are listed are very slight. Subluxations with only a slight degree of laterality such AS THESE may produce a great deal of trouble or incoordination in some individuals, therefore do not overlook listing any slight subluxation as it may, by deviating from its normal position, produce sufficient pressure upon certain fibers to produce a great deal of trouble. Finding the spinous process of the twelfth dorsal, and counting up to the spinous process of the ninth dorsal “B,” which we find to be on center, as well as the vertebrae above it, we will begin comparing from this point downward. Letter “A” represents the spinous process of the tenth dorsal vertebra. Letter “C” represents the spinous process of the eleventh dorsal vertebra. Placing the straight edge from the center of the spinous process of the ninth dorsal “B” to the center of the spinous process of the twelfth dorsal “D,” we find that both “A” and “C” are to the right of “B” and “D,” while “C” is more to the right of “B” and “D” than “A” and therefore the eleventh dorsal would be designated as the greater subluxation within this region. Measuring the distance from the center of the spinous process “A” to “E” and “F,” we would find that “A” is nearer to “F” than to “E.” Making the same measurement from “C” to “G” and “H” we will find that “C” is nearer “H” than to “G.” Letter “I” represents the tip of the spinous process of the eleventh dorsal vertebra which is bent to the right of its own center “C.” Even though this subluxation were corrected by adjustments, it would always palpate as a right subluxation because of this bent spinous process to the right. 143
CHIROPRACTIC SPINOGRAPHY
FIG. 36
144
CHIROPRACTIC SPINOGRAPHY Letter “J” represents the tip of the spinous process of the twelfth dorsal, which is also bent to the right of its own center “D.” The spinographic listing would be as follows: Tenth dorsal right slightly. Eleventh dorsal right and bent right, designated as the greater subluxation. Twelfth dorsal bent right. SPINOGRAPHIC ANALYSIS FOR FIGURE No. 37 Figure No. 37 reveals an acute right rotatory scoliosis of the lower dorsal and lumbar vertebrae. The rotation of the eleventh and twelfth dorsal vertebrae is so marked in this spinograph that the foraminae as outlined below the markings “X” are clearly shown, while the spinous processes of these two vertebrae appear at the extreme left edges of their bodies. This is also true of the spinous processes of the ninth and tenth dorsal. The spinous processes of the lumbar vertebrae, as indicated by the dots on the respective vertebrae, gradually appear coming back to the center as is indicated by the spinous process of the fifth lumbar vertebra. A condition of this kind would reveal a marked prominence of the muscles upon the right side of the spine and a marked depression upon the left side. Rotatory scolioses may often be detected by palpation if the muscles of the back are closely observed. Palpating the spinous processes, we would find the curvature to the right, and if we depended solely upon the palpation of the spinous processes in the direction in which they were curved, and adjusted, we would increase the curvature and rotation rather than correct it The possibility of correcting such a marked rotatory scoliosis would be doubtful, although it might be possible to correct such a curvature to some extent by persistent application of proper adjustments, providing it has been produced 145
CHIROPRACTIC SPINOGRAPHY
FIG. 37
146
CHIROPRACTIC SPINOGRAPHY by a subluxation or subluxations within the curvature. In adjusting conditions of this kind, the point of contact should be on the transverse process from the third to the tenth dorsal inclusive, and on the laminae of the eleventh and twelfth dorsal, and on the mammillary processes in the lumbar region. In rotations, as exaggerated as the one illustrated here, it is impossible to list a lateral subluxation as we are getting a semi-lateral view. Therefore in adjusting a rotatory scolioses where no lateral subluxation can be listed, it is advisable to alternate and adjust all the vertebra in the curvature occasionally, and in this way we are gradually rotating all of the vertebrae back toward the median line. If we were to adjust the twelfth dorsal as the apex on the right laminae this spinous process will be carried more to the right of the one above and below, and there is a possibility of producing a subluxation between these vertebrae. It is for this reason that we must be careful in selecting the vertebra to be adjusted, visualizing what may happen should we continue adjusting the apex exclusively. There are no subluxations that could be listed in this spinograph with the exception of the fourth lumbar, which is left of the third and fifth, and being tipped superior on the left, adaptative to the curvature, it could be listed left and superior. The spinographic listing would be as follows: Fourth lumbar left superior and bent right. Right rotatory scoliosis from the eighth dorsal to the fifth lumbar inclusive. SPINOGRAPHIC ANALYSIS FOR FIGURE No. 38 Figure No. 38 shows a right rotatory scoliosis of the lower dorsal and lumbar vertebrae. Comparing this spinograph with figure No. 15 it will be found that they are identically the same types of curvature with a greater and lesser degree of rotation 147
CHIROPRACTIC SPINOGRAPHY Letter “A” represents the center of the spinous process of the eleventh dorsal vertebra. Comparing this spinous process with “B,” it is found that “B” is more to the left, therefore, it becomes necessary to place the straight edge from the center of the spinous process of the ninth dorsal “C” to the center of the spinous process of the twelfth dorsal “D.” In this manner we find that both tenth and eleventh dorsal are subluxated left of the ninth and twelfth, the tenth dorsal being the greater subluxation in that it has more laterality than the eleventh dorsal. This could be determined by placing the straight edge from “C” to “A.” There is a possibility of the eleventh dorsal palpating as the greater subluxation because it has a larger spinous process than the tenth dorsal and is also slightly bent to the left. The eleventh dorsal spinous process being larger and the ninth dorsal spinous process being longer, may cause the tenth dorsal to palpate anterior, yet the spinograph shows the tenth dorsal to possess more laterality than the eleventh. Letters “E” and “F” represent the left and right lateral margins of the vertebra as shown on the film. In this instance, however, it would be unnecessary to measure the distances as the difference is so great that it is easily detected. The spinous processes of the twelfth dorsal and first lumbar may palpate as left subluxations because they are slightly bent left. It is in conditions of this kind that we have the appearance of a right subluxation in a right rotation, and in fact the spinous process of the first lumbar is to the right of the one above and below, but the reason it is to the right is because the extreme right curvature has carried the entire vertebra to the right and makes it appear as a right subluxation when comparing it with the one above and below with a straight edge. By comparing the center of the spinous processes of the twelfth dorsal, first and second lumbar, we will find that the spinous process of the first lumbar is closer to the left edge 148
CHIROPRACTIC SPINOGRAPHY
FIG. 38
149
CHIROPRACTIC SPINOGRAPHY of its body and the spinous process of the twelfth dorsal and second lumbar are to the left edges of their bodies. This proves that the first lumbar has rotated farther to the right than the one above and below, therefore it cannot be listed as a right subluxation. The spinographic listing would be as follows: Tenth dorsal left inferior, indicated as the greater subluxation. Eleventh dorsal left inferior. Twelfth dorsal bent left. First lumbar bent left. Right rotatory scoliosis from the eighth dorsal to the fourth lumbar inclusive. SPINOGRAPHIC ANALYSIS FOR FIGURE No. 39 Figure No. 39 is another view of the lower dorsal region showing the beginning of a right rotatory scoliosis from the eighth dorsal vertebra down. Letter “A” represents the center of the spinous process of the eighth dorsal vertebra. By comparing this spinous process with the center of the seventh dorsal “B,” and the center of the ninth dorsal “C,” by placing a straight edge from “B” to “C,” we find that “A” is to the left of “B” and “C.” By measuring the distance from the center of the process “A” to the right lateral edge of the body “D,” it will be shown that the distance is greater on this side and a lesser distance upon the left from “A” to “E.” Letter “F” represents the tip of the spinous process of the sixth dorsal vertebra, which is usually long in this case and bent slightly to the left. Comparing the tip of this process with the tip of the spinous process of the seventh dorsal “G,” it will be seen by visualizing the palpating of these two processes the possibility of an error in listings. Letter “H” represents the tip of the spinous process of 150
CHIROPRACTIC SPINOGRAPHY
FIG. 39
151
CHIROPRACTIC SPINOGRAPHY the eighth dorsal, which is bent to the left of its own center “A” and even though this vertebra has been found to be subluxated left, the spinous process should also be listed as it would always palpate as a left subluxation even though the subluxation be corrected. Letter “I” represents the tip of the spinous process of the ninth dorsal. Comparing “I” with the center of the process “C,” it will be shown that this process is bent to the right of its own center making four consecutive bent spinous processes, three of which might be listed as subluxations when comparing the tips, when in reality there is only one subluxation that should be listed. Notice the close proximity of the tip of the spinous process of the ninth dorsal with that of the tenth. This is due to the spinous process of the ninth dorsal being long and overlapping the body of the tenth, and the spinous process of the tenth dorsal being smaller and projecting more posterior to its own body. This close relationship is often mistaken for either an inferior subluxation of the ninth dorsal vertebra or a superior subluxation of the tenth dorsal vertebra, but the spinograph shows neither. The spinographic listing would be as follows: Sixth dorsal bent left slightly. Seventh dorsal bent right. Eighth dorsal left and bent left. Ninth dorsal bent right. Right rotatory scoliosis from the eighth dorsal to the twelfth dorsal inclusive. SPINOGRAPHIC ANALYSIS FOR FIGURE No. 40 Figure No. 40 is one that requires careful study and consideration in listing the subluxations and abnormalities. By covering the lower half of the picture, we have the appearance of a curvature to the left in the cervical region with the 152
CHIROPRACTIC SPINOGRAPHY spinous processes to the right of their own bodies or with the concavity of the curvature, which fact proves that this is a left rotatory curvature within this region. Covering the cervical region, we observe that there is curvature to the right in the upper dorsal region, but the spinous processes in this region are nearer the left edges of the bodies of the vertebrae or with the concavity of the curvature, proving that this is a right rotatory curvature within this region, the change taking place between the seventh cervical and first dorsal vertebra. Letter “A” represents the spinous process of the first dorsal vertebra, which, if compared with letter “C,” which is the center of the spinous process of the second dorsal, will show that “A” is to the left of “C.” Measuring the distance from “A” to “D” and comparing this measurement with that from “A” to “E,” we find that “A” has moved to the left of the median line, as well as being to the left of the one below. This first dorsal vertebra could be listed as a left inferior subluxation, although the inferiority is really adaptative to the curvature, nevertheless by listing the inferiority it would assist the adjustor materially in assuming the proper standing position so that his forces may be properly directed. Letter “B” represents the center of the spinous process of the seventh cervical vertebra, which is to the right of the median line and to the right of the spinous process of the sixth cervical vertebra. It is also tipped in the same manner as the first dorsal vertebra, adaptative to the curvature; however, the laterality being right it should be listed right and superior. The same explanation as given for the first dorsal applies to this vertebra, and it is for this reason alone that inferiority and superiority is often listed from the spinographic negative that it may help the adjustor in directing his forces properly. Letter “F” represents the spinous process of the sixth 153
CHIROPRACTIC SPINOGRAPHY
FIG. 40
154
CHIROPRACTIC SPINOGRAPHY cervical which is found to be cleft and is indicated by the arrow. Note should be made of all such conditions so that the adjustor will never attempt to adjust a spinous process of this character. The exception to the rule as explained in rule No. 6, determining laterality by the use of a straight edge in a rotatory scoliosis, is clearly illustrated when considering the third dorsal vertebra, “A” representing the center of the spinous process of the third dorsal, “G” and “K” the centers of the spinous processes of the second and fourth dorsal vertebrae. Should a straight edge be used through the centers of these spinous processes, the third dorsal would appear slightly to the right of the one above and below. Comparing the relative distance from “H” to “I” and “H” to “J” we shall find that this spinous process is much closer to the left edge of the body and farther away from the right edge of the body than either the second or fourth dorsal vertebrae and should be listed as a left subluxation. The only reason that the spinous process of the third dorsal appears slightly to the right of the one above and below is because it has been carried to the right with the acute curvature accompanying this right rotation. The spinographic listing would be as follows: Third cervical long right prong. Fourth cervical large left prong. Fifth cervical long right prong. Sixth cervical cleft spinous process. (Do not adjust.) Seventh cervical R S. First dorsal L I. Left rotatory scoliosis from the third cervical to the seventh cervical inclusive. Right rotatory scoliosis from the first dorsal to the fourth dorsal inclusive. 155
CHIROPRACTIC SPINOGRAPHY SPINOGRAPHIC ANALYSIS FOR FIGURE No. 41 Figure No. 41 is another type of curvature existing in the lower cervical and upper dorsal region. In the cervical region we have the appearance of a left curvature changing in the upper dorsal to a right curvature. Comparing the curves existing in this spinograph with the curves shown in figure No. 40, we find them very much alike but the type of curvature is different in each case. Figure No. 40 presents a right and left rotatory curvature. Figure No. 41 presents a left and right lateral scoliosis. A left scoliosis in the cervical vertebrae and a right scoliosis in the upper dorsal. This fact is determined by the relationship of the spinous processes to the curvature in that they are with the curvature, while in the rotatory scoliosis the spinous processes are opposite the curvature. Determining the first dorsal vertebra, which in this spinograph is marked “1,” we count up into the cervical region, making our listing from the highest point downward. Letter “A” represents the center of the spinous process of the fourth cervical vertebra. Comparing this center with the center of the spinous process of the third cervical vertebra “B,” with the center of the spinous process of the fifth cervical vertebra “C,” with a straight edge, it will be shown that the fourth cervical is to the left of the third and fifth cervical. After making a comparison in this manner, we then measure the distance from the center of the spinous process “A” to the outer right superior edge of the vertebra “F.” Comparing this measurement with that from “A” to the left superior margin of the vertebra “E,” This measurement proves that this spinous process has moved to the left, and in so doing, the body of the vertebra is rotated right, and this fact accounts for the greater distance showing upon the right of this vertebra. We would therefore list the fourth cervical vertebra as being a left superior subluxation. The superiority is determined by placing a straight edge from “E” to “F,” or 156
CHIROPRACTIC SPINOGRAPHY
FIG. 41
157
CHIROPRACTIC SPINOGRAPHY across the superior and inferior margins of the vertebra. Such procedure will indicate that this vertebra is superior upon the left and inferior upon the right. This appears to be the only subluxation within this region; even though there is a curvature to the left, the spinous processes below the fourth cervical do not show any laterality. Letter “G” represents the center of the spinous process of the first dorsal vertebra. Letters “H” and “I” represent the center of the spinous processes of the seventh cervical and second dorsal vertebrae. Comparing these three centers by the use of a straight edge, it will be found that “G” appears to the right of “H” and “I.” Comparing the distance from “G” to “J” with the distance from “G” to “K,” we find that the distance appears greater upon the left side of this vertebra and lesser upon the right, this indicates that this spinous process has moved to the right and would therefore be listed as a right subluxation. This vertebra could also be listed superior upon the right or right superior, as the body of the vertebra has tipped superior upon the right side adaptative to the curvature. By listing this superiority it would assist the adjustor in assuming the correct standing position so that his forces may be better directed at right angles to the vertebra in question. Letter “L” indicates an exostotic growth on the right of the spinous process of the second dorsal vertebra which would cause this vertebra to appear as the greater subluxation under palpation, when in reality the first dorsal is proved to be the subluxation. Letter “M” represents the tip of the spinous process of the third dorsal vertebra which is found to be bent to the right of its own center and should be listed as such. The spinographic listing is as follows: Third cervical long left prong. Fourth cervical left superior with long left prong. 158
CHIROPRACTIC SPINOGRAPHY Fifth cervical long left prong. First dorsal right superior. Second dorsal exostosis on right of spinous process. Third dorsal bent right. Left scoliosis from the third cervical to the sixth cervical inclusive. Right scoliosis from the seventh cervical to the fourth dorsal inclusive. SPINOGRAPHIC ANALYSIS FOR FIGURE No. 42 Figure No. 42 is an anterior posterior view of the lower cervical and upper dorsal vertebrae presenting subluxations of a marked degree of laterality. This view covers approximately from the third cervical to the fourth or fifth dorsal vertebrae, which is the usual number of vertebrae covered in a film of this region. Determining the first dorsal vertebra is the first requisite in reading a film of this region. Letter “A” represents the center of the spinous process of the first dorsal vertebra with the large transverse processes directly above the first pair of ribs. Comparing the center of the process of the first dorsal “A,” with the center of the spinous process of the seventh cervical “B,” we find that the spinous process “A” is to the left of “B.” Comparing “A” with the center of the spinous process of the second dorsal “C,” we find that “A” is also to the left of “C.” Placing a straight edge from “B” to “C” is the correct manner in which to determine the degree of laterality of the first dorsal vertebra. Letters “D” and “E” represent the outer concave margin of the body of the first dorsal. Measuring the distance from “A” to “D,” we find that this distance is much greater than 159
CHIROPRACTIC SPINOGRAPHY
FIG. 42
160
CHIROPRACTIC SPINOGRAPHY from “A” to “E” and it is in this manner that we prove the laterality of this spinous process to the left. Letter “F” represents the tip of the spinous process of the second dorsal. Comparing “F” with “C,” the center of the spinous process, we find that “F” is bent to the right of “C,” and should be listed as a bent spinous process to the right. Compare the angle of this spinous process from its center to its tip and then compare the spinous process of the third dorsal from the center to its tip and note the difference in the shape of these two processes. The spinous process of the second dorsal is bent to the right and the tip of the third dorsal is in alignment with its center. Counting up into the cervical region from the first dorsal, we find from observation that the center of the spinous process of the sixth cervical “G” appears to be to the left of the one above and below it. To prove this, we place the straight edge from the center of the spinous process of the fifth cervical “H” to the center of the spinous process of the seventh cervical “B,” which will show that the sixth cervical is to the left of the fifth and seventh cervical. After making this comparison, we then prove it by measuring the distance from the center of the spinous process “G” to the outer right superior margin of the vertebra “I.” Comparing this measurement from “G” to the left superior margin of the vertebra “J,” we find the shorter distance on the left. If this method of measurement were used on the other cervical vertebrae superior to the sixth cervical, we would find that all of these spinous processes would more nearly show the left edges of the vertebrae. This does not indicate, however, that these vertebrae are subluxated, as they are not to the left of one another but are left of the center of their own bodies in a slight left scoliosis in this region. The sixth cervical would be the only subluxation listed as it is found to be to the left of the one above and below it, and this constitutes a subluxation. 161
CHIROPRACTIC SPINOGRAPHY The spinographic listing would be as follows: Third cervical long left prong. Fifth cervical long left prong. Sixth cervical left or L. First dorsal left or L. Second dorsal bent right. Slight left scoliosis from the third cervical to the sixth dorsal vertebra. SPINOGRAPHIC ANALYSIS FOR FIGURE No. 43 Figure No. 43 presents an interesting view of the lower cervical and upper dorsal region and especially of the upper dorsal vertebrae. This view covers from the fourth cervical to the sixth or seventh dorsal vertebra. It is impossible, however, to bring out the shadows of the spinous processes below the fourth dorsal vertebra in a print of this character due to the fact that the sternum offers greater resistance to the rays in this region, and therefore this region will naturally show darker upon a print and lighter upon the negative. Determining our first dorsal vertebra, then counting up into the cervical region, finding the center of the spinous process “A,” and comparing this center with the center of the spinous process directly below it, and with the center of the bifurcation of the third cervical above it, we find that “A” is to the left of the one above and below. To prove that this spinous process is left of its own body, measure the distance from “A” to the outer inferior margin of the vertebra “C,” compare this measurement from the center “A” to the outer left inferior margin “B.” This measurement will show that the spinous process is nearer the left edge and farther away from the right edge, and we would therefore list this vertebra as being a left subluxation. When the superior margins of the cervical vertebrae do not show clearly, as in this print, we then use the inferior margin as illustrated. The fifth cervical could be measured in the same manner and would show that it is also to the left of its own body, and is also left of the 162
CHIROPRACTIC SPINOGRAPHY
FIG. 43
163
CHIROPRACTIC SPINOGRAPHY spinous process of the sixth cervical and should be listed left subluxation in that it is to the left of the sixth cervical, but the fourth cervical being more to the left is the subluxation that should be checked as the greater subluxation. Letter “D” indicates an ankylosis of the first and second dorsal vertebrae, in that these two vertebrae appear as one, as there is no space showing between them, as would be the case if there were a cartilage or intervertebral disc present. The dotted line superior to “E” represents the formation of the left laminae, while the lower dotted line represents the formation of the right laminae “E.” This condition presents a malformation in the laminae and spinous process of this vertebra and should be listed accordingly as it is unwise to attempt to adjust such a vertebra or to break an ankylosis of this type. Letter “F” represents the center of the spinous process of the fourth dorsal vertebra. Letters “G” and “H” represent the outer margins of this vertebra. Comparing letter “F” with the spinous process of the vertebra below it would be necessary to question the listing of the fourth as to its relation with the fifth dorsal vertebra in that we cannot compare the fourth with it. Measuring the distance from “F” to the right lateral margin of the vertebra “H,” we will find by comparing this measurement with that from “F” to the left lateral margin “G,” that this process has moved slightly to the left of its own body. Letter “I” represents the tip of the spinous process of the fourth dorsal vertebra which is bent to the right of “F,” and should be listed, as a bent process like this would be misleading when palpating such a condition. The spinographic listing would be as follows: Fourth cervical left or L. First and second dorsal malformation and ankylosis. (Do not adjust). Fourth dorsal left of third and bent right. 164
CHIROPRACTIC SPINOGRAPHY SPINOGRAPHIC ANALYSIS FOR FIGURE No. 44 Figure No. 44 is an unusual lower cervical and upper dorsal spinograph because of the marked laterality of the subluxations shown in the cervical region, while those of the upper dorsal region appear to be in very good alignment. The spine in this region appears quite straight even though we do have marked laterality in the cervical region, and it is this fact that makes this an unusual picture. The majority of cases showing the same degree of laterality will most often show a curvature, which is more likely to be of the rotatory type. Counting from the first dorsal up to the spinous process of the third cervical, as indicated by letter “A,” we find that this spinous process is to the right of the bifurcation directly above it, which is that of the axis, and then comparing “A” with “B” we find that “A” is also very much to the right of “B” and is also much closer to the right margin of its own body and farther away from the left margin. We would therefore list this third cervical as being a marked subluxation to the right. The axis may also be to the right, but we only see the bifurcation of this process and it is unwise to list an axis when so little of it shows on the negative. Even though the axis were right, the third being to the right of the axis and the fourth becomes the greatest subluxation in this region. Letter “C” represents the center of the spinous process of the fifth cervical vertebra. Comparing “C” with “B” and “D” with a straight edge, we find that “C” is to the right of “B” and “D.” Measuring the distance from “C” to the left superior margin of the vertebra “E” and comparing this with the measurement from “C” to “F,” we prove that this spinous process is to the right of its own body as well as right of the fourth and sixth cervical. We may measure the distance from the center of “B” and “D” to the lateral margins of their respective bodies, and they also would measure nearer the right of their bodies. This measurement would not indicate that these vertebrae are subluxations as we have already 165
CHIROPRACTIC SPINOGRAPHY
FIG. 44
166
CHIROPRACTIC SPINOGRAPHY determined that the third and fifth cervical vertebrae are much more to the right of the adjacent vertebrae and therefore are the lateral subluxations in this region. Letter “G” represents the center of the spinous process of the seventh cervical, which appears superior to its own body and quite close to the spinous process of the sixth cervical “D” and a considerable distance superior to the spinous process of the first dorsal vertebra. Comparing the spaces of the intervertebral disc between the seventh cervical and first dorsal, as indicated by the cross, we find that this space is much greater than the one above it. This fact also indicates that the spinous process of the seventh cervical is superior and should be listed accordingly. The spinous processes of the first and second dorsal also appear superior and the spaces directly beneath them also are quite wide indicating that these spinous processes are also tipped superiorly. This apparent tipping to the superior of these processes is undoubtedly adaptative to a kyphotic condition within this region and we would find a marked posteriority upon palpation of these vertebrae. The spinographic listing would be as follows: Axis large right prong. Third cervical right. Fifth cervical right. Seventh cervical superior. SPINOGRAPHIC ANALYSIS FOR FIGURE No. 45 Figure No. 45 presents the lower cervical, dorsal and lumbar region which requires careful study to properly analyze as there are conditions shown in this spinograph that could not be adjusted. There is a malformation in the bodies of the vertebrae 167
CHIROPRACTIC SPINOGRAPHY from as high as can be seen in the cervical region down to and including the body of the ninth dorsal vertebra. The vertebrae are ankylosed in the upper dorsal region and apparently quite wedge-shaped, and it is impossible to clearly define any given vertebra in this upper dorsal region as they appear to be fused together and flattened out. Counting the ribs on the right side from the eleventh upward, we find that the ribs from the first dorsal to the eighth dorsal are crowded into an area approximately three inches in length. This fact alone would lead us to believe there was a malformation or a destructive process having taken place, such as Potts Disease. Observing the ribs upon the left we find a malformation existing from the third to eleventh rib inclusive. The fourth and fifth rib are irregular in their formation near the spine and are ankylosed with one another. The sixth rib appears fractured with the shaft of the rib curved superior closer to the one above. Letter “A” with arrow indicates an ankylosis between the eighth and ninth ribs at this point, while they are again ankylosed nearer the spine, and from this point down to the eleventh rib, we find an ankylosis existing between the ribs and the ankylosis which gives the appearance of three foraminae on this left side. This spinograph shows an absence of ribs upon the twelfth dorsal. From the eighth dorsal vertebra to the third lumbar vertebra there is a marked right rotatory scoliosis. The spinous processes as outlined appear very close to the left lateral margins of the vertebrae, while the last three ribs shown upon the right side appear dislocated because of this marked rotation. Letter “B” represents the fourth lumbar vertebra with a cleft laminae and an absence of a spinous process. It would be very unwise for the Chiropractor to attempt to adjust any of the vertebrae in the lower cervical and dor168
CHIROPRACTIC SPINOGRAPHY
FIG. 45
169
CHIROPRACTIC SPINOGRAPHY sal region from the sixth cervical to the ninth dorsal inclusive but adjustments could be given in the lower dorsal and upper lumbar region for any symptoms within these zones. No attempt should be made to correct a rotatory scoliosis existing in a condition of this kind because it is purely an adaptative position of the spine, and if there is any manifested symptoms, the subluxation within the rotatory scoliosis is the one that should be corrected. If there are no symptoms, or apparent manifestations of disease in cases of this kind, and when the history shows that it is a malformation existing from birth, adjustments should not be given with the idea of correcting the rotatory scoliosis, or any other type of curvature that may exist. The spinographic listing would be as follows: Malformation and ankylosis from the sixth cervical to the ninth dorsal inclusive, involving the ribs upon the left side. Do not adjust within this region. Adaptative right rotatory scoliosis from the ninth dorsal to the third lumbar inclusive. Fourth lumbar cleft spinous process. SPINOGRAPHIC ANALYSIS FOR FIGURE No. 46 Figure No. 46 presents a very interesting lower cervical and upper dorsal spinograph, and if carefully studied the spinographer will gain a very good idea of the appearance of ankylosis as shown in an anterior-posterior spinograph of the lower cervical vertebrae. Letter “A” represents the center of the spinous process of the fourth cervical vertebra. Comparing it with the center of the spinous process of the fifth cervical “B,” it will be found to the left of the fifth. Measuring the distance from “A” to the outer right margin “C,” we find that the distance appears greater upon this side than the distance from “A” to “D” upon the left. 170
CHIROPRACTIC SPINOGRAPHY
FIG. 46
171
CHIROPRACTIC SPINOGRAPHY Letter “F” represents the center of the spinous process of the sixth cervical vertebra, which appears tipped very much to the superior. This fact is also proved by the space appearing between the bodies of the sixth and seventh cervical, which is greater than either the spaces above or below it. It will be noticed that the body of the fifth and sixth cervical really appears as one, and the only line of demarcation is the spinous processes of the two vertebrae and the sygopophysis, or articular processes as indicated by the crosses on both the right and left. Such an appearance indicates the existence of ankylosis between these two vertebrae, due to ossification of the intervertebral disc. In conditions of this kind it is especially advisable to take a lateral view of the region involved, so that we may determine the extent of the ankylosis between the bodies of the vertebrae as this view reveals such conditions more clearly. Letter “E” represents the center of the spinous process of the seventh cervical vertebra; letters “F” and “G” the center of the spinous process of the sixth cervical and first dorsal vertebra. Comparing these three centers with a straight edge it will be found that the seventh cervical is subluxated to the left of the sixth cervical and first dorsal. The dotted line to the left of the spinous process of the seventh cervical indicates an exostotic growth which would cause this vertebra to always palpate as a left subluxation. The upper dorsal vertebrae in this spinograph appear in very good alignment and it would require very close listing to determine any degree of laterality of any of the vertebrae in this region. The spinographic listing would be as follows: Fourth cervical left of the fifth cervical with a long left prong. Fifth cervical cleft spinous process. Fifth and sixth cervical ankylosed. Seventh cervical left with an exostotic growth on the left of the spinous process. 172
CHIROPRACTIC SPINOGRAPHY SPINOGRAPHIC ANALYSIS FOR FIGURE NO. 47 This figure represents a view of the lower cervical and upper dorsal vertebrae. Letter “A” represents the center of bifurcation of the spinous process of the fourth cervical vertebra; letters “B” and “C” the outer edge of the body of the fourth cervical vertebra. Comparing the above letters with each other, we find “A” is nearer to “C” and farther away from “B,” proving that the laterality of this spinous process is to the right. The center of this process is also found to be to the right of the one above and the one below, although the spinous process of the fifth cervical is right of the spinous process of the sixth cervical, therefore it would be well to list both the fourth and fifth cervical, indicating the fourth cervical as the greater subluxation. Measuring the spinous processes of the sixth and seventh cervical we also find these two processes to the right, indicating a slight right scoliosis in the lower cervical region. It would also be well to list the fourth, fifth and sixth cervical as having long right prongs, as the right prongs are much longer than the left and would be misleading in palpation. Letter “D” represents the spinous process of the second dorsal vertebra: letters “E” and “F” the outer edge of the body of the vertebra. Comparing “D” with “F” and “E,” we find that “D” is nearer “F” and farther from “E,” proving that this is a right subluxation. The spinous process of this vertebra is also bent to the right. It is also found that the left transverse process, marked L T is much higher than the right transverse process, marked R T, while the body of the vertebra itself appears to be level, showing that the left transverse process is bent superiorly. Letter “G” represents the center of the spinous process of the third dorsal vertebra; letters “H” and “I” the outer 173
CHIROPRACTIC SPINOGRAPHY
FIG. 47
174
CHIROPRACTIC SPINOGRAPHY edges of the body of the third dorsal vertebra. Comparing these measurements we find that “G” is nearer “I” and farther away from “H,” proving that the subluxation is right. The tip of this spinous process is bent to the left. The spinographic listing would be as follows: Fourth cervical right with a long right prong. Fifth cervical right with a long right prong. Sixth cervical long right prong. Slight right scoliosis in the fourth, fifth, sixth and seventh cervical vertebrae. Second dorsal right, spinous process bent right, indicating the second dorsal as the greater subluxation. Third dorsal right, spinous process bent left. SPINOGRAPHIC ANALYSIS FOR FIGURE No. 48 Figure No. 48 represents a very interesting lower cervical and upper dorsal spinograph, interesting in that it presents a characteristic ankylosis of the first five dorsal vertebrae with the bodies of the vertebrae appearing very small and wedge-shaped. This case presents no history of any pathological condition that would usually be expected such as Potts Disease or Caries of the spine. Without any such history there is only one conclusion to be arrived at and that is that this is either a congenital malformation or one resulting from Rickets or malnutrition. Letter “A” represents the center of the spinous process of the seventh cervical vertebra which under palpation would undoubtedly appear very much to the superior of the spinous process of the first dorsal “B.” This condition is due, however, to the body of the first dorsal settling inferior because of the absence of the intervertebral disc between the first and second dorsal. Letter “C” represents the center of the spinous process of the second dorsal vertebrae and it would appear from ob175
CHIROPRACTIC SPINOGRAPHY
FIG. 48
176
CHIROPRACTIC SPINOGRAPHY servation that “B” and “C” are very close together and the bodies of these two vertebrae appear solidly ankylosed. There is the appearance of a space between the second and third dorsal through the center, and resembles the shadow of the intervertebral disc, but the outer margins of the vertebrae appear to be fused. Letter “D” represents the center of the spinous process of the third dorsal, while the dotted line from this point downward shows an apparent fusing of the spinous processes of the third, fourth, and fifth dorsal vertebrae. Comparing the relationship of the articulations of the ribs of the first, second, third, fourth, and fifth dorsal vertebrae, it will be found that the head of these ribs appear very close together, while those of the sixth, seventh, and eighth dorsal vertebrae are farther apart and are normal. It is under such conditions as these that the Chiropractor should be extremely careful in making his analysis, and the spinographer is especially cautioned to make note of such abnormalities with the advice that an ankylosis such as this be not broken. The spinographic listing would be as follows: Third cervical long left prong. Fourth cervical long left prong. Third, fourth and fifth dorsal ankylosed. The bodies from the first to the fifth dorsal inclusive are wedge shaped and malformed. Advisable not to adjust in this region. SPINOGRAPHIC ANALYSIS FOR FIGURE No. 49 Figure No. 49 represents an anterior posterior view of the lower cervical and upper dorsal vertebrae. It is necessary in pictures of this kind for the observer to first determine the first dorsal vertebra as covered in rule No. 3. In this instance letter “H” represents the center of the 177
CHIROPRACTIC SPINOGRAPHY spinous process of the first dorsal. Counting superior from this vertebra into the cervical region we find that the spinous process of the Axis is shown upon this film. Letter “A” represents the right prong of the spinous process of the axis, which is found to be longer than the left, and should be listed. Letters “B” and “C” represent the left prongs of the third and fourth cervical vertebrae which are much longer than the right prongs. It will be noticed that the centers of these two spinous processes appear in alignment and that the bifurcation also appears in alignment with its own center, which is usually the case in this region. It is the long prongs, as shown in these first three vertebrae, that are often misleading to the adjustor, or to the palpator, as these prongs will naturally raise the surrounding tissue and make them feel more prominent and they may be mistaken as a subluxation in that direction. Letter “D” represents the spinous process of the seventh cervical. Comparing letter “D” with the letters “G” and “H,” or the spinous processes of the sixth cervical and fifth dorsal vertebrae, we find that “D” is to the right of “G” and “H.” This comparison is first made by placing a straight edge from the center of the sixth cervical “G” to the center of the first dorsal “H,” which proves that “D” is to the right of this line or to the right of the vertebra above and below it. Measuring the distance from the center of the spinous process “D” to the outer left superior margin of the body of this vertebra “E,” we find that this distance is greater than the distance from the center “D” to the outer right superior margin “F,” proving that this vertebra is subluxated right. Letter “I” represents the center of the spinous process of the second dorsal. Comparing letter “I” with the spinous process of the first dorsal “H,” we find that “I” is to the left of 178
CHIROPRACTIC SPINOGRAPHY
FIG. 49
179
CHIROPRACTIC SPINOGRAPHY “H.” We cannot, however, compare “I” with the center of the spinous process of the third dorsal vertebra “L” as this spinous process “L” appears to the right of its own body and also to the right of the spinous process of the fourth dorsal “M.” Therefore, the only comparison that we can make of the second dorsal is with the first dorsal vertebra and its own body. Measuring the distance from “I” to “J,” which is the outer right margin of this vertebra, then comparing this distance from “I” to “K,” which represents the left margin of the vertebra, we find that the distance is greater upon the right side, proving that the shadow of this spinous process is to the left of its own body and also left of the vertebra above it and therefore would be listed as a left subluxation. Measuring the distance from the center of the spinous process of the third dorsal “I,” to the outer left edge of the body of the vertebra “N,” and then comparing this measurement with the distance from “L” to “O,” or right edge of the body, we find that the spinous process of the third dorsal appears to the right of its own body and also to the right of the center of the spinous process of the fourth dorsal vertebra “M.” We would therefore list this third dorsal as a right subluxation. This vertebrae is also tipped slightly inferior upon the right side in that the attachments, such as the transverse processes, articular processes and ribs appear lower upon the right side and higher upon the left, while the space between the bodies of the third and fourth dorsal vertebrae is smaller on the inferior on the right and greater upon the left. We therefore could add inferiority to our listing of this vertebra. Letters “P” and “Q” represent the tip of the spinous processes of the third and fourth dorsal vertebra, which are found to be bent to the right of their own centers “L” and “M” and should be listed accordingly even though they are both to the right of their own bodies. With bent processes such as these, even though the subluxation be corrected, this 180
CHIROPRACTIC SPINOGRAPHY vertebra would always palpate as a right subluxation because of the bent spinous process to the right. The spinographic listing would be as follows: Axis long right prong. Third cervical long left prong. Fourth cervical long left prong. Seventh cervical Right or R. Second dorsal Left or L. Third dorsal Right Inferior, bent spinous process right. Fourth dorsal bent spinous process right. SPINOGRAPHIC ANALYSIS FOR FIGURE No. 50 Figure No. 50 is an anterior posterior view of the atlas and axis, which will show only the laterality, superiority and inferiority. Following the principles laid down in rule No. 9 for plate reading, we make the following listing: Letter “A” represents the center of the spinous process of the axis, and the bifurcation of this spinous process is found directly beneath this center with the prongs of the bifurcation outlined. Letter “B” represents the center of the odontoid process at its base, and this center should always be taken at this point. Letter “C” represents the center of the spinous process of the third cervical with the bifurcation and prongs outlined. Letters “D” and “E” represent the outer articulation of the lateral masses of the atlas and axis, which is an important point for observation in listing the atlas. Letters “F” and “G” represent the spaces between the outer margins of the odontoid process and the inner margins of the lateral masses of the atlas. These two spaces are also important factors when listing either atlas and axis. 181
CHIROPRACTIC SPINOGRAPHY
IG. 50
182
CHIROPRACTIC SPINOGRAPHY Comparing the center of the spinous process of the axis “A” with the center of the odontoid process “B,” we find that “A” is very much to the left of “B,” indicating that this spinous process has moved to the left. To prove this fact, we then measure the distance from “A” to “D” on the axis and compare this measurement from “A” to “E” on the axis. This measurement will show a greater distance from the center of the process to the right superior margin of the axis and a lesser distance upon the left. Comparing the center of the spinous process of the axis with the spinous process of the third cervical “C,” we find that “A” is also to the left of “C” even though it is left of its own body. This would prove the axis is subluxated left. Comparing “D” and “E” with the superior lateral margins of the axis, it will be found that these articulations appear normal, or in alignment with one another, even though the axis is badly subluxated. Comparing “F” and “G” we find that these spaces are equal in size, which, with our findings of “D” and “E,” clearly indicate that the atlas has rotated with the body of the axis, a condition which is found in so many cases where the axis is subluxated. The spinographic listing would be as follows: Axis Left or L. Third cervical large left prong. SPINOGRAPHIC ANALYSIS FOR FIGURE No. 51 Figure No. 51 is an interesting anterior posterior view of the atlas, axis, and third cervical. Follow the key carefully that you may clearly understand all of the points brought out in listing this region. Letter “A” represents the center of the spinous process of the axis with the prongs and bifurcation outlined below this center. 183
CHIROPRACTIC SPINOGRAPHY Letter “B” represents the center of the odontoid process, which is our second point for comparison. Letter “C” represents the center of the spinous process of the third cervical with the prongs and bifurcation outlined. Letters “D” and “E” represent the outer superior margin of the axis. Letters “F” and “G” represent the outer inferior margin of the lateral masses of the atlas. Letters “H” and “I” represent the spaces between the outer margin of the odontoid process and the inner margin of the lateral masses of the atlas. Comparing the center of the spinous process of the axis “A,” with the center of the odontoid process “B,” we find that “A” is to the right of “B.” Measuring the distance from “A” to the outer left margin of the axis “E,” we then compare this distance from “A” to the outer right superior margin of the axis “D,” showing that the distance is greater from “A” to “E” than from “A” to “D,” thereby proving that this spinous process has moved to the right. Comparing the center of the spinous process “A” with the center of the spinous process of the third cervical “C,” we find that “C” is also slightly to the right of “A.” This would indicate that the third cervical has more laterality than the axis, but it would be necessary to compare the third cervical with the spinous process of the fourth cervical to prove whether or not the third was the greater subluxation than the fourth cervical. There is a possibility that the third cervical might palpate as a left subluxation due to the fact that the left prong is much larger than the right prong, which should be noted in the spinographic listing. Comparing letters “D” and “E” transversely with a straight edge, it will be found that the right superior margin of the axis “D” is superior to the left superior margin of the axis “E,” or that this axis is tipped higher upon the right side and would be listed superior on this side with the laterality. 184
CHIROPRACTIC SPINOGRAPHY
FIG. 51
185
CHIROPRACTIC SPINOGRAPHY Letters “F” and “G” represent the outer inferior articulation of the lateral masses of the atlas with the axis. Comparing these margins with that of the axis, they are found to be in alignment with the axis. Comparing the spaces on either side of the odontoid process “H” and “I,” they are found to be equal, proving that the atlas is not subluxated laterally but has rotated as well as tipped with the subluxation of the axis. This fact is also proved by the articular spaces shown between the lateral masses of the atlas and axis in that these spaces have not changed. The spinographic listing would be as follows: Axis Right and Superior or R. S. Third cervical Right of Axis with a long left prong. Fourth cervical (?). The question mark opposite the fourth cervical indicates that we have listed the third in relation to the axis only. SPINOGRAPHIC ANALYSIS FOR FIGURE No. 52 Figure No. 52 reveals a marked subluxation of the atlas and axis both in the same direction, and even though one of these subluxations appears greater than the other, it is advisable to list both indicating in the analysis which is the greater subluxation. Letter “A” represents the center of the spinous process of the axis which, when compared with the center of the odontoid process, will be found very much to the right. Measuring the distance from “A” to “R” and comparing this measurement with that from “A” to “C,” we prove that this spinous process is to the right of the median line and also possesses a long right prong. Letter “D” represents the right lateral margin of the right lateral mass of the atlas. Comparing “D” with “C,” it will show that “D” is to the right of “C.” Comparing the left lateral margin “E” with “B,” we find that “E” is also to the right of “B.” This would indicate that the atlas is to the 186
CHIROPRACTIC SPINOGRAPHY
FIG. 52
187
CHIROPRACTIC SPINOGRAPHY right of the axis, but there is also the possibility of this atlas being normal, and only the axis being the subluxation. The apparent right subluxation of the atlas is caused by the marked degree of rotation of the axis, which has rotated the odontoid process and body considerably to the left. In doing so, the left lateral margin of the axis would rotate beyond the left lateral mass of the atlas “E.” Also the right superior margin of the axis would rotate anterior and towards the median line, which would cause the difference showing at this point. Considering the spaces between the inner margins of the lateral masses and odontoid process, as indicated by “F” and “G,” we find that “G” appears much greater than “F,” which would indicate that this odontoid process had moved to the left with the extreme rotation of the body of the axis. Such a condition would naturally make this space greater upon the right and smaller upon the left. It is for this reason that it would be advisable to list the axis only. This spinographic listing would be: Axis right with a long right prong. SPINOGRAPHIC ANALYSIS FOR FIGURE No. 53 Figure No. 53 illustrates a spinograph of the atlas and axis wherein the subluxations of both appear in the same direction, while the last three illustrations covered the subluxation of each were in the opposite directions. It might be well to mention here that often the question is asked, “Do we not find the majority of atlas and axis subluxations in the opposite direction or if the atlas is found right will we always find the axis left ?” Such an assumption is erroneous as it is possible for these vertebrae to be subluxated either way, and there is no set rule that will govern such subluxations. We may find just as many of one kind as another, when considering subluxations of both atlas and axis, but we shall find more axis subluxations than atlas. Letter “A” represents the center of the spinous process of the axis. Comparing this center with the center of the odon188
CHIROPRACTIC SPINOGRAPHY
FIG. 53
189
CHIROPRACTIC SPINOGRAPHY told process, as indicated by the dot at its base, it will be found left. Comparing the distance from “A” to “B,” and “A” to “C,” it will show that the distance is greater upon the right and lesser upon the left, proving that this spinous process has moved to the left of the median line and in doing so has caused the body of the vertebrae to rotate right, which accounts for the greater distance showing upon the right. Letter “D” represents the left inferior margin of the lateral mass of the atlas, which is to the left of the left margin of the axis “C.” Comparing the right lateral mass of the atlas with the right superior margin of the axis “B,” it also appears slightly left although not as much as the left lateral mass. This fact is also accounted for by the rotating of the atlas. Letters “E” and “F” represent the spaces found on the right and left of the odontoid process with “E” appearing as the greater space and “F” the lesser, proving that the left lateral mass has moved away from the odontoid process, while the right lateral mass has moved closer to it, making this space appear smaller. This condition is somewhat increased as the odontoid process is rotated to the right and the axis subluxated to the left, we can consider the transverse processes in this spinograph. The left transverse process as indicated by the cross appears closer to the ramii of the jaw, while the right transverse process as indicated by the cross on this side, appears farther away from the These factors all being considered in the preceding manner, will show us conclusively that the atlas is subluxated left. Comparing the lateral masses with one another by using a straight edge transversely and comparing the articular spaces between the atlas and axis, we find that this atlas shows only laterality, as there is no indication of any tipping. The spinographic listing would be as follows: Atlas left. Axis left. 190
CHIROPRACTIC SPINOGRAPHY SPINOGRAPHIC ANALYSIS FOR FIGURE No. 54 Figure No. 54 illustrates an anterior posterior view of the atlas and axis wherein is presented subluxations of both atlas and axis to a slight degree. Even though these subluxations are slight they should both be listed, as often times a slight subluxation of either atlas or axis may cause sufficient pressure upon nerve fibers to produce severe symptoms, and it is for this reason that the spinographer should consider the slight subluxations in making his spinographic analysis as well as the more prominent subluxations, thereby making his listings as accurate and complete as possible. Letter “A” represents the center of the spinous process of the axis. Comparing this center with the center of the odontoid process, it will be found left. Measuring the distance from “A” to the outer superior margins of the axis at “B” and “C,” and then comparing this measurement, it will be found that this spinous process has moved to the left of the median line and should be listed accordingly. Placing a straight edge across the superior margin of the axis from “D” to “C,” it will show that the body of this axis is practically level but considering the tipping of the odontoid process, which appears to the left, it would indicate that we have an odontoid process which is bent slightly to the left. It is for this reason that the center of the odontoid process at its base is always compared with the center of the spinous process of the axis. Letter “D” represents the outer inferior margin of the right lateral mass, which is to the right of the superior margin of the axis “B.” Considering the relationship of the left lateral mass with the axis, it does not appear to the right of the left superior margin of the axis. This is due to the rotating of the atlas, which in all probability would be rotated posterior upon this side and in doing so it would appear in alignment. Considering the spaces between the inner margins of the 191
CHIROPRACTIC SPINOGRAPHY
FIG. 54
192
CHIROPRACTIC SPINOGRAPHY lateral masses and the odontoid process, it will show that the right space “E” is much larger than the left space “F.” The reason for this space appearing so much larger than the left is because the atlas is subluxated to the right. Placing a straight edge across the atlas from one lateral mass to the other it would appear that the right lateral mass is inferior to the left lateral mass. Comparing the articular spaces between the lateral masses and axis, the space upon the right side, or the two points, “B” and “D” appear very closely together, or much more closely than the two points upon the opposite side. This would indicate that the atlas is subluxated not only right but also inferior upon the right side. The spinographic listing would be as follows: Atlas right inferior. Axis left. SPINOGRAPHIC ANALYSIS FOR FIGURE No. 55 Figure No. 55 is an anterior posterior view of the atlas and axis, with a subluxation of both the atlas and axis. Referring to rule No. 9 which covers the method of listing subluxations within this region, we are advised to consider the axis first. Letter “A” represents the center of the spinous process of the axis with the bifurcation showing below it, with a long left prong. Comparing the center of this process with the center of the odontoid process, as indicated by the white dot at its base, it will be found that “A” is very much to the right of the odontoid process. Measuring the distance from “A” to the left lateral superior margin of the axis “B” and comparing this with the measurement from “A” to the right lateral superior margin of the axis “C,” we find that the distance is much greater upon the left side, proving that the body of this ver193
CHIROPRACTIC SPINOGRAPHY
FIG. 55
194
CHIROPRACTIC SPINOGRAPHY tebra has rotated left, and in doing so the spinous process has moved to the right of the median line and would be listed as a right subluxation. Placing a straight edge transversely across the superior margins of the axis, from “B” to “C,” we would find that the axis is slightly superior upon the right side. Observing the odontoid process, it also appears tipped to the left, which verifies the tipping of the body of the axis, and the axis should be listed right and superior. Considering the atlas our first step is to compare the outer margins of the lateral masses of the atlas with the outer superior margins of the body of the axis. Letter “D” represents the outer inferior margin of the left lateral mass of the atlas, which, when compared with the outer left lateral margin of the axis “B,” will be found to the left of “B.” After making this comparison, compare the right lateral mass of the atlas with the right superior lateral margin of the axis, and it also will be found slightly to the left of “C.” The next consideration is the spaces found on the right and left of the odontoid process as indicated by “E” and “F.” Comparing these spaces with each other, it will be found that “E” appears wider than “F,” proving that the left lateral mass has moved away from the odontoid process, while the right lateral mass has moved closer to the odontoid process. If the atlas was in its normal position and the axis subluxated as found in this spinograph, the space on the right of the odontoid process “F” would appear greater due to the fact that the odontoid process had rotated and tipped to the left because of the laterality and superiority of the axis upon the right. Knowing that there is such a subluxation existing, but still we find the space upon the left of the odontoid greater instead of smaller, it helps to verify that the atlas is subluxated left. Considering the transverse processes, it will be found 195
CHIROPRACTIC SPINOGRAPHY that the left transverse process, as indicated by the dotted line extends to the left of the ramii of the jaw, while the right transverse process is on the left of the right ramii of the jaw. The left transverse process also appears larger than the right transverse process, which would be a misleading factor in palpation as it would cause this atlas to palpate as a more pronounced subluxation than it really is. We can also prove that this atlas is subluxated left by comparing the distance from the outer margin of the right lateral mass to the outer margin of the ramii of the jaw as indicated by the cross. Comparing this measurement from the outer margin of the left lateral mass to the outer margin of the left ramii of the jaw, as indicated by the cross, it would show that this atlas is nearer the left ramii and farther away from the right. We can not, however, always depend upon this measurement as the ramii of the jaw are not always the same on both sides in all spinographs. By placing the straight edge transversely from the left to the right lateral mass, and from the left to the right transverse process, it would appear that the atlas is also tipped higher upon the right and lower upon the left. Even though we find such a tipping, we would not list the atlas as being inferior upon the left, as we must consider the articular spaces found between the atlas and axis. Considering the articular spaces in this spinograph they appear the same in width, indicating that the tipping of the atlas is adaptative to the subluxated axis. If the articular space between the atlas and axis on the left were smaller than that upon the right we would then list it as an L. I. subluxation, this not being the case, our listing of the atlas will be only left. The spinographic listing would be as follows: Atlas left with large left Transverse process. Atlas right superior with long left prong. 196
CHIROPRACTIC SPINOGRAPHY SPINOGRAPHIC ANALYSIS FOR FIGURE No. 56 Figure No. 56 Is a very unusual anterior posterior view of the atlas and axis owing to the marked degree of laterality existing in both atlas and axis. After comparing the points as outlined by the key given for this picture, the method of determining the subluxations within this region will be made much easier when reading films showing laterality of a lesser degree. Letter “A” represents the center of the spinous process of the axis with the prongs and bifurcation outlined below this center. Letter “B” represents the center or base of the odontoid process, or in reality where the center should be as this is a case wherein there is an absence of an odontoid process, which is very unusual. Letter “C” represents the center of the spinous process of the third cervical, and the dotted line below this center indicates the peculiar shape of the prongs and bifurcation of this spinous process, while the spinous process outlined immediately below the spinous process of the third cervical is that of the fourth cervical vertebra. Letters “D” and “E” represent the outer superior margins of the body of the axis. Letters “F” and “G” represent the outer inferior margin of the lateral masses of the atlas. Letters “H” and “I” represent the width of the ramii of the jaw opposite the lateral masses of the atlas, which are used in some cases to prove the laterality of the atlas. This measurement is utilized only when both ramii show the same width. Comparing the center of the spinous process “A” with the base of the odontoid process “B,” we find that “A” is to the left of “B.” Also comparing “A” with “C,” we find that “C” 197
CHIROPRACTIC SPINOGRAPHY
FIG. 56
198
CHIROPRACTIC SPINOGRAPHY Is left of “A” and also left of “B” and the spinous Process of the fourth cervical. This indicates that the third cervical has gone to the left with the axis and there Is also an ankylosis between the axis and third cervical in that These two bodies appear fused with each other, and it Is undoubtedly for This reason that both appear to have the same degree of laterality. Measuring the distance from “A” to the outer right superior margin of the axis “D,” and comparing this measurement from “A” to the outer left superior margin of the axis “E,” we find the distance is greater upon the right, and lesser upon the left, proving that this spinous process has moved to the left and in rotating the body of the axis to the right, a greater distance is shown upon this side. Placing a straight edge transversely from “D” to “E,” we find that the straight edge would be higher upon the left side, indicating that the body of the axis on this side is superior and should be listed accordingly, as the laterality has been proved to be left, therefore the tipping is added to the laterality. Comparing the letters “F” and “G” with “D” and “E,” we find that “F” is to the left of “E.” Also that “G” is to the left of “D,” indicating that both the left and right lateral masses of the atlas have moved to the left. This is also proved by measuring the distance from “G” to the outer margin of “I,” comparing this distance from “F” to the outer margin of “H.” This measurement will show that “F,” or the left lateral mass of the atlas, is more closely to the left ramii and farther away from the right. When one realizes that “G” and “D” should articulate evenly on the right, and “F” and “E” on the left, this picture reveals a marked degree of laterality of the atlas, in fact it is very seldom that we find a subluxation of the atlas as great as is shown in this picture. The absence of the odontoid process may account for the marked degree of laterality of the atlas, in that it would have more freedom in moving laterally. Placing a straight edge transversely from the inferior 199
CHIROPRACTIC SPINOGRAPHY margin of the right lateral mass “G” to the left lateral mass “F,” we would find that the straight edge would be tipped a little higher upon the left side. This, however, does not prove that this atlas is subluxated superior, as the articular spaces between the atlas and axis appear the same. This would indicate that the tipping of the atlas is adaptative to the tipping of the axis, therefore only the laterality of the atlas should be listed. The spinographic listing would be as follows: Atlas Left or L. Axis Left and Superior or L S with a long right prong. Third cervical Left or L adaptative to axis. Ankylosis between axis and third cervical. Absence of odontoid process. It is advisable to make note of any abnormality other than subluxations showing within any given region, or of any vertebra. SPINOGRAPHIC ANALYSIS FOR FIGURE No. 57 Figure No. 57 is another spinograph of the atlas and axis, which is similar in many respects to figure No. 55. The main difference is the laterality of the atlas and axis, which in this instance is just the opposite. Letter “A” represents the center of the spinous process of the axis. Comparing this center with the center of the odontoid process, as indicated by the dot at its base, it will be found to the left. Measuring the distance from “A” to the right superior margin of the axis “B,” and comparing this measurement with the distance from “A” to the left superior margin of the axis “C,” the process appears closer to “C” and is a left subluxation. Placing a straight edge transversely across the superior margin of the axis from “C” to “B,” it will show that the axis 200
CHIROPRACTIC SPINOGRAPHY
FIG. 57
201
CHIROPRACTIC SPINOGRAPHY has tipped superior upon the left, the laterality having been found left, we would add this superiority to our listing. Letter “D” represents the right inferior margin of the right lateral mass of the atlas. Comparing “D” with “B” it will show that “D” is to the right of “B.” The next step would be to compare the left lateral mass of the atlas “E” with the left edge of the axis “C,” which will also show that this lateral mass is to the right of “C.” After making this comparison, consider the spaces found on either side of the odontoid process, and the inner margins of the lateral masses. Comparing “F” with “G,” we find that “G” appears much larger than “F,” proving that the right lateral mass has moved away from the odontoid process, while the left lateral mass has moved closer. It is with the above comparisons such as the lateral masses with the body of the axis and the spaces found between the odontoid process and lateral masses of the atlas that we can in the majority of cases prove the existence of a subluxation of the atlas. We can, in this case, use the transverse processes as the right transverse process as indicated by the cross will appear more clearly to the right ramii of the jaw, while the left transverse process appears farther away from the left ramii of the jaw. We can also compare the distance from the right lateral mass to the outer margin of the ramii of the jaw. This measurement will prove that the atlas appears more clearly to the right lateral mass, while the same measurement on the left side would show that the left lateral mass is farther away from the left ramii of the jaw. Whenever the ramii vary in width, it is not advisable to use this part of the rule in listing atlas subluxations. Placing a straight edge across the atlas from “D” to “E,” it will show that the right lateral mass is inferior to the left. 202
CHIROPRACTIC SPINOGRAPHY Considering the articular spaces between the atlas and axis, they are found the same, which would indicate that the tipping of this atlas is adaptative to the subluxation of the axis, and we would not list the atlas as being inferior upon the right. The spinographic listing would be as follows: Atlas right. Axis left superior. The subluxation to be adjusted would depend upon the symptoms manifested by the case. SPINOGRAPHIC ANALYSIS FOR FIGURE No. 58 Figure No. 58 presents an unusual view of the atlas, axis, and third cervical, which clearly illustrates the necessity of the spinographer knowing the different osseous shadows around and on the vertebra and how to differentiate them from other shadows. It is well to bear in mind that when the shadow of one osseous structure overlaps another, that it is going to show a heavier shadow, while the thinner structure will show a lighter shadow on the negative because of their thinness the X-Ray penetrates them more readily. In the prints or reproduction illustrated here, the lighter shadows indicate the heavier structure while the darker shadow indicates the lighter structure. The first example of the difference in these shadows is presented in the spinous process and laminae of the axis. Letter “A” represents the center of the spinous process of the axis. Immediately above this center, we find the shadow of bone is lighter in shade than is the shadow of the spinous of the axis itself. Also from the right and left of the center of the spinous process of the axis and about three-eighths of an inch in width from inferior to superior, we find the shadow is darker; this is the shadow of the laminae of the axis, and if 203
CHIROPRACTIC SPINOGRAPHY
FIG. 58
204
CHIROPRACTIC SPINOGRAPHY this same comparison is made with the third cervical, it will be possible to differentiate the body of the vertebra, which shows lighter upon this print, while the laminae and spinous processes show darker. These shadows would be the reverse in the negative. In this particular spinograph the odontoid process does not show very clearly because the occipital protuberance overlaps or casts a shadow over it. Comparing the center of the spinous process “A” with the body of the axis, we can prove whether or not the shadow of this spinous process is to the right or left of its own body by measuring the distance from “A” to “B” and “A” to “C.” Such a measurement would indicate that the spinous process appears closer to the right margin of the axis and farther away from the left. Comparing the center of the spinous process of the third cervical “D” with the center of the spinous process of the axis “A,” the third cervical is found more to the right than the axis and should be listed as a greater subluxation than the axis; however, it would be necessary to question the listing of the third as to its relation with the fourth cervical, as on this film we have compared only the third cervical with the axis. In conditions of this kind the middle and lower cervical should be spinographed so as to show the position of the third and fourth cervical in relation to each other. The arrows superior to the right and left of the center of the spinous process of the axis indicate the extent of the posterior arch of the atlas, which has not united to form a complete posterior arch and would be listed as a cleft posterior arch of the atlas. Notice again the difference in the density of shadows where the shadow of the posterior arch of the atlas is cast over the axis. Following the inferior and superior margins of the posterior arch on both the right and left side, they are found to be continuous with the transverse processes of 205
CHIROPRACTIC SPINOGRAPHY the atlas, as indicated by the two crosses on the right and left transverse processes. The spinographic listing would be as follows: Cleft posterior arch of the atlas. (Do not adjust). Axis right. Third cervical right, indicating the third cervical as the greater subluxation. Question mark the fourth cervical vertebra. SPINOGRAPHIC ANALYSIS FOR. FIGURE No. 59 Figure No. 59 is a lateral view of the cervical region taken for the purpose of determining superiority, inferiority and posteriority, which is covered in rule No. 10. This particular view shows a marked degree of posteriority, and if the reader will carefully follow the key as given, and applying the same to any other like exposure, the method of reading lateral views may be clearly understood. Letter “A” represents the anterior inferior margin of the fourth cervical vertebra. Following the dotted line from this point to the superior margin of the seventh cervical vertebra “B,” we find the anterior margins of the bodies of the fifth and sixth cervical vertebrae posterior to the fourth and seventh cervical vertebrae. To further prove our first finding, compare the dotted white line from the posterior inferior margin of the body of the fourth cervical “C,” to the posterior superior margin of the seventh cervical vertebra “D.” It is by comparing both the anterior and posterior margins of the vertebrae with the ones above and below them that determine posteriority from the lateral view. These two dotted lines, as described above, clearly reveal the existence of posterior subluxations of these two vertebrae. To determine the superior or inferiority, we must consider the distances between the bodies of the vertebrae, which is the space occupied by the intervertebral disc, and the spaces 206
CHIROPRACTIC SPINOGRAPHY
FIG. 59
207
CHIROPRACTIC SPINOGRAPHY between the articular processes, and also the spaces between the spinous processes. Letter “E” represents the space found between the bodies of the fourth and fifth cervical, and “F” is the space between the fifth and sixth cervical. It will be found that the space at “E” is greater than “F” and the body of the fifth cervical tips inferior on the anterior border, while the posterior border tips superior, which in turn tips the spinous process of this vertebra also superior, or closer to the spinous process of the fourth cervical. Letter “G” represents the space found between the spinous processes of the fourth and fifth cervical, while letter “H” represents a greater space between the fifth and sixth spinous processes. Letter “B” not only represents the anterior margin of the seventh cervical vertebra, but also shows the existence of a partial ankylosis at the anterior margins of the sixth and seventh cervical vertebrae as the space at this margin is almost completely closed due to the fusion of the two vertebrae at this particular point. It is in this manner that ankylosis or exostosis is shown between the bodies of the vertebrae, and the lateral view will show such conditions much more clearly; in fact, the anterior-posterior view of this region did not reveal the condition at all. The spinographic listing would be as follows: Fifth cervical Posterior Superior. Sixth cervical Posterior. Partial ankylosis between the bodies of the sixth and seventh cervical vertebrae on the anterior. SPINOGRAPHIC ANALYSIS FOR FIGURE No. 60 This shows a dislocation of the sixth cervical as revealed by a lateral view of the cervical region. The dislocation was produced when the patient dived into shallow water, striking the head on the bottom 208
CHIROPRACTIC SPINOGRAPHY
FIG. 60
209
CHIROPRACTIC SPINOGRAPHY A condition of this kind would be termed a broken neck although there is no fracture of any of the parts involved. Notice that “C,” which indicates the anterior inferior edge of the body of the sixth cervical is greatly to the posterior of the one above and below and especially of the one above, the anterior superior margin of the body being about in the center of the inferior of the body of the fifth cervical. Letter “A” indicates the pre-zygapophysis of the sixth and shows it to be to the posterior of the post-zygapophysis of the fifth indicated by “B.” Normally the post-zygapophyses are at the posterior and face the anterior and the pre-zygapophyses are anterior and face to the posterior. In this case the articulating processes are just the reverse and are locked in this position. In this case the fifth cervical was adjusted to the superior so as to allow the superior articulating processes of the sixth to slip back to the anterior of “B,” which is the inferior articulating process of the fifth and thus allow this vertebra to assume its normal position. The spinographic listing is as follows: Sixth cervical dislocated, pre-zygapophyses have slipped to the posterior of the post-zygophyses of the fifth cervical. SPINOGRAPHIC ANALYSIS FOR FIGURE No. 61 This is a lateral view of the cervical region, showing a partial luxation of the fourth cervical vertebra. Notice also the kyphosis in this region where normally there is a lordosis. Letter “A” indicates the posterior margin of the spinous process of the fourth cervical and “B” represents the anterior edge of the body of this vertebra. By comparing “B” with the anterior edges of the third and fifth cervical, we find that the fourth is very much to the posterior; this may be verified by the fact that the spinous 210
CHIROPRACTIC SPINOGRAPHY
FIG. 61
211
CHIROPRACTIC SPINOGRAPHY process of the fourth is posterior to the one above and below it. “C” indicates the pre-zygapophysis of this same vertebra; this articulating process has been thrown out of its normal position and it is now to the posterior of the post-zygapophysis of the third cervical. Due to the extreme posteriority of this vertebra, there is without a doubt a cord pressure at this point. Letter “D” indicates the tip of the spinous process of the sixth cervical, and we find it very much to the inferior, in fact it is nearly touching the spinous process of the seventh cervical. “E” is the anterior edge of the body of the sixth and it appears very much to the superior, that is it is closer to the body of the fifth and farther from the body of the seventh cervical vertebrae. The dotted line from “F” points to the posterior arch of the atlas, which is tipped very much to the superior and appears to be against the occiput. This tipping is adaptative to the kyphosis in the entire cervical region. Under Chiropractic adjustments the fourth cervical was restored to its normal position, the result of which was health. In conditions of this type the lateral view is always advisable as the A. P. view would not reveal the posteriority of kyphosis. The spinographic listing would be as follows: Kyphosis in entire cervical region. Fourth cervical posterior (badly). Sixth cervical posterior inferior. SPINOGRAPHIC ANALYSIS FOR FIGURE No. 62 This is a lateral view of the lumbar and lower dorsal regions of a child about two years of age, showing an acute kyphosis in the region of the tenth, eleventh, and twelfth dor212
CHIROPRACTIC SPINOGRAPHY
FIG. 62
213
CHIROPRACTIC SPINOGRAPHY sal vertebrae, and the lordosis in the lumbar is very pronounced, and is compensative to the extreme posterior curve above. The kyphosis has been produced because of the destruction of the body of the twelfth dorsal by Caries of the spine and commonly called Pott’s Disease. As the body of this vertebra has been destroyed, the anterior support has been removed, the result being that the spine curved to the posterior until a new support was formed by the anterior inferior edge of the body of the eleventh, the small portion of the twelfth that still remains and the superior of the body of the first lumbar. Letter “A” indicates the remaining portion of the body of the twelfth dorsal and “B” is the anterior superior edge of the body of the eleventh dorsal. Notice that the line indicating the anterior edge of the eleventh is continuous with the anterior and inferior of the remainder of the twelfth. This also shows an ankylosis of these two vertebrae on the anterior. Letters “C” and “D” indicate the bodies of the tenth dorsal and first lumbar. Imagine a uniform curved line extending along the anterior edges of the bodies of the ninth and tenth dorsal and the upper lumbar from the first down and note the degree of posteriority of the eleventh and twelfth. This posteriority, however, is adaptative and could never be corrected, and it would not be advisable to adjust either of these vertebrae with a view of correcting this kyphosis or of breaking the ankylosis. Conditions of this kind, as well as dislocations, fractures, etc., are usually better determined by lateral views than from the anterior-posterior view. The spinographic listing would be as follows: Acute kyphosis in lower dorsal region due to destruction of body of the twelfth dorsal. Ankylosis of eleventh and twelfth dorsal. Would not adjust these two vertebrae. 214
PART II X-RAY ELECTRICITY It has been found in the practice of X-Ray work that a fair understanding of electricity is necessary. It is in view of this fact that the following is given to better assist the spinographer in spinograph production. DEFINITIONS AND TERMINOLOGY Actinic Ray—A ray of light or other form of radiant energy capable of producing chemical action. Alternating Current—Currents whose directions are periodically reversed. Ammeter or Amperemeter—Any form of galvanometer which is capable of measuring current strength in amperes. Ampere—Unit of amount of the electric current exerted by an electromotive force of one volt through a resistance of one ohm. Anode—The positive pole of an electric apparatus, or the electrode connected with it. Anti-cathode of X-Ray Tube—A plate of Tungsten, platinum, or other metal supported inside an X-Ray tube upon which the cathodic stream is concentrated. Automatic Cut-Out Switch—A device for automatically cutting off the current at any predetermined period of time by means of a time relay. Back-up Spark—When a current of high voltage is impressed upon the terminals of an X-Ray tube, the vacuum within will resist the passage of this current until the voltage or pressure is raised sufficiently to pass through the tube. The critical point where this occurs may be measured on a 215
CHIROPRACTIC SPINOGRAPHY parallel spark gap, and read off in inches and is called the back-up spark. Blowing a Fuse—The melting of a wire by the passage of an electric current through it. Calibrate—To determine the absolute values of scale divisions of an electrical instrument such as a galvanometer, voltmeter, wattmeter, etc. Candle-Power—The intensity of light emitted by a luminous body estimated in standard candles. Cathode—The negative pole of an electric apparatus or the electrode connected with it. Cathode Rays—Rays originating in a vacuum tube at the negative terminal when a discharge of electricity is passed through the tube. They are not identical with the Roentgen rays since they are deviable by a magnet and by refracting media and are rapidly absorbed by opaque bodies and by the atmosphere. Circuit—A term employed to denote the total electrical path of an installation. Commutator—An apparatus for reversing the direction of the current. Conductor—Any substance which conducts or possesses the power of conducting electricity. Continuous Current (also called Direct)—A current whose direction is constant as distinguished from alternating current. Current Strength—In a direct current circuit the quotient of the total electromotive force divided by the total resistance, or C=E/R 216
CHIROPRACTIC SPINOGRAPHY Auto Transformer—A device for altering the voltage or pressure of a current, which may be either a step-up, i. e. raises the pressure, or a step-down transformer, i. e. lowers the pressure. Direct Current—Flowing in one direction without periodic variation. Dielectric—Any material which offers high resistance to the passage of an electric current. Difference of Potential—When electricity moves, or tends to move, from one point to another, there is said to be a difference of potential between them. Discharge—The disruptive passage of electric current when opposite polarities are approximate or a sudden equalization of potentials. Electric Efficiency—The ratio between the amount of in-put energy and out-put energy. E. M. F., or Electromotive Force—The force exerted by an electrical charge. Fluoroscopy—Roentgenoscopy. Field (Magnetic)—The space about a magnet through which its influence is active. Filtration of X-Rays—Placing in the path of the rays some medium such as aluminum or felt, in order to absorb some of the softer radiation. Fluorescent (Fluoroscopic) Screen—A screen covered with fluorescent material which permits the visual examination of the human body by means of X-Rays. Fluoroscopes—The phenomenon of fluorescence is the emission of visible light when X-Rays or cathode rays strike 217
CHIROPRACTIC SPINOGRAPHY certain substances. In transforming the energy of X-Rays into light for the examination of radioscopic images, some substance must be used which fluoresces under the action of the rays. Roentgen originally used barium plating-cyanide, and this is very largely used now, although various other substances, such as potassium plating-cyanide and calcium tungstate are in use. Since the amount of light given out by a fluorescent screen is small, it is necessary to exclude all other forms of light either by carrying out the observations in a dark room or by enclosing the screen in some suitable observation chamber having an opening for the eyes. The chemicals used in preparing the fluorescent screen are applied to some support, this support in turn being fastened in the observation chamber. Various supports for the chemicals such as cardboard vellum, blackened on one side, and rubber, have all been more or less used. Fuse (Safety)—A soft metal wire placed in a circuit which will melt if a current too strong for safety passes through it. High Tension Rectifier—Usually in form of a disc with metallic segments for commuting the high tension alternating current of the step-up transformer into a pulsating-unidirectional current desirable for exciting the X-Ray tube. Hard—Hard and soft are terms applied to X-Ray and other vacuum tubes; they refer to the relative completeness of the exhaustion therein of the retained air or residual gas. A hard tube has a higher resistance than a low or soft tube. Hot-Wire Meter—A meter whose readings are based on the expansion of a wire, due to an increase of temperature by passing through it of the current that is to be measured. Induced Current—That secondary current produced by induction. It flows in the opposite direction to the primary or inducing current when the latter is made, but in the same direction when it is broken. 218
CHIROPRACTIC SPINOGRAPHY Induction Coil—An apparatus consisting of two associated coils of insulated wire employed for the production of currents by mutual induction. Insulator—A non-conductor or a bad conductor, e. g., glass, rubber, shellac. Intensifying Screen—A surface coated with some fluorescing material, such as tungstate of calcium, placed in contact with the film side of the X-Ray plate; the time necessary for exposure is materially shortened. Inverse Current—The current produced in the secondary of an induction coil on the making or completion of the circuit of the primary. Inverse currents flow in the opposite direction to the original current. Kinetic Energy—The energy of particles of matter; rotatory, vibrating, and forward motion. Kilo-Volt—One thousand volts. Kilowatt—One thousand watts. Milliampere—The unit of electrical current flow in an X-Ray tube. 1/1000 of an ampere. Motor-Generator—For changing alternating current to direct current. Milliamperemeter—An instrument for recording the strength of a current passing in fractions of an ampere. Ohm—Practical unit of electrical resistance. It was decided (Paris Congress, 1884) that the legal ohm is the resistance offered by a column of mercury 106 cm. high, 1 square mm. in cross section, having about the resistance of 100 meters of telegraph wire. Ohm’s Law—The strength of the current varies directly as the E. M. F. and inversely as the resistance of the circuit, 219
CHIROPRACTIC SPINOGRAPHY or the current expressed in amperes is equal to the E. M. F. expressed in volts divided by the resistance expressed in ohms: C=E/R R=E/C E=R x C where E = Voltage. C = Current. R=Ohmic resistance. The law was enunciated by Dr. G. S. Ohm, and is used for showing the relation between electromotive force, resistance, and current. Oscilloscope—A vacuum tube constructed so as to show whether a current is unidirectional or oscillatory, and in the latter case, roughly in which direction the greater quantity of current is flowing. Photography—The science of taking pictures of the visible, and the art or process of procuring pictures by the action of light on certain substances sensitized by various chemical processes, by reflection. Pole Tester—Any device for readily determining the polarity of the current, e. g., wet blue litmus paper will turn red in contact with the positive pole from a galvanic battery. The red spot will become blue again on the application of the negative pole, or when the end tips are placed in water and a galvanic current is turned on, bubbles of hydrogen will rise from the negative side, while the positive tip will become blackened. Potential—potentia, power, ready to act, but not yet acting. It is the condition of electrical tension of a body. This term holds the same relation to electricity that the term level does to gravity; just as water at a higher level tends to move to a point of lower level, so does the accumulation of electric energy, at that point in the circuit at which it is present in excess over any other point in the circuit, tends to seek that point in the circuit at which it is lowest, so that electrical equilibrium may be restored. 220
CHIROPRACTIC SPINOGRAPHY Ray—Roentgen or X-Rays emitted from the source of radiant energy excited by a discharge of electricity within a vacuum tube not deviable by a magnet or refracting medium, they pass through opaque bodies, cause certain substances to fluoresce, affect a photographic plate like light rays, and they have peculiar effects upon living tissue, normal and pathological. Rectified—An apparatus which is used to transform an alternating current into what is practically a unidirectional current. There are several kinds of rectifiers, the simplest of which is the “aluminum cell.” Resistance—(a) That which opposes the current flow. (b) The ratio of E. M. F. to the current. Strength
R = E/C
Rheostat—An instrument for regulating the resistance of an electric current. Rotary Converter—For changing direct to alternating current. Roentgen—Pronounced Rent’-gen. Roentgen Ray—A phenomenon in physics discovered by William Conrad Roentgen. Roentgenology—The science of radiography, or the study and practice of the roentgen ray as it applies to the different branches of the healing art. Roentgenologist—One skilled in roentgenology. Roentgenogram—The shadow picture produced by the roentgen ray on a sensitized plate or film. Roentgenograph—To make a roentgenogram. Roentgenoscope—An apparatus for examination with the fluoroscopic screen, excited by the roentgen ray. 221
CHIROPRACTIC SPINOGRAPHY Roentgenoscopy—Examination by means of the roentgenoscope. Roentgenography—The art of making roentgenograms. Roentgenize—To apply the roentgen ray. Roentgenization—The application of the roentgen ray. Roentgenism—Outward effect of the roentgen ray. Roentgen Diagnosis—Diagnosis by aid of the roentgen ray. Roentgenotherapy—Treatment by the application of the roentgen ray. Roentgen Dermatitis—Skin reaction due to too strong or too oft-repeated application of the roentgen ray. Radiography—Roentgenology. Radiograph—Roentgenogram. Radiographer—One skilled in operating an X-Ray equipment. Radiologist—One operating an X-Ray equipment. Self Induction—Induction produced in a circuit by the induction of a current on itself at the make or break of the current therein. Synchronous Converter—For changing alternating current to direct current. Synchronous Motor—A motor, the rotary of which operates in step or synchronism with the alternating current used to excite it. Skiograph—Roentgenogram. Stereoscopic Radiography—The taking of two exposures of the same region with the source of rays moved the average distance between the pupils of the eyes, or two and three-eighths inches. 222
CHIROPRACTIC SPINOGRAPHY Spinography—Coined by Dr. B. J. Palmer, indicating the science of radiography, as applied to the spine only. Unit Milliampere—1/1000 ampere. Vacuum Tube—Glass tubes or bulbs from which nearly all traces of gas have been removed. Volt—The practical unit of E. M. F. An E. M. F. which would cause a current of 1 ampere to flow through a resistance of 1 ohm. Voltmeter—An instrument for measuring difference of potential. Watt—Is a volt-ampere, or unit of electrical power. X-Rays—So named because it is an unknown ray. X-Ray Tube—A glass bulb or globe exhausted to a high vacuum and provided with specific metallic electrodes within, designed to promote the electrical current flow in one direction when a high tension current is impressed upon the outside terminals of the electrodes, thus generating the X-Rays within. Zero Potential—The earth’s potential. Electrical Conductors A conductor of electricity is a substance which will allow the current to pass over and through it with little or no resistance to the current flow. All metals are conductors, varying with their atomic density. Water and earth are conductors. Electrical Non-Conductors A non-conductor of electricity is a substance that has such a great resistance to the passage of current that the current is lost or absorbed before it has passed through, thereby serving as an insulator. Rubber, mica, glass, porcelain, slate, fibre, wood, and air (only to a limited degree) are good non-conductors or insulators. Many others can be added to the above list. 223
CHIROPRACTIC SPINOGRAPHY Magnets and Magnetism Magnetism is a property possessed by a few metals for attracting bits of iron and steel. Its correct technical term is Magnetic Lines of Force. These Magnetic Lines of Force can be produced by the permanent or by the electro-magnet. The permanent magnet is usually a bar of steel or a certain grade of iron. It can have many shapes, the most common shape of which is the horse-shoe magnet. It is called a permanent magnet because of the certain peculiar fixed positions of the molecules of the magnet. Steel retains the fixed position of these magnetic molecules better than iron. A permanent magnet can be caused to lose its magnetic properties by subjecting it to jars, knocks or blows. Soft or annealed iron will not retain the fixed positions of these molecules. Any magnet, whether a permanent or electro-magnet, is consistent of two poles, called the North Pole and the South Pole. The center or middle of the magnet is called the Equator. The student will have now recognized the relation of these poles and Equator to that of our earth. The earth is just a huge spherical permanent magnet with its North and South poles, and the Equator. A magnet can then be said to be a body which has the power of attracting small bits of iron or steel to itself and does impart some of this power to the pieces of iron or steel, making magnets of them. If two such permanent bar magnets were placed end to end in such a fashion that the North poles of each magnet were close together, the magnetic lines of force from each North pole would tend to push against the magnetic lines of force given off from the North pole of the other magnet. In summary we have a law of magnetism, Like poles of a magnet repel each other. If we placed these two magnets so that a North pole and a South pole were together, the magnetic lines of force would 224
CHIROPRACTIC SPINOGRAPHY pass from the North pole of one magnet, traversing the air space to the South pole of the other magnet into the magnet, to that particular magnet’s North pole, out into the air space around the two magnets, which is called the magnetic field, to the South pole of the other magnet through the bar to its North pole and out again, repeating over and over the same path or circuit. In summary, we find another law of magnetism, Unlike poles of magnets attract each other. In other words the North pole of the above magnet will tend to attract the South pole of the other magnet. Magnetic Lines of Force is the stream or current of magnetic lines which flow from the North pole to the South pole through the bar back to the North pole on the exterior of the bar. Each magnetic line forms a circuit which is called the Magnetic Circuit. The total number of these lines given off at the North pole of the magnet is called the Magnetic Flux. The Magnetic Field is the space outside of the magnet, threading the path along the sides of the magnet. These magnetic lines in the magnetic field represent a tension along their length and tend to shorten as do rubber bands. They also exert a lateral crowding effect on each other in the magnetic field. The Field Intensity is the number of magnetic lines of force per square centimeter of surface at right angles to the magnetic field. Hence, a magnet has its greatest attracting force where the field intensity is greatest. Electro-Magnetic Induction A magnetic field is always set up around a conductor whenever a current of electricity is passed through the conductor. This magnetic field will therefore last as long as the current is flowing through the conductor. If an increase of magnetic lines of force is desired the conductor may be concentrated by winding it in the shape of a coil. Hence, increas225
CHIROPRACTIC SPINOGRAPHY ing the number of magnetic lines of force in a given area. By placing a bar or core of soft iron in the coil the magnetic lines of force can still be magnified in number. This concentration of magnetic lines of force as outlined above is called the Electro Magnet. It has a North pole and a South pole, divided in the middle by the Equator. The student can readily see that it is not a permanent magnet. Ohms Law Ohms Law is the law pertaining to the relations between electrical current, electrical force (called voltage or electromotive force), and electrical resistance. The unit of electrical current is the Ampere. It is the rate of flow of one coulomb per second of current which will deposit a standard amount of silver from a standard silvernitrate solution in a standard time. In other words, we measure a unit of electrical current by the amount of work it will do. The symbol used to designate amperes in the electrical formulae is the capital letter “C.” The unit of electrical pressure is the Volt, sometimes called voltage, electro-motive force, and potential. A volt is the electro-motive force which will drive one ampere (C) of current through the resistance of one ohm (R). The symbol of the volt in the electrical formulae is the capital letter “E.” The unit of electrical resistance is the Ohm. The ohm is the resistance offered by a standard column of mercury to the flow of one ampere of current (C) with a pressure of one volt (E). Some conductors will offer more resistance to the flow of current, while other conductors will offer less. Copper is among the latter and is used for practically all wiring purposes as a conductor, allowing very little current drop or loss. The symbol of the ohm in the electrical formulae is (R). “C” equals Current—It is the intensity of the electrical current in amperes. 226
CHIROPRACTIC SPINOGRAPHY “E” equals Voltage—It is the electro-motive-force in volts or pressure in volts. “R” equals Resistance—It is the resistance to the flow of the current in ohms. In the electrical circuit the current is directly proportional to the voltage and inversely proportional to the resistance. Hence, to better understand this law, we shall convert it into the form of a simple equation. C=E/R Where:
“C” Current in Amperes “E” Pressure in Volts “R” Resistance in Ohms
To find the voltage in a circuit The voltage is directly proportional to the current multiplied by the resistance, converted to form of equation, we have: E=CxR Where:
“E” Pressure in Volts “C” Current in Amperes “R” Resistance in Ohms
To find the resistance in a circuit The resistance is directly proportional to the voltage and inversely proportional to the current, converted to the form of equation, we have: R=E/C Where:
“R” Resistance in Ohms “C” Current in Amperes “E” Pressure in Volts
There is an occasion at times for the use of Watts Law, which is the law of electrical power. 227
CHIROPRACTIC SPINOGRAPHY The Watts of a circuit is directly proportional to the voltage multiplied by the current. Hence, in the formulae we have: W=ExC Where:
“W” is Watts “E” is Pressure in Volts “C” is Current in Amperes
To find the voltage in a circuit where the wattage and current is given, the voltage is directly proportional to the watts and inversely proportional to the current. The formulae of which is: E=W/C Where:
“E” is Pressure in Volts “W” is Watts “C” is Current in Amperes
To find the current in a circuit when the watts and voltage is given we find that the current is directly proportional to the watts and inversely proportional to the voltage. The equation of which is: C=W/E Where:
“C” is Current in Amperes “W” is Watts “E” is Pressure in Volts
For the student to better apply the above laws it would be helpful to use the X-Ray apparatus, after enough experience has been had, to obtain the voltage and current values to find the resistance, etc. In applying Watts Law in a circuit, we may adopt a common light bulb which is rated in watts. The circuit voltage is usually 110 volts and if we have a 100 watt lamp it would be easy by applying the Watts law in finding how much the lamp consumes of current. 228
CHIROPRACTIC SPINOGRAPHY Electrical Circuits Series Circuits A series circuit is when the electrical apparatus is in tandem, i. e., from one terminal of the current generating device to one terminal of the apparatus No. 1, to the first terminal of apparatus No. 2, and from the second or other terminal of the apparatus No. 2 to the other terminal of the current generating device. In a series circuit the current is the same through all the apparatus, but the voltage or pressure behind the current is the sum of the various voltages, i. e., the sum of the different voltages required to force the same current through the different apparatus.
FIG. 63. A Series Circuit
The resistance of the series circuit equals the sum of the resistance of each piece of apparatus in the circuit. Parallel Circuits In the parallel circuit the pieces of apparatus are connected in the circuit so the current is divided between all the apparatus. In a parallel circuit the voltage to the different apparatus remains the same. The current is the sum of the various currents required by the different pieces of apparatus. 229
CHIROPRACTIC SPINOGRAPHY The resistance in the parallel circuit is the reciprocal of the sum of the various reciprocals of the various branches of resistance, for example:
R = 1 ÷ (1/R1 + 1/R2 + 1/R3) = R(1,2,3) ÷ 1 A parallel circuit is usually found in house-lighting circuits. The disadvantage of the series circuit is that if one piece of apparatus should burn out the others will not be sup-
FIG. 64. A Parallel Circuit
plied with current for their function. We find only a few pieces of apparatus that now in modern times are connected in series, the common of which is the ammeter and rheostat. Alternating Current Direct current, as has been stated previous, is one which flows steadily through a conductor in one direction having some particular constant amount. In alternating current the current varies in value, while flowing in one direction, rising from zero degrees as shown in figure No. 65 at “C” to the maximum peak at “A” 90°, where it then falls from this maximum peal: “A” to 180°, or zero value 230
CHIROPRACTIC SPINOGRAPHY The current then reverses. Beginning at the 180° position of the armature of the generator, it rises from 180° at “E” to the maximum peak “F” at 270°, and then falls from “F” to the 360° position of the generator armature, where the current reverses again for the next current wave of positive polarity. The current will continue its reversal as long as the circuit is complete. Distances along the horizontal line in figure No. 65 represent time.
FIG. 65. A Sine Wave Of A. C.
It will be noted in figure No. 65 that a positive wave and a negative wave are equal to 360°. This is called the alternating current Cycle. Each wave is called an alternation. The number of alternating current cycles per second is called the Frequency. Ordinarily the frequency used in most power supply is at 60 cycles per second. Among the other most common we find 25-cycle, 33-cycle frequency, and 133 cycle frequency. However, the generating unit may be so designed to produce any frequency by the proper number of 231
CHIROPRACTIC SPINOGRAPHY field magnets in the generating unit which is rotated at a given speed. For all around purposes, a 60-cycle frequency is most practical and most X-Ray apparatus are designed to operate at that frequency. A current of 60-cycle frequency therefore will have one cycle in 1/60 second, or 120 alternations or waves per second, or one alternation in 1/120 second. The time required to complete one cycle is called a Period. Alternating current flows back and forth in the circuit with as great regularity as a piston moves to and fro in the cylinder of the steam engine, but with greater rapidity. Hence, if we possessed a two-pole (field electro-magnets) generator it must be rotated at a speed of 3600 revolutions per minute to produce a 60-cycle current, or at a speed of 7200 revolutions per minute to produce 120-cycle current. In figure No. 66 is given a schematic drawing representing a current generating device with two poles, and a loop or coil as the armature of the machine. For the positive alternation of the cycle, the current would start to rise from zero at “A” in figure No. 66 which is the section of the loop marked “AC,” as the armature or loop is caused to rotate in a clock-wise direction, the section “AC” will cut the magnetic lines of force that are passing from the North pole (N) to the South pole (S). The section “BD” also cuts these lines which acts as a boost to the section “AC.” When the loop has attained the position as at “B,” figure No. 66, the current of the positive alternation will be at maximum, or 90° position of the loop or armature. It will be noted that the entire loop has rotated 90° of its complete revolution. The student will now see the value of the sine wave with the degree markings of the waves as given in figure No. 65 as an illustration of alternation current. 232
CHIROPRACTIC SPINOGRAPHY
FIG. 66. Current Generating Device.
233
CHIROPRACTIC SPINOGRAPHY In the same manner the negative alternation is obtained. The student should note that in figure No. 66, the current is passing from brush “X” through the circuit to brush “Y” when the section of the loop or coil “AC” is in that position in figure No. 66. When the coil or loop has been rotated one-half turn in such a manner that section of coil “BD” has supplanted the position of “AC” in figure No. 66 “A,” by referring to figure No. 65 at “C” and “E,” we see on the sine wave that the current value is at zero degrees, or at 180° of the cycle. When the section “BD” has supplanted that of “AC” in figure 66 “B,” the negative alternation is at its maximum value of 90° or 270° of the cycle as seen in figure No. 65 at “F.” By referring back to figure No. 66 “B,” if the section “AC” were supplanted by the section “BD,” i. e., having changed places, by tracing the current we should find the current exiting from the machine on the brush which is making contact with the slip-ring connected to the section “BD.” Inductance Inductance is that property that tends to oppose the flow of current in a circuit by magnetic mutual induction. In alternating current, applied to a coil of wire, the first or positive alternation will traverse part of the entire winding without resistance except that offered by the metallic conductor. When the current has reversed, the magnetic lines of force produced by the positive alternation are still in the fields of the winding; hence, opposing the flow of the current by building up a current of magnetic lines of force around the coil or winding which induces a flow of electrical current in the circuit, flowing in opposition to the main current flowing in. This is called Impedance, or ohmic resistance and inductive resistance combined in resisting the current passing through the winding. If direct current were applied to this coil it would pass through the winding without having the opposing current to resist, and would have only the resistance offered by the metallic conductor composing the coil or winding. 234
CHIROPRACTIC SPINOGRAPHY Hence, a winding or coil designed to operate on alternating current would be burnt out if it were operated on direct current. In applying the alternating current to the coil, a resistance of the metallic conductor as in direct current, and the resistance offered by the opposing current produced by the self inductance of the coil is had, which results in much greater resistance. Electrical Pressure Apparatus The Transformer If we should set up a coil having one turn of wire, and cause a current to pass through it, we would have a certain inductance or concentration of magnetic lines of force. If we place a core of soft iron in this coil, we would concentrate the magnetic lines of force, producing more inductance, i. e., would cause more current to bet set up in itself. Supposing the electro-motive-force was equivalent to four Amperes of current at a 6-volt pressure. If we now place another single turn or coil of wire on the same soft iron core, we shall induce the same value of electro-motive-force in coil No. 2 as was in coil No. 1. Hence, we would say that we would have a ratio between the First or primary coil, to the second or secondary coil, of one to one. If we place two turns of wire on the secondary coil, the pressure in volts would be doubled to 12 volts, and the current to one-half the current in the primary coil, or two amperes. This is called the Step-Up Transformer. To better illustrate the idea of inducing an electro-motive-force from one coil to another, having no electrical connections with each other, we would apply the law of electrical production by the generator. In the generator, see figure 66, electricity is generated by cutting the magnetic lines of force at right angles at high speed. Hence we now see that the transformer is a generator of electrical current. Instead of an armature rotating at high speed, cutting magnetic lines of force as in the generator, we have the alternating current 235
CHIROPRACTIC SPINOGRAPHY vibrating at high speed. This current produces magnetic lines of force in the primary coil, which are intermittent in proportion to the frequency of cycles of the alternating current. When these intermittent magnetic lines of force produced by the primary coil, cut the windings of the secondary coil at right angles, a like electro-motive-force is induced in the secondary, providing the number of turns are the same in the secondary as in the primary. If the secondary has twice the number of turns as those of the primary, the voltage induced in the secondary will be in proportion to the number of turns in the secondary, the current induced in the secondary will be in inverse proportion to the ratio of turns between the primary and secondary coils. The secondary voltage is to the primary voltage as the secondary turns are to the primary turns. “E” “E” “T” “T” Secondary: Primary: Secondary: Primary Where: “E” is Pressure in Volts “T” is turns of wire in the winding of both coils The secondary amperage is to the primary amperage as the number of primary are to the number of secondary turns: “C” Secondary:
“C” Primary:
“T” “T” Primary: Secondary
The current in the secondary of the transformer will always flow in the opposite polarity or direction to the current flowing in the primary, as seen in figure No. 67, the current is passing downward through the primary winding, while the induced current in the secondary winding is passing upward; as the current changes in polarity in the primary at the rate of 120 times per second for a 60-cycle alternating current, the induced current in the secondary will change polarity 120 times per second. The purpose of the transformer is to raise the voltage potential from 110 to 220 volts, at which voltage the feed cir236
CHIROPRACTIC SPINOGRAPHY cuit enters into the building to a greater value. This, of course, will vary with the size and type of the apparatus, but usually has a value of 30,000 volts to 110,000 volts at 100 milliamperes.
FIG. 67.
The design of the transformer is extremely important, not from point of capacity, but from the point of maintained voltage under actual operation. If, for instance, the transformer maintained maximum electro-motive-force at practically no load, but would show a decided drop in electro-motive-force under a loaded condition, this would decrease the penetration of the X-Rays, because of the decreased electro-motive-force at the terminals of the tube. Transformers for stepping-up low tension electro-motive-force of alternating current should be of the closed core type (see figure 67 at “B”), i. e., the magnetic circuit is not broken by an air gap. For efficient operation, the core of the transformer should be continuous and of a rectangular shape. The material used 237
CHIROPRACTIC SPINOGRAPHY in building up the core should be of special transformer steel and rigidly clamped so there will be no vibration or chattering of any part of the laminated sections of the core, due to magnetic influences during operation. The part of the core upon which the primary winding is placed should be thoroughly insulated, and in placing the secondary winding, which in the step-up transformer is the high tension side, the very best of insulating material should be used, such as macanite, which will separate and insulate the primary from the secondary winding. A transformer said to have 110,000 volts will produce a ten-inch spark flame across its terminals. Practically all transformers manufactured for X-Ray purposes are of the oil immersed type, while in former years the greatest number were of the wax insulated type. Step-Down Transformer The purpose of the step-down transformer in X-Ray apparatus is used to supply the filament of the X-Ray tube with sufficient electro-motive-force to produce efficient operation of the tube. The laws governing the operation are the same as those of the step-up transformer. However, the greatest number of turns are in the primary winding. A step-up transformer could be used as a step-down transformer by simply reversing the connections of the windings; the secondary of the step-up transformer, as a primary winding of the step-down transformer, and the primary of the step-up transformer as the secondary of the step-down transformer. The step-down transformers, as used on the X-Ray machine for lighting the filament of the tube, are designed to deliver a secondary electro-motive-force of 10 to 12 volts at 5 to 6 amperes. Because of the position of the step-down transformer in the circuit of the X-Ray machine, as a part of the negative 238
CHIROPRACTIC SPINOGRAPHY high-tension lead of the X-Ray tube, the transformer should be constructed for extreme insulation of the primary winding from the secondary winding to allow no passage of the high-tension current to the filament circuit, and thence to ground. If this precaution is not observed when the operator of the machine is operating the filament control or rheostat, be will likely receive a severe shock from the high-tension current trying to pass to the ground through the low-tension side of the step-down transformer. Auto-Transformer This apparatus is used in the X-Ray machine for the control of the voltage. In this apparatus we have a variable inductance with the combination of the principles of operation of the transformer. Step-down voltage and current, and step-up voltage and current, are in the same relation with this apparatus as in the high-tension or low-tension transformers.
FIG. 68. The Auto-Transformer
239
CHIROPRACTIC SPINOGRAPHY In all auto-transformers the ratio of turns between the primary and secondary is a 2:1 ratio or vice versa, whether the machine is designed to function as a step-up or step-down auto transformer. In the auto-transformer, that section of the winding bridged or connected in parallel with the line is called the primary. That section from which the current is taken is called the secondary. By referring to figure 68 the student will observe the main feed lines running into the apparatus are at “A-1” and “A-2.” The current entering for one-half cycle in at “A-1” through the coil “D” and out at “A-2.” If the electro-motive-force in the primary circuit is equivalent to 110 volts and 20 amperes and the control arm “E” is placed on the tapped contact No. 4, the electro-motive-force in the secondary circuit will be one-half the voltage or 55 volts and double the current or 40 amperes. However, the auto transformer will have some effect upon the current. In the above example, the current will not be exactly 40 amperes, but less, because of the resistance of that portion of the winding connected in series by the tapping of the primary coil, to the alternating current flowing through. The auto transformer may be used as a finer control of the current than the rheostat which controls the bulk of the current. As an illustration of the advantage of the use of the autotransformer in the X-Ray machine, the following example will suffice: Suppose it were necessary to obtain a 6-1/2 or 7-inch backup with a given number of milliamperes, and after making the necessary adjustments on the filament control of your Coolidge tube, you find you are unable to obtain the spark gap you desire. Now, if you were using a resistance control type 240
CHIROPRACTIC SPINOGRAPHY of machine, you would find that if you would advance your rheostat, you would not only increase the voltage, but you would also increase the milli-amperes considerably. This, then, is the point wherein the auto control is of considerable advantage. By leaving the rheostat on the contact that you choose, you can advance the auto-transformer, which will increase the voltage or potential so that you will be able to obtain a higher spark-gap without materially increasing the milli-amperes. Another advantage of the auto-transformer is the fact that, when used in connection with a radiator tube, and especially when a continuous exposure is made, the transformer being of a very rugged construction, it will withstand considerable abuse in the way of continuous operation; while, if the same condition were imposed upon the rheostat control type of machine you would find there would be an increase in temperature of same. However, as far as the absolute necessity of this apparatus in the X-Ray machine is concerned it will not help to give more efficiency, but will serve to make the apparatus more flexible. Electrical Resistance Apparatus The Rheostat This device, when used in series in the electrical circuit, serves as a means of controlling the current in a circuit by placing in or out enough resistance to obtain the desired current value. There are many types and forms of rheostats. Among the most common, we find the button rheostat used in all X-Ray machines for heavy duty, the sliding rheostat which is used with most X-Ray machines as a method of controlling the current to the filament of the tube, the water rheostat which is very seldom used except in case of emergencies, the carbon rheostats which are used for heavy duty and minute control. In explanation of the working principles of the rheostat, it can be likened to a valve in a water pipe as the valve is 241
CHIROPRACTIC SPINOGRAPHY opened in the pipe, less resistance is offered to the flow of the water in the pipe. Likewise of the rheostat, the less resisting material one places in the circuit the easier the current can pass through. The rheostat, being placed in one main lead passing to the high tension transformer, acts in the capacity of a valve controlling the current. If the rheostat handle is placed on the weakest button, the current is forced to pass through a great many turns, made up in coil form of German silver or other resistance wire. Most manufacturers use a tinned iron which offers a high resistance and naturally retards the current. Other manufacturers use an iron grid from which taps are taken at different parts of its circuit. This grid resembles somewhat the home bed springs, but of course, less bulky. If the rheostat is advanced, less of the resisting material is in the circuit leading to the transformer primary. As an example, we might assume 1000 feet of German silver wire inserted in the circuit between the primary of the transformer and the incoming power feeds. Suppose only for example, that this reduced the current 50 per cent, and that this 1000 feet was made up in ten coils, spirally wound on some insulating material in a vertical position, in 100-foot lengths. Now, if the current were forced to pass through the entire 1000 feet of resistance wire, as before stated, as example only, the current in the circuit would be reduced 50 per cent. Now, suppose, by moving the control arm to another contact, we would shorten the amount of resistance wire to 900 feet, more current would pass through the 900 feet than through the 1000 feet. Suppose one advances the rheostat until only 500 feet of resistance wire is resisting the flow of the current, in which case the current will be increased 25 per cent in value. The essential features in the design of a rheostat is first its ability to withstand a certain given current on a certain contact over a reasonable length of time without undue heat242
CHIROPRACTIC SPINOGRAPHY ing. So that the current in the tube will be increased gradually as the rheostat is advanced, the graduations should be uniform and not too irregular. The Filament Control This apparatus is connected in series with the primary of the step-down transformer which supplies a low electromotive-force to the Coolidge tube filament. Ordinarily the type control used is a small portable sliding rheostat, which usually rests on top of the X-Ray machine just above the control board. In the event that a rheostat filament control is used it should be capable of a quick and fine adjustment in order that the operator of the machine may take care of the fluctuation of the current being fed to the filament control to enable a steady flow of current through the tube, i. e., to keep the milli-amperes through the tube constant. A different type of control is used on some X-Ray machines. This control works on the same principle of the transformer; in fact, it is a transformer of small size with a ratio of 1:1 between the primary and secondary windings. The primary winding of this control is attached to a handle in such a manner to allow the rotation of the winding. The secondary winding is fastened stationary to the case. Each winding, primary and secondary, has a separate iron core. When the primary winding is in such a position as to have the two iron cores aligned, the current in the secondary will possess the same value of current as the primary winding. If the primary winding is rotated to such a position that half of the primary winding and core are in relation to the secondary winding and core, the current in the secondary will have only one-half the value of electro-motive-force as the primary winding. The advantage of this type of control is that it reduced the fluctuation of the filament supply circuit to a minimum. Allowing more steady operation of the tube, i. e., the milliamperes through the tube will remain more steady than with the rheostat control. 243
CHIROPRACTIC SPINOGRAPHY Other X-Ray Electrical Apparatus Synchronous Motor this motor is called a synchronous motor because it is one that makes either the same number of revolutions per minute as the generator feeding it, or a fixed even fraction thereof. The motor, in other words, synchronizes with the frequency feeding it. Thus, if fed by a generator delivering a current at 60-cycle frequency, the rotor or revolving part of the motor would make 3600 revolutions per minute providing the machine had only a single North pole and South pole. A 60-cycle current from an eight-pole generator will require the armature to be rotated 900 revolutions per minute. Since 900 into 7200 revolutions gives us 8, this is the number of poles required in the generator. A four-pole machine would be required to make twice the number of revolutions per minute as the eight-pole machine. A two-pole machine would be required to make 3600 revolutions per minute. The principle of operation of this motor is not that of the ordinary A. C. motor. In fact, the correct name of this motor is “Inductance Motor.” The operation of it employs magnetism for revolving the rotor. The use of this motor in the X-Ray machine is for the purpose of revolving the rectifying switch, or disc. For this purpose the rotor of the motor must be in absolute step with the current. For a four-pole machine, it must make 1800 revolutions per minute. The rotor must not make 1799 or 1801 revolutions per minute. If in such cases it should, it would cause improper rectification of the high-tension current. The disc to properly rectify a 60-cycle current, must make one-quarter turn each 1/120 of a second, or one-quarter turn for each alternation of the current. The revolving member of the synchronous or induction motor is not an armature as found in other motors; it is a 244
CHIROPRACTIC SPINOGRAPHY steel drum mounted on a shaft, properly balanced to revolve easily in the shaft bearing. The rotor is insulated in sections to break the magnetic lines of force when under operation. The general method used is by spacing the rotor with copper rods running the entire length of the round drum, parallel with the shaft. Revolving of the rotor is obtained by producing magnetic lines of force by a certain number of electro-magnets in pairs, i. e., electro-magnets acting as North poles and electro-magnets acting as South poles. We will take, as example, one pair of magnets, North and South poles. The positive alternation of the current will first energize the North pole and thence to the South pole, exerting an attraction on the rotor from two directions. The positive alternation having dropped to zero, the negative alternation energizes the previous South pole magnet making it a North pole; thence the current passes on to the previous North pole of the motor making it a South pole for the negative alternation, again producing magnetic lines of force which offer an attraction of two different directions. If the motor is caused to reach the proper speed, the rotor of the motor will gradually pick up its normal speed of 3600 revolutions per minute, and will retain that speed until the current is disconnected. If, for a second, the frequency of the current were reduced from 60 cycles to 50 cycles, caused by the slipping of the driving belt on the feeding generator, the motor will at the same time drop its speed in step with this 50-cycle frequency; hence, allowing the proper rectification of the current being fed to the X-Ray tube through the rectifying disc. The rotor is caused to reach the required speed by a special starting device, which is not deemed necessary for explanation in this text as this is cared for automatically by the motor itself, once it has attained half the value of revolutions per minute when under normal operation. These motors may be constructed to operate on 110 volts or 220 volts A. C. 245
CHIROPRACTIC SPINOGRAPHY Rotary and Synchronous Converters A rotary converted is sometimes used in the X-Ray machine. It converts direct current into alternating current, as the alternating current from the alternating current side of the machine is in synchronism with the shaft of the machine, the rectifying disc is therefore mounted on the shaft. Dispensing with the usual synchronous motor, D. C. is supplied to the machine at the commutator end which runs the machine as a motor. Two slip rings, connected to the armature, take off the A. C. The current in the armatures of either D. C. or A. C. generators or motors is always alternating in character. Seventy-seven volts A. C. will be obtained from the converter if same is operated on hundred-ten volts D. C. A synchronous converter converts A. C. into D. C. This machine is never used in X-Ray work. Rotary Rectifying Disc or Switch Most X-Ray tubes cannot be operated on a current such as alternating current. The current on which the tube must be operated is a current flowing in one direction continuously, or a current with a constant polarity. Moreover, a current must be had that has a high potential; or in other words, a high-tension current of enormous voltage. As it is impracticable for a high-potential generator to be constructed to deliver from 30,000 to 110,000 volts of direct current, we must revert to some other means of obtaining a undirectional current for the operation of the X-Ray tube. As a generator of a high tension current of alternating current character, we make use of the step-up transformer. Having transformed the electro-motive-force of 110 or 220 volts A. C. to 30,000 or 110,000 volts A. C., we must have some means of forcing the positive and negative alternations to have the same polarity in the circuit at all times. For this purpose a rotating rectifying switch is used. 246
CHIROPRACTIC SPINOGRAPHY Therefore, the function of this switch, which is also called a rectifying disc, is to rectify the high-tension alternating current into a high-tension, pulsating, unidirectional current for the tube. By referring to figure No. 69, is seen the rotating rectifying switch or disc under operation in the secondary circuit of the high-tension transformer. The current in figure No. 69 “A” is seen passing, as indicated by the arrow heads, when the disc and current are at a positive position or positive polarity. This position exists for only 1/120 second. The negative wave or alternation for the next existing 1/120 second passes as indicated by arrow heads to the positive electrode or terminal of the tube as seen in figure No. 69 “B,” when the disc and current are at the negative position. In figure Nos. 65 “A” and 65 “B” it will be seen that only the peaks of the positive waves, or negative waves when rectified, are used. This exists because of the short distance between the movable contact “X” and “Y” in figure No. 69. If the distance between “X” and “Y” movable contacts is ten inches, then a current equivalent to a ten-inch backup can be used. If an eleven-inch backup is used, the current under that potential would jump from one disc contact to the other, causing a high tension short, which would result in a burnt-out transformer. Therefore, the disc must be designed in such way that the movable contacts “X” and “Y” will pick off only the maximum peaks of the alternations or waves. The portion of the alternations from zero to 70 or 75 degrees will give no appreciable increase of X-Rays providing the time between each maximum wave or alternation peak is not too long, as would be the case by use of the “A” peak in figure No. 65 if the negative alternation or wave should not be rectified. Although only the peaks of the waves are picked off by the movable contacts “X” and “Y” on the disc, these alternations must rise from the zero position to the beginning of the maximum peak of that particular alternation. A current wave cannot begin at 60, 70, or 75 degrees. It will be observed by com247
CHIROPRACTIC SPINOGRAPHY paring the rectified alternations, figure No. 65 “A” and “B” against figure No. 65 “C” alternations, that the peaks of the rectified waves are more continuous, and not so greatly spaced as they would be if the rectified negative alternation were not used. The radiator type tube, connected to a high tension transformer, uses the entire positive alternation. Figure No. 65 “C” from zero to 180°, hence there laps a period of 1/120 second or 180° before the new positive alternation of the new cycle starts. Three principal types of rectifying switches are used; the disc, which is manufactured of mica (a high all-electric or insulating material) the two-bar rectifier, and the four-bar rectifier. For ordinary radiographic purposes using medium power, the disc is efficient and is less bulky. The bar type of
FIG. 69. Rectifying Disc
248
CHIROPRACTIC SPINOGRAPHY rectifiers is used in X-Ray machines where high power is supplied to therapy tubes. The bars or arms of the latter type of rectifiers are constructed of macanite and are usually from eighteen inches to thirty inches in length, dependent on the amount of power used. Electrical Measuring Instruments The Milli-Ampere-Meter This electrical measuring device is used in series in the high tension circuit, to register or measure the number of milli-amperes of current to the tube. It is usually found on the X-Ray machine on the control board or just above the control board. The instrument is constructed to have a stationary permanent magnet, having a North and South pole. A small wooden bobbin on which a coil of wire is wound, is mounted to move freely in pivoted jewel bearings. The coil is connected in series with the circuit to be measured, and across the leads of the bobbin coil is a metal strip called a Shunt. The coil bobbin is held in equilibrium by two spiral springs which also serve to carry the current into and out of the bobbin coil. Only a small fraction of the current passes through the bobbin coil, the majority of the current passes over the metal strip serving as the shunt. The magnetic lines of force from the permanent magnet pass through the bobbin coil continuously. If a given current is caused to flow through the bobbin coil, the magnetic lines of force set up by this coil will tend to repel the magnetic lines of force from the permanent magnet, causing the pivoted bobbin to be repelled. An indicating needle is fastened to the bobbin, and when the bobbin is moved by the repelling of the permanent and the electro-magnet, magnetic lines of force, the indicator will indicate the number of milli-amperes on the calibrated scale of the instrument. 249
CHIROPRACTIC SPINOGRAPHY The Ampere-Meter The milli-ampere meter and the ampere-meter are practically the same instruments. The only difference between the instruments is that the ammeter is designed to withstand and carry more current. The scale of the ammeter is calibrated to register only amperes and not 1/1000 of an ampere as the milli-ampere meter. This instrument is used to measure the amount of current in amperes which is fed to the tungsten filament of the tube. The Volt-Meter The volt-meter is never used in the X-Ray machine to measure more than 220 volts. The principle of operation is the same as the ammeter or milli-ampere meter. It is connected across the circuit to be measured. It contains a very high resistance in series with the bobbin coil, allowing only a small part of the current to pass through the coil. It must not be misconstrued that this device measures voltage. It measures only a small amount of current which in turn is caused to deflect the bobbin coil which moves the indicator needle over a scale that is calibrated in kilo-volts. When more current passes through the device, it is naturally an indication that the current has more pressure, and it is this state that is measured. The Spark Gap The ball-point spark gap, if sealed in an air chamber whose contents will not be effected by atmospheric conditions, is by far the most accurate means of measuring the amount of voltage, with exceptions to the electro-static voltage meter for high tension current. The gap is variable and is shunted across the terminals of the high tension transformer. It has been definitely proved that with a stated amount of current each inch of spark gap will denote a given amount of voltage. 250
CHIROPRACTIC SPINOGRAPHY Thus: 1 inch S. G. equals 20,000 volts; and to each succeeding inch, an additional 10,000 volts is added, hence: 1 inch spark gap equals 20,000 volts 2 inch spark gap equals 30,000 volts 3 inch spark gap equals 40,000 volts 4 inch spark gap equals 50,000 volts 5 inch spark gap equals 60,000 volts 6 inch spark gap equals 70,000 volts 7 inch spark gap equals 80,000 volts 8 inch spark gap equals 90,000 volts 9 inch spark gap equals 100,000 volts 10 inch spark gap equals 110,000 volts As an example, if we desired 60,000 volts pressure behind 20 milliamperes, having manipulated the rheostat until 20 milli-amperes registered on the milli-ammeter, we would then manipulate the auto-control until the 20 milli-amperes would be forced across a five-inch spark gap. If the current jumps the spark gap a possible three times out of five, we would say that we have a five-inch spark gap, 60,000 volts or 60 kilovolts at twenty milli-amperes of current. If we desire to use 60 kilovolts throughout the operation, we must keep the current constant at 20 milli-amperes or else the voltage will increase when the current is decreased, or vice-versa. This method is far more accurate than the kilovolt meter. FIRST. It is in the circuit to be measured, while the kilovolt meter is in the primary circuit that has no electrical connection to the circuit to be measured. SECOND. It is affected, if at all, by only atmospheric conditions; while the kilovolt meter is subject to variations of the current passing through by heating of the coil or resistance, increasing the resistance to the flow of the current. THIRD. It is a more direct method of measuring the voltage, while the kilovolt meter is calibrated from the spark gap discharge, in manufacturing the instrument. Therefore, because of a commercial production, each instrument and machine cannot be tested, charted, and re-calibrated before shipped out. 251
CHIROPRACTIC SPINOGRAPHY The Polarity Indicator The synchronous motor and the rectifying disc are always in synchronism when working properly. In view of this fact, a small segment rectifier is placed on the shaft of the motor so that it will then be in synchronism with the motor and the rectifying disc when the motor is started. When the rectifying disc starts picking off the peaks of the waves, the indicator, which is connected in series with the segment rectifying disc, begins at a peak of the same polarity and registers on the dial that polarity of the current that is being delivered from the large rectifying disc to the positive terminal of the tube or spark gap. The segment disc is a disc which has 90° of its part insulated. The indicator is a direct current instrument and should always be used as such. The segment rectifier should be kept clean from the oil collected from the motor, giving due respect to the brushes. In most large X-Ray apparatus the segment disc will be found enclosed inside of the synchronous motor housing, which will have to be taken apart in order to get to the disc. The segment rectifying disc and the polarity indicator are connected in series with each other, and are then connected across the line leading to the synchronous motor. They should never be connected on a line conducting more than 220 volts, unless the instrument is designed for a much higher current. The X-Ray Machine Motor Type of Apparatus In figure No. 76 we have a circuit of the modern Interrupterless X-Ray machine. The apparatus, whose function and operation were explained in previous pages, is assembled or connected together as shown in this drawing. They are assembled in a cabinet as shown in figure No. 70. From the main feed line we find the main switch, which is used to cut the machine off the line when not under operation, we follow the circuit and find an auxiliary feed line running to the primary of the filament or step-down transformer. 252
CHIROPRACTIC SPINOGRAPHY
FIG. 70. The Interrupterless Machine with all parts named
253
CHIROPRACTIC SPINOGRAPHY The current entering from the feed line may be either 110 or 220 volts A. C. Whichever voltage is used the apparatus must be constructed to operate on that voltage. In series with the primary of the step-down transformer, we find the filament control which varies the current that we may properly control the action of the filament of the X-Ray tube. Returning to the feed circuit of the X-Ray machine, we find the primary of the auto-transformer connected across the line, and in series with the primary we find the X-Ray operating switch. When this switch is closed the current is allowed to complete its circuit. Following the lead from the XRay switch we come to the primary of the high tension transformer. The other terminal of the high tension transformer primary is connected to the control arm of the auto-transformer, which serves as the secondary side of the auto-transformer. The circuit, as described above, is called the primary circuit of the X-Ray machine. For reason of making this circuit less complicated to the student, the motor circuit has been eliminated. However the feed lines running to the synchronous motor are connected at the same points that the auxiliary step-down transformer feed line begins. The polarity indicator and segment rectifying disc can be connected at the same point. It will be noted by the student that no electrical connection exists between the low tension or primary side of the machine, and the high tension or secondary of the machine. The secondary is thoroughly insulated from the primary, but it is possible for the operator to receive a severe jolt by being connected between the primary and secondary, such as having one hand on the filament control, or touching the metal part of the X-Ray switch, and the other hand touching the milli-ammeter or ammeter. The current is induced from the primary of the high tension transformer into the secondary as has been previously explained. The current, as the arrangement of the rectifying disc will show, is traveling from the right to the left through the left section of the rectifying disc through the milli-am254
CHIROPRACTIC SPINOGRAPHY meter to the anode terminal or target of the tube, through the tube, as will be explained later, through one side of the filament circuit, through the right section of the rectifying disc, back to the negative terminal of the transformer, completing the high tension circuit. The current induced into the secondary of the step-down transformer is traveling from the lower end to the upper end, through the ammeter, thence through the filament of the tube out to the other terminal of the secondary coil, completing the circuit for filament circuit carrying low voltage, and amperage. The spark gap is connected across the anode and cathode terminals of the tube, allowing a means of determining the amount of volts pressure behind a given amount of current. Motorless Type X-Ray Apparatus For some purposes, the motorless machine will produce as good radiographs as the motor machine, but because of the limit imposed, it is not to be recommended. In figure No. 82, we have the circuit of the motorless machine using alternating current. The circuit is the same with the elimination of the rectifying disc, and the placing of the milli-ammeter in the center of the secondary winding for its protection to the inverse wave. The student can easily trace the current through this circuit and should see in what respects this machine is lacking. This machine is limited to a technique of a five-inch gap at thirty milli-amperes for twenty seconds exposure, or the limit of this type of radiator tube when used on alternating current, this machine cannot be tested by a spark gap as will be seen in a later chapter. The spark gap must be calibrated at the factory where a means of rectifying the current is available, or else the use of a kilovolt meter employed. It is recommended to the student, a comparison of the two machines under loaded capacity to grasp the difference between the two types. As gas tubes are still used by some spinographers, and manufacturers still sell these tubes, it will be seen that gas tubes will not operate successfully on this type apparatus. 255
PART III X-RAY PHYSICAL PROPERTIES Discovery of X-Rays Had it not been for the experimental work of Geissler with the low evacuated rarefied gas tube, undoubtedly Roentgen would never have discovered the X-Rays. Geissler constructed a glass tube from which he pumped away some of the gaseous atmosphere. He found when this tube was connected to a suitable source of current it was found to light up, giving off an apple green fluorescence. This fluorescence has later been explained to the effect that passing a current through the tube caused the molecules of gas to collide, breaking up into smaller particles called atoms and electrons, resulting in the fluorescence. Crookes later, in experimenting with the vacuum tube of Geissler’s, constructed a tube having a higher state of evacuation. In this tube Crookes observed a purple stream from the cathode to the anode of the tube. He found that this stream was negative particles of matter, commonly called electrons, produced when the tube was excited by the current, causing the particles to collide with each other. He found that a magnet would deflect this stream from its normal path. Upon more experimentation, he found that considerable heat was produced on the anode of the tube when the particles collided with the electrode surface. Hertz, another scientist, in experimenting with the Crookes tube, found that by placing a metal plate between the two electrodes of the tube, this plate would entirely stop the cathode stream. Later Hertz died, and Lenard, his assistant, in conducting the experiment as outlined by his associate placed an aluminum window at one end of the tube in such fashion that part of the electronic stream was caused to bombard it. This electron stream has later been called the cathode 256
CHIROPRACTIC SPINOGRAPHY stream or ray, for it is at the cathode end of the tube that these particles come into existence. Lenard found that upon the bombardment of the aluminum window by the cathode ray that some of this ray presumably passed through the aluminum, causing a crystal screen of plating-barium-cyanide to give off light or fluorescence. The general scientific research of that day was the searching for invisible light rays. It was towards this end that all scientists were working. In 1895, a German professor, by the name of Roentgen, discovered that a radiation was given off from the Crookes tube that would penetrate opaque substances. He, in discovering this radiation, had covered his Crookes tube in such a fashion that all the fluorescence from the bombarding particles was excluded from the laboratory. Having just prepared a fresh plating-barium-cyanide screen, or fluoroscopic screen, near the excited tube, and upon placing it in a certain position on his bench, he found that across its surface was a peculiar dark streak. In trying to locate the source of the disturbance, he shut off the current from the tube. Upon doing this he found that the streak disappeared: He therefore concluded that this radiation, or disturbance, emitted from the tube which had been covered with black paper and cardboard. He then concluded that if this radiation would pass thru cardboard and black paper, it would undoubtedly pass thru flesh. To at least prove his contention, he placed his own hand between the excited tube and the screen. He observed on this screen a shadowy outline of the bony parts of his hand and the lesser shadow of the flesh. Having found the power of this new radiation to penetrate opaque substances, he communicated a message of his discovery to the Physico-Medical Society of Wurzburg, who 257
CHIROPRACTIC SPINOGRAPHY immediately published this wonderful discovery over all the civilized world. It was then that everyone interested in the new discovery duplicated Roentgen’s experiments. Although many changes have been made in the Apparatus Used to produce X-Rays, and new phenomena have been discovered, the laws pertaining to X-Rays and their production still remain the same as Roentgen found them. These laws are as follows: X-Rays travel only in straight lines from the point produced. X-Rays cannot be deflected by a magnet as the cathode stream is deflected. X-Rays cannot be reflected by a mirror as are light rays, although this radiation has some relation to light. X-Rays cannot be refracted, or polarized, as are light rays, by any crystals or prisms, although these rays are refracted to some extent by zinc sulphide, but of no use commercially. X-Rays Because of the significance of the letter “X” in the mathematical formulae for the unknown quantity, this radiation heretofore being unknown, and as yet unknown, he called them “X”-Rays, or unknown Rays. The present theory of the X-Rays is that it is an electro-magnetic disturbance in the ether much the same as light, heat waves, wireless, etc. As has been seen in the preceding chapter on electro-physics, electro-magnetic waves are practically the same as magnetism of a common horse-shoe magnet, but produced in a somewhat different way. These electro-magnetic waves, called X-Rays, are the same as the electro-magnetic lines found when an electro-magnet is excited by a current. Although the electromagnetic waves of X-Rays are closely related to those of other ether disturbances, it has been found that the frequency of vibration per second is so great as to impart a power of 258
CHIROPRACTIC SPINOGRAPHY penetration to the rays. In other words the waves are very short and in the trillions per second. The speed of X-Rays has been found to be the same as the speed of light rays, electricity, etc. The speed of the X-Rays does not necessarily mean that it will travel great distances, nor does it control entirely the penetration of the ray, though it does give the ray the forcing power to conduct its penetration. The penetration of the X-Ray is determined by the number of waves or frequency of waves per second. A piston in a steam cylinder is capable of doing work, but there must be force behind the piston in the form of steam, much the same as found in X-Ray production. If the ray had the proper vibration frequency for deep penetration, it would go nowhere unless it had the force behind it, the velocity of 186,330 miles per second. The wave length of the rays can be varied from very long waves having low penetrative quality to a very short wave having an extreme penetrative quality, enabling us to use different penetrative rays for different classes of work. For instance, a hand would not need as great penetrative rays as the skull or trunk of the human body would require. The property of the ray penetrating opaque substances is dependent on the wave length of the rays meeting with the kinetic energy of the particles composing the opaque matter that is to be penetrated. Glass is transparent to light because the frequency or wave length of the light rays do not interfere with the kinetic energy of particles composing the glass. Black paper is opaque to light rays because the frequency of the light wave is such as to interfere with the particles, agitating them to an extent that they block the ray from passing thru by interposing themselves in the path of the ray. In the element radium we find a ray (Gamma Ray) which also has this penetrative power, but much greater. In analysis of the Gamma Ray, we find that its frequency of vibrations is far in excess of the frequency of the X-Rays. However, the 259
CHIROPRACTIC SPINOGRAPHY laws governing the production of X-Rays differ to some extent from those of Gamma Rays, although fundamentally they are the same. The Laws of Production For the production of X-Rays, we must first have a vacuum tube in which there are two principal electrodes, the anode (positive terminal) and the cathode (negative terminal). It might be said at this time that there are many forms of vacuum tubes, divided in two general classes: the Gas tube and the Coolidge tube, or hot cathode tube. As long as the tube contains the two principal electrodes, the form of the tube is according to the manufacturer’s ideas of construction. SECOND—In this tube we must provide a means for the production of electrons. Two general methods are used, the separation of the particles from gas, and the separation of them from a hot wire, heated by an auxiliary current. THIRD—We must have a means of giving these electrons a high speed, which is obtained by applying a high-tensionundirectional current to the terminals of the tube, which causes the electrons to be whipped into the velocity desired, in proportion to the kilovoltage applied to the tube. FOURTH—We must provide a means within the tube to concentrate these electrons on a small area, which is the focal spot. The size of this spot determines the wattage capacity of the tube and the quality of details of the finished spinograph. FIFTH—We must stop these electrons with sufficient suddenness. It is at this point that the bombarding electrons, that are suddenly stopped, produce the X-Rays. The reader should, after having carefully noted the laws for the production of X-Rays, apply them to the study of the Coolidge and Gas tube construction found in the following chapter. 260
CHIROPRACTIC SPINOGRAPHY Secondary Radiation Secondary radiations are a great source of trouble to all radiographers, and it is impossible to eliminate them, no matter what means are employed. When X-Rays strike a body, it immediately becomes radioactive—that is, the body emits secondary rays or “S” rays, so called after Sagnar, who was the first to detect them. Secondary radiations are not like X-Rays nor do they possess the same penetrative power; they are nothing other than electrons liberated from any body that the X-Rays strike and do not penetrate. Secondary rays are the same as the electrons in the cathode stream and the beta rays of radium. The penetration of secondary rays and the number generated varies depending upon the substance that the X-Rays strike. When X-Rays strike a sheet of aluminum, the liberated secondary rays are more penetrative than if they strike a sheet of lead. When they strike the former, only a small amount of secondary rays are produced, but they penetrate fairly deep; while with the latter, they possess little or no penetrative power, but are liberated in large quantities. The reason that secondary rays cannot be entirely eliminated is because they are generated in the air when X-Rays pass through it, also when the rays strike the patient, and as they pass through the patient. They are produced as well when X-Rays strike the envelope, radiographic plate, and the table or floor below. A later theory has been advanced by Rutherford in which he regards an atom as built up of a minute nucleus of positive electricity surrounded by a cluster of electrons which rotate round the nucleus, and an outer group of electrons which also rotate and are less rigidly attached. The outer electrons, by their number and arrangements, are responsible for the chemical and physical properties of the atom; the inner electrons have influence only on the phenomena of radioactivity. This 261
CHIROPRACTIC SPINOGRAPHY explains why physical and chemical behavior does not go hand in hand with X-Ray and Gamma Ray phenomena. Physics of X-Ray Production The majority of text books and literature published on X-Rays, deal with the production of radiographs, fluoroscopic examinations, and treatments. Very little is said in regard to the actual production of the X-Rays and the types of X-Ray tubes in modern use. These two tubes, as outlined in the history of X-Ray, are the gas tubes, and another type tube, only a few years in use for the production of the ray. It will first be the purpose to explain the physical operation of the gas content tube, or Crookes tube. As has been stated previously, the Crookes tube, when under normal operation, has an apple green fluorescence. This fluorescence is due to the bombardment of the molecules, atoms, and electrons of gas with each other. The molecules exploding into the smaller parts, likewise the atoms and the electrons that are cast free from the molecules and atoms forming with other electrons and atoms to make other molecules. Let us discuss the matter that is around us. Scientists, especially chemists, have found that matter is composed of molecules and that molecules are composed of atoms and that atoms are composed of electrons. They have found that the molecule is the smallest particle of matter that can exist and still retain the architectural structure of the original matter, that is, a molecule of iron can be recognized as a particle of iron. The molecule is composed of smaller particles of matter which are called atoms. The number of atoms and their grouping determine the kinds of molecules resulting in different forms of matter. The atom is the smallest particle of matter that can exist and enter into a purely chemical change. It has been found to be composed of smaller particles of matter which have been named electrons. This name, electron, is derived from the term electro-negative, and is only an abbreviation. 262
CHIROPRACTIC SPINOGRAPHY The electrons, as far as known, are the smallest particles of matter that exist. They have been found to possess a negative charge of electricity, hence, they are a negative body of matter. These little particles may exist bound together in the atom, or they may exist in a free state, roaming about until a collision with other electrons, or atoms, or molecules, joining on to those particles until they in turn are bombarded, when they in turn may lose their number of electrons when shattered by the bombardment of some other particle. The atom may contain any number of electrons and also it must contain a positive charge or attraction, both on the interior and on the exterior of the electrons to hold them in equilibrium. The exterior attraction is called the shell of the atom, while the interior attraction is called the sun or nucleus of the atom. These are both of a positive charge. As some authors set forth, positive is the absence of negative; then, they set about explaining the negative. Positive naturally is the absence of negative, and if the positive did not exist, the negative would not exist in that vicinity. In the element radium, Mme. Currie has found in her analysis three rays, the Gamma, Alpha and Beta. The Gamma rays are of the same nature of X-Rays but far more powerful in regard to penetration. The Alpha rays are the positive atoms and the sun or nucleus of those atoms broken up. The term positive atom is in reality an atom in which the number of electrons are less, rendering the atom of a positive charge or attraction. As a supposition we will say that a neutral or an ordinary atom consists of one thousand electrons revolving around the nucleus. If this atom were caused to lose one hundred of the electrons, leaving nine hundred in the atom, we would call this atom a Positive Ion. If the atom were caused to gain a number to the extent of one hundred electrons, it would be called a Negative Ion. The positive ions and the positive nucleus of the atom, the electron, and the negative ion serve an important part or function in conducting the high-tension current from the positive terminal, or anode of the tube, to the negative terminal, or cathode of the tube. Referring to the second 263
CHIROPRACTIC SPINOGRAPHY law for the production of X-Rays, we must have electrons. In the gas content tube the electrons are produced by the bombardment of the particles with one another. Naturally when the electrons are separated from the atom the nucleus of the atom is left probably in a free state. This nucleus will circulate around the inside of the tube, attracting electrons resulting in a positive ion. Other nucleus will be circulating and will attract electrons producing negative ions. The current from the positive terminal of the current generating device is of a negative characteristic and is attracted to the positive terminal of the tube from the electrical generating device. In the tube the electrons and negative ions are produced and are attracted to the anode or positive terminal from the negative terminal. When these particles bombard the anode, they break up, form positive ions which attract the negative current on the positive terminal, taking on a load of this current. These positive particles are attracted to the negative or cathode terminal of the tube at which point they unload the current which has been changed from a negative character to a positive character, and because of its positive characteristic, is attracted back to the negative terminal of the current generating device. In the Coolidge tube, or hot cathode tube, the vacuum of the tube is very high, and while the tube was evacuated, very little gas was left within the walls of the tube, therefore, some other method of obtaining electrons must be had. A number of years ago, Edison and Richardson found in their experiments with the old type electric lamps, that if an auxiliary terminal were placed within the vacuum tube with the filament that produced the light, and a high-tension current connected so as to form a circuit with the additional terminal, which is called the anode, and a current impressed on this terminal, by placing a suitable measuring device in series with the circuit, current would be found to flow from the anode to the filament or cathode when the filament was of an 264
CHIROPRACTIC SPINOGRAPHY incandescent heat. It was known that this filament produced electrons when heated by a suitable current. The nature of the production of the electrons is explained as the interference with the normal kinetic energy of the particles composing the filament, which in present day use is tungsten. When a current of suitable electro-motive-force is passed through the tungsten wire when enclosed in a vacuum, the current interferes with the normal state of kinetic energy of the particles composing the element, tungsten, agitating them to such an extent above this point that they are caused to overpower the positive attraction of the nucleus and the outer shell of the atom, flying off into space within the walls of the tube. Not only were electrons caused to be flipped off into space, but also a number of the nucleus of the atom. In other words, the current exploded the atom, allowing the electrons and the nucleus of the atoms to fly off into space in a free state. This is the method of production of the electrons in the Coolidge or hot cathode tube. The third law for the production of X-Rays is that we must give the electrons a high speed, as it is dependent upon the speed of these electrons as to the penetrative power of the X-Ray produced. In the gas tube the current that is impressed on the anode is at a high-tension. The more pressure or tension we place upon this current, the faster the positive ions and nucleus must travel to conduct the current to the cathode terminal of the tube. The faster the positive particles reach the cathode terminal, the faster the production of electrons, and by suitable means these electrons are collected and forced towards the anode by the positive particles arriving at the cathode. The positive attraction of the anode also serves to give these electrons their speed, hence the more current and the more pressure behind this current that is impressed at the anode terminals of the tube, the faster the positive particles must travel, and in turn the faster the electrons must travel, because they are forced out of the way by the positive particles and are attracted by 265
CHIROPRACTIC SPINOGRAPHY the positive terminals of the tube. Not only are the electrons attracted to the positive terminal of the tube, but also the negative ions. When the electrons and ions are concentrated by the reflector of the cathode into the form of a beam it is called the cathode stream or ray. The speed of this stream may range in the modern X-Ray tube from thirty-seven thousand miles per second to ninety thousand miles. The velocity is given to the cathode stream, or ray, of the Coolidge or hot cathode tube in the same manner as it is given to the cathode stream or ray in the gas tube; the only difference being in the method of production of the electrons, negative ions, nucleus and positive ions. In the gas tube, the operator of the machine cannot control the production of these particles, while in the Coolidge or hot cathode tube they may be controlled by varying the amount of current supplied to the filament. It is for this reason that we use a small rheostat, or variable inductance, as the filament control on the X-Ray machine. Having provided the means for the production of the electrons upon a small area of the target or anode of the tube, it would do well at this point to discuss the target or anode of the tube. Because of the bombardment of this part of the electrons traveling at a high velocity, we must have some metal that will withstand the heat produced by the constant pounding on this target. Also, we must have a metal composing this part that will not allow the electrons to pass between the molecules into and within the target. In platinum we have the latter. Platinum is an element of high atomic density; that is, the molecules and atoms are closely packed together; while, on the other hand this element has a low melting point in comparison to the other material used for the target. The melting point of platinum is seventeen hundred sixty degrees centigrade. The atomic density, or weight, of platinum is one hundred ninety-five and two-tenths. In a gas tube, platinum serves as a very good target, but because of its high 266
CHIROPRACTIC SPINOGRAPHY commercial value, and the need of more penetrative X-Rays, which would naturally be indirectly the cause of more heat, it was dispensed with, and into its place was elevated tungsten, which has a melting point of thirty-three hundred degrees centigrade, with the atomic density or weight of one hundred eighty-four. In order to estimate the number of electrons to an atom, to give an idea of the atomic density and electronic density of any element, multiply the atomic weight or density of the atom by one thousand. To serve as a comparison with the atomic weight or density of platinum or tungsten, an atom of nitrogen has the atomic density or weight of fourteen. The method of concentration of the electrons on the target is accomplished by a concave reflector in the gas tube, and set back into the cathode neck of the tube to collect all of the negative particles composing the cathode stream. By adjusting the distance of the target from this reflector, the cathode stream is focused in a fashion, to a concentrated point which may vary from the size of a pin head to the diameter of the cathode reflector. The reflecting disc of the Coolidge tube of the Universal type is of a different shape. It is a disc and a small cylinder which are fastened by a support near the center of the hemisphere or bulb of the tube. The distance between the Coolidge tube disc to the target is much shorter than the gas tube reflector to the target. By adjusting the distance between the two parts of the Coolidge tube, any size focal spot may be obtained. Having accomplished the first four laws governing the production of X-Rays, we have one remaining law to accomplish. We must stop the particles in the cathode stream with sufficient suddenness. The electrons and negative ions in the cathode stream, traveling at the rate of thirty-seven thousand to ninety thousand miles per second, and concentrated on a small area called the focal spot of the target, are suddenly stopped when they bombard or collide with the target which, as previously stated, was of a high atomic density. 267
CHIROPRACTIC SPINOGRAPHY It might be said that, when particles traveling at that rate of velocity, concentrated on a small area, and suddenly arrested in their flight, something is bound to happen. Roentgen discovered that this something was an X-Ray. The X-Ray is a disturbance or a force of some form produced when the above is caused to happen. As yet, the subject-matter set forth in this chapter is theory, but is the most logical and comprehensible theory advanced explaining the phenomena of X-Ray production. The newest theory of the X-Ray, which is beginning to be universally accepted by scientists, is that the X-Ray is an electro-magnetic wave similar to the Hertzian or wireless wave, light, ultra-violet rays, infra-red rays and many others. If a given amount of current is applied to an X-Ray tube, as for instance twenty milliamperes, a given number of X-Rays will be produced; because the more current applied, the more electrons bombarding the target, hence producing more X-Rays. If we increase the milliamperes to forty, we shall have twice as many X-Rays as we had when twenty milliamperes were applied. If we apply only ten milliamperes, we shall have only one-half as many X-Rays as was produced by the twenty milliamperes applied. Therefore, the number of milliamperes applied to the tube will determine the Quantity of X-Rays produced, providing the kilo-voltage remains at a given value. If the milliamperes were constant at the amount of twenty, and we were using a two and one-half-inch spark gap, or thirty-five kilo-volts, the X-Rays produced would have a certain penetrative value; that is, would travel a certain distance through some opaque substance. If we should increase the pressure of the current to a five-inch spark gap, or sixty kilo-volts, the penetrative value of the X-Rays would be twice as great as when the two and one-half-inch spark gap were used, while if the spark gap were decreased to one and a quarter-inch spark gap, or twenty-five kilo-volts, the penetrative value of the X-Rays would be only half as great; hence, the amount of kilo-voltage applied to a given current determines the Quality of the X-Ray produced. 268
PART IV X-RAY TUBES AND THEIR ACCESSORIES There are many kinds of X-Ray tubes in use today, but in this text we will consider the ones that have proved to be the most practicable. THE GAS TUBE The gas tube has for description the following parts: 1. Bulb. 2. Anode, or positive end. 3. Cathode, or negative end. 4. Auxiliary stem. 5. Assistant anode. 6. Target. 1. The bulb is the large round part of the tube with a positive terminal on one end and the negative terminal on the other. This bulb contains the target which is in the center. 2. The anode, or positive end, is the long narrow stem of the tube containing a long steel jacket, which extends Into the bulb and supports the target, which is placed at the end of it. Extending in from the extreme end of the anode we have a small wire which is attached to the steel jacket and carries the current into the tube. The positive wire is attached to this end. 3. The cathode, or negative end, is the large end of the tube. Contained in this end is a steel rod to which is attached a steel jacket. In this jacket is contained a concave aluminum disc, the function of which is to reflect the cathode ray to the target producing the X-Ray. A small wire extends from the termination of the steel rod to the extreme end of the cathode; thus, the current is carried back to the machine. The negative wire is attached to this end. 269
CHIROPRACTIC SPINOGRAPHY 4. The auxiliary stem extends outward from the upper or superior part of the bulb about the center. This auxiliary stem contains asbestos wool, which is saturated with a gas-forming chemical. The end of this stem serves to give attachment to the vacuum regulator wire.
FIG 71. The Gas Tube
DESCRIPTIVE PARTS OF GAS TUBE IN FIGURE No. 71 A—Anode B—Assistant Anode C—Cathode D—Regulating Chamber F—Regulating Adjuster G—Hemisphere 270
H—Connection Wire I—Assistant Anode Cap K—Anode Cap L—Cathode Cap M—Cathode Stream N—Focal Point
CHIROPRACTIC SPINOGRAPHY 5. The assistant anode is that part of the tube extending outward from the bulb and lying midway between the anode and the auxiliary stem. It contains an aluminum rod, at the end of which is attached a flat aluminum disc Extending from the anode to the assistant anode is a small coil wire which serves to carry current from the anode to the assistant anode and thence through the tube. The target or anti-cathode, or anode proper, is made up of copper in the center of which is placed a button made of tungsten. This tungsten is about 5/8 of an inch in diameter and about 3/32 of an inch in thickness. It is on this button, when the cathode ray strikes it, that the X-Ray is produced. The target is always placed at an angle of 45 degrees, so that the X-Ray is directed down upon the patient on the table. The most rapid and effective rays are those reflected at right angles from the cathode stream forming a focal point on the anode surface and shown graphically by the heavy cone “No. 10.” The strength of the rays gradually decreases as indicated by the numbers “8-6-4,” etc. TESTING AND OPERATING A GAS TUBE Gas Tubes can be purchased that have a high, medium-high, medium, medium-low, and low vacuum. A high tube and a hard tube are synonymous. A low tube and a soft tube are synonymous. It is well to have a high, medium, and low tube, if one intends to do much X-Ray work; but a medium or medium-high tube is used mostly in spinography. The life of a high tube for spine work is short compared with that of a medium or medium-high tube for this reason: The penetration of a high tube is too great for spine work in the majority of cases. In order to reduce a high tube to its 271
CHIROPRACTIC SPINOGRAPHY proper vacuum or internal resistance for this work, a large quantity of the gas-forming chemical is consumed in that auxiliary stem. To keep the proper vacuum this must be done continually before making an exposure. By constantly doing this, the chemical will soon be exhausted, after which it will be almost impossible to reduce this vacuum, and in attempting it, the tube is likely to puncture, and as a result, it will be necessary to return the tube to the manufacturer for refilling, or a new regulator, as a tube becomes useless unless the regulator is refilled. Re-pumping a tube lowers the efficiency, unless a new cathode is inserted. A high tube is used in such cases as dropsy: quite fleshy individuals, or fluoroscopy, or where deep penetration is required. A medium, or medium-high tube, as stated before, is just the proper vacuum for spine work and does not necessitate a constant excessive reduction. It will not be necessary to use very much of the chemical in the asbestos wool, and as a result, the life of the tube will be much longer than that of a high tube. A low tube, if used with caution, may be used for exposures that do not require great penetration, such as radiographs of the hand, forearm, foot, ankle and leg, or radiographs of very small children. If a tube of this kind is operated until the bulb is quite warm, many times the vacuum will increase until it is suitable for spinography, and it will be found a very stable tube, seldom requiring regulating. A tube of this type can be used successfully for spinographic work if the intensifying screen is used. The number of milliampere seconds and the backup spark, or degree of penetration, are the first two things to be taken into consideration before making an exposure. Determine the amount of milliampere seconds and the backup spark 272
CHIROPRACTIC SPINOGRAPHY required by observing the patient and noting the depth and kind of tissue to be penetrated. HOW TO RAISE THE VACUUM OF A GAS TUBE Detach the wire from the anode to the assistant anode. Then attach the positive wire to the assistant anode, leaving the negative wire connected to the cathode end. Have the rheostat on button one. Insert the X-Ray switch and allow the current to pass into the tube 15 or 20 minutes, or until the tube begins to get warm around the cathode disc. Allow the tube to rest for five or six hours. Repeat this operation several times and let the tube rest a few days before using. This method may or may not be successful. If not, the tube must be sent to the manufacturer for repumping. The Hydrogen X-Ray Tube This is another type of an X-Ray tube which is similar in construction and action to the common type of gas tube, with the exception that it has a reducer in place of the assistant anode, and a raiser in place of the auxiliary stem, and that it may be raised or lowered in vacuum. DESCRIPTION OF THE HYDROGEN X-RAY GAS TUBE The following is a description and instruction for using this type of tube: 1. To lower the vacuum, pass through the reducer about 15 milliamperes for live or ten seconds at a time. Repeat this process if the vacuum is not reduced to the proper amount. It is not advisable to use a greater amount of current because of the damage that might result to the elements; it is more advisable to use more time at the same milliamperage as given above. Always maintain the polarity as indicated by the polarity indicator. 273
CHIROPRACTIC SPINOGRAPHY
HYDROGEN TUBE FIG. 72. Hydrogen Tube
274
CHIROPRACTIC SPINOGRAPHY 2. To raise the vacuum, pass through the raiser about 25 milliamperes of current (never more than 30 milliamperes) for 20 seconds at a time. If the vacuum is below 1/8 inch, disconnect spiral temporarily from the positive terminal of the raiser. Connect anode wire to the positive terminal of the raiser, and the cathode wire to negative or cathode terminal of the raiser. Run three minutes with 22 to 25 milliamperes of current. Repeat the process if necessary. Replace spiral before placing tube back under normal operation. 3. To regulate the tube before making exposure, it should test out at a two-inch spark gap with a low current of about 5 milliamperes, this may vary with some machines, however. 4. The normal tendency of the vacuum is to rise a trifle during the first exposure when the tube is cold. To compensate for this it might be advisable to introduce more gas into the hemisphere. THE COOLIDGE X-RAY TUBE The Coolidge tube is similar in shape to the gas tube but in other respects these two tubes cannot be compared to each other. The Coolidge tube is evacuated to a much higher degree of vacuum having a pressure of not more than a few hundred microns. (A micron is .0001 mm.) The gas tube, as has been previously explained, utilized the gas contents as the means of obtaining the electronic supply. In the Coolidge tube the electronic supply is obtained by the Edison-Richardson effect. The cathode is heated to a white heat by a low-tension current, and when this cathode is heated to that temperature, it will emit electrons, which is a source of electronic supply in the Coolidge tube. The production of electrons in a gas tube cannot be controlled by the operator while the Coolidge tube can be controlled by varying the current that is supplied to the filament of the tube. 275
CHIROPRACTIC SPINOGRAPHY TYPES OF COOLIDGE TUBES Coolidge X-Ray tubes are manufactured in eight different types, each tube having been designed for some specific field in X-Ray work. They are as follows: The Deep Therapy or Ultra-X-Ray tube. It has a capacity of 15 milliamperes of current at 3 kilowatts power. Broad-Focus Universal Type tube has a capacity of 80 milliamperes of current at 5.6 kilowatts power. Medium-Focus Universal Type tube has a capacity of 50 milliamperes of current at 3.5 kilowatts power. Fine-Focus Universal Type tube has a capacity of 25 milliamperes of current at 1.75 kilowatts power. Radiator Type Coolidge X-Ray tube, standard shape construction, self-rectifying, 30-milliampere tube, has a capacity of 30 milliamperes of current at 1.8 killowatts power. Radiator Type Coolidge X-Ray tube, standard shape, selfrectifying, 10-milliampere tube, has a capacity of 10 milliamperes of current at 600 watts. Radiator Type Coolidge X-Ray tube, standard shape, selfrectifying lead glass hemisphere, designed for use with the General Electric Company Bedside Unit, has a capacity of 10 milliamperes of current at 600 watts power. Radiator Type Coolidge tube, dental, self-rectifying tube, designed for use with dental X-Ray Unit, has a capacity of 10 milliamperes of current at 600 watts. UNIVERSAL TYPE OF COOLIDGE TUBE Construction of Universal Tube All Universal type Coolidge tubes are constructed in the same size, the three different types differ only in respect of the sizes of their focal spots. The bulb or hemisphere has a 276
CHIROPRACTIC SPINOGRAPHY
FIG. 73. Universal Type Coolidge X-Ray Tube
diameter of 7 inches, and the length from the tip of the anode terminal to the tip of the cathode terminal is approximately 20 inches. Cathode Terminal The diameter of the cathode neck, or terminal, of the Universal tube, is smaller than the diameter of the anode neck, or terminal. In this neck is found a glass tube which serves as a support for the filament reflecting disc and cylinder. Three molybdenum rods, which are fused into the end of this glass tube, support the reflectors and the filament suspending them in their proper relations with the anode of the tube. Two of these rods also serve the purpose of supplying the low tension current to the filament, eliminating the use of regular conductors.
FIG. 74. Cathode of Universal Type Coolidge X-Ray Tube 277
CHIROPRACTIC SPINOGRAPHY The filament (A) figure No. 74, consists of a closely wound spiral of tungsten wire resembling somewhat the hair spring of a watch but more closely wound. The focusing device for the cathode stream is composed of a cylindrical tube and a flange or disc or molybdenum, (B) figure No. 74. The spiral filament is placed in the cylinder and this cylinder provides a means of focusing the electrons produced by the filament on a focal spot of the target. The disc or flange serves the purpose of reflecting the negative ions produced by the bombardment of the positive ions on the cathode terminals. The flange is about three-quarters of an inch in diameter and about one-sixty-fourth of an inch in thickness. The molybdenum cylinder which contains the spiral filament is approximately one-half inch in length and five-sixteenths inch in diameter. The filament may be heated by a storage battery or by a step-down transformer; the latter has been explained in another chapter. Anode or Anti-Cathode This terminal is also referred to as the target. This part of the tube serves two purposes; first, it is the positive terminal of the tube; second, it serves as the target on which the electrons are focused, for the purpose of producing X-Rays. The anode or target, as seen in figure No. 75, consists of a single piece of wrought tungsten (C), which is attached to a molybdenum rod (B), which in turn is supported by a split iron tube (E). The molybdenum rod is used to support the tungsten target for the reason that it is more easily machined. Wrought tungsten cannot be worked by ordinary machining methods as it is far too hard, consequently the molybdenum
FIG. 75. Anode or Anti-Cathode
278
CHIROPRACTIC SPINOGRAPHY rod is employed which can be machined much more easily. When the target has been heated to a high temperature having the tube under actual operation, there will be noticed a difference in temperature between the tungsten and the molybdenum supporting rod. To the supporting rod is fastened a split iron tube which in turn is slipped over a glass tube to serve as a means of rigidly fastening the support of the target with the X-Ray tube. Through this glass tube is fused a wire which runs from the tip of the anode terminal to the supporting rod of the target, serving as a conductor for the high-tension current. High Tension Circuit of the Universal Coolidge Tube High-tension current may be supplied to the Universal Coolidge tube by the static machine, induction coil, or high-tension transformer. The current supplied to the tube must be of a uni-directional character, although the universal tube will rectify its own current, provided the target does not become heated to such an extent to emit electrons, in which case the negative alternation of the current would pass from the cathode to the anode instead of from the anode to the cathode. However, because of the above reasons, manufacturers do not recommend the use of this type of tube on other than uni-directional current. The high-tension current may be controlled by means of a rheostat or an auto-transformer where the high-tension transformer is used in the machine. It is recommended by the author that both the auto-transformer and rheostat be utilized in which case more efficient operation will be had. Capacities of the Universal Tubes The capacity of the tube is determined by the amount of power that the tube will carry. Power, or Watts, as is found in another chapter, is the voltage multiplied by the current. The power input to any X-Ray tube is determined by four conditions: First—The target material; Second—The size of the focal spot; Third—The time length of applied power; 279
CHIROPRACTIC SPINOGRAPHY Fourth—The temperature of the anode or target at the beginning of the exposure. Power must not be applied to the tube that would cause the focal spot to reach or attain a temperature of 3,300 degrees centigrade. Ninety-eight and eight-tenths per cent of the power applied to the X-Ray tube is converted into heat, therefore, the efficient operation over a definite period is determined by the efficiency of the method used in dissipating that heat. The larger the focal spot of the tube, the more power that can be applied, but also the less definition or sharpness of detail that can be obtained on the radiograph. The Deep-Therapy tube, which is more or less a Universal type of tube, has a larger diameter bulb to better facilitate the dissipation of the heat produced. It is used entirely for producing ultra-X-Rays, for therapeutic treatments. The Broad-Focus tube is used for therapeutic treatments and instantaneous radiography where great penetration is required. The Medium-Focus tube is used for all kinds of X-Ray work, which of course, is limited by the power capacity of the tube. The Fine-Focus tube is recommended for use where sharpness of detail or better definition is required in radiography, or may be used for fluoroscopy. However, these tubes may be operated on any power below their limited capacity according to the needs. General Remarks New tubes, it will be noticed, may have a purplish-hued hemisphere, which is caused by the X-Ray passing through a particular kind of glass of which the tube is constructed. This glass contains a certain amount of manganese. It also may be noticed that the focal spot will have a frosted area, which is due to the crystallization of the tungsten during the evacuation of the tube. This frosted area is not an indication of the exact size of the focal spot. When these tubes are evacuated they are operated and tested as a point just within the maximum capacity of the tube. The parts composing the 280
CHIROPRACTIC SPINOGRAPHY terminals are heated to drive off or out the occuled gas from within those metal parts. Some Universal tubes may be noted to have a green fluorescence in the anode neck of the tube. Also it may be noted a slightly reddish hue to this fluorescence is caused by the action of the reflected cathode rays upon the tiny particles of abrasive material which is deposited at the juncture of the tungsten target and the molybdenum supporting rod. Method of Operation The filament light must always be lit before high-tension current is applied to the tube. This precaution is more for the protection of the patient and machine than for the protection to the tubes. This applies to tubes whether operated on induction coils, static machines, or high-tension transformers. The technic of various operators and the sources of excitation vary so much that it is difficult to make detailed suggestions which are universally applicable. The following general considerations, however, may be of value: The higher the filament current, the greater the milliamperage. The higher the voltage backed up by the tube, the greater the penetration. A simple method of starting radiographic work with the tube is as follows: Take a case, for example, where the operator has been doing his work with the high-tension transformer control on the tenth button with his tube drawing 30 milli-amperes. In this case, all that is necessary with the Coolidge tube is to light up the filament having the filament control set for the least possible amount of current, set the high-tension transformer control on the tenth button, close the main switch, and adjust the filament control until the tube is drawing 30 milli-amperes. 281
CHIROPRACTIC SPINOGRAPHY
FIG. 76. Wiring Diagram of Modern Interrupterless Type X-Ray Machine
282
CHIROPRACTIC SPINOGRAPHY Having once adjusted the tube to this condition, the operator should read and record the amperage in the filament circuit. To reproduce the condition he then needs merely to adjust the filament current to this same value and set his high-tension transformer control on the same button. In this way, after his technic is once established, he never tests the tube by operating it, but is guided solely by the ammeter and the high-tension transformer control button. While this method is generally applicable, it is not universally so, as it will be found that with certain types of generators the same control button and the same milli-amperage as has been used with other tubes will not give the same penetration. In other cases the radiographer will be accustomed to adjust his tube by means of the milliameter and the parallel gap. This procedure can be applied equally well to the Coolidge tube, and will naturally be the one first used in all cases where the operator is not familiar with his machine. Knowing that he wants, for example, 20 milliamperes and a 5-inch parallel gap, he will start with the filament control adjusted for the lowest possible current. He will then adjust the filament control and run up to higher buttons on the main control until the tube is drawing 20 milliamperes and backing up the 5-inch gap. As before he will then read and record the amperage in the filament circuit and the number of the control button and will be subsequently guided solely by this. When excessively high energy impute are employed, the tungsten at the focal spot melts and volatilizes. This results in a sudden lowering of the tube resistance which disappears instantly upon lowering the energy input, but the vaporized tungsten deposits in a thin film over the active hemisphere of the tube, (this mirror-like metal deposit on the inside of the glass should not be confused with the violet coloration which always results when the particular kind of glass used in these bulbs is subjected to prolonged exposure to X-Rays, this violet color is due to some change taking place within the glass itself and is perfectly harmless.) The thin film of tung283
CHIROPRACTIC SPINOGRAPHY sten exerts no appreciable filtering effect upon the X-Rays, but it does disturb the electrical conditions within the tube. Experiments have shown that a grounded metal wire may be brought up into actual contact with a glean bulb when the tube is operating, whereas with a tube having a metal deposit inside, such a wire must be moved away a number of inches to avoid puncturing the tube. The metal of the tube stand is usually grounded, and the number of punctured bulbs would be greatly reduced if the practice of blackening bulbs were discontinued, and if care were taken to avoid approaching the metal of the tube stand nearer the bulb than is absolutely necessary. Furthermore, this practice results in no appreciable gain. It may succeed in increasing X-Ray production a few per cent, but at the same time, it greatly reduces the life of the tube. The tube must not be run with voltages higher than that corresponding to a 10-inch spark gap between points (that is, it should not be made to back up more than a 10-inch parallel gap.) THE RADIATOR TYPE COOLIDGE TUBE Construction of the Radiator Tube The radiator tube is designed and constructed for diagnostic purposes and is recommended for fluoroscopy and radiography only. It should never be used for therapy.
FIG. 77. Radiator Type Coolidge X-Ray Tube
284
CHIROPRACTIC SPINOGRAPHY All radiator type Coolidge tubes are constructed the same size, though divided into two classes of four types. First—We have the radiator 30-milliampere tube, and then the 10-milliampere radiator tube which is constructed in the ordinary form, as a radiator type dental tube, and as a bedside type radiator tube. The two ordinary types, 30-milliampere and 10-milliampere tube, differ only in respect to their focal spot sizes and capacity for the current. The bulb or hemisphere has a diameter of three and three-quarter inches and the length from tip to tip is approximately 19 inches. When a method of cooling the tube is used, such as is found in the radiator type tubes, it is not necessary for them to have as large a hemisphere as a Universal type tube. The tube will function just the same with its smaller hemisphere or bulb than with a larger, as is found in the Universal type tube. The hemisphere of the Universal type tube is larger to help radiate the heat from the target thru the glass walls of the tube. The radiator of the radiator type Coolidge tubes, serves this purpose so that it is not necessary for a larger bulb. Cathode Terminal The cathode terminal, or neck, of the Coolidge radiator type tube is found to be smaller in diameter than the anode neck or terminal. The means of supporting the cathode reflector and filament light is the same as the Coolidge universal tube, however the reflector is concave resembling a hemispherical cup and is constructed of molybdenum. This con-
FIG. 78. Cathode of Radiator Type Coolidge X-Ray Tube
285
CHIROPRACTIC SPINOGRAPHY cave reflector is not found in the radiator tube on the small cylinder which contains the filament, as found in the Universal type tube, due to the smaller hemisphere of the radiator tube. This cup Is Fastened to the end of the cylinder serving to concentrate the Electrons on the anode, the Result of which will allow a smaller focal spot than could be Accomplished by the use of the type reflector found in the Universal tube. This reflector Is about three-quarters of an inch in diameter and about one-half an inch deep. The molybdenum cylinder which contains the spiral filament, is the same size as found in a Coolidge Universal tube. In figure No. 78 we have a cut of the cathode terminal showing the assembling of the metal parts on the glass support of that tube. Anode or Anti-Cathode The anode support or stem is a solid bar of copper about five-eighths of an inch in diameter, which is brought out through the anode neck of the glass tube. The head of the anode, which contains the tungsten button in its face, is a mass of specially purified copper which is cast in a vacuum with the tungsten button. This head is then electrically welded to the support. The tungsten button, which the cathode rays are caused to bombard, is one-tenth of an inch thick and three-eighths of an inch in diameter. On the support rod is found a split metal sleeve, which supports the support rod within the glass neck of the tube, this support rod has a cone-shaped affair near the very end of the tube, which is sealed or fused to the glass neck by the use of platinum, this allows the copper support to extend outside the tube so that the radiator may be fastened, to properly radiate the heat. The complete part will weigh 860 grams, and has been found to have a heat capacity of 81 calories per degree centigrade, compared with the 10-calorie capacity of heat in the Coolidge Universal tube. Having this greater heat capacity with a given energy, or power input, it takes a great deal longer to heat the radiator tube to the same temperature than it does to heat the solid tungsten target of the Universal tube 286
CHIROPRACTIC SPINOGRAPHY using the same power. Copper is Used in the construction of this part because of its ability to conduct a great amount of heat. When the electrons of the cathode stream bombard the tungsten button, the copper head of the anode absorbs the heat from the button, conducting it along the support out of the tube to the radiator from whence it is radiated, cooling the target. What is much more important, however, is the fact that the target in the radiator tube will cool rapidly between exposures owing to the copper support and head, which conducts the heat to the outside of the tube. In figure No. 79 we have a cut showing the assembling of the metal parts composing the anode terminal.
FIG. 79. Anode of Radiator Type Coolidge X-Ray Tube
The High Tension Circuit of Radiator Tube This tube may be operated on any of the high-tension current generating devices that the Universal type tube may be operated upon, however, while the Universal type tube will work efficiently only on a uni-directional current, the radiator type tube may be operated on alternating current, without means of rectifying the alternating current except as found in the tube. Theory of Operation on Unrectified Current (A. C.) In the radiator type tube the inverse wave of the high-tension alternating current does not pass through the tube from the cathode to the anode, as already explained in a previous chapter, the positive particles flow from the anode 287
CHIROPRACTIC SPINOGRAPHY to the cathode conducting the current. In the Universal type tube if the tungsten target is allowed to reach a temperature great enough to emit electrons and positive particles, they will be traveling in the opposite direction as when the target is cool, allowing the inverse current to pass from the cathode to the anode, as long as the target does not reach sufficient temperature to emit the electrons, the current will travel only from the anode to the cathode. The target in a radiator type tube is kept cool by the radiator which, of course, allows the tube to rectify its own current; that is, will not allow the inverse current to pass from the cathode to the anode, but will allow the current of the positive polarity to pass from the anode to the cathode. Capacities of Radiator Tubes The capacity of the tube is determined by the amount of power the tube will carry, which when operated on alternating current is a five-inch gap at 30 milliamperes, or at 10 milliamperes, whichever tube is used. The conditions that determine the power input is the same as given for the Universal type tube. Focal Spots The focal spots of the radiator type tube are much smaller than the focal spot of the fine focus Universal type tube. In order, we find the focal spot of the 30-milliampere radiator type tube next in size to the fine-focus Universal. The 10-milliampere radiator tube has a focal spot smaller than the 30-milliampere tube. The Spark Gap When operating the tube directly from the transformer on the alternating current, it will be found that the inverse voltage is always higher than the useful voltage. Consequently on motorless X-Ray apparatus, there is found no spark gap for a measurement of the voltage, but instead the auto-transformer is calibrated to give the desired voltage to 288
CHIROPRACTIC SPINOGRAPHY the step-up transformer, therefore enabling the operator to obtain the voltage desired. The inverse voltage is greater in potentiality for, as we have already learned, whenever current in the electrical circuit meets resistance, the voltage will correspondingly rise trying to force the current thru the resistance. The measurement of the spark gap when operated on rectified, or uni-directional current, is the same as when operating the Universal tube on that current.
FIG. 80. Radiator Type Coolidge X-Ray Tube Enclosed in Lead Glass Protective Shield
General Remarks New tubes will be found to have the same purple-hued hemisphere and other conditions as explained about the Universal type tube. It is also recommended that the radiator type tubes be operated at the same voltage and milliamperes, varying the time of exposure. When operating the tube in this manner, it is also convenient to use, or keep constant, the target plate distance. This will reduce the number of variable factors of the technique giving the operator only one factor to vary, which is the time of exposure. The operator having a machine and tube set to be operated on a five-inch back-up and 10 milliamperes, at a target plate distance of 18 inches, has only to vary the time of exposure and to proper position the part to be radiographed. For example, when the settings as given above are to be used for radiographing a knee or 289
CHIROPRACTIC SPINOGRAPHY foot, the operator has only to close his switch for five seconds; for a shoulder, 10 seconds. If the shoulder is thicker than medium size, 12 seconds, or even 14 seconds might be necessary; and, if thinner than medium size, eight seconds will perhaps be sufficient. The matter of thickness of the part and the time of exposure may best be determined by practical experience. It must not be construed that the above technique is correct as it is only intended for an illustration as to a method and guide for producing radiographs.
FIG. 81. Radiator Dental Type Coolidge X-Ray Tube
In figure No. 80 we see a cut of the radiator type Coolidge X-Ray tube and in figure No. 81 we have a cut of the radiator type Coolidge tube used for dental radiography. The student will note that this tube is practically the same, with the exception that the cathode end of the tube is at right angles to the anode end of the tube, and when the tube is under operation the X-Rays are given off in a parallel line with the anode terminal of the tube allowing this tube to be brought more closely to the part to be radiographed, such as dental work. 290
CHIROPRACTIC SPINOGRAPHY
FIG. 82. Wiring Diagram of Radiator Type Coolidge X-Ray Tube on Unrectified Current
291
CHIROPRACTIC SPINOGRAPHY In figure No. 82 is given the circuit for use with the radiator tube on alternating current. Determining the Size of Focal Spots As most spinographers are interested in good definition of their spinographs, it may be desirous for them to know of a method by which they may determine the size of focal spots of the tubes they may use. As has been previously explained, the smaller the focal spot, the greater the definition of the radiographs produced. The method to be explained is a pin hole camera method. In making the test for the sizes of the focal spots, we would first obtain a square sheet of lead having a thickness of one-eighth inch, and of the right size to occupy the space ordinarily occupied by the aluminum filter in the tube stand. First make a conical depression in the exact center of this lead. Scrape away the tiny prominence or raised part on the other side of the sheet when this depression was made by the punching device. In the center of this depression a small hole about 0.02 inch in diameter is drilled. Attention might be directed to the fact that if this hole is too large in diameter, the focal spot picture will lack in sharpness; and, if too small, the time of exposure will be needlessly long. Place the lead plate and tube in their respective positions and lay a photographic film on a table below. The size of the focal spot picture may be varied at will by raising or lowering the tube holder. If it is to be of natural size, the distance from film to pin hole should be the exact distance equal to that from the pin hole to the focal spot. It may be a good plan to make two exposures, giving one a longer exposure than the other. The longer exposures will show the full extent of the focal spot, and the shorter one will show the distribution of energy over the focal spot. With a hot cathode tube, the size of the focal spot will always be the same regardless of the current and voltage used. 292
CHIROPRACTIC SPINOGRAPHY THE POTTER-BUCKY DIAPHRAGM Secondary and Scattered Radiation Any substance when exposed to X-Rays will give off X-Rays; some of these rays, called secondary rays or scattered rays, are identical with the primary rays in quality. The proportion of scattered radiation given off is dependent upon the substance that is struck by the primary radiation, and the quality of the primary radiation. A substance of low atomic weight will give off more scattered, or secondary radiation, than would a substance of high atomic weight in which the atoms are more closely packed together.
FIG. 83—“A”. The Bucky-Potter Diaphragm, Standard Model
Scattered radiation can be closely perceived with a fluoroscoping screen which, in some manner, is shielded from the primary radiation of the tube, by exposing a body of low atomic density to primary radiation. The scattering occurs at all depths of the substance, the scattered radiation increasing with the thickness traversed by the primary radiation. They are distributed in all directions, though not uniformly, as more will be found in the backward and forward direction of the primary ray flight. It is these rays that blot or glut out detail and contrast of otherwise good listable plates. When the primary rays pass through the part radio293
CHIROPRACTIC SPINOGRAPHY
FIG. 83—“B”. Spinograph Bucky Diaphragm 294
CHIROPRACTIC SPINOGRAPHY graphed, the surface nearer the plate gives off scattered radiation, which as the primary rays, penetrates the film or plate holder, causing a breaking down of the silver bromide or unexposed portions of the plate. If these scattered rays are dispensed, we have only the shadow effect that is cast upon the plate emulsion of the object penetrated by the primary rays. Theory of Operation of Potter’s Bucky Diaphragm Bucky, in 1913, experimented in filtering out This scattered radiation. The idea in the form of a grid diaphragm, would allow only the primary Rays to pass through to the unexposed plate after the rays penetrated the subject. The scattered ray filter was designed in such a way that it would allow the primary rays to pass through that were in a perpendicular plane with the filter strips of the grid. In construction the grid was constructed to resemble a section of the shell of a cylinder. Strips of lead-foil, five-eighths inch wide, one-fiftieth inch thick, usually two feet in length, with alternate wooden or fiber strips one-sixth inch thick as spacers, were placed together to form this grid, making the strips of lead-foil with the alternate wooden or spacer strips run about five to the inch. In this way the diameter of the grid, should it be constructed as a cylinder, would approximately be 25 inches. (See figure No. 84). His idea was successful as far as eliminating the scattered or secondary radiation was concerned, but because of the alternate strips of wood or spacer material and the filter material, the primary rays in passing through the grid would register the grid pattern over the shadow of the subject as cast by the primary rays on the unexposed plate. This grid was interposed between the subject and the plate. H. E. Potter’s Bucky Diaphragm Dr. H. E. Potter, M. D., in 1917, in experimenting with a model of Bucky’s diaphragm, conceived the idea of having the grid in motion throughout the entire exposure of the primary rays, so that all parts of the plate would have an equal expo295
CHIROPRACTIC SPINOGRAPHY sure. He modified the model of Bucky’s diaphragm to an extent that the grid was placed in motion by a counterweight. When this weight was released it drew the grid across the primary ray path, during the exposure of the primary rays. (See figure No. 84). All the rays, not perpendicular with the grid filter material, were absorbed when striking the edges of the filter strips while the grid was under motion. A secondary ray not perpendicular, but at right angles to the primary rays, would be absorbed before reaching the plate as is seen in figure No. 84, because of their lack of energy to penetrate the filter material. This model was successful in producing a shadow of the subject on the plate, which effect was caused
FIG. 84. Schematic Drawing of the Bucky Diaphragm in Operation
296
CHIROPRACTIC SPINOGRAPHY only by the primary radiation. The plates taken with the model Bucky diaphragm modified by Potter, gave increased brilliancy of the parts, and increased detail which heretofore was glutted out by the secondary or scattered radiation. Different Types and Makes As yet, there are only two types of Bucky diaphragms. The Bucky used in ordinary radiography, called the standard Bucky; and the long length table Bucky, which is usually incorporated in a table for spinograph work. The standard Bucky is approximately 25 inches square, the table Bucky is from three and one half to six feet in length. No difference exists in the principal idea, although different modifications such as timing devices and other accessories are made by different manufacturers. All Buckys have accessories such as immobilization straps, and exposure indicators which give signals when the motion of the grid starts and stops. The Brady Potter-Bucky diaphragm was first commercially adapted, and was closely followed by other manufacturers such as Meyer, Victor, Engeln, Wappler, Kelly-Koett, Adams, Fischer, and many others, so that the prospective buyer now has a large assortment of diaphragms to make choice from, according to their respective needs. In selecting a Bucky diaphragm, consideration should be given the class of work it is to do, size desired, fineness of the grid, ease of operation, and accuracy of the timing devices, although none will be found positively accurate. INTENSIFYING SCREENS In the beginning, the use of X-Rays was limited to the location and reduction of bone fractures, foreign objects and osseous or organic formations which resisted the penetration of the rays. This situation was due to a variety of causes, among which were the lack of experience in determining proper voltages; distances and lengths of exposures; the 297
CHIROPRACTIC SPINOGRAPHY inability to secure a photographic effectiveness greater than one per cent of the intensity of the rays; the leek of suitable actinic convertors; sufficiently sensitive and rapid emulsions for photographic plates and suitable measuring devices. Gradually, as many minds were applied to the problems of Roentgenology, methods were found for saving some of this lost energy and changing it into actinic rays which would increase the intensity of the visible image and the clarity and needed contrast of photographs. X-Ray Negatives Ordinary photographs, which the camera user takes, reproduce the images of landscapes, peoples, or objects upon which ordinary white light rays fall. X-Ray photographs are not produced in this way at all. They are actual shadowgraphs produced by a different sort of ray coming through the object from behind it. The location of the source of radiation behind the object necessitates care in positioning to prevent distortion; the proper voltage and fast, contrasty emulsion on the films or plates to prevent indistinct or hazy images. To secure this contrast, it is especially important that as much of the X-Rays as possible be converted into actinic light rays, which will act upon the emulsion. It follows that suitable screens are absolutely necessary. Why Good Screens Are Necessary In modern surgical practice, the need for an operation is frequently determined by X-Ray photographs. There have been many cases—notably among abdominal operations— where the decision on whether or not to operate rested on the clarity of the image revealed by the X-Ray photograph. Correct diagnosis in surgical and in many medicinal cases requires the use of the best screens available in order that a clear record may be obtained of the affected parts. 298
CHIROPRACTIC SPINOGRAPHY Another Reason When unintensified Roentgen-rays strike a photographic plate or film, less than one per cent of them act on the emulsion to produce an image. To secure a clearer image or show greater detail, or secure speedier exposure, it is therefore necessary to utilize some of this 99 per cent of wasted energy. It has long been known that certain chemicals have fluorescent properties, i.e., of absorbing X-Rays and so changing them that they are emitted as actinic light. At first, screens treated with these chemicals were used only in hand fluoroscopes. Later, experiments were made with screens in taking radiographs, and it was found that much more contrasty negatives were obtained; that sharper detail was secured and that the time of exposure was shortened. Further developments resulted in commercial intensifying screens which were quite successful. The time required for exposure was shortened without reducing the quality of the results. Quite the contrary, exhaustive tests have proved that, when proper screens are used, better radiographs are obtained. With modern screens of extra good quality, the effectiveness is increased 600 per cent, even where but one screen is used. What Constitutes a Good Intensifying Screen? It is impossible to tell the quality of a screen by merely looking at it, although some of its good points will be apparent in its glossiness or surface texture. Commercial intensifying screens are made of specially prepared cardboard coated with a smooth layer of clear white chemical compound having a base of Calcium Tungstate. The exact composition of the compound is important, because an inferior quality of its ingredients will result in excessive phosphorescence. But even more important than the basic purity of the chemicals, is the process of treatment and preparation. Just as two cooks may use exactly the same 299
CHIROPRACTIC SPINOGRAPHY quality and quantity of the identical ingredients and produce, one, an excellent cake, and the other, a poor one, so can an intensifying screen of low power be made from exactly the same materials as are found in the best screen obtainable. The salt in the emulsion must be “tuned” to the film or plate to secure truly good actinic conversions of light rays. Photometric tests by a large manufacturer of photographic materials showed that the light emitted by Intensifying Screens is the most effective light known for photographic work. Mottling and graininess are the most frequent faults of intensifying screens. It is not possible to absolutely overcome graininess since the fluorescent coating is made up of minute particles held together by a binding agent, but the correct preparation of this coating and care in the selection and treatment of the binder will reduce the effect of this graininess to an almost neglectable factor. Intensifying screens are now so carefully made that there is little graininess nor mottling apparent. Performance is the final test of quality in an intensifying screen. A good screen must be coated with a chemical combination of great permanence and stability so that the screen may last indefinitely and be unaffected by heat, light or dampness. The developments of several years of experimenting have, at last, brought out a screen which needs no “airing” at frequent intervals for some weeks, as was necessary in earlier types. Not only is the coating of some X-Ray intensifying screens of so fine a texture that there is virtually no graininess nor mottling, but the composition of the emulsion is not only chemically, but physically correct also, and it is of such permanence that the screens will last indefinitely with reason300
CHIROPRACTIC SPINOGRAPHY able care. They require no seasoning whatever, and are unaffected by heat, light or dampness. Directions for Use of Intensifying Screens The object of the intensifying screen is to assist the actions of the X-Rays in exposing a negative, reducing the time of exposure. The intensifying screen is a cardboard coated on one side with a chemical which fluoresces under the action of the X-Rays, and the actinic light given out assists in exposing the negative. There are two methods of using intensifying screen: one method with the film or plate and the single screen, and the other, with two screens and the duplitized film, which is known as double screen technique. Single Screen Technique Each intensifying screen should be mounted in its own plate-holder or cassette. This serves two purposes. The first and most important is, that it gives the necessary contact between the negative and the screen. It is very essential that intimate contact be maintained between the negative and the screen owing to the fact that the light given out by the screen follows the laws of ordinary light and the intensity of it is inversely proportional to the square of the distance. The light given out by the intensifying screen is not very strong and therefore any slight distance between the plate and the screen will cause a poor picture. The second advantage of the cassette is that it offers a good protection for the intensifying screen. The intensifying screen is mounted on the lid of the cassette, emulsion side out, and when loading the sensitive emulsion of the negative should be next to the sensitive side of the screen. When taking radiographs, place the cassette under the patient so that the rays pass through the smooth aluminum face of the cassette, then through the plate, striking the screen last. The exposure with an intensifying screen will be reduced about one-fifth the usual time required to make 301
CHIROPRACTIC SPINOGRAPHY an unassisted negative. In single screen technique a tube of relatively low penetration should be used. Double Screen Technique This practice consists of using two intensifying screens and a duplitized film. The duplitized film has a photographic emulsion on each side and when using two screens there is a screen against each surface of the film. When mounting double screens in a cassette a thick screen is mounted against the lid of the cassette and a thin screen is mounted in the bottom of the cassette and when loading the duplitized film is placed between the screens. After the cassette is loaded, place it under the patient with the smooth aluminum side up so that the rays will pass through the thin screen first, then the film, and last, the thick screen. Never use plates with double screens.
FIG. 85
302
CHIROPRACTIC SPINOGRAPHY The advantage of double screens is greater speed, for this method is nearly twice as fast as the single screen and plate, and, furthermore, better contrasts are obtained. Method of Mounting Single Intensifying Screens The first operation in mounting an intensifying screen in a cassette is to clean the bottom of the cassette carefully and brush off the felt coating on the lid with a stiff brush so as to remove all foreign particles or pieces of aluminum that may be there. Each screen is shipped in an individual case and wrapped in clean white tissue paper. Remove this paper and wrap into it a piece of clean cardboard the size of the screen to be mounted and about the thickness of an X-Ray plate. Place this in the bottom of the cassette and it will prevent the sensitive surface of the screen from being in contact with
FIG. 86
303
CHIROPRACTIC SPINOGRAPHY any foreign substance which might attach itself. Then place the screen, sensitive side down in the cassette. Take a tube of liquid glue and put a small drop, about the diameter of a lead pencil, in the places as shown in the cut. The screen will then be in the same condition as shown below. With the finger, rub each drop a trifle and then carefully close the lid, being sure that the screen is centralized in the bottom. Fasten down the springs of the cassette and allow the glue to dry for about 30 minutes, and the screen will be ready for use. Method of Mounting Special Intensifying Screens In mounting a special intensifying screen in the bottom of a cassette, better contact will be had if a thin piece of felt be mounted in the bottom first, and the screen mounted to this. It is advisable to cut the felt one-half inch smaller than the size of the screen for the reason that it will be entirely covered by the screen and do away with the possibility of the shedding of hairs. The screen can best be mounted to the felt by means of Paper Transparent Mending Tape about five-eighths of an inch wide. Cut off four pieces about one inch long and fold them in the middle, making a hinge. Moisten one-half of this hinge and fasten one in each corner of the felt. Then moisten part of the other half, place the screen in the cassette, sensitive side up, and close the lid. The advantage of using the paper hinges is that if for any reason it is necessary to remove the screen it can easily be detached. Care of Intensifying Screens Intensifying screens are made with the greatest of care and every precaution is taken to make each screen perfect and reach the Roentgenologist in this condition. We are frequently asked how long a screen should last, and can best answer this question by saying that the limit of 304
CHIROPRACTIC SPINOGRAPHY the life of an intensifying screen is governed by the care given it. Below we are giving a few essential precautions that will assist in making your screens last. Each screen, or pair of screens, should be mounted in its own cassette for protection against handling or damage to the sensitive surface through handling. Do not use a smaller size photographic plate than the size of the screen being used, owing to the danger of damaging the smooth surface with the edge of the plate. Neither do we recommend this practice when using films, particularly when using double screens owing to the danger of scratching the lower screen when localizing the film and when removing it after an exposure; furthermore, the matter of localizing when taking the picture is always a source of trouble. When loading the cassette, carefully brush the screens and negative with a fine camel hair brush or a clean piece of double-faced cotton flannel in order to avoid dust spots. Intensifying screens may be cleaned with pure soap and water, sponging off with a tuft of absorbent cotton, and care should be taken to see that they are thoroughly dry before closing the cassette. Developer spots may be removed to a large extent by the application of Hydrogen Peroxide to the spot on a tuft of cotton. Allow the application to rest on the spot for two or three minutes and then remove. If the spot is not entirely gone, apply fresh solution. This method is most effective if used as soon as the spot is noticed. Be sure that the screen is entirely dry before closing the cassette. The table on which you load your cassette should not be near the developing tank, if it can be avoided, so to prevent the possibility of splashing the screens with developer or hypo. One should not permit the emulsion to touch any aluminum part. When not in use, the cassette should be closed 305
CHIROPRACTIC SPINOGRAPHY and a clean cardboard, preferably covered with white tissue paper, should be kept in the cassette. If you are using double screens better contact will be had if a thin piece of felt be mounted under the special intensifying screen in the bottom of the cassette.
306
PART V THE PREPARATION AND PLACING OF THE PATIENT FOR TAKING SPINOGRAPHS In preparing the patient for the taking of spinographs of all regions except atlas and axis, all clothing should be removed as far down as the waistline, and a garment so made that it may be opened well below the hips should be substituted for the regular clothing, putting the open side to the back, so as to make it possible for the spinographer to see and palpate the full length of the spinal column while placing the patient. This garment may be made of any light weight material except silk. The clothing at the waistline should be loose enough as to be slipped well below the buttocks as the patient is sitting upon the table; by taking the above precaution you are assured that there are no wads of clothing under the buttocks or hips, which would tend to twist the spine out of its natural position when the patient is lying on them, and they also raise the body somewhat off the table. If the patient’s clothing is not properly arranged, it will be found that in a majority of cases, buttons or fastenings of various kinds will be found between the source of radiation, and the film or plate; and these objects or fastenings being made of metal, bone, or other hard substance, offer resistance to the X-Rays and therefore cast a shadow on the film or plate. If the shadow of any object be cast over the shadow of the spine, it may interfere materially with making an accurate listing of that particular part. Buttons or other objects left on the front of the clothing will cast a shadow much larger than the object itself, due to the fact that they are several inches from the film. As an illustration, place some object between a source of light and a table; hold the object close to the table and note that the shadow is approximately the same size as the object; now move the object away from the 307
CHIROPRACTIC SPINOGRAPHY
FIG. 87. Showing first position assumed by patient when being placed upon the table for a Spinograph
308
CHIROPRACTIC SPINOGRAPHY table and toward the light, and you will see that the shadow increases in size as the object is farther from the table. In taking pictures of atlas and axis only, the patient should be required to remove all false teeth where possible, because of the fact that the plates cast shadows, which in the majority of cases hide some part of the atlas or axis. In case the patient is a lady, all hair pins on the back of the head should be removed and the hair should be placed well on top of the head so that the head is resting firmly on the table. Number of Films Required to Spinograph the Entire Spinal Column of an Average Adult This depends upon the size of the films used. In our work here at the P. S. C. we use five 8x10 inch films, or four 8x10 inch and one 5x7 inch may be used to get the entire spinal column of the average height adult. The question is often asked why we use a separate film for the atlas and axis instead of taking them on the same film with the lower cervical and upper dorsals. There are really two reasons why we use the separate film for this region. FIRST: BY centering the tube directly over the atlas and axis we get a much better reading than can be had if the tube were centered to the inferior, which would be the case if we were trying to get them all on one film. SECOND: If we try to get the atlas and axis on the same film with the rest of the cervicals and upper dorsals, we find that the mandible and lower teeth cast a shadow over the middle cervicals so that in the majority of cases we are unable to make an exact listing of this region. In using the small films and centering the tube over small areas of the spine, we are getting the minimum of distortion, as the rays are not directed at as great an angle to cover a film 8x10 inches as would be necessary to cover the film that is 14x17 inches, unless a greater target plate distance were used when using 309
CHIROPRACTIC SPINOGRAPHY
FIG. 88. Showing second position of patient with the operator standing at the patient’s head to see that they are in alignment
310
CHIROPRACTIC SPINOGRAPHY the large film, and this would be objectionable because of the fact that as the target plate distance is increased, the time or length of exposure must also be increased. Most Bucky Diaphragms on the market today are designed to be used with a target plate distance of approximately 25 inches, so that the direct rays are striking the grid perpendicular to the wood and lead strips, of which the grid is made. In case a greater or less target plate distance is used, the rays will not strike the grid perpendicular to the strips making up the grid, the result being that when the primary rays strike the lead strips the radiation would be stopped at that point, which would also mean an increase in exposure in order to properly expose the film. The only instances that we may use the 11x14 inch or 14x17 inch films for spine work is in cases of very pronounced scoliosis, in which we desire to get the entire scoliosis on one film, and in these cases we use a greater target plate distance so as to minimize the distortion as much as possible. In order to be able to read spinographic plates, it is necessary that they be taken in such a position that one or more of the peculiar vertebrae of the spine is shown on the film; for example, if we were taking the upper dorsal region, it would be necessary that we have the first dorsal showing on the film, then when the reading is made, we locate the first dorsal and count from it, up in the cervical region, and down in the dorsal region. In the lower dorsals and upper lumbar region the peculiar vertebra is the twelfth dorsal. The following rules should be closely followed in taking spinographs, and in fact they apply to all Radiographic Work. FIRST: Always have the spine or part to be radiographed as close to the film or plate as possible. SECOND: In spinographing all regions of the spine, always place a marker of some kind on the right-hand side of the film or plate so that it will be photographed onto the film. 311
CHIROPRACTIC SPINOGRAPHY THIRD: If using X-Ray plates always place the emulsion side up, which would be next to the patient. If using duplitized films, either side may be placed up. FOURTH: Always have the film, patient, and tube centered, By that I mean that the patient should be placed so that the median line of the patient’s body is over the center of the film or plate laterally, and then the X-Ray tube should be so placed that the central ray will be directly over the center of the patient and film. With the improved spinographic tables of the present day, it is very easy to get the film and tube centered, so the only real difficulty we need to encounter is that of getting the patient over the center of the film or plate. Most spinographic tables put out today are made with a tunnel just beneath the thin top of the table, and under the center, laterally; the holder containing the film or plate is placed in a tray in this tunnel, and it may be placed at any point desired after the patient is in position. The tube should be placed directly over the center of this tunnel and fastened in that position, so that the film and tube will be on center at all times. Placing of Patient on Spinograph Table With the patient properly prepared, we have him sitting on the table with the feet placed directly in the center of the table, the operator should then stand on one side of the patient, palpating the spinous process of the lower lumbar and the tubercles of the sacrum getting them directly in line with the center of the table. To get the patient directly in the center, it is advisable to instruct him to place his hands on the table directly at his sides and raise the weight of the body off the table, it is then easy for the operator to move the patient in either direction until he gets the center of the sacrum directly over the center line of the table. The operator should now step around to the head of the table and again locate the tubercles of the sacrum to see if they appear to 312
CHIROPRACTIC SPINOGRAPHY be on center, looking at them from this position. The next step is to place the patient in the supine position, and to do this the operator should first instruct the patient to fully relax and to fold the arms across the abdomen. The operator is now at the head of the table, and placing his hands under the shoulder with the thumbs pointing to the superior, he should now support the weight of the patient, bringing them down on the table so that the center of the head is in line with the center of the table. If the patient is properly placed as above described so that both ends of the signs are directly over the center of the film, the entire spine will be found in the center of the film providing there are no curvatures. It must be remembered that the patient should in no way attempt to help to let himself down on the table, because of the fact that if he is holding on the edges of the table with the hands helping to support his weight, he may hold more with one hand than with the other, the result being that the spine is drawn to one side of the center, and a curvature will show on the film and it may have been produced in this way. Placing of Film or Plate for the Various Regions of the Spine When spinographing the entire spinal column, the various regions are taken so as to have a landmark showing on each film. By taking them in this order we can take any region of the spine, and at any other time one or more of the remaining regions could be taken, and we would still be able to get the entire spinal column on the five films even though they be taken at different intervals. The landmarks used for properly placing the film under the different regions are as follows: For the sacrum and coccyx the superior edge of the film is placed approximately 1-1/2 inches above the superior crest of the illi. This will give us the fourth and fifth lumbar, sacrum, and coccyx. For the lumbar region the inferior edge of the film is placed from 2 to 2-1/2 inches below the superior crest of the illi. This will give us the first tubercles of the sacrum, all the lumbar vertebrae and usually the twelfth dorsal, and on short individuals you may also get the eleventh dorsal 313
CHIROPRACTIC SPINOGRAPHY For the lower dorsal region the inferior edge of the film is placed from 3 to 4 inches above the superior crest of the ilk. This gives us the superior edge of the first lumbar and from there upward, including approximately the sixth dorsal. For the lower cervical and upper dorsal region the superior edge of the film is placed even with the inferior edge of the lobe of the ear. This will give us approximately from the third cervical to sixth dorsal inclusive. In taking this region it is necessary that the patient’s chin be raised slightly so that the rays will pass under the chin, exposing the entire film without having a shadow of the mandible and lower teeth showing on the film, as would be the case if the chin were not raised. However, the chin should not be tilted too much to the superior, because as the chin is raised, the occiput drops to the inferior and a lordosis is produced in the cervical region, and this causes the spinous processes of the vertebra above to overlap the vertebra below and interferes somewhat with reading the spinograph. By centering the X-Ray tube about 1 inch to the inferior of the center of the film, it will not be necessary to raise the chin but very little in order to allow the rays to pass just under the chin. In taking the atlas and axis, the center of the film is placed even with the inferior edge of the lobe of the ear, which is also under the center of the spinous process of the axis. To get a picture of the atlas and axis, the patient’s mouth must be open as wide as possible so that the shadow of the teeth will not cast a shadow over the vertebra. The chin of the patient should be raised or lowered until the upper teeth are approximately perpendicular to the occiput so that the shadow of the upper teeth will be thrown directly over the shadow of the occiput. With the head in this position, the chin and forehead will be practically on the same plane; however, this will vary somewhat, due to the peculiarity in shape of the forehead or chin of some individuals. Other Regions There are cases in which we may be interested only in a certain portion of the spine and we may take spinographs of these regions out of the regular order, thereby allowing us to center the 314
CHIROPRACTIC SPINOGRAPHY
FIG. 89. Another view of the P.S.C. Spinographic Laboratory showing proper position of the patient upon the table and operator standing behind the lead screen, ready for exposure.
315
CHIROPRACTIC SPINOGRAPHY tube more directly over the region in which we are interested. For instance, we might be interested in a complete reading of the S. P. region, and to get this reading with the films taken in their regular order we would need the lower dorsal and also the lower cervical and upper dorsal region. Another region in which we are often interested is the K. P., and to get a complete reading of this region on one film we shall place the film so that we are centered over the K. P. region. It must be remembered in taking pictures of the spine out of their regular order that they must be taken in such a manner that one or more of the peculiar vertebra is shown upon the film, otherwise we would be unable to determine our count when listing these regions. The landmarks used in taking the two regions mentioned above are as follows: Taking from the first dorsal down, we place the superior edge of the film about 1 inch superior to a line drawn from the acromion process of one shoulder to the same point on the opposite side. This will give us from first dorsal to approximately the ninth dorsal inclusive of the average individual. In centering over the kidney region the center of the film is placed from 3 to 4 inches above the superior crest of the ilk, which will give us approximately from the tenth dorsal to the second lumbar inclusive. Method of Verification when the Spinographic Listing and Palpation Do Not Agree Cases sometimes arise in which the spinographic listing and the count made from palpation do not correspond, perhaps due to the fact that a particular vertebra has some peculiarity that did not show on the spinograph, due possibly to the fact that a cartilaginous growth may be palpable, but the rays have penetrated it, therefore it does not cast a shadow on the film. Extreme tenderness may sometimes exist around some vertebra and yet no subluxation be shown in this region, and by using some method of locating the exact region of the tenderness we 316
CHIROPRACTIC SPINOGRAPHY may be able to detect some abnormality that would otherwise be overlooked. A good method of locating any particular place is to place a small piece of metal either directly over the point in question or just to one side of this point, the metal being harder than the tissues of the body will cast a shadow on the film, thereby giving us the exact location in which we are interested. An ordinary pin may be used for the marker and can be held in position with a small piece of adhesive tape. In all cases, if the marker is placed directly over the point in question it must be a very small marker, otherwise the shadow cast by the marker may entirely hide the condition for which we are looking. The measurements given for the placement of films for the various regions of the spine are based on the average length spine, therefore, in cases of very tall patients and also in cases of the other extreme, it will be found that these measurements may vary somewhat. In cases having a very pronounced scoliosis in the lumbar region where the pelvis is tipped adaptative to the scoliosis, care must be taken to make an allowance for this tipping, otherwise the film may not be properly placed for the lumbar or lower dorsal region. For instance, in case of an extreme right rotatory scoliosis in the lumbar region in which the pelvis is tipped adaptative to the rotation, we will find the superior crest of the left ilium tipped to the superior, and if we were placing our film for a lumbar region measuring down from 2 to 2-1/2 inches from the superior crest of this ilium, there is a possibility that, due to the extreme tipping of the pelvis, the film would not be far enough to the inferior to get the right inferior edge of the fifth lumbar and the first tubercle of the sacrum Now, let us suppose we have the same condition existing and are interested in getting from the twelfth dorsal up. If we measure from 3 to 4 inches above the superior crest of the left ilium, we shall very likely find that the inferior edge of our film is so far to the superior that we shall fail to get the twelfth dorsal 317
CHIROPRACTIC SPINOGRAPHY showing on the film, therefore, in this type of cases it is necessary that sufficient allowance be made to compensate for this tipping. The same thing would be true if we were taking a pelvis picture of the same patient, and also in cases of the upper dorsal region, where one shoulder is tipped higher than the other, there is a possibility that the film may be placed too far to the inferior or superior to insure us of getting from first dorsal down. Placement for Lateral Views In some cases where the anterior-posterior spinograph, seemingly, does not reveal the proper spinographical analysis, because of the fact the patient does not get results, it is sometimes necessary to take lateral views of the spine. This will show the spinous processes and the intervertebral discs laterally, the exacted relationship of the descriptive parts that make up the intervertebral foraminae, and the anterior edges of the vertebrae. To obtain the best results when making spinograph exposures laterally, have the patient sitting in his normal position, with the film held firmly against the side to be taken. It is not advisable to have someone try to hold the film in its proper place, for the film must be free from motion. A solid frame or fixture of some sort is best utilized for this purpose. Good results are quite often obtained in getting lateral views of the cervical, lower dorsal, and lumbar vertebrae, but not of the upper dorsal region. The difficulty in viewing the latter region is that of having to penetrate the scapulae and shoulder joints in order to shadowgraph the spine. It is true that by rotating the body with the arms extended to the superior, the rays will shadowgraph the spine without having to go through the scapulae. But in placing the patient in this position we have produced considerable distortion in this region and the picture would be of little value in determining subluxations. For this reason we seldom attempt to spinograph this region laterally. The foraminae in the cervical region face slightly to the anterior. If a good outline of the foraminae is desired in this 318
CHIROPRACTIC SPINOGRAPHY region, place the patient at such an angle that the foraminae are on a plane with the film, and in all cases the film and tube should be on a plane. If the foraminae are not desired, a true lateral may be taken. Have the inferior border of the film 1 inch below the tip of the shoulder. Center the tube slightly to the inferior of this region to clearly bring out the seventh cervical and the first dorsal vertebrae. For lateral views of other regions have the patient approximately at right angles with the film. In these regions the foraminae are so located that the spinal nerves emit almost straight laterally. FIGURE No. 90 Illustrating the X-Ray table with patient in proper position for spinographs. No. 1—Indicates the center of the cylinder which is always centered over the region to be exposed. No. 2—Indicates the superior crest of the ilium. No. 3—Inferior margin of the cassette which should always be placed from 2 inches to 2-1/2 inches below the superior crest of the ilium. No. 4—The superior border of the cassette. Notice that path of ray covers the superior and inferior borders of the cassette. With cassette placed in this position and the X-Ray tube centered over it, all of the lumbar vertebrae will be shown upon the negative. Nos. 5 and 6—Indicate the position of the cassette when the lower dorsal region is being taken with the inferior border of cassette No. 5 from 3 to 4 inches above the superior crest of the ilium No. 2. While No. 11 indicates the path of rays when this exposure is being made. No. 6—Indicates the inferior border of the cassette when being placed for lower cervical and upper dorsal and No. 8 the superior border of cassette. Particular attention must be given 319
CHIROPRACTIC SPINOGRAPHY
FIG. 90
320
CHIROPRACTIC SPINOGRAPHY to this region to see that the path of rays, as indicated by figure No. 10, pass just under the point of the chin and not directly through the chin. No. 7—Indicates the superior border of the cassette centered under the atlas and axis with path of rays, figure No. 9, passing directly through the mouth. These instructions may vary with some individuals as all individuals are not the same physical proportion and it is necessary for the operator to use good judgment and place his plates accordingly.
321
PART VI Protection of the Patient At the time of the discovery of X-Rays by Professor Rotengen in the year 1895, nothing was known of the effects that this radiation would have on the tissues of the body. This important science, like all others, had to pass through the experimental stage, and in passing through this stage, a great many patients were burned more or less severely, and some to the extent of losing their lives. The same thing is true in regard to the operator, many of them have been permanently injured, others have lost their lives, in the development of this important work; and all this because they did not know what the effect was or how to protect their patients or themselves from the effects. Effects of X-Rays on Tissues The effect of X-Rays on the skin is spoken of as radiodermatitis and is divided into three degrees as follows: FIRST: There is a slight discoloration of the skin which resembles a sunburn and it may persist for several weeks. This discoloration may be accompanied with slight burning or itching sensation and possibly a temporary loss of hair. SECOND: There is an increase in the severity of the symptoms of the first degree and is followed by burning pain, exfoliation, and the formation of vesicles and exudate, may persist for weeks or even months. THIRD: There is a destruction of skin and even of the deeper tissues, with excruciating pain. Requires months or years to heal and in some cases may never heal. Factors Which Determine the Amount of Exposure Permissible In the development of the X-Rays it has been learned that the amount of exposure necessary to produce any of the three 322
CHIROPRACTIC SPINOGRAPHY forms of radiodermatitis depends upon the following factors: FIRST: The distance from the target of the tube to the patient’s skin in the region being exposed, which is commonly spoken of as the target skin distance. SECOND: BY the amount of penetration being used, and this is regulated by the voltage. THIRD: The amount of current being passed through the tube together with the length of exposure. This is commonly spoken of as the number of milliampere seconds of exposure. FOURTH: Whether or not the rays have been passed through a filter which is interposed between the X-Ray tube and the patient, and also the nature and thickness of the filter should be considered. Factors Which Should Be Used for the Patient’s Protection FIRST: The operator should always get the radiographic history of the patient. This history should include any X-Ray exposures the patient may have had previous to this time in or adjoining the regions that are to be taken at this time. Exposures may have been made of other regions of the body somewhat distant from the region to be taken, and in this case it would be perfectly safe to make the contemplated exposures; but, if exposures have been made any time within three or four weeks prior to the time the patient has come to you, it would not be advisable to make another exposure of this region, unless you are able to find out how much exposure the patient has had, in which case you could then determine whether you have sufficient latitude to make another exposure without danger to the patient. The patient may have had all of the exposure that could safely be given in any one region at one time, but by allowing a few weeks’ time to elapse, the effects of the radiation will have been dissipated and it would then be safe to again expose this region. 323
CHIROPRACTIC SPINOGRAPHY SECOND: Testing of Apparatus. Before placing the patient on the radiographic table or even in close proximity to the tube, the operator should have thoroughly tested out his equipment so that he knows everything is in perfect condition and that he is producing X-Rays of sufficient penetrative value to get through the patient in the minimum of time and yet enable him to produce a good negative. Having the back-up spark or penetration desired, the operator should then note the exact number of milliamperes of current passing through the tube, and this same amount of current should be kept constant during the entire exposures, because of the fact that as the quantity of electrical current increases or decreases the pressure or voltage increases or decreases in the opposite direction, i. e., if upon getting the back-up spark desired, which in this case we will assume is a 5-inch gap, which is equal to approximately 60,000 volts, and we shall now assume that we are getting 19 milliamperes of current passing through our tube, and just so long as we keep this amount of current passing through the tube, just that long will we have the 5-inch spark-gap, but if we allow the quantity of current to increase to 29 milliamperes our voltage would then decrease and we would be getting approximately a 3-inch spark gap or 40,000 volts instead of the 5-inch gap, while on the other hand, if the quantity of current decreased our voltage would increase and we would be getting more than a 5-inch gap. It must be remembered that in order for us to know the exact amount of exposure we are giving we must keep the quantity of current the same that it was when we get the spark-gap required. THIRD: Always Filter the Rays. A filter of some kind should always be interposed between the X-Ray tube and the patient. Aluminum is usually used for the purpose of filtering the rays; however, other substances may be used, such as paper, wood, leather, etc., as the object of the filter is to cut out the very soft rays that are produced in any X-Ray tube, thereby preventing them from coming in contact with the patient’s skin. The thickness of the filter being used determines to a certain extent the amount of exposure that may be given to any one region at 324
CHIROPRACTIC SPINOGRAPHY any one time without injury to the patient. Most filters are from one-half to one millimeter in thickness and are placed from one to two inches below the tube. The thicker the filter being used the greater amount of the soft rays will be cut out, therefore a longer exposure could be given without injury to the patient’s skin, and the cutting out of these soft rays would have no effect on our picture as they would not have sufficient penetrative value to get through the patient and to the film. It is a fact that the higher voltage or back-up spark we are using the more penetrative are the X-Rays that are produced in the tube, but no matter how high the voltage or back-up we are using, some soft rays are produced in the tube and it is the purpose of the filter to prevent these soft rays from reaching the patient. It is also a fact that the lower the voltage or back-up spark the greater is the amount of soft rays being produced in the tube, therefore it is more important to use the filter when using a lower back-up spark. FOURTH: The Target Skin Distance. The greater the distance between the target of the X-Ray tube and the patient’s skin in the region being exposed, the less the danger to the patient for a given amount of exposure. It must be remembered, however, that the intensity of light varies inversely as to the square of the distance; therefore, if too great a target skin distance be used, a much longer exposure would be required in order to get enough radiation to the film to produce a negative of the proper density. The majority of spinographic work is being done with the use of the Bucky Diaphragms and most Bucky Diaphragms are designed to be used with a 25-inch target plate distance, and if a greater or less tube distance be used, the primary rays will not strike the grid perpendicular to the wood and lead strips of which it is made, the result being that quite a percentage of the rays will be absorbed by the lead in the grid and a much longer exposure would be required to get the proper amount of radiation to the film. In using the Bucky Diaphragm for spinographic work and using the 25-inch target plate distance, we find that with the patient of average size the target skin distance will be approximately 16 inches. In extremely heavy patients this distance, of 325
CHIROPRACTIC SPINOGRAPHY course, would be less, but a target skin distance of at least 12 inches should always be maintained even though it be necessary to somewhat increase the target plate distance. FIFTH: Amount of Exposure Which May Be Given Without Danger to the Patient. The amount of exposure which may be safely given to a patient in any one region at any one time or within a very short period of time, depends upon the technique being used, as well as upon the susceptibility of the patient to the effects of the X-Rays. The amount of X-Rays produced varies in direct proportion to the amount of current being passed through the tube and they also vary in direct proportion to the length of exposure; therefore, in making exposures the number of milliampere seconds must be considered. Multiplying the number of milliamperes of current passing through the tube by the number of seconds of time equals the number of milliampere seconds that is seven. The effect of X-Rays on the tissues of the body or on the film varies in direct proportion to the amount of current being passed through the tube, and in direct proportion to the length of exposure and nearly in direct proportion to the square of the voltage used, and they vary inversely as to the square of the distance from the target, to the patient, or to the film Working at a 12-inch target skin distance and a 5-inch spark gap approximately 1600 M. A. S. may be given, but with no factor left for safety; therefore, a risk is taken if that amount of exposure be given. In our work we do not give over 1200 M. A. S. to any one region at one time and we also always use an aluminum filter as an additional safety factor. In a majority of cases our target skin distance is more than 12 inches and this gives us a still greater safety margin. Always Use Sufficient Penetration It is very important that the X-Rays produced in a tube are sufficiently penetrative to get through the patient and to the film 326
CHIROPRACTIC SPINOGRAPHY and give a proper plate density in a reasonable length exposure. In case too low a spark gap is used, part of the rays do not get to the film and a much longer exposure would be necessary to get a proper plate density and in this event the risk to the patient would be much greater. Value of Intensifying Screens Intensifying screens do just what the name implies, they intensify the value of the X-Rays that reach them, thereby giving a much greater action on the film from a given amount of radiation. By the use of double intensifying screens we are enabled to get a good radiograph in a much shorter time, when using either a high or low tube and with the shorter exposure we have added safety for the patient. Use Lead-Glass Bowl and Lead Lined Cones The X-Ray tube should be kept in a lead-glass bowl, the purpose of which is to keep the rays from scattering around the room, thereby keeping unfiltered rays from reaching the patient or in fact anyone in the room. By using various sized lead-lined cones from the tube to the patient, all the radiation, except what passes down through the cone, can be kept from reaching the patient. All the rays striking the sides of the cone are absorbed by the lead lining and do not reach the patient. The size of the cone is determined by the size film that is to be exposed, by using cones of the proper size the only tissues that need be exposed are those between the film and the tube. Protection of Patient from Static and High Tension Current One of the elementary electrical laws is that electricity always travels the path of least resistance. The body is a good conductor of electricity and should the patient get as close to any of the high tension lines as the spark gap being used, the current would jump to the patient if it could get the ground easier that way than it could complete the regular circuit. 327
CHIROPRACTIC SPINOGRAPHY All wiring carrying high tension current should be placed in such a position that it would be impossible for anyone to accidentally get as close to it as twice the length of the spark gap being used. When making exposures the patient should always be watched very closely to see that he does not try to get up, and in so doing get the head or any part of the body close to either end of the tube, as the tube is in the high tension circuit and should the patient get as near the tube as the length of spark gap used, the current would very likely jump to him, and thence to the ground by way of the ground wire from tube stand. It is a very good idea to immobilize the patient so that he cannot get up until released; however, the pressure used should not be enough to cause the spine to be twisted out of its regular position. The tube stand should be connected to the ground by means of a wire from said stand to some good connection with the ground, this will take care of the static discharge that is given off from conductors carrying a high voltage. The sensation produced by static is described by some as a cool breeze blowing over the body, others describe it as a heat sensation, or perhaps a sensation of weight on the body, while to some it seems a prickling sensation. Summary of Factors Which Should Be Used for the Protection of the Patient FIRST: Always get the radiographic history of the case. SECOND: Test the machine and tube before placing patient on table. THIRD: Always use a filter of some kind between the X-Ray tube and patient. FOURTH: Never use less than a 12-inch target skin distance. 328
CHIROPRACTIC SPINOGRAPHY FIFTH: Never give more than 1200 M. A. S. exposure to any one region at one time or in a very short period of time. SIXTH: Always use a back-up spark that will produce X-Rays with sufficient penetration to get through the patient in the minimum of time SEVENTH: Always use double intensifying screens when taking pictures of the thicker parts. EIGHTH: Keep tube enclosed in lead-glass bowl and also use lead-lined cones to keep X-Rays from spreading and exposing more tissue than is necessary to expose the film. NINTH: See that patient cannot get close to any of the high tension conductors; also have table grounded. Protection of the Operator from X-Rays, Secondary Radiation and High Tension Current It is just as essential that the operator take all necessary precaution in protecting himself as well as the patient. In fact, the operator is more liable to be affected by the X-Rays than the patient, because he is working with the equipment day after day, and in so doing, he may be receiving an accumulation of the effects of this radiation, if he is not properly protecting himself. The patient may come in and have one or more exposures made and is then gone and may never be exposed to X-Rays again, or, if other exposures are made, a sufficient amount of time should have elapsed so that any effects that may have been produced will have been dissipated. The following are the ways by which the operator may protect himself from the effects of the X-Rays and secondary radiation. FIRST: Have as great a distance as possible between the X-Ray tube and himself. This method of protection is not practical in the majority of cases because the average Chiropractor’s X-Ray laboratory has a limited amount of space, therefore the machine and table are usually close together for the purpose of 329
CHIROPRACTIC SPINOGRAPHY conserving space and also for convenience. The operator should, at all times, be close enough to the table so that he can watch the X-Ray tube and at the same time see the patient, so in case the patient should move, or attempt to get up, the circuit may be broken, thereby preventing the patient from being injured. SECOND: If the operator can limit the amount of time that he works in the X-Ray laboratory, there may be no bad effects from the radiation, because they have been dissipated as fast as they accumulate. In most cases this method of protection cannot be used, as most operators are working in their laboratory more or less every day. THIRD: By interposing absorbent material, such as lead, between the tube and operator, there is complete protection from the X-Rays and also from the secondary radiation produced around the tube and table. In the majority of cases this method of protection is most effective and satisfactory. If a lead screen is used for this purpose, it should come close to the floor and extend high enough to reach well above the operator’s head, and it should also be wide enough to fully protect the entire body from any direct radiations from the tube and table. This screen should also have a piece of lead glass in it, at a proper height to allow the operator to watch the patient and tube whenever making an exposure. This lead glass should contain approximately 48% of lead, and should be equal in resistance to sheet lead 1/32 inch in thickness. Some operators prefer to protect themselves by wearing an apron or coat and gloves made of a composition which offers considerable resistance to the radiation. This, however, is not complete protection, as all parts of the body are not protected, and because of the fact that this material does not offer enough resistance to stop the primary radiation. 330
CHIROPRACTIC SPINOGRAPHY Lead-glass bowls may be secured for the purpose of enclosing the X-Ray tube and preventing the greater portion of primary radiation from being scattered around the room. With the small lead-glass bowl, which completely encases the radiator type of Coolidge tube with the exception of a small opening immediately below the target, the greater part of the primary radiation is kept from being scattered around the room, as the only exit for these radiations is through the small opening below the target. With the large lead-glass bowl, which only partially encloses the tube, there is only partial protection from the primary radiation, as the entire top of the bowl is open, also a space in each side is left open to receive the ends of the tube. While it is true that we get some protection from the lead-glass bowls, we are not getting any protection from the secondary radiations that are produced by the primary rays after they have left the tube, and the secondary radiations are just as harmful to the operator as the primary rays. FOURTH: The target of the tube should always be placed so that it is facing away from where the operator is working, that is, the anode end of the tube should be closer to the operator. FIFTH: The operator should not submit any part of his body for experimental exposures, neither should he hold patients in position while exposures are being made so that the hands or any part of the body will be exposed to any of the radiation. It is sometimes necessary to hold the patient’s head in position when taking atlas and axis pictures; this should be done either by some mechanical device or by someone who is not working around X-Rays continuously. In doing dental radiography, it is necessary that the films be held in position in the patient’s mouth. This should never be done by the operator, but the patient should be instructed to hold the film in position. SIXTH: If doing fluoroscopic work the fluoroscopic screen should be protected with a lead glass which equals in resistance to 1/32 inch of sheet lead. It should also be seen that there are no 331
CHIROPRACTIC SPINOGRAPHY leaks around the edges of the screen, where the radiation might get through. A test, which will give some idea of the amount of radiation to which the operator is being subjected, may be made in the following manner: Cut a film in small squares, wrapping each square securely in black paper to protect it from the light, or dental films may be used for this purpose, attaching them to the operator’s clothing where they will be subject to all the radiation that the operator is subject to; after working several hours with these films in this position they should be developed a certain length of time. After this has been done, several films should then be taken and given definite fractions of the amount of exposure required to produce an erythema, these films should then be developed the same length of time as the previous ones, and then by noting the density of these various films some idea may be obtained as to the amount of radiation the operator is getting. Protection of Operator from Shock The operator is in more danger of receiving an electric shock than the patient, due perhaps to carelessness on his part while manipulating the machine. It must be remembered that electricity always travels the path of least resistance, and the body is a conductor; therefore, if any part of the body is brought as close to any part of the high tension circuit as the spark gap being used, the current will jump to the body if it can get to the ground more easily by going that way. The following are a few precautions which should be considered for the operator’s protection. FIRST: Keep all wiring in such a position that it will be impossible to accidentally get in contact with it. For this purpose the overhead aerial is recommended, with the machine directly under same, so that the wires leading from the machine to the aerial are in a position that would make it impossible to unintentionally get within 10 to 12 inches of them. SECOND: See that all connections are properly made before attempting to pass any current through the tube. This includes 332
CHIROPRACTIC SPINOGRAPHY both the high and low tension circuits. If the filament circuit is not complete so the light is on, it would be impossible to pass any high tension current through the tube, and should the X-Ray switch be closed at such time, the current would jump a greater gap with the same voltage applied than it would if the light were on, due to the fact that the resistance of the tube is so much greater when the filament is not lighted. THIRD: When operating the machine, use but one hand at a time. Most X-Ray equipments on the market at the present time have the instrument boards insulated so that there is little danger of getting in contact with any of the conductors; however, there is always a possibility of getting too close to some part, but the danger of shock is greatly lessened by using but one hand at a time on any of the controls when operating the machine. FOURTH: By standing on a heavy rubber mat that is kept dry, there is less danger of the current jumping to the body as it would be much harder for it to reach the ground than if no mat were used. FIFTH: Always open the main switch, between the machine and outside line, when doing any repair work on machine, such as replacing fuses, examining connections, etc. 333
PART VII SPINOGRAPH EXPOSURE TECHNIQUE The Photographic Effect by Distance-Time Relation (With voltage, current and absorption factors constant) In the earlier stages of roentgenology exposures of various parts of the body were more or less guesswork and are still today with some technicians, but for the consideration of the technician who wishes to be accurate with his exposure technique he can take into consideration the following methods that are now used: The five factors that are absolutely essential in producing good radiographs are as follows: The tube distance from the anode or target to the X-Ray plate or film, the thickness of the object to be penetrated. Penetration of the X-Rays being produced; the current or milliamperes passing through the tube; the time in seconds that the object is to be exposed. The spine has been, and still is, one of the hardest regions of the body to radiograph, so that all parts and shadows of the vertebra are clearly outlined. Spinographic technique has been our specialty from the time we first used an X-Ray equipment; by making it our specialty we feel that we have improved and developed this part of X-Ray work into an art all its own. The tube distance plays a very important part in taking good spinographs, as it is our aim to have the spine stand out sharp and clearly on the plate, that it may be more easily read from a Chiropractic standpoint. For this reason we must consider some of the laws of physics that have to do with the relation of the intensity of light to the distance. It is self-evident that any light is dimmer the farther away it is. This is a very definite law and in the study of physics it is known as the law of Inverse Squares. 334
CHIROPRACTIC SPINOGRAPHY
FIG. 91
In the above diagram suppose O is a candle or other source of light and A, B, C, D is an opening one foot away from O. Letters A1, B1, C1, D1, represent a screen two feet from O. It is evident that the amount of light passing through A, B, C, D, covers four times the area when it reaches the screen two feet away. The law is generally stated that the intensity of light varies inversely with the square of the distance; in the above diagram it would take four times as long for a given amount of light to reach a square inch of area on the screen as it would a square inch on A, B, C and D. This same law is applicable to the X-Ray. We must, however, consider the length of the first exposure, and the distance of the target from the plate. We must then consider the distance of the target from the plate in the second exposure and from this basis must compute the length of time required. Assume that in the first instance the distance of the target from the plate is 12 inches and the exposure is for 3 seconds. In the second instance the distance of the target from the plate is 24 inches and the length of time must be computed. The foregoing assumes that the tube conditions are the same. 335
CHIROPRACTIC SPINOGRAPHY Let X represent the time for the second exposure. 3 12 —— == —— X 24 3 144 —— == —— X 576 3 1 —— == —— X 4 Multiplying the means by the extreme we have 1xX 3x4 1X = 12 seconds as the length of time for the second exposure. Example: Under certain tube conditions an exposure of 10 seconds is required with the distance at 24 inches. What would be the time of exposure if the distance were 18 inches? Let Z represent the length of time for the second exposure. 10 242 —— == —— Z 182 10 576 —— == —— Z 324 10 16 —— == —— Z 9 Multiplying the means by the extremes we have 16 x X = 10 x 9 16Z = 90 Z = 5-5/8 seconds as the length of time for the second exposure. 336
CHIROPRACTIC SPINOGRAPHY Under certain tube conditions an exposure of 10 seconds is required at a distance of 25 inches. What would be the time of the exposure if the distance were 15 inches? Let Y represent the length of time for the second exposure. 10 25 —— == —— Y 15 10 625 —— == —— Y 225 10 25 —— == —— Y 9 Multiplying the means by the extremes we have 25 x Y = 10 x 9 25Y = 90 Y = 3-3/5 seconds exposure for the second distance of 15 inches. It is well in comparing times of exposures at different distances to take only such distances as have a simple relation to each other. In this way the problem can be solved very quickly as indicated above. In other cases the method is the same, but requires more calculation. Example: Under certain tube conditions if an exposure of six seconds is required at a distance of 17 inches, what exposure would be required at a distance of 23 inches? Let W represent the time of the second exposure. 6 172 —— == —— W 23 6 289 —— == —— W 529 337
CHIROPRACTIC SPINOGRAPHY Multiplying the means by the extremes we have 289 x W = 529 x 6 289W = 3174 W = 10-284/289, or very nearly 11 seconds as the time for the second exposure. For illustration say the tube distance for a certain exposure was 18 inches and required 200 M.A.S. If the tube distance were increased to 36 inches, or twice the distance from the plate, the exposure, instead of being 200 M.A.S. would be 4 X200 M.A.S. Or 800 M.A.S. The plate being twice as far away from the tube focus as given in the preceding scale, the exposure will be 2 X 200 M.A.S. or 400 M.A.S. The exposure in which the tube distance varies several inches can be determined from the preceding instructions. Voltage-Time Relation (With current, distance and absorption factors constant) The voltage relationship to the photographic effect is squared and the time of exposure is in direct proportion to that effect. Thus voltage2 x exposure in seconds Photographic effect = —————————————— 1 Example: If the photographic effect is 40, which with a previous exposure has been found to be the correct effect on the film, and a 4-inch gap was used, we would have: 16 ( V2 ) x T (sec. of exposure) P.E. 40 = —————————————— 1 (40 X 1) ÷ (16 X T) = 2.5 T (sec. exposure) Current-Time Relation (With voltage, distance and absorption factors constant) M.A. x exposure in seconds Photographic effect = —————————————— 1 338
CHIROPRACTIC SPINOGRAPHY The current relationship to the photographic effect is in proportion. Example: If the photographic effect is 40, which with a previous exposure has been found to be the correct effect on the film, we would have, if 10 milliamperes of current were used, 10 M.A. x T P.E. 40= ———————— 1 (40 x 1) ÷ (10 x T) = 4 T (sec. exposure) Summary of the Above Relationships The effect of the X-Rays upon the film is equal to the number of milliamperes, to the voltage squared, and to the time of exposure in seconds. These factors are all in direct proportion to the photographic effect. The target plate distance squared is inversely proportional to the photographic effect. Thus in developing a technique, we would compile these factors into a complete equation: M.A. x V2 x T P.E.= ——————— D2 Tissue Absorption and Time Relation The absorption factor of tissue is represented by the capital letter K. This factor is in direct proportion to the photographic effect as all patients vary in thickness of tissue and hardness of tissue, it would be unwise to state the exact absorption of a given thickness of tissue without having previously experimented to more accurately arrive at an average constant absorption factor. The operator must take into consideration that all patients weighing 150 pounds are not built along the same physical proportions. Some have larger chest development, and are more muscular, while others have smaller chest development and a greater development of the abdomen. It is for this reason that it is more advisable to measure the thickness of the region to 339
CHIROPRACTIC SPINOGRAPHY be spinographed rather than depend upon the weight of the patient alone, and by using good judgment the operator is better enabled to determine whether to increase or decrease the amount of milliampere seconds to be given. Tube Condition Tests for Current and Spark Gap It has been the opinion of some, until experience taught them differently, that the so-called back-up or spark gap test had something to do with the operation of the machine proper as well as of the tube. This test is only a means by which the operator can ascertain the amount of penetration and the condition of his tube. The term back-up, or spark gap, is the amount of force or pressure behind the current that will cause the current to jump an air space between two electrodes or terminals. The spark gap rod and the kilovolt-meter tests are the most common methods used for testing the penetration of the rays and conditions of the tube. Of these two, the spark gap method is more accurate. The spark gap method not only determines the amount of penetration, but acts as a safety device, which enables the operator to keep within the limit of capacity of his tube. When the kilovolt-meter is used, the operator should make use of the spark gap, providing the machine is equipped with such a device in order to make a thorough check on the kilovolt-meter and also for safety. The apparatus for testing the penetration by means of the spark gap rod, is located on top of the machine and consists of two terminals, positive and negative. One of these terminals is known as a ball point terminal, which is stationary, while the rod acts as the other terminal. This rod is supported by and slides through two metal rings or furrows and is graduated in half-inch sections from two to ten inches. The graduations on this rod determine the distance between the end of the spark gap rod and the stationary ball point terminal. In order to familiarize ourselves with our equipment, we must first acquire a working basis or principle before we may 340
CHIROPRACTIC SPINOGRAPHY
FIG. 92. Switch Board of Interrupterless Machine
341
CHIROPRACTIC SPINOGRAPHY successfully operate an X-Ray machine. The following steps of operation are generally adhered to: FIRST: Close main or wall switches. By doing this the outside current is directed into the machine, and distributed through the various circuits of the machine to the different apparatus. SECOND: Light the filament of the tube. This is done by turning on a small button or snap switch. In some machines as soon as the main switches are closed, the current is automatically connected to the filament of the tube. However, it is advisable to have a filament circuit switch for protection to the tube. The switch is usually incorporated in the case of the filament control. The filament control, as previously explained, controls the amount of current supplied to the filament. The operator should learn to adjust this control to a very fine adjustment to eliminate unnecessary fluctuation of the current to the tube. THIRD: Close motor switch, if a motor machine; if a motorless machine is used this step is eliminated. The motor must be revolving at a proper speed in the motor machine before the X-Ray and polarity switches are closed to insure proper rectification of the alternating current by the disc or bar type rectifiers into a pulsating uni-directional current. FOURTH: Close the polarity or pole switch. This switch is more or less an accessory to the X-Ray machine. Its position in the circuit has been previously explained. The correct polarity may be obtained by this switch, by the motor switch or even by the main switch. The use of this switch is to obtain or pick off the positive or negative alternation of the current by the rectifying disc and switch it to the anode terminal of the tube. On some machines an instrument called the polarity indicator is used to indicate the direction of current flow. The dial of the 342
CHIROPRACTIC SPINOGRAPHY indicator is divided into two sections, numbered one and two. When no current is passing through the instrument, the needle is vertical. When the motor is running the needle will point either to the right or left. The polarity switch, which is double poled and has a double throw, is closed in the same direction as indicated by the polarity indicator. FIFTH: Regulate the current by the rheostat. It is very important that sufficient current be in the circuit to eliminate unnecessary varying of the control to give near the value of current desired through the tube. The control should never be advanced more than one step at each trial. After each setting of the rheostat the tube should be readjusted by the filament control to the value of milliamperes desired. The rheostat control is used universally on all X-Ray machines having variable controls. It is sometimes called a compensator. SIXTH: Regulate voltage by auto-transformer and placement of spark gap rod. Having placed sufficient current in the circuit, the desired pressure or voltage to this current is obtained by use of the autotransformer control. The spark gap or back-up rod is set at the desired value. The X-Ray switch is then closed. The current may then arc or jump the gap; if not the voltage control is advanced one button at each trial until the gap is obtained. The voltage control should not be advanced more than one button at each trial unless a previous trial on a particular setting has given the desired spark gap. This also applies to the rheostat control. When the current has sufficient pressure, it will arc across the spark gap at least three trials out of five. This is found by closing the X-Ray switch. The current having jumped the desired gap, the spark gap is then increased one-half inch. If by trial the current still jumps, the voltage or pressure is too great. If the current does not jump when the gap is increased one-half inch, the desired gap has been found. Having obtained the desired gap, the spark gap rod is withdrawn another one-half inch to allow 343
CHIROPRACTIC SPINOGRAPHY an inch additional gap. This is important for two reasons: If the rod remained at the distance of one-half inch greater than the tested gap, and should the line current fluctuate, there would result a corresponding increase or decrease of the kilovoltage, which would interfere with the exposure by current jumping the gap. If the distance is increased to one inch, and should the current have a greater fluctuation, the current will jump the gap, due to less resistance across the gap terminals and a greater resistance within the tube. It therefore serves as a safety device or valve and eliminates interference with the exposure. Auto-transformers are not found on all machines. SEVENTH: X-Ray switch. Ordinarily only one switch is found on X-Ray machines to close the primary circuit of the step-up transformer. However, some machines are equipped with an automatic time switch that will close the circuit for the time required for use in making exposures. The ordinary switch is a single pole, single throw switch. This switch should be used in testing for all current values and settings. Machine Precautions FIRST: Use minimum capacity main fuses for machine for protection of feed line and transformer. SECOND: Keep switches, meters, spark terminals, tube and accessories free from dust. THIRD: Keep rectifying disc clean and motor well oiled. Clean commutator or segment disc on rear of motor shaft. FOURTH: Keep all exposed connections tight. FIFTH: Handle switches by insulated handles. Never become ground path between X-Ray switch and high tension meters. SIXTH: Never allow total output of step-down transformer to the filament of the tube. Place at least half of resistance of filament control in circuit. 344
CHIROPRACTIC SPINOGRAPHY SEVENTH: Always set spark rod one inch greater than working spark gap for safety. EIGHTH: In case of electrical accident give artificial respiration to victim. NINTH: Never dislodge victim from high tension circuit by other than insulated instruments, for example, chair, broom, etc. TENTH: Before taking radiographs be sure to have required penetration and milliamperes. Always test current first and voltage last. Milliampere Seconds As has been previously explained, the number of milliamperes determine the quantity of X-Rays. It is sometimes desirable to know the amount of X-Rays for a given time which has been given to a part in radiography, especially so in determining the amount of effect to tissue, and also the effect upon the photographic film as the effect, whether on tissue or film, is proportional to the number of rays at a given time of exposure. The milliampere second system of determining this effect is used universally. Milliampere Seconds (M.A.S.) are the number of milliamperes (X-Rays produced) multiplied by the time of exposure in seconds. Example: Twenty milliamperes of current is applied to the tube which will produce a given number of X-Rays. A continuous exposure of 20 seconds is given, the effect on the part or film in milliampere seconds would be the product of 20 seconds by 20 milliamperes, or 400 M.A.S. Thus: Time in seconds x M.A. = M.A.S. 20 x 20 = 400 When the number of M.A.S. and the number of milliamperes are given, the time of exposure may be found by dividing the M.A.S. by M.A. 345
CHIROPRACTIC SPINOGRAPHY Thus: M.A.S. ÷ M.A. = Time of exposure in seconds. 400 ÷ 20 = 20 seconds. When the number of M.A.S. and the number of seconds exposure are given, the number of milliamperes of current used may be found by dividing the M.A.S. by the time of exposure in seconds. Thus: M.A.S. ÷ time of exposure in seconds = M.A. of current. 400 ÷ 20 = 20 In the use of a radiographic technique table it is not necessary to know the time of exposure to be given, or the number of milli amperes of current to use, though the number of M.A.S. must be known that will produce a certain effect. Therefore any combination of seconds and milliamperes may be used providing the effect is known, and the required penetration of the rays are had. Any current value may be used as long as the capacity of the tube is not exceeded. It is for this reason that the technique given herewith has been computed to use 20 M.A. of current to insure longer life to the tube. SPINOGRAPHIC EXPOSURE TABLE The following spinographic exposure tables are based upon the results obtained through experience in handling countless numbers of patients. The first table given is based upon experience with X-Ray plates and is given for the benefit of the Chiropractor who is still using plates instead of films. The second exposure table is based upon the use of double intensifying screens with the duplitized X-Ray film. It will be noticed that the penetration or spark gap with this technique is lower than the average exposure technique and the time somewhat longer. By using the lower spark gap and giving more time, it has been found that better spinographs are obtained due to the fact that the rays are absorbed 346
CHIROPRACTIC SPINOGRAPHY by the osseous structures, while the rays readily penetrate the soft tissue surrounding the osseous structure, resulting in a more contrasty film. Spinographs may be obtained with double intensifying screens in less time than given in this technique when a greater penetration is used, but such spinographs are lacking in contrast because the osseous structures have been penetrated. The third exposure table is based upon the use of double intensifying screens with the Bucky Diaphragm in which a higher penetration is always used to compensate for the amount of radiation that is absorbed by the grid of the diaphragm. It is sometimes necessary to use compression when taking spinographs of heavier individuals. The use of compression means bringing the cylinder in contact with the region to be exposed and pressing it down upon the patient just as tightly as they can endure it. This method is used by many operators in taking spinographs of all patients, but it is found more useful for heavier individuals. Spinographic Exposure Technique Applicable to the Apparatus Used in the P. S. C. Spinograph Laboratories with X-Ray Plates Only Based on a 150 lb. Patient PARTS TO BE SPINOGRAPHED
BACK-UP TUBE DISTANCEMILLIAMPERE SECONDS
Lumbar ........................ 5 inch Lower Dorsal .............. 5 inch Upper Dorsal ............... 5 inch Lower Cervical ........... 5 inch Atlas and Axis ............. 5 inch Lateral View Cervical.. 5 inch Lateral View Dorsal ... 6 inch Lateral View Lumbar... 6 inch
24 inches 24 inches 24 inches 24 inches 24 inches 24 inches Compression Compression 347
200-250 250-300 180-200 180-200 100-120 100-120 500-600 500-600
CHIROPRACTIC SPINOGRAPHY Exposure Technique (To be used with double intensifying screens only) DEPTH OF TISSUE SPARK GAP IN INCHES
M. A.TUBE DISTANCE TIME IN INCHES
5 to 6-1/2..................... 3 6-1/2 to 8 .................... 3 8 to 9 .......................... 3-1/2 9 to 10 ........................ 4 10 to 11 ...................... 4-1/2
20 20 20 20 20
24 24 24 24 24
12 to 14 sec. 14 to 16 sec. 13 to 16 sec. 14 to 17 sec. 14 to 17 sec.
20 20 20
Comp. 14 to 17 sec. Comp. 15 to 17 sec. 24 9 to 12 sec.
USE COMPRESSION
11 to 12 ...................... 4-1/2 12 to 14 ...................... 5 Atlas and Axis ............ 3
Exposures with Intensifying Screens without Bucky Diaphragm Before attempting to memorize the data of an exposure table, it is well for every prospective operator to understand the fundamentals of radiograph production. X-Ray pictures are made possible by the action of unknown light rays upon sensitized materials, as almost every individual understands. However, few realize the principles through which the complete production is accomplished. Upon every X-Ray picture, if properly produced, there is a marked contrast between certain structures of the body, particularly between the soft tissues and the bony structures. In the first place, this contrast is due to a difference in the density of the structures which show as contrasted. For instance, every radiograph shows the osseous structure light in color, while the soft tissue is represented as the darkened area or black upon the negative. This is all because the X-Ray waves penetrate these structures to different degrees. X-Rays start upon the sensitized film or plate a certain definite 348
CHIROPRACTIC SPINOGRAPHY action which is completed by the developing solution. The processes of exposing and developing go hand in hand, for either one is insufficient without the other. Silver salts, particularly the bromides, make up a large portion of the sensitizing materials of a film or plate, and light will produce a chemical action upon the sensitive emulsion. The extent of this action depends partly upon the intensity of the light and partly upon the time of exposure. Those rays of light capable of producing action upon sensitized materials are known as actinic rays, and X-Rays may be classified as such. The contrast upon a film then is dependent upon a difference in light action upon its emulsion surfaces. X-Rays focused from above the body pass through it and internally meet the resistance of the different body structures. The firmer and more dense the structure, the fewer the number of X-Rays that will penetrate it because of the greater resistance it offers. Thus, lung tissue is more easily penetrated than is muscle; and likewise it takes greater penetration of rays to pass through osseous structures than is necessary for the complete penetration of muscular tissues. In reality, the X-Rays penetrate the softer tissues quite readily, while the firm, dense structures resist penetration, and a shadow of these firm structures is cast upon the film underneath the patient or on the opposite side of the patient from the generation point of X-Rays. Certainly the firm structures cannot be penetrated by the rays to as great an extent as are the softer tissues if contrast is to be expected. Because of this difference in the density of tissues, X-Rays have an uneven action upon the sensitized materials of the emulsion That portion of the emulsion upon which the rays have acted to the greatest degree turns darkest in the developing solution, while in proportion to the lessened action of the rays, the emulsion remains a lighter color after development. 349
CHIROPRACTIC SPINOGRAPHY The silver salts of the emulsion upon which the rays have their action are changed to a silver oxid compound by the developing solution. The density of this silver oxid under normal conditions is dependent upon the degree to which the rays have been allowed to affect the emulsion in making the exposure. Realizing that the action of the X-Rays is uneven over the surface of the film because of a difference in the resisting qualities of bodily structures, and further that the density of silver oxid is dependent proportionately upon the degree of action of the X-Rays, the “why” of contrast upon an X-Ray film or negative need not be further explained. The bony structures are seen as light in color upon the film because the emulsion underneath them during an exposure is acted upon to a lesser extent than is the emulsion covered by the soft tissues of the body adjacently located. In fluoroscopy, the screen on the opposite side of the patient from the X-Ray tube is a substance which becomes fluorescent under the activity of X-Rays. The intensity of the fluorescence depends upon the intensity of the X-Rays acting upon the screen. Again, the difference in penetrability of tissues makes a contrast possible, and X-Rays do not produce as great fluorescence upon the screen where their path is obstructed by bone as these same rays do upon that portion of the screen covered by the softer structures. The more resisting structures therefore are seen as the darker shadows in fluoroscopic examination. Intensifying screens as used in making X-Ray film or plate exposures are constructed of a material which becomes fluorescent under the action of X-Rays just as does the fluoroscopic screen. This material forming the fluorescent surface is Calcium Tungstate. If plates are used with intensifying screens, only a single screen is used, as there is emulsion on but one side of the plate. Should duplitized film be used, a double intensifying screen technic may be used in order that a fluorescent surface may be in contact with each surface of the sensitized emulsion of the film. 350
CHIROPRACTIC SPINOGRAPHY The screens, made of cardboard with the Calcium Tungstate spread over one surface of the cardboard only, are enclosed in an aluminum cassette, so constructed that it is a safe protection against light rays possessing less penetrative qualities than the X-Rays. The intensifying surfaces of these screens face each other, and protected against the light in the dark room, the film for exposure is placed between these two Calcium Tungstate surfaces. Each surface of the film is then in contact with a Calcium Tungstate or intensifying surface of the screen. The cover of the cassette is possessed of a spring, and by closing the cassette, pressure is exerted over both film surfaces, and evenly distributed. The aluminum cassette offers but little resistance to the rays, and this resistance is equal over the entire area of the film. Any difference in the action of rays upon the intensifying surfaces within the cassette is directly due to a difference in the degree to which X-Rays penetrate the structures inside the body of an individual interposed between the cassette and source of X-Rays. The principle of fluoroscopic exposure applies here. Under the action of the X-Rays, the Calcium Tungstate inside the cassette becomes fluorescent. There is a contrast in this fluorescence because of the difference in density of the structures of the body. The emulsion surfaces of the X-Ray film are sensitized to light and are acted upon by the fluorescence of the intensifying screens in direct proportion to the degree to which these screens become fluorescent, due to the X-Rays. The developing solution completes the process of changing to a silver oxid that portion of the sensitized substances acted upon by the light, while the salts not changed to an oxid are dissolved from the film in the hypo fixing solution. To prove that a very intense light if acting upon a film will make possible a very dense silver oxid, expose a film to daylight and note its color after it has been developed. It is true that every structure of the body may be penetrated 351
CHIROPRACTIC SPINOGRAPHY by X-Rays, providing the penetration of the X-Rays used is great enough and that the exposure is long enough. This leads directly to the question of limiting exposures in such a manner that a maximum of contrast is obtained. At a definite time during an exposure, the X-Rays have penetrated the structure immediately surrounding that one of which an outline is desired and yet have not to a great degree penetrated that one structure in question. The exposure should end here, for at this time a maximum of contrast is produced under those exposure circumstances. Were the exposure shorter, the contrast would be less because the X-Rays have not had ample time to penetrate adjacent tissues. To prolong the exposure beyond this point would mean a greater penetration of the structure in question, consequently a heavier ray action upon the emulsion surface of the film beneath with a resultant proportionate lessening of contrast. A very heavily exposed film is densely black after development, showing far too little outline and contrast to be easily readable, due to the fact that a prolonged penetration has obliterated the detail possible only through correct limitations of exposure. It will apply that the more closely two adjacent structures are compared in resistance to penetration by X-Rays the more accurately must the exposure be made in order to obtain a contrast. On the other hand, it is comparatively easy to produce radiographs of structures which differ widely in density, and the more dense or resisting the structures, the easier they are to radiograph. A very accurate exposure is necessary in order to produce a kidney picture because the kidneys offer very little more resistance to penetration by X-Rays than the tissues immediately adjacent to them. To prolong the exposure but an instant beyond that point, where the structures adjacent have been penetrated, would mean obliteration of the kidney shadow as the kidney would be penetrated as well. 352
CHIROPRACTIC SPINOGRAPHY However, bone offers such a great resistance in comparison to the softer structures surrounding it that a less accurate exposure is necessary, although the more accurate the limitation of the exposure, the clearer will be the detail, and the sharper will be the contrast. In the production of radiographs then, shadows are dealt with, and these shadows are produced as a result of different densities of proximal structures. Intensifying screens are comparatively a late addition to the equipment used in the technique of radiographic exposures, and their usage is dependent upon their fluorescent property under the action of X-Rays. That the screen becomes fluorescent means an increase in the effect upon sensitized materials by the rays which cause this fluorescence. Not only do the X-Rays themselves act upon the emulsion of the film, but by producing fluorescence of the tungstate surfaces the fluorescence has a definite action and effect as well. Considering there is a double action on emulsion brought about by the use of screens instead of the separate action of X-Rays when used without screens, it follows that if intensifying screens are used it is possible to produce the radiograph with either a shorter exposure or with a less penetrative ray, except when using the Bucky-Potter Diaphragm. Without screens, a five-inch back-up spark is necessary to penetrate the body for spine pictures and affect the emulsion of the film to a desired extent. Using screens, a shorter back-up spark may be utilized because the production of screen pictures depends largely upon the fluorescence of the screen. This fluorescence is possible with a low as well as a highly penetrative ray so long as the ray is penetrative enough to pass through the body. It must be borne in mind that the penetrative quality of X-Rays produced in an X-Ray tube is dependent entirely upon the back-up spark used in its operation. Further, the more penetra353
CHIROPRACTIC SPINOGRAPHY tive the quality of the X-Rays used, the quicker will these rays penetrate the bodily structures, soft tissues and osseous formation as well. With high back-up spark, meaning high penetration, the exposure must be more accurately limited than with a less penetrative ray. This because the exposure must be checked at a time when the X-Rays utilized have completed penetration of the surrounding tissues, yet have not penetrated to any great degree the structure of which the radiograph is desired. If highly penetrative rays are used, it is found the grease, is the extent to which these rays penetrate the firmer structures in comparison to those surrounding, with a consequent lessening of contrast. So long as the rays produced are capable of penetrating the body in intensifying screen work, it is the aim of every operator to use a minimum of penetration to accomplish this result. The low penetration causes fluorescence of the screens where the rays pass through the body, while the same low penetration cannot act through the resistant structures proportionately as fast as do the higher back-up spark rays used without screens. Screens actually make possible a shorter exposure with high penetration or a more definite contrast with low penetration and greater length of time. At the Palmer School a 3-1/5 inch B. U. spark is the foundation on which the intensifying screen technic has been developed. This penetration has been used as the foundation because it produces on a medium sized individual a reasonable degree of contrast without undue or excessive exposure. Previous to the usage of intensifying screens in spine work, a 5-inch back-up was the ordinary penetration used, and the foundation on which the technique was based. The lower penetration used in the present screen technique offers possibilities for a sharper and more definite contrast although the time of exposure runs a trifle heavier than in exposures where the screens are not utilized. 354
CHIROPRACTIC SPINOGRAPHY While the aim is always to use the minimum of penetration for best results, it must be remembered that even with high penetration, spinal exposures are heavier than any other bodily exposures made in radiographic circles. The fact that spinal exposures are so heavy makes necessary certain precautions in technique used for the protection of patients against burn from the rays. The lower the penetration used, the greater proportionately is the accumulation of dissipated X-Rays within the body lacking the penetrative quality necessary to work their way through the structures. Eventually, the accumulation of these rays losing their penetrative qualities within the body promotes possibility of erythema or X-Ray dermatitis to the patient and the exposure technique must be so limited as to guard against this danger. Further than changing penetration to meet circumstances, it is advisable always to use an aluminum filter interposed between the X-Ray tube and the patient. This aluminum plate, approximately one-sixteenth of an inch in thickness, filters out some of the rays which lack the penetrative quality necessary to pass entirely through the body and is a safeguarding appliance to be used by every operator in the best interests of patients coming under his care. With a 3-1/2 inch B. U. spark, an individual weighing approximately 150 pounds has been used as the subject for development of intensifying screen technic at The P. S. C. In accordance with experimentation and actual practice at the school the exposure table given has been drawn up for the general information of every spinographer. According to the make of intensifying screen used, there will undoubtedly be a slight variation at least from the exposure list as printed. It is merely meant that the use of this table will make possible the development of a spinal technique adapted to an operator’s own equipment, subject to change as personal judgment decrees. 355
CHIROPRACTIC SPINOGRAPHY Further than a difference in the speed of screens of different manufacture, it is found that screens manufactured by the same concern will sometimes vary in their intensifying qualities. A simple, yet effective manner of overcoming this variation is to number the screens, using each screen for a separate region of the spine or testing each screen separately in order to determine the advisable exposure for every region of the spine. The pictures hardest to produce accurately and consistently are those of children. Should the child be so small that it cannot be quieted to the extent necessary for complete elimination of motion, or should it be crying, it is almost impossible to produce a clearly readable exposure. For the output of pictures where motion is to be expected, very high penetration is essential. The vertebrae of children are composed so largely of cartilaginous materials that the highly penetrative rays necessary for “flash” exposures eliminate the probabilities of good contrast. The lower the back-up spark possible in these exposures, the finer will be the contrast because of the lessened penetration of soft osseous structures of infancy. To use a low back-up spark, however, the time of exposure must be increased and motion has to be eliminated. Should it be possible to completely quiet the child, the best results are obtained by testing for a 2-1/2 inch B. U. and the exposure with 20 M. A. is from 14 to 22 seconds long, dependent upon the thickness of the case. If of a reasonably large size, or that normal to a child between the ages of 7 and 14, a 3-inch B. U. with approximately the same time at 20 M. A. and 24-inch tube distance will show a fine result. In obtaining a radiograph of atlas and axis on children, a cork may be placed between the teeth to separate the jaws. Any substance easily penetrated by X-Rays will do equally as well. Although it is seldom necessary to use higher than a 5-inch B. U. spark, occasionally an individual is radiographed upon whom a greater than 5-inch B. U. penetration is desired. This is 356
CHIROPRACTIC SPINOGRAPHY not because a 5-inch B. U. is not penetration enough to eventually produce the desired effect, but because the time is too great with a danger consequently to the patient. Using on these exceedingly heavy individuals a back-up spark penetration of more than 5 inches, such as 6 inches or 6-1/2 inches, the exposure will be considerably lowered, and it is an advisable course to follow. Realizing that the Coolidge radiator type of tube is used largely in spinographic exposures, it is well to mention again the limited B. U. capacity of every radiator type tube, which is 5 inches. Should a penetration of more than that equal to a 5-inch B. U. spark be desired or essential, either a Coolidge Universal or a gas tube must be utilized.
357
CHIROPRACTIC SPINOGRAPHY Exposure Technique with Bucky Diaphragm and Intensifying Screens Time (Sec.) x M. A. = M. A. S. M. A. S. ÷ M. A. = Time (Sec.) DEPTH SPARK TUBE REGIONS OF TISSUE GAP M. A. DISTANCE TIME (SEC.) M. A. S. 5 6 7 8 9 10 11 12
5 5 5 5 5 5 5 5
20 20 20 20 20 20 20 20
25 25 25 25 25 25 25 25
10-12 12-13 14-15 16-18 18-20 22-24 24-26 28-30
200-240 240-260 280-300 320-360 360-400 440-480 480-520 560-600
5 6 7 8 9 10 11 12
5 5 5 5 5 5 5 5
20 20 20 20 20 20 20 20
25 25 25 25 25 25 25 25
9-11 12-13 14-15 17-19 20-23 24-26 27-28 30-32
180-220 240-260 280-300 340-380 400-460 480-520 540-580 600-640
LOWER LUMBAR
5 6 7 8 9 10 11 12
5 5 5 5 5 5 5 5
20 20 20 20 20 20 20 20
25 25 25 25 25 25 25 25
12-14 15-17 19-21 22-24 24-25 26-27 27-28 30-32
240-280 300-340 380-420 440-480 480-500 520-540 540-580 600-640
LOWER CERVICAL AND UPPER DORSAL
4 5 6 7 8 9 10 11 12
5 5 5 5 5 5 5 5 5
20 20 20 20 20 20 20 20 20
25 25 25 25 25 25 25 25 25
3-5 5-7 8-10 11-12 13-14 15-17 18-19 19-20 20-22
60-100 120-140 160-200 220-240 260-280 300-340 360-380 380-500 400-440
SACRUM AND COCCYX
LUMBAR
358
CHIROPRACTIC SPINOGRAPHY DEPTH SPARK TUBE REGIONS OF TISSUE GAP M. A. DISTANCE TIME (SEC) M. A. S. ADULTS ATLAS Do AND not 5 20 25 6-9 120-180 AXIS measure CHILDREN ATLAS Do AND not 5 20 25 2-4 40-80 AXIS measure
It must be understood that there will have to be some corrections made regarding the above technique for the following reasons: Locality, different makes of films; intensifying screens having more or less intensifying value and different makes of Bucky Diaphragms having grids with a variation in number as to lead strips per inch. The above technique is based on the two speeds of films (Eastman and Agfa films), screens with median intensifying value and a Bucky Diaphragm having a grid with nine lead strips per inch. SPINOGRAPHING CHILDREN It is no more difficult to get a readable film of a child than of an adult, providing the child is properly placed on the table and will be quiet during the exposure. It has been found that it is almost impossible to get good readable films that could be relied upon as being true to the condition of the individual unless that individual will lie perfectly still during the exposure. Extreme care must be exercised in taking spinographs of children, or they will be absolutely useless, because of the danger of over-exposure or of the child moving during the exposure. Do not attempt to spinograph children unless they will lie perfectly quiet during the exposure. Never attempt to force a child to lie still by holding or strapping him down, as it has been found from experience that even though the child be held in position there is a contraction of muscles which may rotate or bend the spine out of its normal position. This being true, a spinograph made under these conditions will not give the exact condition existing in the spine. 359
CHIROPRACTIC SPINOGRAPHY One of the first essentials in taking a spinograph of a child is to win the confidence of the child. Let him know he is not going to be hurt. If necessary take time to show him the machine, tubes, wiring, etc. Get him interested and he will want to play. Make him think you are playing with him. Have him lie perfectly still several times before making the exposure so that when you are ready to make the exposure he will still think you are playing. This method will be found much better than trying to force him to be quiet. The question often arises as to the advisability of giving a child an anesthetic for the purpose of keeping him quiet during the exposure. This is not considered advisable for the reason that the elements of risk are too great for the advantage that is thus gained. Owing to the fact that the bones of a child contain more animal matter than those of an adult, great care must be taken not to penetrate but merely shadowgraph the bone. In order to get the proper outline of the spinous processes, it is advisable to use as low a back-up as possible with a small amount of time. The following exposure table technique as indicated has produced very good results without the Bucky Potter Diaphragm. REGIONS. B. U.
M. A. TUBE DIST.
TIME
Lumbar Dorsal Cervical
20 20 20
3-5 sec. 4-6 sec. 2-4 sec.
3 3 3
24 24 24
THICKNESS TUBE
Radiator 3-6 in. Radiator Radiator
If a Bucky Potter Diaphragm is in use, increase the back-up to five inches, the tube distance to 25, keeping the other factors constant. METHOD OF RECORDING AND CHECKING ON SPINOGRAPHS The Chiropractor or Technician, or both as the case may be, should put his own personality and individuality into spinography, working and striving to make his best films better, adding to his own interest, and contributing to the science of spinography. 360
CHIROPRACTIC SPINOGRAPHY The following table is one way of improving the quality of the work by keeping an absolute check on each and every film made. For example: John Doe has a spinograph taken of the lumbar region, using the technique as indicated in the table. After developing and drying the films, it was found to be under-exposed and too light for reading purposes. Knowing the spinograph will have to be retaken, the next step is to decide the density of the film, which in this case is three seconds under-exposed. The operator having become familiar with his work should be able to decide approximately the density in seconds of any spinographic film. Under remarks in this diagram is written 3SL, meaning the film is under-exposed or three seconds light. Upon the return of John Doe for the second exposure, reference is made to the technique record sheet, as to the technique used in the first exposure. Knowing the first film was three seconds under-exposed, the time for the second exposure would be 12 seconds (the time used in the first exposure) plus or minus the time or seconds indicated on the remark column. In this case it would be 12 plus 3 equals 15 seconds of time which should be technically correct for the second exposure. Technique Record Sheet TUBE
NAME
REGION B. U.
T. THICKREM. A. DIST. TIME NESS OCCUPT. MARKS
1st exp. J. Doe Lumbar 3-1/2 20 2nd exp. J. Doe Lumbar 3-1/2 20
361
24 24
12 8-1/2 Farmer 15 8-1/2 Farmer
3SL OK
PART VIII RADIOGRAPHS OF OTHER OSSEOUS STRUCTURES In making exposures of osseous structures other than the spine, there are three general rules that must be followed in order that good results may be had. 1. Have the center of the X-Ray film or cassette under the structure to be exposed. 2. Center the central ray of the tube directly above the structure to be exposed, thus bring the X-Ray tube on the center of the plate or film. 3. Have the structure which is to be radiographed in close contact with the film or plate. The surface of the structure desired should always be next to the plate or film. The reason for having the object to be exposed as near the plate or film as possible is that more detail and contrast are obtained. For example, hold a pencil under an ordinary light with a table beneath the pencil upon which its shadow will be cast. The nearer the pencil is held to the table the clearer the outline of its shadow. In making exposures of the extremities, it is best to make an exposure of both in order that the normal may be compared with the abnormal. This is due to the fact that the formation of structures vary slightly in different individuals, and what is normal to one may be a seeming abnormality in another. With the foregoing instructions properly applied, any of the osseous structures may be properly radiographed. There are several exceptions to the preceding scale which will now be described. Owing to the fact that different makes of films and plates have a variation in speed, further that one intensifying screen is found to have a greater intensifying factor than another, it is impossible to give in exact figures a technique which will not need. 362
CHIROPRACTIC SPINOGRAPHY corrections by each individual operator to meet individual circumstances. However, a firm foundation can be given showing a comparison of exposure for different regions, and the actual exposure for the separate regions will necessarily be subject to change in correspondence to altered requirements. The following technique is based on the average 150 pound individual without the use of the Bucky-Diaphragm, with the exceptions of the heavy parts where more secondary radiation is produced. It might be well to state here that when making exposures with films in the black paper, and using the Eastman Film Exposure Holder, that a sheet of lead the size of the film may be placed underneath the cardboard holder to absorb the secondary radiation produced by the primary rays as they strike the top of the table after having penetrated the film. It will be found in most cases, especially the thinner structures, that the use of this lead sheet will give sharper outlines to the shadows, which would otherwise be obscured by the effect of the secondary radiation on the film. RADIOGRAPHY OF THE LOWER EXTREMITIES Part—Foot VIEW OF PART—Anterior to posterior. POSITION OF PART—The patient in a sitting or reclining position, with the shoe and hose removed from the foot, the part is placed in the center of a 8x10 film. The part should not be under a muscular strain. POSITION OF TUBE—The tube tilted in order that the central ray is at right angles with the anterior surface of the foot. The central ray is centered directly over the proximal end of the third metatarsal bone. 363
CHIROPRACTIC SPINOGRAPHY TECHNIQUE—With double screens, using duplitized films. SPARK GAP
MA
TUBE DIST.
TIME (Sec.)
MAS
3
20
32
3-4
60-80
TECHNIQUE—Without double screens, using duplitized films. SPARK GAP
MA
TUBE DIST.
TIME (Sec.)
MAS
5
20
36
2-3
40-60
VIEW OF PART—Lateral. POSITION OF PART—The proximal end of the fifth metatarsal bone on the center of the film or cassette. POSITION OF TUBE—The central ray centered over the proximal end of the first metatarsal bone. TECHNIQUE—With double screens and duplitized films. SPARK GAP
MA
TUBE DIST.
TIME (Sec.)
MAS
2-1/2
20
32
4-5
80-100
TECHNIQUE—Without double screens, using duplitized films. SPARK GAP
MA
TUBE DIST.
TIME (See )
MAS
5
20
36
3-4
60-80
Part—Os Calcis VIEW OF PART—Superior to inferior. POSITION OF PART—The patient in standing position with the os calcis in the center of the film or cassette. After the placement of the film under the part, the patient is instructed to step forward with the free extremity, without exerting undue strain on the member to be radiographed. POSITION OF TUBE—The central ray is centered at right angles with the film, and directly over the center of the part. TECHNIQUE—With double screens, and using duplitized films. SPARK GAP
MA
TUBE DIST.
TIME (Sec.)
MAS
3-1/2
20
24
5-6
100-120
364
CHIROPRACTIC SPINOGRAPHY TECHNIQUE—Without double screens, using duplitized films. SPARK GAP
MA
TUBE DIST.
TIME (Sec.)
MAS
5
20
36
3-5
60-100
Part—Ankle VIEW OF PART—Anterior to posterior. POSITION OF PART—The patient in the dorsal position. The film or cassette placed under the part so that the depression found between the external and internal mallelous is directly over the center. POSITION OF TUBE—The central ray centered at a point one inch out from the external mallelous and at right angles with the film or cassette. VIEW OF PART—Lateral. POSITION OF PART—The external mallelous is placed in the center of the film or cassette. POSITION OF TUBE—The central ray at right angles with the film or cassette, centered directly over the internal mallelous. TECHNIQUE—With double screens, using duplitized films. VIEW
SPARK GAP
MA
AP Lateral
3 2-1/2
20 20
TUBE DIST. TIME (Sec.)
32 32
4-5 4-5
MAS
80-100 80-100
TECHNIQUE—Without double screens, using duplitized films. VIEW
SPARK GAP
MA
AP Lateral
5 5
30 30
TUBE DIST. TIME (Sec.)
36 36
4-5 3-4
MAS
120-150 90-120
Part—Knee VIEW OF PART—Anterior to posterior. POSITION OF PART—Patient in dorsal position on the table. With a point midway between the external and internal condyles, and at the edge of the patella on the center of the film or cassette. 365
CHIROPRACTIC SPINOGRAPHY POSITION OF TUBE—The central ray centered directly over a point at the inferior edge of the patella, midway between the two condyles. VIEW OF PART—Posterior to anterior. POSITION OF PART—Patient in prone position on table. With a point at the edge of the patella, midway between the two condyles on the center of the film or cassette. POSITION OF TUBE—The central ray centered directly over the center of the film or cassette. VIEW OF PART—Lateral. POSITION OF PART—Patient on table, lying on the affected side. The knee is flexed as much as possible to obtain a forty-five degree angle of the tibia with the fibula. The external condyle is placed in the center of the film or cassette. POSITION OF TUBE—The central ray is centered directly over a point on the center of the internal condyle. REMARKS—The other limb should be moved forward, with the knee flexed to remove it from the field of exposure. TECHNIQUE—With double screens, using duplitized films. VIEW
SPARK GAP
MA
AP or PA Lateral
3 3
20 20
TUBE DIST. TIME (Sec.)
32 32
7-9 6-8
MAS
140-180 120-160
TECHNIQUE—Without double screens, using duplitized films. VIEW
SPARK GAP
MA
AP or PA Lateral
5 5
20 20
TUBE DIST. TIME (Sec.)
36 36
5-7 3-5
MAS
100-140 60-100
Part—Hip VIEW OF PART—Anterior to posterior. POSITION OF PART—The patient is placed in the dorsal position. If using large size films, the center of the film or cassette is 366
CHIROPRACTIC SPINOGRAPHY placed directly under the center of the symphysis pubis. When using small films, palpate the patient for the crest of the ilium, and the symphysis pubis, bisect the imaginary line and drop to the inferior one and one-half inches. This will give a point approximately over the center of the joint, and the film or cassette is centered directly under this point. POSITION OF TUBE—Center the central ray directly over the center of the film or cassette. TECHNIQUE—Double screens, duplitized films, without use of Bucky diaphragm. SPARK GAP 3-1/2
MA 20
TUBE DIST. TIME (Sec.) MAS 26 9-10 180-200
TECHNIQUE—Double screens, duplitized films, with the use of Bucky diaphragm. SPARK GAP 5
MA 20
TUBE DIST. TIME (Sec.) MAS 26 10-12 200-240
REMARKS—For this part it is sometimes advisable to radiograph both parts on one film for comparison purposes. To obtain better definition of the joint it is advisable to use small films, with single exposures for each part. It is also advisable to have the patient’s feet perpendicular with the median line of the table. This will place the anterior surface of the greater trochantor nearer the surface of the film. RADIOGRAPHY OF THE UPPER EXTREMITIES Part—Hand (Fingers and Metacarpals) In a great many cases it is advisable to radiograph both hands so that we may compare the abnormal with the normal. Both hands may be radiographed with a single exposure or they may be radiographed separately. When looking for fractures or foreign bodies the method of radiographing one hand on one film or X-Ray plate has proved more accurate. This is due to the fact that the central rays from the tube are perpendicular with the part, 367
CHIROPRACTIC SPINOGRAPHY while the former method the rays are found to strike the part at an angle, which causes a certain amount of distortion that is not desirable for comparison purposes. It is necessary that the lines of demarcation be clearly brought out, this end being accomplished by more exposure. VIEW OF PART—Anterior to posterior or posterior to anterior. POSITION OF PART—When using either the anterior to posterior or the posterior to anterior view of the part, the hand is placed parallel with the median line of the film or cassette, having the distal end of the third meta-carpal bone on the center of the film or cassette. When both hands are desired on one film they are placed close together in the center of the film which is placed length-wise so as to accommodate both hands. POSITION OF TUBE—The central ray of the tube is centered directly over the distal end of the third meta-carpal bone. When both hands are wanted on one film, the central ray is directed to a center at a point midway between the two hands on a line drawn between the distal ends or distal joints of the second metacarpal bones for the posterior to anterior view. For the anterior to posterior view the central ray is centered on a point midway between the two hands on a line drawn between the joints of the distal ends of the fifth metacarpal bones. TECHNIQUE—With double screens and duplitized films. VIEW
SPARK GAP
MA
TUBE DIST.
TIME (Sec.)
MAS
AP or PA
2-1/2
20
32
1-1/2—2
30-40
TECHNIQUE—Without double screens, using duplitized films. VIEW
SPARK GAP
MA
TUBE DIST.
TIME (Sec.)
MAS
AP or PA
5
20
36
1-1/2—2
30-40
VIEW OF PART—Lateral. POSITION OF PART—For the above view both hands are usually taken so that they may be used for comparative purposes. Using a 8X10 film both hands are placed on the film so that the film is length-wise to the body of the patient. The hands are 368
CHIROPRACTIC SPINOGRAPHY placed in an inclining position in order to allow the fingers and thumbs of each hand to touch. This will allow more of a semilateral view of the parts, which will throw the shadows of the metacarpals and phalanges away from each other so that one bone will not obscure another. It is not advisable to radiograph these parts in a true lateral position, as one bone would then obscure another. In case such a view of the hand is desired the distal end of the fifth metacarpal bone is placed in the center of the film. If a true lateral view of the phalanges is desired these parts may be taken individually on dental films. POSITION OF TUBE—In taking the semi-lateral view the central ray from the tube is centered directly over a point midway between the distal joints of both second metacarpal bones. For the true lateral view the central ray is centered over the distal ends or joints of the metacarpals. For lateral views of individual phalanges the central ray is centered over the part desired. TECHNIQUE—With double screens and duplitized films. VIEW
SPARK GAP
Semi-Lateral Lateral 2-1/2
MA
TUBE DIST.
TIME (Sec.)
MAS
20
32
2-3
40-60
TECHNIQUE—Without double screens, using duplitized films. VIEW
SPARK GAP
Semi-Lateral Lateral
5
MA
TUBE DIST.
TIME (Sec.)
MAS
20
36
2-3
40-60
REMARKS—It is advisable in radiographing all extremities to immobilize the parts to prevent motion during exposure. Part—Wrist The radiographing of this part is similar to that of the hands with exceptions to the position of the part and central ray. VIEW OF PART—Posterior to anterior or anterior to posterior. POSITION OF PART—The proximal end of the third metacarpal bone on the center of the film or cassette. May be taken 369
CHIROPRACTIC SPINOGRAPHY individually on film or both, as applied to the radiography of the hand. POSITION OF TUBE—The central ray centered over the proximal end of the third meta-carpal bone when taken individually. When both wrists are desired on one film the central ray is directed to a center at a point midway between the two wrists on a line drawn between the proximal ends of the third meta-carpal bones. TECHNIQUE—Same as given for hands. VIEW OF PART—Lateral. POSITION OF PART—The proximal end of the fifth metacarpal bone on the center of the film or cassette. Have the fingers extended. POSITION OF TUBE—The central ray centered over the proximal end of the first meta-carpal bone. TECHNIQUE—The same as given for the true lateral view of the hand. REMARKS—Use standard size cone, and immobilize above and below joint. Using sand bags. Part—Elbow This part may be radiographed for either the anterior to posterior or the lateral view. The elbows are seldom taken on one film for comparative purposes. VIEW OF PART—Anterior to posterior. POSITION OF PART—The arm should be placed in the median line of the film or cassette, with the olecranon process on the center of the film or cassette. The palm of the hand should be pointing up. The arm should be extended as much as possible. POSITION OF TUBE—The central ray is centered on a point directly above the olecranon process. TECHNIQUE—With duplitized films.
double
370
intensifying
screens
and
CHIROPRACTIC SPINOGRAPHY VIEW
SPARK GAP
MA
TUBE DIST.
TIME (Sec.)
MAS
AP
2-1/2
20
32
5-6
100-140
TECHNIQUE—Without double screens, using duplitized films in holder. VIEW SPARK GAP MA TUBE DIST. TIME (Sec.) MAS AP 5 20 36 5-6 100-140 VIEW OF PART—Lateral. POSITION OF PART—The radius and ulnar should be at right angles with each other with the internal epicondyle on the center of the film or cassette. The joint should be immobilized above and below the joint by sandbags. POSITION OF TUBE—The central ray centered directly on the external epicondyle. TECHNIQUE—Same as given for the anterior to posterior view REMARKS—Use standard size cone. Part—Clavical If the chrondro-sternal articulations are involved, the posterior to anterior view is taken. For the acromio-clavicular articulations the best definition is obtained by radiographing the part from the anterior to the posterior radiographing both clavicle with a single exposure on a large film. When only one clavicle is desired for any abnormality of either the chrondro-sternal or the acromio-clavicular articulations a 8x10 film may be used. VIEW OF PART—Posterior to anterior, using large film. POSITION OF PART—The manubrium on the center of the film or cassette. POSITION OF TUBE—The central ray centered directly on the center of the film or cassette. TECHNIQUE—Without use of the Bucky Diaphragm, using double screens and films. 371
CHIROPRACTIC SPINOGRAPHY VIEW
SPARK GAP
MA
TUBE DIST.
TIME (Sec.)
MAS
PA
3
20
26
7-8
140-160
TECHNIQUE—With the use of the Bucky Diaphragm, using double screens and films. VIEW
SPARK GAP
MA
TUBE DIST.
TIME (Sec.)
MAS
PA
5
20
25
5-6
100-120
VIEW OF PART—Anterior to posterior on large film. POSITION OF PART—The third or fourth dorsal vertebrae on the center of a large film or cassette. POSITION OF TUBE—The central ray centered directly over the third or fourth dorsal vertebrae. TECHNIQUE—Without the use of the Bucky Diaphragm the same as given for the posterior to anterior view. TECHNIQUE—With the use of the Bucky Diaphragm the same as given for the posterior to anterior view. REMARKS—When the parts are taken individually on small films the same method of procedure for the position of the part and the position of the tube should be adhered to, bearing in mind that the part should be in the center of the film or cassette and the central ray centered directly over. The technique of exposure is the same when using small films as when using large films. Part—Scapula and Shoulder Joint VIEW OF PART—Anterior to posterior. POSITION OF PART—For best results the scapula should be radiographed individually on small films. For ordinary conditions the scapula and shoulder joint are obtained by the same placement position of the film or cassette and the central ray. The center of the film or cassette is placed under a point about two inches below the clavical, just to the outside of the mamillary line. The patient’s arm should be close to the side, with the thumb point up, to obtain the normal articulation of the humerus with the glenoid cavity. The patient is rotated toward the injured side, 372
CHIROPRACTIC SPINOGRAPHY and banked up under the opposite shoulder to retain this position, in order that the plane of the scapula and shoulder articulation will be on the same plane with the film or cassette. POSITION OF TUBE—Central ray centered directly over a point of the body so as to strike the center of the film at right angles. TECHNIQUE—Double screens, duplitized films, without the use of the Bucky Diaphragm. SPARK GAP MA TUBE DIST. TIME (Sec.) MAS 3 20 26 7-9 140-180 TECHNIQUE—Double screens, duplitized films, with the use of the Bucky Diaphragm. SPARK GAP MA TUBE DIST. TIME (Sec.) MAS 5 20 25 6-8 120-160 Part—Sternum VIEW OF PART—Semi-lateral. POSITION OF PART—Due to the confusion of shadows of the mediastinum, and of the spine, it is necessary that the patient be placed in the prone position, with the arm extended to the superior and elevating one side of the body about thirty degrees to the horizontal plane of the film or cassette. The center of the film or cassette is placed at a point midway of the sternum and from two to three inches to the side. POSITION OF THE TUBE—The central ray is centered directly over the center of the film or cassette, so that it will pass through the elevated side of the body between the scapula and sternum on one side and the spine on the other. The central ray should be at right angles with the plane of the film. TECHNIQUE—With Bucky Diaphragm using double intensifying screens, and duplitized films: SPARK GAP
MA
TUBE DIST.
TIME (Sec.)
MAS
5
20
25
3-6
60-120
373
CHIROPRACTIC SPINOGRAPHY TECHNIQUE—Without Bucky Diaphragm, using double screens and duplitized films. SPARK GAP
MA
TUBE DIST.
TIME (Sec.)
MAS
3
20
26
4-5
80-100
Part—Ribs VIEW OF PART—The ribs may be radiographed, in the anterior to posterior, posterior to anterior, lateral and semi-lateral positions. POSITION OF PART—For a localized point of trauma or disease the point of investigation should be brought in as close contact with the center of the film or cassette as possible. For the costo-sternal, and costal ends of the ribs the patient is placed in a prone position, for the short or floating ribs, the anterior to posterior view is desirable. The lateral and semi-lateral views are desirable for fractures. POSITION OF TUBE—The central rays centered on the center of the film or cassette. The central rays should be at right angles with the plane of the film. TECHNIQUE—Without Bucky Diaphragm, using double screens and duplitized films. VIEW
SPARK GAP
AP or PA 3-1/2 Lateral 4 Semi-Lateral 4
MA
TUBE DIST.
TIME (Sec.)
MAS
20 20 20
26 26 26
7-9 5-7 4-6
140-180 100-140 80-120
TECHNIQUE—With Bucky Diaphragm, and using double screens duplitized films. VIEW
SPARK GAP
AP or PA Lateral Semi-Lateral
5 5 5
MA
TUBE DIST.
TIME (Sec.)
MAS
20 20 20
25 25 25
4-6 6-8 3-5
80-120 120-160 60-100
374
CHIROPRACTIC SPINOGRAPHY RADIOGRAPHY OF THE HEAD The Head If it is the desire of the diagnostician the head may be radiographed from almost any angle to obtain a radiograph. However, only the standard positions of the head will be given. Part—Frontal Sinus and Frontal Bone VIEW OF PART—Posterior to anterior. POSITION OF PART—The frontal sinus is placed in the center of the film or cassette, the patient’s nose should lightly touch the film or cassette. The patient should be placed in a prone position on the table. The film or cassette may be placed at an angle of about twenty-five degrees with the table, with the apex of the wedge or triangle to the inferior. POSITION OF TUBE—The central rays centered on a point at approximately one and one-half inches superior to the neck of the ramus, with the central ray at right angles with the film or cassette. TECHNIQUE—Double screens with duplitized films. SPARK GAP
MA
TUBE DIST.
TIME (Sec.)
MAS
4
20
24
11-13
220-260
TECHNIQUE—Without double screens using duplitized films. SPARK GAP
MA
TUBE DIST.
TIME (Sec.)
MAS
5
40
24
9-11
360-440
VIEW OF PART—Lateral. POSITION OF PART—Taken in a horizontal position, the center of the film or cassette directly under the center of the part, which is about one-half inch toward the posterior of the sinus from the anterior. POSITION OF TUBE—The central ray centered directly over a point approximately one-half inch to the posterior of the sinus from the anterior surface. 375
CHIROPRACTIC SPINOGRAPHY TECHNIQUE—With double screens and duplitized films. SPARK GAP
MA
TUBE DIST.
TIME ( Sec.)
MAS
4
20
24
9-11
180-220
TECHNIQUE—Without double screens, using duplitized films. SPARK GAP
MA
TUBE DIST.
TIME (Sec.)
MAS
5
40
24
8-10
320-400
Part—Antrum VIEW OF PART—Posterior to anterior. POSITION OF PART—Taken in a prone position with the patient’s chin and nose barely touching the film or cassette. The antrum should be in the center of the film or cassette. POSITION OF TUBE—The central ray centered directly over a point approximately one and one-half inches to the superior of the neck of the ramus, with the central ray at right angles with the plane of the film or cassette. TECHNIQUE—With double screens, using duplitized films. Same as given for frontal sinus exposure. TECHNIQUE—Without double screens, using duplitized films or X-Ray plates. The same as given for the frontal sinus exposure. VIEW OF PART—Lateral. POSITION OF PART—Practically the same as given for the lateral frontal sinus with the exceptions that the center of the film or cassette is placed under the region. POSITION OF TUBE—The central ray centered directly over the part, and should be at right angles with the film or cassette. TECHNIQUE—With double screens and duplitized films. The same as given for lateral frontal sinuses. TECHNIQUE—Without double screens, using duplitized films. The same as given for the lateral frontal sinuses. 376
CHIROPRACTIC SPINOGRAPHY REMARKS—When the lateral view of the skull is desired either the lateral posture of the frontal sinus or the lateral view of the antrum is used. The central ray is centered as outlined under those parts. Part—Skull VIEW OF PART—Inferior to superior. POSITION OF PART—The patient is placed in the dorsal position on the table, with the skull hanging over the edge of the table, in order that the superior surface of the skull is resting on the film or cassette, which is supported by a chair or stool. The center of the skull should be in the center of the film or cassette. POSITION OF TUBE—The central ray is centered on the center of the film or cassette, having the central ray at right angles with the plane of the film or cassette TECHNIQUE—With double screens, using duplitized films. The same as given for the posterior to anterior view of the frontal sinus TECHNIQUE—Without double screens, using duplitized films or X-Ray plates, the same as given for the posterior to anterior view of the frontal sinus. VIEW OF PART—Anterior to posterior. POSITION OF PART—The patient is placed in the dorsal position on the table, with the occipit in close contact with the film or cassette, which should be on an angle of twenty-five degrees, with the apex of the triangle toward the inferior of the patient. POSITION OF TUBE—The tube is tilted to an angle of fifteen degrees to the inferior, to allow the central rays to enter the forehead between the frontal eminences. This will give a good outline of the foramen magnum as well as the occipital bone. TECHNIQUE—With double screens, using duplitized films. The same as given for the posterior to anterior view of the frontal sinus. 377
CHIROPRACTIC SPINOGRAPHY TECHNIQUE—Without double screens, using duplitized films. The same as given for the posterior to anterior view of the frontal sinus. Part—Mastoid VIEW OF PART—Posterior to anterior. POSITION OF PART—The same as given for the posterior to anterior view of the frontal sinus. POSITION OF TUBE—The same as given for the posterior to anterior view of the frontal sinus. TECHNIQUE—The same as given for the frontal sinus region. VIEW OF PART—Lateral. POSITION OF PART—The patient is placed on the table, with the affected mastoid on the center of the film or cassette. POSITION OF TUBE.—The central ray is directed to fall on a point two inches to the superior and two inches to the posterior from the external auditory canal. The tube is tilted so that the central ray will pass through external auditory canal of the affected side. TECHNIQUE—With double screens, using duplitized films. The same as given for the lateral view of the frontal sinus. TECHNIQUE—Without double screens, using duplitized films. The same as given for the lateral view of the frontal sinus. REMARKS—It is advisable to radiograph both parts, in order that the normal may be compared with the abnormal. Part—Mandible VIEW OF PART—Inferior to superior. POSITION OF PART—The patient is placed on the table with sandbags under the shoulders, to allow the occipital to rest on the table. Place a large size dental film (Dental A) in the mouth between the teeth, directly over the point of the mandible desired. 378
CHIROPRACTIC SPINOGRAPHY POSITION OF TUBE—Center the central ray at right angles on the center of the film TECHNIQUE—Using the large size dental film, fast speed emulsion. SPARK GAP MA TUBE DIST. TIME (Sec.) MAS 5 10 20 7-8 70-80 VIEW OF PART—Lateral POSITION OF PART—The patient on the table with sand bags under the side of the rest, in order to place it in the median line with the body. The center of the film is placed under the part. The head should be thrown back. POSITION OF TUBE—The tube is tilted to the angle of approximately thirty degrees, with the central ray centered directly over the center of the part. This will throw the shadow of the side nearest the tube above the shadow of the side next to the film or cassette. TECHNIQUE—With double screens, and duplitized films. SPARK GAP MA TUBE DIST. TIME (Sec.) MAS 3 20 30 10-12 200-240 TECHNIQUE—Without double screens, using duplitized films only. SPARK GAP MA TUBE DIST. TIME (Sec.) MAS 5 10 30 12-14 120-140 X-RAY DENTAL RADIOGRAPHS The demand for this phase of radiography is increasing each day. All doubtful cases should be referred to the X-Ray laboratory by the dentist in charge, and the field is rapidly expanding. The majority of the films used for this work are 1-1/2 x 1-1/4 inches in size. There are several kinds of films used for dental work and are commonly known as: 379
CHIROPRACTIC SPINOGRAPHY 1. Slow film. 2. Fast film. 3. Metal back fast film. 4. Metal back slow film. Naturally the slow film requires a longer exposure than a fast film. In using the fast films, the exposure will range from 40 to sixty milliampere-seconds at a tube distance of 18 inches. A five-inch spark gap and 10 milliamperes of current is advised to reduce the number of milliampere-seconds exposure to the region when the entire dental set is radiographed. The molars will require from 80 to 90 milliampere-seconds exposure with the slow film, it will be found that 60 to 80 milliamperes will successfully radiograph the other teeth. If a preference is shown to the use of slow films, it is because of an added detail and contrast to the shadows. This rule applies to an individual of medium size. The film is placed to the lingual side of the teeth and held firmly in place by the patient’s thumb. The film should never be held in the patient’s mouth by an assistant. The patient may assume either a lying or sitting posture, the former being preferable, as motion is better eliminated. Two or three teeth can be radiographed on one film. The entire set of teeth will require 11 films, six films for the upper teeth, and five for the lower teeth. The film should be so placed in the patient’s mouth that its lower border is on a line with the crowns of the teeth to insure obtaining the root shadow. The X-Ray tube should be tilted in order that the central ray is centered on the dental film perpendicular to the plane bisecting the angle between the X-Ray film and teeth in accordance with the illustration. The front uppers are exposed with the film placed short dimension vertical covering the front teeth on two films. For the other teeth the film is placed in the same dimension horizontal. To insure good radiographs of the roots of the teeth, it is 380
CHIROPRACTIC SPINOGRAPHY advisable that the operator place the film to make sure that it is placed high enough or low enough to obtain the roots of the teeth wanted. The average individual if placing the films themselves will not get it high enough as the sharp corners of the film may hurt the patient a little but the average patient will let the operator
FIG. 93. Illustrating the proper angle of Film and Path of Rays when taking radiographs of the teeth
hurt them more than they would hurt themselves. The corners of the film should be bent to eliminate this as much as possible. After the film is placed in the proper position, instruct the patient how to hold it in place. For the upper left and the lower left the film is held in position by the right thumb against the teeth. For the upper right and the lower right the film is held in the same manner by the left thumb. Some patients are more sensitive than others to the effects of placing the film in the mouth as nausea is easily produced if the 381
CHIROPRACTIC SPINOGRAPHY film comes in contact with the palate. To avoid this, instruct the patient to breathe through the mouth, when the film is being placed, this condition is more easily produced in children, and it may be necessary to have the film cut into two pieces in order to get good radiographs of their teeth. The technician that specializes in dental radiography uses the regular dental chair, tipping it backward, flexing the head in correct position for radiographs to be taken, but it is not necessary to have a dental chair as one may purchase a head rest that will attach to any straight-back chair and obtain the same results. When using the table, sandbags are placed under the shoulders, allowing the head to fall back when making the exposures of the lower teeth. When making the upper exposures, the sandbags are removed from under the shoulders and placed under the patient’s head.
382
PART IX SOFT TISSUE RADIOGRAPHY It is not the intention of the author to cover the diagnostic features in giving this technique as this part of Roentgenology requires a thorough knowledge of the normal structures involved, and if any diagnosis is attempted, the operator should familiarize himself with the anatomy of all parts involved. So, in covering this subject, my aim will be to cover the technique that will assure good radiographs of parts desired. Radiographs of soft structures of the body, such as the oesophagus, stomach, small and large intestines, lung, heart, kidney, liver and region of the gallbladder, all come under the heading of soft tissue technique and is not Chiropractic spinography, but for the convenience of all who are doing radiography or spinograph work, the technique which has proved to be the most satisfactory will be given, although it must be borne in mind that all technicians do not follow any given rule, or agree with some that have been given, so it is left for the operator to conscientiously try out the technique given here, endeavoring to improve upon it, if possible. To produce the best results, soft tissue exposures should always be taken with intensifying screens, although some very good soft tissue radiographs have been taken without them. The intensifying screen will make your shadows stand out much more plainly, giving more contrast and detail with less exposure and is much easier on the tube. The first soft tissue radiographs to be considered are those of the alimentary tract, which is divided into four divisions. First, oesophagus; second, stomach; third, small intestine; and fourth, large intestine. These structures, being soft tissue, with little body, it is necessary that an opaque substitute be introduced into the part to be radiographed or the shadows of these parts will not be shown, due to the fact that the X-Rays would penetrate them. The substance that is being used universally for this pur383
CHIROPRACTIC SPINOGRAPHY pose is Barium Sulphate, which is usually handled by all X-Ray supply houses. This Barium Sulphate is mixed with either buttermilk, malted milk, or sweet milk, and bread cubes, depending upon the taste of the patient. In some cases it is necessary to mix it with oat-meal porridge, or any other good cereal, the amount of Barium Sulphate to be given depends upon the size of the patient, never less than three ounces, or more than five ounces, this being mixed with twelve ounces or sixteen ounces of fluid buttermilk, malted milk, sweet milk and bread crumbs. Add the Barium Sulphate to these fluids, continually stirring it until it is thoroughly mixed. The oat meal porridge is usually given when taking pictures of the oesophagus as the fluid passes through so quickly. The operator should always emphasize the necessity of the patient abstaining from heavy foods a day previous to examination to eliminate the production of gas in the alimentary tract. The patient should also dispense with all stimulants to prevent the abnormal peristaltic motion of the parts. The following technique will cover each division of the alimentary tract. OESOPHAGUS Part—Oesophagus This picture should be radiographed on a large film with the patient standing. The oesophagus may be taken either from the posterior to the anterior or from the anterior to the posterior, but the semi-lateral view will give the best outline even though the shadow will be distorted in shape. VIEW OF PART—Right or left semi-lateral. POSITION OF PART—The cassette or film is placed laterally and firmly against the right or left side of the patient, in contact with the anterior surface of the body. The patient should be rotated to either the right or left side in relation to the cassette or film. POSITION OF TUBE—The central ray is centered at a point semi-lateral to the body of the patient, so that the central ray will 384
CHIROPRACTIC SPINOGRAPHY pass between the space found between the heart and the spine as this space contains the oesophagus. TECHNIQUE—With double intensifying screens and duplitized films SPARK GAP MA TUBE DIST. TIME (Sec.) MAS 5 in. 40 30 3/4—1-1/2 30-60 TECHNIQUE—Without screens using duplitized films or X-Ray plate. SPARK GAP MA TUBE DIST. TIME (Sec.) MAS 6 in. 60 30 1-2 60-120 REMARKS—The patient should be given a few swallows of Barium Sulphate paste, prepared by mixing four ounces of Barium Sulphate in malted milk or buttermilk until the mixture has the consistency of a paste. Before making the exposure the patient is allowed to take a mouthful of the paste, when the machine and operator are in readiness the patient is instructed to swallow, at which time the operator makes the required exposure. The above exposures are based upon the 150-pound individual. Should the individual be over or under that weight, thicker or muscular, the operator must do either of the following: increase or decrease milliamperes or increase or decrease time of exposure, as it is not advisable to reduce or raise the penetration as this amount is desirable for radiographing the part instantaneously. STOMACH Part—Stomach To obtain good radiographs of the stomach, it is necessary that the patient abstain from heavy foods at least a day previous to the examination. The patient should be instructed against the use of stimulants, such as coffee or tea, etc., as this will interfere with the peristaltic motion of the alimentary tract. If the bowels are not working freely the patient may be given an enema previous to the examination. If the shadows of both the stomach and the 385
CHIROPRACTIC SPINOGRAPHY large intestines are desired on one film, the patient is given four ounces of Barium Sulphate (CP) twelve hours previous to the examination in order that the meal may have time to pass into the colon. If only the stomach shadow alone is desired this meal is eliminated from the procedure. At the lapse of the twelve hour period or the time of appointment the patient is again given an additional meal consisting of one pint buttermilk and four ounces of Barium Sulphate. The latter meal serves to give the shadow of the stomach. After the second meal has been given a period of from five to ten minutes should lapse to allow the meal to pass into the pyloric end of the stomach and into the duodenum. VIEW OF PART—Posterior to anterior, in either standing or horizontal position. POSITION OF PART—Patient standing or horizontal on table. Coin fastened to umbilicus by adhesive tape as marker from the umbilicus. Patient resting firmly against film or cassette with umbilicus in the center of the film or cassette. POSITION OF TUBE—For the stomach and colon plate as described above on a large film the central ray is centered to a point directly over the umbilicus. TECHNIQUE—With double intensifying screens and duplitized films. SPARK GAP MA TUBE DIST. TIME (Sec.) MAS 5 in. 40 30 1-2 40-80 TECHNIQUE—Without double screens, using duplitized films or X-Ray plates. SPARK GAP MA TUBE DIST. TIME (Sec.) MAS 6 in 60 30 1-2 60-120 REMARKS—The above technique is based on the 150-pound individual. When radiographing the alimentary tract to show each part separately, smaller size films may be used. The central ray should in that case be centered directly over the part. The patient should suspend respiration during the exposure to eliminate the movement of the diaphragm, which would otherwise blur the 386
CHIROPRACTIC SPINOGRAPHY image. It is advisable when examining the alimentary tract to radiograph the parts for both the vertical and the horizontal positions. Part—Small Intestines When radiographs of the small intestines are desired, it is necessary to prepare the patient in the same manner as prepared for the stomach region. The patient should be given a barium meal twenty minutes to one-half hour previous to exposing the part. This is to allow the meal time to enter into the intestines through the pylorus and the duodenum. Two or three exposures should be made to accurately show the changes taking place in the pylorus and in the duodenum after the barium meal has been given. Another plate should be taken in one hour’s time from the time of the first exposure. In most cases the stomach will be about onethird empty while the small intestines are beginning to fill. Two hours after the first exposure, the stomach will be almost empty, small intestines almost full, and the caecum beginning to fill. VIEW OF PART—Posterior to anterior. POSITION OF PART—Practically the same as given for the stomach. POSITION OF TUBE—The central ray centered as given for the stomach region. TECHNIQUE—With double intensifying screens, and duplitized films, will be found to be practically the same as given for the stomach region. TECHNIQUE—Without double screens, using duplitized films or X-Ray plates, practically the same as given for the stomach region. Part—Large Intestines There are two methods of radiographing the large intestines: By barium enema and the method of allowing the stomach meal to pass into the part. Where a more complete examination is 387
CHIROPRACTIC SPINOGRAPHY wanted of this part, more accurate results will be obtained using the barium enema method. One quart of buttermilk or other suitable emulsion is mixed with eight ounces of barium sulphate. This is injected by enema) into the rectum. The complete injection should be accomplished in fifteen minutes. The patient must hold this injection during the exposure. While the injection is being given the patient should roll first on the left side then on back, then on right side. This will help to distribute the injection through the eight parts of the colon. With the ordinary stomach meal procedure the time that the barium meal reaches each part of the colon should be known. Two hours after the meal has been given the patient through the mouth the caecum will be found well filled. Four hours after the ascending colon begins to fill. Ten hours later the ascending colon and transverse colon are well filled, showing the hepatic flexure and the splenic flexure; twenty-four hours later the descending colon is shown as well as the rectum, and at this time the entire colon is filled with all parts showing, the appendix may be seen after the caecum is well filled with the meal. Forty-eight hours later some of the barium will be found in the descending colon and the rectum, providing, however, that the solution given has not stimulated the peristaltic movement which sometimes occurs. The rectum will be shown better by the barium injection. POSITION OF PART—A point from one to two inches below the umbilicus is placed in the center of the film or cassette, having the patient resting firmly against the film or cassette. POSITION OF TUBE—The central ray centered over a point from one to two inches below the umbilicus. TECHNIQUE—With double screens and duplitized films, the same as given for the stomach exposure. TECHNIQUE—Without double intensifying screens, using duplitized films, the same as given for the stomach exposure. 388
CHIROPRACTIC SPINOGRAPHY RADIOGRAPHY OF THE THORAX This branch of radiography has proven to be a valuable one when diseases of its contents are suspected and it aids greatly in verifying the diagnosis that has been made. It is good policy to avoid making a diagnosis from the radiograph alone. When all symptoms, both subjective and objective, are taken into consideration, the negative should be used to verify the diagnosis only. It is with this type of radiography that the fluoroscope is most useful, as the observer is able to watch all movements of the organs suspected, which is much better than taking the radiograph alone for study. Very successful diagnosis can be obtained by using both the fluoroscopic and radiographic examinations in conjunction for verification Radiographs of the thorax will show the lungs, trachea, bronchi aorta, oesophagus, mediastinum, and the bony walls that contain these organs. Owing to the fact that these organs may be diseased by different conditions, two different techniques are used: One for the tubercular condition of the lungs and the other for the bronchi and the heart, as these parts are found to be involved to a greater extent than the other parts. The vertical position for the taking of these parts is desirable, however the horizontal position will give almost equal results. Part—Heart As this organ is constantly in motion an almost instantaneous exposure must be given. VIEW OF PART—Vertical position, posterior to anterior or horizontal position anterior to posterior. POSITION OF PART—With the vertical position, using a 14x17 film or cassette, the edge of the film or cassette should be under the chin, the chin should be stretched well up so that the apices may be shown. The sternum should be in the median line of the film or cassette. 389
CHIROPRACTIC SPINOGRAPHY POSITION OF TUBE—The central ray centered directly over point approximately in the center of the organ. TECHNIQUE—With duplitized films. SPARK GAP
5 in.
double
intensifying
screens
MA
TUBE DIST.
TIME (Sec.)
MAS
40
6 ft. or 72 in.
1/10—3/4
4-12
and
TECHNIQUE—Without double screens, using duplitized films or X-Ray plates. SPARK GAP
6 in.
MA
TUBE DIST.
TIME (Sec.)
MAS
60
6 ft. or 72 in.
1/10—3/4
6-45
REMARKS—The target-plate distance as given in the above technique is essential to produce a shadow of the heart on the film of almost normal size. A radiograph of the heart should never be taken at any other target-plate distance. During the exposure the patient should suspend respiration. Part—Lungs The two different lung radiographs are called the contrasty plate, which is produced by using a low penetration, and the pathology plate, which is produced by the use of a high penetration, slight over-exposure, and slight under-development. The contrasty plate will show the aorta, heart, lung pathology, filling of the bronchi, and the bony skeleton containing the organs. In other words, this plate will show both normal and abnormal pathology which is not desirable when diagnosing for tubercular pathology. Many shadows that exist in the contrasty plate, have been diagnosed as pathology, but have later proven as normal to that particular pair of lungs. The pathology plate is over penetrated, over exposed, and slightly under-developed. This method tends to destroy the shadow of the normal; but will leave traces of the abnormal pathology in relief, therefore producing a good pathology plate as the shadows of the parts are eliminated, enabling the roentgenologist or spinographer to make a more accurate diagnosis. 390
CHIROPRACTIC SPINOGRAPHY However, at times a use will be found for the contrasty plate. A grainy appearance of the shadows, such as produced by the use of intensifying screens is not desirable. VIEW OF PART—Posterior to anterior is desirable, using the vertical position. The anterior to posterior view is taken in the horizontal position. POSITION OF PART—Patient vertical or standing against plate changer or cassette, hands on hips with the fingers pointing down, this is to eliminate the shadows of the scapulas. The anterior surface of the body next the plate changer or cassette, with the sixth dorsal on a line with the center of the film or cassette. The patient should suspend respiration during the exposure. POSITION OF TUBE—The central ray centered at a point directly on the sixth dorsal vertebrae. Care should be taken that the central ray is absolutely at right angles to the plane of the film or cassette. TECHNIQUE—For contrasty lung radiograph, using double screens with duplitized films, and low penetration. SPARK GAP MA TUBE DIST. TIME (Sec.) MAS 3 in. 40 30 2-3 80-120 TECHNIQUE—For pathology lung radiograph, without use of double screens, using duplitized films or X-Ray plates. SPARK GAP MA TUBE DIST. TIME (Sec.) 8 in. 30 30 to 72 in. Flash REMARKS—Care should be taken in the development of the pathology radiograph as this film or plate is easily spoiled when not properly developed. RADIOGRAPHY OF THE URINARY TRACT Good radiographs of the urinary tract can be obtained with very little trouble when the proper technique is applied, and there have been many techniques presented to cover this particular kind of radiography. Some have proved failures; some successes; but 391
CHIROPRACTIC SPINOGRAPHY the best technique that has been advanced to the radiographic field is that of low penetration, with the use of intensifying screens. It might be stated here that the use of intensifying screens has made it possible to use tubes of low penetration very successfully. Radiographs of the kidney ureters and bladder will show the shadows of any obstructions that may be present, such as kidney stones, renal calculi in the ureters and bladder. Do not expect to obtain a good radiograph of the ureters or bladder when these organs are normal as they, being very thin structures, cannot be shown unless there is pathological condition present. In the case of the kidneys, consisting of more tissue, and covering a greater area, usually good radiographs can be obtained. The patient is prepared for these radiographs the same as for the stomach or intestinal radiographs, with the exception that there is no barium meal given. All traces of gas should be eliminated from the alimentary tract, otherwise the gas shadows would destroy the pathology shadows. The patient should be placed on a diet a day or two previous to the exposure, eliminating the use of heavy foods. The bowels should be thoroughly emptied before the exposure. If possible, after the evacuation of the bowels an enema should be given to remove all remaining feces from the colon. All these factors must be closely followed, as sometimes shadows will appear that may be mistaken for stones or deposits of calculi when they are nothing more than an opaque substance which has not been removed from the intestines. Part—Kidney More accurate results are had of this part when radiographed on small size films, about eight by ten inches. The technician will find that compression of the part will sometimes give better results. This may be had by placing a punching bag bladder between the cone or cylinder and the patient’s body directly over the kidney region. Care should be taken that the seam of the bag is not directly over the region. POSITION OF PART—The patient is placed in the dorsal 392
CHIROPRACTIC SPINOGRAPHY position with the knees flexed, and shoulders slightly raised. Place the film or cassette under the region of the kidney, about one to two inches out from the median line, at the edge of the last ribs. POSITION OF TUBE—The central ray is centered directly over the center of the film or cassette. Use compression with the punching bag bladder. TECHNIQUE—With double screens and duplitized films. SPARK GAP
3-1/2 in.
MA
TUBE DIST.
Compression with 30-in. target-plate 40 distance
TIME (Sec.)
MAS
3-6
120-240
TECHNIQUE—Without double screens, using duplitized films or X-Ray plates. SPARK GAP
5 in.
MA
TUBE DIST.
Compression with 30-in. target-plate 30 distance
TIME (Sec.)
MAS
5-7
150-210
Part—Ureters VIEW OF PART—Anterior to posterior. POSITION OF PART—The film or cassette is placed so that the superior edge is even with the last pair of ribs, or the inferior edge of the cassette is even with the crest of the ilium. The median line of the film is placed from one to two inches to the side of the median line of the patient. POSITION OF TUBE—Central ray centered directly over the center of the film or cassette. TECHNIQUE—With double screens and duplitized films, the same as given for the kidney. TECHNIQUE—Without double screens, using duplitized films or X-Ray plates, the same as given for the kidney region. 393
CHIROPRACTIC SPINOGRAPHY Part—Urinary Bladder VIEW OF PART—Inferior to superior. POSITION OF PART—Patient in prone position, with the center of the film or cassette one to two inches above the symphysis pubis. POSITION OF TUBE—Tilt the tube so that the central ray is centered on the center of the film or cassette, passing through the center of the pelvic cavity. TECHNIQUE—With double screens, and duplitized films, same as given for the kidney region. TECHNIQUE—Without double screens, using duplitized films or X-Ray plates, the same as given for the kidney region. REMARKS—The patient should evacuate the bladder of urine before radiographing. RADIOGRAPHY OF THE GALL-BLADDER, LIVER AND GALLSTONES Part—Gall-Bladder, Liver and Gallstones Radiography of the liver, gall-bladder, and bile ducts, relative to the showing of gallstones, is considered one of the most uncertain phases of Roentgenology. The shadow of the liver can be clearly shown, but the gall-bladder and the bile ducts will not show unless some pathological condition exists, and in the greater percentage of cases that have every symptom of gall-stones, the radiograph will not verify the symptoms. This fact is due to the chemical composition of the stones. The stones that do show on the radiograph are found to possess a great amount of lime salts, while the rays may penetrate stones of other chemical composition in the majority of cases. A careful preparation of the patient is absolutely necessary, the same preparation of the patient as outlined for kidney radiography. In many cases the gases in the intestines will overshadow the gall-bladder region with a dark blotch or shadow, therefore making it imperative that a second or even a third exposure be made. The prone position has proved to be the most sat394
CHIROPRACTIC SPINOGRAPHY isfactory, although exposures may be made with the patient in the dorsal position. The exposure should be short, with the patient suspending respiration during the exposure. Be very careful not to over-develop the exposed radiograph. In fact, it is better to slightly under-develop, as some gallstones will be lost if full development is given the exposed radiograph. VIEW OF PART—Posterior to anterior. POSITION OF PART—Place the patient in a prone position, with the film or cassette centered under the liver region. Rotate the patient to the right side, so that the body will have a semilateral position in relation to the film or cassette. To hold this position the patient should be banked with sandbags under the left side. POSITION OF TUBE—The central ray is centered directly over the center of the film or cassette. Care must be taken that the central ray is at right angles with the horizontal plane of the film or cassette and not parallel with the patient. TECHNIQUE—With double intensifying screens and duplitized films. SPARK GAP MA TUBE DIST. TIME (Sec.) MAS 30 in. with 3 in. 40 compression 3-5 120-200 TECHNIQUE—Without double screens, using duplitized films or X-Ray plates. SPARK GAP MA TUBE DIST. TIME (Sec.) MAS 30 in. with 5 in. 30 compression 5-7 150-210 REMARKS—The above exposure is based on the 150-pound individual. It must be borne in mind that there are many factors to be considered in producing satisfactory results, and a great deal of technique will not always seem to work out with some particular type of apparatus, or tube; these facts being considered, it devolves upon the technician to use his knowledge and judgment in finding the difficulty. 395
PART X PHOTOGRAPHIC CHEMISTRY AND DARKROOM PROCEDURE It was due to the sensibility of a photographic plate that X-Rays were positively identified. The chemical action of light upon many chemical compounds had been known for some time prior to the discovery of the X-Rays, but this form of light could not be seen with the naked eye and it was left to the ordinary photographic plate to prove that an invisible ray did exist when a high tension current was passed through a vacuum tube. The most sensitive compounds to light are the halogen salts of silver. Passing through many years of experimentation we have at the present day reached a method of incorporating these salts in a gelatine base which is coated onto a flexible support or onto a glass surface. The flexible supports are known as films and the glass as photographic plates. During the years of experiment it was discovered that different combinations of these salts with other compounds gave rise to an emulsion (the mixture of the halogen salts of silver with the gelatine) which was adaptable to various kinds of photographic work. For example, it was noted that a certain combination was especially adaptable for landscape photography as it gave a greater differentiation in the colors blue, green and red. Another combination was especially adaptable to portrait photography because of the depth of the shadows, etc. Another combination was of greatest use for taking pictures where a very high degree of speed was necessary, and so it goes until we have at the present a photographic plate or film for every special branch of photography. Naturally it would follow that a special emulsion should be devised for the use with X-Rays and adaptable for this work exclusively. 396
CHIROPRACTIC SPINOGRAPHY In all of these different combinations the essential compound is bromide and chlorid of silver and added to these are other compounds which produce the special effects above enumerated. It is impractical for the photographer to coat his own plates as the mixture of salts and gelatin have to be flowed onto the desired surface in several layers; and each allowed to dry at an even temperature before the next is applied, this operation also has to be conducted under a very mild light, one that will not produce any chemical action upon the emulsion. To appreciate the delicacy of this operation, do not fail to avail yourself of the first opportunity to go through a photographic manufacturing plant. To complete the chemical action which the light, either actinic or X-Rays produce on these silver salts, the film or plate has to be put through two complex chemical solutions known as developer and fixing bath. In all of these different combinations or emulsions, it is necessary that a special developer be used that will correspond to the ingredients in the emulsion to bring out the very best results. For that reason it is not desirable to use a portrait developer for landscape plates or an ordinary kodak film developer for X-Ray plates or films. The manufacturer of each and every brand of plates has a special developer adaptable to his particular emulsion and for the very best results that should be used. He has worked out a formula for his emulsion which will give the best results with his particular brand, and it can be depended upon that it will, for photographic goods are sold entirely upon a competitive basis, each manufacturer trying to outdo his competitors. All the formulas herein given are for use with X-Ray plates or films and intended primarily for that use only. PLATE LOADING X-Ray plates and films must be loaded in the dark room with the ruby or green lights no brighter than is used to develop by. If you have not a special table for loading plates, 397
CHIROPRACTIC SPINOGRAPHY be sure that your table or shelf is absolutely clean, allowing no chemical, dirt or moisture to come in contact with either plates or envelopes. Do not load plates just after having mixed or weighed some chemicals, as the air will be laden with chemical dust which will affect the emulsion of the plates, causing fog. To protect the plates from the actinic rays of light, it is first placed in a black envelope and then an orange one. Before starting to load your plates arrange your envelopes alternately, an orange and a black, having the flap ends all in the same direction; this will eliminate all confusion in trying to find the correct envelope in the dark. Open the box of plates, which will be found to have two lids, after all lights are out excepting the ruby or green light. The first plate in the box is always placed emulsion down, after which they are arranged in pairs, held together by proper clasps at each end, with the glass surfaces together. Thus they alternate, first one glass side up, the next emulsion side up, etc., the last plate being necessarily emulsion side up. However, never attempt to remember the order of arrangement of the plates in the box when loading. Hold the plate to the ruby or green light and be sure which is the emulsion side before placing it into the envelope. In radiograph work, it is absolutely essential that you load your plates so that you will know which side carries the emulsion after it is placed into the envelope. The reason for this being that the emulsion side of the plate must always be placed next to the part to be radiographed. The emulsion side of the plate is readily determined by holding at an angle close to the ruby or green light. This surface being dull gives a little or no reflection, while the glass side is shiny and reflects the light. Should you not be positive by this method as to the emulsion side, moisten the index finger slightly and place on one corner of the plate. 398
CHIROPRACTIC SPINOGRAPHY You will find that it adheres readily to the emulsion side, but not to the glass surface. Fold back the flap of the black envelope and hold in such a manner that the flap will not rub against the emulsion of the plate while slipping into the envelope. By allowing the flap to rub over the emulsion you will find upon developing that it has caused fine pencil-like lines, brush-like scratches, called “abrasion marks.” It is claimed this is due to the creation of static electricity and gives the greatest trouble in the winter months. Hold your plate in such a manner that the glass side of the plate rests on your finger tips, the edge of the plate coming in contact with the thumb between the first and second joints. Never press the ball of the thumb or any of the finger tips on the emulsion of the plate, as it is sure to leave the finger prints and might ruin an otherwise good plate. Slide your plate into the envelope with the emulsion side facing the smooth surface of the envelope. Most envelopes have the seam down the center of the back; this must be next to the glass surface of the plate. Turn the flap down and insert this end first into the orange envelope. The emulsion side is still face up, so place in the orange envelope in the same manner that you did the black, emulsion side towards the smooth surface of the envelope. By loading your plates in this manner the seams of both envelopes are on the back or glass side of the plate, and for these reasons: first, the seam on both envelopes would make four thicknesses of paper through the center of your plate for the rays to penetrate and should your tube be low it would show on your plate as a light streak the entire length. Second, commercial glue, or mucilage, with which the seam is made, has been found many times to contain small fillings of metal; these would make pinhead spots on the finished plate. By making it a rule to load your plates in this manner 399
CHIROPRACTIC SPINOGRAPHY you eliminate the danger of taking radiographs through the glass of the plates. While radiographs may be taken in this manner, the glass has a tendency to cut off a part of the rays, thus lessening exposure of the plates. Also in taking radio graphs through the glass side of the plates your image will be reversed and unless some form of marker is used, your readings will all be the opposite of their correct positions. Do not load more plates than you will use in three days, as the chemicals of the paper affect the emulsion and may cause fog. After loading, place in your lead cabinet, or at a distance of 60 to 80 feet from the X-Ray machine. Loading Cassette with Duplitized Films Great care must be taken in loading the intensifying screen to have the fluorescent surface absolutely free from all dust particles and stains. First wipe the screen with a photographer’s camel hair brush, using a light sweeping movement; then wipe the emulsion of the plate in the same way. Place the emulsion side of the plate next to the fluorescent surface of the screen and close the cassette. In using this screen it has been observed that the quality of the plate is greatly improved when the emulsion of the plate and fluorescent surface of the screen are in contact. Therefore you will be obliged to take your radiograph through the glass of the plate, consequently in reading be sure the emulsion is facing you and not the glass side. The fluorescent surface of the screen should never be touched with the hands. Should it become dirty and stained so that simple brushing with the camel hair brush will not remove it, clean in the following manner: moisten a tuft of cotton with grain alcohol and wipe gently, or for stains use a solution of best grade of hydrogen peroxide. Be sure that the surface is thoroughly dry before placing your plate in position. 400
CHIROPRACTIC SPINOGRAPHY The finished plate will present many minute pinholes, which defects are due to the small particles of calcium tungstate of which the screen is made. It is an easy matter to distinguish a screen plate by this characteristic. Remove the plate as soon as the exposure is made, because the prolonged fluorescence of the screen will cause the plate to fog. If it is not to be developed immediately, place in the regular envelope and store in the lead cabinet. Develop in the usual manner. Never store your intensifying screen in the dark room where there are any chemicals or acid fumes; keep in a dry cool place, preferably the lead cabinet. Developing Process The process of developing finishes the chemical action which was started as soon as the rays struck the plate. It is essentially a chemical process and consists in oxidizing the silver salts contained in the emulsion. Only that part of the emulsion struck by the rays will become oxidized in the developer, the remainder will not be changed, but remains a lemon-yellow until dissolved by the hypo fixing bath. Use only chemicals of a standard quality; have clean trays and an absolutely safe ruby or green light. These are paramount factors in producing the best radiographs. Mix your developer by using equal parts of solutions “A” and “B” of the formula given later, having the temperature between 65 and 70 degrees. About 10 ounces for an 8x10 tray is the most convenient amount; less would not cover your plate sufficiently, while more would make it slop as the tray is rocked. Remove your plate from the envelope, using the same care you did in loading. Turn the flap of the black envelope back so that it will not rub the emulsion as it slides out. Hold the plate, emulsion side up and allow it to slip on the finger tips, catching the edge between the first and second joints of the thumb. Keep the fingers off the emulsion surface. 401
CHIROPRACTIC SPINOGRAPHY Slip your plate into the tray of the developer quickly, emulsion face up, and shake the tray vigorously to be sure that it is evenly covered and to remove all air bells. Air bells, or bubbles, must be dislodged within the first 30 seconds the plate is in the developer or they will remain throughout the process and be visible on the finished plate as round transparent spots and pinholes. Rock the tray gently throughout the development to keep any sediment from settling into the emulsion and also to expedite the process. The time for development will depend upon the exposure of the plate and the temperature of the developer. For the finest chemical results the temperature of the developer should be 65 degrees. Warmer developer softens the emulsion, making it very sticky, and develops the plate too rapidly, which is likely to cause them to be streaked and uneven. A lower temperature allows it to develop too slowly, permitting of chemical fog. The density of the negative will increase as the time of the development is prolonged up to the point where the emulsion is oxidized entirely through to the glass of the plate. By occasionally lifting the plate out of the developer and looking at the back you will be able to see to what extent it is developing. When it is entirely developed the plate will look the same on both sides. When you carry development beyond this point chemical fog will set in and will be noticeable by the yellow emulsion, up in the corner where the marker is placed, turning a gray, smoky color. Further development will only deaden the contrast of the lines and make your plate harder to read. A 10-ounce tray of developer should not be used for more than six to ten plates. Rinsing of the Film or Plate Remove the plate from the developer and rinse for half a minute in clean cold water. Should you place your plate 402
CHIROPRACTIC SPINOGRAPHY directly in the hypo, or fixing bath, without first rinsing, you are very likely to cause minute blisters over the entire surface, thus making an unsightly plate and one very difficult to read. This is because the developer is alkaline in reaction and causes a violent chemical reaction with the fixing bath, which is strongly acid. Fixation Procedure After your plate has been in the fixing bath for three minutes it will be safe to turn on your white light. Your plate should be clear, that is, all the yellow of the emulsion removed within five minutes after placing in the fixing solution. Allow your plate to remain in the fixing bath for at least five minutes after it is cleared, for while it looks transparent the unoxidized silver will not all be dissolved out. Therefore, ten minutes is the minimum length of time they should be left in the hypo bath, 15 to 20 minutes is absolutely safe, and longer will not hurt. By leaving them in your fixing bath several hours a slight reduction takes place which reduces the density of the plate. Washing of the Film After Fixation Plates are more easily and quickly washed by using running water. Do not allow the force of the water from the tap to fall directly on the plate, as it invariably raises the emulsion. A regular plate washer can be attached to the tap, but a rubber tube is preferable. Allow the plates to wash 15 minutes in running water, or, if running water is not available, wash in 10 complete changes of water, consuming 30 minutes in all. Should the tap water be riley, put on a filtering cap, as any sediment in the water will settle in the emulsion of the plate. Drying the Film or Plate Great care should be taken in properly drying the negative, as often a good plate is spoiled by careless drying. They 403
CHIROPRACTIC SPINOGRAPHY are best dried in a room of normal temperature which is free from dust. Do not attempt to dry quickly by placing in a warm place or in the sun, as the emulsion will melt and run off the plate. Place on a drying rack and not too close together, as they are likely to dry unevenly and slowly, which may leave drying marks. Removing from one room to another of different temperature after a plate is partially dried will vary the density of the part dried last. This causes large circular spots. In cold weather do not leave where the moisture will freeze on the plate before it is dry, as this will give a mottled appearance. Should you wish to dry the plates quickly, place them before an electric fan. The harder the gelatine (the emulsion) is fixed on the plate, the quicker it will dry. The emulsion can be hardened to a greater extent by placing the plate, after it is all fixed and washed, in a five per cent solution of formaldehyde in five minutes. Another method of quick drying is to moisten a tuft of cotton with grain alcohol and gently swab over the surface of the plate and then place before the fan. If you use the latter method, be sure all hypo is washed out of the plate. DEVELOPING PROCEDURE (Tank Method) The use of tanks for developing kodak films, photographic plates, and photographic films, has been in use for some years, and today we find them universally used. The chemical process is essentially the same as the tray method, and differs only in the amount of work and time required. As the name will indicate, the developer is placed in a tank of suitable size so that when a film is placed on edge it will be entirely immersed. These tanks are specially constructed containers made in various sizes to accommodate the different 404
CHIROPRACTIC SPINOGRAPHY sizes of films and of such material that they will not be acted upon by the chemicals. These can be purchased from any photographic dealer at a very nominal cost. Some very successful photographers use a weak developing solution, thereby necessitating a longer time in the developer, which they claim gives them a much finer grade in the silver deposit of the negatives. As it is not necessary that the Roentgenologist have the same quality of negative in this respect as the portrait photographer, we can use the developer at the same degree of concentration as we do for the tray method. The formula following this article has given us very satisfactory results, and we can recommend it; we are indebted to the Eastman Kodak Company for its use. Before endeavoring to mix it up, measure the capacity of your tank and make about one-half gallon more than is necessary to fill the tank. This extra quantity keep in a closed container and use to refill the tank as it is gradually carried out by removing your films from it. Here I wish to recommend that a floating lid be used to keep as much of the air from the filled tank of developer as is possible. These lids are not supplied as a part of the complete tank, but are furnished to those that wish them at additional cost. As has been stated before, developer will oxidize on contact with the air and become useless regardless as to whether it is being used or not. Therefore, the advisability of keeping all the air possible away from it. When the temperature has been reduced to 65 degrees it is ready to use, and let me impress upon you that the temperature of the developer when this method is used is just as important as when the tray method is used. In order that the film may be held in proper position while in the tank, a special metal hanger has been devised which grips the four corners of the film and holds it flat. A special loading device is also provided which eliminates the danger of finger marks while loading the films onto these hangers. The films are removed from the holders and the 405
CHIROPRACTIC SPINOGRAPHY enclosed black paper discarded under the same special X-Ray ruby light by which they were loaded and fitted onto the film hangers, being furnished in sixes and twelves, and if you and allowed to remain for approximately five minutes at this temperature; as the solution grows older, it will take longer. The tanks are made to accommodate different numbers of hangers, being furnished in sixes and twelves, and if you have that number of films to develop, all may be placed in at one time. During the period of development, it is advisable to lift the hangers up frequently to insure an even action of the developer and avoid their becoming stuck together. It is advisable to make this operation as nearly mechanical as possible, allowing them to remain in the developer for the prescribed length of time, as it is a matter requiring some experience and a sense of judgment to know just when a negative is thoroughly developed by looking at it under the ruby or green light. Should a question of this kind arise, the best method to follow is to remove the hanger with film to the ruby or green light and determine whether or not the yellow unoxidized emulsion in the FILM MARKER is still a lemon-yellow, or has begun to turn a gray smoky color. A gray smoky color is an indication that the film is thoroughly developed and has begun to fog. This is true when the temperature of the developer is correct (65 degrees). When development is complete, remove the film hanger without detaching the film and rinse in water as nearly the same temperature as that of the developer as possible and place into the hypo bath. It is advisable also to have the hypo bath as nearly the temperature of the developer as possible; under no circumstances should the hypo bath be above 75 degrees. After having properly fixed as indicated under the special FIXING on page 403, wash for 15 or 20 minutes in running water and hang up to dry. It is not necessary to remove 406
CHIROPRACTIC SPINOGRAPHY film from hanger during any part of this process, and once it is loaded into the hanger, allow it to remain until developing, rinsing, fixing and drying is complete. The fixing bath used in this method is the same as that used in the tray method, and the formula is furnished elsewhere in the text. A special tank for the fixing bath to be used with this method is similar to the developing tanks in size, but differing in composing. During the hot summer months a special hardening bath is of use when the wash water is above 75 degrees. This special bath hardens the emulsion to a far greater degree than the hypo bath alone will do, and will eliminate much trouble in cities where the water is above this temperature. This will prevent the emulsion softening while the films are washing so that they may be handled with ease and keep the emulsion on the film base. If this is to be used, provide yourself with an extra tank and set it between your developer and fixing tanks. After the films have been thoroughly developed, rinse them and then place into this special hardening solution, allowing it to remain from three to five minutes, then take it out, rinse again and place into the fixing bath and proceed in the usual manner. FORMULA FOR SPECIAL HARDENING (To be used when the wash water is above 75 degrees Farh.) Chrome Alum, 1 lb.; Water, 1 gallon. This solution may be used over and over again until it begins to show a muddy precipitate. It is necessary when this is used that the film be cleaned with a piece of cotton after it has been removed from the washing tank, just prior to drying. 407
CHIROPRACTIC SPINOGRAPHY Developer Formula (Tank Method) Water ..................................... 6 gallons Elon ........................................ 1 oz., 369 grains E. K. Co. Sulphite of Soda ..... 40 oz. Hydroquinone ........................ 7 oz., 145 grains E. K. Co. Carbonate of Soda .. 40 oz. Potassium Bromide ................ 320 grains Mix the chemicals in the order named, dissolving each before the other is added. This same formula can be purchased already mixed ready to add the required quantity of water. DEVELOPING DUPLITIZED X-RAY FILMS As the new X-Ray films recently perfected by the Eastman Kodak Company are duplitized (that is, coated on both sides) it is not necessary to look for the emulsion side either in loading or developing. If developed in the tray care must be taken not to scratch them and use a little more developer in the tray than you would for plates so as to allow them to float as much as possible. We have found in using these films that a standard time developer is the best, as it is otherwise very hard to judge when they are finished. The time for development is reduced about 25 per cent over that of the X-Ray plate, because the same amount of emulsion is spread over both sides of the plate instead of upon one, therefore, making it thinner and allowing the developer to penetrate more rapidly. In using the developer formula herein given, it will require about three and a half minutes to develop a normally exposed X-Ray film. The developing tanks and loaders advised to be used with duplitized X-Ray films will appeal to the busy Roentgenologist. They minimize the work, are absolutely reliable and give uniform results. The many advantages of films over plates will readily appeal to you, but we must impress upon you the extreme caution necessary in handling while loading and developing. 408
CHIROPRACTIC SPINOGRAPHY DEVELOPING DENTAL FILMS Dental X-Ray films are prepared with two films in each capsule, or envelope, one intended for the patient and the other for the dentist. They are to be developed in the regular manner until the object appears the same on both sides. Wash and fix as usual. If some identification mark is needed to distinguish different films, a very simple method is to use a soft lead pencil mark on the emulsion side of the film before it is developed. Mark close to the edge on the narrow ends to avoid interfering with the important part of the film. A developing tank for dental films is a great advantage if you are doing considerable work of this kind. The regular dental developing tank as supplied by the E. K. Co. will hold eight pairs of films at a time. Your assistant can handle the work with this method very readily, as it converts it into a mechanical operation. Developer Formula (Tray Method) Solution A—Water, preferably distilled....................1 gal. Metol or substitute ................................1/4 oz. Hydroquinone .......................................4 oz.. Sodium Sulphite ................................. 7-1/2 oz. Solution B—Water ...................................................1 gal. Sodium Sulphite ................................. 7-1/2 oz. Sodium Carbonate ................................ 10 oz. Potassium Carbonate ............................ 5 oz. Potassium Bromide ..............................3/4 oz. By warming the water, not to exceed 120 degrees, it is much easier to dissolve the chemicals; see that each is added in the order given and also that each is thoroughly dissolved before adding the next. This formula has been found to give the maximum of results in our laboratory work, and we can recommend it to 409
CHIROPRACTIC SPINOGRAPHY you. When the solutions are kept separately, this formula will keep a considerable time. Use equal parts of solutions “A” and “B”; do not mix until ready to use. The temperature should range from 65 to 70 degrees while using. For the normal exposure it will require about four minutes to develop. FIXING BATH OR HYPO We have found from our experience that the chrome alum bath is the best adapted for our work, as it hardens the gelatine to a greater degree than the most commonly used acetic acid hardener. Nevertheless, hypo fixing salts, which you can buy at any photo supply dealer, will answer the purpose. Simply dissolve them in the given quantity of water. The acid fixing bath does two things in fixing the film; first, the hypo-sulphite of soda dissolves the unoxidized silver bromide from the emulsion, making it a soluble salt of silver and rendering the plate transparent. A film is only one-half fixed when the yellow milky color disappears. To remove film then and wash and dry it will give rise to stains later. Secondly, the chrome alum of the bath hardens the gelatine emulsion, making it firm and adhesive to the film. When the emulsion is hard and set it will dry more quickly and is less liable to be scratched. Hypo bath is cheaper than ruined films Keep your bath fresh and clean to obtain best radiographs. Do not add new hypo bath to one partly used. When the hypo fixing bath will not clear the films in five minutes throw it out and make up new. When not in use, keep your fixing bath covered to keep out dirt and prevent evaporation. Hypo Fixing Bath Formula Solution A—Crystal hypo .................................... 4 lbs Water ..........................................120 oz. 410
CHIROPRACTIC SPINOGRAPHY Solution B—Chrome Alum ...................4 OZ. Sodium sulphite (dried)...... 8 oz. Water ............................... 60 oz. Solution C—Sulphuric acid, C. P .........1/2 oz Water ...............................20 oz. Mix each subdivision separately, then add “C” to “B” and thoroughly mix before adding to “A.” Have “C” and “B” cold before mixing. Any photo supply dealer can prepare this formula for you if you have not your own chemicals. INTENSIFICATION PROCESS By this method it is possible to build up a thin, underdeveloped film to a great degree, and an under-exposed film to a point where it is possible to make a reading. The underdeveloped film will show a very marked improvement, while the under-exposed film not quite so much, but in a great majority of cases you can save yourself the expense, time and inconvenience of making the radiograph over. This is a chemical process that will increase the density of the silver oxide in the emulsion and make the lines of demarcation more visible. Before the process is begun, however, it is imperative that all traces of hypo be washed out of the film. Wash for an additional 15 or 30 minutes and while your emulsion is still wet, place in Solution “A.” Solution “A” is known as the bleacher and your plate should be left in it until the image all but disappears and a heavy white coating is formed on the emulsion. The operation may take from five to 15 minutes. Rock the tray continually during the operation. When finished, rinse thoroughly and place in solution “B.” When placed in this solution the image will gradually blacken and should be left here until it is of an even color all over. This should not require more than five minutes. Examination before the light will now reveal a greater density than the original negative, making it now possible to 411
CHIROPRACTIC SPINOGRAPHY see the lines of demarcation. After intensification, the negative must again be thoroughly washed before drying. It is understood, of course, that intensification should only be used when you have a noticeable image to begin with as base. This entire process is performed under a white light. Intensifier Formula Solution A—Bichloride of mercury................... 120 gr. Potassium bromide ......................... 120 gr. Water ...............................................16 oz. Solution B—Sodium sulphite .............................2 oz. Water ...............................................16 oz. Keep in dark bottles; mark solution “poison.” To use: Bleach with solution “A”. Rinse and place in solution “B” to blacken. REDUCING PROCESS An over-exposed film which is so dense that it cannot be read may in the majority of cases be reduced by this method so that it is readable. First, be sure that all hypo is washed out of the plate by giving it an extra washing of 15 to 30 minutes. Place in the tray of solution while the emulsion is still wet. Keep the tray rocking until the reduction is sufficient to enable you to make a reading. The time will vary according to the density of the film and the amount of reduction desired, usually requiring five to 20 minutes. If only a local reduction is desired after the plate is thoroughly washed supply the solution repeatedly with a tuft of cotton to that part only. When this operation is completed it will be necessary to wash the plate again for about 30 minutes in order to remove all chemicals and insure safekeeping. 412
CHIROPRACTIC SPINOGRAPHY The formula given below is similar to that which you may buy put up in sealed tubes from any photo supply dealer. In making up this formula if the two solutions “A” and “B” are kept separately and in dark bottles, there will be no appreciable deterioration. This is not true, however, after they are mixed ready to use. Reducer Formula Solution A—Potassium ferricyanide ....................1 oz. Water ................................................1 6 oz Solution B—Crystal hypo ................................... 1 oz. Water ............................................... 16 oz. To use, mix one ounce of solution “A” with either ounces of solution “B.” This operation is performed under a white light. Wash the tray well after finishing, using a little Sapolio to scour. STORAGE OF PHOTOGRAPHIC SENSITIVE MATERIAL AND ACCESSORIES X-Ray plates or films must be kept in a cool, dry place with the boxes on edge and not lying flat. Do not store near radiators or steam pipes; you will have defective plates if you do. Dampness or any form of moisture is equally bad for both. Do not have them in a room where there is gas burning for any length of time, or near new paint, or the vapor of turpentine. We cannot impress on you too strongly the extreme sensitiveness of the plates, as to both light and chemicals. Plates kept on edge and in a cool, dry place will keep for a year without deterioration. As the X-Rays will penetrate a distance from 60 to 80 feet from the tube, plates must either be kept at a greater distance from this or in a lead-lined cabinet. The ordinary wall is no protection to the plates when the tube is being used, as X-Ray plates can be fogged through several walls. 413
CHIROPRACTIC SPINOGRAPHY
FIG 94. Schematic Drawing of a Model Dark-room Requiring but Small Space in the Laboratory.
414
CHIROPRACTIC SPINOGRAPHY All chemicals must be kept in tight containers, as they absorb moisture from the air, which causes deterioration. Ready prepared formulas come in waxed paper or glass containers so that they will keep under any ordinary conditions. DARK-ROOM EQUIPMENT The room to be used as a dark-room should be located where running water is accessible and where good ventilation is permissible. The size of the room needed will depend somewhat upon the amount of work handled. For the average Chiropractor I should say a room 4x5 would suffice. It must be absolutely dark, not allowing the faintest trace of light to enter through cracks, pinholes or around curtains. The least conceivable rays of light will, if allowed to strike a plate, cause fog. I have seen dark-rooms which were not more than 6 feet square built inside the X-Ray operating room, artistically finished on the outside and lined with black building paper on the interior. These proved to be practical and convenient. It should be arranged to have one table for developing, one for plate loading and one for the fixing bath; have the fixing bath nearest the sink. Do not have any unnecessary shelves or tables, as the dark room is a place where rubbish will accumulate very rapidly. It should at all times present the same tidy appearance as your other offices. When you work in here, you do so as a chemist, for all the dark-room operations are but chemical processes. The chemist never allows dirt to accumulate; never uses dirty utensils; never allows any spilled chemicals to remain on tables, scales or floor. You must do the same. Probably the most important part of your dark-room equipment is the safe light. As a majority of safe lights are not safe, be positive that you have a safe one and you may test it in this manner: Place an unexposed plate under the light (emulsion up) the same distance that you would do your developing; lay a coin or piece of metal on it, and leave 415
CHIROPRACTIC SPINOGRAPHY exposed for five minutes. Now, develop the plate, and if any outline of the object shows on the finished plate, your light is unsafe. Never use any metal containers for mixing your solutions; use a glass graduate or bottle. Steel enameled trays are the most durable of all, while glass or fiber are as suitable. Four trays should be the correct equipment for your work. You should have two graduates, a 32-oz. and a smaller one; a hard rubber stirring rod and dark colored bottles with stoppers to keep the solutions in. Many forms of developing tanks are on the market and any of the standard quality are suitable if you desire to use this method. Entirely satisfactory results may be obtained with the tank method, providing the temperature can be controlled. Our only advice, however, about this method would be to use a metol-hydroquinone developing formula. It has been our experience in the P. S. C. laboratory that the shadows and finer details of spine work are best shown by the above developer, while pyro developer is very contrasty and oxidizes quickly. The most convenient method for taking care of your fixing bath is to obtain a regular fiber fixing box made for that purpose. Your solution can be kept until used up if covered when not in use. A plate washer in which the plates can stand on edge and the water allowed to flow through them will wash your plates quickly and easily and occupies very little space. A drying rack will enable you to dry your plates more quickly and evenly and it should be up away from any dust. As these are inexpensive you cannot afford to be without one. Photo supply dealers are now selling a fibroid cloth, black in color and similar in appearance to oil cloth. This is intended for covering tables, trays and making aprons. It is acid and alkali proof and is an excellent article for these purposes. 416
CHIROPRACTIC SPINOGRAPHY DARK-ROOM “DON’TS” 1. Don’t give your plates to a photographer to develop unless he has had special instruction in developing X-Ray plates, for he will be guided by the method used in ordinary photographic developing and your plates will be underdeveloped. 2. Don’t use old, weak developer, for its cost is nothing compared with the cost of a plate. The developer commences to oxidize as soon as it is mixed and unless kept on ice or in a very cool place, will not keep over from one day to the next. 3. Don’t tub your fingers over the surface of the plate while it is developing. 4. Don’t put the hands into the hypo and then back into the developer, for a few drops of hypo solution in the developer will absolutely ruin it. Wash the hands well and then dry. 5. Don’t use a tray for hypo one day and for developer the next. Mark your trays and use them for the same solution each time. 6. Don’t strengthen old weak hypo with some new Throw it out and make another batch. 7. Don’t turn on your white light until the plates have been in the fixing bath for at lease three minutes. 8. Don’t remove the plates from the fixing bath to wash for at least five minutes after they become clear 9. Don’t hold your plate to a bright light for examination until the hypo bath has removed all milky appearance. 10. Don’t load plates just after mixing or weighing chemicals in your dark room. 417
CHIROPRACTIC SPINOGRAPHY PLATE OR FILM TROUBLES Ninety-nine per cent of plate defects are due directly to careless manipulation in the dark room. Fog, a smoky appearance; due to unsafe ruby light, too long in the developer, the plates not being properly stored, or chemical dust while loading. Flat negatives, having little or no contrast, may be due to any of the following: under-exposure, cold developer, underdevelopment, or exhausted developer. Pinholes, or round, transparent spots, are due to air bells. These form the second the plate is put into the developer, and may only be overcome by vigorously shaking or rocking the trays. These occur more frequently in the tank method. Hypo, or other chemical rust, may settle on the plate during loading and cause either transparent or dark spots. Small dark spots are usually caused by using envelopes on which some developer has been spilled or by water spattering on the plates before developing. Streaky plates may be caused by caused by improper, uneven drying, by rocking the tray in one direction only during development, or a hypo solution that is old and exhausted. Stains—milky streaks may be clue to insufficient washing wherein all hypo is not moved; this usually appears two or three days after being dried. Yellow stains usually due to old developer, or hypo developer. Greenish stains due to too warm a developer. Bluish, almost metallic luster, prolonged over-development causing a deposit of metallic silver. 418
CHIROPRACTIC SPINOGRAPHY Abrasion marks, caused by rubbing the surface of the plate while loading or careless handling afterwards. Crescents, white streaks or lines appearing on a film are due to improper handling; never bend a film when loading, as this is the cause of most white streaks in films. CONCLUSION In conclusion, I wish to impress upon the student or practitioner that in studying this text, or taking the course as taught by this Institution, that it is our aim to give the student a foundation of Chiropractic spinography which he can improve upon only by experience. After all that has been written upon the subject of Roentgenology, there is still more that could be written, as the possibilities of the X-Rays are far-reaching, and unknown today, as every year sees improvements and development of this great work. Therefore, it is the hope of the author that this text will be of assistance to every one who reads it and that they will become a student of this work, not only today, but tomorrow and every other day. It is to be expected that the beginner will make a few mistakes in some phases of the work. By carefully analyzing each step connected with every phase of the work, that your mistake may be found and corrected, will help the spinographer to find his own short comings, and thereby improve his work. If this work has been beneficial to the Chiropractic field as it is intended for, even though there are some who do not use it in their practice, it will have served its purpose. THE END 419
INDEX Adjustment of Vertebral Subluxations.................................................... 16-17 Analysis compared with Spinograph....................................................... 17-18 Apparatus, Electrical Pressure ................................................................... 235 Apparatus, Electrical Resistance ............................................................... 241 Apparatus, Motor Type X-Ray .................................................................. 252 Apparatus, Motorless Type X-Ray............................................................. 255 Apparatus, Other Electrical........................................................................ 244 Bowl, Lead-Glass, use of ........................................................................... 327 Circuits, Electrical ..................................................................................... 229 Series Circuit ..................................................................................... 229 Parallel Circuit .................................................................................. 229 Coolidge Universal Tube, high-tension ............................................. 279 Coolidge Radiator Tube, high-tension ............................................... 287 Magnetic Circuit ............................................................................... 225 Conductors, Electrical ............................................................................... 223 Cones, Lead-Lined, use of ......................................................................... 327 Control, Filament ...................................................................................... 243 Converters, Rotary and Synchronous......................................................... 246 Current, Alternating .................................................................................. 230 Cycle of ............................................................................................. 231 Frequency of ..................................................................................... 231 Definitions and Terminology as applied to Electricity and X-Ray ............ 215 Diaphragm, Potter-Bucky ......................................................................... 293 Theory of Operation........................................................................... 295 Types and Makes ............................................................................... 297 Description of Spinograph Negatives ............................................... 85 to 214 Effects of X-Rays on Tissue....................................................................... 322 Exposure Technique for Spinographs ........................................................ 334 Exposure Tables, Spinograph ......................................................... 346 to 358 Technique for Photographic Plates .................................................... 347 Technique with Double Screens......................................................... 348 Technique without Bucky Diaphragm..................................... 348 to 357 Technique with Bucky Diaphragm..................................................... 358 Technique for Spinographing Children.............................................. 360 Factors permissible which determine amount of exposure......................... 322 Field, Magnetic, Nature of ......................................................................... 225 Flux, Magnetic .......................................................................................... 225 Gap, Spark (Parallel Spark Gap)................................................................ 250
421
CHIROPRACTIC SPINOGRAPHY Illustrations— Ankylosis, illustrations ........................................................ 108, 110, 116 Dislocated Spine, illustrations ..................................................... 124, 209 Malformation, illustration ................................................................... 113 POTTS Disease, illustrations ....................................................... 126, 213 Sacrum, rotated, illustration ................................................................. 131 Spina bifida, illustration............................................... 118, 120, 122, 128 Exostosis with Concavity of Curvature, illustration............................. 116 Impedance ................................................................................................. 234 Indicator, Polarity ..................................................................................... 252 Inductance ................................................................................................. 234 Induction, Electro Magnetic ...................................................................... 225 Instruments, Electrical Measuring ............................................................ 249 Ions, Positive and Negative ....................................................................... 263 Machine, The X-Ray ................................................................................. 252 Magnets and Magnetism ............................................................................ 224 Magnetism Laws ................................................................................. 224 Magnetic Flux ..................................................................................... 225 Magnetic Line of Force........................................................................ 224 Magnet, Electro ................................................................................... 226 Magnet, Permanent ............................................................................. 224 Meters— Ampere Meter ..................................................................................... 250 Milliampere Meter .............................................................................. 249 Volt Meter ........................................................................................... 250 Milliampere Seconds ................................................................................ 345 Motor, Synchronous ................................................................................. 244 Negatives, X-Ray ...................................................................................... 298 Non-conductors, Electrical ....................................................................... 223 Ohms Law ................................................................................................. 226 Operator, Protection from X-Rays, and Secondary Radiation .................. 329 Protection from High-tension Current and Shock .................... 329 to 332 Patient, Placement of, on Spinographic table ............................................ 312 Placing on Table for Various Regions of the Spine ............................ 313 Placement for Lateral Views ............................................................... 318 Patient, Protection of ................................................................................ 322 Protective Factors which should be used ............................................ 323 Summary of Factors ............................................................................ 328 Protection from Static and High-tension Current ................................ 327 Photographic Effects— Current-time Relation ......................................................................... 338 Distance-time Relation ........................................................................ 334 Voltage-time Relation ......................................................................... 338
422
CHIROPRACTIC SPINOGRAPHY Tissue Absorption and Time Relation..................................................... 339 Summary of Relationship Factors ........................................................... 339 Photographic Chemistry and Dark-Room Procedure— Dark-Room Equipment .......................................................................... 415 Dark-room Don’ts .................................................................................. 417 Developing Process ................................................................................ 401 Developing Procedure, tank method ....................................................... 404 Developing Duplitized Films ................................................................. 408 Developing Dental Films ....................................................................... 409 Developing Formula, tray method........................................................... 409 Developing Formula, tank method.......................................................... 408 Drying the Film or Plate.......................................................................... 403 Formula for Special Hardening Solution ................................................ 407 Fixation Procedure ................................................................................. 403 Fixing Bath or Hypo Solution................................................................. 410 Hypo Fixing Bath Formula ..................................................................... 410 Intensifier Formula ................................................................................. 412 Intensification Process ........................................................................... 411 Loading Cassette with Duplitized Films ................................................. 400 Plate Loading ......................................................................................... 397 Plate and Film Troubles .......................................................................... 418 Rinsing of Film or Plate ......................................................................... 402 Reducing Formula .................................................................................. 413 Reducing Process ................................................................................... 412 Storage of Photographic Sensitive Material and Accessories ................. 413 Washing of the Film or Plate after Fixation ............................................ 403 Polarity Indicator ........................................................................................... 252 Precautions, Machine ..................................................................................... 344 Radiation, Secondary and Scattered........................................................ 261, 293 Radiography of Other Osseous Structures ........................................... 362 to 382 Lower Extremities .................................................................................. 363 Ankle .................................................................................................. 365 Foot .................................................................................................... 363 Hip ..................................................................................................... 366 Knee ................................................................................................... 365 Os Calcis ............................................................................................ 364 Upper Extremities .................................................................................. 367 Clavicle .............................................................................................. 371 Elbow ................................................................................................. 370 Hand ................................................................................................... 367 Ribs .................................................................................................... 374 Sternum .............................................................................................. 373 Wrists ................................................................................................. 369 Radiography of the Head ........................................................... 375 to 378 Antrum .............................................................................................. 376 Dental Radiographs ........................................................................... 379 Frontal Sinus and Frontal Bone ........................................................ 375
423
CHIROPRACTIC SPINOGRAPHY Mandible ........................................................................................... 378 Mastoid ............................................................................................. 378 Skull .................................................................................................. 377 Recording Spinographs .......................................................................... 360-361 Recording Spinograph Analysis....................................................................... 86 Rheostat, or Resistor ...................................................................................... 241 Screens, Intensifying ..................................................................................... 297 Care of ................................................................................................... 304 Directions for Use .................................................................................. 301 Double Screen Technique ...................................................................... 302 How used ...................................................................................... 348, 357 Method of Mounting Single Screens...................................................... 303 Method of Mounting Special Screens .................................................... 304 Value of ................................................................................................ 327 Why Good Screens Are Necessary......................................................... 298 What Constitutes a Screen ..................................................................... 299 Soft Tissue Radiography— Alimentary Tract ................................................................................... 384 Large Intestines ................................................................................. 387 Oesophagus ....................................................................................... 384 Small Intestines ................................................................................. 387 Stomach ............................................................................................ 385 Gall-Bladder .......................................................................................... 394 Gall-Stones ............................................................................................ 394 Liver ...................................................................................................... 394 Thorax ................................................................................................... 389 Heart .................................................................................................. 389 Lungs ................................................................................................ 390 Urinary Tract ......................................................................................... 391 Kidney ............................................................................................... 392 Urinary bladder ................................................................................. 394 Ureters ............................................................................................... 393 Spinograph Analysis— Abnormalities ...................................................................................... 69, 73 Ankylosis ............................................................................................ 69, 72 Apex of Scoliosis, when to list....................................................... 48, 49, 50 Atlas and Axis, listing of...................................................................... 54, 62 Atlas and Axis Analysis ................................................................... 181, 206 Bent Spinous Processes, how to determine................................................ 40 Center of Spinous Processes ...................................................................... 33 Center of Spinous Processes in Cervical Region ....................................... 33 Cervical Vertebrae, how to list................................................................... 51 Cleft Spinous Processes ........................................................................... 122 Coccyx ...................................................................................................... 69 Coccyx, how to list .................................................................................... 69 Curvatures ..................................................................................... 44, 50, 75 Determining Land Marks ........................................................................... 28
424
CHIROPRACTIC SPINOGRAPHY Determining Median Line ........................................................................ 28 Exostosis and Ankylosis ................................................................... 69, 72 Fifth Lumbar ........................................................................................... 32 First Dorsal ............................................................................................. 28 Ilii, how to list.......................................................................................... 67 Ilii, subluxations of .................................................................................. 67 Inferiority, how to list ......................................................................... 41 65 Lateral Spinograph Analysis ........................................................... 206 214 Laterality ................................................................................................. 32 Lateral Scoliosis ...................................................................................... 49 Long Spinous Processes........................................................................... 34 Lateral Views .......................................................................................... 63 Lower Cervical and Upper Dorsal Analysis................................... 153, 180 Lower Dorsal Analysis................................................................... 135, 153 Lumbar Analysis ............................................................................. 87, 128 Marker, placing on film............................................................................ 27 Position of Spinograph for Reading......................................................... 27 Posteriority .............................................................................................. 32 Rotatory Scoliosis ............................................................................. 44, 50 Rules for Plate Reading............................................................................ 27 Sacrum Analysis ......................................................................... 129 to 135 Sacrum Subluxations ................................................................. 129 to 135 Sacrum, rotation of................................................................................... 66 Scoliosis, lateral ................................................................................ 49, 50 Scoliosis, rotatory ............................................................................. 44, 50 Subluxations, lateral ................................................................................ 32 Superiority, how to list....................................................................... 41, 65 Tenth Dorsal ..................................................................................... 34, 35 Twelfth Dorsal ........................................................................................ 30 Vertebral Subluxations, Lateral ............................................................... 32 Spinography, Introduction of ........................................................................... 14 Spinography, Use of, today.............................................................................. 20 Value of .................................................................................................. 18 Why introduced ........................................................................... 16, 17, 18 What it is.................................................................................................. 20 Spinography of Children........................................................................ 356, 359 Switch, Rotatory ........................................................................................... 246 Table, Spark-gap ........................................................................................... 251 Tests, Spark-gap with Motorless Apparatus and Radiator Tubes................... 288 Tests, Tube Condition, for Current and Spark-gap ........................................ 340 Transformers— Auto-transformer ................................................................................... 239 Step-down Transformer ........................................................................ 238 Step-up Transformer ............................................................................. 235 Tubes (X-Ray) and Accessories— Coolidge Tubes ..................................................................................... 275
425
CHIROPRACTIC SPINOGRAPHY Types of ............................................................................................ 276 Universal Type— Capacities of Universal Types............................................................ 279 Construction of ................................................................................. 276 Anode Terminal or Electrode ....................................................... 278 Cathode Terminal or Electrode .................................................... 278 General Remarks ............................................................................... 280 Method of Operation.......................................................................... 281 Radiator Type— Capacities of Radiator Types ............................................................. 288 Construction of ................................................................................. 284 Anode Terminal or Electrode ....................................................... 286 Cathode Terminal or Electrode .................................................... 285 Focal Spots ........................................................................................ 288 General Remarks ......................................................................... 289 Operation Theory on Un-rectified (AC) Current.......................... 287 Gas Tubes— Descriptive Parts ......................................................................... 270 How to raise vacuum.................................................................... 273 Testing and Operating .................................................................. 271 Hydrogen Gas Tubes— Description of .............................................................................. 273 Verification, Method of, When Spinographic and Palpation Analysis do not agree ....................................................................................... 316 X-Rays .......................................................................................................... 258 X-Ray electricity ................................................................................... 215 Effects on Tissue................................................................................... 322 Discovery of .......................................................................................... 256 Laws of................................................................................................... 258 Laws of Production ............................................................................... 260 Penetration of ............................................................................. 253 to 355 Physical Properties ................................................................................ 256 Physics of Production ........................................................................... 262 Quality of .............................................................................................. 268 Quantity of ............................................................................................ 268
426