Digital Design and FPGA
Implementation of a Wireless
Video Surveillance System
Vivek Shah Noel Campbell Raymond Tong Introductory Digital Systems Laboratory 5/19/2006
Abstract: This laboratory used a Xilinx FPGA to create a video surveillance system with wireless transmission as a digital circuit. The surveillance system was fully functional and able to capture, encode, and transmit and image, as well as receive, decode, and display the image. ModelSim simulations were used to test the various modules of the surveillance system, as well as Verilog test benches. After a comprehensive suite of tests found no errors in the design, the surveillance system was programmed into a FPGA and passed physical testing as well.
Table of Contents 1. 2. 3. 4. 5.
6. 7. 8.
Title Page and Abstract Table of Contents List of Figures, Tables, and Equations Operational Overview Module Description and Implemention a. Capture-Encode-Transmit System i. Video Capture 1. NTSC Decoder 2. Store 64 3. Set Address 4. VGA Controller 5. Delay 6. YCrCb to RGB converter 7. Display ii. Video Memory (Encoder) iii. Encoder 1. DCT Multiply a. DCT Front b. DCT Table c. Multiplier Shift Register d. DCT Back 2. Encode_memory_register 3. Encode_FSM iv. Wireless Block Memory v. Wireless Transmitter 1. Transmitter Control Unit a. TX Shift Register b. RS232 Sender vi. Wireless Packet Sender b. Receiver-Decode-Display System i. Wireless Receiver 1. Packet Receiver 2. Receiver Control Unit a. RS232 Receiver b. RX Shift Register ii. Wireless Block Memory (Decoder) iii. Decoder 1. DCT Multiply Decode a. DCT Front Decode b. DCT Table c. Multiplier Shift Register d. DCT Back Decode 2. Decoder FSM iv. Video Memory (Decode) v. Video Display 1. Read 64 Testing and Debugging Conclusion Appendix
1
2
3
4
5
5
5 5
6
6
7
7
7
7
8
8
10
10
10
10
10
11 11
12
12
13
13
13
14
14
14
14
14
14
14
15
15
16
16
16
16
16
17
17
17
18
19
22
23
2
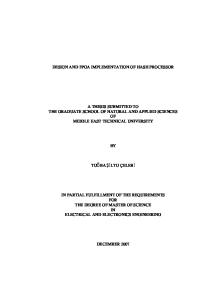
List of Figures Figure 1 – System Diagram .........................................................................................................................................................4
Figure 2 – Block diagram of Video Capture Module. .................................................................................................................5
Figure 3 – Set Address Finite State Machine...............................................................................................................................6
Figure 4 – Writing to Video Memory Process .............................................................................................................................8
Figure 5 – DCT coefficients used in the encoded block. .............................................................................................................9
Figure 6 – Block diagram for encoder module. ...........................................................................................................................9
Figure 7 – State Transition Diagram for Encoder FSM.............................................................................................................12
Figure 8: Transmitter Block Diagram........................................................................................................................................13
Figure 9 - Wireless Receiver Block Diagram ............................................................................................................................14
Figure 10 – Block diagram of Decoder module.........................................................................................................................16
Figure 11 – State Transition Diagram for Decode FSM. ...........................................................................................................17
Figure 12 – Block diagram of the Video Display Module.........................................................................................................18
Figure 13 – Video Capture/Display Testbench..........................................................................................................................19
Figure 14 – Video Encoder Testbench ModelSim waveform outputs. ......................................................................................20
Figure 15 – Decoder Testbench ModelSim waveform output. ..................................................................................................21
Figure 16: Logic analyzer screenshot verifying overall system data flow.................................................................................22
List of Tables Table 1 – Blanking and Synching Signal Values.........................................................................................................................7
Table 2 – DCT Coefficient matrix as stored in memory using fixed point notation..................................................................10
Table 3 –Outputs for ENCODE_BLOCK state of encode FSM................................................................................................12
List of Equations Equation 1 – Matrix novation of DCT using 8x8 matrices. .........................................................................................................9
Equation 2 – Two dimensional Discrete Consine Transform algorithm......................................................................................9
Equation 3 – Matrix notation of IDCT using 8x8 matrices........................................................................................................15
Equation 4 – Two dimensional Inverse Discrete Cosine Transform algorithm. ........................................................................15
3
Operational Overview The problem with conventional security systems today is that they are mostly wired, meaning the security station must be placed within a fixed distance from the camera. This usually means that the security camera must be placed in a fixed location because it is difficult to move a wire embedded in the wall or ceiling of a building. In order to provide more flexibility, this project implemented a wireless security system where image data is sent wirelessly to a receiver station and displayed on the screen. However, in a wireless system where the transfer rate is more restrictive than a wired system, the information must be condensed in some form. This particular system uses a proprietary DCT based encoding method similar to JPEG encoding to decrease the size of the image data. There are six main components of this system. Image data must be captured, encoded, transmitted wirelessly, received wirelessly, decoded, and displayed on the monitor. A system diagram if provided in Figure 1.
Video Capture
Block Memory Matrix
Video Encoder
Block Memory
Wireless Transmitter
Video Decoder
Block Memory
Wireless Receiver
Labkit # 1
VGA Monitor
Block Memory Matrix
Labkit # 2 Figure 1 – System Diagram The system was designed with modularity in mind. In order to achieve this, every subsystem is separated by a memory interface. In normal operation, analog camera data is converted to a digital bit stream by ADV7185 chip on the labkit. Then this data is organized into a 240X240 pixel image, stripped of any chrominance (color) values, and written into memory so that it can be encoded. The encoder module processes the stored image by applying a Discrete Cosine Transform to 8x8 pixel blocks. The resulting coefficients are sent through the RS323 transmitter to the wireless transmitter. The encoded data is then divided into 10 byte packets and transmitted across the wireless channel. Once the data has been received, the wireless receiver sends the data to the receiver labkit via the RS232 interface and commits the data to memory to be decoded. Using the Inverse DCT algorithm, the encoded data is decoded into grayscale pixels. These pixels are displayed on the screen in an image by the video display unit. A 240X240 grayscale image contains nearly half a mega bit of information. The challenge of this project was to decrease it to the smallest size possible in order to maximize the update rate (in frames/second) and still maintain a recognizable picture. Here, it was possible to take a 512 bit block of information (an 8X8 pixel block) and condense it down to 78 bits (70,200 bits for a full image). By using a variant of JPEG encoding, it is possible to retain much of the visible information in an image, while still compressing the information to just a few bytes. Our compression algorithm discarded 85% of the encoded coefficients, and was still able to transmit a coherent picture. Based on this compression and our wireless channel, we were able to achieve approximately one frame of video per second.
4
Module Description and Implementation Capture-Encode-Transmit System Video Capture (RAYMOND) The Video Capture module has many sub-modules within it (NTSC Decoder, Store 64, Set Address, VGA Controller, Display, and Delay) whose functions will be described later. The main purpose of the Video Capture module is to connect all the sub-modules together and maintain an internal pixel counter and line counter for the data coming from the camera, which is in NTSC format. The reason why an internal pixel counter and line counter are needed is because one of the sub-modules, NTSC Decoder, only provides the start and end of lines and not the exact line number or pixel number. To compensate for this lack of information, Video Capture uses the State output from the NTSC Decoder to initialize its internal counter and line counter. Then, every time the data is valid (another output from the NTSC Decoder), it increments the internal pixel counter. To increment the internal line counter, it uses the State output from the NTSC decoder. For example, if the State output indicates the beginning of a line, and the input from the camera indicates it is in the field just before the active odd lines, then the internal line counter will reset to 0. So, when the State output indicates the beginning of a line and the camera input indicates it is now in the active odd lines, the internal line counter will increment.
Figure 2 – Block diagram of Video Capture Module. To reset back to pixel_count_internal = 0, Video Capture waits until the camera is at the beginning of a line. To reset back to line_count_internal = 0, Video Capture waits until the camera is at the beginning of a line and shows it is in the blanking field just before the odd active field. Another important purpose of the Video Capture module is that it writes color data into the color memory block (24X57600). When the data is valid, 0